Receiving Stock As a Casual User
This section discusses how to:
Select items to receive.
Add or change a receipt.
Reject a shipment.
Add comments at the receipt heading and line levels.
Review or add asset information to an item.
Generate tag numbers.
Generate serial numbers.
Enter the location for an item.
View recorded receipts.
|
Page Name |
Definition Name |
Usage |
|---|---|---|
|
PV_PO_PICK_ORDERSC |
Select items to receive. |
|
|
PV_RECV_WPO |
Add or change a receipt. |
|
|
PV_RECV_COMMENTS |
Record one or more comments at the header level of this receipt and add attachments. You cannot access this page unless your user ID is linked to the eProcurement role action of MULTI_COMMENTS. |
|
|
Standard Comments Page |
PV_STD_COMM_SEC |
Use this page to apply a standard comment as a comment to the receipt line or receipt header. Standard comments are frequently used comments that have been defined in the system using the Standard Comments (STANDARD_COMMENTS) and Standard Comment Type (STD_COMMENT_TYPE) components. Enter search criteria of Comment Type, Comment ID, or Description and then click the Search button to display the standard comments. Select a standard comment and click OK to apply the comment to the requisition.
|
|
Reject Shipment Page |
PV_RECV_REJECT |
Reject a shipment. Click the Reject Shipment link on the Receive page. |
|
Line Details Page |
PV_RECV_WPO_DETAIL |
View more information about the item, all receipts from this requisition, and the PO that is used. Click the Details button on the Receive page. |
|
Receipt Line Comments Page |
PV_RECV_COMMENTS |
Use this page to record the condition of the shipment when it arrived at the location (good, fair, or damaged), add comments about the receipt line, and add attachments to the receipt line. You are limited to one comment and no attachments unless your user ID is linked to the eProcurement role action of MULTI_COMMENTS. Click the Receive Comments icon on the Receive page. |
|
RECV_WPO_AM |
Review or add asset information to an item. This page is used only when the item is an asset item. |
|
|
RECV_WPO_PUTAWAY |
Enter the location of an item. |
|
|
Inventory Item Information Page |
RECV_INV_ITEMS_SP |
View the inventory information that is defined for this item on the Item Definition page. Click the Inventory Item Info link on the Inventory Putaway Information page. |
|
Storage Location Search Page |
RECV_STOR_LOC_SRCH |
Search for a material storage location in PeopleSoft Inventory, where you can put the received items. Click the Search button on the Inventory Putaway Information page. |
|
PV_RECV_UPDATE_REQ |
View recorded receipts. Add details, return items to supplier, or cancel a receipt. |
Use the Receive Items page (PV_PO_PICK_ORDERSC) to select items to receive.
Navigation:
This example illustrates the fields and controls on the Receive Items page. You can find definitions for the fields and controls later on this page.
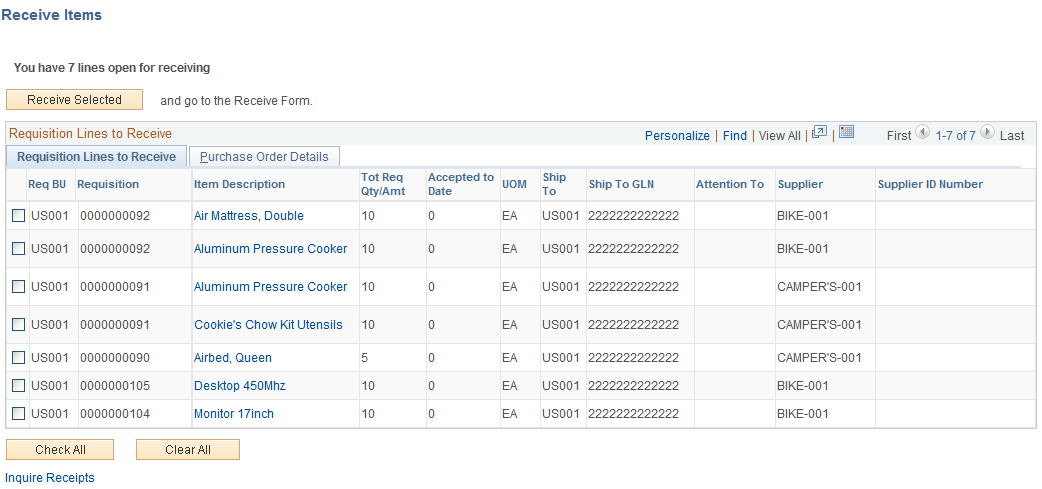
For a requisition line to appear on this page, the item must have been placed on a PO and dispatched to the supplier. You can view the requisitions that you entered and those that were purchased for you. When the entire quantity of the item has been received, the requisition line no longer appears on this page.
Requisition Lines to Receive Tab
Field or Control |
Description |
|---|---|
Receive Selected |
Click to receive the requisition lines that you select on this page. The system displays the Receive page, where you can make changes to the receipt quantity, review requisition details, and add comments. |
Requisition |
Select the check box to the left of the line, and click Receive Selected to display the Receive page. |
Item Description |
Click to access the Item Description page, where you can review item details and an item image, if it's available. |
Total Req Qty/Amt (total requested quantity/amount) |
Displays a quantity only if one of the lines was over received and a return to supplier (RTV) was created to return the excess stock. This is the quantity that you expect to receive (the requisition quantity or the overage amount). |
Accepted to Date |
Displays the number of items that have been accepted to date. |
Ship To |
Displays the business unit to which the requisition item is going to be shipped. |
Attention To |
Displays the name of the individual who should receive the items or services on this requisition line. Once the shipment is physically received, this individual should record the receipt, enabling the buyers to track the quality and promptness of the supplier. |
Supplier |
Displays the supplier who is supplying the item. |
Check All |
Click this button to select all requisition lines with the same supplier as the first line or as the line you have already selected. One receipt can include only one supplier; therefore, not all displayed lines are selected by this button. |
Inquire Receipts and Manage Return to Suppliers |
Click these links to display previously recorded receipts or RTVs for the requisitions. This information verifies that a receipt form or an RTV has been entered for this shipment. |
Warning! Do not change the RTV Adjust Sourcing option after transactions have been recorded in PeopleSoft eProcurement. Changing this option may alter the quantities that appear so that they become inconsistent in the PeopleSoft eProcurement receiving and RTV transactions.
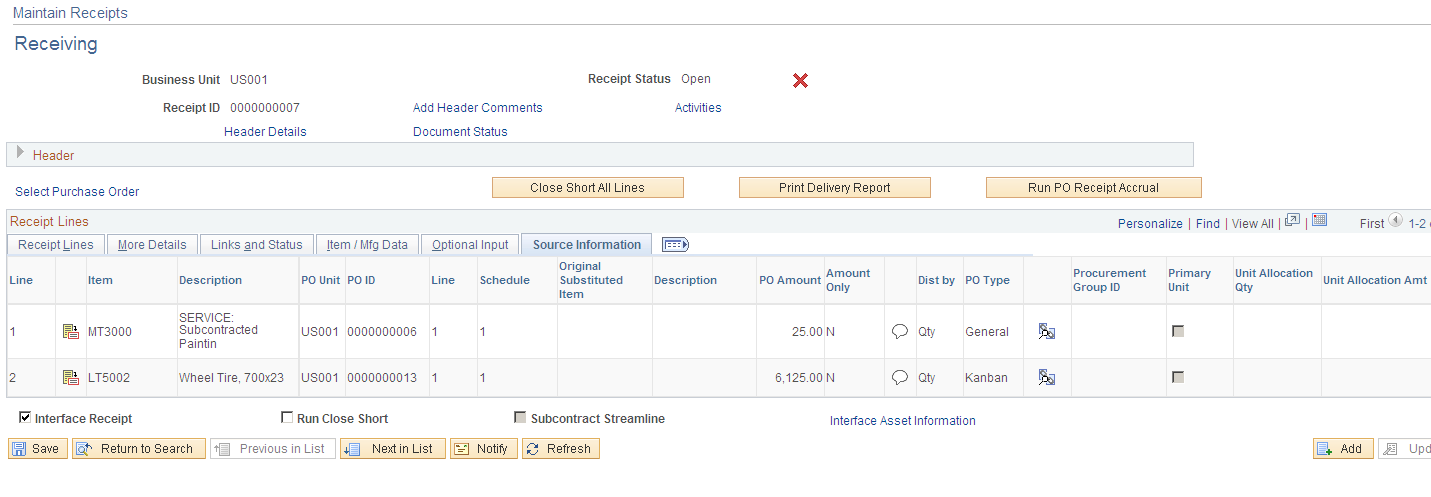
Purchase Order Details Tab
Select the Purchase Order Details tab.
Field or Control |
Description |
|---|---|
PO Qty (purchase order quantity) |
Displays the quantity for this PO. |
Recv Reqd (receiving required) |
Displays Y (yes) or N (no) to indicate whether the item requires receiving to pay the supplier for the goods. You do not need to enter a receipt for any item that is marked with N. |
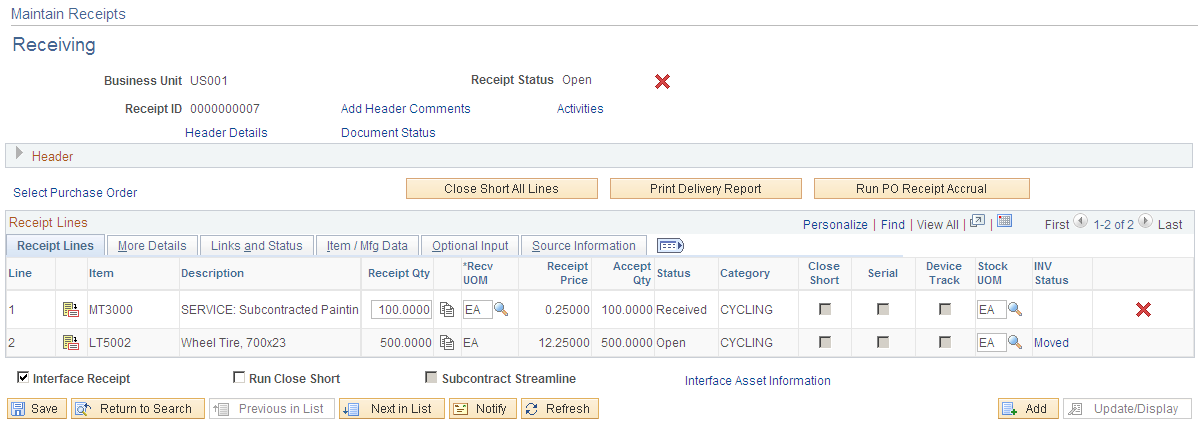
Use the Receive page (PV_RECV_WPO) to add or change a receipt.
Navigation:
Search for items to retrieve, and then click the Details icon of the item to review or update.
This example illustrates the fields and controls on the Receive page. You can find definitions for the fields and controls later on this page.
This example illustrates the fields and controls on the Source Information page. You can find definitions for the fields and controls later on this page.
Add a new receipt of one or more PO lines and reject and inspect received quantities. Before creating a receipt, verify that the PO was dispatched.
|
Field or Control |
Description |
|---|---|
|
Receipt No (receipt number) or New Receipt |
Displays the receipt ID that was assigned when the receipt was entered. If you are adding a new receipt, the words New Receipt appear until the page is saved. Then a receipt ID is assigned automatically. |
|
Received Date |
Enter the date that the shipment arrived. The default is today's date, but you can change it if the shipment arrived earlier. |
|
Add Header Comments |
Select to access the Receipt Header Comments page, where you can record one or more comments at the header-level of this receipt and add attachments. This link is not visible unless your user ID is linked to the eProcurement role action of MULTI_COMMENTS. |
|
Reject Shipment |
Click to access the Reject Shipment page, where you can reject some or all of the items that are sent to you. |
|
Item Description |
Click this link to view a detailed description and picture (if available) of the item. |
|
Received Qty (received quantity) |
Enter the quantity of the items that you received. |
|
Clone Quantity |
Click the Clone Quantity button to copy the received quantity from one line to all other lines on this form. This button saves data entry steps when you have many line items. |
|
UOM (unit of measure) |
Select the type of unit by which the item was shipped to you, for example, by box, each, and so on. |
|
Accept Qty (accept quantity) |
Displays the number of items that you are accepting. If you do not reject any items by clicking the Reject Shipment link and entering the quantity that you are rejecting on the Reject Shipment page, the system assumes that you are accepting all of the items that you received. If you rejected any items, the system automatically calculates the accepted quantity when you click OK. |
|
|
Click the Details button to access the Line Details page, where you can view more data about the item, the PO that you are receiving, and the previous and current receipts. |
|
|
Select this icon to access the Receipt Line Comments page, where you can record the condition of the shipment when it arrived at the location (good, fair, or damaged), add comments about the receipt line, and add attachments to the receipt line. You are limited to one comment and no attachments unless your user ID is linked to the eProcurement role action of MULTI_COMMENTS. |
|
|
Select this icon to view comments added on the purchase order at the header-level, line-level, or ship to level. To appear here, the purchase order comments must have been marked with the Show at Receipt check box. |
|
Asset Status |
Click to access the Asset Management Information page, where you can view or change the fixed asset information, such as serial ID and asset profile ID. This link appears only if the item is designated as a fixed asset for PeopleSoft Asset Management. |
|
Inventory Status |
Click to access the Inventory Putaway Information page, where you can view or change the inventory information, such as serial ID and warehouse location. This link appears only if the item is designated as a PeopleSoft Inventory item. |
|
|
Click the Device Tracking button to access the Device Tracking page. |
|
Inquire Return to Suppliers |
Click to access the Manage Return to Suppliers page, where you can view a list of suppliers from which you have canceled orders, closed orders, open orders, or shipped orders. |
|
Inquire Receipts |
Click to access the Manage Receipts page, where you can view a list of requisitions, receipt numbers, received date, PO IDs, received quantity, and status of receipts. |
|
Procurement Group ID |
(Display only) Displays the Procurement Group ID for the item upon saving the component if the purchasing group options are enabled. When saving the component, the existing rows in the RECV_LN_ASSET record are updated with the Procurement Group ID, Primary Unit, Unit Allocation Quantity, and Unit Allocation Amount). |
|
Primary Unit |
(Display only) Displays as selected if this item is the primary unit for the Procurement Group ID, if applicable. When saving the component, all of the procurement group fields are populated on the page and the existing rows in the RECV_LN_ASSET record are updated with the Procurement Group ID, Primary Unit, Unit Allocation Quantity, and Unit Allocation Amount). |
|
Unit Allocation Qty |
(Display only) Displays upon saving the component, if applicable. If the receipt distribution quantity exceeds the allocation quantity the system repeats the first RECV_LN_ASSET row for the remainder of the allocation quantity until it totals the distribution quantity. |
|
Unit Allocation Amt |
(Display only) Displays upon saving the component, if applicable. If the receipt distribution amount exceeds the allocation amount, the system repeats the first RECV_LN_ASSET row for the remainder of the allocation amount until it totals the distribution amount. |

 (Receive Comments icon)
 (PO Comments icon)
 (Device Tracking icon)
Use the Reject Shipment page (PV_RECV_REJECT) to reject a shipment.
Navigation:
Click the Reject Shipment link on the Receive page.
This example illustrates the fields and controls on the Reject Shipment page. You can find definitions for the fields and controls later on this page.
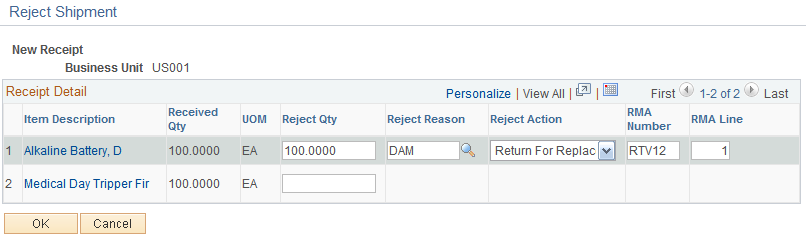
Reject some or all of the items that you are recording in this receipt by entering information about each item that you are rejecting.
|
Field or Control |
Description |
|---|---|
|
Reject Qty (reject quantity) |
Enter the quantity of the item that you are rejecting. This can be all or part of the quantity that was delivered to you (the received quantity). When you enter a quantity and move out of the field, the remaining fields on this page are available for entry. |
|
Reject Reason |
Select the reason why you are rejecting the items. |
|
Reject Action |
Select how you want the supplier to correct the mistake. This is an information field; to return stock to the supplier, use the Return to Supplier page. |
|
RMA Number (return material authorization number) and RMA Line (return material authorization line) |
Enter the return material authorization number and line number that the supplier provided . |
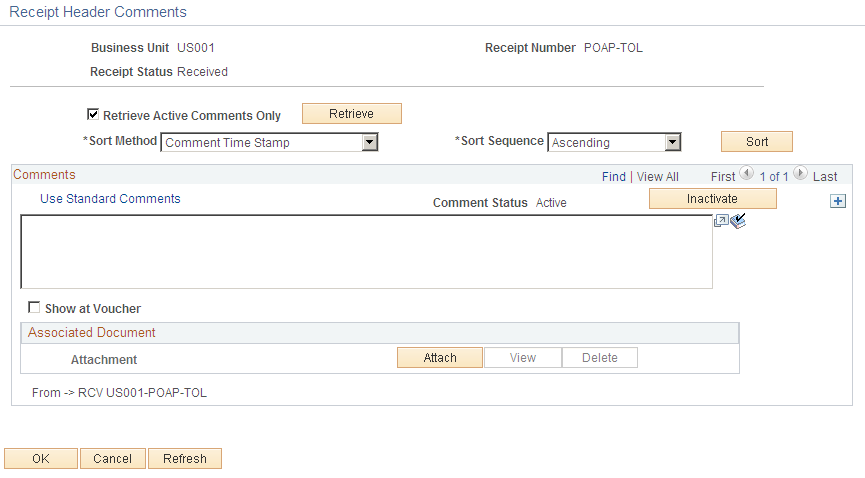
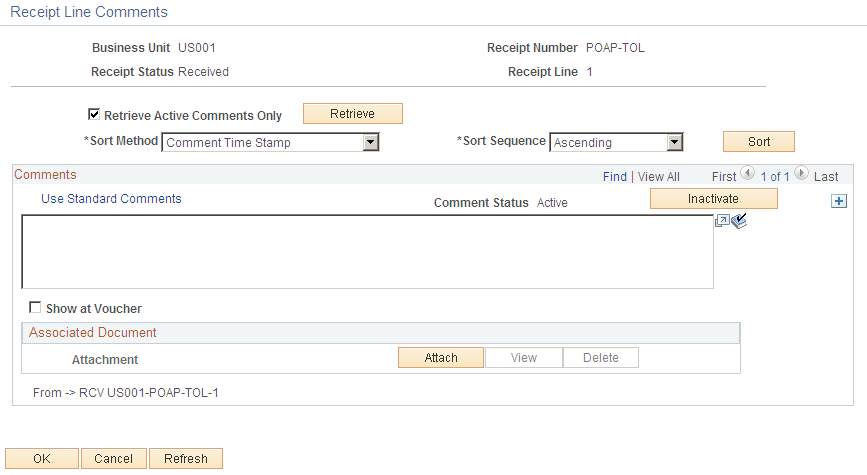
The Receipt Header Comments page and the Receipt Line Comments page use the same fields. Navigation is different and each page adds comments and attachments to a different part of the receipt.
Use the Receipt Header Comments page (PV_RECV_COMMENTS) to record one or more comments at the header level of this receipt and add attachments.
You cannot access this page unless your user ID is linked to the eProcurement role action of MULTI_COMMENTS.
Navigation:
Click the Add Header Comments link on the Receive page.
This example illustrates the fields and controls on the Receipt Header Comments page. You can find definitions for the fields and controls later on this page.
This example illustrates the fields and controls on the Receipt Line Comments page. You can find definitions for the fields and controls later on this page.
|
Field or Control |
Description |
|---|---|
|
Condition |
(Receipt Line Comment page only) Select the general condition of the shipment; the options are Good, Fair, and Damaged. |
|
|
Select to add a new comment field. Comments are numbered as you add them. |
|
Use Standard Comments |
Click to access the Standard Comments page (PV_STD_COMM_SEC), where you can select a standard comment to be applied as a comment to this receipt. Standard comments are frequently used comments that have been defined in the system using the Standard Comments (STANDARD_COMMENTS) and Standard Comment Type (STD_COMMENT_TYPE) components. |
|
|
Click to perform a spell check on the comment. |
|
Add Attachments |
Click to access the File Attachments window, where you can browse and select a file to be attached to this comment. Only one file can be attached to each comment. Once a file is attached, the Attachment group box displays the file details including file name, the user who attached it, and the date and time it was attached. The Send Supplier check box applies to each file separately. |
|
Show at Voucher |
Select if you want this comment to appear on the voucher. |
|
OK |
Select to return to the Receive page with the comments and attachments that you have added on this page. |
|
Cancel |
Select to return to the Receive page without saving the changes that were added to this page. |
 (Add a New Row icon)
 (Spell Check Comment icon)
Use the Asset Management Information page (RECV_WPO_AM) to review or add asset information to an item.
Navigation:
Click the Asset Status link on the Receive page.
Field or Control |
Description |
|---|---|
Select Action |
Select appropriate action from the given options that has to be applied for the asset details. |
Tag Number |
The value for this field is generated if you select action Assign Tag Ids in the Select Action drop down list. |
Serial ID |
The value for this field is generated if you select action Assign Serial Ids in the Select Action drop down list. |
Insert Non-Serial Row |
Click to distribute non-serialized item rows to different asset management custodians and locations. This generates another asset row for the same asset management (AM) unit. If you split the AM quantity, you must reduce the earlier AM quantities for this unit. The total AM quantity for this unit must match the total quantity that you've accepted. When an item is inventory-related, you can't split a quantity of one for a serialized row. |
Next Asset ID |
Click to assign a temporary value of AUTO-ASSIGN as the line item's asset ID value. This value is replaced with the next available asset ID value when you save the receipt. |
AM Business Unit (asset management unit) |
Displays the PeopleSoft Asset Management business unit, where the item is capitalized. |
CAP Sequence (capital acquisition planning sequence) |
Displays the sequence number for the capital acquisition plan. |
Cost Type |
Enter the cost type code for the receipt item if applicable. Cost types represent different components of the cost of an asset, such as materials, labor, and overhead. For example, you can differentiate between the cost of building an asset and its market value by allocating the cost of production to one cost type and the margin of profit to another cost type. Cost type, combined with the asset category and transaction code, determines the general ledger accounts into which the costs are entered. |
Sel (select) |
Select to display the Insert Non-Serial Row button if you want to distribute non-serialized item rows to different asset management custodians and locations. |
Dist Seq (distribution sequence) |
Displays the receiving distribution sequence number that is associated with the selected asset row. |
Quantity |
Enter the item quantity that is being distributed on the selected distribution sequence. |
|
Click the Cancel Row button to cancel this asset schedule information. If the receipt has not been interfaced, this asset row is not interfaced and is deleted during receipt interface processing. If the receipt is interfaced, a retire asset transaction is passed to PeopleSoft Asset Management. |
 (Cancel Row icon)
Use the Inventory Putaway Information page (RECV_INV_ITEMS_SP) to enter the location of an item.
Navigation:
Click the Inventory Status link on the Receive page.
Enter or review the location in PeopleSoft Inventory where this item will be placed; record serial and lot IDs. If the item that you are receiving was marked as a PeopleSoft Inventory item (and PeopleSoft Inventory is installed), use this page to record the information that is required to put the item in inventory. The default information appears from the item definition. Change this information only if you are storing the item in a different inventory location.
|
Field or Control |
Description |
|---|---|
|
Status |
Displays the receipt shipping status. The status can be Open, Received, Closed, Canceled, or Hold. If the status is Open or Received, then you can change the inventory distribution information on this page. |
|
Select Action |
Select appropriate action from the given options that has to be applied for the inventory putaway details. |
|
Serial ID |
The value for this field is generated if you select action Assign Serial Ids in the Select Action drop down list. |
|
Lot ID |
The value for this field is generated if you select action Assign Lot Ids in the Select Action drop down list. |
|
Insert Non-Serial Row |
Click to split out non-serialized item row quantities to different putaway locations. This generates another putaway row for the same PeopleSoft Inventory business unit. You must reduce the earlier putaway quantities for this unit if you split a putaway. The total putaway quantity for this unit must match the total quantity that you've accepted. When an item is inventory-related, you cannot split a quantity of one for a serialized row. |
|
Distribution Line Number |
Displays the distribution line number. The distribution level of the purchase order records the internal location where the stock is to be delivered. |
|
Consigned |
Select if the stock is defined as consigned goods. The costs of consigned goods are not recorded until the item is used or shipped. |
|
Non-Owned Item |
Select if the stock is defined as not owned. The costs of non-owned goods are not recorded unless they are also marked as consigned goods. |
|
Location Code |
Displays the delivery location within the shipment address to which this stock should go. |
You can view and change item information and location in the inventory warehouse.
|
Field or Control |
Description |
|---|---|
|
Sel (select) |
Select to display the Insert Non-Serial Row button if you need to insert a non-serial row number for this row. |
|
Quantity |
Enter the quantity for this row. The total of all the rows must equal the accept quantity on the Receipt form. |
|
Expiration Date |
Displays the date that the stock expires. The default date is based on the item definition; you can change it. |
|
Area |
Displays the storage area of the inventory warehouse where this item will be stored. The default information here is based on the item defaults. You can change the value. |
|
Search |
Click the Search button to access a search page, where you can select the material storage location for the item in the inventory warehouse. |
|
Lev 1, Lev 2, Lev 3, Lev 4 (level 1, level 2, level 3, level 4) |
Displays the levels of the inventory warehouse (subdivisions of the Area field) in which this item will be stored. The default information is based on the item defaults. You can change the value. If PeopleSoft Inventory does not use this field, it may be blank. |
|
Container |
Enter the container ID if the inventory system uses container management (license plating). This ID can also be assigned later in PeopleSoft Inventory. |
Use the Manage Receipts page (PV_RECV_UPDATE_REQ) to view recorded receipts.
Add details, return items to supplier, or cancel a receipt.
Navigation:
Click the Inquire Receipts link on the Receive page.
This example illustrates the fields and controls on the Manage Receipts page. You can find definitions for the fields and controls later on this page.
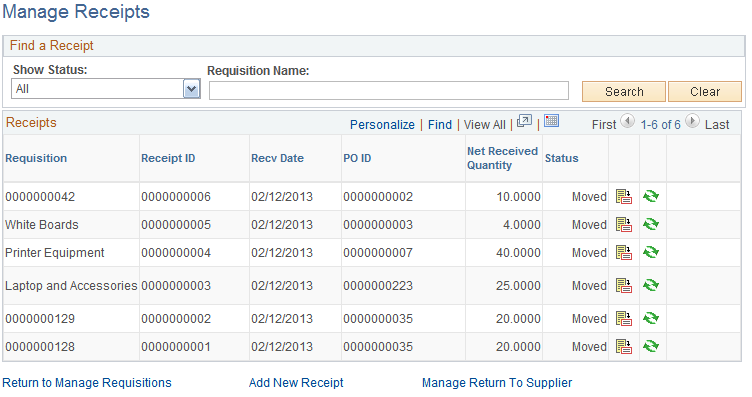
The maximum number of rows that are retrieved and that appear on this page can be defined on the eProcurement Installation Options page. If the search returns more than the defined number of rows, an error message appears.
Field or Control |
Description |
|---|---|
Show Status |
Select to view receipts with these statuses:
|
Requisition Name |
Search by the name of a specific requisition. The requisition name is the name that the requester assigned when creating the requisition. If a name was not assigned, the system uses the requisition ID as the name. This limits the search results to one specific requisition. |
|
Click the Details button to access the Receive page, where you can view and change this receipt. |
|
Click the RTV Setup button to access the Select Receipts to Return page, where you can enter the information that is needed to return the items to the supplier. If this button is unavailable, the item is a PeopleSoft Inventory or Asset Management item, and you must Move the status of the receipt before you can enter an RTV. |
|
Click the Cancel button to access the Cancel Receipt page, where you can view a list of the items on the receipt and then either choose to cancel the receipt or return to the Manage Receipts page. |


