Registering Online
New bidders and new suppliers can self-register online. Existing users that want to create a new user account can register through the supplier portal.
How a user accesses the online registration depends on the type of registration and setup.
Existing suppliers access self-registration pages to add a new user account through the supplier portal. New bidders and new suppliers can access online registration through a URL provided in an email invitation. Internal users can access online registration pages through the employee portal. Any prospective registrants can also access pages through a link on a public website.
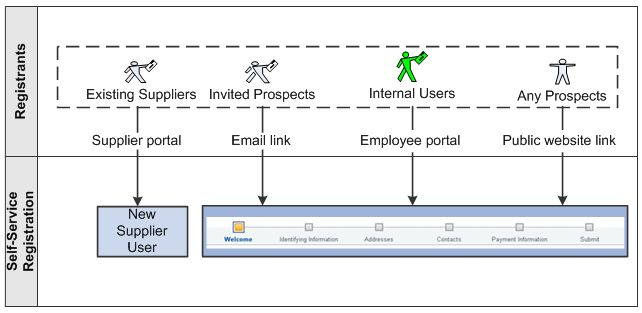
The navigation in this documentation refers to the menu selections in the Employee portal.
The online registration pages appear in a horizontal navigation that guides users through the registration process. The actual pages and fields that appear on each page are determined by registration templates during system setup for online registration.
See Creating Templates for Online Registration.
Supplier information fields are discussed in more depth in Understanding Supplier Maintenance.
New suppliers and new bidders using self-registration follow these steps:
Welcome - Step 1 of 7
Identifying Information - Step 2 of 7
Addresses - Step 3 of 7
Contacts - Step 4 of 7
Payment Information - Step 5 of 7
Categorization - Step 6 of 7
Submit - Step 7 of 7
Note: If no attributes are selected for the Supplier Location Information section on the Supplier Request Templates – Attributes page, the system hides the Payment Information page in the online registration pages. See Creating Templates for Online Registration.
|
Page Name |
Definition Name |
Usage |
|---|---|---|
|
SUP_OB_BID_REG_PG1 |
Begin the registration process. |
|
|
SUP_OB_BID_REG_PG2 |
Enter information about you as an individual or about your company, including answering any profile questions set up for this registration. |
|
|
SUP_OB_DUP_TIN |
Choose an action when a duplicate supplier is found in the system. Appears if duplicate checking is enabled for this registration. |
|
|
SUP_OB_SAV_REG |
Make an interim save. You can resume where you left off at a later time. |
|
|
SUP_OB_BID_REG_PG3 |
Enter contact addresses. Depending on setup and registration usage, address types vary. |
|
|
SUP_OB_BID_REG_PG4 |
Select contacts for this account. |
|
|
SUP_OB_CNTCT |
Add contact details. |
|
|
SUP_OB_BID_REG_PGP |
Enter payment information. |
|
|
SUP_OB_BID_REG_PG5 |
Identify buying or selling categories. |
|
|
SUP_OB_BID_REG_PG6 |
Review the terms and conditions and submit registration information. |
|
|
SUP_OB_USER_REG |
Enter new user account registration. |
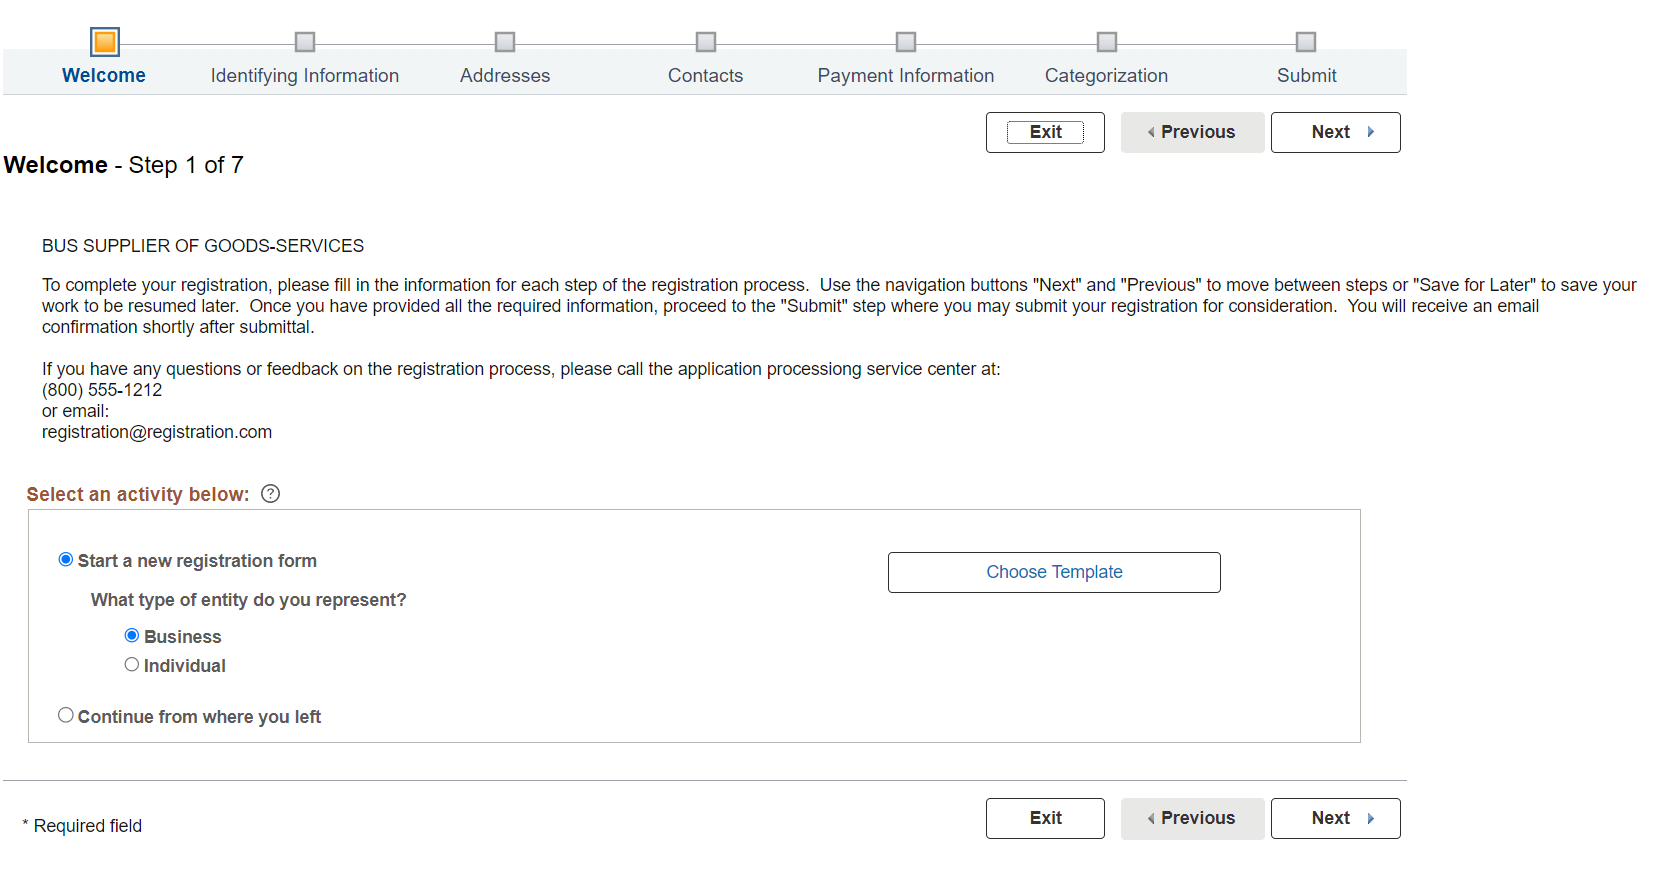
Use the Welcome page (SUP_OB_BID_REG_PG1) to begin the registration process.
Navigation:
Email invitation
Public URL
This example illustrates the fields and controls on the Online Registration: Welcome page for a new supplier. The Welcome page for new bidders also includes a field for registrants to indicate whether they are registering to buy, sell, or both buy and sell.
|
Field or Control |
Description |
|---|---|
|
Start a new registration form |
Indicate whether the type of entity you represent is a Business or an Individual and click the Next button. |
|
Choose Template |
Select the Entity Type and click the Choose Template button. Supplier Templates page will appear and show the list of templates for that selected Entity. If no template is selected and proceed to the Next. The default template will be applied. |
|
Continue from where you left |
Select this option to resume a registration process that you had previously initiated. Enter the registration ID if you know it or select it using the prompt. |
|
Forgot your registration ID |
Displays the link when you click the Continue from where you left option is selected. Click this link and enter the required details to retrieve a forgotten password. |
|
Review Registration |
This link is displayed after you select a registration ID. Click the link to view the registration details you entered. |
|
Withdraw |
This button is displayed after you select a registration ID. You can click this button to withdraw the registration request if it is no longer required. You can withdraw the registrations only in the Draft and Request More Information statuses. Depending on the Reason Codes Reason Type Withdraw Request setting on the Supplier Request System Setup - General Page, you may have the option to select a Reason Code for the withdrawal. To withdraw a request with the Reason Code, see Withdraw Request Page. Note: Only internal users can withdraw registration requests through employee portal. |
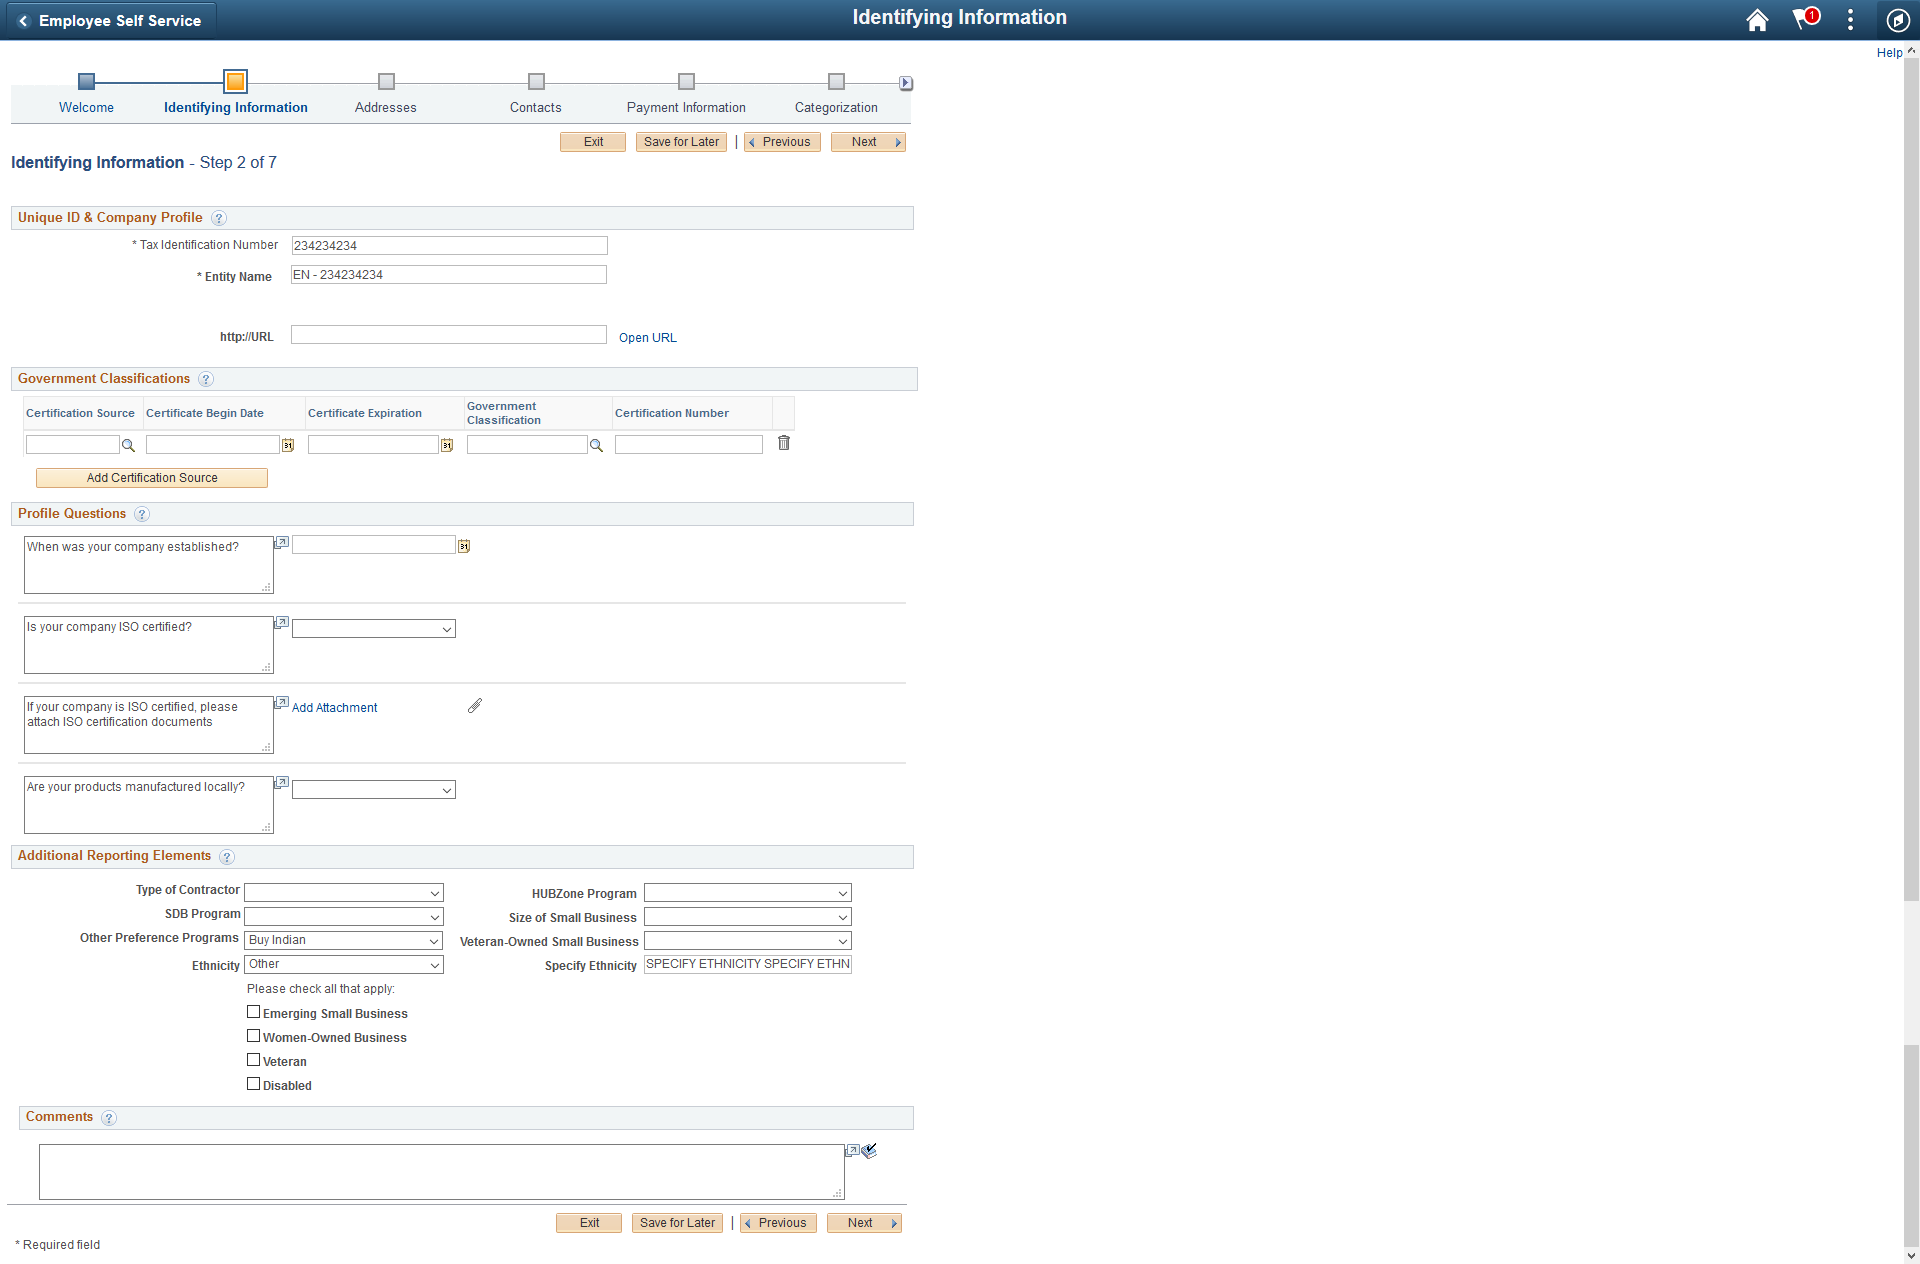
Use the Identifying Information page (SUP_OB_BID_REG_PG2) to enter information about you as an individual or about your company, including answering any profile questions set up for this registration.
Navigation:
Click the Next button on the Welcome page.
This example illustrates the fields and controls on the Identifying Information Page (New Bidder and New Supplier). You can find definitions for the fields and controls later on this page.
Field or Control |
Description |
|---|---|
Tax Identification Number |
Enter the entity’s valid TIN for tax withholding. |
Entity Name |
Enter the individual or company name. |
http://URL |
Enter a URL or click the Open URL link to populate the URL in the http://URL field. |
Supplier Short Name |
Enter a short version of the entity name. |
Government Classifications group box |
Specify any pertinent certifications held by the supplier. For more information, see the (USA) Specifying Government Classifications section in Identifying Information Page |
Standard Industry Code |
Select appropriate SIC code by clicking the prompt button. For more information, see the Standard Industry Codes (Standard Industry Codes) section in Identifying Information Page |
SIC Code Type |
Select required SIC Code Type. All SIC code types specified on the Registration Template page will be available for selection. You can select multiple SIC code types from the drop-down list. Note: If only one SIC code type is specified on the Registration Template page then this field will not appear. |
Profile Questions group box |
Enter additional data or answers to questions that are not otherwise captured in the fields of the supplier master. Click the Add Attachment button to provide attachments for questions. You can remove attachments added on the change request, but previously existing attachments cannot be removed |
Add Attachment |
Click this link to add supporting documentation as attachments. |
Additional Reporting Elements group box |
Specify information related to government regulations for minority and other protected classes, such as Type of Contractor, HUBZone program, SDB program, size of small business, veteran-owned or women-owned small businesses, ethnicity, and others. Enter a common parent’s TIN and name. For more information, see the (USA) Additional Reporting Elements section in Identifying Information Page |
Comments |
Enter any comments about the Supplier. |
Use the Duplicate Information page (SUP_OB_DUP_TIN) to choose an action when a duplicate supplier is found in the system.
Appears if duplicate checking is enabled for this registration.
Navigation:
Click the Next button on the Identifying Information page.
This example illustrates the fields and controls on the Duplicate Information page.
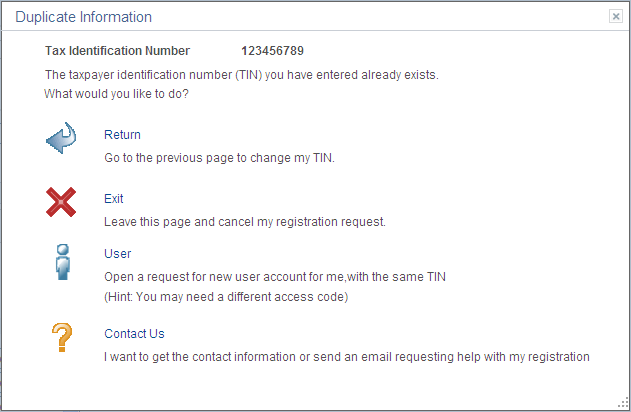
Choose an action and click the appropriate link when this page appears.
Field or Control |
Description |
|---|---|
Return |
Click this link to return to the Identifying Information page, where you can enter a different taxpayer identification number (TIN) and continue the registration process. |
Exit |
Click this link to completely exit the online registration pages and cancel the registration request. |
User |
Click this link to request a new user account using the same TIN. This action switches the type of registration request and may require a different access code for new user account registration. |
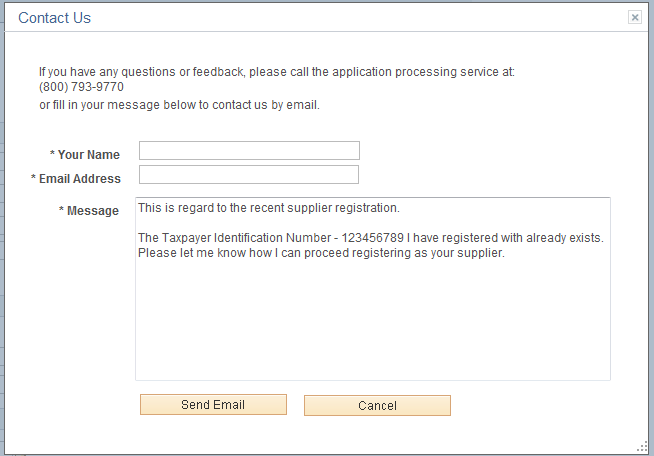
Contact Us |
Click this link to access the registration help contact or initiate an email message you can use to request help with registration. |
This example illustrates the fields and controls on the Duplicate Information - Contact Us (SUPOB_DUP_TIN_EML) page.
Use the Save for Later page (SUP_OB_SAV_REG) to make an interim save during the registration process.
You can resume where you left off at a later time.
Navigation:
Click the Save for Later button when available on the registration pages.
This example illustrates the fields and controls on the Save for Later page.
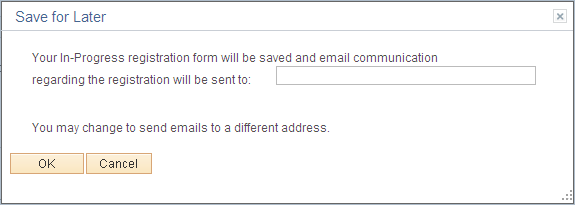
Enter a valid email address to receive notifications and communication about this registration.
For external registration requests, the email address defaults from the primary address, if present, or from the primary contact, if there is no email address specified for the primary address.
Use the Addresses page (SUP_OB_BID_REG_PG3) to enter contact addresses.
Address types available on this page may vary depending on the registration usage.
New Suppliers: Remit To Address and Invoice Address.
New Bidders: If registering to buy, Bill To Address and Ship To Address. If registering to sell, Invoice Address. If registering to both buy and sell, the page shows all three address types.
Navigation:
Click the Next button on the Identifying Information page.
This example illustrates the fields and controls on the Online Registration: Addresses page for a new bidder or new supplier.
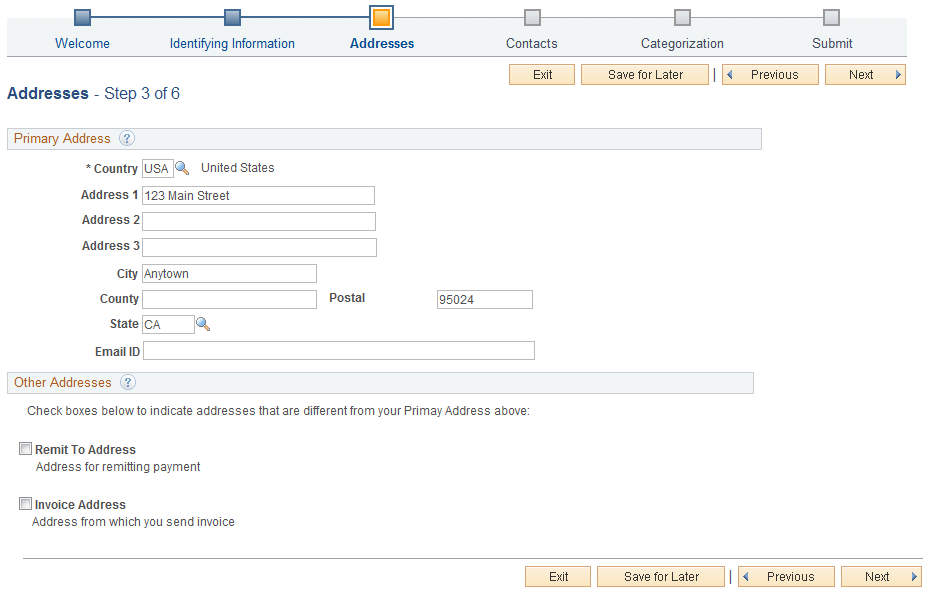
Enter an address in the Primary Address section.
If desired, you can add these additional addresses:
Click the Remit To Address check box to add an address for remitting payment.
Click the Invoice Address check box to add an address for invoices.
Use the Contacts page (SUP_OB_BID_REG_PG4) to select contacts for this account.
Navigation:
Click the Next button on the Addresses page.
This example illustrates the fields and controls on the Online Registration: Contacts page for a new bidder or new supplier.
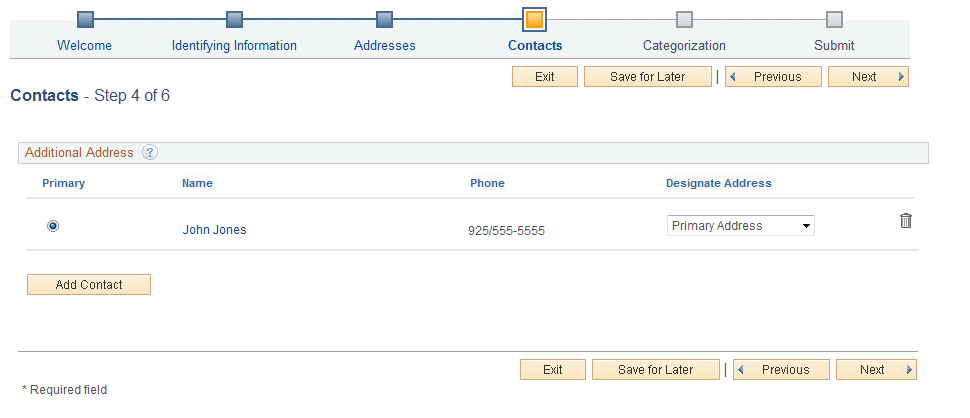
Use the Add Contacts page (SUP_OB_CNTCT) to enter contact information of the contact.
Navigation:
Click the Add Contact button on the Contacts page.
This example illustrates the fields and controls on the Add Contacts page for a new bidder or new supplier.
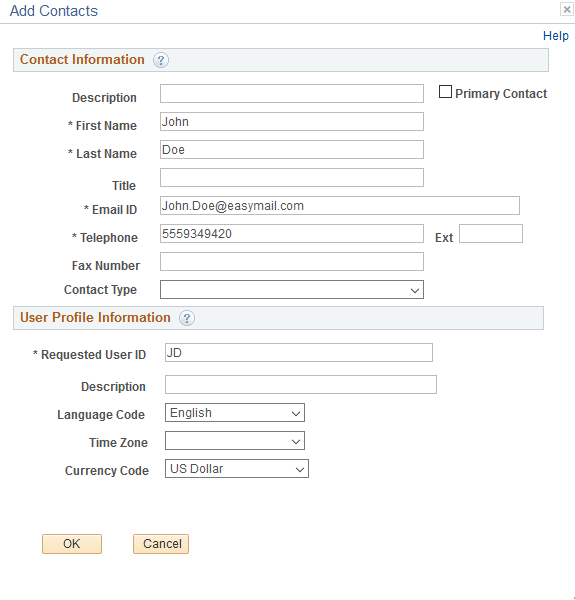
When you enter more than one contact, you must designate one contact as the primary contact by checking the Primary Contact checkbox.
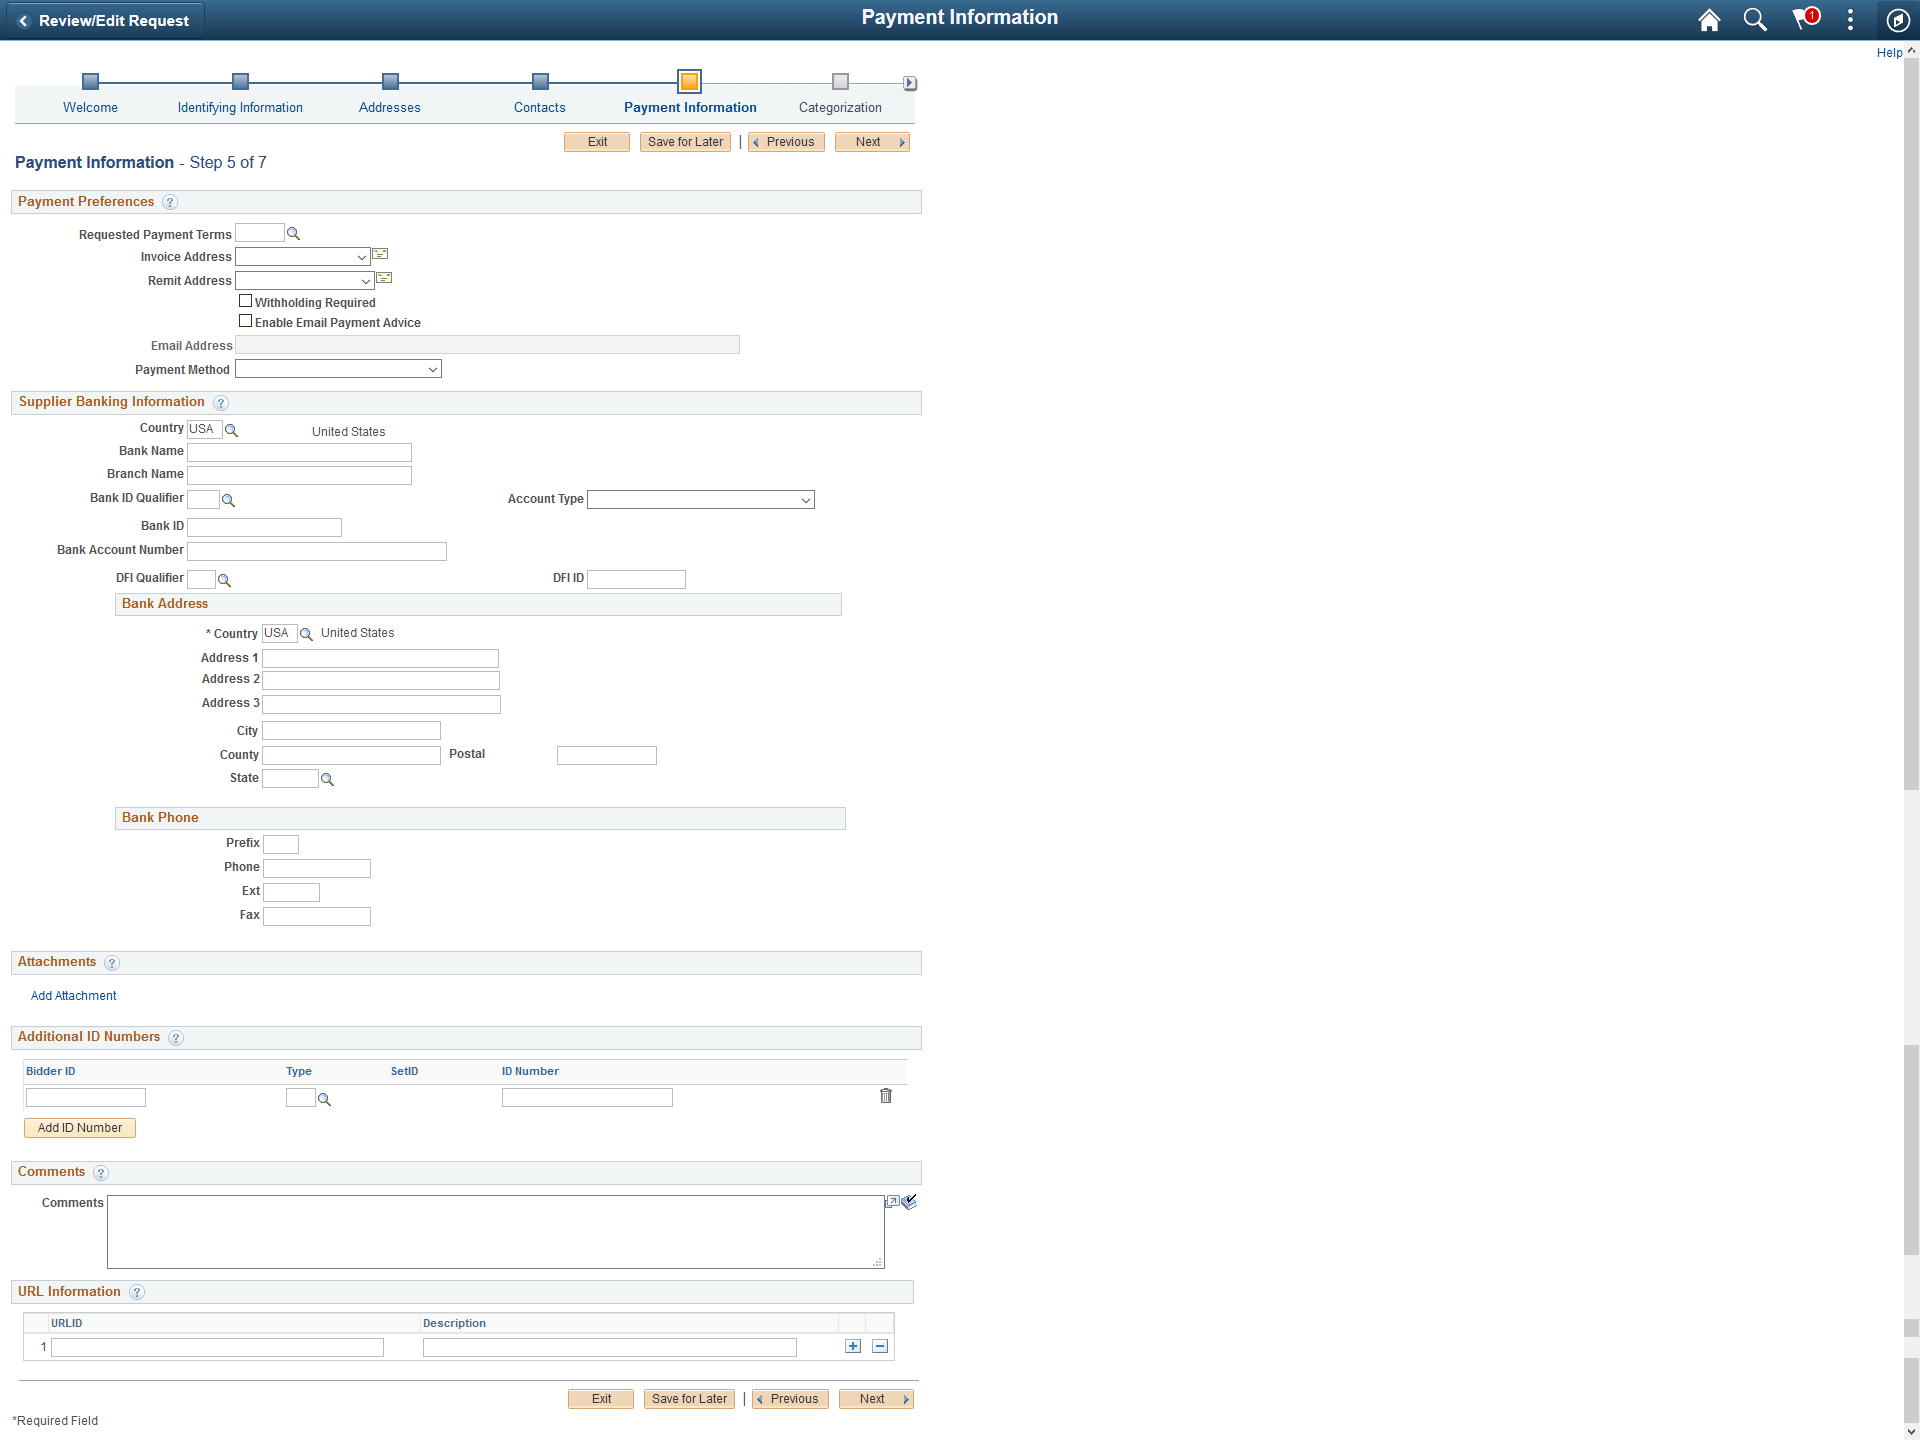
Use the Payment Information page (SUP_OB_BID_REG_PGP) to enter payment information.
Navigation:
Click the Next button on the Contacts page.
Note: If no attributes are selected for the Supplier Location Information section on the Registration Template Setup - Attributes page, the system hides the Payment Information page in the online registration pages. See Supplier Request Templates - General Page (New Suppliers and New Bidders).
This example illustrates the fields and controls on the Online Registration: Payment Information page for a new supplier or new bidder.
Field or Control |
Description |
|---|---|
|
Bank Account Number |
If you set up bank account encryption, bank account number and IBAN are masked on the page. Only users with NACHA administrator role is allowed to view or edit supplier banking information. Note: NACHA administrator role is delivered only for internal users (employee portal) and not suppliers. The NACHA administrator role is not applicable for external users (supplier portal). For more information about bank account number encryption and the National Automated Clearing House Association (NACHA) data security requirements, see Understanding Bank Account Encryption and Setting Up Bank Account Encryption. |
Add Attachment |
Click this button to add one or more attachments. You can upload and view a variety of documents, including Microsoft Word and Adobe Reader documents, as well as Microsoft Excel, PowerPoint, and Access files. Attachments are read only files. You can edit these files and load them again to make changes. |
SIC Code Type |
Select required SIC Code Type. All SIC code types specified on the Registration Template page will be available for selection. You can select multiple SIC code types from the drop-down list. Note: If only one SIC code type is specified on the Registration Template page then this field will not appear. |
Add SIC Code |
Click this button to add multiple standard industry classification (SIC) codes required for reporting by some governments in the Standard Industry Codes section. You can supply multiple types of industry codes for the same supplier. For example, a standard USA SIC code and a North American Industrial Classification System (NAICS) code can be defined for the same supplier. You can also supply multiple SIC codes for the same SIC type or different SIC code types. |
Add ID Number |
Click this button to add identification numbers, including type and number. Depending on the type of number that you select, different fields are available for entry. If you select a DUNS Number (With Edit) number, for example, you activate the SetID and DUNS Number fields. If you select DUNS Number (No Edit) number you activate the ID Number field and the Credit File check box. If you select DUNS + 4 Suffix number you activate the ID Number field only. In the ID Number field enter the 4 digit suffix. If you enter another type of number, you activate the ID Number field. |
URL Information |
Enter the URL information for the Supplier’s website. |
Use the Categorization page (SUP_OB_BID_REG_PG5) to identify buying or selling categories.
Navigation:
Click the Next button on the Contacts page. (New Bidder)
Click the Next button on the Payment Information page. (New Supplier)
This example illustrates the fields and controls on the Online Registration: Categorization page for a new bidder and new supplier.
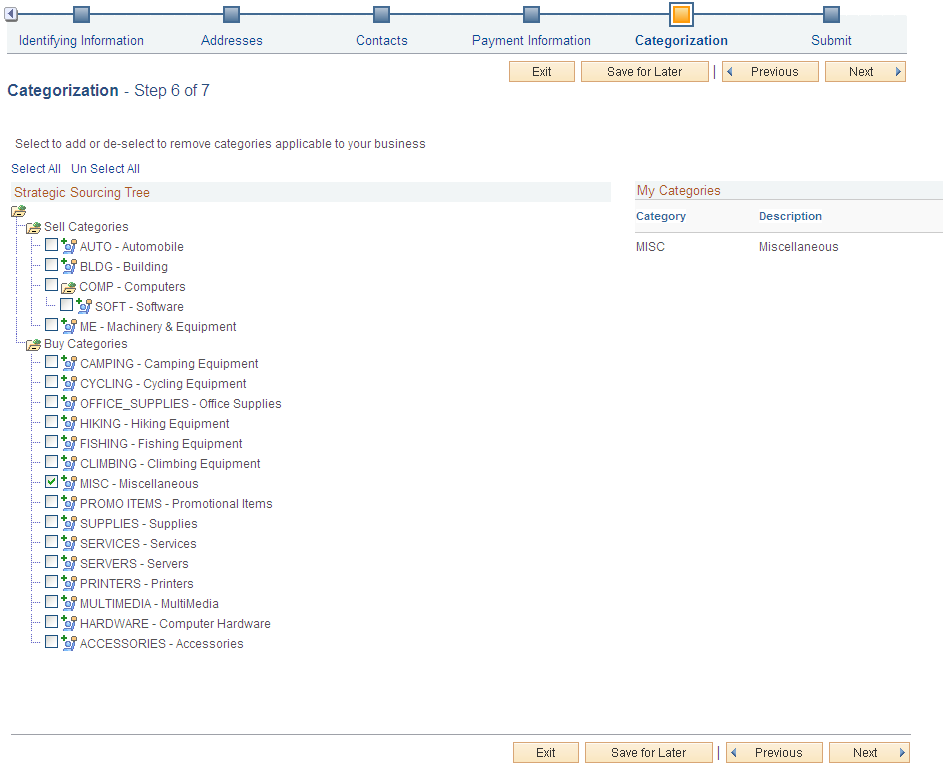
Click the check box next to the category node in the Strategic Sourcing Tree. Your selections in the tree structure appear in the My Categories list.
Use the Submit page (SUP_OB_BID_REG_PG6) to review the terms and conditions and submit registration information.
This example illustrates the fields and controls on the Online Registration: Submit page for a new bidder or new supplier.
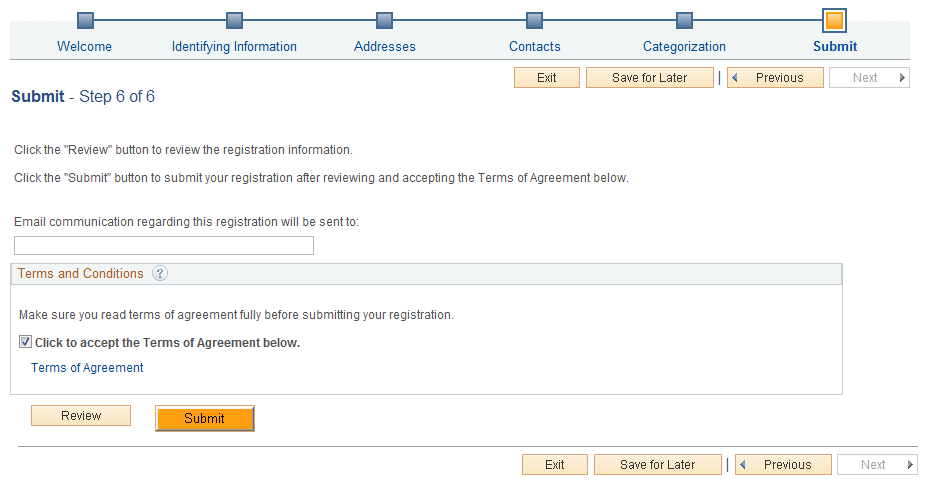
To complete online registration, review and accept the terms and conditions and click the Submit button. You can click the Terms of Agreement link to view the terms and conditions. In the Terms of Agreement page you have the option of printing the terms and conditions or saving a soft copy of the same. You will receive further instructions or confirmation by email. Before submitting this request, you can review a summary of the information you provided by clicking the Review button. If you want to make any changes, registrants can navigate to the different pages using the Previous or Next buttons, or click the link in the horizontal navigation for the appropriate registration page.
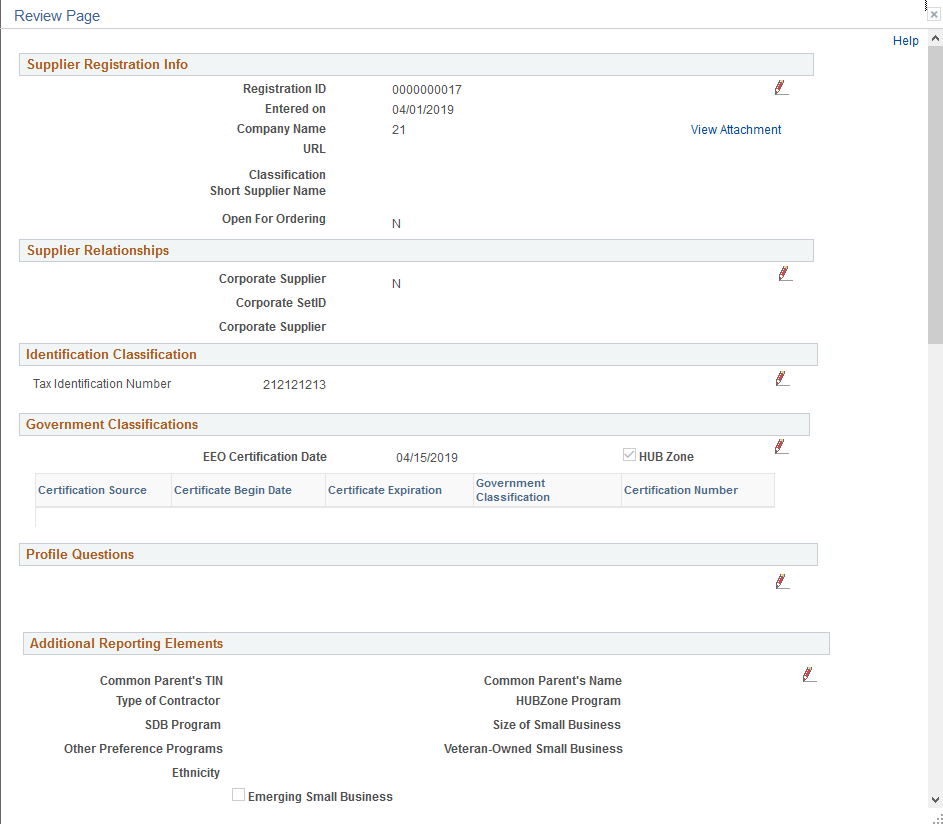
On the Review page, select View Attachment link to review the list of available attachments. Click the attachment file name to view or download it.
You can also edit registration information on the Review page (SUP_OB_SBMT_REVIW). Click the Edit icon next to the fields that you want to update.
This example illustrates the fields and controls on the Submit Registration - Review page (1 of 2).
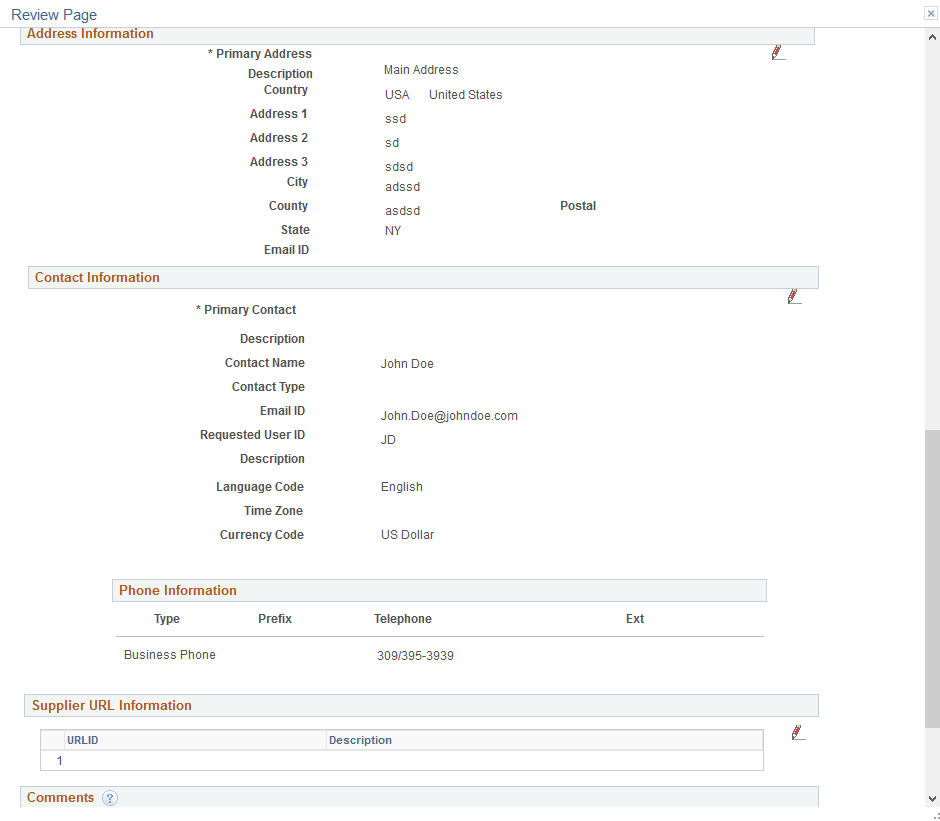
This example illustrates the fields and controls on the Submit Registration - Review page (2 of 2).
Use the Register New User Accounts page (SUP_OB_USER_REG) to enter new user account registration.
Navigation:
Email invitation
Supplier portal login pagelet
This example illustrates the fields and controls on the Register New User Accounts page.
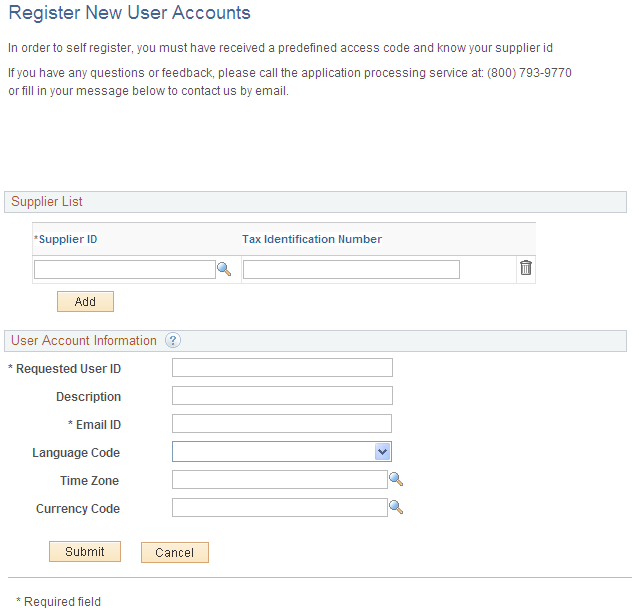
Enter a supplier ID and tax identification number that exist in the system.
Enter new user account information in the User Account Information fields and click the Submit button to finalize the request for the new user account based on the specified supplier ID.
The requesters (internal or external) may select the wrong template to use based on the actions they are performing and the type of supplier action is being performed.
The wrong template can vary depending on who determines that the template was incorrect and when that identification occurs. Following points describe the process for reconciling the registration if wrong template is selected.
Wrong template identified by the internal or external user before saving or submitting the registration
Before saving or submitting the registration, return to the Welcome page and choose a different template. It will clear all the previously entered data.
Wrong template identified by the external user after save and before submit
Organization can provide help information and guidance to the requester. For example, call or send email to the administrator with all registration information. After verification, the administrator can use the Manage Obsolete Request feature to notify and withdraw the registration, and suggest the requester to create a new registration.
Wrong template identified by the internal user after save and before submit
Internal requester can withdraw the registration through either the Registration component (Continue) or the MOR component and create a new registration using a different Template.
Wrong template identified by the reviewer-editor or approver after submit
The approver can use the Request More Information action to return the registration back to the requester. The internal user can withdraw the registration and create new registration choosing a different template. For external user the administrator can withdraw the registration and notify the requester.
Reviewer-Editor or Approver can manually adjust Supplier or Bidder Master to correct any issues caused by using the wrong template. They can also initiate a Supplier Change Request Invitation for the supplier to correct or provide missing information.
Wrong template identified by the internal or external user after submit
Internal user can contact Supplier Admin about the issue and external user can contact the customer following instructions in Registration Template and/or Portal Content page. Reviewer-Editor or Approver can also use MOR to notify the requester and withdraw the registration.