Defining PeopleSoft Payables Business Unit Options by SetID
To set up your PeopleSoft Payables business unit options by SetID, use the Payables Options component (BU_CTLB).
To load data into the tables for the Payables Options component, use the EM_BU_CTLB component interface.
|
Page Name |
Definition Name |
Usage |
|---|---|---|
|
BU_AP_OPT_ACCTG |
Define accounting date options for PeopleSoft Payables business units sharing the SetID. |
|
|
BU_AP_OPT_VCHR1 |
Enter the voucher approval rules, currencies, and single payment supplier for the SetID. |
|
|
BU_AP_OPT_VCHR2 |
Specify the actions that the system takes when it encounters duplicate invoices, incorrect ChartFields, and vouchers with unbalanced lines. |
|
|
Payables Options – Document Management |
BU_AP_OPT_DCM |
Specify the third party imaging integration options to enable data input from an imaged invoice. |
|
BU_AP_OPT_PYMNT |
Specify the default payment terms, payment method, and bank account for the SetID. These options control the defaults for suppliers and individual vouchers. |
|
|
Holiday Processing Options Page |
HOL_PROC_SEC |
Specify the holiday processing options for the SetID. |
|
BU_AP_OPT_TAX |
Specify sales tax, use tax, and VAT options for the SetID. |
You continue the business unit setup by defining business unit parameters in the Payables Options component, which defines the defaults at the SetID level. All business units assigned to the SetID use the defaults that you specify in this component.
Note: Before you can complete the business unit setup in the Payables Options component, you must set up the control tables common to all PeopleSoft applications and use the Payables Definition component to establish the PeopleSoft Payables business units.
Note: You must also define processing options for the PeopleSoft Payables business units.
Use the Payables Options - Payables Options page (BU_AP_OPT_ACCTG) to define accounting date options for PeopleSoft Payables business units sharing the SetID.
Navigation:
This example illustrates the fields and controls on the Payables Options – Payables Options page. You can find definitions for the fields and controls later on this page.
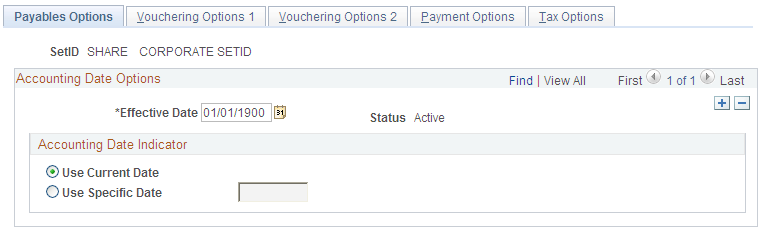
Specify the accounting date option that the system uses for the SetID. This setting controls default values (through the default hierarchy) on individual vouchers. The accounting date controls the period in which the accounting entry information appears in the general ledger. It largely determines when an accounting entry is selected for journal generation.
Field or Control |
Description |
|---|---|
Use Current Date |
Select to have the system apply the date of the transaction as the accounting date. |
Use Specific Date |
Select to have the system use the date that you enter on this page to determine which period to use for posting the transactions. Keep in mind that if you enter a specific date here, all voucher transactions entered for business units using the SetID will have the same accounting date. |
Use the Payables Options - Vouchering Options 1 page (BU_AP_OPT_VCHR1) to enter the voucher approval rules, currencies, and single payment supplier for the SetID.
Navigation:
This example illustrates the fields and controls on the Payables Options – Vouchering Options 1 page. You can find definitions for the fields and controls later on this page.

Field or Control |
Description |
|---|---|
Voucher Approval |
|
Requestor Option |
Select to determine who is used as the Requestor for a Voucher Approval.
Note: This field appears only when Approval Framework is selected in Voucher Approval. |
Business Process |
Enter a business process name to identify the purpose of the workflow; for example, Process Voucher Approval. |
Rule Set |
Enter a rule set name to identify the steps of the process that a voucher undergoes as it is processed by workflow for approval; for example, Payment Approval Rule Set 1. |
Route Denials To |
Enter the roles to which denied vouchers are routed through workflow. |
Currency |
Enter the default voucher currency for the business units assigned to this SetID. This is the transaction currency that the system uses by default on vouchers for these business units. You can select alternate currencies when you enter vouchers if you have multicurrency bank accounts. You can also select alternate currencies when you enter supplier information. The supplier currency then appears by default on vouchers that are entered into the system for a particular supplier. |
Rate Type |
Enter the rate type that the system uses for all vouchers generated for business units using the SetID. Rate types are defined on the Market Rate Type page. |
Single Payment Supplier ID |
Enter the single payment supplier ID that the business units using the SetID use on vouchers for one-time suppliers who are not set up in the system. You set up the single payment supplier by SetID in the Supplier Information component (VNDR_ID). This single-payment supplier defaults onto the voucher. For online vouchers, you can override it when you enter the voucher. For vouchers processed by the Voucher Build process, you can override it by specifying a single payment supplier ID as the supplier in the source data that you stage be processed. |
You can override most of these options throughout the control hierarchy at the origin, control group, supplier, and voucher level.
Use the Payables Options - Vouchering Options 2 page (BU_AP_OPT_VCHR2) to specify the actions that the system takes when it encounters duplicate invoices, incorrect ChartFields, and vouchers with unbalanced lines.
Navigation:
This example illustrates the fields and controls on the Payables Options – Vouchering Options 2 page. You can find definitions for the fields and controls later on this page.
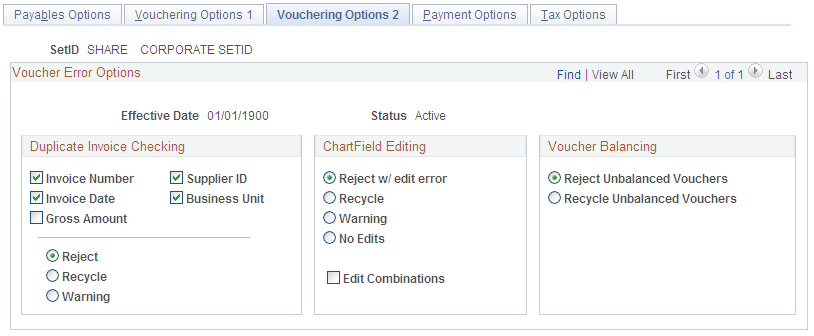
Select one of the following actions to indicate how the system handles errors when checking for duplicate information, validating ChartFields and ChartField combinations, or balancing vouchers:
Field or Control |
Description |
|---|---|
Reject |
Select to have the system reject the voucher; you cannot save the voucher until the error is fixed. Note: The Voucher Build process treats rejected vouchers as recycle vouchers. |
Recycle |
Select to save your work without enabling the voucher to be posted until the error is corrected. The system displays a message to this effect. Note: You can search for and correct vouchers in recycle status in both the online Voucher component (VCHR_EXPRESS) and the Voucher Maintenance component (VCHR_CORRECTION). |
Warning |
The system issues a warning but enables you to save, post, and pay the voucher. Note: The Voucher Build process passes vouchers that fail warning edits without providing a warning. |
No Edits |
Select to bypass ChartField editing. |
Duplicate Invoice Checking
Depending on the options that you select here, the system checks each voucher that is entered for a business unit for duplicates. It can check for duplicate invoice numbers, invoice dates, or any combination of the options listed here.
If you select multiple options, the system performs an AND check. For example, if you select invoice number and invoice date, the system finds a duplicate if the invoice number and invoice date are the same. The system does not find a duplicate, however, if the invoice number is the same but not the date. The more variables that you select, the less likely it is that the system will identify duplicate vouchers.
If any of these variables are found to have values that already exist in the voucher tables, you can have the system reject, recycle, or issue a warning when the voucher is saved.
In addition, if you enable duplicate invoice checking for a business unit, the system also performs a preliminary check when you add vouchers. The system checks against the voucher table to see if any existing vouchers already contain the entered invoice number. If it finds any that do, it issues a warning message before displaying the Invoice Information page. This preliminary check ensures that you do not discover a duplicate invoice number after you enter all of the voucher information.
Note: Duplicate invoice checking is not case-sensitive when matching invoice IDs.
Note: Duplicate invoice checking only looks for duplicates within the same voucher style. For example, if the voucher style is Regular Voucher, then duplicate invoice checking only considers vouchers that have a voucher style of Regular Voucher as possible duplicates. If the voucher had a reversal, it would not consider that a duplicate, because the voucher style is Reversal Voucher.
ChartField Editing
Select the appropriate ChartField editing options to determine the action that the system takes when a voucher's ChartFields do not match the ChartFields available to the business unit.
Field or Control |
Description |
|---|---|
Edit Combinations |
Select to use ChartField combination editing. Note: If you plan to use ChartField combination editing, it is important that you select the Edit Combinations check box in addition to one of the ChartField editing options. Selecting this option enables ChartField combination editing to validate against the ChartFields that you define during setup. If this option is not selected, and you have only selected the reject, recycle or warning option, ChartField combination editing checks only that you entered valid, single ChartField values on the vouchers. |
Voucher Balancing
Specify whether the system should reject or recycle vouchers that are not in balance.
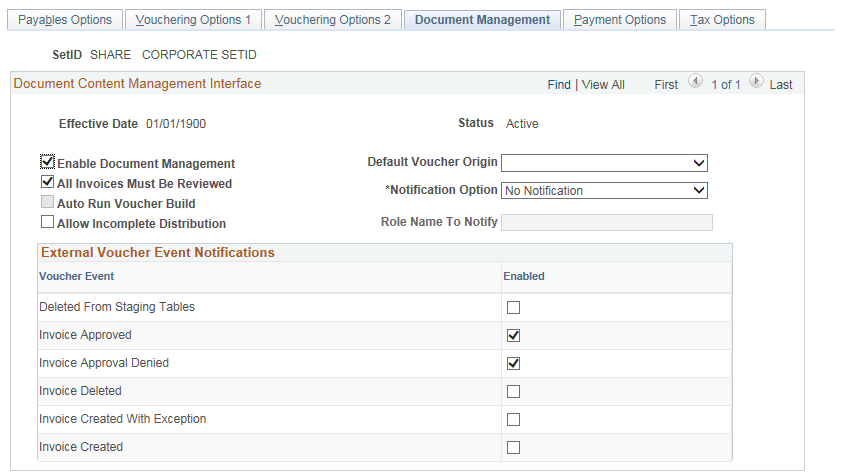
Use the Payables Options – Document Management (BU_AP_OPT_DCM) page to specify the options for integrating a third party imaging solution to capture data input from an imaged invoice. This page is available only if the Document Content Management Interface is enabled on the Installation Options – Payables page.
Navigation:
This example illustrates the fields and controls on the Payables Options – Document Management page. You can find definitions for the fields and controls later on this page.
Field or Control |
Description |
|---|---|
Enable Document Management |
Select to enable imaging integration for all business units defined for the SetID. |
Default Voucher Origin |
Select the default voucher origin. The system uses this option for all vouchers that are created using the imaging integration process. |
All Invoices Must Be Reviewed |
Select to ensure that all imaged invoices entering the PeopleSoft system are reviewed for corrections, using the Quick Invoice Page. This determines the status of the voucher in the Quick Invoice. |
Auto Run Voucher Build |
Select to trigger the Voucher Build Process for every imaging invoice that enters the system. No notifications are sent for review. Note: If All Invoices Must Be Reviewed is selected, this option is disabled. |
Notification Option |
Select to send an email notification each time a new imaged invoice enters the system. In addition, the Accounts Payable department gets a notification on the WorkCenter (My Work links) that there are imaging invoices for review. See Example: Accounts Payable WorkCenter Note: You must define a role for which notifications are sent. When entering a large number of imaging invoices, email notifications are sent one for each invoice created. |
Allow Incomplete Distribution |
Select to allow non-PO invoices without a Speedchart to not be rejected if accounting details are incomplete. |
External Voucher Event Notifications |
Select to send a message to the third party imaging solution that the voucher was created. In case the imaging solution that is integrated into PeopleSoft requires status updates to the imaged data within its database, the appropriate event(s) can be selected accordingly. All options are deselected by default:
|
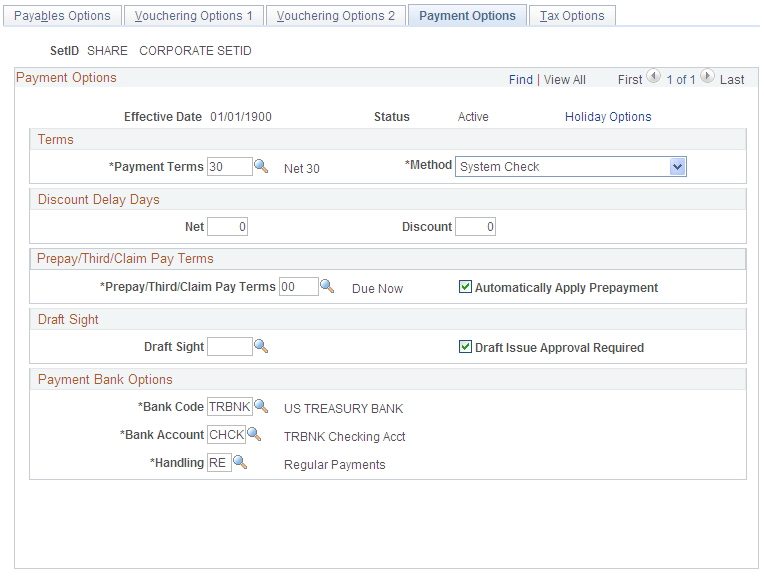
Use the Payables Options - Payment Options page (BU_AP_OPT_PYMNT) to specify the default payment terms, payment method, and bank account for the SetID.
These options control the defaults for suppliers and individual vouchers.
Navigation:
This example illustrates the fields and controls on the Payables Options – Payment Options page. You can find definitions for the fields and controls later on this page.
Field or Control |
Description |
|---|---|
Holiday Options |
Click to open the Holiday Processing Options page, where you can establish bank holiday processing for this SetID. The system calculates bank holidays using the business calendar defined on the Business Calendars page. Options for holiday processing are:
If you select the Due After Holiday option, you can also select the Allow due date in next month option to enable a payment to be made in the next month. If you don't select this option and the payment date after a holiday does fall in the next month, the system schedules the payment before the holiday. For example, you would not select this option if you want payments to be made after a holiday but not in the next month when a holiday falls at the end of a month. Note: Normally, holiday options appear by default from the PeopleSoft Payables business unit level and are carried over to the supplier level and then to the voucher level. However, if a user specifies holiday options during the bank account setup, the bank account options override the default value on the voucher. |
Terms
Select the default payment terms ID and payment method for the SetID. The preferred payment method options are:
Field or Control |
Description |
|---|---|
Automated Clearing House |
Select to create an electronic file containing the required clearinghouse information. You send all applicable payments in one file to a clearinghouse. The clearinghouse then sends the payments to the supplier's bank. |
Direct Debit |
Select to make a payment directly to the supplier's bank account through electronic transfers for specific goods or services. While contractual, the payments can be for different amounts and can vary over periodic intervals. |
Draft - Customer EFT (draft - customer electronic funds transfer) |
Select to create EFT files instead of printed drafts. You send the file to your bank when the draft payment is due. |
Draft - Customer Initiated |
Select to have the system produce a draft before the draft due date. It details the draft identification number, the draft amount, and the draft maturity date, and you send it to the supplier. About 10 days before the draft maturity date, the supplier submits the draft to its bank for collection. The supplier's bank asks your bank to honor the draft. The supplier submits the draft to your bank for verification. Once your bank verifies the funds, it pays the draft. |
Draft - Supplier Initiated |
Select to have the supplier initiate payment and have the draft drawn against your bank account with a future due date. Upon the settlement date of the draft, you can assume that the whole amount of the draft has been withdrawn from your account. |
Electronic Funds Transfer (EFT) |
Select to create an electronic file containing the required bank and payment information. You send all applicable payments in one file to your bank for payment. The bank then sends the payments to your supplier's bank |
Giro - EFT |
Select to create an output data file containing the payment information. You send the output data file to the bank electronically or on taped media. This payment method is primarily used in Singapore. |
Giro - Manual |
Select to use a type of remittance slip that is handled as a manual payment. Accept Giro is a standard format used in the Netherlands that has an invoice with a tear-off portion. The tear-off section displays all of the information necessary to execute a payment. You detach the tear-off portion and send it to your bank for payment to the supplier. Your bank sends payment to the supplier's bank, and the supplier's account information is updated. |
Letter of Credit |
Select to use an agreement issued by a bank at the request of its client and add the bank's promise of payment to your promise. The letter of credit frequently requires congruity with a number of terms, conditions, or events before the supplier can collect payment. All vouchers that have the same letter of credit ID are grouped in a single payment. Only those payments for which you have selected the L/C Advice option on the Preferences page of the Payment Selection Criteria component (PYCYCL_DEFN) have a printed letter of credit advice. |
Manual Check |
Select to use the manual payment functionality, which records into the system a check that was typed or handwritten outside of the system. |
System Check |
Select to use scheduled payments that require a printed paper check and remittance advice. |
Wire Transfer |
Select to create an electronic payment from your bank account to the supplier's bank account. Wires can be created by running pay cycle processes to process your wire transfer payments and also by Pay Cycle Manager using PeopleSoft Financial Gateway. |
Discount Delay Days
Discount delay days enable you to specify extra days to process checks when you know that most or all of the suppliers for these business unit are lenient with due dates. In calculating the due date for discount and net, the system checks the payment terms and payment terms basis date. Based on the terms, it calculates the discount and net date. It adds the discount and net delay days, as specified by the control hierarchy, to yield the updated discount date and net date.
Field or Control |
Description |
|---|---|
Net |
Enter the number of delay days for net payment. A delay of 5 days provides extra time to make the net payment. |
Discount |
Enter the number of delay days for discount payment. If you enter 2 delay days, you can process payments two days later than the discount due date and still have the PeopleSoft Payables system take the discount. |
You define payment terms on the Payment Terms page.
Prepay/Third/Claim Pay Terms
Field or Control |
Description |
|---|---|
Prepay/Third/Claim Pay Terms |
Specify the default prepayment, third-party, or claim (claimback) payment terms ID for the SetID. |
Automatically Apply Prepayment |
Select this check box to enable the system to apply unapplied vouchers to prepayments automatically during the Voucher Posting process. |
Prepayments and claimbacks have some restrictions on payment terms. For example, you cannot use discounts or multiple payment terms with prepayments or claimbacks. If you select an invalid value from the list of available options, the system issues an error message indicating that the selected terms cannot be used.
Note: If you do not populate this field, the payment terms for prepaid vouchers for the SetID appear as blank in the Voucher component. You can enter or override payment terms for prepaid vouchers at the voucher level.
Payment terms for third-party vouchers cannot include a discount.
Draft Sight
Field or Control |
Description |
|---|---|
Draft Sight |
Enter the sight code. This code references the agreed upon payment terms between you and the supplier for draft payments. It is similar to accounts payable and accounts receivable payment terms, such as NET30, except that it does not use discounts. Use the Sight Codes page to establish sight codes. |
Draft Issue Approval Required |
Select to specify that the status Approved is required before accounting entries can be generated for drafts using the Payment Posting Application Engine process (AP_PSTPYMNT). If you select this check box, approval is required before accounting entries can be generated. All payments must have DFT_STATUS = 'A' (approved). If you do not select this check box, approval is not required for payment posting, and payments can have draft status of either C (created) or A (approved). |
To access the Holiday Processing Options page, click the Holiday Options link on the Payables Options - Payment Options page.
Payment Bank Options
Select a default payment bank, bank account, and handling code for the SetID. You define these codes on the Payment Handling Codes page. Some examples are:
|
Handling Code |
Name |
Short Name |
|---|---|---|
|
HD |
High Dollar Payment |
High $ |
|
IN |
Internal Distribution |
Internal |
|
PO |
Route to Purchasing |
Purchasing |
|
RE |
Regular Payments |
Regular |
(USF) Pay Sched/Date Calculation
Field or Control |
Description |
|---|---|
Pay Schedule Type |
Select the default schedule payment type for the business units sharing the SetID. You can override this setting at the origin, supplier, and voucher levels of the control hierarchy. Options are: Manual: Indicates that the agency can cut checks to pay the supplier directly. If you select this option, the Pay Cycle Application Engine process (AP_APY2015) does not process payment schedules for this business unit. Other: Indicates that the payments cover nontransportation expenses. Transport: Indicates that the payments cover transportation expenses. |
Date Calculation Basis |
Specify whether the system calculates the payment date using the federal prompt payment criteria. The following values are delivered with the system:
|
Use the Payables Options - Tax Options page (BU_AP_OPT_TAX) to specify sales tax, use tax, and VAT options for the SetID.
Navigation:
This example illustrates the fields and controls on the Payables Options – Tax Options page. You can find definitions for the fields and controls later on this page.
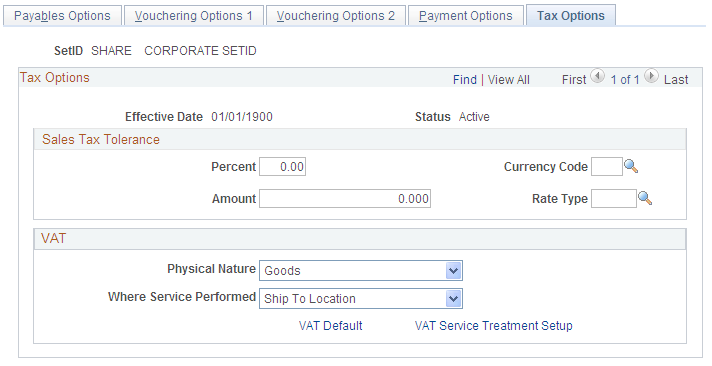
The sales tax tolerance determines the allowable difference between the sum of the sales tax calculated for each voucher line and the total amount entered in the voucher header. If there is a discrepancy, the system compares the amount of difference against the sales tax tolerance rules that you specify here. You determine how the system handles such discrepancies for a PeopleSoft Payables business unit on the Payables Definition - Tax Options page. On the same page, you can also determine whether to handle any discrepancy in entered and calculated sales tax by accruing the difference as use tax.
Field or Control |
Description |
|---|---|
Percent |
Enter a value to define the tolerance as a percent of the calculated sales tax amount. Enter a percent value in this field. |
Amount |
Enter a value to define the tolerance as a fixed amount. Enter an amount in this field. The system checks against the percentage first, and if it is out of tolerance, it then checks against the amount. If both are exceeded, a warning or error is issued (according to the discrepancy handling that you set up on the Payables Definition - Tax Options page). If the percent is exceeded and the amount is not—as in the case of a low voucher amount—the tolerance is met and the voucher is saved without issuing a warning. |
Currency Code and Rate Type |
Enter the currency code and rate type for the tolerance amount. |
VAT Options
In this group box, you establish the following defaults for all PeopleSoft Payables business units that share the SetID:
Physical nature (whether the default is for goods or services).
Where services performed (the country in which services purchased by the business unit are most often performed).
Field or Control |
Description |
|---|---|
Physical Nature |
Select the default physical nature for transactions. Options are Intangible/Services and Physical Goods. For many countries, you must report the sale or purchase of goods separately from services. |
Where Service Performed |
Enter the default location for where a service is most often performed; that is, the place at which the VAT liability is incurred. Options are Buyer's Location, Ship From Location, Ship To Location, and Supplier's Location. |
VAT Default |
Click to access the VAT Defaults Setup page. The VAT Defaults Setup page is a common page used to set up VAT defaults for all PeopleSoft applications that process VAT transactions. On this page, you can define PeopleSoft Payables VAT defaults for the business units sharing the SetID (as applicable). In PeopleSoft Payables, several of these defaults can be overridden at the voucher origin level, control group level, supplier level, and the voucher itself. Defaults are defined by VAT reporting country and defaulting state. These defaults include:
Other options can only be overridden at certain points in the control hierarchy:
Note: These settings can also be set by accessing the VAT Defaults component directly and selecting the AP Options driver. |
VAT Service Treatment Setup |
Click to access the Services VAT Treatment Drivers Setup page. The Services VAT Treatment Drivers Setup page is a common page used to set up VAT services treatment for all PeopleSoft applications that process VAT transactions. If you are required to implement special handling for services, you can specify PeopleSoft Payables VAT service treatment defaults on this page (as applicable). Establish the following PeopleSoft Payables VAT defaults for the business units shared by the SetID:
Services VAT defaults are defined by the seller's location country and state. Note: These settings can also be set by accessing the VAT Service Treatment Setup component directly and selecting the AP Options driver. |