Creating Solutions
To define solutions, use the Solution (RC_SOLUTION) component. This component also allows you to define solutions and send them for approval. For details on defining approval enabled solutions, see Creating Approval Enabled Solutions.
This topic discusses how to:
Define solutions.
Track notes and attachments.
Identify solution libraries.
Manage relationships with cases, products, errors, and other solutions.
Manage relationships with service orders, products and other solutions.
Relate solutions.
View solution history.
View Solution Feedback provided by Employees and Agents
|
Page Name |
Definition Name |
Usage |
|---|---|---|
|
Solution - Solution |
RC_SOLN_DETAILS |
Create and deactivate solutions. |
|
Solution - Notes |
RC_SOLN_NOTES |
Add notes or attachments. |
|
Solution - Libraries |
RC_SOLN_LIBRARY |
Identify libraries to which the solution belongs. When users search for solutions using Solution Advisor, they can choose which libraries to search. |
|
Solution - Related Actions |
RC_SOLN_SIMILAR |
Review the solutions, cases, products, and errors, and category/type/detail, service orders, and business projects that are related to this solution, and create relationships with other solutions and products. |
|
Relationship Type |
RC_SOLREL_TYPE_SEC |
Identify a related solution and the relationship type. This page is used for the both the case and service order related actions. |
|
Solution - History |
RC_SOLN_HISTORY |
Review a history of important events in the life of the solution. |
|
Solution Summary |
RC_SOLN_SUMMARY |
View solution summary information for the current solution. |
|
Solution - Feedback |
RC_SOLN_FEEDBACK |
View solution feedback provided by Employees and Agents. |
Use the Solution - Solution page (RC_SOLN_DETAILS) to create and deactivate solutions. This section applies solely if approval is not configured for the solution. If approval is enabled for solution, see Creating Approval Enabled Solutions.
Navigation:
Alternatively, click the Manager Solutions tile on the HR Service Manager homepage.
Note: When solutions appear in the Search Results section on the Solution search page initially, they are displayed on the list by solution ID in ascending order. If you click the Solution ID column name to sort solutions in the list, the system reorders them (in ascending or descending order) by solution ID one character at a time. Suppose that there are three solutions in the search result grid and their IDs are 30, 31 and 301054 respectively. If you click the column name to sort them by solution ID in ascending order, they appear in this order: 30, 301054 and 31.
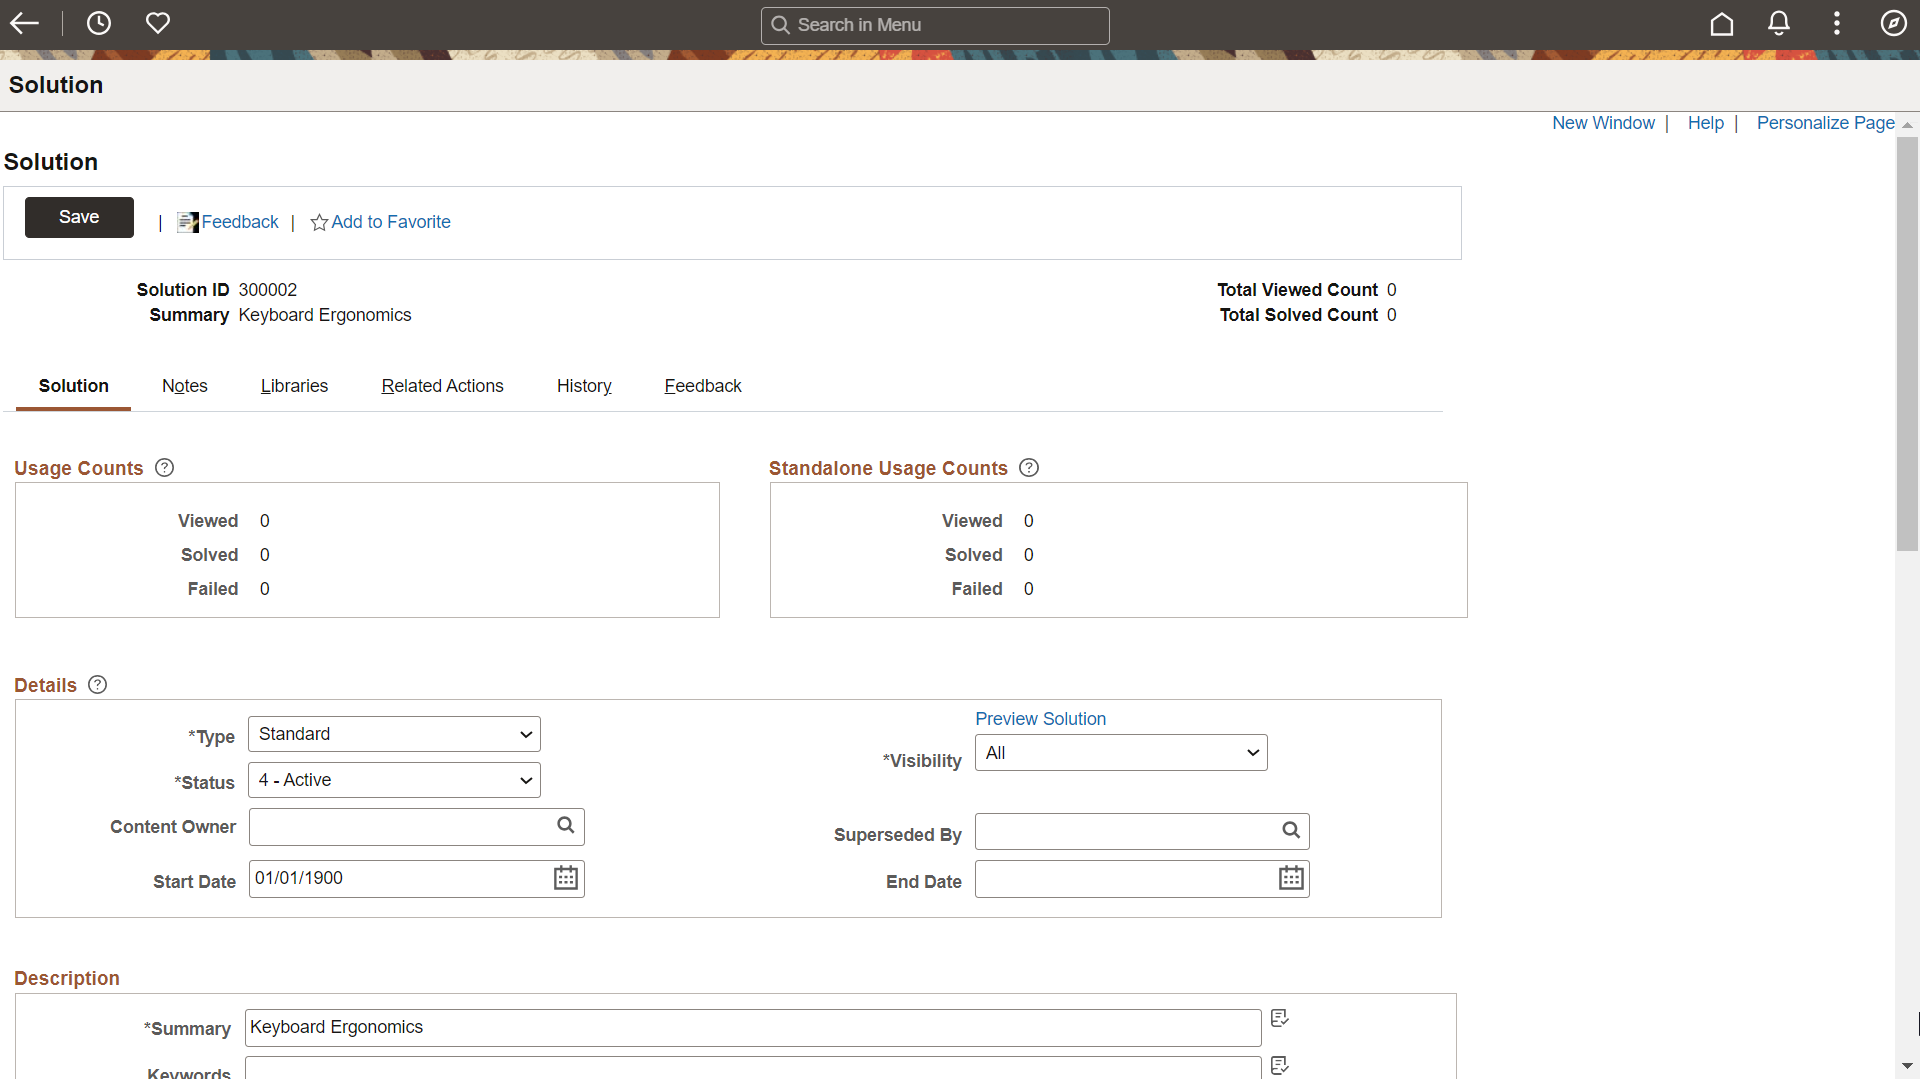
This example illustrates the fields and controls on the Solution - Solution page (1 of 2).
This example illustrates the fields and controls on the Solution - Solution page (2 of 2).
Note: If you change the solution's type, you must rerun the build search index process for solutions to update the solution set. This provides users with accurate search results when trying to locate solutions to problems.
|
Field or Control |
Description |
|---|---|
|
Feedback |
Used to enter feedback while viewing a solution. For details, see Agent Feedback on Solutions. |
|
Add to Favorite/Remove from favorite |
Click the star icon to mark/unmark the solution as your personal favorite. |
|
Total Viewed Count |
Displays the sum of the viewed usage count and viewed standard usage count. |
|
Total Solved Count |
Displays the sum of the viewed solved count and viewed standard solved count. |
Feedback on Solutions
Users with appropriate access can provide feedback for a solution. To provide the feedback, perform the following:
Click the Feedback link on the Solution — Solution page. This displays the Solution Feedback modal window.
This example illustrates the fields and controls on the Solution Feedback modal window.
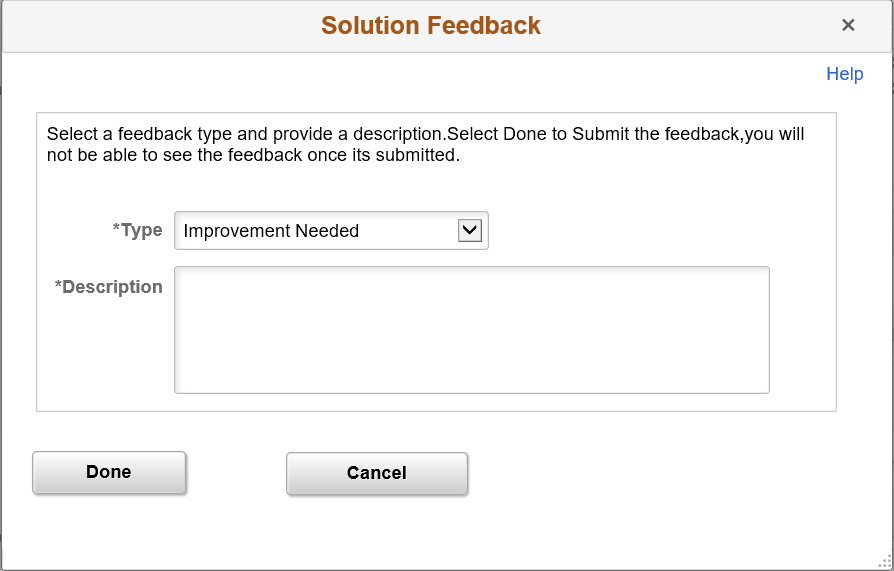
Select the required feedback type. The values displayed in the drop-down list are based on the feedback types configured in the Feedback Type page. For details, see Feedback Type Page
Enter a meaningful description.
Click Done.
Note: ‘Type’ and ‘Description’ are mandatory fields.
Usage Counts
This section displays the usage counts of the solution when it is used in relation to cases or service orders. The numbers are updated by running the Update Usage Counts process.
|
Field or Control |
Description |
|---|---|
|
Viewed, Solved, and Failed |
Displays:
|
Standalone Usage Counts
This section displays the usage counts of the solution when it is used in the standalone mode, not related to any CRM transactions. The numbers are updated by running the Update Usage Counts process.
|
Field or Control |
Description |
|---|---|
|
Viewed, Solved, and Failed |
Displays:
|
Details
|
Field or Control |
Description |
|---|---|
|
Type |
Normally, select either Standard or Workaround. Solutions created when agents enter an independent text resolution are given the type Adhoc. You can convert these to standard solutions by changing the type. Solutions created when a agent or technician uses external content to resolve a case or service order are given a solution of type of Link. You can't manually create a solution of type of Link. Solutions created when self-service users choose predefined case closure reasons are given the type of Canned. |
|
Preview Solution |
Click to see a preview of the solution in a new browser window. |
|
Status |
Select from: Draft: When a new adhoc solution is added to a case, the system creates a solution behind the scenes with a solution type of Adhoc and a solution status of Draft. Adhoc solutions, however, are not accessible through Solution Advisor. Submitted for Review: When an agent clicks the Submit button on the Resolution Details page, the system changes the solution status from Draft to Submitted for Review. In Review: Managers use this status to indicate that the adhoc solution is being reviewed for approval or denial. Active: The solution is approved and available to agents. Denied: The solution is denied for general use by agents. Expired: The solution is no longer valid as of the expired or superseded date. Superseded: The solution is no longer valid because another solution has replaced it. Rework: The solution is marked for update and further review. |
|
Visibility |
Select All if self-service users are allowed to view this solution. Select Internal to prevent self-service users from using this solution. Note: Users cannot search for internal solutions through PeopleSoft Self Service applications. If an internal solution is added to an agent facing case, however, it can be viewed from self service once it's added to the case. |
|
Content Owner |
Enter the content owner group that the solution belongs to. Only active content owners with same setID as the solutions are available for selection. When the status of an expired or superseded solution is changed to Active, the system checks if the associated content owner (if available) is active. If the content owner is inactive, an error message is displayed and the status of the solution cannot be updated; if it is active, the solution status can be updated. |
|
Path Detail |
The system displays this field when the type is File or Link. It includes a URL to the website or file where a solution resides. |
|
Superseded By |
When the solution status is Superseded, identify the replacement solution in this field. Selecting a replacement solution automatically sets the status to Superseded. Selecting a status other than Superseded clears the Superseded By field. When you merge solutions using the Merge Similar Solutions page, the system sets the status to Superseded and identifies the replacement solution automatically. |
|
Start Date |
Enter the start date when the solution (in active status) becomes available for searching through the PeopleSoft Search Framework. When the Search Schedule Index process is executed, it looks for solutions with start dates that are equal to the current system date and adds them to the search index. Solutions must be added to the search index in order for them to be searchable in cases, service orders, defects and email messages (ERMS). By default, the system uses the current date as the solution start date. You can create future-dated solutions by specifying a future start date. |
|
End Date |
Enter the end date on which the solution is no longer searchable for use by the PeopleSoft Search Framework. The Search Schedule Index process removes solutions with end dates that are equal to or earlier than the current system date from the search index |
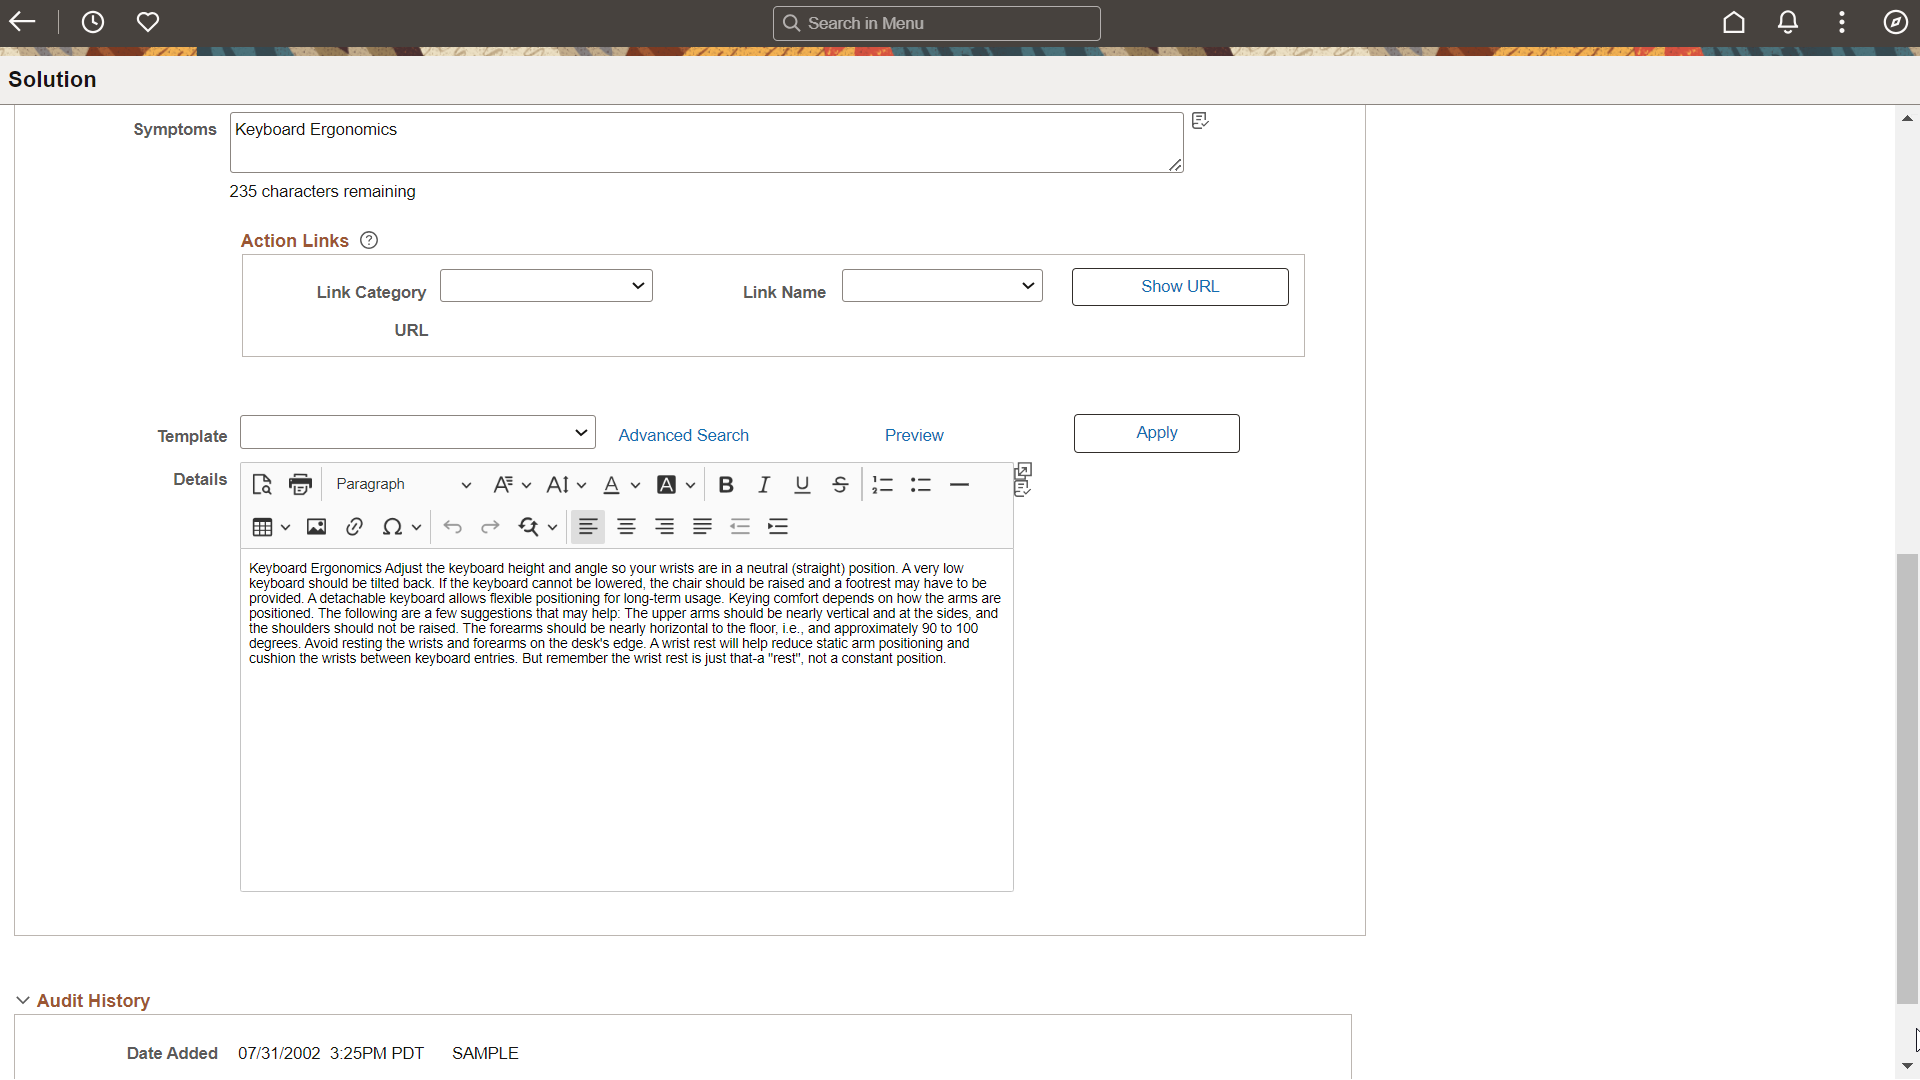
Description
|
Field or Control |
Description |
|---|---|
|
Summary |
Enter a short description of the solution. |
|
Keywords |
Enter search keywords or a phrase for the solution. |
|
Symptoms |
Enter a description of the problem that the solution addresses. |
|
Template |
Select a template package to be used for this solution. |
|
Apply Template |
Click this button to apply the template package specified in the Template field to the solution. More than one template package can be applied to a solution: each time a template package is selected and applied, it will appear at the top of the solution Details area. |
|
Details |
Enter the full explanation of how to solve the problem. |
Use the Solution - Notes page (RC_SOLN_NOTES) to add notes or attachments.
Navigation:
The Solution - Notes page uses the standard PeopleSoft CRM interface for working with notes and attachments.
Attachments are visible on solution summary pages based upon the value of the Attachment Visibility field for the note with which it is associated. If the value of the field is Internal, the attachments are only visible on agent-facing pages: if the value is All, the attachments are also visible in self-service pages.
Regardless of the value of the Attachment Visibility field, solution notes themselves are never visible in self-service pages.
You would normally want attachments to have a visibility of All if they are files that a caller uses when applying the solution: for example, DLL files or BAT files that fix software problems.
Use the Solution - Libraries page (RC_SOLN_LIBRARY) to identify libraries to which the solution belongs.
When users search for solutions using Solution Advisor, they can choose which libraries to search.
Navigation:
This example illustrates the fields and controls on the Solution - Libraries page.
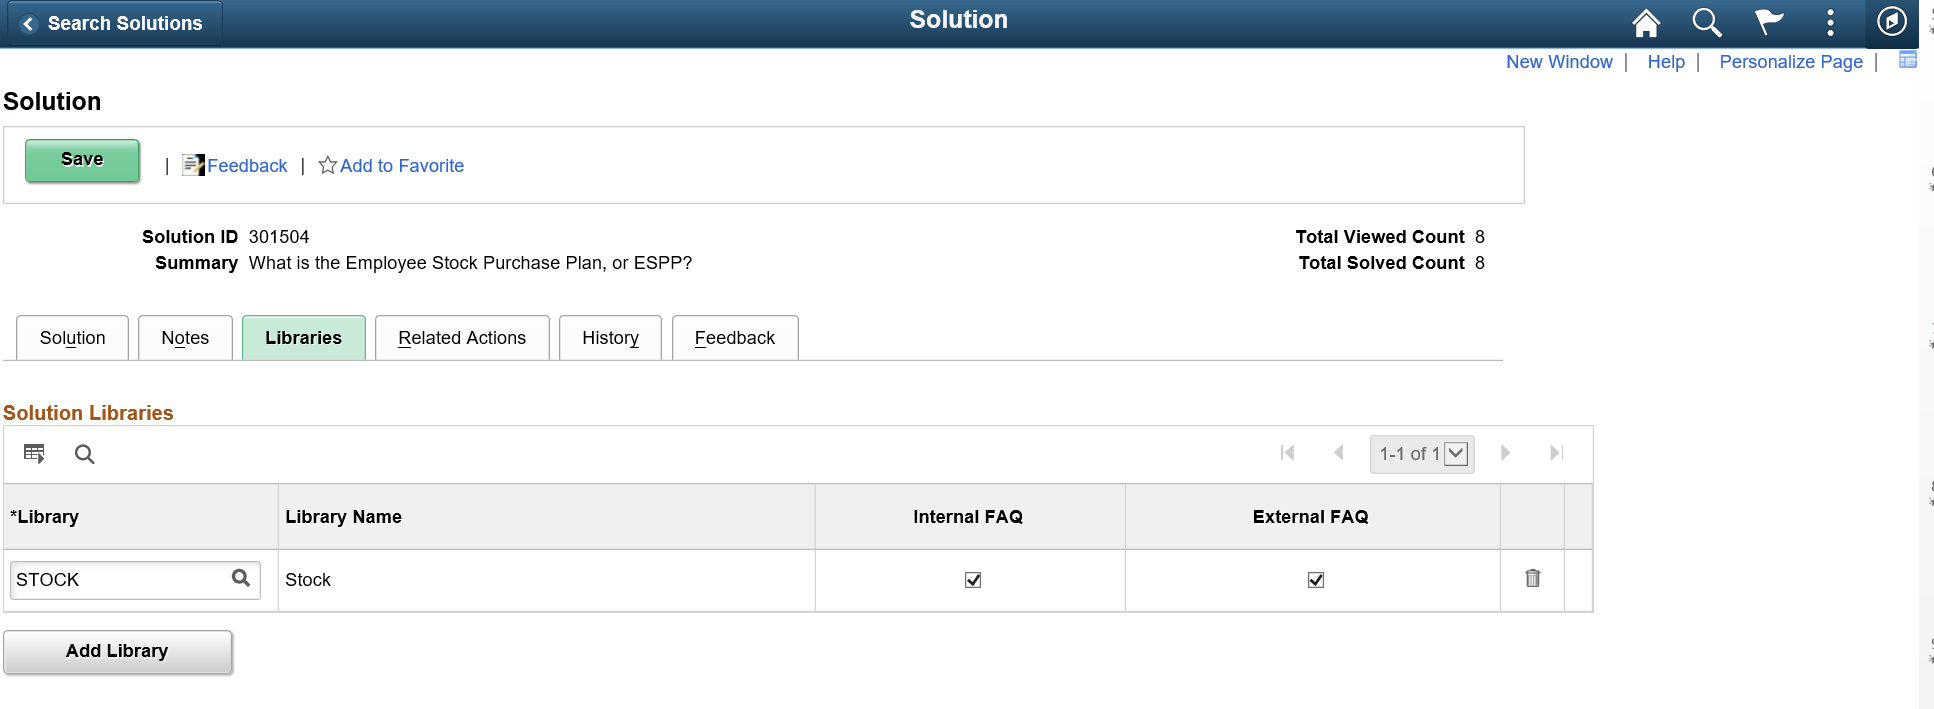
Libraries are only applicable to call center applications.
|
Field or Control |
Description |
|---|---|
|
Library |
Select a library to which you wish to associate this solution |
|
Internal FAQ |
Select this check box to make this solution available to agents searching Frequently Asked Questions on cases. |
|
External FAQ |
Select this check box to make this solution available to external customers using the self-service Frequently Asked Questions page. |
Use the Solution - Related Actions page (RC_SOLN_SIMILAR) to review the solutions, cases, products, and errors, and category/type/detail, service orders, and business projects that are related to this solution, and create relationships with other solutions and products.
Navigation:
This example illustrates the fields and controls on the Solution - Related Actions page.
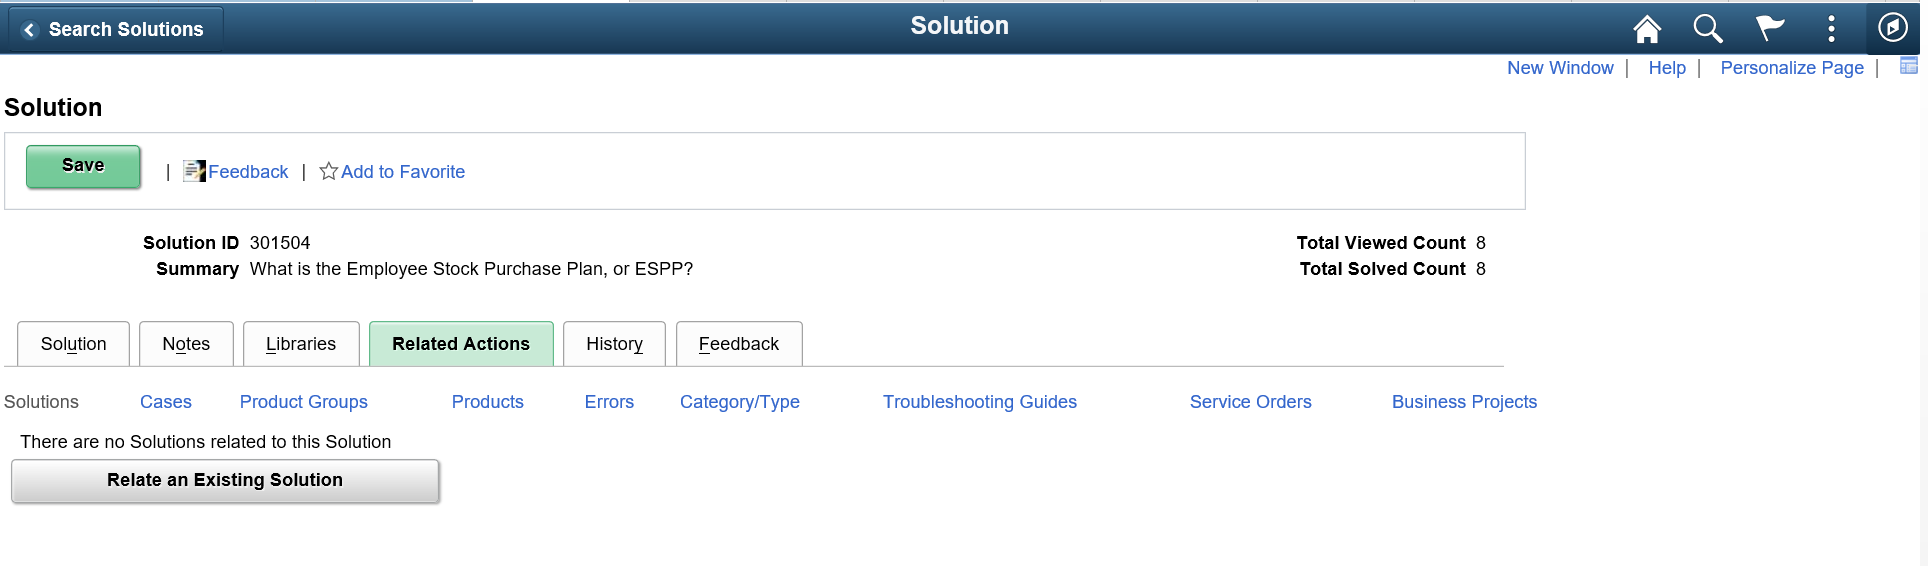
Click the links below the tab to see different types of related actions in the grid.
Solutions
This grid lists all solutions that are related to the current solution. You can relate solutions manually or create solution relationships by running the Related Solution process.
Click the Relate an Existing Solution button to access the Relate Existing Solutions page. Use this page to establish a relationship between the currently displayed solution and an existing solution.
This information appears for each related solution:
The relationship type.
The solution ID and summary.
Click the solution ID to view the solution summary.
The link source: MAN (manually created) or SYS (system-created).
The date and time the relationship was created.
Note: You cannot relate an existing solution to an adhoc solution.
Issues
Case relationships, or issues, are relevant only for call center applications. When you resolve a case, the system adds the newly resolved case to the solution's list of related cases.
This grid lists all cases to which the solution has been applied, regardless of whether the solution solved the case. The system maintains the list of related cases in real-time.
This information appears for each related case:
The case ID and summary.
Click the case ID to transfer to the case.
A resolution status that indicates whether the solution resolved the case.
Products
This grid lists all products for cases that the solution successfully resolved. You can relate products manually or use the Update Solution Usage Counts process to create additional relationships automatically.
This information appears for each related product:
The product ID and description.
A solved count that indicates the number of cases with this product that the solution resolved.
The link source: MAN (manually created) or SYS (system-created).
The date and time the relationship was created.
Errors
Errors are relevant only to call center applications. This grid lists all errors for cases that the solution successfully resolved. You cannot add rows of data manually; you must use the Update Solution Usage Counts process to create additional relationships.
This information appears for each related error:
The error ID and error message.
A solved count that indicates the number of cases with this error that the solution resolved.
The link source: MAN (manually created) or SYS (system-created).
Currently, you cannot create manual relationships.
Category/Type
Categories, specialty types, and details are relevant only for call center applications. This grid lists all categories, types, and details for cases that the solution successfully resolved. You can change the specialty types and details listed for the category by selecting new values from the drop-down list boxes for the two fields.
This information appears for each related category/type/detail:
The category, specialty type, and detail.
A solved count that indicates the number of cases with this category/type/detail combination that the solution resolved.
The link source: MAN (manually created) or SYS (system-created).
Currently, you cannot create manual relationships.
Service Orders
Service order relationships are relevant only for PeopleSoft Integrated FieldService applications. When you complete a service order, the system adds the service order to the solution's list of related service orders.
Business Projects
You can set up an AAF policy to launch a business project after a solution is saved for a case or service order. The business project is typically used to send notifications to solution managers or send worklist entries to specific employees. This grid lists all business projects associated with the solution.
This information appears for each business project that is related to the solution:
The business project summary and status.
To access the Business Project Status page, click the View Details\Transfer icon for the Related Business Project.
The date the business project was created and the person who created it
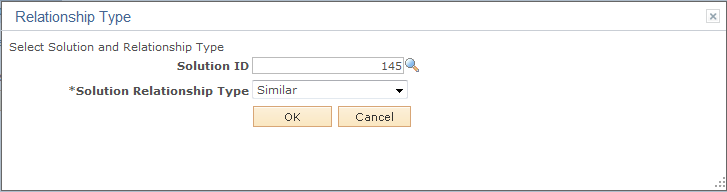
Use the Relationship Type page (RC_SOLREL_TYPE_SEC) to identify a related solution and the relationship type.
Navigation:
Click the Relate an Existing Solution button on the Solution - Related Actions page.
This example illustrates the fields and controls on the Relate Existing Solution page.
|
Field or Control |
Description |
|---|---|
|
Solution ID |
Select the solution to relate to the current solution. |
|
Solution Relationship Type |
Select from the values established on the Solution Relationship Type page. |
|
OK |
Click this button to establish the relationship and return to the Solution - Related Actions page. |
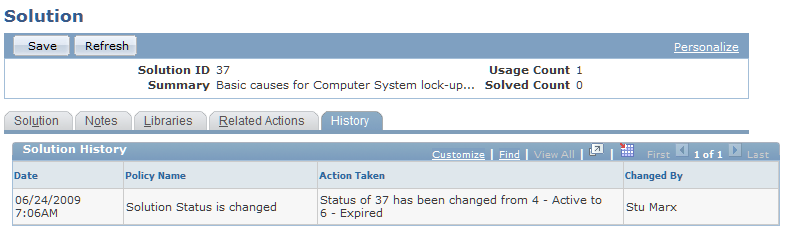
Use the Solution - History page (RC_SOLN_HISTORY) to review a history of important events in the life of the solution.
Navigation:
This example illustrates the fields and controls on the Solution - History page.
|
Field or Control |
Description |
|---|---|
|
Policy Name |
Displays the name of the policy that caused the history item to be logged. This information is usually recorded after the solution is saved. Note: The components present in Active Analytics Framework (AAF) are used to build policies. The information that appears on this page is triggered after the solution is saved. |
|
Action Taken |
Displays the name of the event. The description of the action comes from the description of the policy established in AAF. |
|
Changed By |
The person who made the change that triggered the event. |
Use the Solution - Feedback page to review all the comments provided by Agents and Employees.
Navigation:
This example illustrates the fields and controls on the Solution - Feedback page.
Note: The Feedback tab is displayed only for users tagged with permission list ‘CRRC1122’ (content owners). Feedback can be further filtered by Feedback Type and Review Status. Feedback Type will hold the value "All" by default. Review Status default value can be configured from Review Status set up (Default check box).
|
Field or Control |
Description |
|---|---|
|
Description |
Description of the feedback. |
|
Type |
Type of feedback. |
|
Employee |
Employee or agent who provided the feedback. |
|
Date |
Date on which the feedback was provided. |
|
Reviewed By |
Content owner who reviewed the feedback provided by agents or employees. |
|
Date Reviewed |
Date on which the feedback was reviewed. |
|
Review Status |
Status of review. |
To review a feedback, perform the following:
Select a particular feedback from the Feedback Summary block. This displays the Feedback Detail modal window as shown:
This example illustrates the fields and controls on the Feedback Detail modal window.
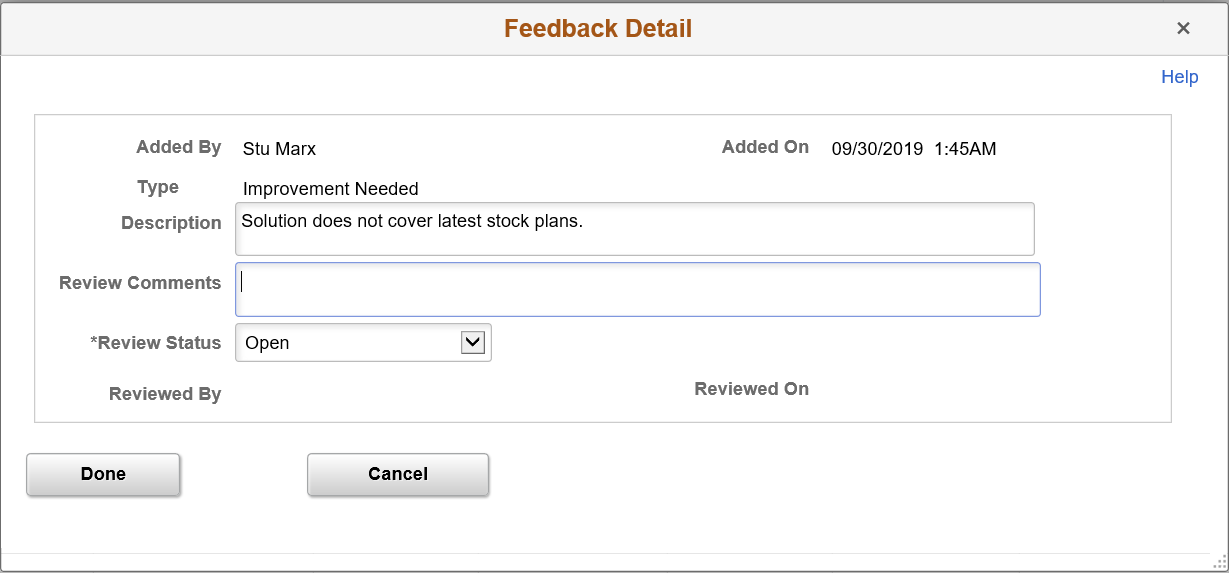
Enter the review comments.
Select an appropriate review status. The values displayed in the drop-down list are based on the configurations on the Review Status page. For details, see Review Status Page
Note: Users cannot edit a feedback further if any of the review status is with in "Feedback is closed" category.
Click Done.
Users can also bulk update solution feedbacks. To bulk update the feedbacks, perform the following:
Select the check-box corresponding to the feedbacks which you want to edit.
Click the Bulk Update button. This displays the Feedback — Bulk Update modal window as shown:
This example illustrates the fields and controls on the Feedback Bulk Update modal window.
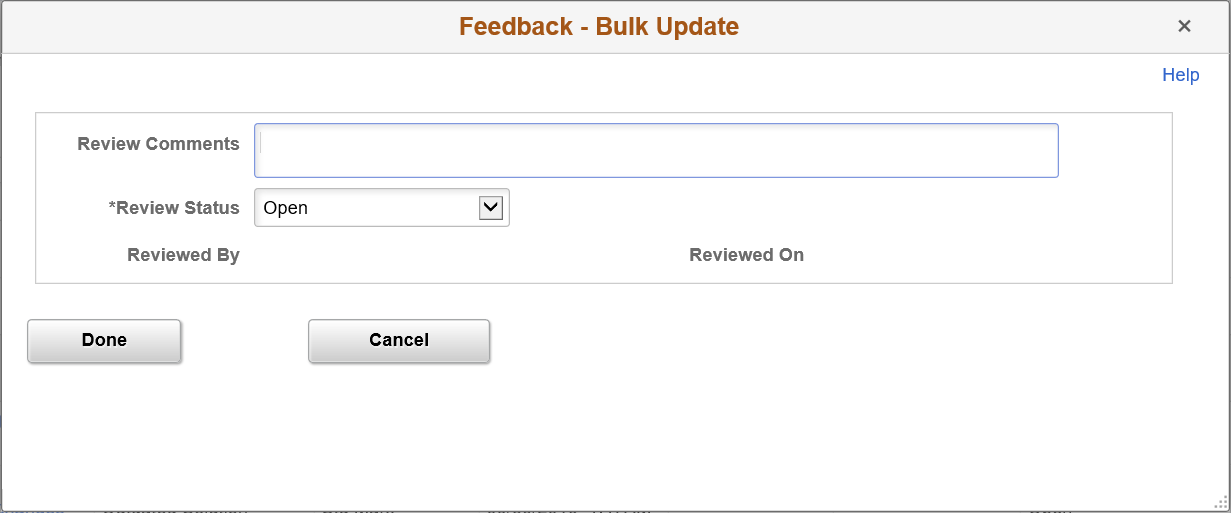
Provide the review comments and select a review status.
Click Done.