Maintaining Worker Information
To maintain worker information, use the Worker (RD_WORKER_2) component.
These topics discuss how to:
View and maintain summary worker information.
View and maintain worker details.
View and maintain user profiles.
Enter job details.
View assignment summary information.
Define default schedules.
Associate competencies with workers.
Define job assignment criteria.
Associate workers with provider groups and worklists.
Define default storage locations.
Define default signatures.
|
Page Name |
Definition Name |
Usage |
|---|---|---|
|
Worker |
RD_WORK_GSRCH |
Search the database for existing workers. |
|
Person |
RD_PERSON_SEARCH |
Search the database for existing persons. To access the Worker component for a person, click the Add Worker Information or Edit Worker Information link on the Person - Summary page. |
|
RD_PRSN_PRIMARY |
View and update summary information for a worker. |
|
|
RD_PRSN_DETAILS |
View and maintain worker profile information. |
|
|
RD_PERSON_USER |
Maintain the worker's user profile. |
|
|
RD_WORKER_DETAIL |
Enter information about the specified worker's job. |
|
|
RD_ASGN_JOB |
View assignment summary information for the worker. |
|
|
RD_WORKER_SCHEDULE |
Define default workdays for the specified worker. |
|
|
RD_WORKER_CMP_PROF |
Associate the specified worker with a competency and define the worker's level of proficiency for the competency. |
|
|
RD_WORKER_CRITERIA |
Define criteria that the assignment engine uses to match the specified worker to a case or service order. |
|
|
RD_WORKER_GROUPS |
Associate the worker with provider groups and group worklists. |
|
|
RD_WORK_STORLOC |
Define inventory storage locations that are associated with good and defective storage locations on a field service worker's truck. |
|
|
RD_WORKER_WF_SIG |
Define a default signature to use when the specified worker sends manual notifications. |
|
|
Worker - Notes |
RD_PERSON_NOTES |
Add notes and attachments for the specified worker. |
|
Worker - Address Book |
RD_PRSN_ADDR_BOOKS |
View and update a worker's contact information. |
|
Worker - More Info |
RD_PROFILE |
View and update a worker's marketing profile data. |
Use the Worker - Worker: Primary page (RD_PRSN_PRIMARY) to view and update summary information for a worker.
Navigation:
Enter required information on the Add Worker pages and click the Create Worker button.
This example illustrates the fields and controls on the Worker - Worker: Primary page. You can find definitions for the fields and controls later on this page.
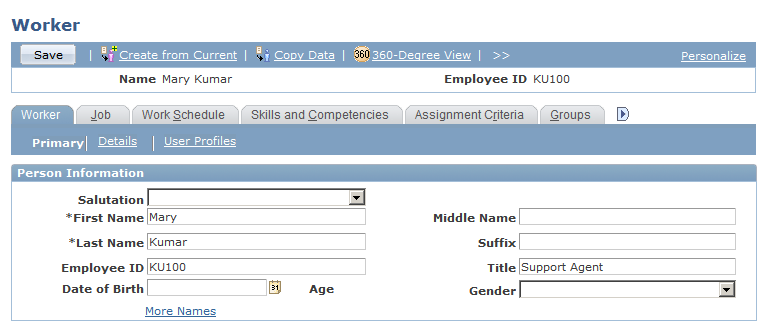
The Worker - Worker: Primary page and the Person - Primary page are identical in appearance and usage, except:
The Worker - Worker: Primary page contains the employee ID and title.
The Person - Primary page contains a setID.
Contact information entries and user-defined fields on the Worker - Worker: Primary page act the same as those on the Person - Primary page.
Use the Worker - Worker: Details page (RD_PRSN_DETAILS) to view and maintain worker profile information.
Navigation:
Click the Details link on the Worker - Primary page.
This example illustrates the fields and controls on the Worker - Worker: Details page. You can find definitions for the fields and controls later on this page.
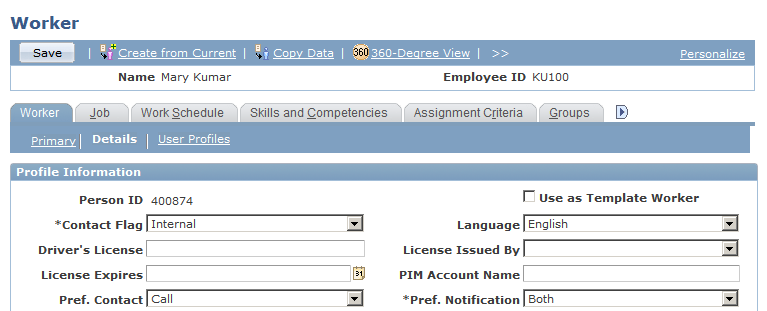
This page is similar in appearance and use to the Person - Details page, except:
Only the Profile Information region appears on the worker page.
On the worker page, the Use as Template Worker field enables you to make this worker's information available as a template for creating a worker.
Use the Worker - Worker: User Profiles page (RD_PERSON_USER) to maintain the worker's user profile.
Navigation:
Click the User Profiles link on the Worker - Primary page.
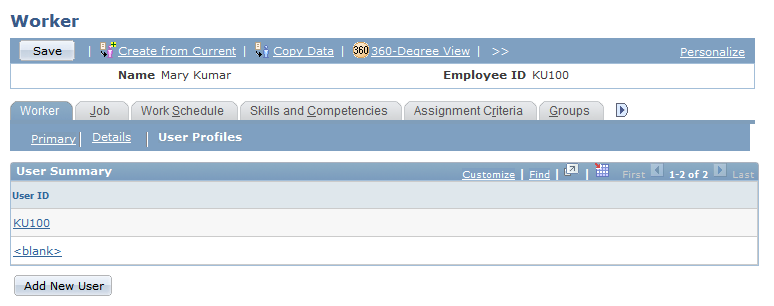
This example illustrates the fields and controls on the Worker - Worker: User Profiles: User Summary page. You can find definitions for the fields and controls later on this page.
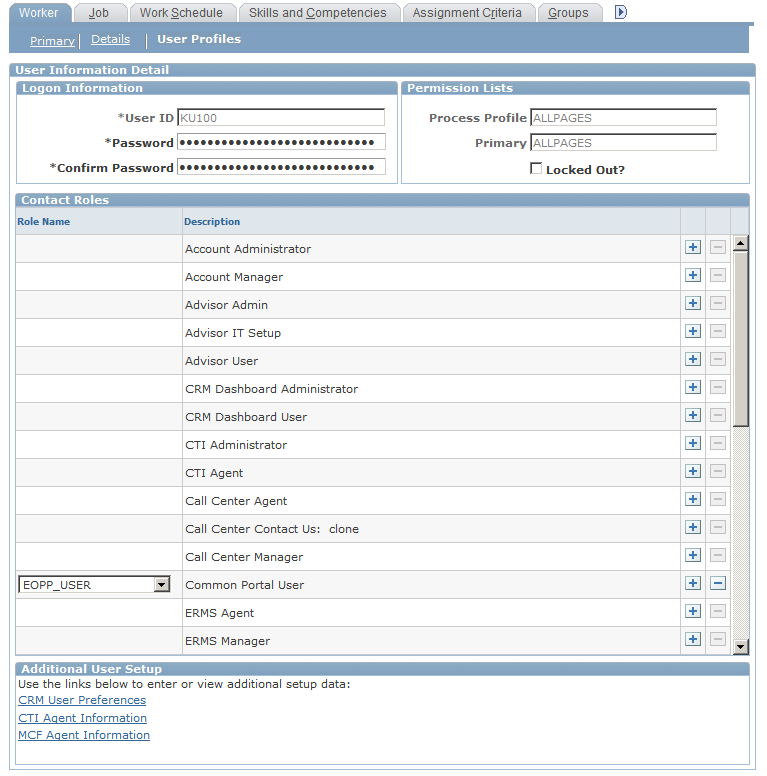
This example illustrates the fields and controls on the Worker - Worker: User Profiles: User Information Detail page. You can find definitions for the fields and controls later on this page.
A list of the user IDs that the worker is authorized to use appears in the User Summary region of this page. You can click a listed user ID to view and modify the details of the user ID or click the Add New User button to add a new user ID to the worker.
This page is similar in appearance and use to the Person - User Profiles page, except that the Additional User Setup region appears on the detail view of the page for workers in the GBL market.
Use the Worker - Job: Job Details page (RD_WORKER_DETAIL) to enter information about the specified worker's job.
Navigation:
Select the Job tab from any page in the Worker component.
This example illustrates the fields and controls on the Worker - Job: Job Details page. You can find definitions for the fields and controls later on this page.

By default, job details for the currently active primary job for the worker appear on this page. All workers can scroll through and view historical, current, and future job information. When the worker has existing job data and requires new job data, for example, a new supervisor ID, job code, or location, you add a new job details row with the new information. By default, the new effective date is the current date.
All users can update and delete effective-dated future job rows within a job assignment as long as at least one effective-dated row for each job assignment remains. All users can view historical, current, and future job data.
Secured Worker Information
You can perform these functions only if your sign-in role has secured worker access:
Modify historical and current-dated job information records.
Delete historical and current job information records.
Modify the worker's employee status.
View the worker's HR (Human Resources) status. Examples of HR status are Active, Retired, and Terminated.
Job Information
Field or Control |
Description |
|---|---|
Worker Role |
Select the worker's role. The worker role indicates the worker's relationship to the organization. Values are Employee and Contingent Worker. This field is available only for the earliest job details record on an assignment. |
Effective Date |
Enter the effective date of the current job details. When you add new job details, the current date appears by default. All workers can view present, current, and future job details. |
Effective Sequence |
Sequences the order in which job detail records appear. When you add a new job details record, the system assigns it sequence number zero and increments the sequence numbers on the existing job details records by one. This is to ensure that job details appear in descending date order. |
Job Indicator |
Indicates that this is the primary job for the assignment. When you add a new job record and mark it as primary, the system recalculates the primary job assignment indicator. |
Source |
Indicates the source of the job record. Values are HCM, indicating that the job information was imported from the HCM system and CRM, indicating that the information was entered in CRM. You cannot update job records that originated in the HCM system. |
GL Business Unit (General Ledger business unit) |
Enter the business unit that is used to account for the worker's costs on the general ledger. |
Physical Location |
Enter a description of the worker's physical location. You can use this field to specify locations such as an office or cubicle number. |
Holiday Schedule |
Select the holiday dates that are valid for this worker. |
Supervisor ID |
Select the supervisor to whom this worker reports. |
Officer Code |
Select an officer code to identify highly compensated employees for the Non-Discrimination Testing - 401(k)/401(m) report (NDT004). |
Manager Level |
Select the worker's management level, if applicable. |
Return to Summary |
Click this link to view the Job Summary page, which lists summary information about the worker's assignments. |
Entering Job Codes, Departments, and Locations
Job Code, Department, and Location Code are controlled by setID. You must enter the corresponding setID, and only values for the setID are valid. This information is defined when you set up worker foundational data.
Use the Worker - Job: Job Summary page (RD_ASGN_JOB) to view assignment summary information for the worker.
Navigation:
Select the Job tab from any page in the Worker component.
Scroll to the bottom of the Job Detail page and click the Return to Summary link.
This example illustrates the fields and controls on the Worker - Job: Job Summary page. You can find definitions for the fields and controls later on this page.
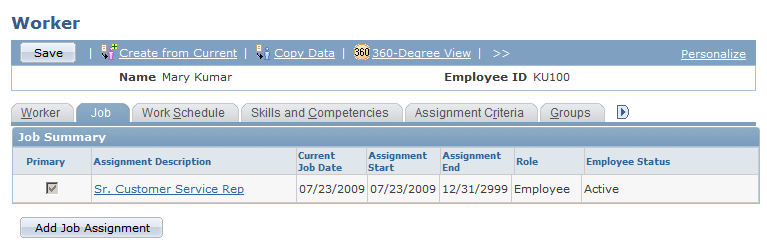
Use this page to view summary information from all the assignments the worker has had and drill down into the job details for any past, current, or future assignment. The system determines the assignment start and assignment end date from the dates of the job detail records for the assignment. The system also determines the primary assignment for the worker
Field or Control |
Description |
|---|---|
Add Job Assignment |
Click to add a new job assignment. New job assignments are added with the Hire action/reason. When you add a new job assignment, the Job Details page appears. |
Use the Worker - Work Schedule page (RD_WORKER_SCHEDULE) to define default workdays for the specified worker.
Navigation:
Select the Work Schedule tab from any page in the Worker component.
This example illustrates the fields and controls on the Worker - Work Schedule page. You can find definitions for the fields and controls later on this page.
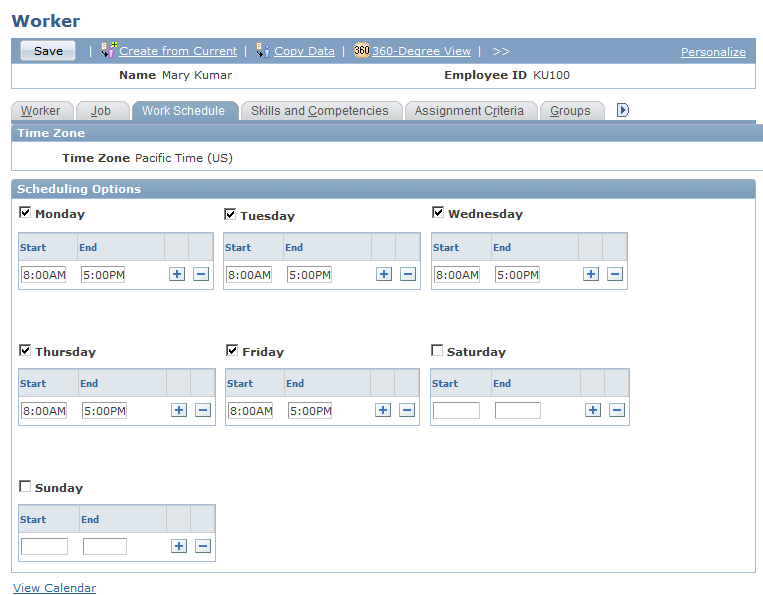
When evaluating worker availability for assignments, the system checks standard work week information that you define for the worker on this page.
Select the default work days for the specified person. The Start and End fields define the default hours of operation for the person. Enter start and end times for each work period in the day. You can enter multiple work periods to represent lunch breaks, shifts, and so forth. By default, the system populates these values with the standard work week information that you define for the installation.
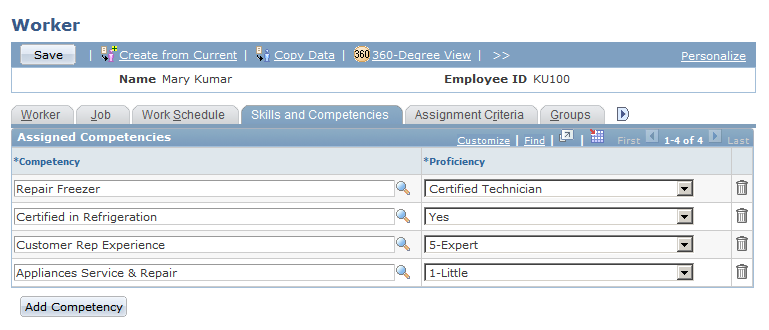
Use the Worker - Skills and Competencies page (RD_WORKER_CMP_PROF) to associate the specified worker with a competency and define the worker's level of proficiency for the competency.
Navigation:
Select the Skills and Competencies tab from any page in the Worker component.
This example illustrates the fields and controls on the Worker - Skills and Competencies page. You can find definitions for the fields and controls later on this page.
Important! Before assigning competencies on the Worker - Skills and Competencies page in CRM, you must select the Use Only Evaluation Type installation option.
The Person Competency EIP loads competency data with all evaluation types into CRM. Although the evaluation type does not appear in CRM, CRM pages list only the competency records that match the specified evaluation type. If you do not specify an evaluation type during the installation, competency records for all evaluation types are available, which can degrade system performance.
Field or Control |
Description |
|---|---|
Description |
Select a competency that is associated with the worker. In CRM, you establish competencies on the Competencies page under |
Proficiency |
Enter the worker's level of expertise for the competency. The rating model that is defined for the competency on the Competencies page determines the available proficiency values. In PeopleSoft FieldService, the system checks a worker's proficiency level for a competency to determine whether the worker is qualified to perform work on a service order that requires the competency. In PeopleSoft Support and PeopleSoft HelpDesk, the system checks a worker's proficiency level for a competency to determine whether the worker is qualified to perform work on a case that requires expertise in the problem type. |
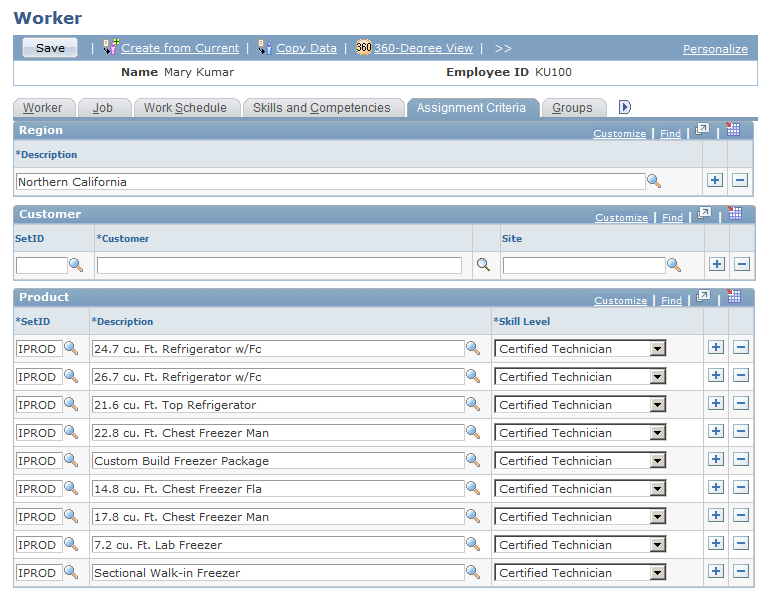
Use the Worker - Assignment Criteria page (RD_WORKER_CRITERIA) to define criteria that the assignment engine uses to match the specified worker to a case or service order.
Navigation:
Select the Assignment Criteria tab from any page in the Worker component.
This example illustrates the fields and controls on the Worker - Assignment Criteria page (1 of 2). You can find definitions for the fields and controls later on this page.
This example illustrates the fields and controls on the Worker - Assignment Criteria page (2 of 2). You can find definitions for the fields and controls later on this page.
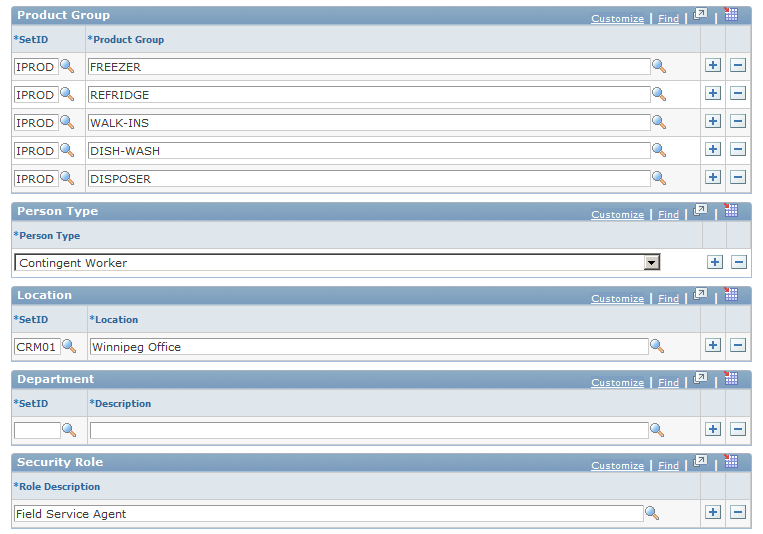
The system uses the values in the Customer, Region, Product, Product Group, Location, Department, and Role fields to evaluate how suitable a worker is for assignment to the service order, case, or change request task relative to other workers in the provider group.
When you perform an assignment search from a case, service order, or change request task, the assignment engine calculates a point value for each criteria value on the service order, case, or change request task that the worker matches based on the weight, or relative importance, of the match. The sum of the point values divided by the total possible points for the service order or case becomes the worker's fit score. Failure to match individual criteria lowers the worker's total fit score but does not exclude the worker from the list of suggested assignment candidates. Failure to match any criteria excludes the worker from the suggested candidates.
The assignment engine uses a different set of assignment criteria values for cases in PeopleSoft HelpDesk, cases in PeopleSoft Support, service orders in PeopleSoft FieldService, or tasks in PeopleSoft Change Management. For help desk cases, the assignment engine matches values for location, product, and product group. For both support cases and service orders, the assignment engine matches values for customer, site, region, product, and product group. For tasks in Change Management, the assignment engine matches values for location, department, either product or product group, and role.
Region
Enter the worker's region. The assignment engine matches the worker's region to the region on the service order or case.
Customer
If the worker can support the customer at any site, enter the customer and leave the Site field blank. You can also select a site without specifying a customer.
Product
The values for the Proficiency field depend on the product rating model that you specify for the setID when you set up the assignment engine.
Product Group
Enter the product groups that the worker supports and the setIDs of the product groups.
Location
Enter the worker's location and the location setID. The assignment engine matches the worker's location for change management tasks.
Department
Enter the worker's department and setID of the department.
Role
Enter the description of the worker's role. This is used to assign change management tasks to workers.
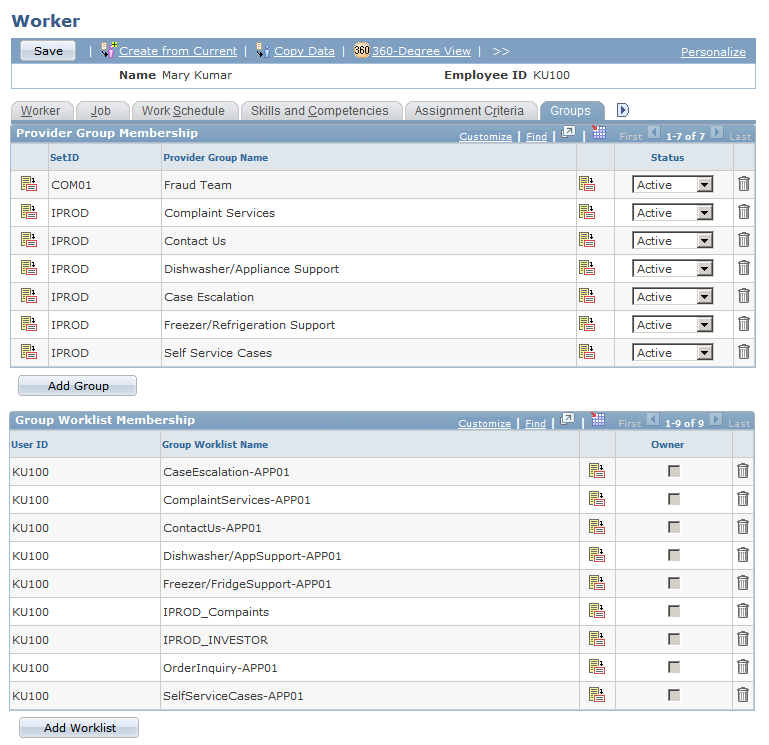
Use the Worker - Groups page (RD_WORKER_GROUPS) to associate the worker with provider groups and group worklists.
Navigation:
Select the Groups tab from any page in the Worker component.
This example illustrates the fields and controls on the Worker - Groups page. You can find definitions for the fields and controls later on this page.
Use the Worker - Storage Locations page (RD_WORK_STORLOC) to define inventory storage locations that are associated with good and defective storage locations on a field service worker's truck.
Navigation:
Select the Storage Locations tab from any page in the Worker component.
This example illustrates the fields and controls on the Worker - Storage Locations page. You can find definitions for the fields and controls later on this page.
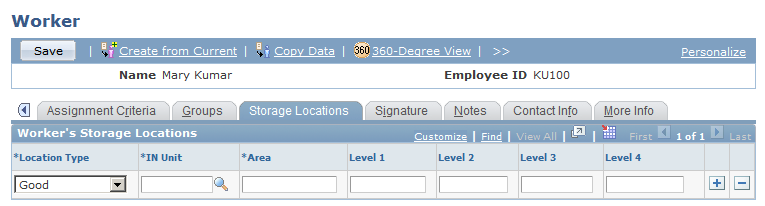
Storage location information is required only for workers who perform field service activities. Material movement transactions that are initiated from the Manage Material page in PeopleSoft FieldService update quantities in the inventory storage locations that are associated with the lead technician on the service order line.
You must define one and only one good truck stock location and one and only one defective truck stock location for each field service worker. The good and defective locations can't have the same storage location definition—the area and up to four storage levels—in PeopleSoft Inventory or a third-party inventory system.
Field or Control |
Description |
|---|---|
Location Type |
Select the type of material location that is on the truck. Values are: Good: The location for material that is used to complete a service request at a customer's site. Defective: The location of material that was removed from a customer's site. Typically, the worker returns this stock to the central distribution center for inspection or scrap processing. |
IN Unit (inventory unit) |
Enter the identification of the inventory business unit with the material storage location that corresponds to the material location type that is on the worker's truck. You define the inventory business unit in PeopleSoft Inventory or a third-party inventory system and insert it in the CRM system by using the Business Unit EIP. |
Area, Level 1, Level 2, Level 3, and Level 4 |
Enter the material storage area in PeopleSoft Inventory or a third-party inventory system that corresponds to the material location type that is on the worker's truck. You can define a storage location address in an inventory system by using a storage area and up to four levels representing a physical subdivision of the storage area, such as aisles, rows, shelves, and bins. |
Important! No prompts are available for the storage location definition fields Area, Level 1, Level 2, Level 3, and Level 4. Unlike business units, storage location information is not synchronized with an inventory system. You must know the correct storage location definitions to enter. Material movement transactions that are initiated from the Manage Material page are successfully recorded in the inventory system only if the storage location definition that you enter is a valid storage location for the inventory business unit that is referenced in the IN Unit field.
See the product documentation for PeopleSoft Inventory.
Use the Worker - Signature page (RD_WORKER_WF_SIG) to define a default signature to use when the specified worker sends manual notifications.
Navigation:
Select the Signature tab from any page in the Worker component.
In the Notification Signature field, enter the default signature that is used when someone sends manual notifications. When this person clicks the Notification button from a transaction and accesses the Outbound Notification page, this signature appears in the Message field.