Administering Content References
This section discusses how to define and administer content reference definitions.
Access the Content Ref Administration page ( Navigate the portal registry hierarchy until you are in the parent folder for the content reference; then click the link for an existing content reference or click the Add Content Reference link.)
This example illustrates the fields and controls on the Content Ref Administration page. You can find definitions for the fields and controls later on this page.
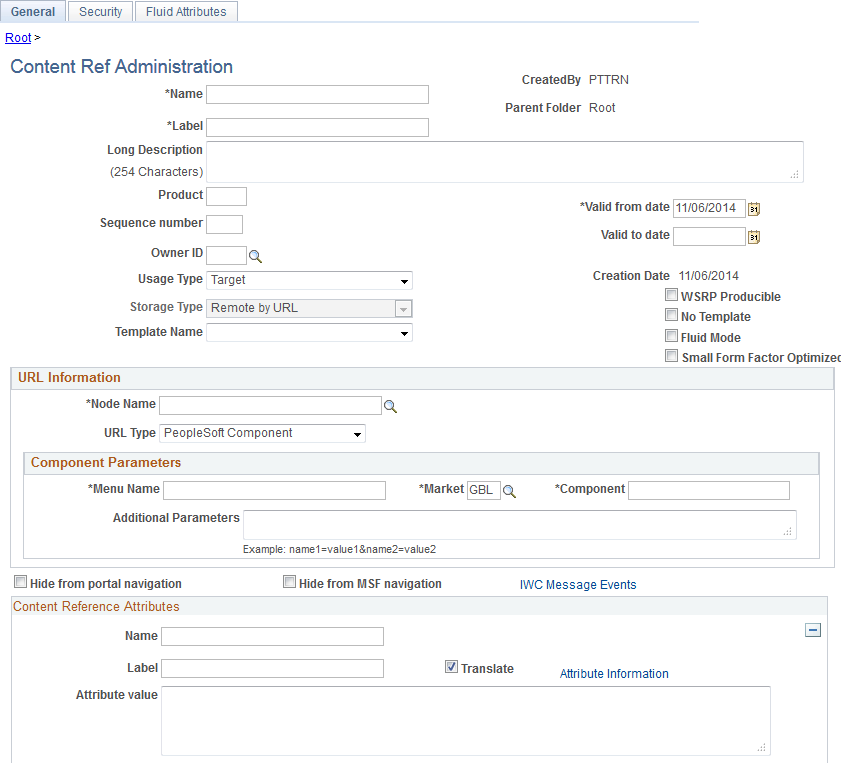
Note: Many of the fields described in this section appear only when you enter certain field values.
Many of these fields are similar to fields on the Folder Administration page.
When you save a content reference that points to a PeopleSoft component or script on the default local node, the security settings for the content reference are inherited automatically from the menu or script security settings. Any permission lists or roles that you enter on the Content Reference Security page before saving the content reference are deleted and replaced by those of the component or script. These new security settings are also propagated up the folder hierarchy. This ensures that the content reference is visible and all folders are viewable, enabling users to navigate to the component.
Warning! Do not add internal component-based PeopleSoft content references using the Content Ref Administration page. Use the registration wizard instead so that information is consistent between Application Designer and the portal. Any changes made to the menu definition in Application Designer and not made to the portal content reference definition break the content reference. The portal navigation system uses the portal registry, not the internal location of menu definitions in Application Designer.
See Understanding the Registration Wizard.
This table describes the fields that appear on the Content Ref Administration page:
Field or Control |
Description |
|---|---|
Usage Type |
Select from these usage types:
Based on the value that you select, the application shows, hides, disables, and enables the other fields on the page so that only the fields that are relevant to the usage type are available. For example, if you select a usage type of Pagelet, then Pagelet Attributes group box appears in which you can specify the default column, the refresh time, and other properties that apply specifically to pagelets. For a typical PeopleSoft application page, set the usage type to Target (the default value) and the URL type to PeopleSoft Component. With a usage type of target, the content will populate the target area on the page. Note: An additional group box titled Homepage tab attributes is displayed when either Fluid Homepage or Homepage tab is selected as the usage type. See Creating and Configuring Homepage Definitions for more information. |
Storage Type |
This field is enabled when you selected a usage type of Frame template or HTML template. Select Local (in HTML Catalog) or the default value, Remote by URL. |
HTML Area |
This text area is enabled when you select a usage type of HTML template or Frame Template and Local (in HTML Catalog) as the storage type. An HTML template uses the HTML that is entered into the HTML area of a content reference that is located in the Templates folder, which you find within the Portal Objects folder. Bind variables cannot be used within the HTML area. The HTML area includes any HTML that is required for the template itself, plus tags that specify the URLs for template pagelets. |
Template Name |
Select the template for this page. If you leave this field blank, the portal servlet automatically uses the default template of the node at runtime. The node default template is set up on the General Settings page. If a node default template has not been specified, it uses the portal default template. |
WSRP Producible |
Note: This option appears only for usage types of Target and Pagelet. Select this option for PeopleSoft content that you intend to expose for remote WSRP portals to consume. Important! Do not select this option for fluid components. Fluid components and pages are not WSRP producible. |
No Template |
Select this option to have the target content not wrapped with a portal template (by the psp servlet) at runtime. This option is selected automatically for certain types of fluid content; manually select it for all other types of fluid content. For classic content, it is typically not desirable to select this option. When this check box is selected, the Template Name field is hidden. Note: This option appears only for usage type of Target. |
Fluid Mode |
Manually select this option only for:
Note: This option appears only for usage type of Target. Note: For local component-based fluid content, this setting is maintained on the component definition in Application Designer and appears as display-only here. |
Display on Small Form Factor |
Manually select this option only if this content reference has been designed to display and perform well on small form factor devices such as smart phones. If this option is deselected, any tile defined for this content reference will not be available on fluid homepages or fluid dashboards when the user is signed in on a small form factor device. Note: This option appears only for usage type of Target. Note: For local component-based fluid content, this setting is maintained on the component definition in Application Designer and appears as display-only here. |
Create Content Reference Link |
Click to create or edit a content reference link. |
Add Content Reference |
Click to add a content reference. |
Test Content Reference |
Click to test a content reference. |
Hide from portal navigation |
Select to hide the content reference from menu navigation. Note: If this option is selected and then this content reference is added to a permission list, the permission list is not added to the parent folder. However, if the content reference is already added to a permission list and then this option is selected, the permission list is not removed from the parent folder. |
Hide from MSF Navigation |
MSF is not currently supported. |
IWC Message Events |
Click to access the Interwindow Communications page. |
URL Information
The fields that appear in this group box are based on the selection that you make in the URL Type field.
Field or Control |
Description |
|---|---|
Node Name |
Specify the node that hosts this content reference. Enter LOCAL_NODE to associate the content reference with the default local node (as defined on the Node Definitions page). Note: In a clustered environment, when the Usage Type is set to Pagelet, the node name should not be defined as LOCAL_NODE and must be set to the actual portal host node for the pagelet. |
URL Type |
Select from these URL types:
Note: The availability of these options depends on the selected usage type. |
Additional Parameters |
Enter query string parameters to be appended onto a PeopleSoft component or PeopleSoft script. For example, enter emplid=8001. |
Pagelet Attributes
The Pagelet Attributes group box enables you to manage pagelet behavior and appearance.
Content Reference Attributes
Content reference attributes provide a framework to specify and store free-form information about a content reference. For example, you can use content reference attributes to specify and store keywords, help information, related content properties, and related links for content references.
In addition, portal-aware applications can use content reference attribute information for application-specific processing. Portal-aware applications are those that:
Know about the portal registry and API.
Know how to get information from a content reference.
Contain code that can access the properties of content references and do something meaningful with the information.
Field or Control |
Description |
|---|---|
Name |
Enter an object name to identify the attribute programmatically. This name is not displayed to the user. Note: The name can consist of letters, digits, and underscores ( _ ) only. It cannot contain any spaces and cannot begin with a digit. |
Translate |
Select to specify that the label and attribute values are translated. |
Attribute Information |
Click to create related links. You can create related links only after entering RELLINK in the Name field. |
Label |
Enter a descriptive name for the attribute to display to the user. The label is required only if Translate is selected. |
Attribute value |
Enter information about the attribute that the portal uses to apply the attribute to the content reference. |
Links
This grid appears only if content reference links that connect to this content reference exist. Click Link Definition to view the definition of each listed content reference link.
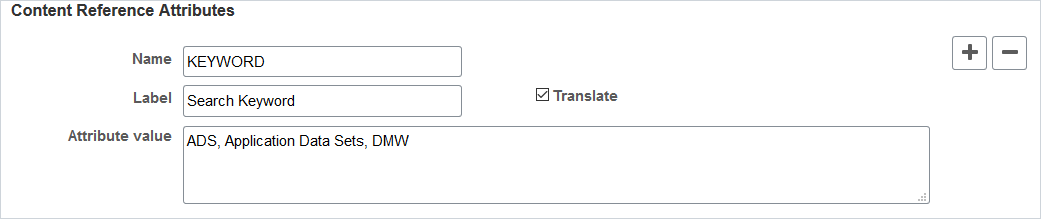
Available Content Reference Attributes
This example illustrates the fields in the Content Reference Attributes group box using the KEYWORD attribute as an example.
This table describes the content reference attributes that your PeopleTools portal recognizes:
|
Content Reference Attribute Name |
Description |
|---|---|
|
BANNERTILEHANDLER |
Use this attribute to identify the custom application class implementation of PTNUI:Banner:BannerTile that applies to this contextual fluid dashboard. |
|
BCUPDATELABEL |
Use this attribute to override the default label in the breadcrumbs. See Overriding Default Breadcrumbs Using Content Reference Attributes. |
|
BCUPDATETYPE |
Use this attribute to override the default breadcrumb update behavior. See Overriding Default Breadcrumbs Using Content Reference Attributes. |
|
BGLOBALVALUES |
Use this attribute to prevent pagelets from loading in parallel. Pagelets with global variables should not be loaded in parallel; such pagelets must be loaded sequentially. When the parallelLoading web profile property is set to true, you must also add the BGLOBALVALUES content reference attribute to the content reference definition for each pagelet that includes global variables; set the BGLOBALVALUES attribute to true. Then, these pagelets will be loaded sequentially while all other pagelets will be loaded in parallel. |
|
KEYWORD KEYWORD_CUST |
Use these attributes to enter keywords or keyword phrases to be indexed by the PeopleSoft Search Framework as part of the PTPORTALREGISTRY (the menu) search index. Keywords can be used to add alternative search terms not found in the content reference label or description. Separate search keywords or phrases by commas. Select the Translate check box when using these attributes. The example preceding this table illustrates the use of the KEYWORD attribute. The KEYWORD attribute is reserved for use by PeopleSoft application development teams. The KEYWORD_CUST attribute is for use by customers. |
|
KEYWORD KEYWORD_LNG |
These attributes are added by the system when keywords are added to specific portal definitions such as classic WorkCenters, classic dashboards, and classic pagelet definitions. Then, the keywords are available on the Pagelet Search page. See Searching for and Importing Pagelets and Tiles. |
|
Name of a default homepage object or image |
Use this attribute to override a default HTML object or image used for homepage components, such as tabs and pagelets, by providing the name of an alternative HTML object or image. Note: You can override only a specified set of homepage objects and images. |
|
IMAGE_BIND_12 to IMAGE_BIND_26 |
Use these attributes (numbered from 12 to 26) to insert additional custom images on a homepage tab. |
|
NAVNEWWIN |
Use this attribute to specify that the component or page always opens in a new browser window. Note: This attribute applies to links on navigation collection template pagelets that appear in the pagelet area of a WorkCenter page. |
|
NAVTOPWIN |
Use this attribute to specify that the component or page opens in the current browser window and replaces the current page completely. Note: This option affects only the link behavior when it is rendered in a navigation collection template pagelet inside the pagelet area of a WorkCenter page. |
|
PSCACHECONTROL |
Use this attribute to implement caching for individual pagelets and targets based on user, role, or application. |
|
PORTAL_BANNER_PGLT |
Use this attribute to create a banner pagelet, which can appear at the top of a homepage or dashboard page and spans the width of the page. Note: To use a pagelet as a banner pagelet, it has to be added to a homepage tab or dashboard page as a required-fixed pagelet in the first column. |
|
PORTAL_ENCODING_OVERRIDE |
Use this attribute to override the character set encoding that is used by the content reference. |
|
PORTAL_HP_COMPONENT |
Use this attribute to hide pagelet attributes such as the title bar, the borders, or both. |
|
PSTIMEOUT |
Use this attribute to specify how long the portal should wait for a pagelet to load before it considers the pagelet unavailable. |
|
PT_PORTAL_PGLT_HDR_IMG |
Use this attribute to add an icon to the header of the pagelet. The attribute value should be the name of the image definition that is stored in the image catalog using Application Designer. |
|
PTPPB_PAGELET_HELP_LINK |
Use this attribute to specify a URL that you want to associate with the help link for a pagelet. Note: This attribute takes priority over a PeopleSoft Help ID if both properties are set. |
|
RCF_SERVICE_PARAMETER |
Use this attribute to provide related content service parameters in name/label pairs for the content reference. The presence of this attribute changes the default behavior of component-based URLs and supplants all parameters with those that you enter in the Value field. See Creating and Managing Related Content Service Definitions. |
|
RELLINK |
Use this attribute to create related links for the content reference. |
|
TILEAPPFILTER |
Use this attribute to specify a custom application class to hide or display this tile on fluid homepages and dashboards. |
Content Reference Type Parameters
This table summarizes the valid combinations of usage type, storage type, and URL type or key HTML content supported for content references:
|
Usage Type |
Storage Type |
URL Type or Key HTML Content |
|---|---|---|
|
Frame template |
Remote by URL |
PeopleSoft Script |
|
Frame template |
Remote by URL |
Non-PeopleSoft URL |
|
Frame template |
Local (in HTML Catalog) |
Target or IClientComponent element |
|
Target |
Remote by URL |
PeopleSoft Component |
|
HTML template |
Local (in HTML Catalog) |
Target, Pagelet, or Source element |
|
HTML template |
Remote by URL |
PeopleSoft Script |
|
HTML template |
Remote by URL |
Non-PeopleSoft URL |
|
Homepage tab |
Local (in HTML Catalog) |
PeopleSoft Homepage tab |
|
Inline Frame template |
Local (in HTML Catalog) |
Target or Pagelet component |
|
Inline Frame template |
Remote by URL |
PeopleSoft Script |
|
Inline Frame template |
Remote by URL |
Non-PeopleSoft URL |
|
Pagelet |
Remote by URL |
Non-PeopleSoft URL |
|
Pagelet |
Remote by URL |
PeopleSoft Component |
|
Pagelet |
Remote by URL |
PeopleSoft Script |
|
Pagelet |
Remote by URL |
PeopleSoft Generic URL |
|
Pagelet |
Remote by URL |
PeopleSoft Worklist URL |
|
Pagelet |
Remote by URL |
Remote Portlet |
|
Target |
Remote by URL |
PeopleSoft Generic URL |
|
Target |
Remote by URL |
PeopleSoft Script |
|
Target |
Remote by URL |
PeopleSoft Worklist URL |
|
Target |
Remote by URL |
Non-PeopleSoft URL |
|
Target |
Remote by URL |
Remote Portlet |
You can create related links for a portal page using the RELLINK content reference attribute. You can create related links to external sites, to internal sites, and to other portal pages.
Note: Related links can be implemented with your choice of template on the content reference. Using the PeopleTools Related Links template displays the related links for the content reference, but not the portal menu navigation.
To create related links:
Define the RELLINK content reference attribute.
Create related links groups.
Create related links for each group.
Test the related links.
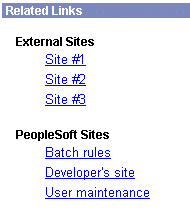
This example illustrates related links for a content reference.
This table describes the page elements shown in the sample page:
|
Page Element |
Description |
|---|---|
|
Related Links |
RELLINK content reference attribute with the label Related Links. |
|
External Sites |
A related link group defined with the label External Sites. |
|
Site #1, Site #2, Site #3 |
Related links for the External Sites group. |
|
PeopleSoft Sites |
A related link group defined with the label PeopleSoft Sites. |
|
Batch rules, Developers' site, and User maintenance |
Related links for the PeopleSoft Sites group. |
Defining the RELLINK Content Reference Attribute
To define a related link content reference attribute:
Access the Content Ref Administration page (Navigate to the appropriate content reference; then click the Edit link.)
Enter RELATEDLINKS_TEMPLATE in the Template Name field.
In the Name field of the Content Reference Attributes region, enter RELLINK.
After you enter this value and move out of the field, the Attribute Information link changes to Edit Related Links.
Verify that the Translate check box is selected.
Enter a label for the related links attribute.
Note: You do not need to enter any information in the Attribute Value field. After you create the related link group and the related links, the system populates this field with all defined attributes as a string.
Creating Related Link Groups
Access the Related Links Group (PORTAL_RLNK_ADM) page.
To create a related link group:
In the Related Link Groups Label field, enter a name.
This name is the heading under which you place related links.
To create additional related link groups, click Add and repeat step 1.
Creating Related Links
To create a link:
In the Related Links region on the Related Links Group (PORTAL_RLNK_ADM) page, enter a name in the Related Link URL Label field.
This name appears as a link under the group name.
If you're linking to an internal site, select a node name from the list.
If you're linking to an external site, leave this field blank.
In the Related Link URL field, enter URL information for the link.
If the link is to an internal site, enter the URL or URI. The URL or URI can be to an internal site, to a portal, and so on. If you specified a value for the Portal URI Text field on the node definition, you can enter a specific document name as the target. The name is appended to the URI text for a full URL.
If the link is to an external site, enter the URL.
To define additional links for the group, click Add and repeat steps 2 and 3.
Click OK to save the entry and return to the Content Ref Administration page.
The Attribute Value field is populated with an XML-type formatted string. This string contains all the related link data and is stored in the PORTAL_ATTR_VAL field of the PSPRSMATTRVAL record for the content reference specified in the PORTAL_OBJNAME field. The following example shows a generated XML-type formatted string:
<GRPLBL>Worklist Pages
		<URLLBL>Worklist Details</URLLBL>
		<CP>Portal</CP>		<URL>ICType=Panel&Menu=WORKLIST&Market=GBL&PanelGroupName=WORKLIST_DETAILS
		</URL>
		<URLLBL>Worklist Monitor</URLLBL>
		<CP>Portal</CP>		<URL>ICType=Panel&Menu=WORKFLOW_ADMINISTRATOR&Market=GBL&PanelGroupName=WF_MONITOR_01
		</URL>
	</GRPLBL>

	<GRPLBL>Tasks
		<URLLBL>Task List Summary</URLLBL>
		<CP>Portal</CP>
		<URL>ICType=Panel&Menu=PORTAL_COMPONENTS&Market=GBL&PanelGroupName=EO_PE_TASK_LIST		</URL>
</GRPLBL>
Testing Related Links
You should test related links to view how the page appears to users, ensure that the labels are correct, and verify that the links function properly. To test related links, click Test Content Reference on the Content Ref Administration page just above the URL Information region.
Note that:
If the portal cache is enabled on the web server, the related link template does not appear for a content reference page accessed from the menu until the cache expires.
Related link URLs are displayed only when a user has security access to the URLs.
To grant security access to a related link URL, register the related link URL as a separate content reference and associate permission lists with it.
If the related link is not separately registered, then it is treated as having public access.
If a related link group contains no URLs to which the user has security access, the related link group is hidden. If the user does not have access to any of the related links associated with the target page, then the related links section of the template is hidden.
If the target page does not display any related links, ensure that:
The application and portal databases are registered as content providers.
Also check for data-entry errors.
The templates are registered in Application Designer with the correct names.
If the templates are registered, check for data-entry errors.
The correct related link template is specified for the target page.
Also ensure that the value of the PORTAL_TEMPL_NAME field in the PSPRSMDEFN record displays a correct related link template
The RELLINK string was saved on the target page in the content registry.
Check whether an XML string appears in the Attribute Value field on the Content Ref Administration page. If not, then delete and reenter the RELLINK attribute for all the related link information.
You assigned security in the registry to the user for the content references listed as related link URLs.
If not, assign security using the Content Reference Security page for registered related link URLs.
Access the Content Reference Security page (Select Click the Edit link for a content reference; then select the Security page.)
This example illustrates the fields and controls on the Content Reference Security page. You can find definitions for the fields and controls later on this page.
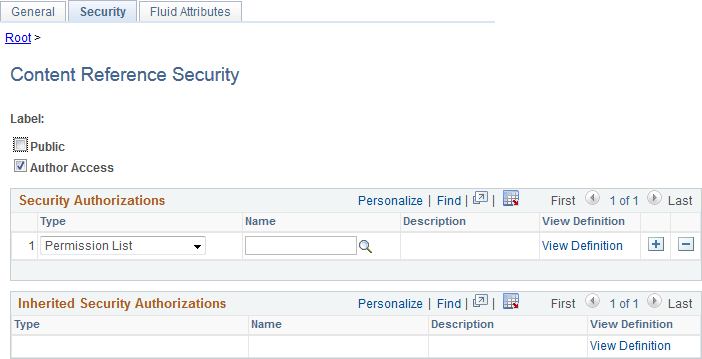
This page is similar to the Folder Security page. You can specify the permission lists and roles that grant security access to the content reference.
Certain URL types inherit the security permission list and role authorizations from the referenced object. For these URL types, you can view, but not modify the security by using the Content Reference Security page. All fields except Public and Author Access are display-only. This is the list of URL types that inherit security authorization:
PeopleSoft Component.
Worklist.
PeopleSoft Script.
When you save a content reference that points to a PeopleSoft component or script on the default local node, the security settings for the content reference are inherited automatically from the menu or script security settings. Any permission lists or roles that you entered on the Content Reference Security page before saving the content reference are deleted and replaced by those of the component or script. These new security settings are also propagated up the folder hierarchy. This ensures that the content reference is visible and all folders are viewable, enabling users to navigate to the component.
Note: If you copy, move, or add a content reference to a folder, the security settings of the content reference are propagated up the folder hierarchy. This ensures that the content reference is visible and all folders are viewable, and it enables users to navigate to the content reference. If you remove the content reference from that folder, the security settings that were applied when it was added to the folder are also removed from the folder hierarchy, without disturbing any settings still required for other content references remaining in that folder.
Note: While a content reference link does inherit cascaded security from it's own parent folder, it does not inherit cascaded security from the linked-to content reference's parent folder.
Field or Control |
Description |
|---|---|
Public |
Select to make the content reference available to all users. When this check box is selected, all other fields except Label are hidden. |
Author Access |
Select to allow content reference access to the creator of the definition, regardless of how other permissions are set. This setting is useful for troubleshooting and testing purposes. |
Access the Fluid Attributes page (Select Click the Edit link for a content reference; then select the Fluid Attributes tab.)
This example illustrates the fields and controls on the Fluid Attributes page. You can find definitions for the fields and controls later on this page.
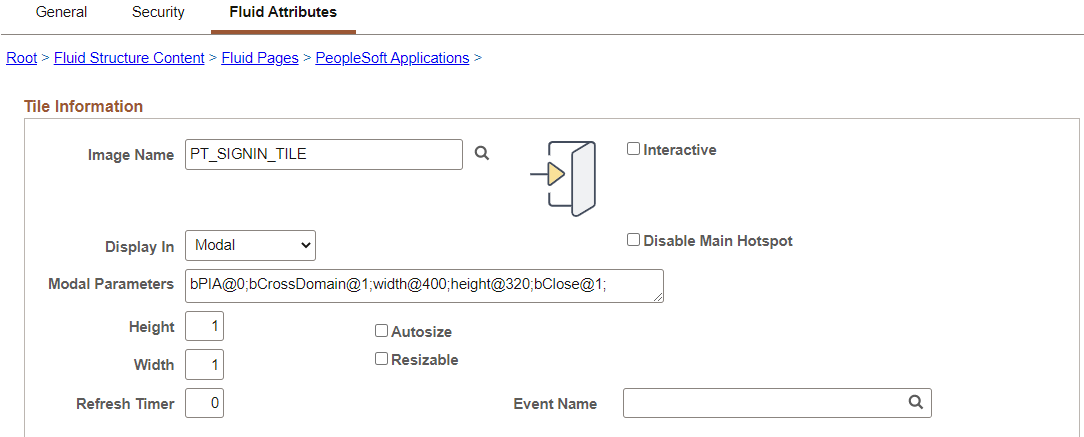
Tile Information
Use the Fluid Attributes page to configure the behavior and appearance of fluid content such as tiles, embedded related content, and related information. Certain fields pertain to tile definitions only while others pertain to all types of fluid content.
Field or Control |
Description |
|---|---|
Image Name |
Click the Image lookup button to display the Browse Image Catalog page, which allows you to select an image (in SVG format only) from the database to display a custom static image as the fluid content. Otherwise the default image is displayed. See the following section, "Using the Browse Image Catalog Page" for more information. Note: When dynamic content is also configured for a tile, this static image is displayed only until the dynamic content is loaded. |
Interactive |
Select this option to display the fluid content as interactive, which allows users to enter data or click buttons within the fluid content. Since interactive fluid content require more resources than non-interactive ones, select this option only as needed. Important! You must also set dynamic tile content for the fluid content to be interactive; otherwise, a static content is displayed. See the following sections for more information. Important! While embedded related content can be defined as interactive, you should be aware of the limitations. See the section, “Limitations with Interactive Grouplets,” in Fluid Related Content for more information. |
Display In |
Control how the target transaction or content appears once a user taps the tile. Options are:
|
Disable Main Hotspot |
Select this option to allow links that are displayed dynamically within the tile to be available and usable. Selecting this option disables clicking the tile to display the target content defined for the tile. |
Modal Parameters |
Enter custom modal options. See Modal Options for more information. |
Height |
Set the height of the tile. The default dimensions of a tile are 1 tile unit by 1 tile unit. Tiles up to 8x8 are supported. Note the following conditions and limitations with respect to the height and width of a tile:
See the following section titled “Tile Height and Width” for a table of tile widths and heights from 1 to 8. |
Width |
Set the width of the tile. |
Autosize |
Select this option to allow the fluid content to dynamically resize itself based on the size of the content. Note the following conditions and limitations with respect to the autosize option:
|
Resizable |
Select this option to allow the tile to be redisplayed at the specified alternate dimensions. Note the following conditions and limitations with respect to the resizable option:
|
Alternate Height |
Set the alternate height for a resizable tile. |
Alternate Width |
Set the alternate width for a resizable tile. |
Refresh Timer |
Enter the time in seconds to set an automatic refresh period for dynamic content on a tile. When the timer limit has been reached, the system re-draws the tile so that it displays the current data, such as in the case with chart. The default value of 0 disables any automatic refresh. Note: The system enforces a 10 second minimum limit. Any value entered less than 10 seconds is ignored and is treated as 10 seconds. When setting this value, be sure to monitor performance of the page refreshes and adjust accordingly. |
Event Name |
Select the event name to subscribe to a push notification event defined on the server. Subscribing to an event allows the tile content to be updated by the event. See Understanding the Push Notification Framework and Defining Eventsfor more information on defining push notification events. |
Dynamic Tile ContentURL Type |
If you want the tile, embedded related content ,or related information to display dynamic content, select one of these options:
See the following sections for information on each option. Selecting None results in the system displaying the selected static image or a default static image if no image is defined on the content reference. |
Dynamic Tile ContentSame as Main CREF |
Click the Same as Main CREF button to reset the dynamic content URL type and parameters to be the same as those already defined on the Content Ref Administration (General) page. Important! For PeopleSoft components (and for PeopleSoft generic URLs starting with c/ which represent a component URL), the target content URL and the dynamic content URL are required to identify different components to prevent data integrity errors in the component buffer. When the target content (on the General page) is one of these two types, the Same as Main CREF button is not displayed. For the dynamic content, you must manually define a component different from the target component before you can save the content reference definition. See Limitations on Accessing a Component as a Grouplet and Then in a Standalone Manner for more information. |
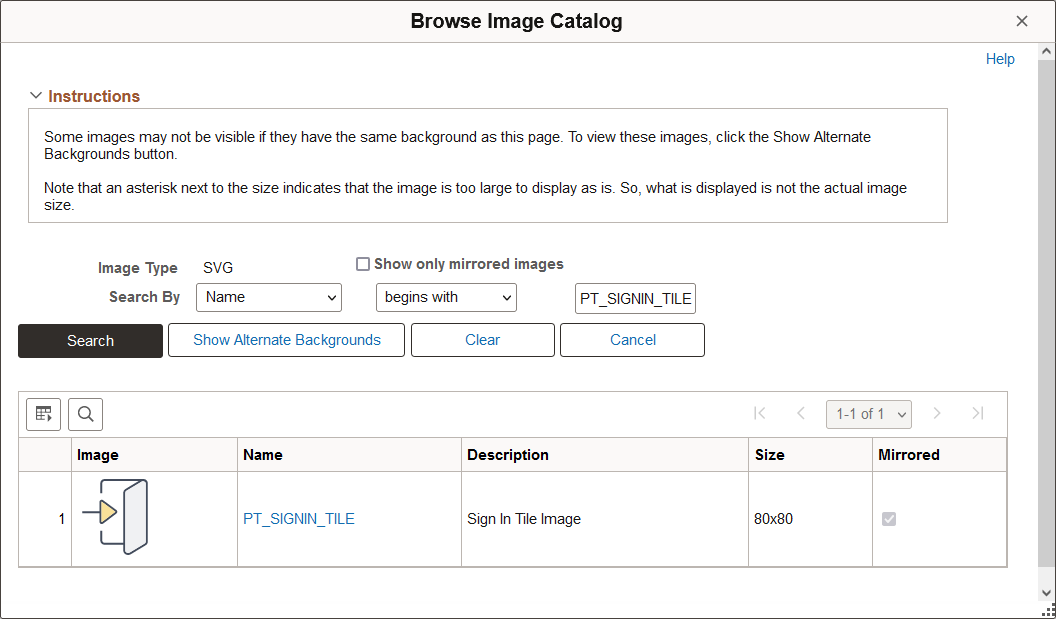
Using the Browse Image Catalog Page
Use the Browse Image Catalog page to select an SVG from the database to display a custom static image as the fluid content.
This example illustrates the fields and controls on the Browse Image Catalog page.
|
Field or Control |
Description |
|---|---|
|
Image Type |
SVG is selected by default and cannot be changed. |
|
Show only mirrored images |
Select Yes to only retrieve images that are mirrored. Otherwise, both mirrored and unmirrored images are retrieved. |
|
Search By |
Select Name or Description and additional search criteria to limit the search results. |
|
Search |
Click the Search button to retrieve the images meeting the search criteria from the database. |
|
Show Alternate Backgrounds |
Click the Show Alternate Backgrounds button to redisplay each image in the current grid on three background colors: white, gray, and black. This option allows you to view white images, which are not visible on the default white background. In this example, the white check mark is visible on the gray and black backgrounds:
|
|
Clear |
Click the Clear button to clear both the search criteria and the grid. |
|
Cancel |
Click the Cancel button to close the secondary window. |
|
Name |
Select an image by name to use it as the custom static image. |

Tile Height and Width
PeopleTools supports tile sizes from 1 tile unit by 1 tile unit up to 8x8. Tile units are device dependent, which means that tiles are not actually square. The actual pixel width and height of a tile depends on the device type—either small form factor (SFF) or non-SFF as illustrated in the following table:
|
Width |
SFF |
Non-SFF |
Height |
SFF |
Non-SFF |
|---|---|---|---|---|---|
|
1 |
152 |
250 |
1 |
120 |
197 |
|
2 |
309 |
510 |
2 |
245 |
404 |
|
3 |
466 |
770 |
3 |
370 |
611 |
|
4 |
623 |
1030 |
4 |
495 |
818 |
|
5 |
780 |
1290 |
5 |
620 |
1025 |
|
6 |
937 |
1550 |
6 |
745 |
1232 |
|
7 |
1094 |
1810 |
7 |
870 |
1439 |
|
8 |
1251 |
2070 |
8 |
995 |
1646 |
Note: Tiles up to 8x8 are supported.
Dynamic Tile Content: Non-PeopleSoft URL
Use the Non-PeopleSoft URL type to display external content as dynamic fluid content.
Important! For the autosize option to work with external content, the external content and the PeopleSoft application must reside within the same domain. Otherwise, the autosize option is ignored.
This example illustrates the fields and controls from the Dynamic Tile Content group box for a non-PeopleSoft URL. You can find definitions for the fields and controls later on this page.

Field or Control |
Description |
|---|---|
Node Name |
Optionally, enter a defined node name. |
Portal URL |
Enter the complete or partial URL in this field. If you selected a defined node, then enter the partial URL here. The result is the concatenation of the selected node's URI text and the portal URL that you entered. |
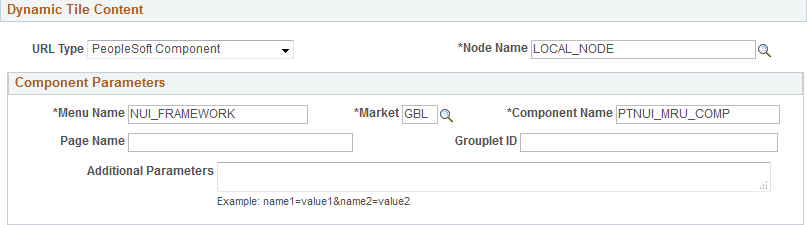
Dynamic Tile Content: PeopleSoft Component
Use the URL type of PeopleSoft Component to display a fluid component as dynamic fluid content.
This example illustrates the fields and controls from the Dynamic Tile Content group box for a PeopleSoft component. You can find definitions for the fields and controls later on this page.
Field or Control |
Description |
|---|---|
Node Name |
Enter the node for the target component. |
Menu Name |
Enter the menu for the target component. |
Market |
Select the market for the target component. |
Component Name |
Enter the name for the fluid component. |
Page Name |
Optionally, enter the fluid page name. Note: Because multi-page components are not recommended as dynamic content, the page name is not required. |
Grouplet ID |
Enter the page field name as defined on the General tab of the group box definition. See Working with Group Boxes for more information. Note: The grouplet ID is ignored when the definition is defined to be interactive; the entire component is rendered instead. For non-interactive definitions, if the grouplet ID is not specified, the entire page is rendered instead. |
Additional Parameters |
Enter any additional query string parameters to be appended onto the URL for the PeopleSoft component. For example, enter emplid=8001. |
Dynamic Tile Content: PeopleSoft Generic URL
Use the PeopleSoft Generic URL type to display any PeopleSoft URL type as dynamic fluid content. The generic URL type can be used to define iScripts, worklists, and even component-based URLs.
This example illustrates the fields and controls from the Dynamic Tile Content group box for a PeopleSoft generic URL. You can find definitions for the fields and controls later on this page.

Field or Control |
Description |
|---|---|
Node Name |
Optionally, enter a defined node name. |
Portal URL |
Enter the complete or partial URL in this field. If you selected a defined node, then enter the partial URL here. The result is the concatenation of the selected node's URI text and the portal URL that you entered. |
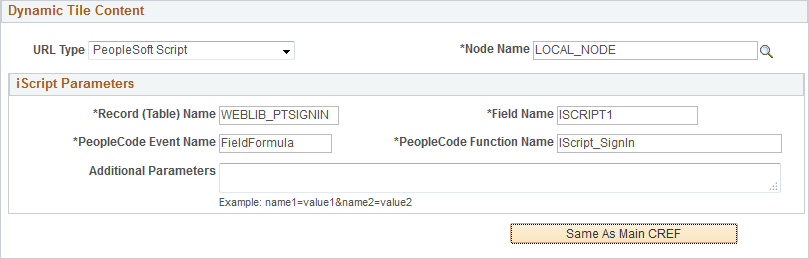
Dynamic Tile Content: PeopleSoft Script
Use the PeopleSoft Script type to display a PeopleSoft iScript as dynamic fluid content.
This example illustrates the fields and controls from the Dynamic Tile Content group box for a PeopleSoft iScript. You can find definitions for the fields and controls later on this page.
Field or Control |
Description |
|---|---|
Node Name |
Enter the node for the target iScript. |
Record (Table) Name |
Enter the WEBLIB derived/work record name that contains the target iScript. |
Field Name |
Enter the field name that contains the target iScript. |
PeopleCode Event Name |
Enter the PeopleCode event name. |
PeopleCode Function Name |
Enter the user-defined PeopleCode function to be executed. |
Additional Parameters |
Enter any additional query string parameters to be appended onto the URL for the PeopleSoft script. For example, enter emplid=8001. |
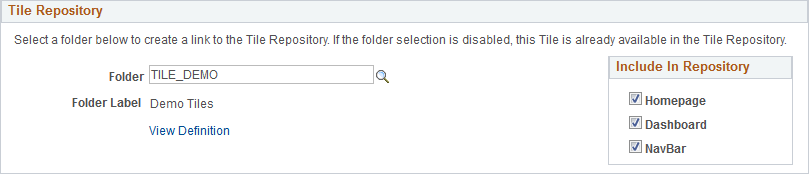
Tile Repository
Use the Tile Repository group box to specify the category (folder) where content reference definition (or its content reference link definition) resides within the tile repository. In this regard, the tile repository refers to the portal registry subfolders under Fluid Structure Content > Fluid Pages.
This example illustrates the fields and controls in the Tile Repository group box. You can find definitions for the fields and controls later on this page.
Field or Control |
Description |
|---|---|
Folder |
For an existing content reference outside the tile repository, select a subfolder within the tile repository. Note: Specifying a subfolder within the tile repository creates a content reference link there. The existing content reference definition remains wherever it is defined. |
Folder Label |
Displays the label for the selected folder. |
View Definition |
Click the View Definition link to view the definition for the content reference link. |
Homepage |
Select this option to allow the definition to be listed when the Add Tile dialog box is accessed from fluid homepages. |
Dashboard |
Select this option to allow the definition to be listed when the Add Tile dialog box is accessed from fluid dashboards. |
NavBar |
Select this option to allow the definition to be listed when the Add Tile dialog box is accessed from the NavBar. |
You can use automated queries to discover the content references to which a given user, permission list, or role has access. Each query provides a different degree of detail about the properties of the content references.
Reviewing Content Reference Security by User
Access the User ID Queries page ().
This page contains several general-purpose security queries, along with the following links to content reference access queries for the selected user, which are described on the page:
User ID's Content Reference Access.
User ID's Content Reference (includes Portal) Access.
User ID's Content Reference (includes Menu, Component and Market) Access.
User ID's Content Reference (includes Portal, Menu, Component and Market) Access.
When you click one of the query links, a page appears in a new window, containing a grid with the information described for each content reference.
Reviewing Content Reference Security by Permission List
Access the Permission List Queries page ().
This page is similar to the User ID Queries page, with the following equivalent links to content reference access queries for the selected permission list:
Permission List's Content Reference Access.
Permission List's Content Reference (includes Portal) Access.
Permission List's Content Reference (includes Menu, Component and Market) Access.
Permission List's Content Reference (includes Portal, Menu, Component and Market) Access.
When you click one of the query links, a page appears in a new window, containing a grid with the information described for each content reference.
Reviewing Content Reference Security by Role
Access the Role Queries page ().
This page is similar to the User ID Queries page, with the following equivalent links to content reference access queries for the selected role:
Role's Content Reference Access.
Role's Content Reference (includes Portal) Access.
Role's Content Reference (includes Menu, Component and Market) Access.
Role's Content Reference (includes Portal, Menu, Component and Market) Access.
When you click one of the query links, a page appears in a new window containing a grid with the information described for each content reference.
After creating or modifying a content reference and setting up permissions, test the content reference.
Click Home in the portal navigation header
Use the Menu pagelet or the Main Menu to navigate to the content reference.
Click the content reference.
You can also click the Test Content Reference on the Content Ref Administration page.
Note: The Test Content Reference link appears on the Content Ref Administration page when the usage type of the content reference type is set to Target only.
Access the Select a Content Reference or Content Reference Link page (Select Navigate the portal registry hierarchy into the parent folder in which you want the link to appear. Click the Add Content Reference Link link that appears after the Content References group box.)
The following example illustrates the Select a Content Reference or Content Reference Link page.
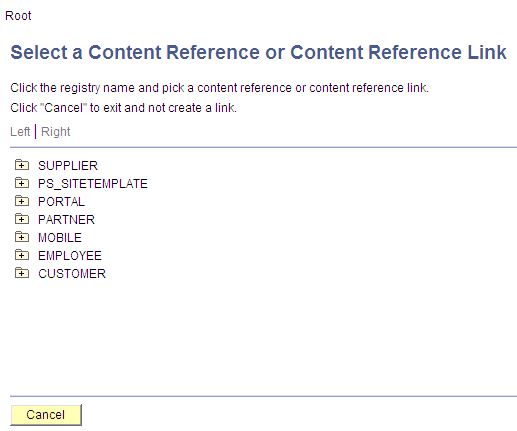
Click the folder icons to navigate the tree structure until you find the target of the link. Click the link and the Content Reference Link Administration page appears.
The following example illustrates the Content Reference Link Administration page.
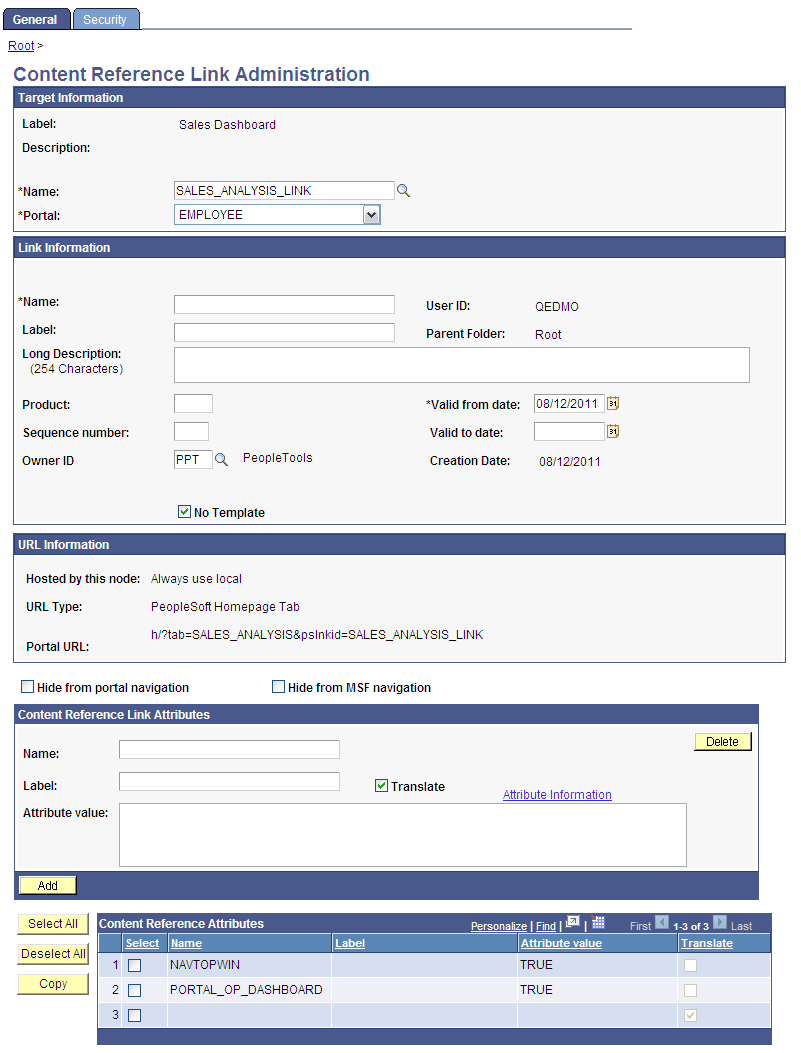
PeopleSoft portals store content references based on their URLs, so you can't register two different content references that specify the same URL. Content reference links overcome this limitation by enabling you to define more than one menu item that invokes a given URL. You define a content reference link like any other content reference, but instead of specifying a URL, you specify an existing content reference as its destination. At runtime, clicking the content reference link on the portal menu connects to the destination content reference by URL.
Note: To the user, a content reference link looks and works the same as a content reference on the portal menu.
A content reference link can point to:
A content reference of usage type Target.
Another content reference link.
You can define a content reference link in the same locations that you can define a content reference of usage type Target. Multiple content reference links can connect to a single destination content reference.
By connecting one content reference link to another content reference link, you can create a chain of redirection, which always ends in a content reference of usage type Target. You don’t need to know what the ultimate destination is when you define your new content reference link, and you can duplicate the property settings of the content reference link to which it connects rather than those of the ultimate destination. However, Oracle recommends that you limit your use of chains of content reference links because they impose processing overhead on your portal when selected.
Warning! If you delete a destination content reference or content reference link, all content reference links that connect to it are also deleted. This behavior propagates back through any content reference link chain.
Target Information
Field or Control |
Description |
|---|---|
Name |
Select the destination content reference to which you want this content reference link to connect. |
Portal |
Select the portal that contains the destination content reference to which you want this content reference link to connect. The Always use local value refers to the portal where the content reference link is defined, so moving or copying it to a different portal changes the resolution of this value. Important! If you change this value, you must also select a new link content reference. |
Link Information
Field or Control |
Description |
|---|---|
Name |
Enter a unique object name for this content reference link. This field is required. |
Test Content Reference Link |
Click to test this content reference link. Clicking this button should produce the same result as clicking the content reference link from the portal menu. |
If you omit values in following fields, their values are inherited from the destination content reference:
Label.
Long Description.
Product.
Sequence number.
Object owner identifier.
No Template.
Template Name.
Valid from date.
Valid to date.
URL Information
These fields are display-only and reflect the URL information of the content reference that you are linking to.
See “URL Information” in Defining Content References.
Content Reference Attributes
If the destination content reference has defined content reference attributes, they appear in this grid. You can copy them from the grid to the Content Reference Link Attributes group box using the following page elements:
Field or Control |
Description |
|---|---|
Select |
Select to designate a content reference attribute for copying to the Content Reference Link Attributes group box. |
Select All |
Click to designate all content reference attributes for copying to the Content Reference Link Attributes group box. |
Copy |
Click to copy the selected content reference attributes to the Content Reference Link Attributes group box. |
Content Reference Link Attributes
Content reference link attributes and content reference attributes share the same page fields.
You can define content reference link attributes directly in this group box, or you can copy an attribute from the destination content reference using the Content Reference Attributes grid, and modify it to suit your purposes.
At runtime, the content reference link attributes defined here are combined with the content reference attributes defined at the link destination, and they are applied together.
Important! If a content reference link attribute defined here has the same name as a content reference attribute defined at the link destination, but a different attribute value, the value defined here takes precedence and is applied at runtime.
Content reference link attributes are independent and separate from the content reference attributes at the link destination. Modifying one has no effect on the other.
Access the Content Reference Link Security page (Click the Security tab on the Content Reference Link Administration page.)
The fields on this page are disabled because content reference links inherit the security settings of the destination, linked-to object.
Note: While a content reference link does inherit cascaded security from it's own parent folder, it does not inherit cascaded security from the linked-to content reference's parent folder.