 Understanding Notification Templates
This chapter provides an overview of notification templates and discusses how to:
Define template variables.
Define additional recipients.
Define notification templates.
Define generic templates.
Delete templates.
Access notification templates.
Send email notifications in the user's preferred language.
Understanding Notification TemplatesUse templates to establish a common format for notifications for a particular purpose. Users can create two types of notification templates:
Component templates that are used for specific PeopleSoft components.
Generic templates that can be used from any component.
Defining template variables is the first step in setting up component templates. Template variables are page buffer variables that are always accessible to the component for which the template is being created. Creating component template variables requires an in-depth knowledge of component buffers. Although there can be multiple templates for a component, there is only one set of component template variables.
Use the Define Template Variables page to define:
Component data variables that are populated from specific locations on the component buffers.
Component URL variables that are expanded into URLs in the outgoing notification to help in navigating to the PeopleSoft system.
Component URL variables enable users to navigate to a specific PeopleSoft page when the template containing the variable is activated. You can specify a portal, node, menu, component, market, page, and action for the URL, as well as key values for navigating to a specific target transaction for the selected component. Component URL variables values come from the search record keys in the component and must be resolved to bypass the search page.
By default, when you are creating new template variables, set the first URL variable to the URL for the current component. This assumes that all of the search record fields were found as part of the component buffers. If this is not the case, you must create component data variables and enter the data variable name in the Value column to link the URL variable field name with a data variable.
External URL variables that are expanded into non-PeopleSoft component URLs, such as an iScript URL or www.yahoo.com.
You can add as many variables as necessary to meet your notification needs.
Note. All variables are resolved at runtime, so you should limit the number of variables to those that you really need.
Defining Template VariablesTo replicate worklists, use the Template Variables (WL_TEMPLATE_VAR) component.
This section describes how to:
Define template variables.
Define component data variables.
Define component URL variables.
Define external URL variables.
 Pages Used to Define Template Variables
|
Page Name |
Object Name |
Navigation |
Usage |
|
Define Template Variables |
WL_TEMPLATE_VAR |
PeopleTools, Workflow, Notifications, Template Variables, Define Template Variables |
Define template variables on a component. |
|
Component Data Variables |
WL_TEMPL_CMPVAR |
PeopleTools, Workflow, Notifications, Template Variables, Define Template Variables, Component Data Variables, Edit |
Define component data variables for the template. |
|
Component URL Variables |
WL_TEMPL_URLVAR |
PeopleTools, Workflow, Notifications, Template Variables, Define Template Variables, Component URL Variables, Edit |
Define component URL variables for the template. |
|
External URL Variables |
WL_TEMPL_XURL |
PeopleTools, Workflow, Notifications, Template Variables, Define Template Variables, External URL Variables, Edit |
Define external URL variables for the template. |
Defining Template Variables
Access the Define Template Variables page.
|
Add a Component Data Variable |
Click to add a component data variable to the template. Click Edit to specify information about the variable. |
|
Add a Component URL Variable |
Click to add a component URL variable to the template. Click Edit to specify information about the variable. |
|
Add an External URL Variable |
Click to add an external URL variable to the template. Click Edit to specify information about the variable. |
Note. Notification template variables do not indicate the true order of the variables. The order of template variables is determined by the sequence of the variables specified in the message text on the Define Template page. If the sequence of the variables in the message text is not in ascending, numerical order, then the template variables that you have declared must follow the order in the message text. If you do not synchronize the order of the template variables and the order that they appear in the message text, the system does not resolve the unordered variables.
Defining Component Data VariablesAccess the Component Data Variables page.
|
Level |
Select the level of the component buffer: Level 0 or Level 1. |
|
Primary Record |
Specify the record name where the data on the component buffer will be. This might be the same as the primary record name within a scroll area or a grid. |
|
Record |
Specify the record name where the data on the component buffer will be. This might be the same as the primary record name within a scroll area or a grid. |
|
Field Name |
Specify the name of the field where the data on the component buffer will be. |
|
Field Label ID |
Select the label that the user who creates the component template sees in the variable list. |
|
Display Value |
Select from the drop-down list box Display Values. The most common choice is Value, which is the data value of the field that you selected in Field Name. This is the only valid choice when using Component Templates from the Notify toolbar button. If you are using component templates from custom PeopleCode, you have two additional options: Formatted Value: The value that is used is exactly what the user sees on the page, but it is not necessarily the actual value that is stored in the field. For example, if the page field is displaying Xlat values, the template variable is populated with the Xlat value. If the page field shows a formatted date, the template variable is populated with the formatted date. If the page field shows a value from a prompt table, the template variable is populated with the value of the prompt table shown on the page. Field Name: The template variable is populated with the long description of the field label that is selected in the Field Label ID field. If no field label exists, it uses the field name in the database table (for example, TRXTYPE). |
How Display Values Are Used
The value format for component template variables is %C1, %C2, and so on.
If you specify the Display value as Value, then the variable will resolve to be the value that is stored in the database for that field. In the following screen, note that the value %C5 is assigned a label ID of Transaction Type and the display value is Value (values for this field can be IA, IS, OA, or OS, as defined in the translate table).
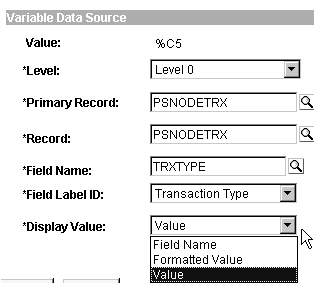
Example of the Value display value
If the Display Value is set to Formatted Value, then the variable will resolve to be the value that the end user sees on the page for that field.

Example of the Displayed Text property
In this example, if the display value selected was Formatted Value and the field property displayed text is Xlat Short, %C5 values could be InAsync, Insync and so on (as shown in the following Field Properties screen).
If you set the display value to Field Name, then the variable will resolve to be the field label of that field. If no field label exists, then it will resolve to be the field name in the database table (for example, TRXTYPE).
Note. If the component template is activated by a Notify button (not using user-defined PeopleCode), the display values of Field Name and Formatted Value are not used (the variable will always resolve to the field Value).
Defining Component URL VariablesAccess the Component URL Variables page.
The name format for component URL variables is %URLC1, %URLC2, and so on.
|
Use current portal |
If using the current portal for a link, select Yes. If using another portal, select No and enter the portal name. |
|
Use current node |
If the current node contains the URL, select Yes. If using another node, activate No and enter the node name. |
|
Use current page |
If you want the URL to dynamically include the page that the user has open, select Yes. If you want the URL to include a specific page, select No and enter the page name. |
|
Action |
Specify the action for the URL variables: Update/Display, Add, or Correction. |
|
Component Keys |
If the component is in the current node, click the Reset Key Values button to populate the Field Name column based on the component metadata. If the component is in another node, set the field names of the component keys yourself. In the Value column, specify a reference to a component data variable that has been defined on the Component Data Variables page (for example, %C1, %C2, or %C3). If you do not specify the component key field names and values, the URL displays the Search Dialog page to the user. |
Defining External URL VariablesAccess the External URL Variables page.
The name format for external URL variables is %URL1, %URL2, and so on.
Specify the complete URL, along with a description.
Defining Additional RecipientsThis section provides an overview of the additional recipients list and discusses how to define additional recipients.
Understanding the Additional Recipients List
The additional recipients list contains email addresses or user IDs that the system uses at runtime to send notifications. You set specific fields in a component for this purpose while defining template variables. Whoever defines template variables must know which fields will contain the recipient lists.
Page Used to Define an Additional Recipients List
|
Page Name |
Object Name |
Navigation |
Usage |
|
Additional Recipient List |
WL_DISTR_GRP |
PeopleTools, Workflow, Notifications, Template Variables, Additional Recipient List |
Define additional recipients of notifications for each template. |
Defining the Additional Recipients List
Access the Additional Recipient List page.
After the values are specified on this page, the additional recipient list appears on the Notification page when a notification is sent. Then users can select values from the additional recipient list for the To, CC, or BCC fields.
|
Level |
Select Level 0 or Level 1. |
|
Primary Record |
For level 1, this is usually the name of the primary record on the grid or scroll area. For level 0, this is the same as the record name. |
|
Record |
Specify the name of the record containing the field that stores the list. |
|
Field Name |
Specify the name of the field that stores the list. |
|
Field Label ID |
Select the label that the user sending the notification sees in the additional recipients list. |
Note. Users should enter notification recipient names in the format Last_Name,First_Name.
Defining Notification TemplatesTo define notification templates, use the Notification Template (WL_TEMPLATE) component.
This section discusses how to:
Define component notification templates.
Define Research In Motion (RIM) BlackBerry email responses.
Pages Used to Define Notification Templates
|
Page Name |
Object Name |
Navigation |
Usage |
|
Define Template |
WL_TEMPLATE |
PeopleTools, Workflow, Notifications, Notification Templates, Define Template |
Define component notification templates. |
|
Blackberry Email Responses |
WL_TEMPL_RESP |
PeopleTools, Workflow, Notifications, Notification Templates, Blackberry Email Responses |
Define email responses for use with the RIM BlackBerry device. |
Defining Component Notification Templates
Access the Define Template page.
After you define template variables, you can create notification templates. You can define more than one template for a component.
|
Descr (description) |
Enter a template description to appear on the Send Notification page if more than one template is defined for the component. |
|
Default Template |
Select to identify one template per component as the default template. This is informational only. |
|
Instructional Text |
Enter text to appear at the top of the Send Notification page for this template. |
|
Priority |
(Optional) Set a default priority for this notification. |
|
Sender |
Select: User: Send value to the email address of the user who performs the send. System: Send to the email address of the application server setting SMTPSender. System-Blackberry: Send to the email address of the application server setting SMTPBlackberryReplyTo. Other: Send to the value in the Email ID field. |
|
Email ID |
If you selected Other for the sender, enter an email address (for example, [email protected]). |
|
Subject and Message Text |
Specify text or any of the available variables (for example, %C1 or %Date) to include in the subject and message. |
If BlackBerry responses are entered, the Sender field on the Define Templates page is automatically set to System-BlackBerry. This is the only valid value for a BlackBerry template. The Email ID field is blank so that the receiver of the BlackBerry notification always replies to a specific email address. The BlackBerry Email Response program polls that one email address.
Defining BlackBerry Email ResponsesAccess the Blackberry Email Responses page.
|
Enter text to add to the template message text. The responses do not appear in the RIM BlackBerry email device until the user selects Reply To. This provides a chance to add a reminder to the message text. |
|
|
Response Name |
Enter up to 10 possible responses. Each of these is associated with the Forward as Email and Forward as Worklist check boxes. Run an Application Engine program section to process the response. |
|
Forward as Email and Forward as Worklist |
Select to forward the response email message to the user who sent the notification. |
|
Program and Section |
(Optional) Used by the RIM BlackBerry Email Response Program to call specific user sections based on the response detected on incoming RIM BlackBerry email messages. These fields are not required, as users can decide that an email message or worklist entry is enough processing for each RIM BlackBerry response. |
Calling Component Templates with PeopleCode
As with generic templates, component templates can be called directly with PeopleCode or with the DoModalComponent as follows:
import PT_WF_NOTIFICATION:NotificationTemplate;
&name = "MYCOMPONENTTEMPLATE";
&mynotifytemplate = create NotificationTemplate(%Component, %Market, &name, "C");
&xmlVars = &mynotifytemplate.SetupCompVarsAndRcpts(GetLevel0());
PT_WF_NOTIFY.RAWXML = &xmlVars;
PT_WF_NOTIFY.MENUNAME = %Menu;
PT_WF_NOTIFY.COMPONENT_ID = %Component;
PT_WF_NOTIFY.MARKET = %Market;
PT_WF_NOTIFY.PANELNAME = %Panel;
PT_WF_NOTIFY.WL_TEMPLATE_ID = &name;
PT_WF_NOTIFY.WL_TEMPLATE_TYPE = "C";
PT_WF_NOTIFY.NOTIFY_TO = "[email protected]";
DoModalComponent(MenuName.WORKFLOW_ADMINISTRATOR, BarName.USE, ItemName.NOTIFICATION, Page.PT_WF_NOTIFY, "U", Record.PT_WF_NOTIFY);
See Also
Using PeopleCode with Generic Templates
Defining Generic TemplatesTo define generic templates, use the Generic Templates (WL_TEMPLATE_GEN) component.
This section provides an overview of generic templates and discusses how to:
Define generic templates.
Use PeopleCode with generic templates.
Understanding Generic TemplatesYou can call generic templates from any PeopleCode program. Use generic templates when a component template does not meet your requirements. For example, you might use generic templates when developing:
Application Engine PeopleCode.
Service Operation handler PeopleCode.
Notifications being sent in the background in a component, for which the user is not prompted with the Send Notification page.
Applications that need to have more control of the Send Notification page to set default To, CC, or BCC values, or to set default message text that is editable.
Applications that need to send HTML email.
Note. The SYSTEMDEFAULT generic template is a special case. It is used by the Notify toolbar button on all components if there are no other component templates defined for that component. You cannot add template variables for SYSTEMDEFAULT. Two template variables are available for this template: %1, which generates a component URL for the page with only search keys from which the Notify button is selected; and %2, which generates a component URL for the page with both search keys and alternate search keys. Do not change this template unless you want to make a system-wide change.
Pages Used to Define Generic Templates
|
Page Name |
Object Name |
Navigation |
Usage |
|
Generic Template Definition |
WL_TEMPLATE_GEN |
PeopleTools, Workflow, Notifications, Generic Templates, Generic Template Definition |
Define generic notification templates. |
|
Blackberry Email Responses |
WL_TEMPL_GEN_RESP |
PeopleTools, Workflow, Notifications, Generic Templates, Blackberry Email Responses |
Define email responses for RIM BlackBerry devices. |
Defining Generic TemplatesAccess the Generic Template Definition page.
The pages and fields in the Generic Templates component are the same as those for defining the notification templates, except for two key differences:
A generic template does not reference any information from the template variables component.
Add template variables directly to the generic template explicitly by adding rows in the template variables grid.
A generic template does not support Additional Recipients.
This is because the generic template is not used to launch the Send Notification page (which is where the additional recipients are displayed).
To use a generic template from a component, you do not select a Notify check box in the component properties dialog box. You must create a button and use PeopleCode to specify which generic template to use. Furthermore, you must pass in data that is needed by the template to populate template variables.
Template variables are placeholders in the template that can be populated with data passed in with PeopleCode. The order of the data being passed must match the order of the corresponding variables in the Template Variables grid. Thus, the suggested naming for these variables is %1, %2, and so on. This is consistent with the Message Catalog use of variables.
Using PeopleCode with Generic TemplatesGeneric templates other than SYSTEMDEFAULT are usually used only in PeopleCode calls. The following sample code shows how to use a generic template called MYTEMPLATE to send out a notification:
import PT_WF_NOTIFICATION:NotificationAddress;
import PT_WF_NOTIFICATION:Notification;
import PT_WF_NOTIFICATION:NotificationTemplate;
Local array of string &aryValues;
Local array of NotificationAddress &mynotifyto;
Local NotificationAddress &mynotifyaddress;
Local Notification &mynotification;
&mynotifyto = CreateArrayRept(&mynotifyaddress, 0);
&emailid = "[email protected]";
&mynotifyaddress = create NotificationAddress("", "", "", &emailid, "Email");
&mynotifyto.Push(&mynotifyaddress);
&mynotifytemplate = create NotificationTemplate("","", "MYTEMPLATE", "G");
/* Populate an array to contain the values needed by the template */
&aryValues = CreateArrayRept("", 0);
&aryValues.Push("FIRST VALUE");
&aryValues.Push("SECOND VALUE");
&xmlVars = &mynotifytemplate.SetupGenericVars(&aryValues);
&mynotifytemplate.GetAndExpandTemplate(%Language, &xmlVars);
/* At this point, the &mynotifytemplate should have every value resolved */
&mynotification = create Notification("[email protected]", %Datetime, %Language);
&mynotification.NotifyTo = &mynotifyto;
&mynotification.Subject = &mynotifytemplate.Subject;
&mynotification.Message = &mynotifytemplate.Text;
&mynotification.Send();
Note. You can also use this code for component templates by replacing the G with a C. Then, populate the component name and market when calling the template as shown in the following example code. The template variables are all assumed to be in the page buffers.
&mynotifytemplate = create NotificationTemplate(%Component, %Market, "MYCOMPONENTTEMPLATE", "C");
&xmlVars = &mynotifytemplate.SetupCompVarsAndRcpts(GetLevel0());
&mynotifytemplate.GetAndExpandTemplate(%Language, &xmlVars);
Deleting TemplatesTo delete notification templates, use the Delete Notification Templates (WL_TEMPL_DELETE) component.
You can delete component templates, but not generic templates.
To delete a component template:
Select PeopleTools, Workflow, Notifications, Delete Notification Templates.
The Delete Notification Templates page displays all of the component templates defined in the system.
Select the Select check box for templates that you want to delete.
Click the Delete button.
Note. This does not remove the template variables.
Accessing Notification Templates
To access notification templates and use the Notify feature, select the Notify check box in the Selected Toolbar Actions group box in the Component Properties dialog box for each component. This causes the Notify button to appear on each browser page of the component.
When you click the Notify button, the system saves the component information and displays the Send Notification page. Add notification details on the Send Notification page before you send the notification as an email message or worklist item.
You can also access notification templates through user-defined PeopleCode. At runtime, users can select the type of template (generic or notification [component]), the actual template, and the data that populates the template variables.
Note. Spell check is enabled for notification templates and generic templates to verify message text and response text.
Sending Email Notifications in a User's Preferred LanguageThis section provides an overview of sending email notifications in a user's preferred language and discusses how to:
Send email notifications using SetLanguage().
Store preconfigured email text in the Message Catalog.
Understanding Sending Email Notifications in a User's Preferred Language
If your organization has PeopleSoft users who speak multiple languages, you can send email notifications in a user’s preferred language. You have these options:
Sending email notifications using SetLanguage( ).
Storing preconfigured email text in the Message Catalog.
When developing custom notifications involving multiple languages, consider the following:
The PeopleSoft system does not translate email text from one language to another.
This discussion assumes that you implement one of the methods described in this section to route emails to users in their preferred language.
When calling the SetLanguage ( ) online, only the language of the sender can be accessed.
The page buffer contains only the language of the user currently accessing the component. If used in an Application Engine program (in batch mode), multiple languages can be accessed.
The Notification class does not support multiple languages for each recipient.
The system sends the email in the language of the sender and not each individual recipient. The page buffer contains only the language of the user currently accessing the component.
If you do not implement any custom email notifications to deal with multiple languages, the system sends email notifications only in the language last used (the language of the sender).
See Also
Understanding Notification Classes
Sending Email Notifications using SetLanguage( )The PeopleSoft system does not translate email content when sending email. However you can use predefined text in the message catalog or Notification templates to accommodate different languages. Using the SetLanguage( ) PeopleCode function enables the system to read the user profile language preference of the intended recipient and send an email in that user’s preferred language.
If there are multiple recipients with different language preferences, then individual emails can be sent to each recipient using a loop around the SetLanguage( ) and TriggerBusinessEvent ( ) function calls. The same method can be applied to SendMail.
As an example, assuming the TO field is a Role mapped to a field SEND_TO_ROLE without route control, you can make the following changes:
To send email notifications using SetLanguage( ):
Change the field map for the TO field in Activity email routing to Roleuser by Oprid Qry or Roleuser by Roleuser Qry.
Map the bind variable to a field on the page (the value of which will be formatted at runtime in PeopleCode).
For this example, assume the field to be RECEIVER_ID. It can be a field of a derived/work record.
In the event for which the TriggerBusinessEvent, or SendMail, is called, use the following code as a model, and modify the emphasized variables:
Local Rowset &ROLE_USER;

/* 1. Retrieve the TO user list */
/* Create a rowset to retrieve all users for the role */
&ROLE_USER = CreateRowset(Record.ROLEUSER_VW);
&ROLE_USER.Fill("where ROLENAME= :1", SEND_TO_ROLE);

/* Loop through user list to send email in their language code */
For &i = 1 To &ROLE_USER.ActiveRowCount
   RECEIVER_ID = &ROLE_USER(&i).ROLEUSER_VW.OPRID.Value;

   /* 2. Get the user language code and set the language code*/
   SQLExec("Select LANGUAGE_CD FROM PSOPRDEFN where OPRID = :1", &OPRID, &LAN_CD);
   &temp = SetLanguage(&LAN_CD);
/* check return code &temp for error .....*/

/* 3. Retrieve text from message catalog for the language code */
&subject = MsgGetText(msg_set, msg_num_subject, "");
&text = MsgGetText(msg_set, msg_num_text, "");
/*..... Format fields mapped in email route for translation .....*/
/* RECORD.FIELD_SUBJECT.Value = &subject; */
/* RECORD.FIELD_TEXT.Value = &text; */

   /* 4. Call TriggerBusinessEvent or SendMail to send email */
&temp = TriggerBusinessEvent(BusProcess."bus_proc_name",
BusActivity."activity_name", BusEvent."event_name");
/* &temp = SendMail(0, RECEIVER_ID, "", "", &subject, &text); */

End-For;

/* 5. Set language code back to current user */
SQLExec("Select LANGUAGE_CD FROM PSOPRDEFN where OPRID = :1", %OperatorId, &ORIGINAL_LANGCD);
&temp = SetLanguage(&ORIGINAL_LANGCD);
/*..... Or &temp = SetLanguage(%Language).....*/
%OperatorId, &ORIGINAL_LANGCD);
&temp = SetLanguage(&ORIGINAL_LANGCD);
/*..... Or &temp = SetLanguage(%Language).....*/
Storing Preconfigured Email Text in the Message CatalogFor generic email notifications, such as “An item has been added to your worklist,” you can store copies of the text of this email in the message catalog for as many languages as you support. During the notification, you include PeopleCode to use the appropriate text based on a user’s preferred language.
Note. This method can run online.