 Understanding OAS 10g Within PeopleSoft
This chapter provides an overview of Oracle Application Server (OAS) 10g Release 3, and discusses how to:
Use Application Server Control.
Stop and start OAS 10g system components.
Set up HTTP session timeout.
Implement secure sockets layer on OAS 10g.
Configure Java Virtual Machine heap size.
Monitor OAS 10g performance.
Uninstall PIA on OAS 10g.
Important! This chapter covers aspects of Oracle Application Server that relate specifically to OAS activity in a PeopleSoft environment. Any OAS subjects that are not discussed here are covered in the comprehensive, online OAS help system and Oracle OAS documentation.
See Also
http://www.oracle.com/technology/documentation/appserver10131.html
Understanding OAS 10g Within PeopleSoft
The OAS is a J2EE application server that PeopleSoft uses as a web server to deploy the PeopleSoft Internet Architecture. Though the version bundled for use with your PeopleTools installation is the OAS SOA Suite, only the J2EE & Web Server install type has been tailored specifically to work with your PeopleSoft application environment.
Your PeopleSoft application primarily takes advantage of the web server functionality of OAS 10g, which is provided by these system components:
Oracle HTTP Server (OHS), which is based on the Apache web server.
Oracle Application Server Containers for J2EE (OC4J).
Note. Though the version bundled for use with your PeopleTools installation is the OAS SOA Suite, PeopleSoft customers are granted a license for J2EE & Web Server Install type with PeopleSoft Enterprise at no additional cost. PeopleSoft Enterprise customers can choose Oracle Application Server as an alternative to BEA WebLogic or IBM WebSphere for use with PeopleSoft Enterprise. This license is provided solely for use with PeopleSoft Enterprise and any other modules of Oracle Application Server SOA Suite (such as SOA) outside of use with PeopleSoft Enterprise applications requires the purchase of an Oracle Application Server license.
This section discusses:
Oracle HTTP server.
Oracle Application Server containers for J2EE (OC4J).
OAS 10g Welcome page.
 Oracle HTTP Server
The Oracle HTTP Server (OHS), which is the Oracle version of the Apache web server, is installed during the normal OAS installation. Only one OHS exists per OAS installation. The OHS is installed in ORACLE_HOME\Apache.
Note. If you are using OAS as your web server, you must use OHS as your HTTP(s) or reverse proxy server.
Note. There are no special steps to setup a reverse proxy server when using Oracle Application Server. Reverse proxy functionality is handled by the OHS component that comes with the OAS installation, by default.
Oracle Application Server Containers for J2EE (OC4J)The OC4J system component is a JVM process that loads the PeopleSoft Internet Architecture. The number of OC4J components vary depending on the choices you made during the PeopleSoft Internet Architecture installation.
Single Component Server OC4J Instances
If you specified the default application name of PeopleSoft at install time, and specified a single-component server (appropriate for testing and development), the OC4J instances are:
home
This comprises the minimum set of J2EE applications installed with OC4J, including the Application Server Control application.
PeopleSoft
This contains all of the PeopleSoft web modules.
Multiple Component Server OC4J Instances
If you specified the default application name of PeopleSoft at install time, and specified a multi-component server (more appropriate for a production environment), the OC4J instances are:
home
This comprises the minimum set of J2EE applications installed with OC4J, including the Application Server Control application.
PSEMHUB_PeopleSoft
This contains the PSEMHUB web module used by the PeopleSoft Environment Management Hub.
PSOL_PeopleSoft
This contains the PSOL web module used by the PeopleSoft Online Library Manager.
PIA_PeopleSoft
This contains the PORTAL and other web modules used for PeopleSoft online transactions.
Virtual Host ConnectionsIn the PeopleSoft implementation of OAS, there is no direct connection between PeopleSoft users and the OC4J component. All connections, HTTP and HTTPS, are initiated through the HTTP Server (OHS). For each OC4J component created during the PeopleSoft Internet Architecture deployment two VirtualHost entities are created in OAS_HOME\Apache\Apache\conf\mod_oc4j.conf file under the Oracle HTTP Server component. Each VirtualHost corresponds to HTTP and HTTPS access respectively. A single, persistent connection between the Oracle HTTP Server and the OC4J servlet container is managed by the APJ13 protocol.
Note. Uninstalling PeopleSoft either from the command line or through the Application Server Control pages will not remove the "Listen" and "VirtualHosts" entities added in the mod_oc4j.conf file. However, subsequent PeopleSoft deployments will update these entries in the mod_oc4j.conf file.
The OAS 10g Welcome PageThe home base for your OAS 10g installation is the Oracle Application Server 10g Welcome page. You access this page in a browser by entering the fully qualified URL for your web server host machine. For example,
http://myserver.mycompany.com:7777/
Note. Normally, OAS 10g assumes that this URL uses port 80 in Windows, and port 7777 in UNIX. However, the OAS setup procedure might have changed these values. You can discover the correct URL and port to use by examining the file OAS_HOME\install\readme.txt. If port 80 is used, you can omit it from the URL.
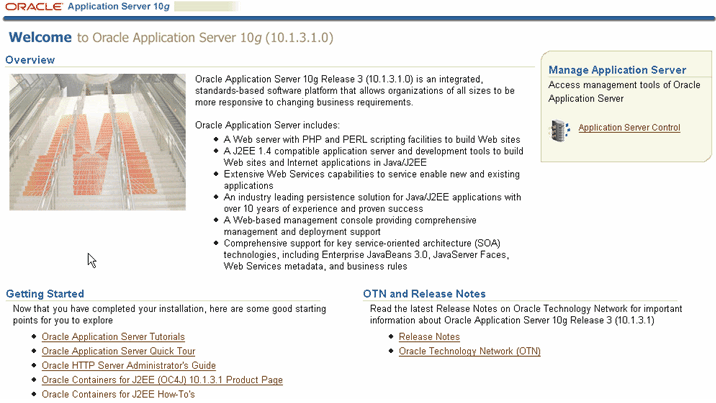
Oracle Application Server 10g Welcome Screen
The Oracle Application Server 10g Welcome page serves as the gateway to all of the OAS 10g supporting information and facilities, including release notes, demonstrations, quick start information, documentation, technical support, discussion forums, and software downloads.
The Welcome page also provides access—through the Oracle Application Server Logins—to Oracle Application Server Control, where you administer your web server.
Using Oracle Application Server ControlYou use the web-based Oracle Application Server Control utility to configure, start, stop, and monitor your OAS installation. Oracle Application Server Control is installed when you install OAS 10g.
This section discusses how to:
Access Oracle Application Server Control.
Change the administrator password.
Accessing Oracle Application Server Control
To access Oracle Application Server Control:
Do one of the following:
On the OAS 10g Welcome page, click the link under Oracle Application Server Logins to log on to Oracle Enterprise Manager 10g Application Server Control.
In a browser, enter the URL for the Oracle HTTP Server, plus port number "7777" and application "em". For example:
http://myserver.mycompany.com:7777/em
Note. You can also discover the correct URL and port to use by examining the file OAS_HOME\install\readme.txt.
For the Application Server Control Login prompt, enter the User Name oc4jadmin.
For Password enter the administrator password that you defined when you installed OAS 10g, and click Login.
The default is password4u.
Home Page
The Application Server Control Home page lists all the instances that are installed.
The Application Server Control Home page enables you to monitor overall application server and system performance and status, as well as start, stop, and configure various aspects of the enabled system components including OC4J instances.
The Status field for each system component or OC4J instance indicates whether the component is alive, with an upward-pointing green arrow, or down, with a downward-pointing red arrow. Click the Refresh Data button at the upper right to update the information on the page.
You can click a component or OC4J instance name to display the Home page for the component. From the component Home page, you can monitor the performance of the component. You can also navigate to its Administration page, which provides links to configuration pages for the component.
Note. The Management system component represents Oracle Enterprise Manager itself.
OC4J Component Home Page
The OC4J Component Home page displays information pertinent to an OC4J component.
From the OC4J Component Home page, you can:
monitor the performance of the OC4J instance.
navigate to the Administration page for an OC4J instance, which provides links to configuration pages for the instance.
navigate to view the J2EE applications deployed to this OC4J component.
Applications Page
The Applications page displays a list of all the applications that are deployed as part of the OC4J component.
Each OC4J instance contains one default application (ascontrol), and one or more additional applications. This default application is the Application Server Control application.
You can click an application name to display the home page for that application. From the application home page, you can monitor the performance, web modules, and Enterprise Java Beans (EJB) modules of the application. You can also access application properties.
Changing the Administrator Password
You can change the administrator password that you specified for the user oc4Jadmin when you installed the current instance of OAS 10g.
To change the administrator password:
At the command prompt, navigate to the location of the opmnctl command within the home folder of the OAS 10g instance that you want to administer.
For example:
cd C:\OraHome_1\opmn\bin
Stop the OAS instance.
For example, run the following command:
opmnctl stopall
Update the following lines in the ORACLE_HOME/sysman/j2ee/config/jazn-data.xml file.
<realm> <name>enterprise-manager</name> <users> <user>
<name>ias_admin</name>
<credentials>!<new password></credentials> </user>
Note. Make sure to preface the <new password> with an exclamation point (!).
Start the OAS instance.
For example:
opmnctl startall
Getting More Information on the Application Server Control
On any page of the Oracle Enterprise Manager Application Server Control, you can click the Help link to access context sensitive online help for that page. The help content is displayed on the View Topic tab. You can also use the Search tab for a full text search of the online help system, and use the Contents tab to browse the online help system from the top down.
You can also access the Oracle Technology Network on the Oracle corporate website, which contains a complete line of documentation for all Oracle products and technologies.
See Oracle Technology Network, http://www.oracle.com/technology/products/ias/index.html
Stopping and Starting OAS 10g System Components
This section provides an overview of stopping and starting system components and discusses how to:
Use the Application Server Control Home page.
Use the command line.
Understanding Stopping and Starting System Components
By default, all of the system components of an OAS instance are automatically started when you install them. You can stop, start, or restart components from the Application Server Control Home page, or from a command line.
Note. You can't stop or restart the Management component from the Application Server Control Home page, as that would have the effect of disabling Oracle Enterprise Manager itself. However, the Management component does have an effect on system performance, so you can monitor its performance in the Application Server Control.
OAS 10g includes several infrastructure elements that are essential to administering the application server. One element, Oracle Process Management and Notification server (OPMN), runs in the background as a daemon, and is the tool that Oracle Application Server Control calls to start and stop the OAS system components. OPMN is automatically installed, configured, and started along with your application server.
You control OPMN transparently from the Application Server Control, or explicitly from a command line using the opmnctl command.
Stopping and Starting Using the Application Server Control
You can stop, start, or restart the application server instance as a whole, or its individual system components or OC4J instances.
Stopping and Starting the Application Server Instance
Because the Application Server Control application is run as part of the default OC4J component, you can only stop all the components using Application Server Control. You cannot use Application Server Control to start the components after they have been stopped.
To stop all of the system components of the displayed OAS instance, select all components and click the Stop button.
A confirmation page appears, warning you that all of the system components will be stopped. Click Yes to confirm that you want to proceed. The Management component will remain active.
To restart all of the system components of the displayed OAS instance, select all of the components and click Restart.
A confirmation page appears, warning you that only components that are already active will be restarted, and components that are down will remain down. Click Yes to confirm that you want to proceed. The Management component will remain active.
Note. You will need to re-login to Application Server Control after a restart of all system components is complete.
Stopping and Starting Individual Components
You can control individual system components and OC4J instances by selecting the check box next to each component that you want to control.
To stop the selected components, click the Stop button.
A confirmation page appears. Click Yes to confirm that you want to proceed.
To start the selected components, click the Start button.
A status page appears during the start process.
To stop, then restart the selected components, click the Restart button.
A confirmation page appears. Click Yes to confirm that you want to proceed.
Only the selected components that are already active will be restarted, and if a selected component is down, an error message warns that it was not restarted.
Note. If the OHS component of the home OC4J component is stopped, a new login to the Application Server Control is required to access the Application Server Control.
Using the Command Line
At a command prompt, navigate to the location of the opmnctl command within the home folder of the OAS 10g instance that you want to administer. For example:
cd C:\OraHome_1\opmn\bin
Stopping and Starting the Application Server Instance
You can control the application server instance as a whole by stopping or starting all of the system components at once.
To stop all of the system components in the current OAS instance, enter the following command:
opmnctl stopall
The Management component remains active.
To start all of the system components in the current OAS instance, enter the following command:
opmnctl startproc
To stop, then restart all of the active components in the current OAS instance, enter the following command:
opmnctl restartproc
Only the components that are already active are restarted, and components that are down remain down. The Management component remains active.
Stopping and Starting Individual Components
You control individual system components and OC4J instances by specifying them as opmnctl attribute values. You can control components at the ias-component level (for example, HTTP_Server or OC4J) or at the process-type level (for example, home or PIA_PeopleSoft).
Use the following command syntax for OC4J instances:
opmnctl command ias-component=OC4J process-type=instancename
Use the following command syntax for HTTP_Server:
opmnctl command ias-component=HTTP_Server
Note. Component names are case sensitive.
For example, to stop the PIA_PeopleSoft OC4J instance, enter the following command:
opmnctl stopproc ias-component=OC4J process-type=PIA_PeopleSoft
For example, to start the home OC4J instance, enter the following command:
opmnctl startproc ias-component=OC4J process-type=home
For example, to stop then restart the HTTP_Server component, enter the following command:
opmnctl restartproc ias-component=HTTP_Server
Setting HTTP Session Timeout
HTTP session timeouts are not configured with OAS. Timeout controls are accessible on the Security page of the PeopleSoft Web Profile Configuration component. PeopleSoft Internet Architecture ignores any session timeout configured on the web server. The session timeouts that you set in the web profile override any HTTP session timeouts that are set for the web server.
See Also
Implementing Secure Sockets Layer (SSL) on OAS 10g
This section provides an overview of SSL encryption with OAS 10g and discusses how to:
Create a wallet.
Import root CA certificate into the wallet.
Set up the user certificate.
Enable SSL on the HTTP Server.
Understanding SSL Encryption with OAS 10g
Setting up SSL encryption for OAS 10g requires you to configure SSL for the OAS instance only. You don't need to configure SSL separately for the OC4J component because no direct connection to the OC4J component occurs.
Implementing SSL for OAS 10g involves these tasks:
Creating a Wallet
A wallet is a required repository for storing user certificates and other information needed to validate the certificates of peers.
To create a wallet:
Launch Oracle Wallet Manager.
Windows: Select Programs, Oracle — <Oracle Instance>, Integrated Management Tools, Wallet Manager.
UNIX: On the command line enter <OAS_Home>/bin/owm.
Create a new wallet:
Select Wallet, New.
On the New Wallet dialog box enter a valid Wallet Password, select a Wallet Type of Standard, and click OK.
Note. The password ensures unauthorized use of your credentials.
When prompted to create a certificate request at this time, click No.
This returns you to the Oracle Wallet Manager main window. The new wallet you just created appears in the left window pane. The certificate has a status of [Empty], and the wallet displays its default trusted certificates.
Save and name the wallet.
Select Wallet, Save.
Navigate to ORACLE_HOME\Apache\Apache\conf\ssl.wlt.
Enter a new wallet name after the ...\ssl.wlt in the Directory edit box.
For example, ...\ssl.wlt\newwallet
When prompted to create the new wallet, click Yes.
Note. This location must be used in the SSL configuration for clients and servers. A message at the bottom of the main Oracle Wallet Manager window confirms that the wallet was successfully saved.
Select Wallet, Auto Login.
Modify the ssl.conf file.
Open OAS_HOME\Apache\Apache\conf\ssl.conf.
Modify the SSL Wallet File parameter to reflect the new name of the wallet you just created.
For example, change
SSLWallet file:C:\Oracle\OraHome_gs\Apache\Apache\conf\ssl.wlt\default
to
SSLWallet file:C:\Oracle\OraHome_gs\Apache\Apache\conf\ssl.wlt\newwallet
Importing the Root CA Certificate on the Wallet
To import root CA certificate into wallet:
Download the root CA certificate from the Certificate Authority of your choice.
Make note of the location where you store the certificate file.
Open Oracle Wallet Manager, and open your wallet.
Select Operations, Import Trusted Certificate.
Navigate to where the root certificate is being stored, select the certificate file, and click Open.
Note. The root certificate should now appear in the Oracle Wallet Manager under Trusted Certificates.
Select Wallet, Save.
Setting Up the User Certificate
Setting up the user certificate involves:
Creating a certificate request in the wallet.
Submitting the certificate request to the certificate authority.
Importing the new certificate into the wallet.
To set up the user certificate:
Create a certificate request in the wallet.
Launch Oracle Wallet Manager, and open your wallet.
Select Operations, Add Certificate Request.
On the Create Certificate Request dialog, enter the appropriate information, and click OK.
Note. The Common Name edit box should contain the server machine name.
Submit certificate request to certificate authority.
In your browser, open the website of your certificate authority and navigate to the interface used for submitting certificate requests.
In the Oracle Wallet Manager, select the Certificate:[Requested] node under the Wallet node in the left pane, and copy the information appearing in the Certificate Request edit box (including the BEGIN NEW.... and END NEW.... lines).
Submit the certificate request information to the certificate authority, and save the generated DER certificate as a file.
Import user certificate into wallet.
In Oracle Wallet Manager select, Operations, Import User Certificate.
On the Import Certificate dialog select the Select a file that contains the certificate option.
Navigate to the location where you downloaded the user certificate, and click Open.
Select Wallet, Save.
Enabling SSL
To enable SSL:
Open OAS_HOME/Apache/Apache/conf/mod_oc4j.conf file.
Identify the VirtualHost section corresponding to the HTTPS (SSL) Port 3, and in this section, go to the <IfDefine SSL> entry and update the following:
Change the value of the SSLEngine attribute from "off" to "on".
Update the location of SSLWallet to point to the location where the wallet was stored.
Restart Oracle HTTP Server using Application Server Control, using one of the following commands:
UNIX:
OAS_HOME/opmn/bin> opmnctl [verbose] restartproc ias component=HTTP_Server
Windows:
OAS_HOME\opmn\bin> opmnctl [verbose] restartproc ias-component=HTTP_Server
Configuring Java Virtual Machine (JVM) Heap Size
You configure the JVM heap size for PIA on the PIA OC4J instance Server Administration page.
To Configure the JVM heap size:
In the System Components grid of the Application Server Control Home page, click the name of the OC4J instance that contains the PIA web modules (for example, PIA_PeopleSoft).
On the OC4J instance Home page, select the Administration page.
On the OC4J Instance Properties list, click the Server Properties link.
Edit boxes Maximum heap size and Initial heap size show the current configured values; edit these values as needed.
Click Apply.
Monitoring OAS 10g Performance
For every OAS 10g instance, you can perform the following tasks from the instance Home Page:
View the overall status of your application server, as well as a selected set of performance metrics.
Drill down to specific application server components, such as Oracle HTTP Server, and get more detailed information about how each component is performing.
Compare the performance of each component and analyze how each application affects your overall OAS 10g performance.
Make changes to the configuration of your OAS 10g applications. For example, you can make changes to the configuration of your Oracle HTTP Server.
Note. In 10.1.3.1, you can't make any configuration changes to Oracle HTTP Server (OHS) component. Any changes to OHS should be done manually.
Understanding the Status Icons
You use the status icon in the General section of the page to determine the overall status and availability of the OAS 10g instance. You can review the status of the individual OAS 10g system components using the Status column of the System Components grid. The following status icons can appear:
|
|
The indicated OAS 10g system component is active. |
|
|
The indicated OAS 10g system component is down. |
Viewing OAS 10g Performance Metrics
You can view specific performance metrics for any system component, or general performance metrics for the displayed OAS 10g instance at any time. On the home page of any OAS 10g OC4J component, click the Performance link to access the different metric pages for that component.
Uninstalling PeopleSoft on OAS 10g
You can uninstall the PeopleSoft (PIA) components of OAS 10g from the Application Server Control Home page, or from a command line.
Warning! None of the files and directories related to components that you're uninstalling can be open or currently accessed, or the
subsequent behavior of OAS 10g will be unpredictable. This includes, for example, viewing the directory structure of the OC4J
instances in Windows Explorer.
Make sure that you close all folder views of OAS_HOME\j2ee and close all open files within that directory structure, before
you uninstall PIA components.
Uninstalling PeopleSoft Using Application Server Control
To uninstall individual OC4J instances:
Click on the Application Server instance to uninstall individual OC4J instances.
Click the Delete icon to remove the OC4J component.
Note. Non-OC4J components such as the HTTP_Server can’t be accidentally deleted this way. Application Server Control detects any incorrectly selected components and presents an error message.
Using the Command Line
To uninstall individual OC4J instances:
At a command prompt, navigate to the location of the opmnctl command within the OAS 10g instance from which you want remove PIA.
cd C:\OraHome_1\opmn\bin
Stop the OC4 component by entering the following command:
opmnctl stopproc process-type -co OC4Jinstancename
For example:
opmnctl stopproc process-type -co PeopleSoft
Navigate to the bin directory of the OAS 10g instance.
For example:
cd C:\OraHome_1\bin
Remove the OC4J component by entering the following command:
removeinstance -instanceName OC4Jinstancename
For example:
removeinstance -instanceName PeopleSoft
Setting Up a Reverse Proxy Server (RPS)
Oracle | PeopleSoft supports the use of a reverse proxy server (RPS) with OAS 10g. An RPS supplies the URL to which the browsers connect, but a backend web server handles the transaction processing.
This section discusses how to:
Configure Oracle WebCache as an RPS.
Configure Microsoft Internet Information Server (IIS) as an RPS.
Configure Sun ONE as an RPS.
Configuring Oracle WebCache as an RPS
PeopleSoft support OracleAS Web Cache as a reverse proxy server (RPS) to the Oracle Application Server. OracleAS Web Cache is not bundled with Oracle Application Server and needs to be installed separately.
Note. Web Cache is not bundled with PeopleTools; it is a separately licensed product.
See Also
Oracle® Application Server Web Cache Administrator’s Guidehttp://download-west.oracle.com/docs/cd/B14099_02/caching.htm
Configuring Microsoft Internet Information Server (IIS) as an RPS
OracleAS Proxy Plug-in is a reverse HTTP proxy. The plug-in forwards incoming HTTP requests to an Oracle Application Server instance This section provides proxy plug-in configuration instructions for IIS listener on Windows systems. This section discusses how to:
Install and configure the OracleAS Proxy plug-in.
Configure the IIS Listener to Use OracleAS Proxy Plug-in.
Configure OAS 10.1.3.1 to Forward Requests to Proxy.
Installing and Configuring the OracleAS Proxy Plug-In
To install and configure the OracleAS Proxy plug-in:
Download OracleAS Proxy Plug-in.
OracleAS Proxy Plug-in is available on the Oracle Application Server 10g Companion CD, which is included in your Oracle Application Server CD Pack. OracleAS Proxy Plug-in for IIS is a shared library oracle_proxy.dll located in the /plugins/win32/iis directory.
Install the OracleAS Proxy Plug-in.
After downloading OracleAS Proxy Plug-in, place the appropriate configuration file and shared library in directories that the third-party listener can access.
Configure the OracleAS Proxy Plug-in.
There is one configuration file for OracleAS Proxy Plug-in: the Proxy Server Definition file. It controls the proxy functionality. The presence of the configuration file in the Web server's file system makes the functionality active.
The proxy server definition file must reside in a directory that is readable by the third-party listener. For simplicity, you could create a directory called proxy in a convenient location on your system, and place the proxy server definition file, the proxy shared library file, and proxy log files in it. Described in detail in Proxy Configuration File Parameters section, the proxy server definition file contains:
Name value pairs that describe the servers that will be used to proxy requests to Oracle Application Server.
Options for communicating with the servers.
A set of rules that map URLs to the servers.
For example, in a text editor, create the server definition configuration file (as in., servers) and save it in such a place where it is readable by the web server listener (as in., F:\IIS\ proxy\). This file should contain these required parameters:
oproxy.serverlist=ias1
oproxy.ias1.hostname=foo.peoplesoft.com
oproxy.ias1.port=7778
oproxy.ias1.urlrule=/*
Where:
serverlist: must be a unique name to identify the server in the other configuration parameters.
hostname: the hostname of the OAS 10.1.3.1.
port: HTTP Port specified during PIA install on OAS 10.1.3.1.
urlrule: defines which URL is redirected and which is handled by IIS itself.
Configuring the IIS Listener to Use OracleAS Proxy Plug-In
To configure the IIS listener to use OracleAS proxy plug-in:
Select Start, Run.
In the Run dialog, enter regedit.
In the Registry Editor window, expand the HKEY_LOCAL_MACHINE folder.
Expand the SOFTWARE folder.
Select the Oracle folder.
Select Edit, New, Key.
The system adds a new folder under the Oracle folder with the name New Key #1.
Enter IIS Proxy Adapter for the key name.
Select Edit, New, String Value.
The system adds a new value in the right window pane with the name New Value #1.
Enter server_defs for the value name.
Select Edit, Modify, and in the Edit String dialog box, enter the full path of your proxy server definition file (F:\IIS\proxy\servers) in the Value data field, and click OK.
(Optional) Specify log_file and log_level using the procedure specified in the previous steps.
Add a string value with the name log_file and the desired location of the log file (as in, F:\IIS\proxy\proxy.log).
Add a string value with the name log_level and a value for the desired log level. Valid values are debug, inform, error, and emerg.
Using the IIS management console, add oracle_proxy.dll as a filter in your IIS Web site.
The name of the filter should be oproxy and its executable must point to the directory containing oracle_proxy.dll (as in, F:IIS\\proxy\oracle_proxy.dll).
Using the IIS management console, add oracle_proxy.dll as a filter in your IIS Web site.
The name of the filter should be oproxy and its executable must point to the directory containing oracle_proxy.dll (as in, d:\proxy\oracle_proxy.dll).
Restart IIS (stop and then start the IIS Server), ensuring that the oproxy filter is marked with a green upward arrow.
Note. To restart IIS, you must stop all of the IIS services through the control panel, or restart the computer. This is the only way to ensure that the .dll is reloaded. Restarting IIS through the management console is not sufficient.
Configuring OAS 10.1.3.1 to Forward Requests to the Proxy
To configure OAS 10.1.3.1 to forward requests to the proxy:
Open OAS_HOME/Apache/Apache/conf/mod_oc4j.conf file in a text editor.
Add the ISS listener port information to the VirtualHost section after the ServerName entry.
Use the following syntax:
Port <port corresponding to the IIS Listener>
For example,
Port 8220
Restart OAS.
Configuring Sun ONE as an RPS
OracleAS Proxy Plug-in is a reverse HTTP proxy. The plug-in forwards incoming HTTP requests to an Oracle Application Server instance. This section provides proxy plug-in configuration instructions for Sun ONE Enterprise Server listener on UNIX and Windows systems.
Note. If you are configuring the Sun ONE listener on Windows, use forward slashes (/) in all paths.
Note. The default configuration files for Sun ONE route all incoming requests for the URI /servlet to the Sun ONE servlet handler. The OracleAS Proxy Plug-in does not override the Sun ONE server's configuration settings. You must ensure that the URL mappings to the OracleAS Proxy Plug-in are distinct from the URL mappings to the Sun ONE servlet engine.
This section discusses how to:
Install and configure OracleAS proxy plug-in.
Configure Sun ONE listener to use OracleAS proxy plug-in.
Configure OAS 10.1.3.1 to forward requests to the proxy.
Installing and Configuring OracleAS Proxy Plug-in
To install and configure OracleAS proxy plug-in:
Download the OracleAS proxy plug-in
OracleAS Proxy Plug-in is available on the Oracle Application Server 10g Companion CD, which is included in your Oracle Application Server CD Pack. The following table contains information about the shared libraries for OracleAS Proxy Plug-in.
|
Platform |
File Name |
Location and Description |
Instructions |
|
UNIX |
oracle_proxy.so |
oacle_proxy.so is the OracleAS Proxy Plug-in file for Sun ONE Web listener. It is located in the /plugin/solaris/sunone director. |
To install the plug-in into the listener, place oracle_proxy.so in a directory to which the listener has read and execute privileges. |
|
Windows |
oracle_proxy.sunone.dll |
Oracle_proxy_sunone.dll is the OracleAS Proxy Plug-in file for Sun ONE Web listener. It is located in the /plugins/win32/sunone directory. |
To install the plug-in into the listener, copy oracle_proxy_sunone.dll to a directory the listener can access. |
Install OracleAS Proxy Plug-in.
After downloading OracleAS Proxy Plug-in, place the appropriate configuration file and shared library in directories that the third-party listener can access.
Configure the OracleAS Proxy Plug-in.
There is one configuration file for OracleAS Proxy Plug-in: the Proxy Server Definition file. It controls the proxy functionality. The presence of the configuration file in the Web server's file system makes the functionality active.
The proxy server definition file must reside in a directory that is readable by the third-party listener. For simplicity, you could create a directory called proxy in a convenient location on your system, and place the proxy server definition file, the proxy shared library file, and proxy log files in it. Described in detail in Proxy Configuration File Parameters section, the proxy server definition file contains:
Name value pairs that describe the servers that will be used to proxy requests to Oracle Application Server.
Options for communicating with the servers.
A set of rules that map URLs to the servers.
For example, in a text editor, create the server definition configuration file (as in., servers) and save it in such a place where it is readable by the web server listener (as in, F:\iPlanet\proxy\). This file should contain these required parameters:
oproxy.serverlist=ias1
oproxy.ias1.hostname=foo.peoplesoft.com
oproxy.ias1.port=7778
oproxy.ias1.urlrule=/*
Where:
serverlist: must be a unique name to identify the server in the other configuration parameters.
hostname: the hostname of the OAS 10.1.3.1.
port: HTTP Port specified during PIA install on OAS 10.1.3.1.
urlrule: defines which URL is redirected and which is handled by Sun ONE itself.
Configuring Sun ONE Listener to Use OracleAS Proxy Plug-in
To configure Sun ONE listener to use OracleAS proxy plug-in:
Open the magnus.conf file in version 6, or obj.conf in version 4 in the Sun ONE listener /config directory.
Add the load-modules line, which the listener uses to determine where the proxy shared library is, and which functions are exposed by this library.
On UNIX:
Init fn="load-modules" shlib="/path/oracle_proxy.so" funcs=op_init,op_objecttype,op_service
On Windows:
Init fn="load-modules" shlib="/path/oracle_proxy_sunone.dll" funcs=op_init,op_objecttype,op_service
where /path/ is the path to the shared library for the plug-in.
Add the configuration parameters line.
Init fn="op_init" server_defs="/path/servers" log_file="/path/oproxy.log" log_level=error
where /path/ is the path to the proxy server definition and log files. The proxy server definition file contains all of the configuration information for the servers that the proxy plug-in interacts with. A log file and log level to log messages from the plug-in can also be specified (optional).
Add the object type line to the <Object name=default> section of the obj.conf file, before all other lines beginning with the word ObjectType.
ObjectType fn=op_objecttype
Add the service type line before all other lines that begin with the word "Service":
Service type="oracle/proxy" fn="op_service"
Start the listener using the GUI or the shell script.
Configuring OAS 10.1.3.1 to Forward Requests to the Proxy
To configure OAS 10.1.3.1 to forward requests to the proxy:
Open OAS_HOME/Apache/Apache/conf/mod_oc4j.conf file in a text editor.
Add the Sun ONE listener port information to the VirtualHost section after the ServerName entry
Port <port corresponding to the Sun One listener>
For example,
Port 8220
Restart OAS.