 Overview of Pagelet Wizard
This chapter provides overviews of Pagelet Wizard and its data sources, display formats, display sizes, and pagelet types. This chapter discusses how to:
Define Pagelet Wizard transformation types, display formats, and data types.
Define Pagelet Wizard XSL prototypes.
Define Pagelet Wizard headers and footers.
Define Pagelet Wizard pagelet categories.
Enter pagelet identifying information (step 1).
Select a pagelet data source (step 2).
Specify pagelet data source parameters (step 3).
Select a pagelet display format (step 4).
Specify pagelet display options (step 5).
Specify pagelet publication options (step 6).
Use Pagelet Wizard post-transformation processing.
Overview of Pagelet WizardPagelet Wizard pagelets are small pages that provide display-only snapshots of applicable content. Pagelet Wizard provides a user-friendly, browser-based graphical user interface (GUI) that leads you through the series of steps involved in creating and publishing a pagelet.
Portal administrators and nontechnical users can use Pagelet Wizard to integrate and transform data from a variety of data sources. The following diagram illustrates a high-level Pagelet Wizard architectural process flow:
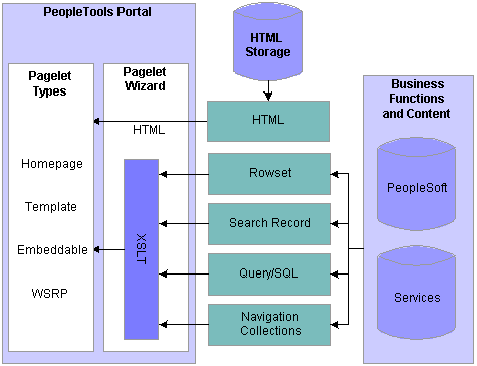
Pagelet Wizard architectural data flow
You do not need to have PeopleSoft-specific application development tools or skills to use Pagelet Wizard to create pagelets. During the pagelet-creation process, the Pagelet Wizard GUI presents a series of numbered steps. Each step appears in a numbered path at the top of the Pagelet Wizard component to indicate where you are in the pagelet creation process.
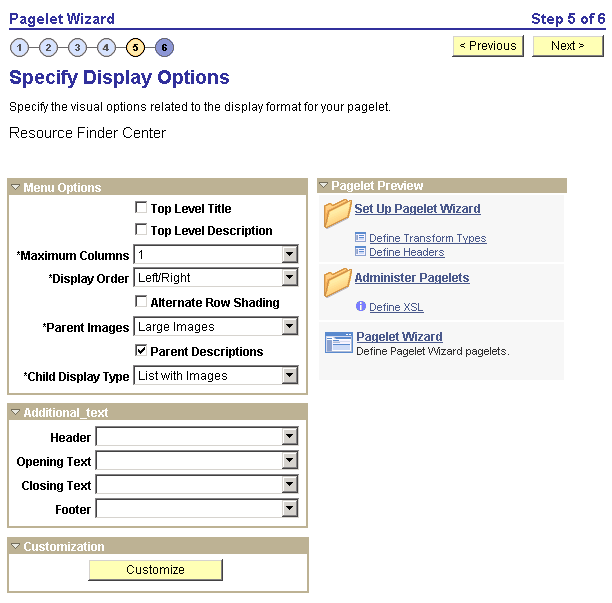
Numbered steps on the Specify Display Options page
This labeled path assists you in navigating forward and back through the steps in the wizard, which enables you to review or edit pagelet definition values. Once you’ve completed a step, Pagelet Wizard automatically takes you to the next appropriate step.
The Pagelet Wizard GUI leads you through the following steps that are typically used to create a pagelet:
Specify pagelet information.
Select data source.
Specify data source parameters.
Select display format.
Specify display options.
Specify publishing options.
Note. Before you start building a pagelet with Pagelet Wizard, you should familiarize yourself with all data sources. This enables you to evaluate the best way to retrieve the data that you want to display on the pagelet.
See Also
Step 2: Selecting a Pagelet Data Source
Overview of Pagelet Wizard Data SourcesPagelet Wizard supports the creation of pagelets using the following data sources:
|
HTML |
Use to present appropriately sized static HTML pages in Pagelet Wizard pagelets. HTML data source pagelets are compatible with the passthru and custom display formats. |
|
IB Connector |
Interacts directly with connectors registered to the Integration Broker and secured using Define IB Connector Security within Pagelet Wizard. This data type should only be used when it is not desirable to use the Integration Broker data type. |
|
Integration Broker |
For pagelets that use Integration Broker to retrieve data from external sources. This middleware technology facilitates synchronous and asynchronous messaging among internal systems and with trading partners, while managing message structure, message format, and transport disparities. |
|
Navigation Collections |
Use to create Pagelet Wizard pagelets from existing sets of folders and links stored in Navigation Collections. Navigation Collection data source pagelets are compatible with the menu and custom display formats. |
|
PeopleSoft Query |
Use to access PeopleSoft application data or any tables within the PeopleSoft environment through Pagelet Wizard pagelets. PeopleSoft Query data source pagelets are compatible with the table, list, chart, and custom display formats. |
|
Rowset |
Use to access a rowset record whose data is populated at runtime. This data source is geared toward supplying data to embedded pagelets. Rowset data source pagelets are compatible with the table, list, chart, and custom display formats. You designate a record as the rowset data source when you design your pagelet using Pagelet Wizard. When the pagelet is executed for display, the data populated for the rowset must contain that record in the first level of the rowset. If the runtime rowset does not contain the record specified in Pagelet Wizard, no data appears in the pagelet. |
|
Search record |
Use to create Pagelet Wizard pagelets that provide quick access to specific transactions on a target transaction page. The search record data type enables you to select a basic search record or a component interface. Use the basic search record data type for simple search lookup pages. Use the component interface search record data type when the basic search record does not provide the required functionality; for example, when security or PeopleCode considerations need to be taken into account. Search record data source pagelets are compatible with the search list display format. |
|
URL |
URL data type retrieves data from external sources like the Internet. This includes sources such as RSS newsfeeds. Use to display appropriately sized dynamic HTML pages on Pagelet Wizard pagelets. URL data-source pagelets are compatible with the custom and passthru display formats. |
Note. The SOAP data type used in previous releases is now included in the functionality of the IB data type. In PeopleTools 8.49, SOAP services are consumed using Integration Broker, so use the IB data type to create pagelets going forward.
You can define your own data types on the Define Data Types page.
See Also
Selecting a Navigation Collection Data Source
Step 2: Selecting a Pagelet Data Source
Overview of Pagelet Wizard Display FormatsPagelet Wizard supports the creation of pagelets based on the following display formats:
Table
List
Chart
Menu
Search list
Passthru
Custom (Extensible Stylesheet Language, or XSL)
The table display format is appropriate for creating a pagelet that displays data from the PeopleSoft Query and rowset data sources. Following is an example of a table pagelet displaying data from a PeopleSoft Query data source:
Table pagelet example
The list display format is appropriate for creating a pagelet that displays data from the PeopleSoft Query and rowset data sources. Following is an example of a list pagelet displaying data from a PeopleSoft Query data source:
List pagelet example
The chart display format is appropriate for creating a pagelet that displays data from the PeopleSoft Query and rowset data sources. Following is an example of a chart pagelet displaying data from a PeopleSoft Query data source:
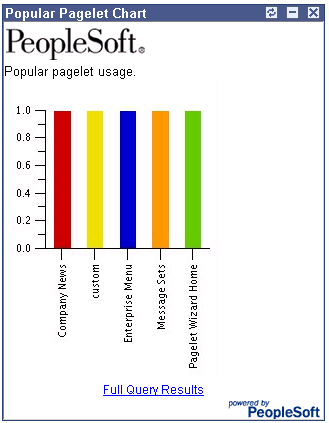
Chart pagelet example
The menu display format is appropriate for creating a pagelet that displays data from a Navigation Collection data source. Following is an example of a menu pagelet displaying data from a Navigation Collection data source:
Menu pagelet example
The search list display format is appropriate for creating pagelets that display data from the search record data source. Following are examples of search list pagelets displaying data from a search record data source:
Search list pagelet example (Show Results options set to N)
Search list pagelet example (Show Results option set to Y)
The passthru display format is appropriate for creating a pagelet that displays data from the HTML, Content Management, IB Connector, and URL data sources. Because the passthru display format performs no further transformations on data from the data source, it should only be used with data sources that return HTML that can be directly displayed as a pagelet. Following is an example of a passthru pagelet displaying data from an HTML data source:
Passthru pagelet example
The custom display format is appropriate for creating a pagelet using all datasources that return XML. Generally, most data types return XML, but there are potential circumstances where IBConnector, URL, and HTML datatypes will not return XML. In those instances, the custom display format would not be appropriate.
Use the custom display format when you want to use a display format other than the ones expressly listed in the Pagelet Wizard. When you select the custom display format, Pagelet Wizard enables you to select a format provided by one of the delivered XSL prototypes, or you can select an XSL template that you created on the Define XSL page.
Following is an example of a custom pagelet displaying data from a PeopleSoft Query data source:
Custom pagelet example
This custom pagelet uses the same PeopleSoft Query data source as the table pagelet example shown earlier; however, this example has a custom XSL template applied.
See Also
Defining Pagelet Wizard XSL Prototypes
Step 4: Selecting a Pagelet Display Format
Overview of Pagelet Wizard Display SizesIn addition to the display format, pagelet sizing is also important during pagelet creation. Pagelet Wizard uses pagelet sizing that follows a basic set of rules that enable pagelets to appear properly on a PeopleSoft portal homepage. Pagelet size corresponds to the homepage layout that is specified. You can specify either a two-column layout that displays one narrow pagelet and one wide pagelet, or a three-column layout that displays three narrow pagelets.
Pagelets that you design with the Pagelet Wizard should conform to the dimensions of the narrow column pagelet and (optionally) the wide column pagelet. A narrow pagelet should be 240 pixels wide. Subtracting the border and the internal margin provides 218 pixels for content. A wide pagelet should be 490 pixels wide. Subtracting the border and the internal margin provides 468 pixels for content.
If you display a pagelet that is wider than the homepage column that contains it, an error does not occur. The column expands to accommodate the content; however, this may require horizontal scrolling on the homepage, which can be inconvenient for the end user. In accordance with general pagelet design principles, make the pagelet height as short as possible.
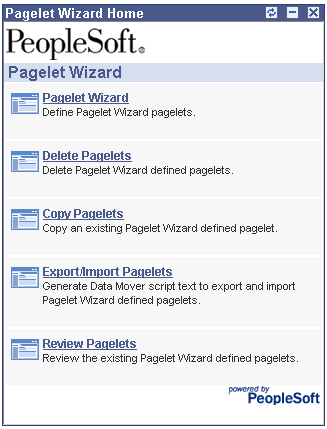
Overview of Pagelet Wizard Pagelet TypesPagelet Wizard supports the publication of the following pagelet types:
Homepage pagelets.
Template pagelets.
Embeddable pagelets.
Web Services for Remote Portlets (WSRP) portlets.
A homepage pagelet is a version of a pagelet that is available for use on the portal homepage. The layout and content of the homepage is usually configurable by the end user, and homepage pagelets can be designated as optional or required.
Homepage pagelet example
A template pagelet is a version of a pagelet that can be added to a PeopleSoft template. These pagelets can extract and leverage keys specified by the target transaction for the template. Publishing a pagelet as a template pagelet is useful only when the PeopleSoft Enterprise Portal is installed and the Intelligent Context Manager feature will be used to display the template pagelet.
Template pagelet example
An embeddable pagelet is a version of a pagelet that can be generated by the Pagelet Wizard application programming interface (API) for rendering within an HTML area of a PeopleSoft Pure Internet Architecture page or an iScript.
WSRP Portlet
A WSRP portlet is a portlet that can be used with external portals that support the WSRP standard.
See Also
Step 6: Specifying Pagelet Publication Options
Understanding Web Services For Remote Portlets (WSRP)
Enterprise PeopleTools 8.49 PeopleBook: Using PeopleSoft Applications
Defining Pagelet Wizard Setup Values
This section discusses how to:
Set up the PeopleSoft Integration Broker gateway for Pagelet Wizard.
Set up the Pagelet Wizard IB Connector (Integration Broker) data source.
Set up the Pagelet Wizard Integration Broker data source.
 Pages Used to Set Up Pagelet Wizard Setup Values
|
Page Name |
Object Name |
Navigation |
Usage |
|
Gateways |
IB_GATEWAY |
PeopleTools, Integration Broker, Configuration, Gateways |
Specify the gateway’s location, update configuration settings, and register target connectors to be used with the gateway. |
|
Define IB Connector Security - Connectors |
PTPPB_IBCONN_TRANS |
PeopleTools, Portal, Pagelet Wizard, Define IB Connector Security, Connectors |
Apply security to a connector that you want to use with the Pagelet Wizard IB Connector data source. |
|
Define IB Connector Security - Default Security |
PTPPB_IBCON_DEFSEC |
PeopleTools, Portal, Pagelet Wizard, Define IB Connector Security, Default Security |
Select one or more permission lists to which you want to provide access to IB Connector. This security will be applied to connectors for which the Apply Default Security option is selected on the Define IB Connector Security - Connectors page. |
|
Define IB Connector Security |
PTPPB_IBCON_CUSTSC |
Click the Custom Security button on the Define IB Connector Security - Connectors page. |
Select one or more permission lists to which you want to provide access to IB Connector. This security will be applied to connectors for which you clicked the Custom Security button on the Define IB Connector Security - Connectors page. |
Setting Up the PeopleSoft Integration Broker Gateway for Pagelet WizardThis section provides an overview of setting up the PeopleSoft Integration Broker Gateway for Pagelet Wizard and discusses how to set up the default Gateway for use with Pagelet Wizard data sources.
When you use the Pagelet Wizard PeopleTool with PeopleSoft Enterprise Portal installed, the IB Connector and Integration Broker data sources become available for use. These data sources rely on PeopleSoft Integration Broker for web interactivity. You must set up the default gateway before these data sources are usable with your system.
Setting Up the Default Gateway for Use with Pagelet Wizard Data SourcesAccess the Gateways page.
Set up the default gateway according to the instructions in the Integration Broker PeopleBook.
See Managing Integration Gateways.
Click Save.
Click Load Gateway Connectors.
Click Save.
Setting Up the Pagelet Wizard IB Connector Data Source SecurityAccess the Define Connector Security page.
See Using the Delivered Listening Connectors and Target Connectors.
|
Integration Gateway ID |
Select the appropriate Integration Gateway. |
|
Active Flag |
Select to activate the connector and make it available for use with the Pagelet Wizard IB Connector data source. |
|
Apply Default Security |
Select to apply the default security settings that are defined on the Define IB Connector Security - Default Security page to the connector. |
|
Custom Security |
Click to access the Define Connector Security page, where you can define custom security settings for the connector. |
Setting Up the Pagelet Wizard Integration Broker Data SourceWhen you use the Pagelet Wizard PeopleTool with PeopleSoft Enterprise Portal installed, the Integration Broker data source becomes available for use. You must perform the following tasks before the Integration Broker data source is usable with your system.
Set up the Integration Broker listening connector.
Set up the appropriate service, service operation, handlers, and routings for the operation you want to use.
Defining Pagelet Wizard Transformation Types, Display Formats, and Data TypesThis section discusses how to:
Define transformation types.
Define display formats.
Define data types.
Pages Used to Define Pagelet Wizard Transformation Types, Display Formats, and Data Types
|
Page Name |
Object Name |
Navigation |
Usage |
|
Define Transform Types |
PTPPB_TXFRMTYP_MTC |
PeopleTools, Portal, Pagelet Wizard, Define Transform Types |
Define transformation methods that can be applied to Pagelet Wizard pagelet content. |
|
Define Display Formats |
PTPPB_DISPFRMT_MTC |
PeopleTools, Portal, Pagelet Wizard, Define Display Formats |
Define display formats that can be used to format Pagelet Wizard pagelet content. |
|
Define Data Types |
PTPPB_DATATYPE_MTC |
PeopleTools, Portal, Pagelet Wizard, Define Data Types |
Define data types that can be used to supply Pagelet Wizard with pagelet content. |
|
Document Type Definition (DTD) |
PTPPB_DATADTD_SBP |
Click the View Document Type Definition (DTD) link on the Define Data Types page. |
Access the DTD that describes the XML generated by the selected data type. |
Defining Transformation TypesAccess the Define Transform Types page.
Pagelet Wizard is delivered with the following transformation type definitions to support their associated display formats:
PASSTHRU
XSL
Warning! Do not alter delivered field values for these transformation types.
This Define Transform Types page enables you to build your own transformation types. For example, you could create a new transformation type called ABC123. You would then extend Pagelet Wizard to perform ABC123 transformations by building a supporting application class and registering it as a transformation type. You could then create builders for assembling pagelet displays that create ABC123 transformation definitions.
See Overview of Pagelet Wizard Display Formats.
|
Transformation Type |
Enter the internal name that you want to assign to the transformation type. |
|
Description |
For reference purposes only, enter a short description of the transformation type. |
|
Long Description |
For reference purposes only, enter a more detailed description of the transformation type. |
Supporting Application Class
The application class specified here refers to the PeopleCode that implements the transformation type.
|
Package Name |
Enter the application class package name that you want to use for the transformation type. |
|
Path |
Enter the application class path that you want to use for the transformation type. |
|
Application Class ID |
Enter the name of the application class that you want to use for the transformation type. The class must exist in the application package name that you have specified. |
Defining Display FormatsAccess the Define Display Formats page.
A display format performs the following tasks:
Defines a TransformBuilder, which is code that builds a particular type of display format (chart, menu, list, and so forth).
Identifies the proper transformation to use with pagelets created with a specific display format builder.
For example, the chart display format defines the code that builds charts, and it specifies that Pagelet Wizard must use the XSL transformation for pagelets created using this display format.
Pagelet Wizard is delivered with the following display format definitions to support their associated display formats:
CHART
CUSTOM
LIST
MENU
PASSTHRU
SEARCHREC
TABLE
Warning! Do not alter delivered field values for these display formats.
See Overview of Pagelet Wizard Display Formats.
|
Display Format ID |
Enter the name that you want to assign to the display format. |
|
Description |
Enter a short description of the display format. This short description appears as the display format name value on the Select Display Format page in Pagelet Wizard. |
|
Active |
Select to activate the display format and make it a selectable value in Pagelet Wizard. If you deactivate a display format, the display format is no longer available for selection on the Select Display Format page when accessed for associated data types. Existing pagelets that have been created using a deactivated display format are unaffected; however, you can no longer use Pagelet Wizard to change the display settings for those pagelets. |
|
Long Description |
Enter a detailed description of the display format. This long description appears as the display format description on the Select Display Format page in Pagelet Wizard. |
|
Sort Order |
Enter a numeric value to specify the order in which you want the display format to appear as a selectable field value relative to other display formats on the Select Display Format page. |
|
Image Name |
Select the image that you want to appear with the display format name and description on the Select Display Format page. |
|
Transformation Type |
Display formats use a transformation technology. Select the transformation type that you want to use for the display format. Available transformation types are defined on the Define Transform Types page. |
|
Page Name |
Enter the object name of the page to be used to define display options for this display format. This page must exist in the PTPPB_WIZARD component in PeopleSoft Application Designer. |
Supporting Application Class
The application class specified here refers to the PeopleCode that implements the display format. This code is the builder that creates the definition that Pagelet Wizard uses (along with the transformation) to display the pagelet.
|
Package Name |
Enter the application class package name to use for the display format. |
|
Path |
Enter the application class path to use for the display format. |
|
Application Class ID |
Enter the name of the application class to use for the display format. The class must exist in the application package name that you specify. |
Defining Data TypesAccess the Define Data Types page.
Pagelet Wizard is delivered with the following data type definitions to support their associated data sources:
HTML data type enables you to specify HTML code to display in the pagelet.
IBCONNECTOR data type interacts directly with connectors registered to the Integration Broker and secured using Define IB Connector Security within Pagelet Wizard. This data type should only be used when it is not desirable to use the Integration Broker data type.
IBDATASOURCE data type retrieves messages using Integration Broker. Specifically, it uses outbound synchronous messages to retrieve data from external sources.
NAVIGATION_COLLECTION data type enables you to display navigation collections within the context of a pagelet
PSQUERY data type enables you to use PeopleSoft Query to create database queries on records and fields within the PeopleSoft system.
ROWSET data type is used with embedded pagelets. Rowsets can exist within components.
SEARCHREC data type displays the search box or the search results from a given component.
URL data type retrieves data from external sources like the Internet. This includes sources like RSS newsfeeds.
Warning! Do not alter delivered field values for these data types.
See Overview of Pagelet Wizard Data Sources.
|
Data Type |
Enter the internal name that you want to assign to the data type. |
|
Description |
Enter a short description of the data type. This short description appears as the prompt list value when you select data sources in Pagelet Wizard. |
|
Active |
Select activate the data type and make it a selectable value in Pagelet Wizard. If you deactivate a data type, the data type is no longer available for selection on the Select Data Source page. If you deactivate a data type that is in use, associated pagelets do not display data. The pagelets display an error message instead. |
|
Long Description |
Enter a detailed description of the data type. This long description appears as the data type description on the Select Data Source page in Pagelet Wizard. |
Supporting Application Class
The application class specified here refers to the PeopleCode that implements the data type. This is the code that Pagelet Wizard calls to retrieve the data for the pagelet.
|
Package Name |
Enter the application class package name that you want to use for the data type. |
|
Path |
Enter the application class path that you want to use for the data type. |
|
Application Class ID |
Enter the name of the application class that you want to use for the data type. The class must exist in the application package name that you specify. |
Display Formats to use with this Data Type
|
Display Format ID |
Enter the display formats that are supported by the data type. You can select from existing display formats defined on the Define Display Formats page. |
|
View Document Type Definition (DTD) |
Click to access the Document Type Definition (DTD) page, where you can access the DTD that describes the XML generated by the selected data type. |
Viewing the Document Type Definition (DTD)
The Document Type Definition (DTD) page enables you to view the tags and attributes are used to describe content in the XML from the data source type. This information is useful when using third-party tools to generate XSL templates for the datatype.
Defining Pagelet Wizard XSL PrototypesThis section discusses how to define XSL prototypes for use in building Pagelet Wizard pagelets.
Page Used to Define Pagelet Wizard XSL Prototypes
|
Page Name |
Object Name |
Navigation |
Usage |
|
Define XSL |
PTPPB_XSLPROT_MTCE |
PeopleTools, Portal, Pagelet Wizard, Define XSL |
Create custom XSL definitions for use with Pagelet Wizard. |
Defining XSL Prototypes
Access the Define XSL page.
Pagelet Wizard is delivered with the following XSL prototypes to support their associated data sources and display formats:
|
XSL Prototype Name |
Data Type |
Description |
|
NAV_SMALLIMAGES |
NAVIGATION_COLLECTION |
Small Images |
|
LIST_QUERY |
PSQUERY |
Bullet List |
|
NUMBERED_LIST_QUERY |
PSQUERY |
Numbered List |
|
TABLE_QUERY |
PSQUERY |
Table |
|
PAPP_IB_BULLET_LIST |
IBDATASOURCE |
Bullet List |
|
PAPP_IB_CUSTOM_LIST |
IBDATASOURCE |
Customizable List |
|
PAPP_IB_CUSTOM_TABLE |
IBDATASOURCE |
Customizable Table |
|
PAPP_IB_NUMBER_LIST |
IBDATASOURCE |
Numbered List |
|
PAPP_IB_NUMBER_LIST_H |
IBDATASOURCE |
Numbered List - Header |
|
PAPP_IB_SKELETON |
IBDATASOURCE |
Skeleton XSL |
|
PAPP_IB_TABLE |
IBDATASOURCE |
Table |
|
PAPP_URL_ATOM03 |
URL |
ATOM 0.3 |
|
PAPP_URL_RSS |
URL |
RSS |
|
PAPP_URL_RSS091 |
URL |
RSS 0.91-0.93 |
|
PAPP_URL_RSS10 |
URL |
RSS 1.0 |
|
PAPP_URL_RSS20 |
URL |
RSS 2.0 |
|
PAPP_URL_SKELETON |
URL |
Skeleton XSL |
Warning! Do not alter the delivered XSL for these XSL prototypes.
|
XSL Prototype ID |
Enter an ID for the XSL prototype. |
|
Description |
Enter a description of the XSL prototype. The text that you enter here appears as available XSL template field values on the Specify Display Options page when you create a custom display format pagelet. |
|
Active |
Select to activate the XSL prototype and make it an available XSL template field value on the Specify Display Options page for custom display format pagelets. If you deactivate an XSL prototype, the prototype is no longer available for selection on the Specify Display Options page for the custom display format. Existing pagelets that have been created using the deactivated XSL prototype are unaffected. |
|
Long Description |
For reference purposes only, enter a long description of the XSL prototype. |
|
Data Type |
Select the applicable data type for the XSL prototype. You can assign only one data type per XSL prototype. |
|
Define XSL |
Enter XSL code for formatting pagelet XML data in the desired pagelet format. |
|
Delete XSL |
Click to delete the XSL prototype definition. You will be prompted to confirm your deletion. |
Defining Pagelet Wizard Headers and FootersThis section discusses how to:
Define headers.
Define header images.
Define footers.
Define footer images.
Pages Used to Define Pagelet Wizard Headers and Footers
|
Page Name |
Object Name |
Navigation |
Usage |
|
Define Header |
PTPPB_HDR_MTCE |
PeopleTools, Portal, Pagelet Wizard, Define Headers, Define Header |
Create a pagelet header design. Enter HTML that you want to appear on the header. |
|
Define Headers - Specify Image |
PTPPB_HDR_IMAGE |
PeopleTools, Portal, Pagelet Wizard, Define Headers, Define Header, Specify Image |
Specify an image that you want to appear on the pagelet header. Specify image properties. |
|
Define Headers - Preview |
PTPPB_HDR_PREVIEW |
PeopleTools, Portal, Pagelet Wizard, Define Headers, Define Header, Preview |
View the fully assembled pagelet header. After previewing the pagelet header, you can adjust the HTML and image parameters as needed. |
|
Define Footer |
PTPPB_FTR_MTCE |
PeopleTools, Portal, Pagelet Wizard, Define Footers, Define Footer |
Create a pagelet footer design. Enter HTML that you want to appear on the footer. |
|
Define Footers - Specify Image |
PTPPB_FTR_IMAGE |
PeopleTools, Portal, Pagelet Wizard, Define Footers, Specify Image |
Specify an image that you want to appear on the pagelet footer. Specify image properties. |
|
Define Footers - Preview |
PTPPB_FTR_PREVIEW |
PeopleTools, Portal, Pagelet Wizard, Define Footers, Preview |
View the fully assembled pagelet footer. After previewing the pagelet footer, you can adjust the HTML and image parameters as needed. |
Defining HeadersAccess the Define Header page.
Pagelet Header
|
Header ID |
Enter an ID for the pagelet header. |
|
Description |
Enter a description of the pagelet header. The text that you enter here appears as the selectable field value in the Header field when users assign headers to pagelets on the Specify Display Options page. |
|
Active |
Select to activate the pagelet header and make it a selectable field value in the Header field on the Specify Display Options page. If you deactivate a header that is in use, the header no longer appears on associated pagelets. In addition, the header is not be available for selection on the Specify Display Options page. |
|
Long Description |
For reference purposes only, enter a long description of the pagelet header. |
|
HTML Area |
Enter the HTML code that you want to use to generate the pagelet header. You can enter both HTML text and image references. Alternatively, you can include an image by selecting it on the Specify Image page. |
|
Delete Header |
Click to delete the pagelet header design. You will be prompted to confirm your deletion. |
Defining Header ImagesAccess the Define Headers - Specify Image page.
Header Image
|
Image Source |
Select the image source. Options are: System Catalog. Select to specify an image from the PeopleTools system image catalog. External Source. Select to specify an image from a source external to the PeopleTools system image catalog. |
|
Image Name |
If you select the System Catalog image source, click the Search button to access a list of existing images. |
|
Image URL |
If you select the External Source image source, enter a URL for the desired image file. All image types are supported. Ensure that the location of the image provides reliable access. |
|
Alignment |
Select the alignment of the image. Options are: Left: Select to align the image with the left margin of the pagelet. Right: Select to align the image with the right margin of the pagelet. |
|
Height |
Enter the image height in pixels if the image needs to be resized. If you enter an image height, the system adjusts the image width to fit the image height. |
|
Width |
Enter the image width in pixels if the image needs to be resized. If you enter an image width, the system adjusts the image height to fit the image width. |
|
Float Over Text |
Enter text that you want to appear when the user moves the cursor over the image. |
Defining FootersAccess the Define Footer page.
Pagelet Footer
|
Footer ID |
Enter an ID for the pagelet footer. |
|
Description |
Enter a description of the pagelet footer. The text that you enter here appears as the selectable field value in the Footer field when users assign footers to pagelets on the Specify Display Options page. |
|
Active |
Select to activate the pagelet footer and make it a selectable field value in the Footer field on the Specify Display Options page. If you deactivate a footer that is in use, the footer no longer appears on associated pagelets. In addition, the footer is not be available for selection on the Specify Display Options page. |
|
Long Description |
For reference purposes only, enter a long description of the pagelet footer. |
|
HTML Area |
Enter that HTML code that you want to use to generate the pagelet footer. You can enter both HTML text and image references. Alternatively, you can include an image by selecting it on the Specify Image page. |
|
Delete Footer |
Click to delete the pagelet footer design. You will be prompted to confirm your deletion. |
Defining Footer ImagesAccess the Define Footers - Specify Image page.
Footer Image
|
Image Source |
Select the image source. Options are: System Catalog: Select to specify an image from the PeopleTools system image catalog. External Source: Select to specify an image from a source external to the PeopleTools system image catalog. |
|
Image Name |
If you select System Catalog as the image source, click the Search button to access a list of existing images. |
|
Image URL |
If you select External Source as the image source, enter a URL for the desired image file. All image types are supported. Ensure that the location of the image provides reliable access. |
|
Alignment |
Select the alignment of the image. Options are: Left: Select to align the image with the left margin of the pagelet. Right: Select to align the image with the right margin of the pagelet. |
|
Height |
Enter the image height in pixels if the image needs to be resized. If you enter an image height, the system adjusts the image width to fit the image height. |
|
Width |
Enter the image width in pixels if the image needs to be resized. If you enter an image width, the system adjusts the image height to fit the image width. |
|
Float Over Text |
Enter text that you want to appear when the user moves the cursor over the image. |
Defining Pagelet Wizard Pagelet CategoriesThis section discusses how to define Pagelet Wizard pagelet categories.
Page Used to Define Pagelet Wizard Pagelet Categories
|
Page Name |
Object Name |
Navigation |
Usage |
|
Define Categories |
PTPPB_PGLTCATG_MTC |
PeopleTools, Portal, Pagelet Wizard, Define Categories |
Define categories used to organize pagelets created using Pagelet Wizard. |
Defining Pagelet Categories
Access the Define Categories page.
|
Category ID |
Enter a Pagelet Wizard pagelet category ID. You can use category IDs to organize Pagelet Wizard pagelets. The portal administrator can use this value when running pagelet reports and when searching for pagelets that need to be moved between different portal sites. Categories provide another level of organization in addition to the owner ID. For example, you can use a departmental owner ID, and within that, categorize your pagelets by pagelet type. |
|
Description |
Enter a description of the pagelet category. The text that you enter here appears as a field value in the Category ID field when users assign pagelets to categories on the Specify Pagelet Information page. |
|
Active |
Select to activate the pagelet category and make it a selectable field value in the Category ID field on the Specify Pagelet Information page. If you deactivate a category, the category is no longer available for selection on the Specify Pagelet Information page. Existing pagelets that have been created using the deactivated category are unaffected. |
|
Long Description |
For reference purposes only, enter a long description of the pagelet category. |
|
Delete Category |
Click to delete a pagelet category. You are prompted to confirm the deletion. If you delete a category, the category is no longer available for selection on the Specify Pagelet Information page. Existing pagelets that have been created using the deactivated category still appear, but the pagelet category is removed from the pagelet definition in Pagelet Wizard. |
Step 1: Entering Pagelet Identifying InformationThis section discusses how to specify pagelet information. This is step 1 in the Pagelet Wizard pagelet creation process.
Note. Before you start building a pagelet with Pagelet Wizard, familiarize yourself with all data sources. This enables you to evaluate the best way to retrieve the data that you want to display in the pagelet.
See Also
Overview of Pagelet Wizard Data Sources
Page Used to Enter Pagelet Identifying Information
|
Page Name |
Object Name |
Navigation |
Usage |
|
Specify Pagelet Information |
PTPPB_WIZ_INFO |
PeopleTools, Portal, Pagelet Wizard, Pagelet Wizard |
Define description and summary information for a pagelet. |
Specifying Pagelet Information
Access the Specify Pagelet Information page.
|
Pagelet ID |
Enter an ID for the pagelet. Each pagelet that you build with Pagelet Wizard must have a unique ID. Note. Pagelet IDs can only contain the characters A-Z, a-z, and _. All other characters put into a pagelet ID will be removed by the system. If all characters are removed from the user entered pagelet ID, then the Registry Object Prefix will be used instead. If, after removing illegal characters from the pagelet ID, the name is found to match an existing pagelet ID, then Pagelet Wizard will append numbers to the end of the pagelet ID to make the new pagelet ID unique. |
|
Pagelet Title |
Enter a unique title for the pagelet. This value appears in the pagelet title bar, which is the solid bar at the top of the pagelet. If you change the pagelet title value for a published pagelet, you must unpublish and republish the pagelet for the change to take effect. |
|
Description |
Enter additional descriptive information to identify the pagelet. This reference text is used in Verity and search record searches. |
|
Owner ID |
Select the value that you want to use to identify pagelets created by the organization. The portal administrator can use this value when searching for pagelets through PeopleSoft Application Designer or SQL queries on the portal registry table. Do not select a delivered PeopleSoft owner ID. You can define unique owner IDs for the organization by entering field translate values for the OBJECTOWNERID field using PeopleSoft Application Designer. |
|
Category ID |
To organize Pagelet Wizard pagelets, select a category assignment for the pagelet. You create pagelet categories on the Define Categories page. The portal administrator can use this value when running pagelet reports and when searching for pagelets that need to be moved between different portal sites. Categories provide another level of organization in addition to the owner ID. For example, you can use a departmental owner ID, and within that, categorize pagelets for that ID by pagelet type. |
Step 2: Selecting a Pagelet Data SourceThis section discusses selecting a pagelet data source. This is step 2 in the Pagelet Wizard pagelet creation process. Specifically, this section discusses how to :
Select an HTML data source.
Select a Navigation Collection data source.
Select a PeopleSoft Query data source.
Select a rowset data source.
Select a search record data source.
You can define other data sources by using the Define Data Types page.
See Also
Overview of Pagelet Wizard Data Sources
Page Used to Select a Pagelet Data Source
|
Page Name |
Object Name |
Navigation |
Usage |
|
Select Data Source |
PTPPB_WIZ_DATASRC |
PeopleTools, Portal, Pagelet Wizard, Pagelet Wizard Click the Next button or the icon for step 2. |
Select the type of data source for the pagelet. |
Selecting an HTML Data SourceAccess the Select Data Source page. Select HTML in the Data Type field.
When you use HTML as the data source for a pagelet, the pagelet does not provide configurable parameters that enable criteria selection. Consequently, there is also no end user personalization for HTML data source pagelets.
When creating an HTML data source pagelet, you skip step 3 and proceed to step 4, in which you select the pagelet display format.
Data Source
|
HTML Text |
Enter the HTML code that you want to use as the data source for the pagelet. You can enter an HTML document or fragment. This HTML can include embedded JavaScript. Ensure that the HTML that you enter generates content that is appropriately sized for pagelet display. See Defining Data Types. |
Selecting an IB Connector Data SourceAccess the Select Data Source page. Select IB Connector in the Data Type field.
Data Source
|
Integration Gateway ID |
Select the Integration Broker gateway that contains the connector that you want to use to supply content to the pagelet. |
|
Connector ID |
Select the connector that you want to use to supply content to the pagelet. |
Selecting an Integration Broker Data SourceAccess the Select Data Source page. Select Integration Broker in the Data Type field.
You can use an outbound synchronous message defined in the local database as a data source for a Pagelet Wizard pagelet. Outbound, synchronous messages are messages for which a request is made to a target system and a response is expected in real time.
The message can be either structured or unstructured. If the message is structured, then a record structure has been associated with the outbound message and that record structure is translated into data source parameters during step 3. If the message is unstructured, then no record structure has been associated with the outbound message, so no data source parameters can be supplied and Pagelet Wizard bypasses step 3.
Typically, because outbound synchronous messages are designed to run in real time, they are associated with transactions with good performance records. As with all pagelet data sources, you should understand that pagelet performanc, and homepage performance are tied to the performance of the underlying Integration Broker message and target transaction. You should review the performance of the target transaction before creating an Integration Broker message-based pagelet.
Data Source
|
Service Operation |
Select the requesting service operation that you want to be the data source for the pagelet. |
|
Receiver Node Name |
Select the node that is associated with the selected requesting service operation. |
Data Source Details
If the selected message is structured, the Data Source Details group box displays input and output records and fields that are defined in the message structure.
Selecting a Navigation Collection Data SourceAccess the Select Data Source page. Select Navigation Collection in the Data Type field.
The Navigation Collection that you use as the data source must have already been created using the Navigation Collections feature. However, the Navigation Collection does not need to exist in its final form. Any changes that you make to the underlying Navigation Collection used as the data source are immediately reflected on any pagelets created from that Navigation Collection.
Note. Although it is possible to create a Navigation Collection pagelet directly from the Navigation Collections feature, pagelets created using this feature cannot be maintained in Pagelet Wizard. Only Navigation Collection pagelets created specifically with Pagelet Wizard can be maintained in Pagelet Wizard.
See Understanding Navigation Collections.
|
Data Type |
Select Navigation Collection. |
Data Source
|
Portal Name |
Select the portal that contains the navigation collection for the pagelet. |
|
Collection Name |
Select the name of the Navigation Collection that you want to use to create the pagelet. |
Selecting a Query Data SourceAccess the Select Data Source page. Select PS Query in the Data Type field.
Queries typically return a number of columns and rows. Queries for pagelets should be selected based on available display space on the homepage. In addition, avoid selecting long-running queries that can delay the display of the homepage.
Keep in mind that public query results are available to portal viewers only if they have appropriate access to the underlying data record. Permission lists in the users’ role definitions must contain query access groups that include the records in the query definition.
|
Data Type |
Select PS Query. |
Data Source
|
Query Name |
Select a query to serve as the data source for the pagelet. You can select any public query in the local database. PeopleSoft queries provide SQL access to any table recognized by the PeopleSoft system. This includes external, remote tables that are recognized by the PeopleSoft system by way of a database link. |
Note. Even though a query is marked as public, PeopleSoft Query still applies security to the underlying records. Ensure that the users of this pagelet have query security access to the underlying records to avoid runtime errors.
Data Source Details
|
Inputs |
Displays the data source parameter fields that correspond to the query’s input prompts. Also displays the required system-supplied .MAXROWS query data source parameter that you can use to limit the amount of data returned to the pagelet. |
|
Outputs |
Displays the data source parameter fields that correspond to the query’s output. |
Selecting a Rowset Data SourceAccess the Select Data Source page. Select Rowset in the Data Type field.
A rowset is a record that collects rows of data and can contain data from one or more records. The rowset data source is geared towards supplying data to embedded pagelets. This is because embedded pagelets require that a populated rowset be passed into the data source for it to be able to display the data as a chart or table, for example.
Embedded pagelets do not allow for customizable parameters that enable criteria selection. Consequently, there is also no end user personalization for rowset data source pagelets.
When creating a rowset data source pagelet you skip step 3 and go on to step 4 in which you select your pagelet display format.
Data Source
|
Record Name |
Select the record that contains the layout of the rowset you want to use to supply your pagelet with data. Records available for selection are records that are tables or views. |
Selecting a Search Record Data SourceAccess the Select Data Source page. Select Search Record in the Data Type field.
Search records typically return a number of columns and rows. When you select search records to be displayed on pagelets, consider the available display space on the homepage.
|
Data Type |
Select Search Record. |
Data Source
|
Portal Name |
Select the portal in which the search record for the pagelet resides. |
|
Content Reference |
Select the content reference for the search record. |
|
Access Type |
Select the type of access for the search record data. Options are: Basic Search Record: Select to have the search record pagelet retrieve data based on the basic search record defined in the selected portal. CI: <component interface name>: Select when the basic search record does not provide the required functionality; for example, when security or PeopleCode considerations need to be taken into account This option is available if the selected search record has an associated component interface. Select to have the search record pagelet retrieve data by way of the component interface. |
Data Source Details
|
Inputs |
Displays search record key input fields, as well as other system-required input fields that are used to derive data that is displayed on the search record pagelet. |
|
Outputs |
Displays search record key output fields, as well as other output fields for which search results are displayed on the search record pagelet. These output fields are derived from the drop-down list box fields on the search record. If the SHOWRESULTS data source parameter field for the pagelet is set to N, the search key output fields appear as Search By drop-down list values on the pagelet. |
Selecting a URL Data SourceAccess the Select Data Source page. Select URL in the Data Type field.
|
URL |
Enter any HTTP-accessible URL as the data source for the pagelet. The URL may or may not require query string parameters that can be specified and personalized as end-user prompts within Pagelet Wizard. For example, the Yahoo! search page URL takes the form http://search.yahoo.com/search?p=searchterm. If you want to make searchterm a user-specified data parameter, enter a URL field value of http://search.yahoo.com/search. In step 3 on the Specify Data Source Parameters page, add a data source parameter Field Name value of p and set its Usage Type field value to User Specified with a default value. Pagelet Wizard then adds the ?p=searchterm value, with the searchterm value able to be personalized by the user, to the URL before it retrieves the content to the pagelet. |
Step 3: Specifying Pagelet Data Source ParametersThis section provides an overview of variables supported as data source parameters, lists common elements, and discusses specifying pagelet data source parameters. This is step 3 in the Pagelet Wizard pagelet creation process. Specifically, this section discusses how to:
Specify HTML data source parameter values.
Specify IB Connector data source parameters.
Specify Integration Broker data source parameters.
Specify Navigation Collection data source parameters.
Specify query data source parameters.
Specify rowset data source parameters.
Specify search record data source parameters.
Specify URL data source parameters.
Understanding System Variables Supported as Data Source ParametersWhen you set the Usage Type field to System Variable or User Specified on the Specify Data Source Parameters page, you can enter a system variable such as %UserId, which the system substitutes at runtime with the actual value represented by the variable. The following system variables are supported as data source parameters.
%AuthenticationToken
%ClientDate
%ClientTimeZone
%ContentID
%ContentType
%Copyright
%Currency
%Date
%DateTime
%DbName
%DbServerName
%DbType
%EmailAddress
%EmployeeId
%HPTabName
%IsMultiLanguageEnabled
%Language
%Language_Base
%LocalNode
%Market%MaxMessageSize
%NavigatorHomePermissionList
%Node
%PasswordExpired
%Portal
%PrimaryPermissionList
%ProcessProfilePermissionList
%RowSecurityPermissionList
%RunningInPortal
%ServerTimeZone
%Time
%UserDescription
%UserId
Common Elements Used in This Section
|
Description |
Displays a description of the data source parameter. |
|
Usage Type |
Select the type of end-user accessibility that you want to grant for the data source parameter field when it appears on the pagelet. Options are:
|
|
Default Value |
If you select User Specified or Admin Specified as the usage type and the data source parameter is a required value, you must enter the default value that should appear before a user enters a value. If the data source parameter is not a required value, you do not have to enter a default value. If you select a default value when defining available user-specified values on the Specify Data Source Parameter Values page, that default value populates this field. If you select User Specified as the usage type, you can enter a system variable as the default value. For example, to make the current date the default value for a user-specified parameter, enter a default value of %Date. If you select System Variable as the usage type, you must enter the system variable to use as the data source parameter value. See Understanding System Variables Supported as Data Source Parameters. If you select Fixed as the usage type, you must enter the fixed value. You can enter a value that includes the % and * wildcards at the beginning or end of a value in the Default Value field. |
|
|
If you select Fixed as the usage type and the data source parameter has associated prompt values, you can use the Look up Value button to search for available data source parameter values. If you select System Variable as the usage type, you can use the Look up Value button to access a list of valid system variables. If you select User Specified as the usage type, this button does not appear. |
|
User Values |
If you select User Specified as the usage type, click to access the Specify Data Source Parameter Values page. |
Page Used to Specify Pagelet Data Source Parameters
|
Page Name |
Object Name |
Navigation |
Usage |
|
Specify Data Source Parameters |
PTPPB_WIZ_DATAPRMS |
PeopleTools, Portal, Pagelet Wizard, Pagelet Wizard Click the Next button on the Select Data Source page, or click the icon for step 3. |
Configure the data source parameters required for the data to be displayed on the pagelet. For instance, when entering data source parameters for a query pagelet, you specify input data that extracts output data to the pagelet. The parameters vary depending on the data source selected on the Select Data Source page. This page is accessible only when building a pagelet with a data source that allows modification of associated parameters. These data sources include PeopleSoft Query, search record, and Navigation Collections. Note. This step is not applicable when creating pagelets with an HTML data source. |
|
Specify Data Source Parameter Values |
PTPPB_WIZ_PRMVALS |
Click the Values link on the Specify Data Source Parameters page. |
Enter values for the end user to select from when personalizing user-specific parameters on a pagelet. Note. This page is accessible only for data source parameters for which you have selected the User Specified or Admin Specified usage types. |
Specifying HTML Data Source Parameters
When creating an HTML data source pagelet you skip step 3 and go on to step 4 in which you select your pagelet display format.
Specifying IB Connector Data Source ParametersAccess the Specify Data Source Parameters page after selecting IB Connector as the data type on the Select Data Source page.
Define the data source parameters for the IB Connector data source. Click the User Values button to set the default values for users.
See Understanding PeopleSoft Integration Broker.
See Specifying User-Defined Data Source Paramters.
Specifying Integration Broker Data Source Parameters
Access the Specify Data Source Parameters page after selecting Integration Broker as the data type on the Select Data Source page.
This step is applicable for the Integration Broker data source if the service operation is based on a structured message or if the message is structured but contains a schema. The structure that is associated with the message is translated into data source parameters on this page.
If the message is unstructured, then no schema structure has been associated with the message. Therefore, no data source parameters can be supplied and Pagelet Wizard bypasses this step.
You must supply values for all rows with the Required option selected.
Personalization Instructions
Use the Personalization Instructions text box to enter custom personalization instructions for the pagelet. These personalization instructions appear on the Personalization page of the pagelet.
Note. Personalization instructions must be translatable.
Specifying Navigation Collection Data Source ParametersAccess the Specify Data Source Parameters page after selecting Navigation Collection as the data type on the Select Data Source page.
Data Source Parameters
Pagelet Wizard analyzes the selected query and retrieves a list of predefined parameters and any related prompt list values. You cannot add to the list of parameters.
|
Field Name |
Displays the following data source parameters required by the Navigation Collection data source. .INCLUDECHILDREN: Determines whether the pagelet displays Navigation Collection child links. .MAXCHILDLINKS: If the pagelet is defined to display child links, determines the maximum number of Navigation Collection child links to display. |
|
Required |
This option is selected if the data source parameter must contain a value on the pagelet to retrieve data successfully. For example, the .INCLUDECHILDREN field is required. If this option is selected and display-only, the value is set in the application class at the API level. |
|
Reset to Default |
Click to reset the values on this page to the default values specified by the Navigation Collection data source API. |
|
Values |
Click the Values link to set the default values for users. |
Personalization Instructions
Use the Personalization Instructions text box to enter custom personalization instructions for the pagelet. These personalization instructions appear on the Personalization page of the pagelet.
Note. Personalization instructions must be translatable.
Specifying Query Data Source ParametersAccess the Specify Data Source Parameters page after selecting PS Query as the data type on the Select Data Source page.
Data Source Parameters
Pagelet Wizard analyzes the selected query and translates the query prompts into the list of pagelet parameters shown in this step. You cannot add to the list of parameters. Most prompts will be marked as required; however, any prompts that are used exclusively in the IN clause of the query will not be marked as required.
It is possible to attain advanced functionality with proper design of the query and the Pagelet Wizard pagelet. For example, you might want to create a pagelet that will show open purchase orders for a list of vendors, and allow each user to specify up to five vendors. To achieve this functionality, you would first create a query to retrieve the open purchase orders for up to five vendors. When you create this query, ensure that the five vendor ID prompts are used only in the IN clause of the query. You can then create a pagelet using the PS Query data type and choose the query you have created. The five vendor ID prompts will be shown as data source parameters. However, they will be marked as not required. It will then be possible for end users to specify any number of vendors (up to five) when they personalize the pagelet. Finally, update the personalization instructions on the pagelet to explain to the end users that they may supply up to five vendor IDs.
|
Field Name |
Displays the data source parameters that correspond to the query prompts associated with the selected query. Also displays the required system-supplied .MAXROWS query data source parameter that you can use to limit the amount of data returned on the pagelet. |
|
Required |
This option is selected if the data source parameter must have a value entered on the pagelet to retrieve data successfully. For example, the .MAXROWS field is required. If this option is selected and display-only, the value is set in the application class at the application programming interface (API) level. If you leave this option cleared, the data source parameter value can be clear at runtime, or it can be entered to refine the data selection criteria. Prompts tied to the IN clause of the query will not be marked as required. |
|
Reset to Default |
Click to reset the values on this page to the default values specified by the query data source API. |
|
Values |
Click the Values link to set the default values for users. |
Personalization Instructions
Use the Personalization Instructions text box to enter custom personalization instructions for the pagelet. These personalization instructions appear on the Personalization page of the pagelet.
Note. Personalization instructions must be translatable.
Specifying Rowset Data Source Parameters
When creating a rowset data source pagelet you skip step 3 and go on to step 4 in which you select your pagelet display format.
Specifying Search Record Data Source ParametersAccess the Specify Data Source Parameters page after selecting Search Record as the data type on the Select Data Source page.
Data Source Parameters
Pagelet Wizard analyzes the selected search record and retrieves a list of search keys required for the search record. You cannot add to the list of data source parameters.
For fields that are search keys but that are not displayed on the search prompt page or in the result set for the search record (for example, the setID, Business Unit, Operator ID, and Operclass fields), Pagelet Wizard assimilates the PeopleTools behavior and does not display the keys during design or at runtime. It simply binds in the same values that PeopleTools would use. These values are derived from the default field values established by the user in the PSRECDEFN table.
|
Field Name |
Displays the data source parameters that correspond to the search keys required for the search record. Also displays the required system-supplied .MAXROWS and SHOWRESULTS search record data source parameters. Use the .MAXROWS field to limit the amount of data returned to the pagelet. Use the SHOWRESULTS field to determine whether search results appear on the pagelet. If this field value is set to Y, search record results appear directly on the pagelet with links to transaction data. In addition, if this field value is set to Y, the search results grid displays results based on the supplied data source parameter default key field values. If no defaults are supplied, all results appear, up to the .MAXROWS value defined for the pagelet. If this field value is set to N, the pagelet displays a search prompt for the selected search record. The Search By drop-down list values available on the pagelet are the search keys for the search record. If data source parameter default key field values have been defined, when the pagelet is initially accessed, the default value appears in the begins with pagelet field. |
|
Required |
This option is selected if the data source parameter must have a value entered on the pagelet to retrieve data successfully. For example, the .MAXROWS and SHOWRESULTS fields are required. If this option is selected and display-only, the value is set in the application class at the API level. Search key values are not required because the search record pagelet supports partially populated keys so that you can define the pagelet to return all possible results. If you leave this option clear, the data source parameter value can be blank at runtime, or the value can be provided to refine the data selection criteria. |
|
Reset to Default |
Click to reset the values on this page to the default values specified by the search record data source API. |
|
Values |
Click the Values link to set the default values for users. |
Personalization Instructions
Use the Personalization Instructions text box to enter custom personalization instructions for the pagelet. These personalization instructions appear on the Personalization page of the pagelet.
Note. Personalization instructions must be translatable.
Specifying URL Data Source ParametersAccess the Specify Data Source Parameters page after selecting URL as the data type on the Select Data Source page.
The data source parameters that you can define on this page correspond to URL query parameters, such as an HTTP GET request.
An HTTP GET request is a URL type for which parameters are placed on the query string separated by ? and &, such as http://search.yahoo.com/search?p=searchterm.
For example, the Yahoo! search page URL takes the form: http://search.yahoo.com/search?p=searchterm. If you want to make searchterm a user-specified data parameter, enter a URL field value of http://search.yahoo.com/search in step 2 on the Select Data Source page. In step 3 on this page, add a data source parameter Field Name value of p and set its Usage Type field value to User Specified with a default value. Pagelet Wizard then adds the ?p=searchterm value, with the searchterm value able to be personalized by the user, to the URL before it retrieves the content to the pagelet.
You can specify a parameter for the number of milliseconds that a data source will wait for a response before timing out on the homepage. When you set .timeout_ms you can then enter the number of milliseconds that the system will wait.
Passing Cookies
When the URL request is in the AuthenticationToken domain , then the URL data source will pass all cookies on the request to retrieve the content. (The only exception to this rule is if the request is being made back to the local webserver. In that instance, only the PS_TOKEN cookie will be passed). Any requests to servers outside of the AuthTokenDomain will not have any cookies passed.
To turn off the passing of cookies other than PS_TOKEN, add the parameter .passcookies as a Fixed usage type with a default value of False. Adding this parameter with a value of False will instruct pagelet wizard to only pass the PS_TOKEN cookie (and no other cookies) for requests within the AuthenticationToken domain. Adding the .passcookies parameter with a value of True is not recommended, since this is the same as the default behavior.
Note. Make sure to examine any security impact that passing cookies might present in your configuration before setting this parameter.
Personalization Instructions
Use the Personalization Instructions text box to enter custom personalization instructions for the pagelet. These personalization instructions appear on the Personalization page of the pagelet.
Note. Personalization instructions must be translatable.
Specifying User-Defined Data Source Paramters
Click the User Values button to display the Specify Data Source Parameters page.
Select the parameter value to be displayed to the user as the default value for the field. Users can select from this list of valid values when they personalize the pagelet.
Step 4: Selecting a Pagelet Display FormatThis section discusses how to select a display format. This is step 4 in the Pagelet Wizard pagelet creation process.
Page Used to Select a Pagelet Display Format
|
Page Name |
Object Name |
Navigation |
Usage |
|
Select Display Format |
PTPPB_WIZ_DISPFRMT |
PeopleTools, Portal, Pagelet Wizard, Pagelet Wizard Click the Next button on the Specify Data Source Parameters page, or click the icon for step 4. |
Specify the data transformation method and display format for the pagelet. |
Selecting a Display Format
Access the Select Display Format page.
Select the format to use for the pagelet. The display formats available for selection on this page depend on the data source you have selected on the Select Data Source page. Options are:
|
Table |
Available for query and rowset data source pagelets. |
|
List |
Available for query and rowset data source pagelets. |
|
Chart |
Available for query and rowset data source pagelets. |
|
Menu |
Available for Navigation Collection data source pagelets. |
|
Search List |
Available for search record data source pagelets. |
|
Passthru |
Available for HTML source pagelets. |
|
Custom |
Available for HTML, Navigation Collection, query, rowset, and search record data source pagelets. |
See Also
Step 5: Specifying Pagelet Display Options
Step 5: Specifying Pagelet Display OptionsThis section lists common elements and discusses specifying pagelet display options. This is step 5 in the Pagelet Wizard pagelet creation process Specifically, this section discusses how to:
Specify table display options.
Specify passthru display options.
Specify search list display options.
Specify menu display options.
Specify list display options.
Specify chart display options.
Specify custom display options.
Specify data link details.
Specify URL and newsfeed options.
Common Elements Used in This Section
This section discusses common elements used in this section.
|
|
Click the Link Options icon to access the Link Details page, where you can enter values that link elements in the pagelet to pages (components or URLs) that provide details about the data. |
Additional Text
The Additional Text group box contains options to add headers, footers, opening text, and closing text to a pagelet.
|
Header |
Select a pagelet header. You can select from headers that are defined on the Define Header page. See Defining Headers. |
|
Opening Text |
Select the type of opening text that you want to appear on the pagelet. Options are: Freeform Text/HTML: The Text field appears. Enter the opening text that appears on the pagelet. Message Catalog Entry: The Message Set and Number fields appear. Select the message set and message number that appear as opening text on the pagelet. You can select from the messages defined in the database. See Message Catalog. |
|
Show “View Source Data” Link |
Displays when PS Query is selected as the data source for a pagelet. Select to display the Full Query Results link on the pagelet. Click the Full Query Results link to access the full results of the query used for the pagelet. |
|
Closing Text |
Select the type of closing text that appears on the pagelet. Options are: Freeform Text/HTML: The Text field appears. Enter the closing text that appears on the pagelet. Message Catalog Entry: The Message Set and Number fields appear. Select the message set and message number that appear as closing text on the pagelet. You can select from the messages defined in the database. See Message Catalog. |
|
Footer |
Select a pagelet footer. You can select from footers that are defined on the Define Footer page. See Defining Footers. |
Customization
The Customization group box contains the option to customize your pagelet.
|
Customize |
Click to customize the pagelet by applying a custom XSL template, or by directly editing the XSL resulting from the pagelet display options you have defined so far. When you click Customize, you switch from a non-custom display format selected on the Select Display Format page, to a custom format of your definition. The XSL field is populated based upon preexisting display options set for the original non-custom display format. You can edit the XSL directly in the XSL field and retain as much of the original non-custom display options as you wish. Keep in mind that if you apply an XSL template using the XSL Template field, the XSL is regenerated based on the selected template and original non-custom display options you have set may be overridden. Making any edits to the XSL, either directly or by assigning a template, disconnects the pagelet definition from the original non-custom display format. When you click the Customize button, the current pagelet definition is saved for restoration purposes. You can revert to this pre-customization pagelet definition by clicking the Undo Customizations button. Clicking this button assigns your pagelet to the Custom design format on the Select Display Format page - Step 4. When you return to the Specify Publishing Options page - Step 5, you will access the version of the page for the Custom display format. |
Pages Used to Specify Pagelet Display Options
|
Page Name |
Object Name |
Navigation |
Usage |
|
Specify Display Options (table format) |
PTPPB_WIZ_DISP_TBL |
PeopleTools, Portal, Pagelet Wizard, Pagelet Wizard Select Table as the display format and click the Next button on the Select Display Format page, or click the icon for the step 5. |
Enter pagelet table formatting details and header and footer options. Preview the pagelet. |
|
Set Thresholds |
PTPPB_WIZ_TRSHVALS |
Select the Set Thresholdsbutton in the Table Options of Step 5 in Pagelet Wizard. |
Specify the default threshold options for tables in pagelets. |
|
Specify Display Options (passthru format) |
PTPPB_WIZ_DISP_PST |
PeopleTools, Portal, Pagelet Wizard, Pagelet Wizard Select Passthru as the display format and click the Next button on the Select Display Format page, or click the icon for step 5. |
Enter pagelet passthru formatting details and header and footer options. Preview the pagelet. |
|
Specify Display Options (search list format) |
PTPPB_WIZ_DISP_SRC |
PeopleTools, Portal, Pagelet Wizard, Pagelet Wizard Select the Search List as the display format and click the Next button on the Select Display Format page, or click the icon for step 5. |
Enter pagelet search list formatting details and header and footer options. Preview the pagelet. |
|
Specify Display Options (menu format) |
PTPPB_WIZ_DISP_NAV |
PeopleTools, Portal, Pagelet Wizard, Pagelet Wizard Select Menu as the display format and click the Next button on the Select Display Format page, or click the icon for step 5. |
Enter pagelet menu formatting details and header and footer options. Preview the pagelet. |
|
Specify Display Options (list format) |
PTPPB_WIZ_DISP_LST |
PeopleTools, Portal, Pagelet Wizard, Pagelet Wizard Select List as the display format and click the Next button on the Select Display Format page, or click the icon for step 5. |
Enter pagelet list formatting details and header and footer options. Preview the pagelet. |
|
Specify Display Options (chart format) |
PTPPB_WIZ_DISP_CHT |
PeopleTools, Portal, Pagelet Wizard, Pagelet Wizard Select Chart as the display format and click the Next button on the Select Display Format page, or click the icon for step 5. |
Enter pagelet chart formatting details and header and footer options. Preview the pagelet. |
|
Specify Display Options (custom format) |
PTPPB_WIZ_DISP_CUS |
PeopleTools, Portal, Pagelet Wizard, Pagelet Wizard Select Custom as the display format and click the Next button on the Select Display Format page, or click the icon for step 5. |
Enter pagelet custom formatting details and header and footer options. Preview the pagelet. |
|
Link Details |
PTPPB_WIZ_LINK_DTL |
Click the Link Options |
Enter linking details that convert pagelet column data into drill-down links to pages that provide details about the pagelet data. |
Specifying Table Display OptionsAccess the Specify Display Options page after selecting the Table option on the Select Display Format page.
Table Options
Select options that will display grid lines, alternate row shading, and row numbers on the table-formatted pagelet.
Columns
|
Column Name |
Displays possible column headings provided by the selected data source parameters. Use the drop-down list boxes to set the order in which the columns appear on the table-formatted pagelet. Use the Add button or the Delete button to add or remove columns. |
|
Alignment |
Specify the alignment of the text in the column. Options are Center, Left, and Right. |
|
|
Click the Link Options icon to display the Link Details page where you can set paths, parameters, and behavior of links. |
Setting Thresholds
Access the Set Thresholds page by clicking the Set Thresholds button.
Use the Set Thresholds page to set the column alignment and threshold options.
|
Allowed Comparators |
The system displays the column names and enables you to set the comparators for that column based on numbers, text, or both. |
|
Allow User Thresholds |
Select this checkbox to enable users to set their own threshold values for the table from the Personalization page. |
Set the display order and attributes of each column. Use the up and down arrows to change the display order of the columns, if necessary. Each column threshold can have a unique color associated with it—duplicates are allowed. If more than one threshold rule applies for a given value, the rule that is positioned highest in the list is the one that is applied.
|
Column Name |
Select the column name from the drop-down list box. |
|
Comparator |
Select a comparator value for each column |
|
Value |
Enter the threshold value for the column. When this value is reached, the highlight and color attributes become active. |
|
Highlight |
If you choose to have highlighting for the threshold, select either the entire row or just a single cell. |
|
Color |
Select the color for the column. |
|
|
Use the arrows to move each individual column up or down in the table. |
Pagelet Preview
Displays a preview of the pagelet based on most display option settings on this page.
Specifying Passthru Display OptionsAccess the Specify Display Options page after selecting the Passthru option on the Select Display Format page.
Pagelet Preview
Displays a preview of the pagelet based on most display option settings on this page.
Specifying Search List Display OptionsAccess the Specify Display Options page after selecting the Search List option on the Select Display Format page.
Pagelet Preview
Displays a preview of the pagelet based on most display option settings on this page.
Specifying Menu Display OptionsAccess the Specify Display Options page after selecting the Menu option on the Select Display Format page.
Menu Options
|
Top Level Title |
Select to have the menu pagelet display the top-level title defined in the underlying Navigation Collection. |
|
Top Level Description |
Select to have the menu pagelet display the top-level description defined in the underlying Navigation Collection. |
|
Maximum Columns |
Select the number of columns to display (options are 1 through 4) on the Navigation Collection menu pagelet. Narrow pagelets display contents in one column. Wide pagelets can display contents in up to four columns. |
|
Display Order |
Select the order in which you want Navigation Collection elements to appear on the menu pagelet. When you create a Navigation Collection, you define the order of folders and links in the collection using options in the Placement Properties group box on the Edit Folder page and the Edit Link page. Options are: Left to Right: Select to display the elements from left to right on the menu pagelet. Top to Bottom. Select to display the elements from top to bottom on the menu pagelet. |
|
Alternate Row Shading |
Select to display alternate row shading on the menu-formatted pagelet. |
|
Parent Images |
Select the type of images you want to display for parent-level Navigation Collection elements (folders) on the menu pagelet. When you create a Navigation Collection, the collection definition includes specified large and small images that appear for parent-level elements in the Navigation Collection. Options are: Large Images: Select to have the menu pagelet display the large folder image defined for the underlying Navigation Collection. No Images: Select to prevent parent-level images from appearing on the menu pagelet. Small Images: Select to have the menu pagelet display the small folder image defined for the underlying Navigation Collection. |
|
Parent Descriptions |
Select to have the menu pagelet display parent-level folder descriptions defined in the underlying Navigation Collection. |
|
Child Display Type |
Select the display type for child links on the menu pagelet. Options are: Comma Delimited: Displays the maximum number of child links separated by commas. List with Images: Displays the maximum number of child links accompanied by icons. This icon is the small content image selected in the Navigation Collection system or registry options for the underlying Navigation Collection. Simple List: Displays the maximum number of child links, one child link per row. No bullets, numbers, or icons appear in the list. |
Pagelet Preview
Displays a preview of the pagelet based on most display option settings on this page.
See Also
Specifying List Display OptionsAccess the Specify Display Options page after selecting the List option on the Select Display Format page.
List Options
|
List Display Type |
Select the list format for displaying query results on the list pagelet. Options are: Bulleted List: Displays query results in a bulleted list. Numbered List: Displays query results in a numbered list. Simple List: Displays query results in a list with no bullets or numbers. |
|
List Field Name |
Select the field whose values are displayed in the list on the pagelet. |
|
Alternate-Row Shading |
Select to use alternate-row shading on the list pagelet. |
Pagelet Preview
Displays a preview of the pagelet based on most display option settings on this page.
Specifying Chart Display OptionsAccess the Specify Display Options page after selecting the Chart option on the Select Display Format page.
To generate a chart pagelet using Pagelet Wizard, you include information related to the chart’s x axis and y axis. The y axis is the axis that contains the query data. In most charts, the y axis is the vertical axis. However, in a horizontal bar chart, the y axis is the horizontal axis. The x axis is the axis against which the y-axis data is measured.
For example, a chart pagelet may have a y axis that displays the number of times that a pagelet has been accessed. This access count can be displayed against an x axis that shows the name of the pagelet accessed.
Chart Options
|
Chart Type |
Select the type of chart used to display the query results on the pagelet. Available chart formats are those supported by the PeopleCode Chart class. See Chart Class. |
|
X-Axis Field |
Select the field used to derive x-axis values for the chart. Available values are determined by the data source’s output fields. |
|
X-Axis Label |
Select the field you want to use to derive the labels for the x-axis values for the chart. Available values are determined by the data source’s output fields. |
|
X Label Angle |
Enter the angle at which you want the text of the x-axis labels to appear along the x-axis on the pagelet. |
|
Y Axis Data |
Select to indicate whether the y-axis data is stored in rows or columns in the selected query. This enables the Pagelet Wizard to read query data and generate the chart. in Columns: Select if the y-axis data is stored in columns. |
For example, you might have query data stored as shown below:
|
Quarter |
Revenue |
Profit |
|
Q1 |
3562 |
1010 |
|
Q2 |
3473 |
1290 |
|
Q3 |
4568 |
1490 |
|
Q4 |
5668 |
2769 |
|
Y Axis Data (continued) |
in Rows: Select if the y-axis data to be used to generate the chart is stored in rows. |
For example, you might have query data stored as shown below:
|
Quarter |
Type |
Value |
|
Q1 |
Revenue |
3562 |
|
Q1 |
Profit |
1010 |
|
Q2 |
Revenue |
3473 |
|
Q2 |
Profit |
1290 |
|
Q3 |
Revenue |
4568 |
|
Q3 |
Profit |
1490 |
|
Q4 |
Revenue |
5668 |
|
Q4 |
Profit |
2769 |
|
Y-Axis Field |
Select the field that you want to use to derive y-axis values for the chart. Available values are determined by the data source’s output fields. If you set the Y Axis Data field to in Columns, you can select up to four y-axis fields to create a chart pagelet that displays data for multiple fields. For example, if you track sales figures for several departments over multiple years, you can assign each department its own y-axis value. |
|
Color |
Select the color for the y-axis data. If you select multiple y-axis fields, selecting a different color for each field improves pagelet usability. This option is available only if the y-axis data is in stored columns. |
|
Y-Axis Series |
This field is available if the Y Axis Data field is set to in Rows. Select the field used to generate a color-coded series of y-axis data. Colors are automatically assigned, but you can override them by supplying custom XSL. |
Advanced Options
|
3D Angle |
If you select a 3D chart type, enter the angle at which you want the 3D data to be displayed. |
|
Legend |
Select the area of the pagelet where the chart legend appears. Options are:
|
|
Height |
Enter the height of the chart in pixels. |
|
Width |
Enter the width of the chart in pixels. If you do not enter height or width values, the chart is automatically sized based on the pagelet position and size (narrow or wide). |
|
Overlay Fields |
Select up to three fields for which you want to display data using a line drawn over the background chart. Overlays apply to all charts types except 2D and 3D pie charts. |
Pagelet Preview
Displays a preview of the pagelet based on most display option settings on this page.
Specifying Custom Display OptionsAccess the Specify Display Options page after selecting the Custom option on the Select Display Format page.
Custom Options
|
XSL Template |
Select the XSL template used to generate the custom format pagelet. Available XSL templates are defined on the Define XSL page. Only XSL templates defined for the selected data source are displayed. |
|
Generate |
Click to generate custom XSL for the pagelet based on the selected XSL template. This XSL is displayed in the XSL text box and is applied to the XML in the XML text box to generate the pagelet preview. |
Pagelet Preview
Displays a preview of the pagelet based on most display option settings on this page.
Specifying Data Link DetailsAccess the Link Details page.
You can access this page for field or column names that are displayed on the Specify Display Options page when you access the page for the table, rowset, list, and chart formats. Entering information on the Link Details page enables you to link data that appears on the pagelet to additional information.
Pagelet Wizard builds the column data link as follows using link path, parameter, and suffix values:
http://baseURL/linkpath1/linkpath2/…/linkpathN/?parm1=val1&parm2=val2&…&parmN=valNlinksuffix
|
Link Type |
Select the type of link destination to define for the data. Options are: Content Reference: Select to define data links to a content reference. External URL: Select to define data links to an external URL. |
|
Portal Name |
Select the portal in which the content reference resides. This field appears when you select Content Reference as the link type. |
|
Content Reference |
Select the content reference to which the link points. This field appears when you select Content Reference as the link type. |
|
Base URL |
Enter the URL to which you want the link to point. This field appears when you select External URL as the link type. Options are: Specified by Data: Select to have the system dynamically generate the link information based on the selected data field. Fixed Text Entry: Select to hardcode the link information by entering a value. |
Link Paths
|
Path Source |
Select the method used to determine the link destination. Options are: Specified by Data: Select to have the system dynamically generate the link information based on the selected data field. Fixed Text Entry: Select to hardcode the link information by entering a value. |
|
Link Path |
This field appears if you select Specified by Data as the path source. Select the data field used to generate the link. |
|
Parameter Value |
This field appears if you select Fixed Text Entry as the path source. Enter a parameter value. |
Link Parameters
|
Name Source |
Select the method used to determine the link destination. Options are: Specified by Data: Select to have the system dynamically generate the link information based on the selected data field. Fixed Text Entry: Select to hardcode the link information by entering a value. |
|
Parameter Name |
Enter a value that corresponds to the value in the Parameter Value field. |
|
Parameter Value |
If you have selected Specified by Data as the name source, select a data field. If you have selected Fixed Text Entry as the name source, enter a parameter value. |
|
Link Suffix |
Select the method used to determine the link destination. Specified by Data: Select to have the system dynamically generate the link information based on the selected data field. Fixed Text Entry: Select to hardcode the link information by entering a value. If you have selected Specified by Data as the link suffix, select a data field. If you have selected Fixed Text Entryas the link suffix, enter a parameter value. |
|
Link Behavior |
Options are: Display in portal: Select if you want the content accessed by the data link to be displayed within the portal. Open in a new window: Select if you want the content accessed by the data link to be displayed in a new window. |
|
Reset to Default |
Click to clear the values on this page and remove the link. |
Enterprise 8.9 XSL Templates
Enterprise Portal 8.9 delivers five XSL templates that enable you to transform content from internet news sources that use industry-standard formats such as RSS and ATOM. When selecting the URL data source and the Custom Display Format, the following additional templates appear in the drop-down list box in Step 5 of Pagelet Wizard.
These include:
ATOM 0.3
RSS
RSS 0.91 - 0.93
RSS 1.0
RSS 2.0
Select the appropriate XSL template from the list and click the Generate button. The formatted news articles will appear in the pagelet preview on the right side.
Step 6: Specifying Pagelet Publication OptionsThis section discusses common elements used in this section and how to specify pagelet publication options. This is step 6 in the Pagelet Wizard pagelet creation process.
Common Elements Used in This Section
This section discusses common elements used in this section.
|
Enable Caching |
Select to enable caching for the pagelet. Enabling caching improves performance because once the pagelet is stored in the cache memory, the next time the pagelet is accessed, it is retrieved and displayed from cache memory instead of requiring a trip to the server. Selecting this option displays the Caching Options group box. See Add link to the Caching Options section below |
|
WSRP Portlet |
Select this option if you intend this pagelet to be produced by PeopleSoft as WSRP portlet. Web Services for Remote Portlets (WSRP) is a standard that defines the way in which remote web services should plug into the pages of a portal. WSRP standards allow you to easily embed a remote web service into a portal. The portal then displays interactive content and services that are dynamically updated from the remote servers. When creating WSRP portlets in the Pagelet Wizard, consider the following aspects of WSRP portlet publishing:
|
Caching Options
Entering caching options creates a content reference attribute for the new pagelet content reference. The content reference attribute contains the following information:
Name: PSCACHECONTROL
Label: PSCache-Control
Attribute value: <Caching type field value>;max-age=<Minutes to Cache field value>
Once the pagelet is saved and registered, you can use Pagelet Wizard to alter caching options in the same way you can alter other registration information. However, altering caching option values will require that you re-register the pagelet.
See Administering Content References.
|
Caching Type |
Private. Select to enable user-based caching. For example, pagelet caching is stored per user. If user A accesses the pagelet, only user A will access the pagelet from the cache. Public. Select to enable application-based caching. For example, pagelet caching is stored per web server instance. If a user accesses the pagelet using web server instance 1, only other users accessing the pagelets using web server instance 1 will access the pagelet from the cache. Role. Select to enable role-based caching. For example, pagelet caching is stored per role combination. If user A has roles 1, 2, and 3, only another user with all roles 1, 2, and 3 will access the pagelet from the cache. |
|
Minutes to Cache |
Enter the number of minutes for which you want the pagelet to remain in the cache. If you do not enter a value, a default value of 30 minutes is used. |
Pages Used to Specify Pagelet Publication Options
|
Page Name |
Object Name |
Navigation |
Usage |
|
Specify Publishing Options |
PTPPB_WIZ_PUBOPT |
PeopleTools, Portal, Pagelet Wizard, Pagelet Wizard Click the Next button on the Specify Display Options page, or click the icon for step 6. |
Specify the type of pagelet that you want to publish. Provide registration, caching, and security details, and register the pagelet. |
|
Pagelet Creation Confirmed |
PTPPB_WIZ_FINISH |
Click the Finish button on the Specify Publishing Options page. |
Confirm that the creation of the pagelet is complete. |
Specifying Publication Options
Access the Specify Publishing Options page.
When you access a pagelet definition on this page, the pagelet’s registration option (Homepage Pagelet, Template Pagelets, Embeddable Pagelet, or WSRP Portlet) is reflected only as it exists in the portal you are currently logged in to. Select the registration option to publish the pagelet to the portal where you are currently logged in.
For example, if you access ABC123 pagelet, the Homepage Pagelet option is selected only if the portal where you are currently logged in contains a CREF for the ABC123 pagelet. If there is no CREF for this pagelet in the current portal, even if there is a CREF for this pagelet in another portal on the same database, the Homepage Pagelet option will be clear. Select the Homepage Pagelet option to publish the pagelet to the current portal.
Homepage Pagelet
Select this option to publish the pagelet as a homepage pagelet that can be added to a user’s homepage.
|
Folder |
Select the pagelet folder to which you want to assign the pagelet. The pagelet appears in this pagelet category on the Personalize Content page, which users access to add or remove pagelets from their homepages. See Enterprise PeopleTools 8.49 PeopleBook: Using PeopleSoft Applications. |
Advanced Options
|
Hide Pagelet Title Bar |
Select to display the pagelet without a title bar. |
|
Hide Pagelet Border |
Select to display the pagelet without a border. |
|
Requires Personalization |
Select to specify that the pagelet requires end-user personalization. The pagelet displays a personalization button that accesses a personalization page. With this option selected, you are requiring that the end user access the personalization page to personalize and specify data source parameter values before it displays data. A message notifying the user of the personalization requirement appears on the pagelet. If this option is clear, the pagelet displays data using the default data source parameter values provided. |
Template Pagelet
Select this option to publish the pagelet as a template pagelet that can be added to any template. Template pagelets can extract and leverage keys specified by the target transaction for the template. Publishing a pagelet as a template pagelet is useful only when the PeopleSoft Enterprise Portal is installed and the Intelligent Context Manager feature will be used to display the template pagelet.
When a pagelet is published as a template pagelet, any user-specified parameters are automatically available as parameters that can be set by key passing in Context manager. In order for the keys to pass correctly, the key name in Context Manager (the key name on the page) must be identical to the name of the parameter in the pagelet. If the names match, then any key values passed are used by the template pagelet in place of the default values. If the names are not an exact match, the default values appear. Since users cannot customize template pages, user-specified parameters can only show the default values or the values that come through Context Manager key passing.
See PeopleSoft Enterprise Portal Solutions 9 PeopleBook: Enterprise Portal Application Technology,“Designing Template Pages for Intelligent Context Manager,” Exposing a Custom Key Structure to the Intelligent Context Manager
Advanced Options
|
Behavior if Keys not Present |
Select one of the following options to indicate how pagelet data is displayed if target transaction keys are not present to populate the pagelet’s parameters. Options are: Use Specified Defaults: If target transaction keys are not present, the pagelet will display data using the defaults specified in Step 3: Specify Pagelet Data Source Parameters. Display Message: If target transaction keys are not present, the pagelet does not display data but instead displays a message. Hide Pagelet: If target transaction keys are not present, the pagelet does not appear. |
WSRP Portlet
Select this option to make your pagelet available for use with external portals that support the WSRP standard.
See Specifying Publication Options.
Embeddable Pagelet
Select this option to make your pagelet available as an embeddable pagelet that can be generated by the Pagelet Wizard API for rendering within an HTML area of a PeopleSoft Pure Internet Architecture page or an iScript.
Pagelet Security
If you change any pagelet security options for a registered pagelet, you must re-register the pagelet.
|
Security Type |
Select the type of security that you want to assign to the pagelet. Options are: Public Access: Select to designate that all users can access the pagelet. Select Security Access: Select to assign role- or permission list-based security to the pagelet. The Selected Security scroll area appears. |
|
Author Access |
Select to provide the pagelet author with access to the pagelet regardless of any security restrictions assigned to the pagelet. This access is granted based on the author’s user ID. |
|
Update Security |
This button displays when Pagelet Wizard determines that there is an inconsistency between the security defined for the pagelet on this page and the security on one or more of the content references defined for the pagelet. When you click this button, the content reference security is updated for all of the content references for Homepage Pagelet, Template Pagelet, and WSRP Portlet options. |
Selected Security
|
Type |
Select the type of security assigned to the pagelet. Specified security is applied to the content reference entries when the pagelets are registered. Options are: Permission List: Select to assign permission list-based security to the pagelet. Select a permission list in the Name field. Role: Select to assign role-based security to the pagelet. Select a role in the Name field. |
|
Finish |
Click to complete the creation of the pagelet. The Pagelet Creation Confirmed page appears. After you click the Finish button for a pagelet, the button no longer appears when you access the pagelet definition in Pagelet Wizard. Once a pagelet has been created, you can apply any modifications to the pagelet definition by clicking the Save button. |
Using Pagelet Wizard Post-Transformation Processing
This section provides an overview of Pagelet Wizard post-transformation processing and discusses how to:
Insert message catalog text.
Format Date, Time, DateTime, Currency, and Number elements.
Insert a content-reference-based link.
Insert a content reference URL as text.
Generate charts.
Insert pagelet headers and footers in specific locations.
Understanding Pagelet Wizard Post-Transformation ProcessingPagelet Wizard enables you to use delivered Pagelet Wizard builder transformation tasks in custom and passthru transformations.
Listed in the order in which they are executed in post-transformation processing, the following transformation tasks are not automatically generated for custom and passthru transformations, but they can be added using embedded tags:
Insert Message Catalog text.
Format Date, Time, DateTime, Currency, and Number.
Insert content-reference-based links.
Insert content reference URLs as text.
Generate charts.
Insert pagelet headers and footers in specific locations.
These tasks are handled by the Post Transformation step, which is built into Pagelet Wizard.
The following diagram illustrates the point at which the Post Transformation step runs in the process flow for displaying a Pagelet Wizard pagelet.
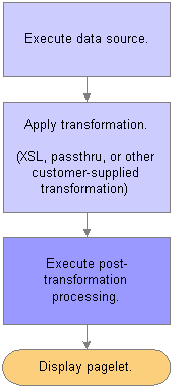
Pagelet Wizard pagelet-display processing flow
The Post Transformation step runs after the completion of the Transformation step. Following the Post Transformation step, the Pagelet Wizard pagelet appears for the user. Pagelet Wizard uses embedded tags to identify the type of Post Transformation processing that occurs.
Tags that perform these post-transformation tasks can be placed in the HTML for HTML pagelets using the passthru transformation, or in the XSL for pagelets using a custom transformation. For all other transformations—such as chart, list, table, and so forth—Pagelet Wizard automatically generates the tags when necessary. These tags are primarily meant to be used by pagelet designers who want to create custom pagelets using functionality similar to what our delivered Pagelet Wizard builders provide.
Inserting Message Catalog TextUse the following syntax to insert the text of a message catalog entry. Variables that are user-supplied are italicized.
Note. This processing step occurs only if the output of the Transformation step is XHTML-compliant.
See http://www.w3.org/TR/xhtml1/
|
Item to Insert |
XHTML Tag |
HTML After Processing |
|
Message Catalog Text |
<PSMSGTEXT MSGSET="message set" MSGNBR="message number" DEFAULT="defaulttext"/> |
Message text. |
|
Message Catalog Explain Text |
<PSMSGEXPLAINTEXT MSGSET="message set" MSGNBR="message number" DEFAULT="defaulttext"/> |
Message explanation text. |
Formatting Date, Time, DateTime, Currency, and Number ElementsUse the following syntax to format a Date, Time, DateTime, Currency, or Number elements. Variables that are user-supplied are set in italics.
Note. This processing step only occurs if the output of the Transformation step is XHTML compliant.
See http://www.w3.org/TR/xhtml1/
|
Item to Insert |
XHTML Tag |
HTML After Processing |
|
Date |
<PSFORMAT TYPE="DATE" [FORMAT="format string"]>DateToFormat</PSFORMAT> Note. FORMAT has the same syntax as the DateTimeToLocalizedString() PeopleCode Function. |
Formatted Date. |
|
Time |
<PSFORMAT TYPE="TIME" [SOURCETZ="Source Time Zone"][DESTTZ="Destination Time Zone"] [FORMAT="format string"]>TimeToFormat</PSFORMAT> Note. SOURCETZ and DESTTZ have the same format as the DateTimeToTimeZone() PeopleCode function. FORMAT has the same syntax as the DateTimeToLocalizedString() PeopleCode Function. |
Formatted Time. |
|
DateTime |
<PSFORMAT TYPE="DATETIME" [SOURCETZ="Source Time Zone"][DESTTZ="Destination Time Zone"] [FORMAT="format string"]>DateTimeToFormat</PSFORMAT> Note. SOURCETZ and DESTTZ have the same format as the DateTimeToTimeZone() PeopleCode function. FORMAT has the same syntax as the DateTimeToLocalizedString() PeopleCode Function. |
Formatted DateTime. |
|
Number |
<PSFORMAT TYPE="NUMBER" FORMAT="format string" [WIDTH="width"] [PRECISION="precision"]>NumberToFormat</PSFORMAT> Note. FORMAT, WIDTH, and PRECISION have the same format as the NumberToDisplayString() PeopleCode Function. |
Formatted Number. |
|
Currency |
<PSFORMAT TYPE="CURRENCY" FORMAT="format string" [WIDTH="width"] [PRECISION="precision"] [CURRENCY_CODE="CODE "] [CURRENCY_DECORATION="SYMBOL/CODE/BOTH "]>NumberToFormat</PSFORMAT> Note. FORMAT, WIDTH, and PRECISION have the same format as the NumberToDisplayString() PeopleCode Function. CURRENCY_CODE can be one of the supported PeopleSoft currency codes, or if left blank, defaults to the user's currency code. CURRENCY_DECORATION can have the value of SYMBOL (currency symbol appears before the number), CODE (currency code appears after the number), or BOTH (the default). |
Formatted Number with currency symbol and/or currency code. |
Disabling WSRP Style Substitution
Use the following post-processing tag to disable WSRP style substitution. <PSNOWSRPSTYLESSUBST/> takes no parameters and signals that the style classes referenced in the pagelet are already WSRP compliant. Including this tag can have a slight positive improvement in performance.
Inserting a Content-Reference-Based LinkUse the following syntax to insert a content-reference-based link into a Pagelet Wizard pagelet. Variables that are user-supplied are set in italics.
Note. This processing step only occurs if the output of the Transformation step is XHTML compliant.
See http://www.w3.org/TR/xhtml1/
|
Item to Insert |
XHTML Tag |
HTML After Processing |
|
Content Reference Link |
<PSREGISTERDLINK PORTAL="portal name" CREF="content reference name" target="target" APPEND="append">Text of Link</PSREGISTEREDLINK> |
<A HREF="http…URL of content reference…[?/&]append" target="target">Text of Link</A> |
Inserting a Content Reference URL as TextUse the following syntax to insert a content reference URL as text into a Pagelet Wizard pagelet. Variables that are user-supplied are set in italics.
Note. This processing step only occurs if the output of the Transformation step is XHTML compliant.
See http://www.w3.org/TR/xhtml1/
|
Item to Insert |
XHTML Tag |
HTML After Processing |
|
Content Reference URL |
<PSREGISTERDURL PORTAL="portal name" CREF="content reference name" APPEND="append"/> |
http…URL of content reference…[?/&]append |
Generating ChartsEmbedded charts are generated in the Post Transformation step.
For details about chart generation and its syntax, refer to the ChartXSLBuilder included in the EOPPB_PAGELET Application Class. You can access the ChartXSLBuilder application class code using PeopleSoft Application Designer.
Inserting Pagelet Headers and Footers in Specific LocationsPagelet Wizard automatically inserts a pagelet's header in front of the output of the Transformation step, and it inserts the pagelet's footer after the output of the Transformation step.
To alter this behavior, you must use special HTML comment tags. Here is the syntax of these tags:
|
Item to Insert |
HTML Tag |
XSL Equivalent |
|
Header |
<!--PWHEADER--> |
<xsl:comment>PWHEADER</xsl:comment> |
|
Footer |
<!--PWFOOTER--> |
<xsl:comment>PWFOOTER</xsl:comment> |
Administering Pagelets
This section discusses the following:
Deleting and copying Pagelet Wizard pagelets.
Generating export and import scripts for Pagelet Wizard.
Publishing pagelets to multiple portals.
Publishing multiple pagelets to a portal
Reviewing Pagelet Wizard pagelet details
Common Elements Used in This Chapter
This section discusses common elements used in this chapter.
Filter Pagelets
If appropriate, use the options in the Filter Pagelets group box to narrow the range of pagelets displayed in the Pagelets scroll area.
|
Data Type |
Select the data type of the pagelet that you want to appear in the Pagelets scroll area. Options are:
|
|
Published Type |
Select the pagelet type assigned to the pagelet that you want to appear in the Pagelets scroll area. Options are:
|
|
Portal Name |
The portal name that you select here does not filter results, but rather serves to inform you which pagelets displayed in the Pagelet scroll area have been published in the selected portal. Pagelets are automatically published to the portal where the pagelet author is logged in when creating the pagelet. |
|
Pagelet Keyword |
Enter keywords to narrow the range of pagelets that appear in the Pagelets scroll area. Pagelet elements that are used as keywords used include pagelet ID, title, and description. |
|
Search |
Click to perform a pagelet search using the criteria entered in the Filter Pagelets group box. |
|
Reset |
Click to clear the Pagelet Keyword field. |
Pagelets
The Pagelets scroll area provides the following pagelet information.
|
Pagelet ID |
Displays the pagelet ID. Click to access the pagelet definition in the Pagelet Wizard component. |
|
Pagelet Title |
Displays the pagelet title. |
|
Homepage |
If selected, indicates that the pagelet has been published as a homepage page. |
|
Template |
If selected, indicates that the pagelet has been published as a template pagelet. |
|
WSRP |
If selected, indicates that the pagelet has been published as a WSRP portlet. |
|
Embeddable |
If selected, indicates that the pagelet has been published as an embeddable pagelet. |
Pages Used to Administer Pagelet Wizard Pagelets
|
Page Name |
Object Name |
Navigation |
Usage |
|
Delete Pagelets |
PTPPB_ADMIN_DELETE |
PeopleTools, Portal, Pagelet Wizard, Delete Pagelets |
Delete one or more pagelets. Deleting a pagelet removes the pagelet definition from Pagelet Wizard, as well as deletes associated metadata and registry entries from the database and portal registry. |
|
Copy Pagelets |
PTPPB_ADMIN_SAVEAS |
PeopleTools, Portal, Pagelet Wizard, Copy Pagelets |
Create a new pagelet that is a clone of an existing pagelet. The new pagelet has a unique pagelet ID. The pagelet copy inherits all aspects of the original pagelet, with the exception of registration information. |
|
Export/Import Pagelets |
PTPPB_ADMIN_EXPIMP |
PeopleTools, Portal, Pagelet Wizard, Export/Import Pagelets |
Exporting and importing a pagelet generates the Data Mover script text to export and import the Pagelet Wizard defined pagelets. |
|
Review Pagelets |
PTPPB_ADMIN_REPORT |
PeopleTools, Portal, Pagelet Wizard, Review Pagelets |
Review the existing Pagelet Wizard defined pagelets. |
Understanding Administering Pagelets
This chapter lists common elements used in administering pagelets and discusses how to:
Delete and copy Pagelet Wizard pagelets.
Generate export and import scripts for pagelets.
Review Pagelet Wizard pagelet details.
Deleting and Copying Pagelet Wizard PageletsThis section discusses how to:
Delete pagelets.
Copy pagelets.
Deleting Pagelets
Access the Delete Pagelets page.
Deleting a pagelet removes the pagelet definition from Pagelet Wizard. In addition, associated metadata and registry entries are deleted from the database and portal registry.
|
Select |
Select the pagelets to delete. |
|
Delete Selected Pagelets |
Click to delete selected pagelets. The system prompts you to confirm the deletion. |
The Published tab shows information about how the pagelet has been published.
|
Homepage |
If selected, indicates that the pagelet has been published as a homepage page. |
|
Template |
If selected, indicates that the pagelet has been published as a template pagelet. |
|
WSRP |
If selected, indicates that the pagelet has been published as a WSRP portlet. |
|
Embeddable |
If selected, indicates that the pagelet has been published as an embeddable pagelet. |
Copying Pagelets
Access the Copy Pagelets page.
The pagelet copy inherits all aspects of the original pagelet, with the exception of registration information.
|
Select |
Select the pagelet to copy. |
|
New Pagelet ID |
Enter a unique pagelet ID for the new pagelet that will be copied from the selected existing pagelet. Note. Pagelet IDs can only contain the characters A-Z, a-z, and _. All other characters put into a pagelet ID will be removed by the system. If all characters are removed from the user entered pagelet ID, then the Registry Object Prefix will be used instead. If, after removing illegal characters from the pagelet ID, the name is found to match an existing pagelet ID, then Pagelet Wizard will append numbers to the end of the pagelet ID to make the new pagelet ID unique. |
|
Include Personalization Data |
Select to copy any end-user personalizations defined for the existing pagelet along with the new pagelet. |
|
Save New Pagelet |
Click to create the cloned pagelet with the new pagelet ID. Once you create the copied pagelet, you must publish it before it can be used as a homepage pagelet or a template pagelet. You can access the new pagelet in the Pagelet Wizard and publish the pagelet during step 6 on the Specify Publishing Options page. |
The Published tab shows information about how the pagelet has been published.
|
Homepage |
If selected, indicates that the pagelet has been published as a homepage page. |
|
Template |
If selected, indicates that the pagelet has been published as a template pagelet. |
|
WSRP |
If selected, indicates that the pagelet has been published as a WSRP portlet. |
|
Embeddable |
If selected, indicates that the pagelet has been published as an embeddable pagelet. |
Generating Export and Import Scripts for Pagelet Wizard PageletsThis section provides overviews of export and import scripts for Pagelet Wizard pagelets and export and import scripts for Pagelet Wizard setup data, and discusses how to generate export and import pagelet scripts.
Understanding Export and Import Scripts for Pagelet Wizard Pagelets
You can use these export and import scripts to copy Pagelet Wizard pagelet definitions from one database to another.
When you export or import a pagelet, the imported pagelet is not automatically published. You must access the pagelet definition in Pagelet Wizard in the target portal in the target database and publish the pagelet on the Specify Publishing Options page in step 6.
Alternatively, you can run the generated export and import Data Mover scripts (.DMS scripts) and copy the pagelet CREF by placing it into a PeopleSoft Application Designer project.
Note. These export and import scripts do not include the ability to export or import Pagelet Wizard setup data associated with the pagelet definitions being exported/imported.
Generating Export and Import Pagelet Scripts
Access the Export/Import Pagelets page.
|
Select |
Select the pagelets for which you want to generate export and import scripts. |
|
Include Personalize Data |
Select to include any end-user personalizations defined for the selected pagelets in the export and import. |
|
Generate Scripts |
Click to generate export and import scripts for the selected pagelets. The scripts appear on the Data Mover Scripts page. Copy the generated scripts into PeopleSoft Data Mover to export the selected pagelet definitions from a source database and import them into a target database. See Enterprise PeopleTools 8.49 PeopleBook: Data Management, “Using PeopleSoft Data Mover” |
Note. There are other Pagelet Wizard-related Data Mover scripts delivered with PeopleSoft Enterprise Components for users who need more customizable scripting for pagelet migration between databases. You can find these scripts delivered in the pshome scripts directory.
Generating Export/Import Scripts for Pagelet Wizard Setup Data
We deliver the following Data Mover scripts to export/import Pagelet Wizard setup data:
EOPPB_SETUP_DEFN_IMP.DMS
EOPPB_SETUP_DEFN_EXP.DMS
Use these scripts to copy the following types of Pagelet Wizard setup data from one database to another; from a development database to a production database, for example:
Footers.
Headers.
Categories.
XSL prototype templates.
You can find these scripts delivered in the pshome scripts directory.
Reviewing Pagelet Wizard Pagelet DetailsAccess the Review Pagelets page.
On any of the tabs for this component, you can click on the Pagelet ID to open Pagelet Wizard and the definition of the pagelet.
General Pagelet Information
Click the Pagelet ID link to open Pagelet Wizard and the definition of the pagelet.
Pagelet Type Information
|
Category |
Displays the category ID from step 1 of Pagelet Wizard. |
|
Data Type |
Displays the pagelet data type. |
|
Display Format ID |
Displays the format ID of the pagelet. |
Pagelet Publishing Information
|
Homepage |
If selected, indicates that the pagelet has been published as a homepage page. |
|
Template |
If selected, indicates that the pagelet has been published as a template pagelet. |
|
WSRP |
If selected, indicates that the pagelet has been published as a WSRP portlet. |
|
Embeddable |
If selected, indicates that the pagelet has been published as an embeddable pagelet. |
|
Cache |
The system displays a checkbox if caching is enabled for this pagelet. |
|
Time |
The time the pagelet is held in the cache. |
Pagelet Audit Information
This tab includes the timestamp and user ID of the person who created the pagelet as well as information on any updates to the pagelet.