 Understanding PS/nVision Personalization
This chapter provides an overview of personalization options and describes how to:
Use Configuration Manager.
Personalize NVSUSER.XLS.
Set report preferences.
Customize the style sheet wizard.
Customize delivered VBA wizards.
Change the startup file.
Use PS/nVision API functions.
Understanding PS/nVision PersonalizationYou can personalize numerous PS/nVision options through Configuration Manager and can even change the user interface for reporting and DrillDown. PS/nVision provides an Excel workbook (NVSUSER.XLS) with a custom DrillDown menu and buttons for common actions. From this starting point, you can construct a custom user interface for your organization or even for selected groups of users.
Note. PS/nVision also supports previous versions of personalized and non-personalized NVSUSER.XLM files.
PeopleSoft delivers NVSUSER as a starting point. You can use it with minimal modifications, make major enhancements, or replace it altogether.
Using Configuration ManagerPeopleTools provides Configuration Manager to maintain PeopleSoft-specific configuration information in the Windows Registry. You should use Configuration Manager to maintain PS/nVision settings (and other PeopleTools settings) rather than editing the Windows Registry directly.
This section describes how to:
Change Configuration Manager settings.
Define directory paths.
Specify formatting options.
 Changing Configuration Manager Settings
Access Configuration Manager.
To access Configuration Manager:
Select Start, Programs, PeopleSoft 8, Configuration Manager.
Select the Profile tab.
Select the profile to change and click Edit.
The settings on this dialog box control where PS/nVision looks for various file types. PeopleSoft Query Link, the feature that enables you to send PeopleSoft Query output to a spreadsheet, also refers to these Configuration Manager settings.
Note. Changes made with Configuration Manager do not take effect until you sign on to the system. If you’re signed on while making changes to Configuration Manager, you’ll have to sign off and sign back on to see the effect of the changes.
The following table describes the settings available for PS/nVision in Configuration Manager.
|
Control |
Description |
|
Space Between Query Columns |
Sets the number of blank Excel characters that PeopleSoft Query Link places between query output columns. To eliminate spacer columns, set this value to 0. Spacer columns improve readability, but can be problematic with Excel list features (such as filters or subtotals), or if you want to export data to another program. |
|
Customization Macros |
Specifies the directory path PS/nVision should search for macros used with PS/nVision and PeopleSoft Query Link. It is usually %PS_HOME%\EXCEL. This is also the path PS/nVision searches for the user macro sheet (normally NVSUSER.XLS) if it is not found in the layout directory path. |
|
Specifies the directory path PS/nVision should search for layout files. They’re usually in \USER\NVISION\LAYOUT, but you might also have a shared layout directory on the network. The layout directory path is also searched first for the user macro file (normally NVSUSER.XLS), allowing you to use a personalized front-end macro sheet rather than the standard one for the organization. |
|
|
Specifies the directory that contains PS/nVision DrillDown layouts, usually \USER\NVISION\LAYOUT\DRILLDN. |
|
|
Specifies the directory into which PS/nVision places report instances. This can be overridden via the directory template on the Report Request dialog box. |
|
|
Specifies where to look for the QUERY.XLT file. This file defines the Excel styles used to format output. If no template directory is specified, or if PS/nVision doesn't find Query.XLT there, it searches in the personalization macro path. |
|
|
Style Sheets |
Specifies the directory of predefined nPlosion styles for the style sheet. |
Note. These settings are for the Windows version of PS/nVision. To run PS/nVision through Process Scheduler, the configuration settings are in [nVision] section of $PSHOME\APPSERV\PRCS\$databasname\psprcs.cfg
Defining Directory PathsYou can specify paths containing multiple directory locations for layouts and several other types of files. Within a path, semicolons separate directory names, and the directories in the path are searched in the order listed. For example, the layout path might contain the following:
C:\USER\NVISION\LAYOUT;N:\PS\NVISION\LAYOUT
When PS/nVision starts, it searches the layout directories in sequence for NVSUSER.XLS. If PS/nVision can’t find it in any of these directories, it looks in the macro directory path. If it can’t find NVSUSER.XLS, it looks for NVSUSER.XLM. Similarly, when PS/nVision opens or runs a report, it searches the layout directories in sequence until it finds the layout. The same path options exist for the Excel installation path, macros, templates, and DrillDown layouts.
In addition, when searching a directory path, PS/nVision looks first for a subdirectory with the name of the current user’s language. For example, if the language setting in Configuration Manager is French, PS/nVision searches the following directories in sequence for the layout directory in the example above:
C:\USER\NVISION\LAYOUT\FRA
C:\USER\NVISION\LAYOUT
N:\PS\NVISION\LAYOUT\FRA
N:\PS\NVISION\LAYOUT
This enables users of different languages to share the same settings while maintaining layouts in multiple languages.
Specifying Formatting OptionsThe PeopleSoft Query Link portion of PS/nVision uses a standard Microsoft Excel template, QUERY.XLT, to format data retrieved from a query. QUERY.XLT contains some special styles that you can personalize. Use the Excel Format, Styles option and save your changes to QUERY.XLT.
Note. The location of QUERY.XLT is specified on Configuration Manager’s nVision tab in the Query Templates dialog box.
The following table lists the special PeopleSoft styles you can apply to QUERY.XLT.
|
Style Name |
Data Type Formatted |
|
PSChar |
Character fields (such as names). |
|
PSDate |
Dates. |
|
PSDec |
Numbers with decimal places, such as dollar amounts. |
|
PSInt |
Integers (such as years). |
|
PSHeading |
Column headings. |
|
PSSpacer |
Space between data columns. |
Personalizing NVSUSER.XLSThe NVSUSER worksheet provided by PeopleSoft includes macros to personalize the user menu and toolbar.
This section describes how to:
Customize buttons.
Add buttons with the button wizard.
Customize menus.
Make Excel row and column indicators visible.
Change the toolbar.
See Also
Using PS/nVision API Functions
Customizing ButtonsEach button on the NVSUSER sheets has a macro assigned to it to perform some function. As delivered, NVSUSER has buttons grouped into Run, View, and Command groups. You can change the groupings and meanings of the buttons. You can also format the button sheet to personalize its color and appearance.
To change the macro a button is assigned to:
Position the mouse pointer over the button (it becomes a hand), but don’t click it.
Right-click and select Assign, Macro from the shortcut menu.
Enter the name of the macro you want to run when the button is clicked.
Click OK to complete the assignment.
Note. If you have macros that were created using Excel 95, you will see the Excel Edit Name dialog box when defining the name for the cell in which the macro begins. Select the Command-type option to identify your macro as a Command macro. This dialog box does not appear for later versions of Excel.
Adding Buttons With the Button Wizard
Click Add Buttons from the NVSUSER.XLS home page.
Select whether to run a report or view a report. Click Next.
Choose either your report request or your instance. You can navigate to an instance from the button with ellipses on it.
Click Next.
Type in a caption for your button.
(Optional) Choose a picture for your button by clicking the Image button and navigating to the location of an image file.
Click Finished.
The new button is placed directly below the lowest-positioned button in a specific Run or View category. Once initially placed on the sheet, the button can be moved or changed accordingly. However, try not to ungroup buttons with images. If necessary, remember the defined button name before ungrouping; then, when regrouped, rename the button group accordingly. To ungroup the button, right-click it, select the ungroup function from the menu, and make your changes. To regroup, right-click it again and select the regroup function from the menu.
Customizing Menus
Access the Menu Control Table page by clicking on the PSMenu tab on NVSUSER.XLS.
You can select a DrillDown layout, DrillDown query, or a macro to run when a menu command is selected.
|
Application |
Identifies the application that uses this menu item. This makes it easier to enable or disable the actions associated with an application by setting its Active check box. The Application field is not used by the supplied macros, but acts as a description on this page. |
|
Active |
Enter Y to make the menu item active or N to keep it in the table but deactivate it. |
|
Menu Command |
Enter the text that appears when the user pulls down the menu. |
|
DrillDown Layout |
Select a layout, present in your DrillDown layout path, to be used in a matrix or tabular DrillDown. |
|
DrillDown Query |
Enter a query name to be used in a PeopleSoft Query Link-style tabular DrillDown. |
|
Macro |
Enter the name of a macro to run when the item is selected. |
|
Description |
Enter descriptive text to appear in the status bar when a user highlights the command. |
Rebuilding the Menu
To rebuild the menu with new information that has been entered, click the Rebuild Menu button.
Making Excel Row and Column Indicators VisibleTo make Excel row and column indicators visible for both the PeopleSoft menu and toolbar sheets:
Select Excel menu Tools, Options.
On the View tab select the Row & column headers check box and click OK.
Row indicators (1,2,3, and so on.) and column indicators (A,B,C, and so on.) become visible.
Insert or delete rows or columns by clicking a row or column indicator to highlight the row or column.
After you're done making changes to the PeopleSoft menu or toolbar sheet, hide the row and column indicators by clearing the Row & column headers check box before saving the modified NVSUSER.XLS.
Changing the ToolbarTo personalize the toolbar:
Select the Toolbar tab on the NVSUSER.xls.
(Optional.) Edit the name of the toolbar in the Toolbar Name box.
Set the location of the toolbar in the Docking Position box.
You can enter left, right, top, or bottom to have the toolbar docked accordingly, or you can select float to have the toolbar float over the spreadsheet.
Edit the table of tool commands, adding, changing, and deleting items to get the toolbar you want.
For each tool you add or change, specify one of the following actions.
A layout, present in your DrillDown layout path, to be used in a matrix or tabular DrillDown.
A query name to be used in a PeopleSoft Query Link-style tabular DrillDown.
The name of a macro to run when the tool button is clicked.
For each tool, also specify the following:
Active. Y to make the tool active; N to keep it in the table, but not in the toolbar.
Face. The name of the picture that identifies the tool. Either use a picture already defined on the Toolbar worksheet or design your own using a drawing program such as Paintbrush. The picture must be 16 pixels square. Copy the picture from the drawing program and paste it onto the Toolbar worksheet. While it is selected, enter a name for it, and enter this name in the Face column.
Gap. To leave a gap between tools, enter gap in the Face column.
Status text. Enter descriptive text to appear in the status bar when the mouse rests over the tool.
Tip text. Enter a brief description to appear in a tool tip when the mouse rests over the tool.
When the table is, as you want it, click Rebuild Toolbar to build the new toolbar.
Setting Report PreferencesNVSUSER allows you to store personalized, categorized report requests. You can quickly view frequently used requests by category and run them with a click of a button. One NVSUSER can be stored on a remote server location and still allow individual users to view requests from any client workstation. In addition, you can view and copy other users’ Report Request preferences if given the proper security access to alleviate the redundancy setup process.
This section describes how to:
Set report request preferences.
Copy a user’s report request preferences.
Customize the report instance view.
Setting Report Request Preferences
Access the Personal Report Settings dialog box.
To set report request preferences:
Click Report Preferences on the NVSUSER homepage.
The Personal Report Settings dialog box appears.
Select an appropriate business unit.
(Optional.) Enter a new category or select an existing one.
Select the reports you want for that category and click Add or Remove.
Click OK.
The information is stored in the NVSReports tab of NVSUSER.xls
Copying a User’s Report Request Preferences
To view or copy another user’s report request preferences:
Click the Operator button on the NVSUSER homepage.
Another dialog box appears with a drop-down list of all users who have already set and stored report request preferences on this NVSUSER.xls.
Select a user from the list to access that user’s report references and personalized categories.
Click the Copy button to copy the other user’s preferences.
Click the Report Preferences button to see your report settings.
Note. When you copy another user’s preferences, your previous preferences are deleted. You cannot change another user’s report request preferences without copying them first.
Customizing the Report Instance ViewFrom the NVSUSER homepage, you can pull in report instances from folders that you specify. You can then select reports from the list and open them without having to navigate through a file directory system.
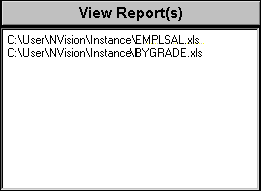
View Reports group box from the NVSUSER homepage
For example, if a series of report books were being run overnight and placed into a common file location, a manager could log in to the NVSUSER homepage and all the reports would be pulled from the specified directories.
To personalize the report instance view:
Select Go, Configuration.
Select the Profile tab.
Select the profile to change and click Edit.
Select the nVision tab on the Edit Profile dialog box.
Enter or navigate to the location of your report instance files.
You can have more than one folder listed, but you must have them separated by semicolons. However, Excel does have a limit of 255 characters.
Customizing Delivered VBA WizardsNVSUSER delivers VBA forms to perform functions from storing information in the PeopleSoft system to creating a button to run a report. To find the VBA forms, select Tools, Macros, Visual Basic Editor from the Excel menu bar.
The VBA forms provide several examples of using Visual Basic PeopleSoft APIs to personalize PS/nVision. These features can add tremendous depth to your reporting ability.
Several VBA wizards take advantage of the PeopleSoft Open Query method to pull information from the PeopleSoft system. To use this method, you need create a query in the PeopleSoft system.
There are also examples of VBA forms passing prompt values to the queries. The following table lists queries that PS/nVision accesses and wizards that use them.
|
Query |
VBA Wizard |
|
NVS_OPERATORS |
NVSUSER.xls |
|
NVS_PERSNL_RPTS |
NVSUSER.xls, Personal_Settings |
|
NVS_CATEGORY |
NVSUSER.xls, Personal_Settings |
|
NVS_RPT_ID |
Personal_Settings, Button Wizard |
|
NVS_MENU |
PSDrill |
|
NVS_MENU_BAR |
PSDrill |
|
NVS_MENU_ITEM |
PSDrill |
|
NVS_MENU_PANEL |
PSDrill |
|
NVS_MENU_PNL_KEYS |
PSDrill |
See Also
Microsoft Visual Basic Applications manual
Using the PS/nVision Visual Basic Interface
Changing the Startup FileWhen you start PS/nVision, it opens NVSUSER.XLS by default. If it cannot locate NVSUSER.XLS, it looks for the NVSUSER.XLM file.
If you start PS/nVision from a Microsoft Windows shortcut, you can specify a different startup file on the PS/nVision command line. Include the -SF argument followed by the name of the startup file. For example, to have PS/nVision open the file NVSDEV.XLS, enter a command similar to the following in the Target edit box in the Properties dialog box for the shortcut.
c:\pt800\bin\client\winx86\psnvs.exe -SFNVSDEV.XLS
This feature enables you to provide different startup files for different classes of users.
Note. PS/nVision searches for the startup file in the same directories where it looks for its default startup file.
See Also
Using PS/nVision API FunctionsPS/nVision has an API function interface. The Excel macros that you write can use these functions to gain access to PS/nVision features. This table describes the API functions.
Note. None of these functions may be called within a macro called via NvsInstanceHook.
|
Interface Function |
Purpose |
Arguments |
Example |
|
NvsAutoDrill |
Performs an AutoDrill, like selecting the AutoDrill menu item. AutoDrill is only usable in reports based on queries, and in ledger-based reports for which the NvsDefaultDrill name is defined in the layout, specifying the name of the layout to run as an AutoDrill. |
None |
=NvsAutoDrill() |
|
NvsDrillDown |
Start a matrix DrillDown, like the DrillDown item on the nVision menu. The user will choose a DrillDown layout from the Open dialog box. |
None |
=NvsDrillDown() |
|
NvsDrillLayout |
Run a matrix DrillDown using a specified layout. |
Layout name |
=NvsDrillLayout("ACTPER.XNV") |
|
NvsDrillQuery |
Run a tabular DrillDown using a specified Query. |
Query name |
=NvsDrillQuery("Journals") |
|
NvsJumpBack |
Jump back to the sheet and cell from which the current sheet drilled down (same as Jump Back command.) |
None |
=NvsJumpBack() |
|
NvsLayoutDefn |
Show the Layout Definition dialog box for the selected row, column, or cell. This is the equivalent of the nVision, Layout Definition menu item. |
None |
=NvsLayoutDefn() |
|
NvsNewLayout |
Creates a new layout, like the New Layout menu item. |
None |
=NvsNewLayout() |
|
NvsOnWindow |
Activate PS/nVision menus for the current window. This is required when your macro opens a sheet, since Excel does not signal PS/nVision that the new sheet has been activated. |
None |
=NvsOnWindow() |
|
NvsOpenFile |
Open an Excel worksheet, waiting if necessary in case another user on the network is accessing the file. If the file is opened successfully, call NvsOnWindow to update menus. Optional arguments say whether to update links to other documents and if file is to be opened read-only. |
filespec, updlinks, readonly |
=NvsOpenFile ("FSDEMO.XLS", TRUE, FALSE) |
|
NvsOpenLayout |
Open a layout, like the Open Layout menu item. |
None |
=NvsOpenLayout() |
|
NvsOpenReport |
Open a report request, like clicking the Open button in the Report Request dialog box. |
None |
=NvsOpenReport() |
|
NvsOpenScope |
Open an existing scope definition, like clicking the Open button in the Scope Definition dialog box. |
None |
=NvsOpenScope() |
|
NvsReDrill |
Repeat the most recent DrillDown from the currently selected amount cell. |
None |
=NvsReDrill() |
|
NvsReport Request |
Display the Report Request dialog, like the nVision, Report Request menu item. |
None |
=NvsReportRequest() |
|
NvsRunCurrent |
Runs the current report, like the nVision, Run Current Report menu item. |
None |
=NvsRunCurrent() |
|
NvsRunQuery |
Run a specified query, without inheriting DrillDown criteria. |
Query name |
=NvsRunQuery ("AP Journals") |
|
NvsRunReport |
When used without a parameter, prompts the user to select a report to run, then runs the selected report. With a parameter, runs a specified matrix report, without showing the report key dialog or Report Request. |
Business Unit, Report ID |
=NvsRunReport() ("M04","ISDEMO") |
|
NvsSaveAsLayout |
Prompts user to save the layout with a new name, like the nVision, Save As Layout menu item. |
None |
=NvsSaveAsLayout() |
|
NvsScopeDefn |
Opens the Scope Definition dialog box, like the nVision, Scope Definition menu item. |
None |
=NvsScopeDefn() |