Creating and Using Links with the Related Links Service
This topic discusses ways to view linked content, create links to related content and related workspace.
|
Page Name |
Definition Name |
Usage |
|---|---|---|
|
EPPRS_LINK_CNT |
Navigate to linked content. |
|
|
EPPRS_ADD_LINK |
Upload a file attachment. |
|
|
EPPRS_ADD_LINK |
Create links to existing PeopleSoft Interaction Hub content and to external URLs. |
|
|
EPPRS_WS_CREATE |
Create a collaborative workspace in PeopleSoft Interaction Hub and link to this workspace. |
Use the Linked Content page (EPPRS_LINK_CNT) to navigate to linked content.
Navigation:
On the transaction page, select
This example illustrates the fields and controls on the Linked Content page. You can find definitions for the fields and controls later on this page.
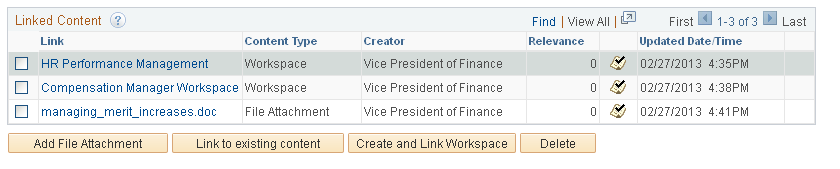
Use the Linked Content page to navigate to the linked content. The links on this page are initially ordered by the date and time the link was created, in reverse chronological order. Similar to other PeopleSoft grids, you can resort the information by content type, relevance, creator, and so on.
Field or Control |
Description |
|---|---|
Link |
Clicking a link opens the link target in a separate browser window. When you click the link for a file attachment, the attachment is downloaded and opened on your computer using the ViewAttachment PeopleCode function. Note: Depending on the file type and the browser you are using, a separate application might be executed to open the attachment, a separate browser window might be opened displaying the attachment, or you might be prompted to save or open the file. |
|
Click the Relevance icon button to the right of the Relevance column to indicate whether you think a link is relevant, which will add one to the current relevance score. After you mark a link as relevant, the Relevance icon button becomes disabled and you cannot change your relevance rating for that link. |
|
The Shared Link icon indicates that a link was created as shared across all instances of this transaction. If no icon is displayed, then the link is unique to this instance of the transaction. |


Use the Add File Attachment page (EPPRS_ADD_LINK) to upload a file attachment.
Navigation:
On the Related Links tab, click the Add Attachment button on the Linked Content page.
You can attach files and create links to existing content.
Adding Attachments
Access the Add File Attachment Page to attach files (on the Related Links tab, click the Add File Attachment button on the Linked Content page).
This example illustrates the fields and controls on the Add File Attachment Page. You can find definitions for the fields and controls later on this page.
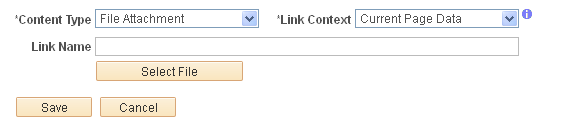
Use the Add File Attachment page to attach files either to the application page or the current page. File attachments are uploaded from your computer to the storage location defined by your PeopleSoft Interaction Hub administrator.
See Understanding the Setup of Related Content Services.
Field or Control |
Description |
|---|---|
Content Type |
Specifies File Attachment as the content type. The content type cannot be changed. |
Link Context |
Select the placement of the attachment.
|
|
Place your mouse cursor over the icon to display a pop-up with additional information including the page name, context keys, and key values. |
Link Name |
By default, this field provides the name of the uploaded file; you can override the default link name. |
Select File |
Click to browse and upload the file. |
Save |
Click to save the attachment and return to the Linked Content page. |

Use the Link to Existing Content page (EPPRS_ADD_LINK) to create links to existing PeopleSoft Interaction Hub content and to external URLs.
Navigation:
On the Related Links tab, click the Link to existing content button on the Linked Content page.
This example illustrates the fields and controls on the Link to Existing Content page. You can find definitions for the fields and controls later on this page.

Use the Link to Existing Content page to create links to existing PeopleSoft Interaction Hub content and to external URLs.
Field or Control |
Description |
|---|---|
Content Type |
Select the content type for the link. Important! To search for blogs, discussions, and workspaces in the PeopleSoft Interaction Hub database, you must build and maintain search indexes for each of those scopes in the PeopleSoft Interaction Hub database. Select from these values:
|
Link Context |
Select the context for the link:
|
|
Place your mouse cursor over the icon to display a pop-up with additional information including the page name, context keys, and key values. |
Link Name |
Provides the link name on the Linked Content page. This field provides the name of the item selected in the search results by default; you can override the default link name. You must enter a name for an external URL. |
Search Text |
Enter search text. Leave this field blank or use the * wildcard character to search for all instances of a given content type. |
Search |
Click to perform the search. Note: To search for blogs, discussion forums, or workspaces, the portal administrator must build and maintain appropriate search indexes. |
Save |
Click the Save button to save the link and return to the Linked Content page. Note: Select a link in the search results before you click the Save button; otherwise, an error message or invalid link will result. |
Cancel |
Click to return to the Linked Content page without creating a link. |
Page label to appear in the Workspace |
Note: This option is available only when Workspaces is selected as the content type. Enter an optional label for the page that appears in the Workspace. |
Include Related Discussions to the Workspace |
Note: This option is available only when Workspaces is selected as the content type. Select this option to include any related discussions associated with this transaction in the workspace. |
Search Results |
Select an item from the search results to be the target of the link. |
Use the Create and Link Workspace page (EPPRS_WS_CREATE) to create a collaborative workspace in PeopleSoft Interaction Hub and link to this workspace.
Navigation:
On the Related Links tab, click the Create and Link Workspace button on the Linked Content page.
This example illustrates the fields and controls on the Create and Link Workspace Page. You can find definitions for the fields and controls later on this page.

Use the Create and Link Workspace page to create a new workspace and to create a link to that workspace from the current transaction or transaction instance.
Field or Control |
Description |
|---|---|
Name |
Enter a name for the workspace. The name of the workspace appears in the header on the workspace homepage, at the top of the workspace menu, and anywhere workspaces are listed, for example, on pages to search for or manage workspaces, in pagelets, in search results, and so on. |
Template |
Select the template on which you want to base your linked workspace. Note: If the transaction is registered with a template in PeopleSoft Interaction Hub, then that template is automatically be selected. |
Description |
Enter an optional description for the workspace. This description also becomes the default welcome text, which appears in the Welcome module if that module is configured for this workspace. |
Copy Members From the Template |
Select this option to copy the members and privileges from the workspace template. |
Include Related Discussions to the Workspace |
Select this option to include any related discussions associated with this transaction in the workspace. |
Link Context |
Select the context for the link:
|
|
Place your mouse cursor over the icon to display a pop-up with additional information including the page name, context keys, and key values. |
Page label to appear in the Workspace |
Enter an optional label for the page. |
Save |
Click the Save button to create the workspace. The linked workspace opens in a new window with the Administration - Properties page displayed |
Cancel |
Click to return to the Linked Content page without creating a workspace. |