Using the Links Module
This section provides an overview of the Links module and discusses ways to add and maintain links and folders. It also discusses working with the Links pagelet and accessing the folder contents.
|
Page Name |
Definition Name |
Usage |
|---|---|---|
|
EPPCW_LKBROWSE |
Add, edit, and delete folders and links in the Links module. |
|
|
EPPCW_LKCONTENT |
Add links to a folder. Access the link contents of a folder. |
|
|
Link Properties Page |
EPPCW_LKLINK |
Add and maintain links in the Links module. See Adding a Link |
|
Search Links Page |
EPPCW_ADD_LINK |
Search for blog posts, discussion topics, or workspaces to which to link. See Adding a Link |
|
Key Name Mapping Page |
EPPCW_LKKEYMAP |
Select the keys that you want to pass to the link and provide optional new names for these keys. See Adding a Link |
|
Select New Parent Folder Page |
EPPCW_LKNEW_PRNT |
View a graphical display of the collection of folders and links defined for the Links module and select the folder in which you want the selected link to reside. See Adding a Link |
|
EPPCW_LKFOLDER |
Add and maintain folders in the Links module. |
Use the Links module to build and maintain a collection of useful links that are related to a workspace. This collection of links is displayed for member use on the Links pagelet, which appears by default on the workspace homepage.
You can include links to the following types of content:
External URLs.
PeopleSoft menu items.
If you define a Link pagelet collection as a part of a workspace template, the collection will appear in the Link pagelet in any workspaces built by means of the template.
Access the Links page (in the workspace menu, click the Links link).
This example illustrates the fields and controls on the Links page. You can find definitions for the fields and controls later on this page.
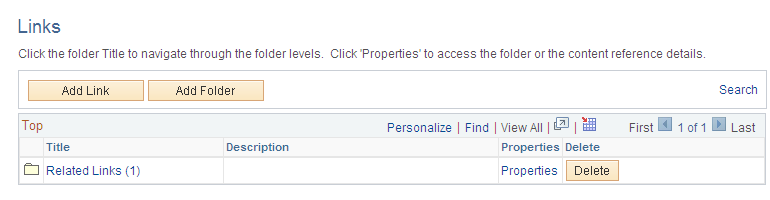
The Links page displays links that were created in this workspace, including links created automatically by the system.
If the workspace was linked to or created from the Related Links related content service, then a folder with the name of the PeopleSoft application transaction page is created automatically and contains a link back to the transaction from which this workspace was linked or created. Alternatively, if the workspace was created from the Related Workspaces pagelet of Context Manager, then the Related Links folder is created automatically and contains a link back to the transaction from which this workspace was created.
Field or Control |
Description |
|---|---|
Add Link |
Click to access the Link Properties page. |
Add Folder |
Click to access the Folder Properties page. |
Search |
Click to access the Search page. |
Top
Field or Control |
Description |
|---|---|
Title |
Click for a folder to access the Links page (EPPCW_LKCONTENT). Click for a link to access the content of the link destination. |
Properties |
Click for a folder to access the Folder Properties page. Click for a link to access the Link Properties page. |
Delete |
Click to delete a folder or link. You will be prompted to confirm the deletion. |
Access the Links page (click the link for a folder on the Links page).
This screenshot shows folder links on the Links page.
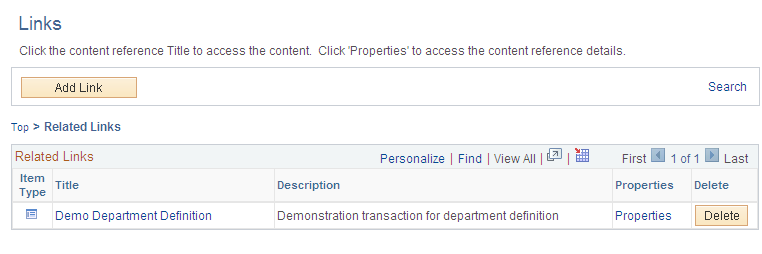
The elements on this page are the same as the elements on the Links page, with the exception that this page allows only the addition of and access to links in folders in the Links module.
The Links module allows the addition of one level of folders and does not allow the nesting of folders within folders. Use the Links page to add a first-level folder.
See Links Page.
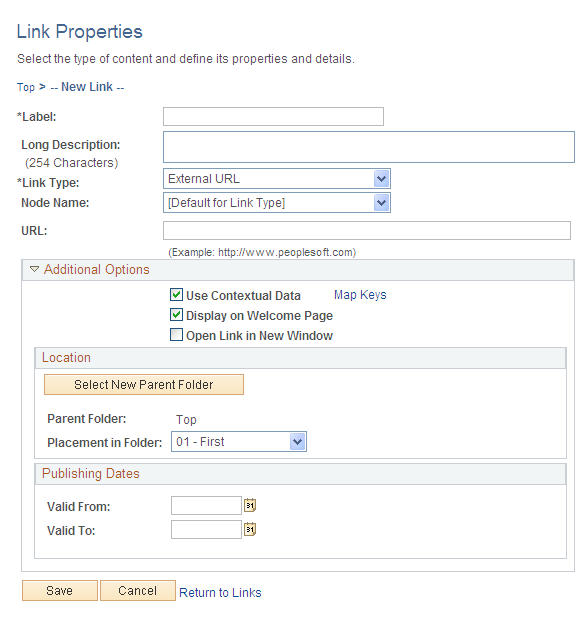
Access the Link Properties page (click the Add Link button on the Links page).
This example illustrates the fields and controls on the Link Properties page. You can find definitions for the fields and controls later on this page.
Field or Control |
Description |
|---|---|
Label |
Enter the text that you want to appear as the link used to access the link content. |
Long Description |
Enter a long description of the link content, which will appear in the Description column on the Links page. This description will also appear as rollover text for the link on the Link pagelet. |
Link Type |
Select the link type:
|
URL |
This field appears when the Link Type field is set to External URL. Enter the URL address of the website to which you want to create a link. |
Portal |
This field appears when the Link Type field is set to Menu Item. Select the portal in which the menu item for which you want to provide a link resides. |
Menu Item |
This field appears when the Link Type field is set to Menu Item. Select the menu item to which you want to provide a link. |
Go to the Portal Registry Entry for this CREF |
The field appears once link properties have been saved. Click to access the Content Ref Administration page for the menu item. See the product documentation for PeopleTools: Portal Technology,“Administering Portals,” Administering Content References. |
Additional Options
Field or Control |
Description |
|---|---|
Use Contextual Data |
Select to use contextual data defined in the workspace to derive link content. For example, if you create a workspace that contains contextual data to a specific transaction or URL, a link to the transaction or URL will automatically be added to the Related Links folder on the Links pagelet for the workspace. |
Map Key |
Click to display the Key Name Mapping page, enabling you to select the keys passed to the link. |
Display on Welcome Page |
Select to display the link in the Links pagelet on the workspace homepage. |
Open Link in New Window |
Select to indicate that, when this link is accessed, you want the link content to appear in a new window. If this option is not selected, then when this link is accessed, the link content is displayed within your workspace frame. |
Location
The Location group box appears once link properties have been saved. The fields in this group box enable you to change the location of an existing link.
Field or Control |
Description |
|---|---|
Select New Parent Folder |
Click to access the Select New Parent Folder page, where you can move the link to a folder other than the current folder. |
Parent Folder |
Displays the name of the parent folder of the link. |
Placement in Folder |
Select a value in the drop-down list box to change the placement of the link within its parent folder. Available placement values reflect saved link sequencing. |
Publishing Dates
Field or Control |
Description |
|---|---|
Valid From |
Enter a date on which the link will be valid. This is the date on which the link appears on the Links pagelet on the workspace homepage. If you do not enter a value, the link appears when the data is saved. |
Valid To |
Enter a date on which the link ceases to be valid. This is the date on which the link no longer appears in the Links pagelet on the workspace homepage. If you do not enter a value, the link does not expire. |
Searching for a Link
Access the Search Links page (click a Click to Search link on the Link Properties page).
This example illustrates the fields and controls on the Search Links page. You can find definitions for the fields and controls later on this page.
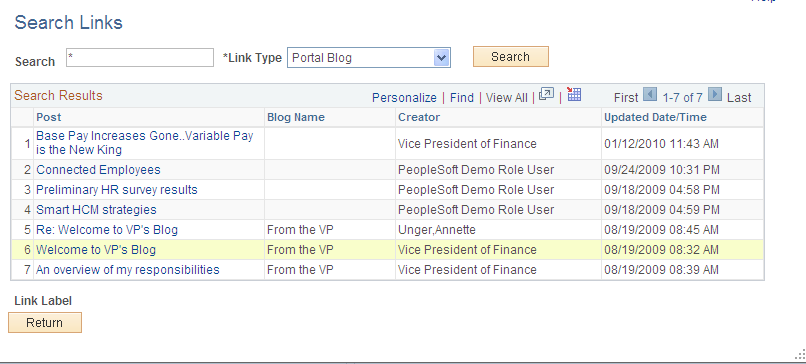
Use the Search Links page to search for content as the link.
Field or Control |
Description |
|---|---|
Search |
Enter the search criteria. |
Link Type |
Select the link type:
|
Search |
Click to perform the search. |
Search Results |
Click a link in the search results to select that item as the link destination. |
Return |
Once a link is selected, click the Return button to return to the Link Properties page. |
Mapping Keys for a Link
Access the Key Name Mapping page (select the Map Keys link on the Link Properties page).
This example illustrates the fields and controls on the Key Name Mapping page.
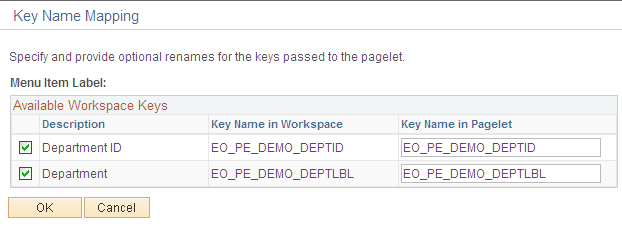
Select the keys that you want to pass to the link and provide optional new names for these keys.
Selecting a New Parent Folder for a Link
Access the Select New Parent Folder page (click the Select New Parent Folder button on the Link Properties page).
This example illustrates the fields and controls on the Select New Parent Folder page.
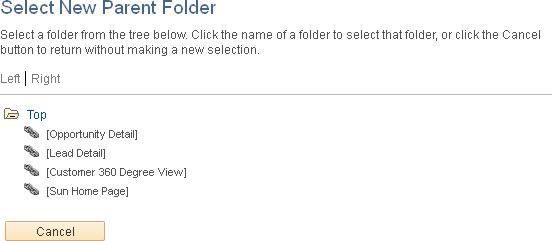
Navigate the link folder hierarchy to select a new parent folder.
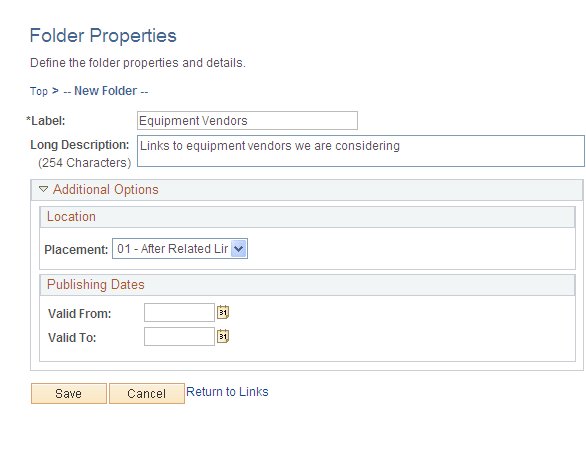
Access the Folder Properties page (click the Add Folder button on the Links page).
This example illustrates the fields and controls on the Folder Properties page. You can find definitions for the fields and controls later on this page.
Field or Control |
Description |
|---|---|
Label |
Enter the text that you want to appear as the folder name link used to access folder content. |
Long Description |
Enter a long description of the folder content, which will appear in the Description column on the Links page and as rollover text for the folder as it appears on the Links pagelet. |
Go to the Portal Registry Entry for this folder |
Click to access the Folder Administration page for the folder. See the product documentation for PeopleTools: Portal Technology, “Administering Portals,” Administering Folders. |
Location
Field or Control |
Description |
|---|---|
Placement |
Select a value in the drop-down list box to change the placement of the folder within the parent folder. Available placement values reflect saved folder sequencing. Placement options are not available for the Related Links folder. |
Publishing Dates
Field or Control |
Description |
|---|---|
Valid From |
Enter the date on which you want the folder to be valid. This is the date on which the folder will appear on the Links pagelet on the workspace homepage. If you do not enter a value, the folder will appear when you save this page. |
Valid To |
Enter the date on which you want the folder to cease being valid. This is the date on which the folder will no longer appear on the Links pagelet on the workspace homepage. If you do not enter a value, the folder will appear indefinitely when you save this page. |
Access the Links pagelet from the workspace homepage.
This example illustrates the fields and controls on the Links pagelet. You can find definitions for the fields and controls later on this page.
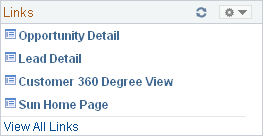
Use the Links pagelet to access links added to the Links module. The Links pagelet displays links created in this workspace, including links created automatically by the system.
If the workspace was linked to or created from the Related Links related content service, then a folder with the name of the PeopleSoft application transaction page is created automatically and contains a link back to the transaction from which this workspace was linked or created.
Field or Control |
Description |
|---|---|
Links |
Click a link in the Links column to open the link. |
View All Links |
Click to access the top folder of the Links module. |