Purging and Inactivating Content
This section discusses ways to purge and inactivate content and also to preview items selected from the Purge/Inactive page.
|
Page Name |
Definition Name |
Usage |
|---|---|---|
|
EPPCM_PRG_RUN |
Purge content or folders, inactivate content, unpublish content, or delete versions from the Content Management system. |
|
|
EPPCM_PRG_VIEW |
Preview items to be purged or inactivated. |
|
|
Process Scheduler Request |
PRCSRQSTDLG |
Specify process variables. |
You use the Purge/Inactivate page to set parameters for the Purge/Inactivate process, an Application Engine program. You can set up the Purge/Inactivate process to perform one of several actions depending on the selected feature within the content management system:
Delete Past Versions deletes the noncurrent versions of a piece of content.
Only the last approved version and any successive versions of the content are retained.
Purge Items deletes content, folders, or both from the system.
This action excludes folders that do not allow deletes and content in folders that do not allow deletes.
Set Inactive Date updates the inactive date for the selected content.
Unpublish Content changes the content’s status from published to pending (or blank).
Only items that meet all of the selection criteria are processed.
Note: Use care in selecting and processing items from this page. Content or folders that are purged from the system cannot be retrieved.
Use the Purge/Inactivate page (EPPCM_PRG_RUN) to purge content or folders, inactivate content, unpublish content, or delete versions from the Content Management system.
Navigation:
This example illustrates the fields and controls on the Purge/Inactivate page. You can find definitions for the fields and controls later on this page.
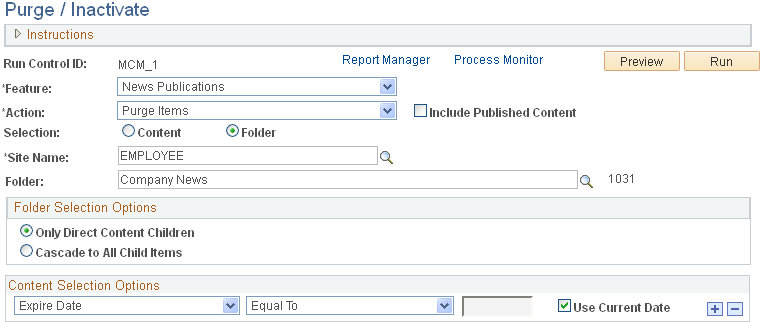
Options available to use on this page are based on the feature definition. For example, with Managed Content, if you select to purge content, the system purges only unpublished content. If you select to delete past versions, the system deletes versions prior to the last approved one.
Warning! Use care in selecting and processing items from this page. Content or folders that are purged from the system cannot be retrieved.
Field or Control |
Description |
|---|---|
Run Control ID |
Displays the run control ID for the purge/inactive process. |
Report Manager |
Click to access the Report Manager module to view report results. |
Process Monitor |
Click to access the Process Monitor to view the status of job requests. |
Preview |
Click to view the pieces of content, folders, published menu items, and pagelet definitions that have been selected and what action will be performed on them on the Purge/Inactive - Preview Selection page. |
Run |
Click to access the Process Request page, where you can start the Application Engine process to purge or inactivate content or folders. See PeopleTools: System and Server Administration, “Submitting and Scheduling Process Requests.” |
Feature |
Select a feature from the drop-down list box to perform. The available features are:
|
Action |
These are the available actions:
|
Include Published Content |
This field appears if the Action field is set to Purge Items. Select this option to include published content in the action. |
Inactive Date |
This field appears if the Action field is set to Inactive Date. Select a date to use as the date that the content is considered inactive. Leaving this field blank creates a blank inactive date for the content. |
Selection |
Select whether the specified action should be performed on Content or on a Folder. When you select the Folder option, this selection becomes your starting folder. |
Site Name |
This field appears if the Folder option is selected. Select the name of the site if you select to purge folders. |
Folder |
This field appears if the Folder option is selected. Select the folder name and ID if you are purging folders. |
Folder Selection Options |
Select the Only Direct Content Children option if the content is published in more than one location. This action is performed only on the children content directly under the folder. Select the Cascade to All Child Items option to perform action on child folder and child content. |
Folder Cascade Options |
This section appears if the Cascade to All Child Items option is selected. The available options are:
|
Content Selection Options
The Content Selection Options section includes these options:
Content ID enables you to select a comparison operator and a content ID.
Created by User ID enables you to select a comparison operator and a user ID.
Expire Date enables you to select a comparison operator and a date from the calendar or the current date.
Inactive Date enables you to select a comparison operator and a date from the calendar or the current date.
Last Updated Date enables you to select a comparison operator and a date from the calendar or the current date.
Last Updated by User ID enables you to select a comparison operator and a user ID.
Use the Purge/Inactivate - Preview Selection page (EPPCM_PRG_VIEW) to preview items to be purged or inactivated.
Navigation:
On the Purge/Inactivate page, click the Preview button.
This example illustrates the fields and controls on the Purge/Inactivate - Preview Selection page: Content Location tab.
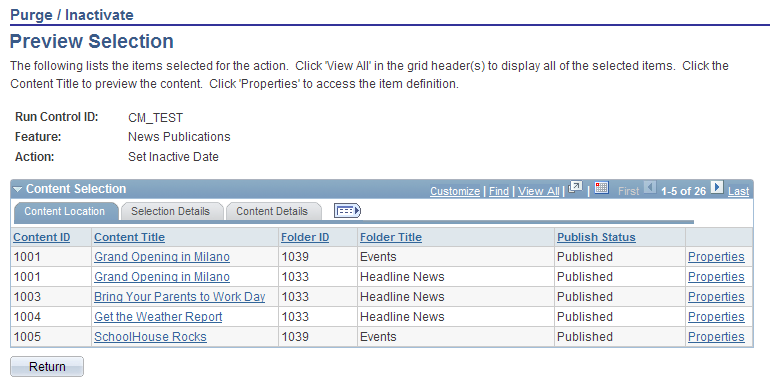
The Purge/Inactivate - Preview Selection page: Content Location tab enables you to preview the list of items that will be affected by the Purge/Inactivate process. If you select a folder to purge, and the folder is published as a pagelet or a menu item, the folder and all its content is purged.
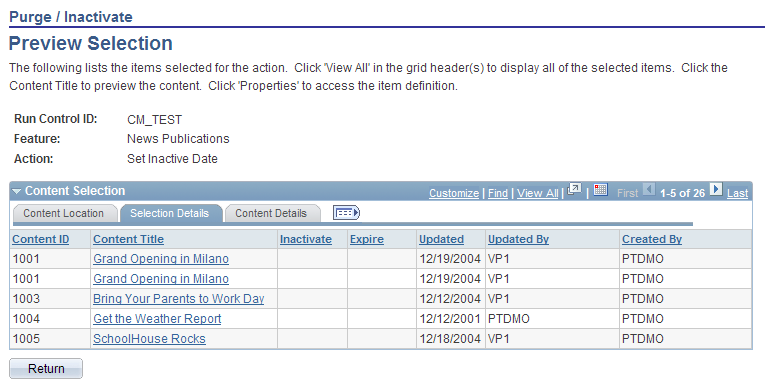
Selection Details Tab
Access the Purge/Inactivate - Preview Selection page: Selection Details tab (select ; click the Preview button, and select the Selection Details tab).
This example illustrates the fields and controls on the Purge/Inactivate - Preview Selection page: Selection Details tab.
Content Details Tab
Access the Purge/Inactivate - Preview Selection page: Content Details tab (select ; click the Preview button, and select the Content Details subtab).
This example illustrates the fields and controls on the Purge/Inactivate - Preview Selection page: Content Details tab.
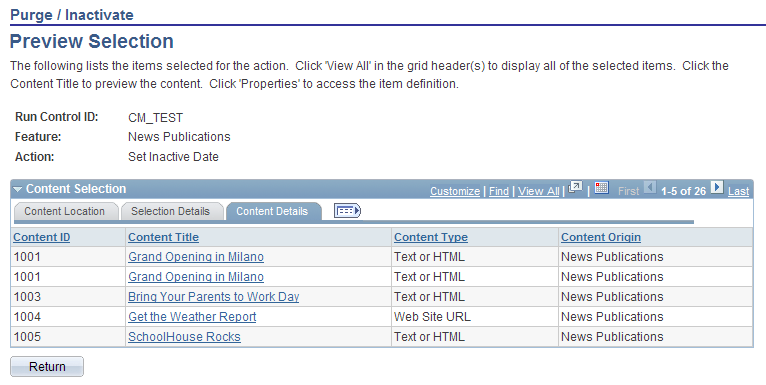
When you select the Versions option on the Content Versions page, the Content Details tab shows the different content versions being acted upon.
Content Versions Page
Use the Content Versions page (EPPCM_CONT_VER) to review, delete, or check out different versions for a specific content item.
Navigation:
Click the Properties link on the Browse Managed Content or My Managed Content page.
Click the Versions link on the Content Properties page.
The Content Versions page lists each version of the content and gives you the status of the action that will occur to each version of the content. The system retains the Max Approved version, which is also the last updated date, and any version thereafter. The system deletes any version before the Max Approved version.
See Managing Versions.