Using the Branding WorkCenter
This topic discusses prerequisites and how to use the Branding WorkCenter.
|
Page Name |
Definition Name |
Usage |
|---|---|---|
|
PTBR_NODE_NETWORK |
Review branding system settings for each system in the cluster. |
|
|
PTBR_SYNC_THEME |
Manage fluid component theme style sheet mappings. |
|
|
Create Data Migration Project Page |
PTBR_CREATE_ADS |
Create a Data Migration Workbench project to migrate theme data to another system. |
A cluster is a collection of PeopleSoft applications that contains one PeopleSoft Interaction Hub database, and one or more application databases. The PeopleSoft Interaction Hub system serves as both the administrative center for federating the cluster of application systems and as the gateway to access the application content.
While you can use other methodologies to integrate multiple PeopleSoft applications so that you can manage branding from the PeopleSoft Interaction Hub system, the simplest and most complete methodology is to use unified navigation to federate the systems. For more information, see Understanding Unified Navigation.
Note: While your cluster can include more than one instance of a PeopleSoft application—for example, two or more instances of PeopleSoft HCM—the Branding WorkCenter will automatically generate links to manage remote branding settings for certain remote content provider node names only—specifically, for nodes named HRMS, ERP, ELM, or CRM. Therefore, only the PeopleSoft HCM instance with the remote content provider node named HRMS can be managed through the Branding WorkCenter.
The Branding WorkCenter organizes access to managing branding locally and across a cluster of PeopleSoft applications. The Branding WorkCenter provides access to:
All of the PeopleTools pages used to manage branding features and definitions in the local PeopleSoft Interaction Hub system.
Selected PeopleTools pages that allow you to remotely manage settings on certain live systems in the cluster. These selected pages include:
Branding System Options
Component Branding
Pagelet Branding
Note: A live system is one that is up and running when the Branding WorkCenter is accessed. While a system might be configured as part of the cluster, if it is not up and running when the Branding WorkCenter is accessed, then current system information and links to remotely manage its branding settings will not be displayed in the Branding WorkCenter. Moreover, these links can be displayed for certain systems only. Specifically, links for remote content provider nodes named HRMS, ERP, ELM, or CRM will be displayed. If the remote content provider node has another name—for example, HRMS2, or ERP_EMEA, and so on—then no links can be automatically generated to manage branding settings on that system.
WorkCenter-specific pages to:
Identify branding system settings for all live systems in the cluster.
Publish fluid component theme style sheet mappings to all remote systems in the cluster.
The starting page of the Branding WorkCenter summarizes the system settings for all of the systems in the cluster. In the following example, three configured systems are live in the cluster: PeopleSoft FSCM (E92DP343 node), PeopleSoft HCM (H21DP343 node), and PeopleSoft Interaction Hub (P91DP343 node).
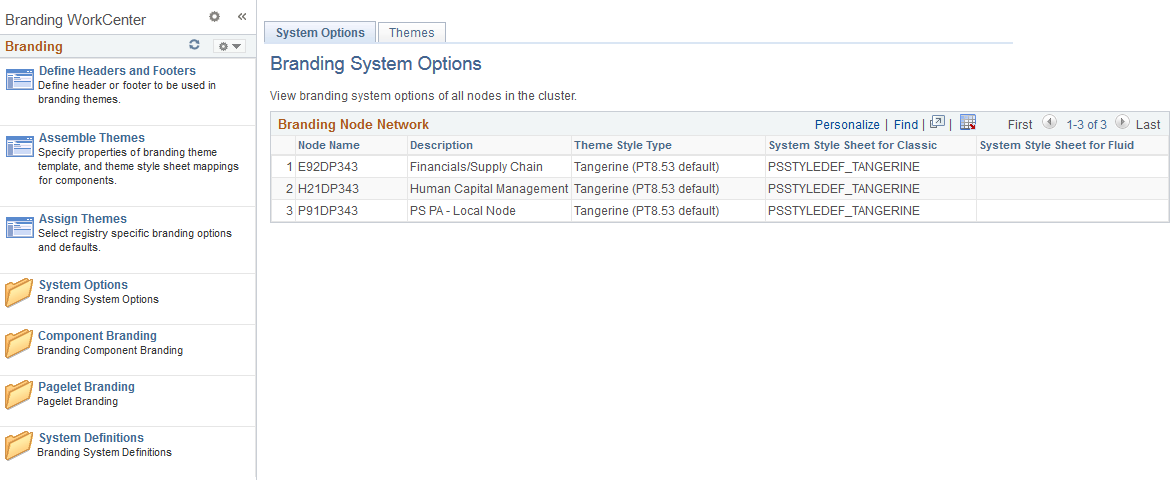
The first three links (Define Headers and Footers, Assemble Themes, and Assign Themes) provide access to manage these branding settings on the local PeopleSoft Interaction Hub system only.
In addition, the System Options folder, Component Branding folder, and Pagelet Branding folder each contain links to manage settings for the local system and all remote systems in the cluster.
Finally, the System Definitions folder contains links to manage branding elements, user attribute types, and branding objects, and to generate theme style sheets on the local PeopleSoft Interaction Hub system only.
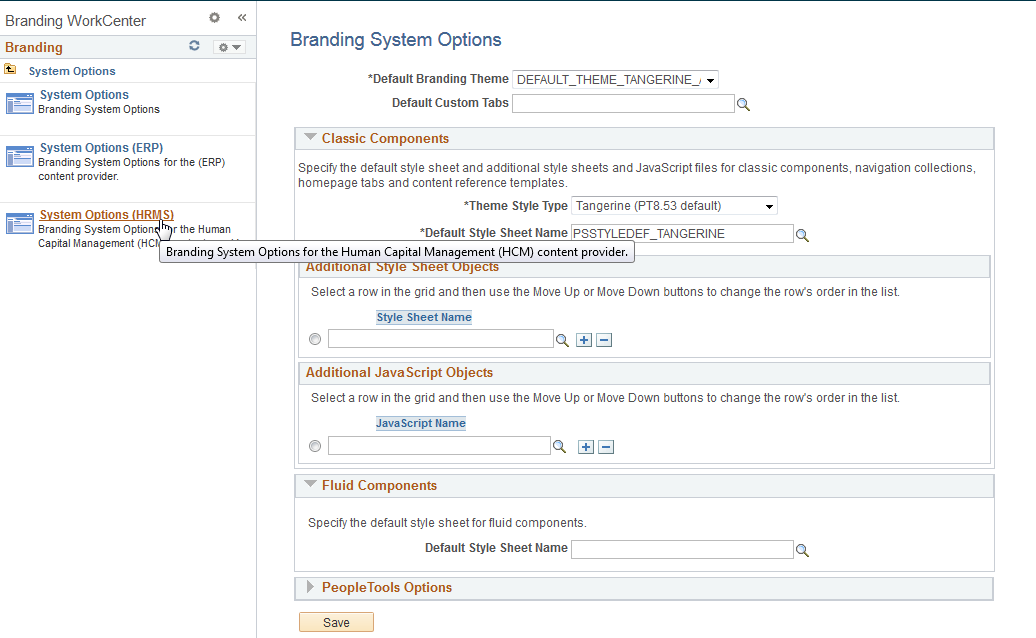
The Branding WorkCenter also provides access to selected pages that allow you to remotely manage settings on each system in the cluster. In the following example, the Branding System Options page is displayed for the PeopleSoft HCM system within the Branding WorkCenter.
Note: The Branding pagelet displays the remote system name in parenthesis after the page name; no such designation is given for the local PeopleSoft Interaction Hub system. However, the page itself does not display any indication of the system or remote content provider node. These links can be displayed for certain systems only. Specifically, links for remote content provider nodes named HRMS, ERP, ELM, or CRM will be displayed. If the remote content provider node has another name—for example, HRMS2, or ERP_EMEA, and so on—then no links can be automatically generated to manage branding settings on that system.
When a system is configured as part of the cluster, but it is currently offline, the system is still listed on the WorkCenter’s System Options page. In the following example, the PeopleSoft FSCM system is offline, so no information is available on the current branding system settings. In addition, the automatically generated link for System Options (ERP) is not displayed in the Branding pagelet at the left.

Use the System Options page (PTBR_NODE_NETWORK) to review branding system settings for each system in the cluster.
Navigation:
This example illustrates the fields and controls on the System Options page. In this example, three systems are configured in the cluster: PeopleSoft FSCM (E92DP343 node), PeopleSoft HCM (H21DP343 node), and PeopleSoft Interaction Hub (P91DP343 node).
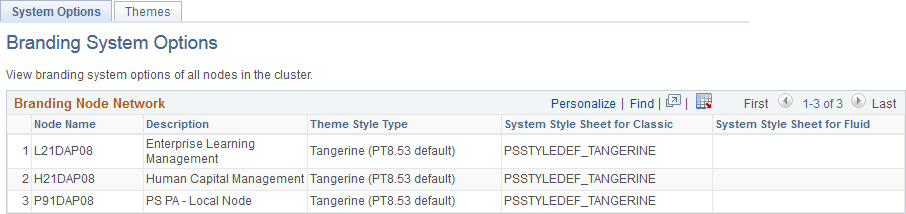
The System Options page displays a summary of the branding system settings for each system in the cluster. Because the System Options page is the starting page for the Branding WorkCenter, it is displayed automatically each time you access the WorkCenter.
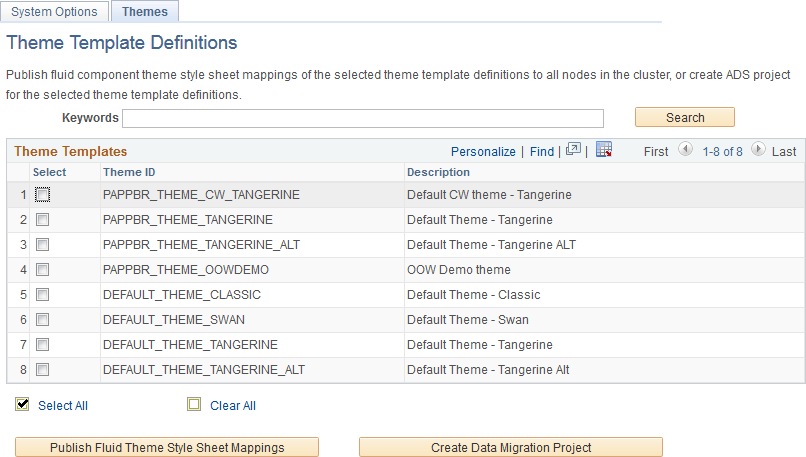
Use the Themes page (PTBR_SYNC_THEME) to manage fluid component theme style sheet mappings.
Navigation:
From the Branding WorkCenter starting page, select the Themes page.
This example illustrates the fields and controls on the Themes page. You can find definitions for the fields and controls later on this page.
Field or Control |
Description |
|---|---|
Keywords |
Enter keyword text to search against the theme ID, label, and description. |
Search |
Click the Search button to perform the search. If no keyword values are entered, then all theme definitions in the current system are displayed. |
Select |
Select this check box to select one or more theme definitions to be published or to be included in the Data Migration Workbench project. |
Select All |
Click this button to select all theme definitions. |
Clear All |
Click this button to deselect all theme definitions. |
Publish Fluid Theme Style Sheet Mappings |
Click this button to publish fluid style sheet mapping pairs for the selected theme definitions. See “Publishing Fluid Style Sheet Mappings” for more information. |
Create Data Migration Project |
Click this button to create a Data Migration Workbench project that includes the selected theme definitions. See “Creating a Data Migration Project” for more information. Note: A Data Migration Project Workbench project is also referred to as an Application Data Set (ADS). |
Use the Themes page to manage fluid component theme style sheet mappings by:
Publishing selected fluid component theme style sheet mapping pairs to the remote systems.
By creating a Data Migration Workbench project for the selected themes.
Publishing Fluid Style Sheet Mappings
To publish fluid style sheet mappings:
In the PeopleSoft Interaction Hub system, generate theme style sheet stubs for fluid components from the original base style sheets on the Generate Theme Style Sheets page. See PeopleTools: Portal Technology, “Using PeopleTools Branding Features,” Additional Branding Tasks, Generate Theme Style Sheets for Fluid Components for more information.
In the PeopleSoft Interaction Hub system, register a base style sheet and theme style sheet pair for a specific node on the Assemble Themes page. See PeopleTools: Portal Technology, “Using PeopleTools Branding Features,” Administering System Branding, Assembling Branding Themes for more information.
Access the Themes page in the Branding WorkCenter.
Select one or more branding theme definitions from the PeopleSoft Interaction Hub system.
Click the Publish Fluid Theme Style Sheet Mappings button.
Important! The theme definition themselves are not copied to the remote systems. Only active theme mapping data whose node name is not LOCAL_NODE are published. On the receiving side, when a theme definition with the same ID also exists in the target system, its active mapping data is replaced. When a theme definition with the same ID does not exist in the target system, a theme definition is not created, but the mapping data is copied regardless. To create the theme definition and associated style sheets and images in the target system first, create a Data Migration Workbench project and apply it to the remote system. Use the procedure in the following section, “Creating a Data Migration Project.”
Creating a Data Migration Project
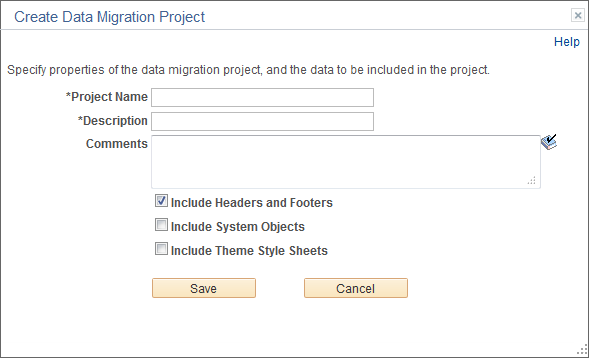
Use the Create Data Migration Project page (PTBR_CREATE_ADS) to create a Data Migration Workbench project to migrate theme data to another system.
This example illustrates the fields and controls on the Create Data Migration Workbench page. You can find definitions for the fields and controls later on this page.
Field or Control |
Description |
|---|---|
Project Name |
Enter a name for the data migration project. |
Description |
Enter a description for the data migration project. |
Comments |
Enter any additional comments that will appear with the project in Data Migration Workbench. |
Include Headers and Footers |
Select this check box to add the header and footer definitions used by the selected theme definitions into the project. |
Include System Objects |
Select this check box to add the image objects, HTML objects, style sheet objects, URL objects, and message catalog objects used by the header or footer definitions of the selected theme definitions into the project. Note: This check box is displayed only when the Include Headers and Footers check box is selected. |
Include Theme Style Sheets |
Select this check box to add the theme style sheets of the selected theme definitions into the project, which include the theme style sheets and skin style sheets for classic style sheets as well as mapped theme style sheets and global override style sheets for fluid components. Also included are the parent style sheets or children style sheets of those style sheet objects, when applicable, as well as images used by them. |
For more information on creating Data Migration Workbench projects, see Using Data Migration Workbench,” Defining Data Migration Project.