Setting Up Unified Navigation
This topic discusses setting up unified navigation.
|
Page Name |
Definition Name |
Usage |
|---|---|---|
|
PTUN_REMOTENODECFG |
Test single signon for each remote node. Optionally, specify whether to synchronize user system profiles and user personalization data. |
|
|
PTUN_DDMENUCFG |
Add a remote menu folder or content reference and configure its location in the portal system's drop-down menu. |
To set up the unified navigation node network on the portal system:
Select to open the Unified Navigation WorkCenter page.
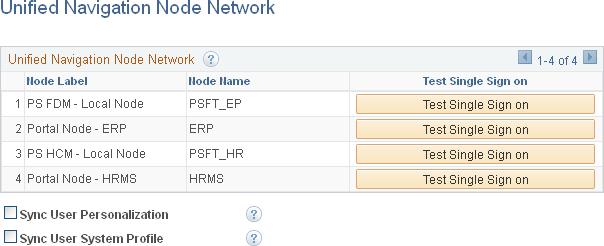
In the Unified Navigation pagelet, expand the Unified Navigation Setup section and click the Unified Navigation Node Network link to open the Unified Navigation Node Network page in the target area.
This example illustrates the fields and controls on the Unified Navigation Node Network page. You can find definitions for the fields and controls later on this page.
Field or Control |
Description |
|---|---|
Test Single Signon |
Click the Test Single Signon button to validate the single signon configuration for that remote node. |
Sync User Personalization |
Select this option to synchronize user personalization settings (My Personalizations settings such as time zone) from the portal system to all other remote systems defined in this node network. |
Sync User System Profile |
Select this option to synchronize user profile settings (My System Profile settings such as email addresses) from the portal system to all other remote systems defined in this node network. |
Configuring the drop-down menu provides access to the menu structure of the remote system within the main drop-down menu of the portal system. When a remote folder and a content reference is added to the drop-down menu, it can be added under a unique local parent folder. Alternatively, multiple remote folders or content references can be added under a single local parent folder.
Note: Prior to PeopleTools 8.54, you could add only remote folders in the portal registry. With PeopleTools 8.54, you can also add content references to the unified remote folders.
Adding content references to the unified remote folders requires that both the portal system and the content provider system must be on PeopleTools release 8.54 or later.
To add remote folders and content references to the drop-down menu:
Select to open the Unified Navigation WorkCenter page.
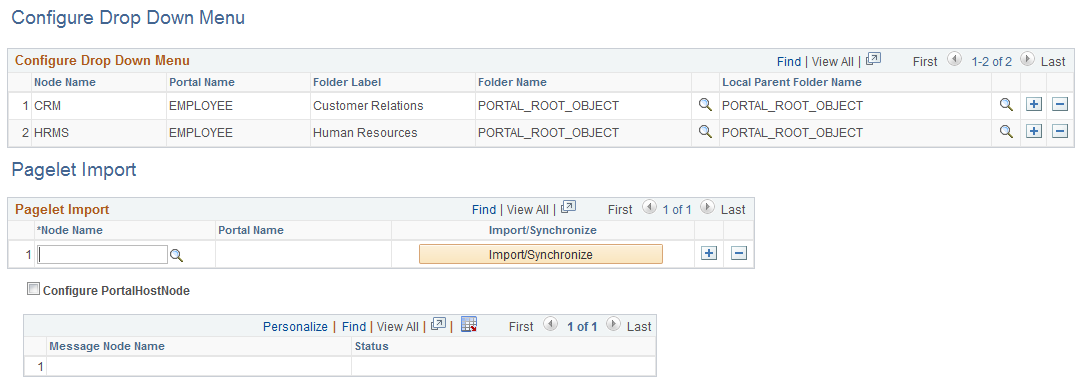
In the Unified Navigation pagelet, expand the Unified Navigation Setup section and click the Select Remote Content link to open the Configure Drop Down Menu page in the target area.
This example illustrates the fields and controls on the Configure Drop Down Menu page. You can find definitions for the fields and controls later on this page.
Field or Control |
Description |
|---|---|
Node Name |
Select a portal host node from the list of defined content provider nodes. Note: While default local nodes are also listed, use the portal host node for the content provider. |
Portal Name |
The current portal name is automatically filled in after you select the remote folder or local parent folder. |
Folder Label |
Enter the label for the new folder as it will appear in the PeopleSoft Interaction Hub system's drop-down menu. Important! Do not use the following special characters in the labels for a remote folder: { } #. |
Folder Name |
Click the lookup button, navigate the tree of folders, and select the remote folder from the content provider node. Note: The selected remote folder and all menu items and subfolders contained within it will be available in the drop-down menu on the PeopleSoft Interaction Hub system. |
Local Parent Folder Name |
Click the lookup button, navigate the tree of folders, and select the parent folder on the PeopleSoft Interaction Hub system. |
Pagelet Import |
The Pagelet Import grid is discussed in the Importing Pagelets from Content Provider Systems topic. |
Configure PortalHostNode |
When you set up a unified navigation system, you must select the Configure PortalHostNode check box. In a unified navigation system, the Configure PortalHostNode field ensures that the Home, Notifications, Logout options on the portal system’s header point to the portal system. |
Configuring Multiple Remote Folders in the Same Local Parent Folder
Two or more remote folders can be configured under the same local parent folder. To configure multiple remote folders:
In the Configure Drop Down Menu grid, click the Add row button to add a new row.
In the Node Name field, enter or select a portal host node from the list of defined content provider nodes.
In the Folder Label field, enter the label for the new folder as it will appear in the portal system's drop-down menu.
Important! Do not use the following special characters in the labels for a remote folder: { } #.
In the Folder Name field, click the lookup button, navigate the tree of folders, and select the remote folder from remote content provider node.
If the next remote folder is on the same remote node, skip to the next step. Otherwise, in the Node Name field, enter or select a different portal host node from the list of defined content provider nodes.
In the Folder Name field, click the lookup button, navigate the tree of folders, and select the remote folder from remote content provider node.
Repeat steps 5 and 6 for each remote folder to be added under the local parent folder.
In the Local Parent Folder Name field, click the lookup button, navigate the tree of folders, and select the local root folder on the PeopleSoft Interaction Hub system.
Click Save to save the configuration.
In the following example, the local folder labelled Self Service includes two remote folders from different content providers: CRM:CO_EMPLOYEE_SELF_SERVICE and HRMS:CO_EMPLOYEE_SELF_SERVICE.

To complete configuration of remote content, you must do the following:
Update all content reference definitions that specify LOCAL_NODE on each content provider system.
Synchronize security settings for remote folders in the PeopleSoft Interaction Hub system.
Updating All Content Reference Definitions That Specify LOCAL_NODE
On each content provider system, update all content reference definitions that specify LOCAL_NODE as the node name to use the portal host node name instead. For example, on a PeopleSoft HCM content provider system, the following SQL would update LOCAL_NODE to the HRMS node:
update PSPRSMDEFN set PORTAL_CNTPRV_NAM='HRMS' where PORTAL_REFTYPE='C' and PORTAL_CNTPRV_NAM='LOCAL_NODE' and PORTAL_NAME='EMPLOYEE';After updating the content reference definitions, you must delete the application server cache on both the PeopleSoft Interaction Hub system and the content provider system, and then restart both application servers.
Synchronizing Security Settings For Remote Folders
Remote folders are added with security set to public in the PeopleSoft Interaction Hub system. Therefore, to ensure that only authorized users are allowed to see the remote folders in the drop-down menu, you need to synchronize the new folder's security with the settings from the content provider system. To synchronize the security settings between the systems, you must manually remove the public setting and apply the same security settings that exist in the content provider system to the folder’s content reference definition in the PeopleSoft Interaction Hub system.
Once unified navigation configuration is complete, you can import pagelets from content provider systems for use in the portal system. Your PeopleSoft Interaction Hub system offers three methods for importing pagelets:
You can import or update all pagelets in bulk from a remote node.
You can import or update an individual pagelet for use within a specific PeopleTools feature, such as homepage tab content, a WorkCenter, or as a related content service.
You can use PeopleSoft Interaction Hub-specific facilities to define a source application and import a specific pagelet.
See Importing Pagelets from Content Provider Systems for details on each of these methods.
After setting up unified navigation, you can set up additional functionality for Fluid mode.
Select portal host node.
Assign grouplets to delivered landing pages.
When you set up a unified navigation system, on the Configure Drop Down Menu page, you must select the Configure PortalHostNode check box.
In a unified navigation system, the Configure PortalHostNode field ensures that the Home, Notifications, Sign Out links on the portal system’s header point to the portal system.
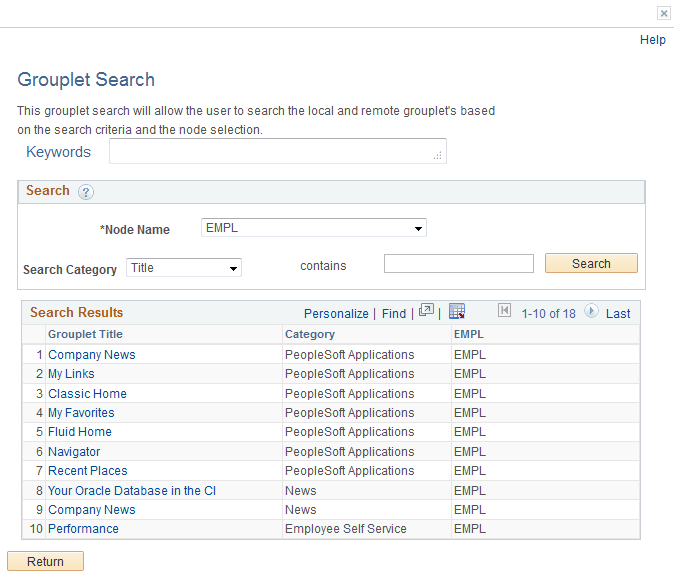
When you want to deliver landing pages to your users, an administrator can assign remote grouplets/tiles to these landing pages.
An administrator uses the Grouplet Search page to search on grouplet/tiles in remote folders and assign these to the delivered landing pages.
Note: The Grouplet Search page does not search on all categories across the cluster. You must search on grouplets within a specific node and then add the required grouplet.
Navigation:
Click Fluid Structure Content.
Click Fluid Homepages.
Click Edit link of a content reference.
Click the Tile Content tab.
Click the Grouplet Search button.
This example illustrates the fields and controls on the Grouplet Search page.