Creating Sites
This topic discusses fulfilling various requirements when creating a site.
|
Page Name |
Definition Name |
Usage |
|---|---|---|
|
EPPSM_SITE_DEFN |
Define portal sites. |
|
|
EPPSM_SITE_BRNDING |
Select the branding theme for the site. |
|
|
EPPSM_SITE_ADMIN |
Specify the users or roles authorized to administer this site. |
|
|
EPPSM_SITE_FEATURE |
Specify the features you want to enable on the site. |
|
|
EPPSM_SITE_TEMPLTS |
Specify the templates available to site publishers when adding links to the site menu navigation. |
|
|
EPPSM_SITE_PAGELTS |
Specify which pagelets will be available to site administrators when configuring the site homepage. |
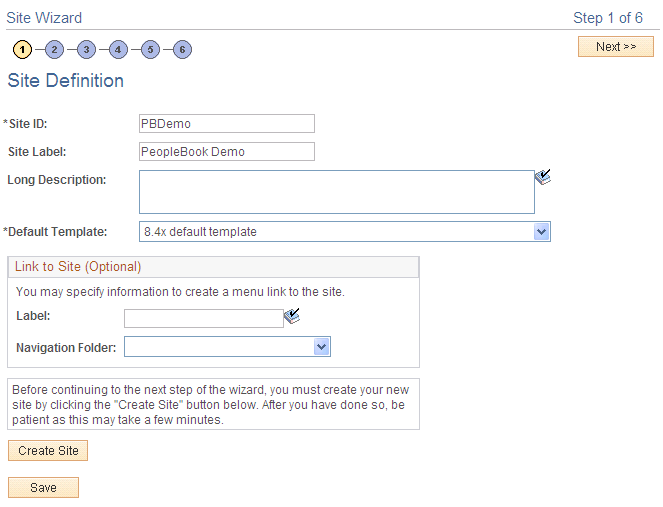
Use the Site Wizard - Site Definition page (EPPSM_SITE_DEFN) to define portal sites.
Navigation:
Click the icon for step 1 while you are on any page in the Site Wizard.
. Click the Add New Site button.
. Click the Edit button.
This example illustrates the fields and controls on the Site Wizard - Site Definition page. You can find definitions for the fields and controls later on this page.
Field or Control |
Description |
|---|---|
Site ID |
Specify a site ID to identify this site. The site ID cannot contain spaces. The site ID is used as the identifier for the portal registry created to support this site. The Site ID field value appears in the list of sites you can select from on the Manage Sites page. |
Site Label |
Enter the label you want to use for the site. This site label appears in email alerts for the site. |
Long Description |
Enter a description of the site. The long description appears as the link hover text for this site in the sponsor portal's menu navigation. The Long Description field value appears in the list of sites you can select on the Manage Sites page. |
Default Template |
Select a default template for site content from the drop-down list box. The default template is used for all content pages within the site unless overrides are authorized by the site administrator in the Define Publishing Defaults component. The templates available in the drop-down list box are those defined in PS_SITETEMPLATE. |
Label |
Specify a label that will appear in the sponsor portal's navigation. |
Navigation Folder |
Select the navigation folder in which you want a link to this site to appear on users' menus. This link definition is optional. The link can be created later using the Managing Navigation component within the portal to add a link with the type Portal Site. Folders available in the drop-down list box are those available in the sponsor portal. Note: If you choose to select a navigation folder for this site, the link may not appear in the portal menu until the menu is refreshed. |
Create Site |
After defining the new site, click to initiate the system processing for site creation. This process can take several minutes; do not interrupt it. A message appears to indicate successful creation of the new site and to prompt you to continue to the next step. |
Use the Site Wizard - Authorize Site Branding page (EPPSM_SITE_BRNDING) to select the branding theme for the site.
Navigation:
Click Next on the Site Wizard - Site Definition page.
Click the icon for step 2 while you are on any page in the Site Wizard.
This example illustrates the fields and controls on the Site Wizard - Authorize Site Branding page. You can find definitions for the fields and controls later on this page.

Field or Control |
Description |
|---|---|
Theme Name |
Select the branding theme to be used for the site from the branding theme definitions in the system. |
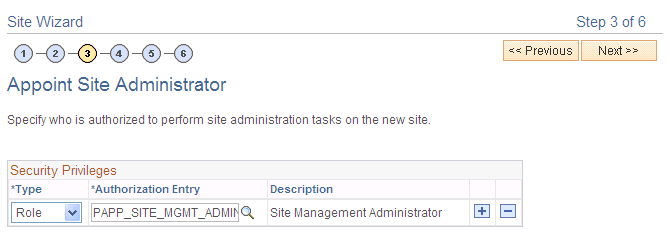
Use the Site Wizard - Appoint Site Administrator page (EPPSM_SITE_ADMIN) to specify the users or roles authorized to administer this site.
Navigation:
Click the Next button on the Site Wizard - Authorize Site Branding page.
Click the icon for step 3 while you are on any page in the Site Wizard.
This example illustrates the fields and controls on the Site Wizard - Appoint Site Administrator page. You can find definitions for the fields and controls later on this page.
Field or Control |
Description |
|---|---|
Type |
Select the type of site administrator you want to define for this entry: User or Role. |
Authorization Entry |
Based on the value you selected in the Type field, specify an authorized administrator by user ID or role. |
Use the Site Wizard - Select Site Features page (EPPSM_SITE_FEATURE) to specify the features you want to enable on the site.
Navigation:
Click the Next button on the Site Wizard - Appoint Site Administrator page.
Click the icon for step 4 while you are on any page in the Site Wizard.
This example illustrates the fields and controls on the Site Wizard - Select Site Features page.

Use this page to enable features for your site. Features that are not selected still exist in the system, but will not be visible in the site unless they are selected. Data and content references are hidden from the portal navigation, but not deleted. The list of features comes from PS_SITETEMPLATE and includes content references, pagelets, and folders.
Use the Site Wizard - Specify Site Templates page (EPPSM_SITE_TEMPLTS) to specify the templates available to site publishers when adding links to the site menu navigation.
Navigation:
Click the Next button on the Site Wizard - Appoint Site Administrator page.
Click the icon for step 5 while you are on any page in the Site Wizard.
This example illustrates the fields and controls on the Site Wizard - Specify Site Templates page. You can find definitions for the fields and controls later on this page.
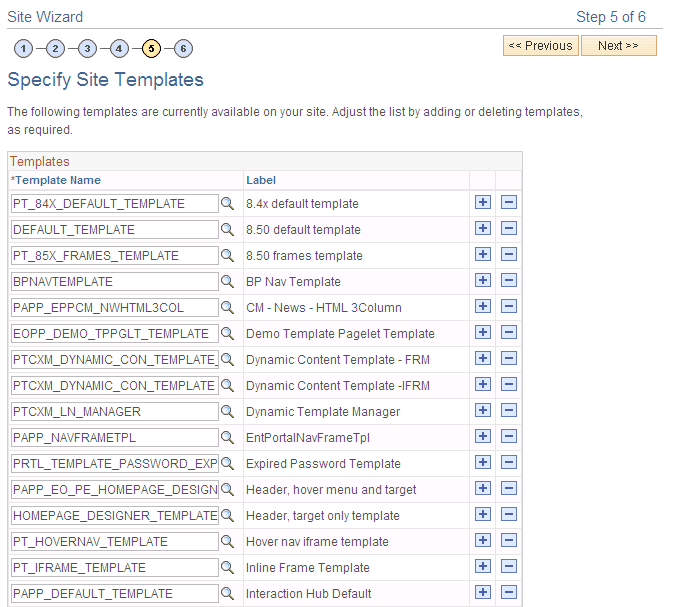
This initial set of templates is the complete list of available templates based on the PS_SITETEMPLATE registry. All templates are initially assigned to new sites. You can add or delete templates as required.
Note: Site publishers can only apply templates if the site administrator selects the Can select own template(s) option on the Set Publishing Defaults page accessed for the site. Otherwise, the default template specified during site definition always applies.
Field or Control |
Description |
|---|---|
Template Name |
This value is the content reference name assigned to the template in the PS_SITETEMPLATE template folder. |
When a site is created, all of the templates in PS_SITETEMPLATE are copied to the site. You can add site templates from the templates in PS_SITETEMPLATE or from the default portal, but not from another site. If you delete a template from the site, the template is deleted only from this site, not from PS_SITETEMPLATE.
See the product documentation for PeopleTools: Portal Technology.
Use the Site Wizard - Specify Site Pagelets page (EPPSM_SITE_PAGELTS) to specify which pagelets will be available to site administrators when configuring the site homepage.
Navigation:
Click the Next button on the Site Wizard - Specify Site Templates page.
Click the icon for step 6 while you are on any page in the Site Wizard.
This example illustrates the fields and controls on the Site Wizard - Specify Site Pagelets page. You can find definitions for the fields and controls later on this page.

The initial list of pagelets is the complete list of pagelets based on the PS_SITETEMPLATE registry. All pagelets are initially assigned to new sites. You can add or delete pagelets as required.
Note: The portal administrator can copy any pagelet over from the default portal into the site using the portal's Structure and Content copy feature. Before doing so, the portal administrator must ensure that a pagelet's functionality is suitable for use on the site, both technically and functionally.
Field or Control |
Description |
|---|---|
Portal Pagelet Name |
Specify the portal pagelets available from the sponsor site that will be available to users of this site. This value is the content reference name assigned to the pagelet in the PS_SITETEMPLATE pagelet folder. Making a portal pagelet available does not automatically make the pagelet appear on a user's homepage. Each user can configure the homepage by adding and arranging pagelets. |