 Understanding Community Calendars
This chapter gives you an overview of working with the Community Calendars feature and discusses:
Creating community calendars
Working with community calendars
Creating a calendar event
Publishing a Community Calendar pagelet
Subscribing to calendar alerts
Administering calendars
Understanding Community Calendars
Community calendars provide a way for groups to share, organize, and communicate about events that pertain to their organization or group. Calendar membership can be assigned for users or roles and have different privileges including the ability to view, create, and edit the events for a calendar. Users can view calendars online in pagelets or in the full-page view accessible from the pagelet or the menu navigation.
Community calendars can be accessed from portals, sites, and workspaces.
Understanding the My Events Pagelet
The My Events pagelet is a delivered homepage pagelet that shows all of the events a user has access to across portals, sites, and workspaces (if personalized to do so). Users can personalize the appearance of this pagelet to show a weekly or daily view and to select one or more calendars they want to retrieve events from and display in the pagelet.
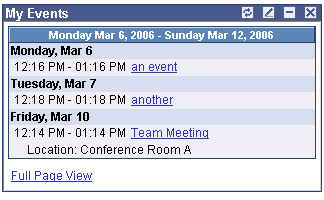
My Events pagelet
Understanding the Community Calendar Pagelet
The custom pagelets that you publish from the Community Calendar component can be created to meet the needs of your project or department and can be published to sites and portals. Access to the calendar is based on calendar membership.
Community Calendar pagelets can be published from Pagelet Wizard using the Community Calendars data type, as well.
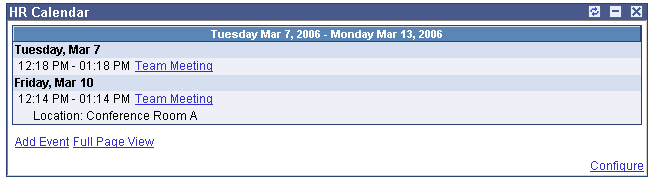
Example of a calendar created from Pagelet Wizard
Understanding Community Calendars in Workspaces
Community calendars appear as Upcoming Events in workspaces, if calendars have been enabled in step 4 of the Workspace Wizard or if they have been selected on the workspace Modules page. A consolidated list of all action items that are associated with the workspace appears in the pagelet. To view the full calendar, click the View All Events link and the system displays the workspace calendar. The workspace calendar is also available from the Calendar menu item.
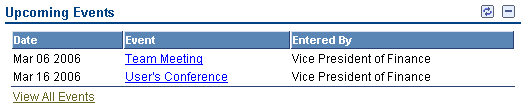
Upcoming Events
Creating Community Calendars
This section discusses creating community calendars and how to:
Use the Community Calendars page.
Add a community calendar.
Assign community calendar participants and privileges.
 Pages Used to Create Community Calendars
|
Page Name |
Object Name |
Navigation |
Usage |
|
Community Calendars |
EPPCA_BROWSE |
My Content, My Community Calendars In workspaces, click the Calendars link the left-hand navigation. |
View and manage community calendars and the associated events that you have access to. |
|
Calendar Properties |
EPPCA_CAL_DETAIL |
Click the Add Calendar button on the Community Calendars page. Click the Properties link on the Community Calendars page. |
Use to modify the properties of the calendar. |
|
Calendar Security |
EPPCA_CAL_MEM |
Click the Add Calendar button on the Community Calendars page and select Calendar Security. Click the Properties link on the Community Calendars page and select Calendar Security. |
Use to manage the security settings for calendar users. |
Using the Community Calendars Page
Access the Community Calendars page.
Use the Community Calendars page to browse through the list of calendars in the current portal that you are a member of and have permission to view. If you have permission to create a calendar, the Add Calendar button appears on the page.
If you are the administrator of the calendar, the Properties link is available and you can edit the calendar properties and security. The Delete button is available only to the administrator, as well.
If you are an administrator for calendars that have been set to a status of Inactive, the system displays a lookup on the page that enables you to display either all active calendars or all inactive calendars that you are an administrator for.
|
Add Calendar |
Click to create a new community calendar. Note. This button only appears for those users who have permission to create a calendar. |
|
Search |
Click to access the Search Events page where you can retrieve events based on search criteria that you enter. |
|
Title |
Click the calendar title to view the individual calendar. |
|
Properties |
Click to view the Calendar Properties page where you can make modifications to the calendar and to user security access. |
|
Delete |
Click to delete the calendar. Note. This button appears only for those users who have privileges to delete calendars. |
Adding a Community Calendar
Access the Calendar Properties page.
Enter a name for the calendar in the Title field as well as descriptive information about the calendar.
|
Title |
Enter the name of the calendar. The text you enter in this field becomes the title of the calendar. |
|
Active |
Select this option to make the calendar active and have the calendar appear in the portal or site. If this option is not selected, the calendar will not be available to users. |
|
Publish as Pagelet |
Displays the Publish Pagelet Wizard Definition page where you can publish the pagelet to the homepage. |
Assigning Community Calendar Participants and Privileges
Access the Calendar Security page.
Use this page to define privilege sets for individuals or different groups of users. Members and privilege sets are assigned for each calendar. Privilege sets define security for accessing and viewing calendars, as well as for editing and deleting calendars and calendar events.
|
Member Type |
Select the type of participant you want to add to the calendar. Available values include: Role. Select to be able to select a role in the Member Name field. Available group names are derived from PeopleSoft roles defined in the Roles component. See Enterprise PeopleTools 8.48 PeopleBook: Security Administration, “Setting Up Roles” User. Select to be able to select a user in the Member Name field. Available users are derived from PeopleSoft users defined in the User Profiles component. See Enterprise PeopleTools 8.48 PeopleBook: Security Administration, “Administering User Profiles” |
|
Member Name |
The name of the member as defined in the Roles component or the list of users from the User Profiles component. |
|
Privilege Set ID |
Select a privilege level you want to assign to the member. Available values are: Administrator. Administrators can add, edit, or delete calendar events and calendars. In addition, they can add and delete list members. Contributor. Contributors can add or edit calendar events. They can delete their own calendar events, but not those belonging to others. Viewer. Viewers have read-only access to calendar and calendar events. |
|
|
Click to view additional information about the actions that the privilege set enables the member to use. |
|
Publish as Pagelet |
Displays the Publish Pagelet Wizard Definition page where you can publish the pagelet to the homepage. |
Working with Community Calendars
This section discusses working with community calendars and how to:
Select calendar views.
View an event.
Search for an event.
Common Elements Used in This Section
|
Add Event |
Click this button to add an event to the calendar. This button appears on all calendar views if you have contributor or administrator privileges for the calendar. |
|
Alerts |
Click the Alerts link accompanied by this icon to access the Add Alert Subscription page, where you can subscribe to email alerts that keep you informed of updates to the selected calendar. |
|
Search |
Click to access the Search Events page where you can retrieve events based on the search criteria that you enter. |
|
|
Click to scroll backward through the page element. For example, on the monthly view page you can click the button to go back to a previous month. |
|
|
Click to scroll forward through the page element. For example, on the monthly view page you can click the button to go forward to an upcoming month. |
|
|
Indicates a recurring event. |
|
|
Indicates an all day event. |
|
Go to My Calendars |
Click the link to go to the Calendars page that lists all available calendars within the current portal. |
|
Full Page View or View All Events |
These links will show different results based on the pagelet type. From My Events, the link will display events from all calendars that you have access to. From a calendar published from the Community Calendar feature, the link will display only events related to the calendar that the pagelet is based upon. From a calendar pagelet in a workspace, the link will display only events related to that workspace. From the Upcoming Events pagelet in a workspace, the link will appear as View All Events and the link will display only events related to that workspace. |
Pages Used to Work with a Community Calendar
|
Page Name |
Object Name |
Navigation |
Usage |
|
Community Calendars |
EPPCA_BROWSE |
My Content, My Community Calendars |
Use to select a calendar. |
|
Community Calendar (Monthly View) |
EPPCA_MONTHLY |
Click the calendar Title on the Community Calendars page. |
View a specific calendar. The default view is Monthly. |
|
Calendar (Daily View) |
EPPCA_DAILY |
Click the calendar Title on the Community Calendars page and select Daily View from the drop-down listbox. |
View calendar events for a specific day. |
|
Calendar (Weekly View) |
EPPCA_WEEKLY |
Click the calendar Title on the Community Calendars page and select Weekly View from the drop-down listbox. |
View calendar events for an entire week. |
|
Calendar (Yearly) |
EPPCA_YEARLY |
Click the calendar Title on the Community Calendars page and select Yearly View from the drop-down listbox. |
View calendar events for an entire year. |
|
Event Details |
EPPCA_EVENT_EDIT |
Click Add Event on the Calendar page. |
Add an event to a calendar. |
|
Define Recurrences |
EPPCA_RECUR_SEC |
Click Define Recurrence or Edit Recurrence on the Event Details page. |
Use to set up events that repeat. |
|
Event View |
EPPCA_EVENT_VIEW |
Click Preview on the Event Details page. |
Preview the event. |
Selecting Calendar Views
This section discusses calendars and how to:
Set regional settings for calendars
View all events in the community calendar
View your community calendars
View the daily calendar
View the weekly calendar
View the monthly calendar
View the yearly calendar
Setting Regional Settings for Calendars
Regional settings such as date and time formats for calendars are set using My Personalizations on the left navigation. Select to personalize your date, time, and number formats. Select settings for afternoon and morning designators (AM/PM or am/pm), date format (MMDDYY, DDMMYY, or YYMMDD), a local time zone, and so on.
See Enterprise PeopleTools 8.48 PeopleBook: Using PeopleSoft Applications, “Setting User Preferences”Defining Your User Personalizations
Viewing All Events in All Community Calendars
Access the Community Calendar page by clicking the Full Page View link in the My Events pagelet. This view shows all events from the calendars you are a member of from all portals, sites, and workspaces based on your personalization options for the pagelet.
Note. This view is only available from the My Events pagelet
When you click the Full Page View link from the My Events pagelet, the system displays the events from all of your available calendars combined into one calendar. The default view is the monthly view for all calendars. To view the events of a single calendar, select a calendar name from the drop-down list box.
To display the daily view for the current date, select the date link next to the Today field. You can select a weekly view for a specific week by selecting the number in the left column of that week.
To see abbreviated event details including the title of the event, the location, and the date and time, hover your cursor over the event and the location will appear in the hover text pop-up text message.
To see the Event page and view all details for the event, click the title of the event in the calendar.
Viewing Your Community Calendars
The My Community Calendars page displays all calendars that you are a member of or have permissions to view. Using this page, you can view daily, weekly, monthly, and yearly views of each calendar.
See Using the Community Calendars Page.
Viewing the Monthly Calendar
Access the monthly view of the calendar.
Note. This view is available from My Community Calendars and only shows events from your calendars in the current portal.
Workspace events appear in the My Events pagelet, but not in the monthly view when accessed outside the workspace.
Use this view to see all dates for an entire month. To view a month other than the one you've selected, click the appropriate month in the left navigation.
The days in the selected month are highlighted with light blue background. The days of the month that occur before and after the selected month are highlighted in gray. The current date is highlighted with a darker blue color.
Event titles appear on the days that have an event scheduled. Click the title to view the details of the event.
To display the daily view for the current date, select the date link next to the Today field. You can select a weekly view for a specific week by selecting the number in the left column of that week.
To add an event to this calendar, you can either click the Add Event button or click the plus sign (+) on the specific date in the calendar. You must have contributor or administrator privileges to add an event to the calendar.
Viewing the Yearly Calendar
Access the yearly view of the calendar.
Use this view to see all dates for an entire calendar year. To view a year other than the one you've selected, click the appropriate year in the left navigation.
The current date is highlighted. Bold and underlined dates indicate that there is an event associated with that date. Click the date to display the daily view of the calendar.
Viewing the Weekly Calendar
Access the weekly calendar.
Use this view to see all events for the selected week. Only days with events scheduled appear in the page. To view a date that is not in the week that you've selected, click the date in the calendar in the left navigation.
Event titles appear on the days that have an event scheduled. Click the title to view the details of the event.
Viewing the Daily Calendar
Access the daily calendar.
Use this view to see all events for the selected date. Select the title of the event or the name of the contact to view more details. To view a date other than the one that you've selected, click the date in the calendar in the left navigation.
Viewing an Event
Access the Event page.
|
Export |
Enables you to add the event to your personal, default calendar application. |
|
Alerts |
Enables you to subscribe to email alerts for the event. |
|
Edit Event |
Click this link to display the Event Details page where you can change or update the event information. The link is visible only if you are a contributor to the calendar and you have created this event, or if you are an administrator of the calendar. |
Searching for an Event
Access the Search Events page.
The Search Events page returns items that you have access to.
|
Search Text |
Enter the text query in the Search Text field. |
|
Search Tips |
Click Search Tips to get more information about searching for events. |
|
Search In |
Select a location to search for calendar events. Available options are:
|
Exporting an Event to a Personal Calendar
Depending on the options defined in the Installation Options page, the system can either create a calendar event that you can save to your personal default calendar application or it can send you an email with an attachment that enables you to add the event to your calendar. The remarks appear in the body of the calendar event and the title field is the subject of the calendar event.
Creating a Calendar Event
This section discusses creating a calendar event and how to:
Define a calendar event.
Define recurring events.
Create an event notification.
Note. Users who need to create calendar events need to have security access to run Process Scheduler notifications.
Defining a Calendar Event
Access the Event Details page.
|
Title |
Enter the title for the event. This text appears on the calendar to identify the event. This field appears as the title link in the calendar view. |
|
Date |
Enter the date of the event. |
|
All Day Event |
Select this check box to create an event that will be identified as lasting all day. In the calendar an icon appears with the title of the event identifying the meeting as lasting all day. |
|
Define Recurrence |
Select this link to access the Define Recurrences page that enables you to create repeating events. |
|
Start Time |
Shows the current time as a default start time for the meeting and can be changed. This time is based on your regional settings. This field appears in the hover text in the calendar view. |
|
End Time |
Shows an hour later than the current time as a default end time for the meeting and can be changed. This time is based on your regional settings. This field appears in the hover text in the calendar view. |
|
Location |
Enter information about where the event will take place. This information will appear in the weekly and daily views of the calendar and appears as hover text in the calendar view. |
|
Type |
Enter free-form text describing what type of event you are creating. |
|
Contact |
Select a user name for the contact person. After you select the contact name, their profile name appears next to the fields. You can click the profile name to view the profile page and start a messaging session or send an email, if those options are enabled. If Resource Finder is enabled, the system displays the Resource Finder profile. |
|
Summary |
Enter a summary of the event. |
|
Content Type |
You can add attachments or additional information to the event using the following options: File Attachment enables you to use the File Upload page to attach a file to the event. Managed Content enables you to import a piece of managed content from any portal providing it has been approved for publishing and its parent folder allows for publishing. Note. Attaching a piece of content to an event is considered to be a form of publishing the content. Text or HTML enables you to use the text editor to enter plain text or HTML that appears on the Event Details page. Web Site URL enables you to add a URL that appears on the Event Details page. This additional content is accessible from the Event page. |
|
Notify |
Click to send a notification. |
|
Preview |
Click to display a preview of the event before it is published to the calendar. |
Defining Recurring Events
Access the Define Recurrences page.
Use the Define Recurrence page to define a series of repeating events over time.
|
Date |
Select the date of the first recurring event. |
|
Start Time |
Shows the current time as a default start time for the meeting and can be changed. This time is based on your regional settings. This field appears in the hover text in the calendar view. |
|
End Time |
Shows an hour later than the current time as a default end time for the meeting and can be changed. This time is based on your regional settings. This field appears in the hover text in the calendar view. |
|
Type |
Enter the type of recurrence. Select Daily to set an interval for how many days the recurrence should repeat. Select Weekly to set an interval for how many weeks the interval should repeat. The day of the week that the event takes place on is displayed by the system. Select Monthly to set which week and which day of the week that the interval will repeat. |
|
Define Range With |
Select a method to define when the event stops repeating. Select Number of Occurrences to specify a number of times the event repeats. Select End Date to select a date from the calendar for the event to stop repeating. |
|
Remove Recurrences |
Click to remove the entire series of recurring events from the calendar. |
Editing a Recurring Event
If you select to edit a recurring event, you will be prompted to select either just one occurrence of the recurring event or all events in the series. If you select to edit just one occurrence in the series, the changes you make will apply to this date only. You will be able to view the Define Recurrence page, but not make any changes to the recurrences. Information attached to the event from the Additional Event Information group box can only be edited when updating the entire series of recurring events since the item is shared across the series of events.
If you choose to edit all events in the series, then all information related to the event is available for editing. The changes you make will apply to the entire series of recurring events. To delete the recurring events, click Edit Recurrences and click Remove Recurrences on the Define Recurrences page.
Creating an Event Notification
Access the Event Notifications page.
Use the Event Notification page to send messages to users associated with the calendar or the event.
Include in 'To' List
Select the people you want to receive the notification. Selecting any of these options will populate the To field with the corresponding users from the calendar. If you select more than one option, the entries will not overwrite each other. Additionally, you can manually enter email addresses in the To: field.
Note. Addresses for the Cc: and Bcc: fields must be manually entered or copied and pasted from the To: field.
|
All Members |
Sends the notification to all members of the calendar. |
|
Contact |
Sends the notification to the event contact. |
|
Me |
Sends the notification to you. |
|
Add Selected to Email |
Populates the To field with names of those people you have selected to receive the notification. |
Use this section of the page to enter additional address information as well as the text of the notification. The system displays the title of the event as the subject of the notification.
|
Message |
When sending an ad hoc notification, type the text of the message in this text box. The text appears in the email message along with a URL to the Event Detail page. |
|
Send |
Click to send the email notification. |
Viewing a Notification
Access the notification in your default email application.
The message text from the notification appears along with a URL to display the event.
Publishing a Community Calendar Pagelet
This section discusses:
Publishing a calendar from the Community Calendars component.
Publishing a calendar from Pagelet Wizard.
Editing a published pagelet.
Pages Used to Publish a Community Calendar
|
Page Name |
Object Name |
Navigation |
Usage |
|
Publish Pagelet Wizard Definition |
EPPPB_PGLT_PUB |
Click the Add Pagelet button on the Publish as Pagelet page. Click the Publish as Pagelet link on the Calendar Properties page. |
Publish a calendar pagelet to a site or portal. |
|
Publish as Pagelet |
EPPPB_PGLT_LST |
Click the Add Pagelet button on the Publish as Pagelet page. Click the Publish as Pagelet link on the Calendar Properties page. |
Publish the calendar as a pagelet. |
|
Pagelet Wizard |
PTPPB_WIZ_INFO |
Portal Administration, Pagelets, Pagelet Wizard |
Create and publish a Community Calendars pagelet. |
Publishing a Community Calendar from the Calendar Component
Access the Publish Pagelet Wizard Definition page.
Pagelet
The pagelet title and description from the Calendar Properties page appear in the pagelet group box. You may edit these two fields, if necessary.
|
Pagelet Folder |
Select a folder to publish to. Only folders from the current site are available to select. See Enterprise PeopleTools 8.48 PeopleBook: Using PeopleSoft Applications, “Setting User Preferences” |
|
Date Range |
Specify the default view for the calendar pagelet at the time it is published. Available options are Current Month, Current Day, and 7 Days Starting Today to give you a monthly, daily, or weekly calendar view. |
|
Pagelet Security |
Select the security options for viewing the pagelet. Available options are: Publish as Public, which enables all users to view the pagelet. Publish with Security Roles, which uses the roles defined on the Calendar Security page when publishing the pagelet. Note. If there are no roles defined on the Calendar Security page, the system automatically selects to publish the pagelet as Public. |
Homepage Tabs
Use this group box to define the homepage tab labels and behavior for the pagelet.
|
Homepage Tab |
Select the tabs that will display the pagelet. |
|
Pagelet Behavior |
Select the behavior options for the pagelet. Optional. The pagelet will not automatically appear on the homepage. However, it is available for selection when users personalize their homepages. This setting should not be used for guest homepage pagelets because guest users do not have personalization privileges. Optional-Default (optional-default). The pagelet will appear on all user homepages if they have access to the pagelet. The pagelet can be removed when users personalize their homepage. This setting should not be used for guest homepage pagelets because guest users do not have personalization privileges. Required-Fixed (required-fixed). The pagelet will appear on all user homepages if they have access to the pagelet. The placement of the pagelet cannot be changed and the pagelet cannot be removed from the homepage. Required. The pagelet will appear on all user homepages if they have access to the pagelet. The placement of the pagelet can be changed, but it cannot be removed from the homepage. |
|
Publish |
Click the Publish button to display the Publish as Pagelet page, where you can review or edit the pagelet definition |
Subscribing to Calendar Alerts
This section discusses subscribing to calendar alerts.
Note. Calendar alerts must be set to Active on the Alerts Setup page.
See Also
Defining Alert Options By Feature
Pages Used to Subscribe to Calendar Alerts
|
Page Name |
Object Name |
Navigation |
Usage |
|
Add Alert Subscription |
EPPAN_ALERTS |
Click the Alerts link. |
Subscribe to email alerts for a calendar or for an event. |
Subscribing to a Calendar Alert
Access the Add Alert Subscription page from a calendar or from an event.
|
Calendar |
When selected, you will receive an email update when the date, time, or location fields in any existing event in the calendar are modified or when an event is created or canceled. |
|
Event |
When selected, you will receive an email update when the specific event is modified or canceled. If the event is a recurring event, you can only subscribe to alerts for one date in the series using this page. To subscribe to more than one event in the series, you must open each event and subscribe to it individually. |
Using a Calendar Alert
Access the calendar alert in your default email application.
Use the links for the calendar name and the event name to view the calendar and event views.
Preferences for alerts are set on the My Alerts page.
See Also
Administering Calendars
This section discusses how to administer community calendars.
Pages Used to Administer Community Calendars
|
Page Name |
Object Name |
Navigation |
Usage |
|
Administer Community Calendars |
EPPCA_INQUIRY |
Portal Administration, Administer Calendars |
Use to change privileges and to delete calendars. |
|
Calendar Security |
EPPCA_CAL_MEM |
Click Privileges on the Administer Community Calendars page. |
Use to assign privileges to members of the calendar. |
Administering Community Calendars
Access the Administer Community Calendars page.
Use this page to perform high-level system administration of calendars. The portal administrator does not need to be a member of the calendar to perform administrative tasks, but can grant security access to the calendar using this component. This enables the administrator to manage and track all calendars in the system.
To grant administrative privileges, click the Privileges link to access the Calendar Security page.
To delete calendars, select the title of the calendar and click the Delete button.
|
Last Modified Before |
Select a date that the calendar was modified before. |
|
Created by |
Select the user ID of the person who created the calendar. |
|
Administered by |
Select the user ID of a person with administrative privileges for the calendar. |
|
Status |
Select to search for active or inactive calendars. |
|
Keyword |
Enter keywords used in the title and description of the calendar. |
|
Filter |
Click to perform the search for a calendar. |
|
Reset |
Click to clear all filter criteria from the page. |
|
Title |
If the link is active, the system displays the view of the calendar. If are not a member of the calendar, the link will be unavailable. |
|
Created By |
The system displays the user ID of the person who created the calendar. |
|
Created Date |
The system displays the date the calendar was created. |
|
Last Updated |
The system displays the date the calendar was most recently updated. |
|
Privileges |
Click to display the Calendar Security page where you can edit, add, or delete calendar privileges. |
Editing Security on Calendars
Access the Calendar Security page.
Use this page to assign privileges for different groups of users. Members and privilege sets are assigned at the calendar level. Privilege sets maintain security for accessing and managing calendars as well as viewing, editing, and deleting events.
|
Member Type |
Select the type of participant you want to add to calendar. Available values include: Role. Select to be able to select a role in the Member Name field. Available group names are derived from PeopleSoft roles defined in the Roles component. See Enterprise PeopleTools 8.48 PeopleBook: Security Administration, “Setting Up Roles” User. Select to be able to select a user in the Member Name field. Available users are derived from PeopleSoft users defined in the User Profiles component. See Enterprise PeopleTools 8.48 PeopleBook: Security Administration, “Administering User Profiles” |
|
Member Name |
The name of the member as defined in the Roles component or the list of users from the User Profiles component. |
|
Privilege Set ID |
Select a privilege level you want to assign to the member. Delivered values are: Administrator. Administrators can add, edit, or delete events and calendars. In addition, they can add and delete calendar members. Contributor. Contributors can add or edit events. They can delete their own events, but not those belonging to others. Viewer. Viewers have read-only access to the calendar. |
|
|
Click to view additional information about the actions that the privilege set enables the member to use. |