Defining and Maintaining Configurable Matrices
To define configurable matrices, use the Define Configurable Matrices (WCS_LK_TBL_DEFN) component.
This section lists common elements and discusses how to define and maintain configurable matrices.
|
Page Name |
Definition Name |
Usage |
|---|---|---|
|
WCS_LK_TBL_DEFN |
Define and maintain matrices. |
|
|
WCS_LK_TBL_INPUTS |
Define inputs to the configurable matrix. |
|
|
WCS_LK_TBL_OUTPUTS |
Define outputs of the matrix. |
|
|
WCS_LK_TBL_KEYS |
Specify the search keys to be used to match worker data. |
|
|
WCS_LK_TBL_KEY_SEC |
Automatically load search keys for specific sources using a prompt table. |
|
|
WCS_LK_TBL_DATA |
Enter values for the output data. |
|
|
WCS_LK_TBL_VIEW |
View the matrix as of the last saved version. |
Field or Control |
Description |
|---|---|
Description |
Enter a description for the matrix. |
Status |
Select Active or Inactive. Important! Matrices must have a status of Active to be used in any business process. |
Comment |
Add relevant comments for this matrix. |
Default Label |
Enter the label. |
Use the Matrix Definition page (WCS_LK_TBL_DEFN) to define and maintain matrices.
Navigation:
This example illustrates the fields and controls on the Matrix Definition page.
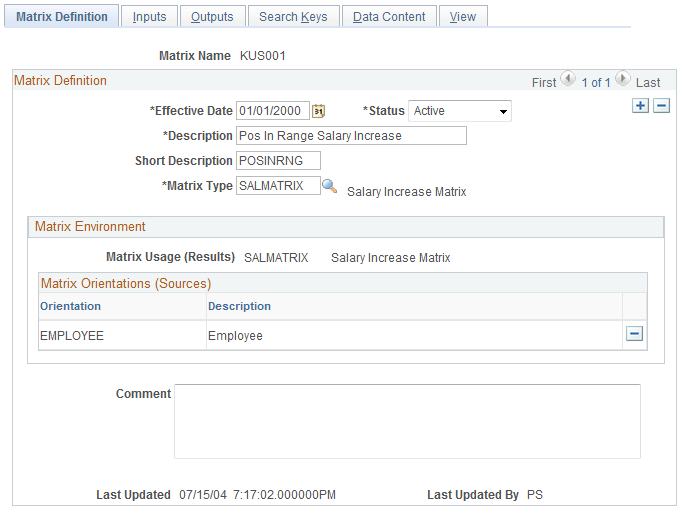
Note: All matrices are created with a status of Inactive. You must change the status to Active to use them.
Field or Control |
Description |
|---|---|
Matrix Type |
Select the matrix type on which the configurable matrix should be based. Values are:
|
Orientation |
The orientation indicates the starting point for associating the employee ID to other related fields. If all sources used in the matrix can be evaluated using EMPLOYEE and JOB records only, then you only need the EMPLOYEE orientation. If sources can be evaluated starting from worker's Position information, then you can add POSITION as another orientation. Note: You must have at least one orientation. You can, however, have both orientations. If the information available to the calling program is only position data and not the employee ID, then you need POSITION as an orientation to allow the matrix to evaluate the sources. |
Use the Inputs page (WCS_LK_TBL_INPUTS) to define inputs to the configurable matrix.
Navigation:
This example illustrates the fields and controls on the Inputs page.
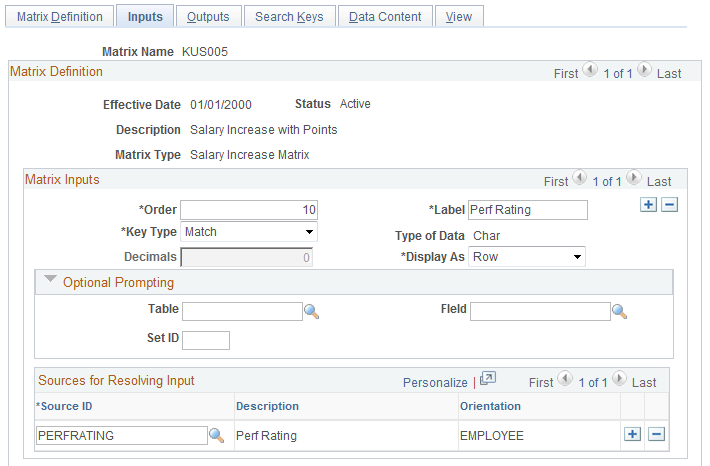
Matrix Inputs
Field or Control |
Description |
|---|---|
Order |
Enter the numerical value to indicate the order in which the inputs should appear in the configurable matrix. This value will also determine the order in which the inputs are evaluated against the worker data. |
Label |
Enter the label that will appear. |
Key Type |
Select a value:
|
Decimals |
Enter the number of decimal positions to maintain for numeric inputs. This field will be grayed out as applicable. |
Display As |
Select whether this input should appear as a Row or a Column header. Important! Only one input can be selected as a column header. However, you can choose to have all inputs appear as rows. |
Optional Prompting
If you want the ability to enter search keys from a prompt table, you can use this section to specify the table, the field, and, if appropriate, the setID.
Note: The system does not enforce that search keys must exist in that table. You are allowed to enter search keys that are new and do not exist in any table.
Sources for Resolving Input
Field or Control |
Description |
|---|---|
Source ID |
Select one or more sources that can be used to derive the matrix inputs. For example, if you are defining an input for JOBCODE, you should select the JOBCODE source ID. Every input is defined using at least one source; therefore, you must select at least one source. Note: You can leave the label for the input blank, and upon selecting the source, the system will populate the label field with the default label for that source. |
Range Rules
Field or Control |
Description |
|---|---|
Range Lookup Method |
Select the method that dictates which breakpoint (range) the system should consider as a match. Values are:
|
The following example illustrates how ranges work. Assume that Percent-In-Range is the input. The typical ranges are 0–40%, 41–60%, 61–80%, and 81–100%. For this example, we will only use the last 3 ranges (41–100%). When defining these ranges in a configurable matrix, we only enter the range breakpoints, which in this example are 40, 60, 80, and 100. The system interprets these breakpoints as defining the following ranges:
|
Range Breakpoints |
Range Breakpoints are equal to |
|---|---|
|
40 |
All values below 40, up to and including 40. |
|
60 |
All values greater than 40, up to and including 60. |
|
80 |
All values greater than 60, up to and including 80. |
|
100 |
All values greater than 80, up to and including 100. |
Analyzing the Lookup Methods
Assuming a worker has a value of 45 percent:
If the method is Use Higher Limit, the system determines that 60 is the first breakpoint higher than 45, and it will use 60.
If the method is Use Lower Limit, the system determines that 40 is the first breakpoint lower than 45, and it will use 40.
If the method is Use Nearest Limit, the system determines that 45 is closest to 40, and it will use 40. (If the worker's percent-in-range had been 55, the system would have used 60.)
When Outside Range
Field or Control |
Description |
|---|---|
Use First Limit if Under |
Use this option if you want the system to consider the first breakpoint a match for all values lower than the first breakpoint. For example, if the worker had a percent-in-range of 20, the system would use 40 if this option were selected. If this option is deselected, the system will not find any matches for the input. |
Use Last Limit if Over |
Use this option if you want the system to consider the last breakpoint a match for all values higher than the last breakpoint. For example, if the worker had a percent–in–range of 120, the system would use 100 if this option were selected. If this option is deselected, the system will not find any matches for the input. |
Special Processing
Field or Control |
Description |
|---|---|
Interpolate Result IDs |
Use this option if you want the system to calculate and return a numerical value that is proportional to the values tied to specific breakpoints. |
Example Interpolating Result IDs
For this example, assume that you have a matrix with the same percent-in-range breakpoints and one output that is a rate.
Note: All values are percentages, unless noted otherwise.
|
Step |
40 |
60 |
80 |
100 |
|---|---|---|---|---|
|
1 |
40 |
30 |
20 |
10 |
|
2 |
50 |
40 |
30 |
20 |
|
3 |
60 |
50 |
40 |
30 |
|
4 |
70 |
60 |
50 |
40 |
If you assume that the worker is on Step 1 and the Percent-in-Range (PIR) is 50, then the rate could be 40 or 30. However, if the Interpolate Result IDs option is selected, then the system would calculate the ratio of worker's value (50) to the lower limit (40), and use that ratio on the lower rate (40) and return a rate of 35. The worker's PIR of 50 is exactly between the breakpoints 40 and 60; therefore, the system calculates a rate exactly between the rates of 40 and 30.
If the PIR were 55 (75 percent of the numerical difference between 40 and 60), then the system would return 32.50 as the 75 percent rate value between 40 and 60.
Use the Outputs page (WCS_LK_TBL_OUTPUTS) to define outputs of the matrix.
Navigation:
This example illustrates the fields and controls on the Outputs page.
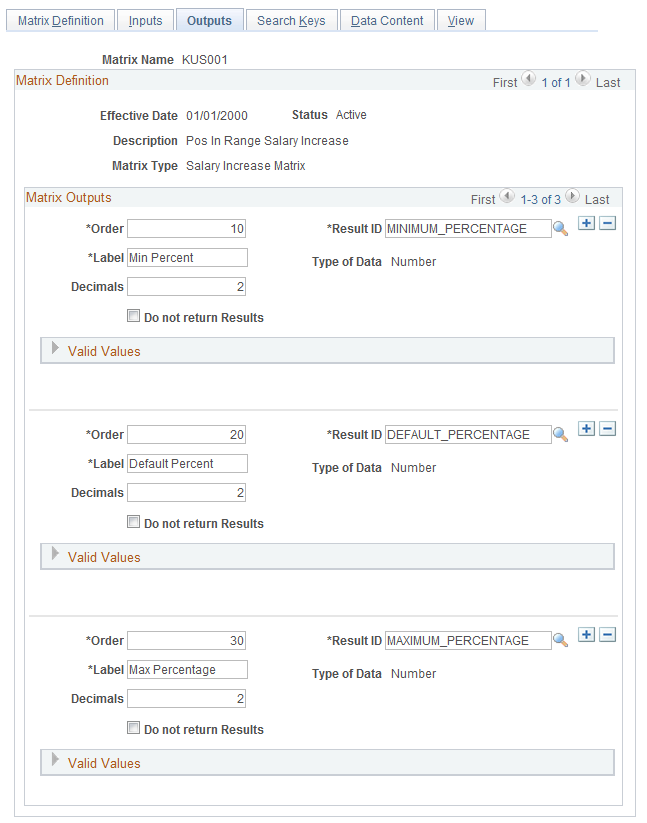
Note: Results that are available on this page will differ depending upon the matrix type.
Matrix Outputs (Result Columns)
Field or Control |
Description |
|---|---|
Order |
Enter a numerical value that indicates the order in which the outputs should appear in the matrix. |
Result ID |
Select a value that the configurable matrix should return as an output. These values come from the Results ID table. |
Label |
Enter the label that will appear in the matrix. |
Type of Data |
This display-only field indicates if the result ID has a character, number, or date format. |
Decimals |
If the result ID has a number format, then you can enter the number of decimal places that you want to appear in the matrix. |
Do not return Results |
Select this check box if the result is to be used as a reference only for a calculation in another result. For example, if you have a PCNTOFBASE type result that uses BASERATE as its reference, then you can set this check box on the BASERATE result ID. The calling program will only receive PCNTOFBASE as an output result ID; it will not receive any other output from the matrix. Note: You will see all defined result IDs on matrix displays, even though this check box may be selected for some results. |
Valid Values |
Select a table, a field, and, if appropriate, a setID to use to designate a list of values for an output column. The system uses the record and field designations as an edit table for the output values. |
Use the Search Keys page (WCS_LK_TBL_KEYS) to specify the search keys to be used to match worker data.
Navigation:
This example illustrates the fields and controls on the Search Keys page.
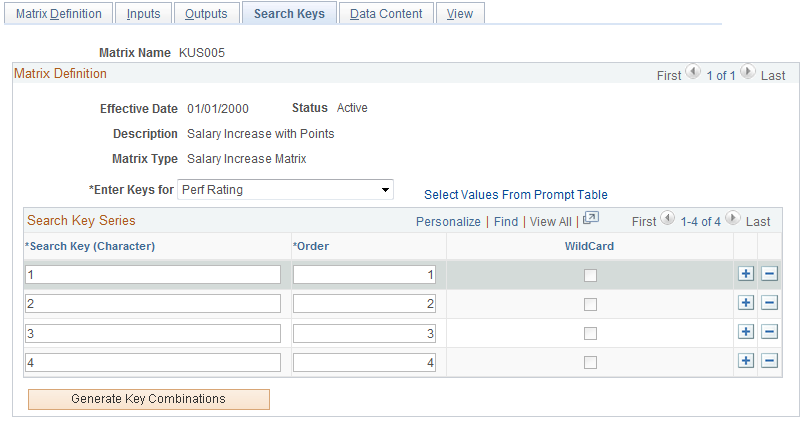
Use this page to enter the key values against which worker data is matched. In the previous example, the system checked for worker's performance ratings to be 1, 2, 3, or 4.
Note: For market pay matrices, you are allowed to create the matrix without specifying any search keys and output data values, which is useful when you intend to load data into the matrix from a flat file. In this case, you define the matrix, but you do not specify search keys and output data. You can still update the status to Active. Then, you can load data into it from a flat file. However, if you change the status of the matrix to Active and you have not defined any search criteria or values, you will receive a warning.
For more options, review the sections about market pay matrices for an explanation of how to load data into a matrix.
Matrix Definition
Field or Control |
Description |
|---|---|
Enter Keys for |
Select the input for which you will enter search keys. These values come from the Inputs page. You must enter at least one search key for each input (except for market pay matrices). In the previous example, after you entered keys for performance ratings, you would switch to Percent-In-Range and enter keys for that input. |
Select Values From Prompt Table |
If you defined the Table and Field in the Optional Prompting group box for the selected input, you can click this link to access the Load Configurable Matrix Keys search page, which lists the values from that table. This link is not available if the input has a key type of Range. |
Search Key Series
Field or Control |
Description |
|---|---|
Search Key (Character) |
Enter a value, which will be the key value against which worker data is matched. For example, you would enter rows with key values 1, 2, 3, 4 for the input Performance Rating. You would enter key values 40, 60, 80, and 100 for the input Percent-in-Range. |
Order |
Enter a numeric value that indicates the order in which the search keys will appear in the matrix. This field only applies to keys of type Character. Numeric and Date values have an implicit order and do not use this field for display order. |
WildCard |
Select if the system should use the search key as a wildcard. That is, if the worker's data did not match any other key, then the system will use this row as a match. For example, assume that four departments are listed in the matrix as keys 101, 102, 103, and 104. If you wanted all workers in all other departments to be handled separately, then you would enter a fifth key for Dept and make it a wildcard. You can set a wildcard only if the key type is set to Match. Wildcards do not apply for key type of Range. |
Generate Key Combinations |
After you have completed entering keys for all inputs, click this button to generate the key combinations for the configurable matrix. The system automatically takes you to the Data Content page, where you can enter values for each result ID for different input combinations. |
Example: Generating Key Combinations
For example, if you had one input as Dept with values 101, 102, 103, and 104, and another input of Job Risk with values of High, Med, or Low and a single output of Rate, then the system would generate the following table of combinations automatically:
|
Dept |
Risk |
Rate |
|---|---|---|
|
101 |
Low |
0 |
|
101 |
Med |
0 |
|
101 |
High |
0 |
|
102 |
Low |
0 |
|
102 |
Med |
0 |
|
102 |
High |
0 |
|
103 |
Low |
0 |
|
103 |
Med |
0 |
|
103 |
High |
0 |
|
104 |
Low |
0 |
|
104 |
Med |
0 |
|
104 |
High |
0 |
Now you can enter the rates, and you do not need to manually enter Dept IDs or Risk levels.
Use the Load Configurable Matrix Keys page (WCS_LK_TBL_KEY_SEC) to automatically load search keys for specific sources using a prompt table.
Navigation:
Click the Select Values from Prompt Table link on the Search Keys page.
This example illustrates the fields and controls on the Load Configurable Matrix Keys page.
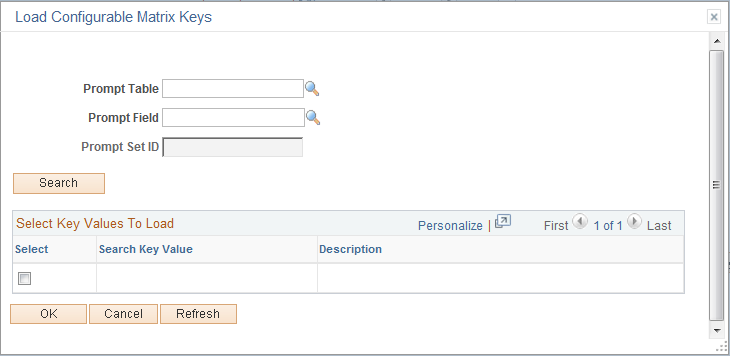
To load values from a specific prompt table:
Select a value in the Prompt Table field.
Select a value in the Prompt Field field.
Click the Search button.
In the Select Key Values To Load grid, select the check boxes for the values you want to load.
Click OK.
Use the Data Content page (WCS_LK_TBL_DATA) to enter values for the output data.
Navigation:
This example illustrates the fields and controls on the Data Content page.
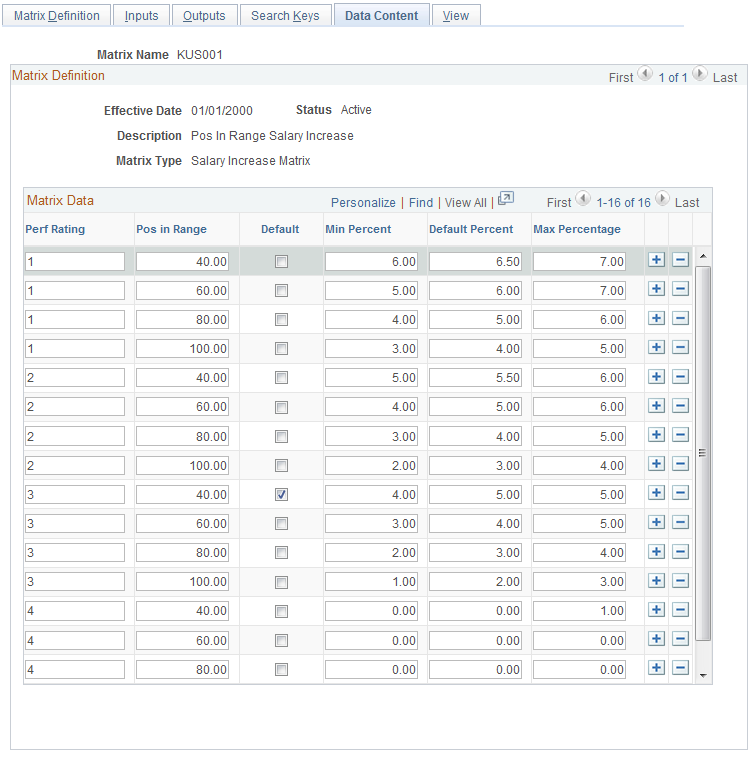
This page lists the combinations of search keys for all inputs that the matrix will evaluate. For each combination, it lists all outputs fields. You can add the character, date, or numerical values of each output here. The columns that appear on this page vary depending on the fields you define on the Inputs page and Outputs page. The columns to the left of the Default check box are defined on the Inputs page. The columns to the right of the Default check box are defined on the Outputs page.
Note: All inputs appear to the left of the Default column, and all outputs appear to the right of the Default column.
Field or Control |
Description |
|---|---|
Default |
(Optional) Select the row that you want to use as default results if the system does not find a match between the worker data and any combination of input rows. In the previous example, you were able to choose a default for a worker who was above or below the 40 and 100 ranges or who did not have a performance rating. A good practice is to select a default for a rate matrix that is attached to a rate code that is associated with a salary step. Important! You can only select one row as a Default. |
Use the View page (WCS_LK_TBL_VIEW) to view the matrix as of the last saved version.
Navigation:
This example illustrates the fields and controls on the View page.
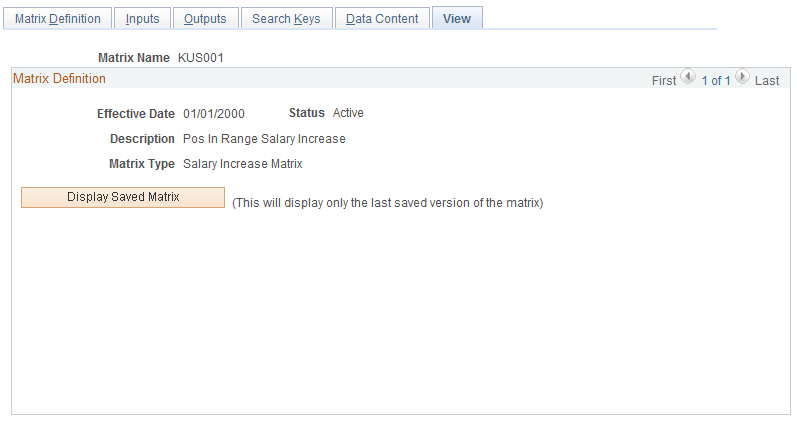
After you enter all data content for outputs, you must save the matrix. You can view the matrix on this page only after you have saved it.
When you click the Display Saved Matrix button, the results that are generated are from the last saved version of the matrix.
Important! This page will display only the last saved version of the matrix.