Creating Personnel Actions Using Fluid
To add, update, or change any employee data, U.S. Federal Government employees have to create a Personnel Actions Request (PAR). Following topics discuss on creating Personnel Action Requests for U.S. Federal government employees using PeopleSoft Fluid User Interface.
|
Page Name |
Definition Name |
Usage |
|---|---|---|
|
HC_EE_REQUEST_FL_USF |
View or initiate a Personnel Action Request in fluid. |
|
|
HC_EE_REQUEST_USF_FL |
Search for a person for whom you want a to view or initiate a Personnel Action Request in fluid. |
|
|
GVT_REQ_SCH_FL |
View a list of Personnel Action Requests recorded for this employee. |
|
|
GVT_REQ_ADD_SCF |
Initiate a new PAR transaction. |
|
|
GVT_APVLCHAIN_SCF |
View the approval status of a personnel action request. |
|
|
N/A |
In the Create/View Personnel Actions fluid pages, the application follows the PeopleTools Activity Guide Framework. The Activity Guide shows the steps in the PAR process and provides navigation buttons for proceeding through the steps. |
|
|
GVT_JOB0_FL |
Enter information for the PAR process, such as the approving authorities, PAR remarks, and tracking information. |
|
|
GVT_PAR_PROCES_SCF |
Enter or look up comments specific to this position or employee situation. |
|
|
GVT_AWD_DATA_SCF |
View or assign an award to a federal employee and enter award, informational, and payroll details. |
|
|
GVT_EE_CNTRL_SCF |
View or enter job-tracking information. |
|
|
GVT_PAR_PRT_PA_SCF |
Print the official Notification of Personnel Action form (SF-50) or Request for Personnel Action form (SF-52). These are used to notify employee and payroll office of the action, and to record the action in the Official Personnel Folder . It also provides a chronological record of actions that have occurred. |
|
|
GVT_PERS_DATA1_FL |
Enter the employee's personal information, such as name, address, birthplace, education, military service, citizenship, veteran status, marital status, race of origin, and handicap status. |
|
|
GVT_ADDRINF_SCF |
Enter home and mailing address information |
|
|
GVT_HOME_GEOLOCTN |
View or enter the geographic location codes for the state, county or city. |
|
|
GVT_PERS_PH_SCF |
Enter employee phone, fax, cellular, and other numbers. |
|
|
GVT_BRTHINF_SCF |
Enter the employee's birth information. |
|
|
GVT_VETINF_SCF |
Enter veterans information. |
|
|
GVT_MARITAL_SCF |
Enter marital information. |
|
|
GVT_EDUCINF_SCF |
View or enter schools attended and degrees completed by this employee. |
|
|
GVT_JOB1_FL |
Enter job information, including the employee's position, agency, and department. |
|
|
FEGLI/Retirement/FICA Page (Federal Employees Group Life Insurance / Retirement / Federal Insurance Contributions Act) |
GVT_BENDATA1_SCF |
Enter life insurance and retirement data. |
|
Benefits/FEHB Data Page (Benefits / Federal Employees Health Benefits Data) |
GVT_BENDATA_SCF |
Specify benefit programs in which the employee is enrolled in PeopleSoft Human Resources. |
|
GVT_DEPTINF_SCF |
View departmental hierarchy for the individual's position. |
|
|
GVT_DETAIL_SCF |
Track information for employees on a detail assignment. You probably won't use this page when first hiring an employee. |
|
|
GVT_NFC_JOB_SCF |
Track required National Finance Center (NFC) information for employees. Enter Job, Benefits and Payroll values necessary for processing this employee at NFC. |
|
|
GVT_OTH_PAY_SCF |
Enter compensation that employees receive, in addition to the base pay. |
|
|
GVT_LOC_PAY_SCF |
View the various pay rate and compensation calculations the system calculates and displays based on the base pay and compensation frequency you enter on the Compensation page. |
|
|
GVT_JOBDIST_SCF |
View a summary of the employee's job earnings distribution. |
|
|
GVT_EMPLOYMENT1_FL |
Enter employment information, such as employee service computation and conversion dates, within-grade-increase data, union, probation, RIF, tenure, and security data. |
|
|
GVT_EXPIRDT_SCF |
Enter expiration dates for temporary promotions, position changes, sabbaticals, or detail assignments. |
|
|
GVT_APPDATA_SCF |
Enter appointment limits and indicate if this person is in a special employment program. |
|
|
GVT_EMPL_PROB_SCF |
Document any probation start and end dates that apply to this person. |
|
|
GVT_SECURTY_SCF |
Indicate if financial disclosure is required and the due date. |
|
|
GVT_NONPAY_SCF |
Track information related to a status of nonpay. |
|
|
TL_EMPL_DATAFG_SCF |
Review or enter PeopleSoft time and labor data for this employee. |
|
|
GVT_CPDF_FL |
Initiate online regulatory edits for this PAR transaction and review edits and errors. |
|
|
GVT_SUMMARY_FL |
Submit the PAR transaction request. |
|
|
GVT_PAR_RVW_FL |
Use the PAR for Review page to view the higher dated action requests that are affected by the retroactive PAR. |
Note: If the PAR is initiated for a Hire action, create an employee instance and save the Hire PAR request with PAR Status as INI (initiated) in the Add Employment Instance USF - Data Control page. For more information, see Adding an Employment Instance.
Later, access and submit the Hire request using the Create Personnel Actions page.
Use the Personnel Action USF tile to view or initiate a Personnel Action Request in fluid.
Navigation:
Select Fluid Home under the main menu. On the page that appears, select the Workforce Administrator home page.
The Personnel Action USF tile will not be displayed on the Workforce Administrator landing page by default, you need to manually added it. Once added, it will appear on the Workforce Administrator home page.
Note: ‘Workforce Admin Homepage Fluid’ role should be added to User Profile to have Workforce Administrator home page access.
This example illustrates the Personnel Action USF tile.
Use the Personnel Search page (HC_EE_REQUEST_USF_FL) to search for a person for whom you want to view or initiate a Personnel Action Request in fluid.
Navigation:
Click the Personnel Action USF Tile from the Workforce Administrator home page in fluid.
This example illustrates the fields and controls on the Personnel Search page.
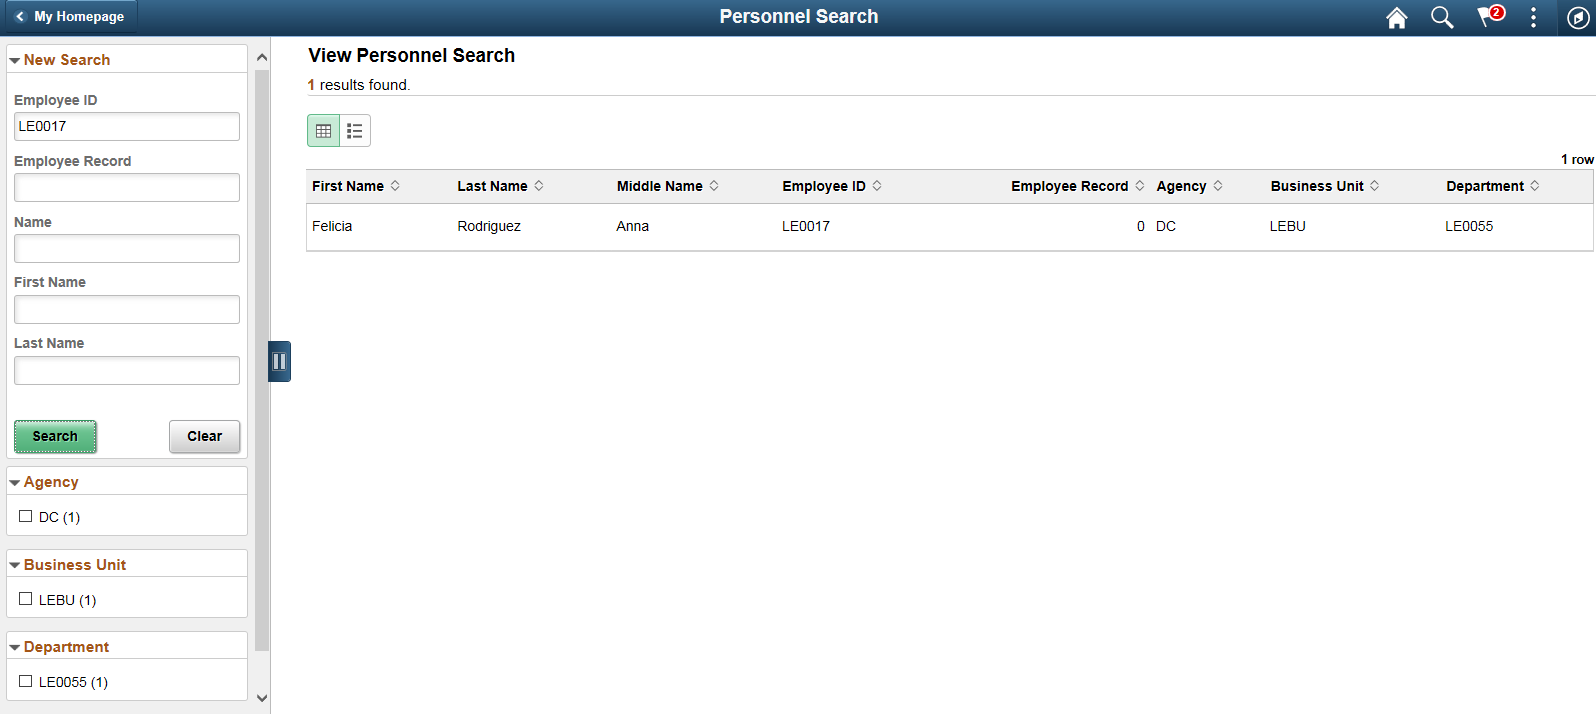
Search Filters
Use the left search filter panel of the page to enter search or filter criteria to find a person. To enter partial searches, use the % wild card character.
Click the Hide Filters or Show Filters tab to close or open the filter panel. After you have entered filter criteria, click Search. The right panel will display the results of the search and the left search filter panel will display additional criteria that you can use to continue filtering your search by facets.
View Personnel Search
From the search results, select an employee to access.
The results list will display up to the number of rows defined in the Max Rows in Pivot Grids field on the PeopleTools Options page (PeopleTools, Utilities, Administration, PeopleTools Options). Click the sort arrows in the column headings to change the sort order.
Use the Personnel Actions USF page (GVT_REQ_SCH_FL) to view a list of Personnel Action Requests recorded for this employee.
Navigation:
Click the Personnel Action USF Tile from the Workforce Administrator home page, and then select an employee row from the Personnel Search Page.
Select an employee row from the Personnel Search Page.
This example illustrates the fields and controls on the Personnel Actions USF page.
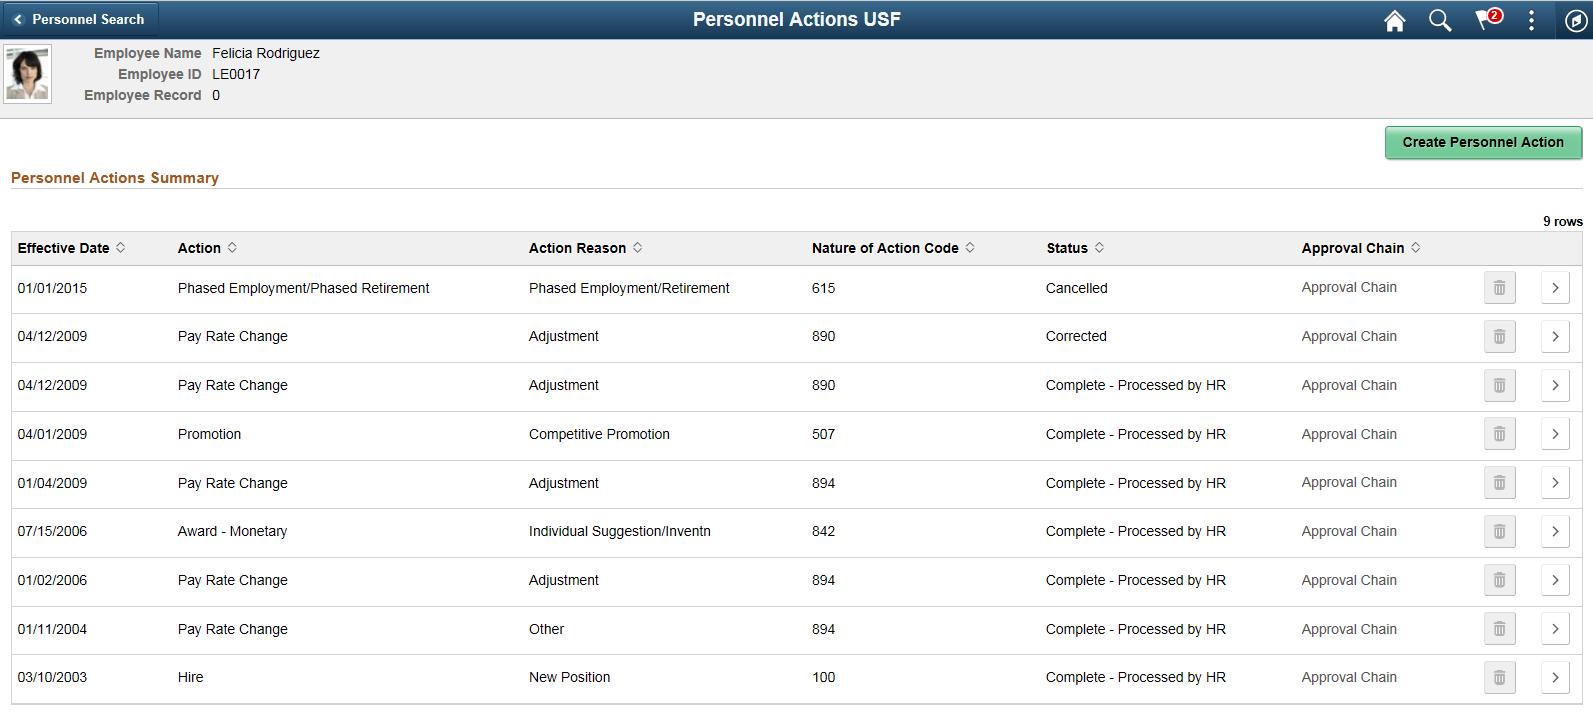
Rows display in effective date order, most current at the top. Click the sort arrows in the column headings to change the sort order.
Field or Control |
Description |
|---|---|
|
Click this button to initiate a new personnel action request which will open the Activity Guide. The user will start with the e Request Details Page |
Status |
Displays the status of the request within the PAR request/approval process. |
Approval Chain |
When a request is In Progress, the Approval Chain appears as an active link. Click this link to open the Approval Status Page and view the approval chain and status of each reviewer. Note: Approval Chain will not be enabled for those rows which used old workflow |
|
Click this button to remove this row from the employee’s job record. Delete button is enabled only for 'Saved' status rows. User will not be able to delete the data once submitted. Delete button will be disabled for this. |
|
Click this button to access the Request Data - Data Control Page and view or enter details for this job row. |

 (Delete button)
 (View/Continue button)
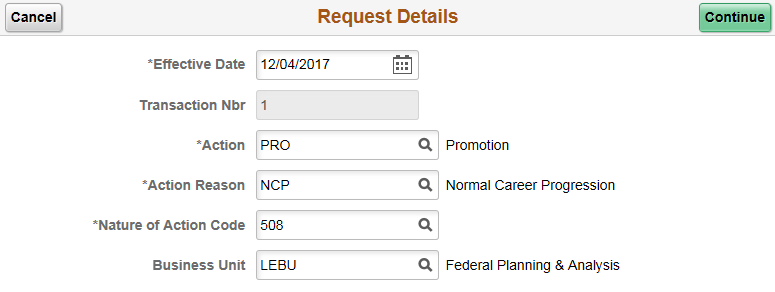
Use the Request Details page (GVT_REQ_ADD_SCF) to initiate a new Personnel Action Request.
Navigation:
Click the Create Personnel Action button from the Personnel Actions USF Page.
This example illustrates the fields and controls on the Request Details page.
Field or Control |
Description |
|---|---|
Effective Date |
Enter the effective date, which is used as the default effective date of the action throughout the system. You cannot change this date after you start. Note: You can also select a past date prior to the latest PAR row as effective date to initiate a retroactive personnel action request. For more information, see Creating a Retroactive PAR |
Transaction Nbr (transaction number) |
By default, the Transaction Number appears as ‘1’, for the first transaction. If there exists one more transaction on the same day, this number defaults to 2 and so on. Your agency can use these numbers to track the individual transactions for this employee that occur on the same day. This field controls the order in which actions are processed internally and the order in which they are output across interfaces. |
Action and Action Reason |
Enter the reason and reason code for this employment instance, such as new position, temporary assignment, or trainee. Note: For agency-to-agency transfers, the request may be submitted by both agencies, and the action and reason for each agency's request depends on whether the employee is arriving or leaving. If the employee is arriving, process the action as a hire. When an employee transfers into your agency from another agency, the action is Hire and the reason is Transfer From (another agency). When an employee transfers out of your agency to another agency, the action is Terminate and the reason is Transfer To (another agency). |
Nature of Action Code |
Select the federal numerical code defined to identify the nature of action that is occurring, such as an appointment or promotion. Nature of action codes are used for statistical and data processing purposes, such as Standard Form 52 or Standard Form 50, and are defined on the Nature of Actions USF Page. See this page for more information on using and maintaining NOA codes. |
Business Unit |
Enter a business unit. The page will provide a Business Unit value by default based on the latest processed or corrected employment row of the employee, but you can update this value as needed. |
|
Click this button to continue to the Request Data - Data Control Page and enter details for the employment instance. |
|
Click this button to cancel the new job instance and return to the Personnel Actions USF Page. |


Use the Approval Status page (GVT_APVLCHAIN_SCF) to view the approval status of a personnel action request.
Navigation:
Click the Approval Status link from the Personnel Actions USF Page.
This example illustrates the fields and controls on the Approval Status page.
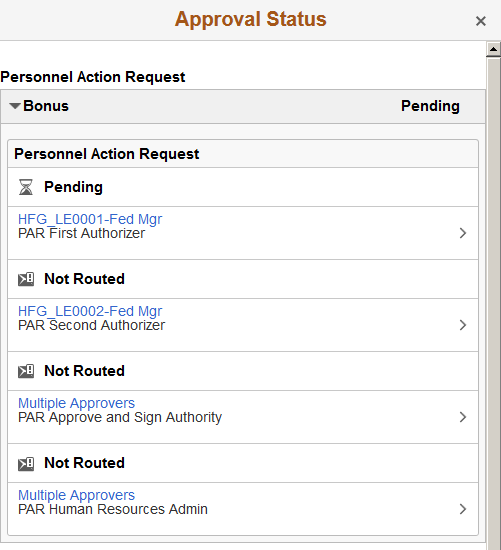
Click an individual approver row to view approver details such as the status of the request and contact information.
Click a row that says Multiple Approvers and review the approver chain. Here you can expand individual approver rows to view contact information.
In the Create/View Personnel Actions fluid pages, the application appears within the context of a PeopleTools Activity Guide. It uses the Page and Field Configurator utility to display the steps a user has to perform. User can also control the visibility and availability of the fields based on the Nature of Action Code series.
For more information on Field and Page Configurator, see Using Page and Field Configurator
The Activity Guide shows a list of application steps in the left panel and the page that corresponds to the current step in the main content area. The right panel displays related information and configurable reference links. The Activity Guide also provides navigation buttons in the page banner.
Note: Only a user with PAR AG Administrator role can access the AG template setup. Create/View Personnel Actions is the Activity Guide template that we have used. For more information on managing activity guide template, see PeopleTools: Creating and Maintaining Activity Guide Templates.
This example illustrates the Activity Guide framework within which the Create/View Personnel Actions pages appear.
Note: Throughout this topic, the page illustrations show sections of the Create/View Personnel Actions process without the context of the Activity Guide step list. Even though the Activity Guide framework is not illustrated, remember that all steps appear within that framework.
Page Banner
The top of PeopleSoft pages is called the page banner. In other PeopleSoft applications, the banner displays several standard icon buttons. The banner will display the name of the transaction you are performing.
On most pages, users see the standard set of banner icon buttons.
Field or Control |
Description |
|---|---|
|
Clicking this button exits the Create/View Personnel Actions data entry and review pages. If the user has not moved past the Request Data steps and saved, the system does not save the personnel action request. If you have saved the Request Data step (see the last substep of the Request Data step to save) before exiting, the request appears on the Personnel Actions USF Page as a saved (unsubmitted) request. The user can resume the request later. |
|
Clicking this button temporarily save the changes to the current substep and navigates to the previous step or substep. The button is not visible on the first step in the request. |
|
Clicking this button temporarily saves changes to a current substep and navigates to the next step or substep. You must save the changes in the Request Data step by accessing the last substep, before moving to the next step in the process. On the last step of the request (the Transaction Summary step), the Next button is replaced by a Submit button. |
|
This button appears only on the Transaction Summary step. Click this button to submit the request. The user cannot make any further changes to the request after submission. Request that have been submitted appear on the Personnel Actions USF Page with the status of In Progress-Requested. Note: If it's a Retro Transaction, ‘Submit’ button appears on ‘PAR for Review’ step. |


Employee Information Page Header
A gray area under the main page banner displays contextual information that is specific to the employee for whom you are making the request.
List of Steps
The Activity Guide framework includes a left panel that lists the steps in the PAR process.
Field or Control |
Description |
|---|---|
<Step or Substep Name> |
On the left panel with the list of steps, individual steps are numbered and labeled. Some steps will have substeps, which are not numbered. Steps with substeps are indicated by an expand/collapse icon after the step name. The step is automatically expanded when the user reaches it. The user can also click the parent step at any time to expand or collapse it. The page will highlight the current step or substep. If a step consists of substep, you must visit each substep sequentially before saving on the last substep of the step. Upon a save, if any required information is missing, a message appears, and the user must provide the missing information before saving the data and continuing. |
<Step Status> |
Each step and substep has a status.
Users can return to steps and substeps by clicking the step. Note: All the steps will be in 'Visited' status for those transactions in status 'In Progress - Requested' and above. |
<Transaction Name> Pages
Within the Activity Guide framework, the right panel displays the page for the current step in the PAR process.
Field or Control |
Description |
|---|---|
<Title Text> |
Displays a page title that includes the step number and step name—for example, Step 2 of 3: Validate Data For substeps, the page title includes both the step and substep name, separated by a hyphen. For example, Step 1 of 3: Request Data - Data Control indicates that the step title is Request Data and the substep title is Data Control. |
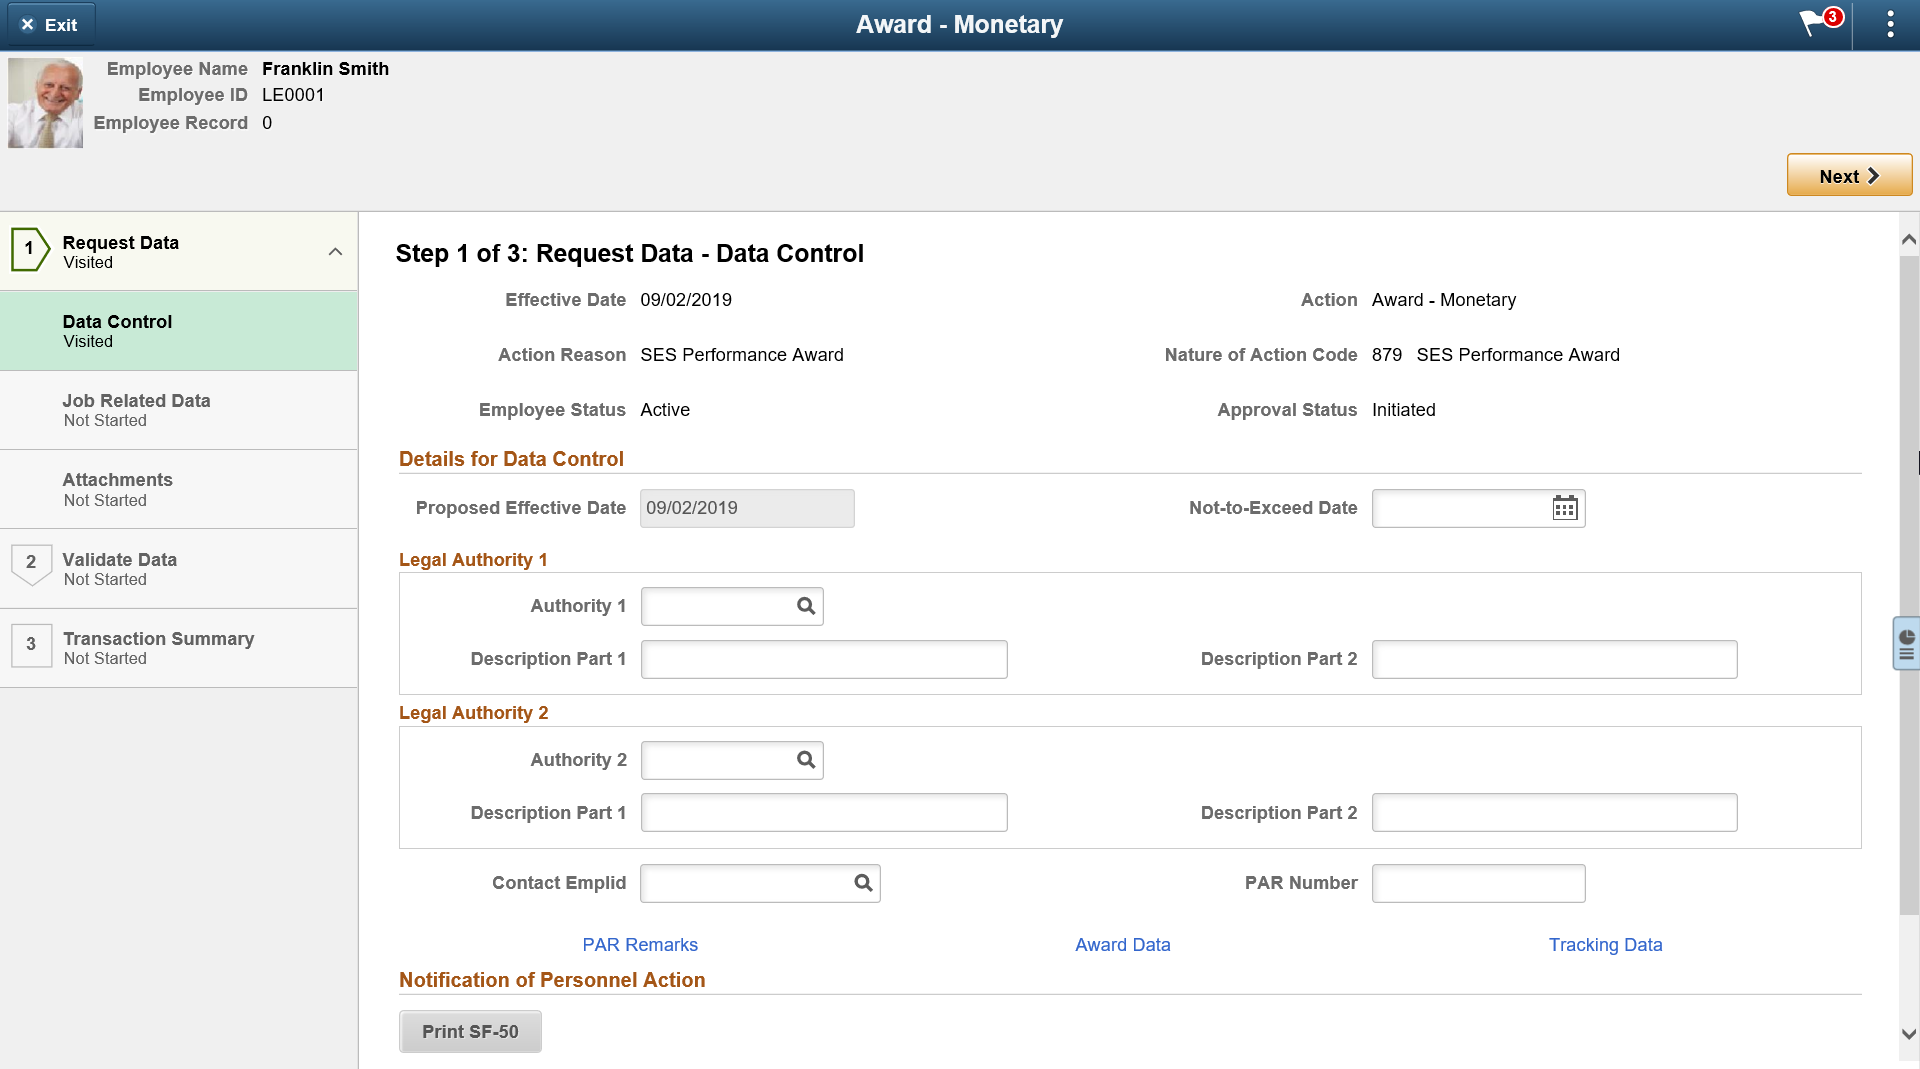
Use the Request Data - Data Control page (GVT_JOB0_FL) to enter information for the PAR process, such as the approving authorities, PAR remarks, and tracking information.
Navigation:
Click the Continue button from the Request Details Page.
Click the View/Continue button from the Personnel Actions USF Page.
Click the Data Control page tab category from the left panel of the Create/View Personnel Actions - <Transaction Name> pages.
Click the Previous button from the Request Data - Personal Data Page.
This example illustrates the fields and controls on the Request Data - Data Control page.
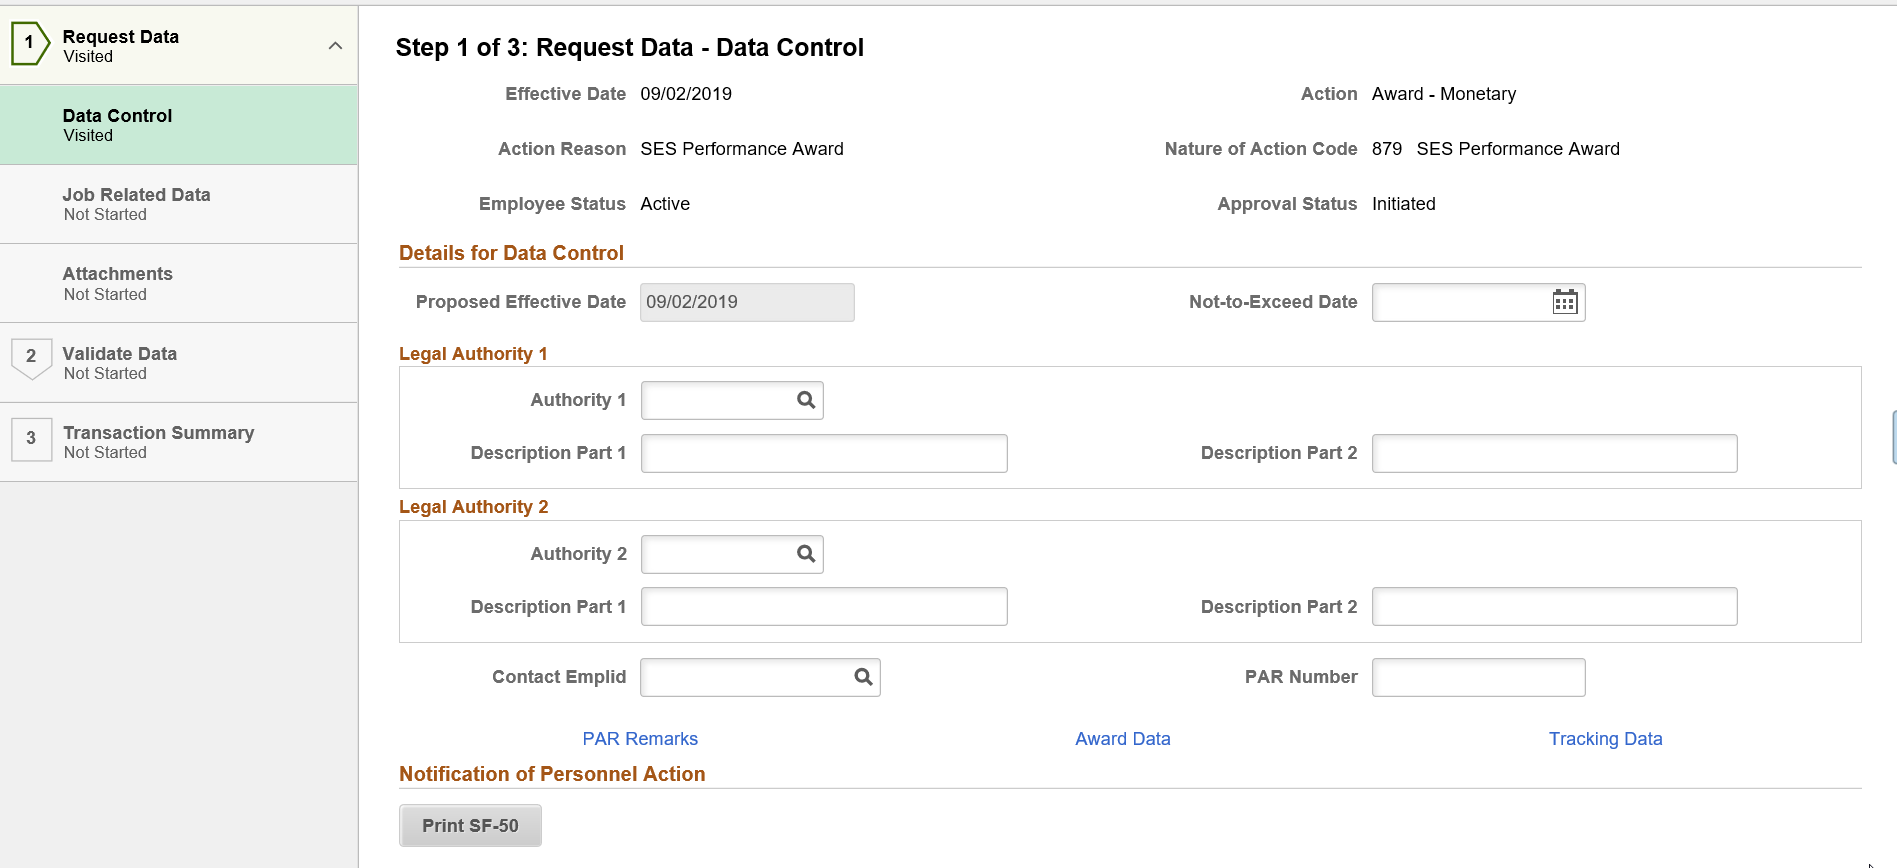
Details for Data Control
Field or Control |
Description |
|---|---|
Proposed Effective Date |
This field is populated with the date that is entered in the Actual Effective Date field. |
Not to Exceed Date |
Enter the ending date of a temporary action (for example, the date a temporary job expires or designate the length of time the temporary employment can last). Based on NOA code this field becomes a mandatory field to be filled in. |
Authority (1), Authority (2), Description Part 1 and Description Part 2 |
Select the appropriate legal authority for this NOA code. This field is usually reserved for use by human resources specialists. PeopleSoft provides a list of common legal authority codes and descriptions as provided by the US Office of Personnel Management. |
Override NFC Indicator |
Switch the value to Yes to override the value in the NFC Indicator field. |
Contact Emplid (contact employee ID) |
Enter the employee ID of the person to contact with any questions regarding the personnel action request. |
NFC Indicator (National Finance Center processing) |
Displays the status of the transaction in relation to NFC, as maintained by the user or system. Options in this field include:
|
PAR Request Nbr (PAR request number) |
(Optional) Enter a PAR request number for each employee request after you save this request. This field is for your agency's information only. |
PAR Remarks |
Click to access the PAR Remarks Page and view or enter comments specific to this position or employee situation. |
Award Data |
This link is active only for award and bonus personnel actions. Click this link to access the Award Data Page to view or assign an award to a federal employee and enter award, informational, and payroll details. |
Tracking Data |
Click this link to access the Job Tracking Information Page to view or enter job-tracking information. |
Notification of and Request for Personnel Action
Field or Control |
Description |
|---|---|
Print SF-52 and Print SF-50 |
Select these buttons to print the Notice of Personnel Action USF or Request Personnel Action USF action request. For more information, see the Notice of Personnel Action USF or Request Personnel Action USF - Parameters Page. |
Use the PAR Remarks page (GVT_PAR_PROCES_SCF) to enter or look up comments specific to this position or employee situation.
Navigation:
Click the PAR Remarks link on the Request Data - Data Control Page.
This example illustrates the fields and controls on the PAR Remarks page.
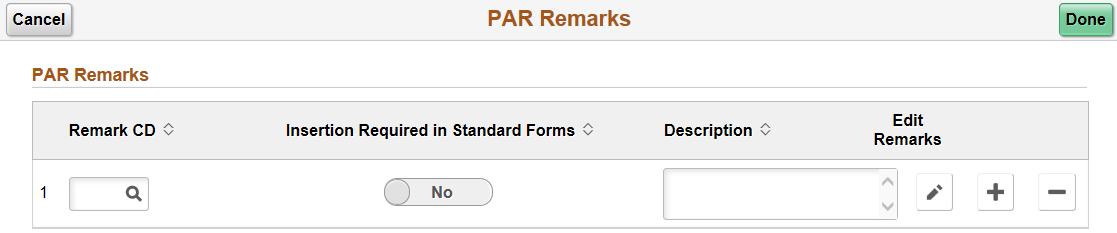
Use this page to enter remarks. Use the Add row button to enter multiple comments or the Delete row button to remove a comment.
Field or Control |
Description |
|---|---|
Remark CD (remark code) |
Select from the list of descriptions, conditions, and comments about this position or employee action. The remarks that you select appear in the comments box. Edit them as necessary. |
Insertion Required |
If this remark needs employee-specific information, this item displays Yes. The default settings for this option are defined with the codes on the Personnel Action Rqst Rmks Page. |
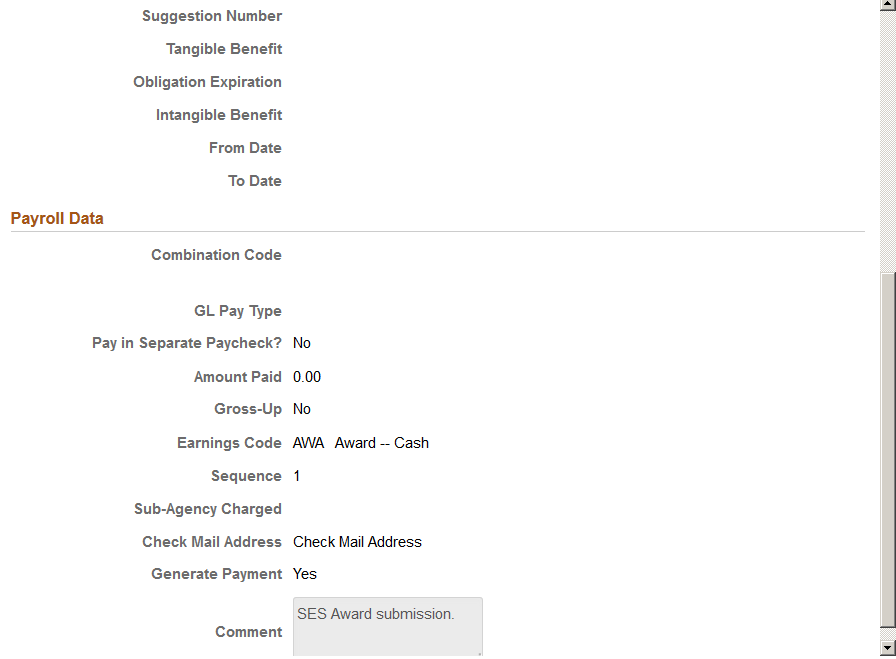
Use the Award Data page (GVT_AWD_DATA_SCF) to view or assign an award to a federal employee and enter award, informational, and payroll details.
Navigation:
Click the Award Data link on the Request Data - Data Control Page.
This link is available only when the Action field is AWD (award - monetary) or BON (bonus), and the Reason Code field is populated.
This example illustrates the fields and controls on the Award Data page (1 of 2).

This example illustrates the fields and controls on the Award Data page (2 of 2).
Use this page to enter remarks. Click the Cancel button to return to the Request Data - Data Control Page without saving your data, or click Done to save your award data.
Award Data
Field or Control |
Description |
|---|---|
Award Percent |
Enter the percent of pay to be paid as an award. |
Award Code |
Displays the NFC award code, which defaults from the Award Action definition. |
Amount |
Enter the award amount granted. |
Hours |
Enter the hours granted as an award. |
Pay Period Amount and Process Until |
Enter the award amount paid each pay period until a specified date. |
Informational Data
Payroll for North America uses the award data that is then paid to the employee.
Field or Control |
Description |
|---|---|
Award Group |
Identify an award group number. |
Use By Date |
Enter the date by which this award must be used. |
Suggestion Number |
Enter a suggested monetary amount. |
Tangible Benefit |
Enter the tangible benefit amount. |
Obligation Expiration |
Enter the expiration date of any obligations, such as amounts of orders placed, contracts and subgrants awarded, goods and services received, and similar transactions. |
Intangible Benefit |
Enter the amount value of an intangible benefit, if applicable. |
From Date |
Enter the award begin date (NFC only). |
To Date |
Enter the award end date (NFC only). |
Payroll Data
Field or Control |
Description |
|---|---|
Combination Code, GL Pay Type, Amount Paid, Gross Up, and Earnings Code |
The information in these fields defaults from the Award Action definition. |
Sub Agency Charged |
Identify the accounting station charged for cash award if not the employee's accounting station (NFC Only). |
Check Mail Address Indicator |
Specify where NFC should mail an award check. For example, the award may not get mailed to the employee's address, but instead to an office for a ceremony (NFC Only). |
Generate Payment |
Select Yes to generate the award payment (NFC Only). |
Use the Job Tracking Information page (GVT_EE_CNTRL_SCF) to view or enter job-tracking information.
Navigation:
Click the Tracking Data link on the Request Data - Data Control Page.
This example illustrates the fields and controls on the Job Tracking Information page.
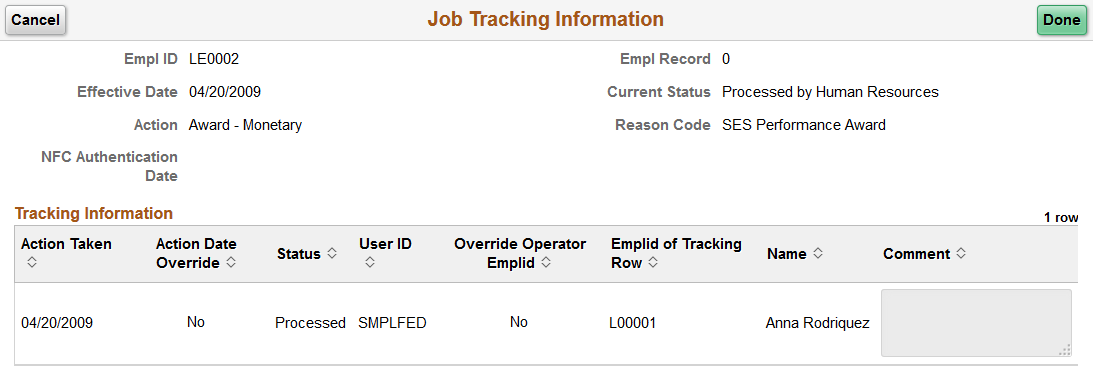
Tracking Information
Field or Control |
Description |
|---|---|
Action Taken |
Displays the date that the action request was entered. |
Action Date Override |
Switch to Yes make the Action Taken field available for entry so that you can change the action date. |
Override Operator Emplid (override operator employee ID) |
(Optional) Switch to Yes to indicate that a person other than the one whose user ID was used to log in is entering data. For example, when an administrative assistant is entering data on behalf of a supervisor. |
Emplid of Tracking Row (employee ID of tracking row) and Name |
When the Override Operator Emplid field is set to Yes, this field becomes available for entry. Enter the ID of the person actually performing the data entry and that employee’s name will appear in the Name field. |
Use the Print Parameters page (GVT_PAR_PRT_PA_SCF) to print the official Notification of Personnel Action form (SF-50) or Request for Personnel Action form (SF-52) used to notify employee and payroll office of the action, record the action in the Official Personnel Folder, and provide a chronological record of actions that have occurred.
Navigation:
Click the Print SF-50 or Print SF-52 button from the Request Data - Data Control Page.
This example illustrates the fields and controls on the Print Parameters page.
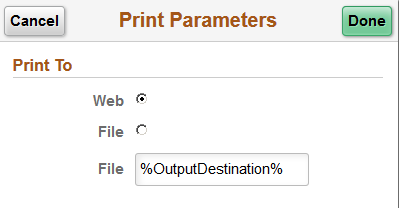
Select to print the report to the web or to a file. When you select File, the page displays the File field where you indicate the location to save the file.
Use the Request Data - Personal Data page (GVT_PERS_DATA1_FL) to enter the employee's personal information, such as name, address, birthplace, education, military service, citizenship, veteran status, marital status, race of origin, and handicap status.
Navigation:
Click the Personal Data page tab category from the left panel of the Create/View Personnel Actions - <Transaction Name> pages.
Click the Next button on the Request Data - Data Control Page or the Previous button from the Request Data - Job Related Data Page.
This example illustrates the fields and controls on the Request Data - Personal Data page (2 of 2).
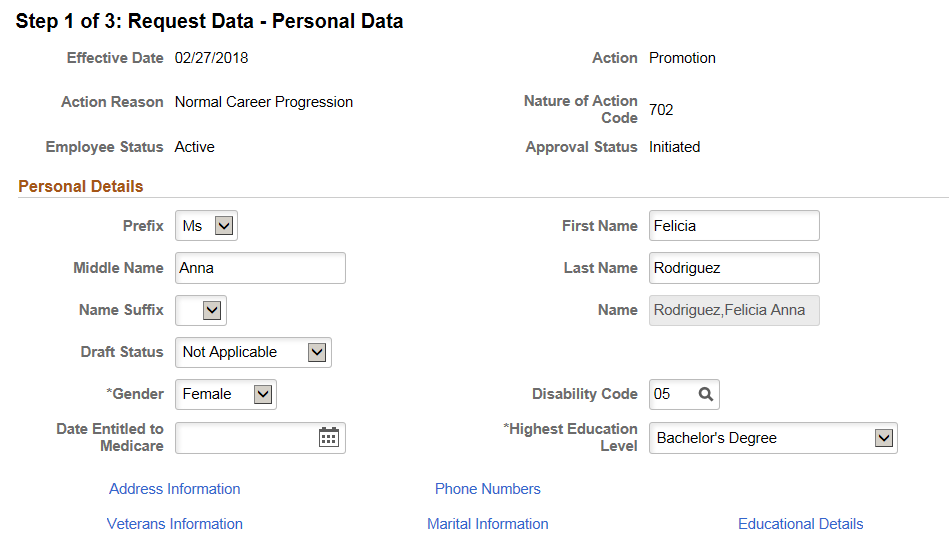
This example illustrates the fields and controls on the Create/View Personnel Actions - Personal Data page (2 of 2).

Personal Details
Use this section to enter a person’s name information.
Field or Control |
Description |
|---|---|
Date of Birth |
Enter the employee's date of birth. If you do not enter a birth date, a warning message appears when you save the record. Although this field isn't required for the Administering Workforce business process, the system uses the date in some benefit and payroll tasks to calculate an employee's age. If you do not have the birth date currently, after you acknowledge the message, you can continue entering information. However, it is recommended that you enter the information later. |
Draft Status |
(Optional) Select a draft status. Options include Not Applicable, Not Yet Registered, and Registered. |
Disability Code |
Select the disability code from the list, or if none, select the value 05 - No Handicap. |
Date Entitled to Medicare |
(Optional) Enter the date the employee is entitled to Medicare. |
Highest Education Level |
(Optional) Select the employee's highest level of education |
Gender |
Indicate the employee's gender. |
Address Information |
Click to access the Address Information Page and enter home and mailing address information. |
Phone Numbers |
Click to access the Personal Phone Numbers Page and enter employee phone, fax, mobile, and other numbers. |
Additional Birth Information |
Click to access the Additional Birth Information Page and enter the employee's birth information. |
Veterans Information |
Click to access the Veterans Information Pageand enter veterans information. |
Marital Information |
Click to access the Marital Status Page and enter marital information. |
Educational Details |
Click to access the Educational Details Page and enter or view the schools attended and degrees completed by this employee. |
Citizenship Status
Field or Control |
Description |
|---|---|
Country |
Select the country for the citizenship status you want to define for this person. The Citizenship Status field options are tied to the country you select. |
Citizenship Status |
Select the appropriate citizenship status for this country. |
National Identifier
Field or Control |
Description |
|---|---|
Country |
Many countries have unique national ID formats. Select the country with the ID format you want to use for this person. |
National ID Type |
Enter the corresponding ID type of the employee's country you selected in this section. |
National ID |
Enter the employee's national identification number. |
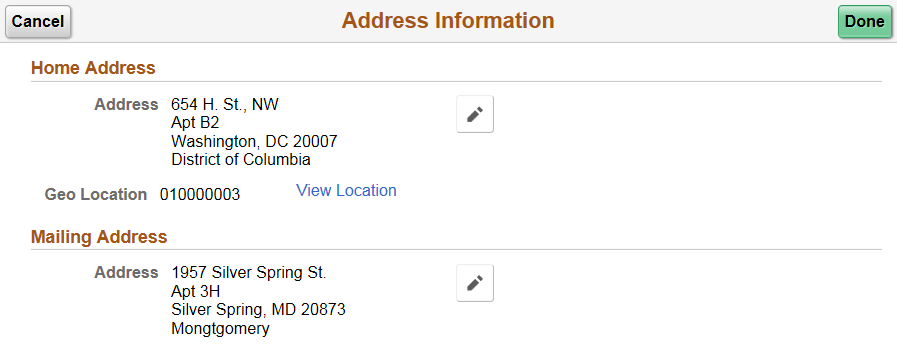
Use the Address Information page (GVT_ADDRINF_SCF) to enter home and mailing address information.
Navigation:
Click the Address Information link from the Request Data - Personal Data Page.
This example illustrates the fields and controls on the Address Information page.
Field or Control |
Description |
|---|---|
Home Address |
The home address information appears in the Address field on this page. |
Edit |
Click the Edit button to open the Push Notification modal page where you will complete the address fields. |
Geo Location |
Geographic location code appears in the Geo Location field on this page. Note: If you want to newly link a geographic location to this person, enter the code in the modal page. Geographic location rules are set up on the Geographic Location Table |
View Location |
Click this link to access the Location Description Page and view or enter the geographic location codes for state, country, or city. Note: This link is visible only if you have selected the Geo Location. |
Mailing Address |
The mailing address information appears in the Address field on this page. |
Edit |
Click the Edit button to open the Push Notification modal page where you will complete the address fields. You can enter the designated agent code for the mailing address in the modal page. |
Cancel |
Click Cancel to return to the Request Data - Personal Data Page without saving your entries. |
Done |
Click to save your address information. |
Use the Location Description page (GVT_HOME_GEOLOCTN) to view the geographic location codes for the state, county or city.
Navigation:
Click the View Location link from the Address Information Page.
This example illustrates the fields and controls on the Personal Phone Numbers page.
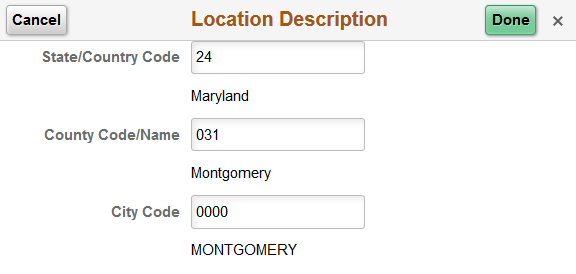
When you enter a geo location code on the Address Information Page, the system will auto populate these fields.
Use the Personal Phone Numbers page (GVT_PERS_PH_SCF) to enter employee phone, fax, cellular, and other numbers.
Navigation:
Click the Phone Numbers link from the Request Data - Personal Data Page.
This example illustrates the fields and controls on the Personal Phone Numbers page.
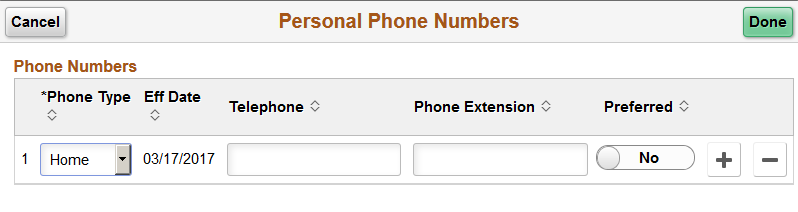
Select a contact type such as a phone number or email and enter the details for that number. You can select one number as a preferred number. Click the Add button to enter additional contact information.
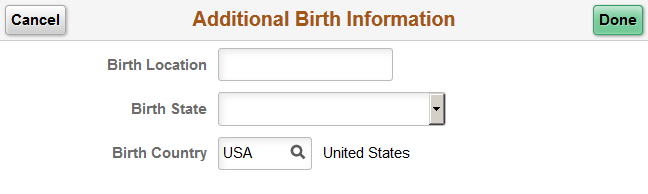
Use the Additional Birth Information page (GVT_BRTHINF_SCF) to enter the employee's birth information.
Navigation:
Click the Additional Birth Information link from the Request Data - Personal Data Page.
This example illustrates the fields and controls on the Additional Birth Information page.
Field or Control |
Description |
|---|---|
Birth Location |
Enter the name of the city. |
Birth State |
Select the birth state. |
Birth Country |
Select the birth country. |
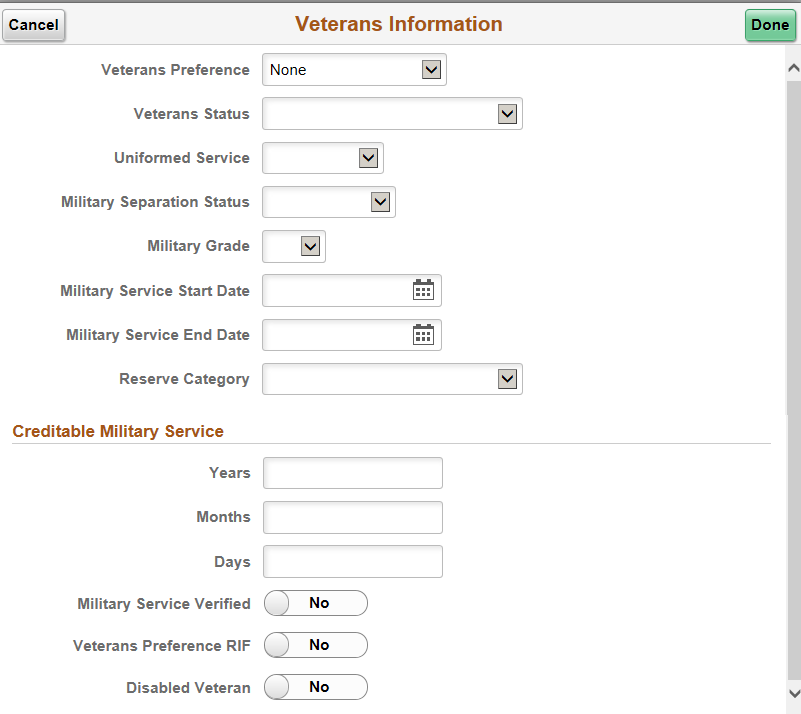
Use the Veterans Information page (GVT_VETINF_SCF) to enter veterans information.
Navigation:
Click the Veterans Information link from the Request Data - Personal Data Page.
This example illustrates the fields and controls on the Veterans Information page (1 of 2).
Field or Control |
Description |
|---|---|
Veterans Preference |
Select the veteran's hiring preference that applies. For information about preference guidelines refer to the U.S. Office of Personnel Management's Vets Info Guide. |
Veterans Status |
Select the veteran's status. |
Uniformed Service |
Select the type of uniformed service in which this veteran served. |
Military Separation Status |
Select the veteran's military separation status. |
Military Grade |
Select the veteran's military grade. |
Military Service Start Date and End Date |
Enter the veteran's military service start and end dates. |
Reserve Category |
Select the employee's reserve category, or select Not Applicable. |
Creditable Military Service
Field or Control |
Description |
|---|---|
Years, Months, and Days |
Enter the creditable military service in years, months, and days. |
Military Service Verified |
Switch to Yes if you have received verification of service. |
Veterans Preference RIF (veterans preference reduction in force) |
Switch to Yes to indicate the employee is eligible for veteran's preference in instances of Reductions In Force. See the U.S. Office of Personnel Management's Vets Info Guide for more information. |
Disabled Veteran |
Switch to Yes if the veteran is disabled. |
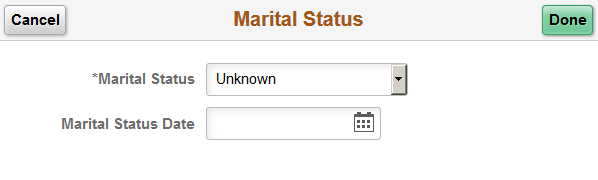
Use the Marital Status page (GVT_MARITAL_SCF) to enter marital information.
Navigation:
Click the Marital Information link from the Request Data - Personal Data Page.
This example illustrates the fields and controls on the Marital Status page.
Field or Control |
Description |
|---|---|
Marital Status |
Select the person's marital status. |
Marital Status Date |
Enter the date on which this status took effect. |
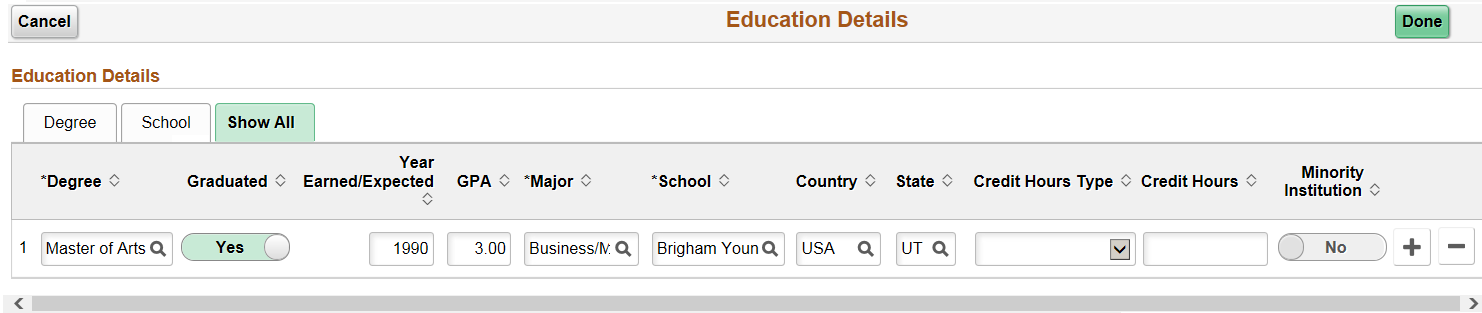
Use the Educational Details page (GVT_EDUCINF_SCF) to view or enter schools attended and degrees completed by this employee.
Navigation:
Click the Educational Details link from the Request Data - Personal Data Page.
This example illustrates the fields and controls on the Educational Details page.
Field or Control |
Description |
|---|---|
Degree |
Select the degree earned or expected for the employee. Degrees are defined in the content catalog that is part of the Manage Profiles business process. |
Graduated |
Swipe to Yes if the employee has graduated. |
Year Earned\Expected |
Enter the year the degree was earned or is expected to be earned if the employee has not graduated. |
GPA (grade point average) |
Enter the employee's grade point average from the school. |
Major |
Select the major code for the degree earned or being earned. Define major codes on the Majors page. |
School |
Select the code designating the school the employee graduated from or currently attends. Based on the selected code, name of the school is displayed. Define school codes on the Schools page. |
Country |
Select the country where the school is located. |
State |
Enter the state where the school is located. |
Credit Hours Type |
Select the hours type. Values are: Continuing Education, Other Pay, Quarter Hours, and Semester Hours. |
Credit Hours |
Enter the credit hours earned either upon completion or to this point if not complete. |
Minority Institution |
Indicate if the employee attended or attends a designated minority institution. If you entered a school code, the value will default from the employee’s profile. |
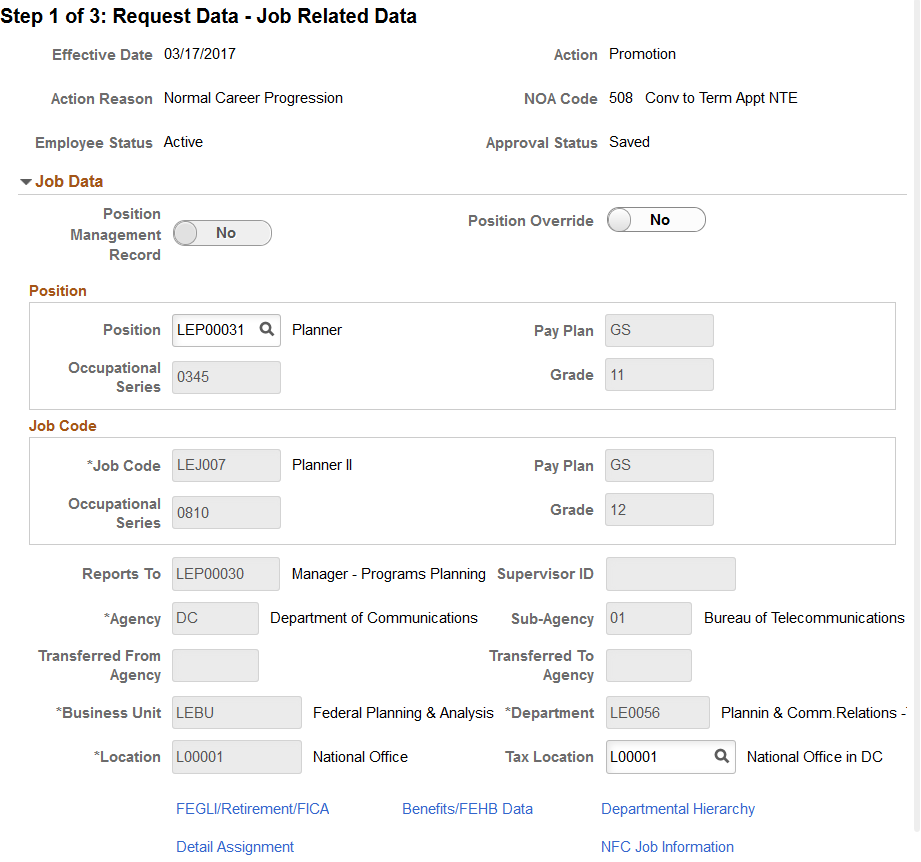
Use the Request Data - Job Related Data page (GVT_JOB1_FL) to enter job information, including the employee's position, agency, and department.
Navigation:
Click the Job Related Data page tab category from the left panel of the Create/View Personnel Actions - <Transaction Name> pages.
Click the Next button on theRequest Data - Personal Data Page or the Previous button from the Request Data - Employment Data Page.
This example illustrates the fields and controls on the Request Data - Job Related Data page (1 of 3).
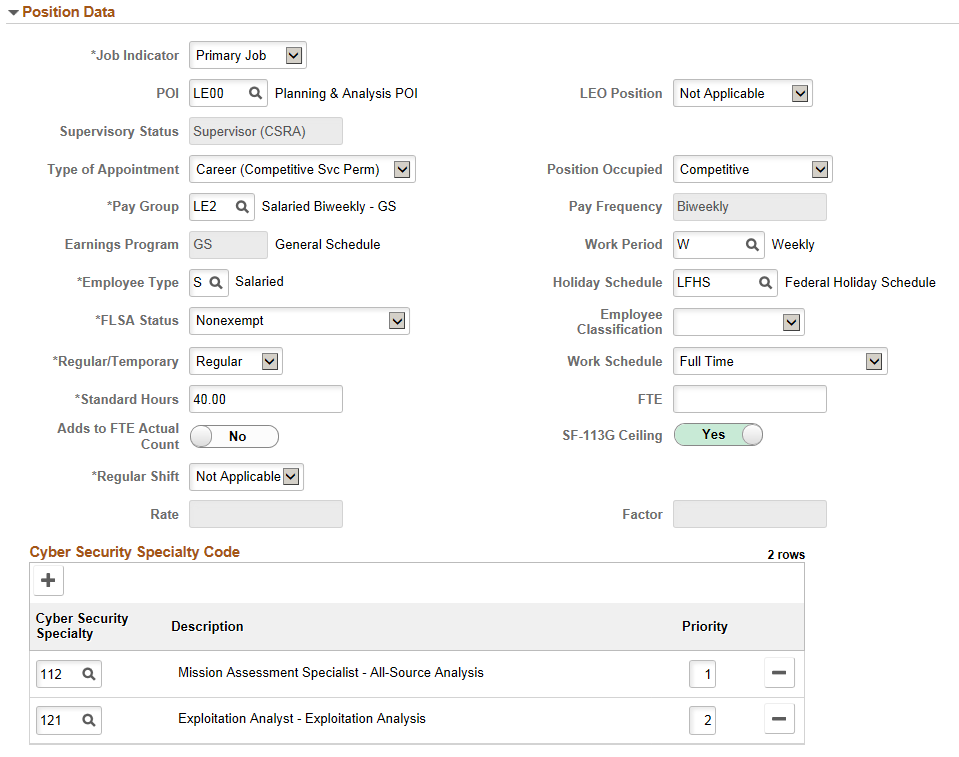
This example illustrates the fields and controls on the Request Data - Job Related Data page (2 of 3).
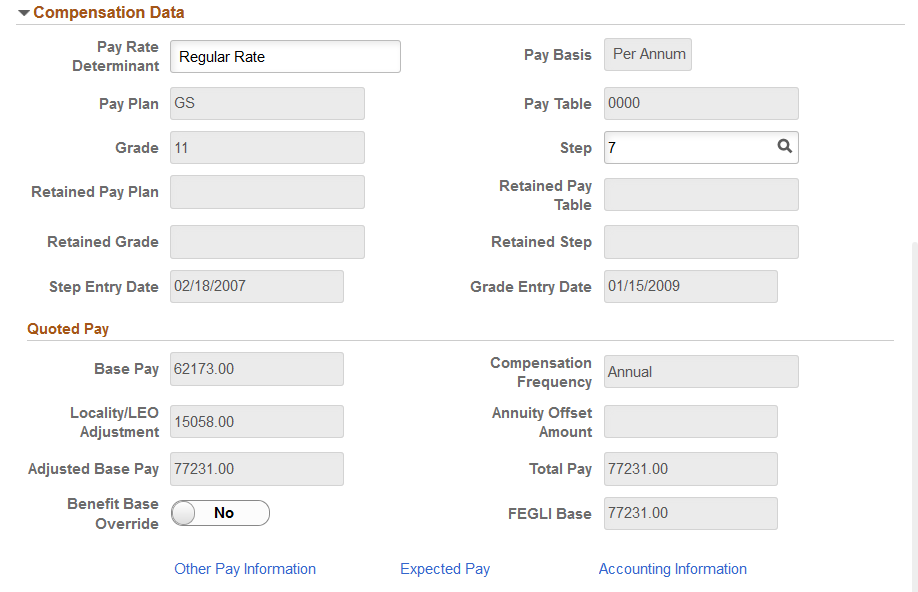
This example illustrates the fields and controls on the Request Data - Job Related Data page (3 of 3).
Job Data
When using Position Management, many values on this page are provided by default from the position. If necessary, you can override most of these defaults.
Field or Control |
Description |
|---|---|
Position Management Record |
If your organization uses the Manage Positions business process and the administrator has made updates to this position, the option displays Yes. For an initial employment instance (for a new hire), No is selected, as the new hire would not have information to update. |
Position Override |
Switch the Position Override option to Yes to make changes to position data that are otherwise locked in by the position data record. This will enable you to change any of the position-related fields, such as the Job Code, Department, Agency, and Sub-agency. PeopleSoft Human Resources issues a warning message if you assign an employee to a position that has already been filled by another employee or if a new employee appointment exceeds the maximum head count for that position. Note: After you have assigned an employee to a position, you must maintain all employee data manually while the employee is assigned to this position in the system. The system won't update position data automatically for the employee when position information is changed. |
Position |
Select a position. When you move out of this field, the system provides default data for position-related fields. This data comes from the Add/Update Position Info component if the Manage Positions business process is being used. Job code, agency, subagency, business unit, department, and location all are set by default to position management data. In addition, the system inserts a default value in the Reports To and Supervisor's ID fields on this page if these are entered when setting up the position. If you've associated agencies with departments on the Department table, the system enters the agency code on this page and the field is unavailable for entry. It also enters default values in the Position Data section for the pay periods, employee type, holiday schedule (which you define in the Pay Group table), and pay group fields (which you associate with a position in the Add/Update Position Info component in the Organizational Development, Position Management, Maintain Positions/Budgets menu). The system enters the standard hours that correspond to the job code. If you've associated them with the job code, the system also enters the pay plan, pay table, and grade, and compensation frequency within the Compensation Data section. In addition, within the Compensation Data section, the system enters the grade and step entry date, which is the date the employee was first assigned to the grade and step. |
Pay Plan and Grade |
Displays the pay plan and grade associated with the position. |
Occupational Series |
Displays the occupational series that is associated with this position. |
Job Code |
If you are not using the Manage Positions business process, enter the job code. Otherwise, the job code is derived from the value established in the Add/Update Position Info component. |
Agency, Sub-Agency, Business Unit, Department, and Location |
Select the ID types for these fields individually. If the position management hiring process is used, the system enters default values when the Position ID is selected. |
Transferred From Agency |
If the reason code entered on the Request Details Page was Transfer, select the agency from which the employee is transferring. Note: Not valid for a concurrent assignment. |
Transferred To Agency |
This is not a valid field in the hiring process. This field is used primarily in other types of PAR requests. It becomes active based on the action and reason code entered on the Request Details Page. Note: Not valid for a concurrent assignment. |
Tax Location |
Derived from the department-tax location relationship established on the Department table. You can also select the tax location for this person. |
Position Data
Use this section to enter position information like employee type, classification, appointment type, work schedule, and pay group.
Field or Control |
Description |
|---|---|
POI (personnel office identifier) |
Set by default from the position data or the job code. |
LEO Position (law enforcement officer position) |
If this is a law enforcement officer position, a value appears from the job code. |
Type of Appointment |
Enter the employee's type of appointment, such as Career (Competitive Service Permanent), Limited, Executive, or Schedule A - C. |
Position Occupied |
This field identifies the type of appointment which can occupy the position. Values are Competitive, Excepted Senior Executive Service (SES) Career Reserved and SES General. |
Pay Group |
A value appears here if you defined one on the Position Data page. Otherwise, select a pay group. |
Pay Frequency |
Set by default from the pay group. |
Work Period |
Select the time period in which employees must complete the standard hours. The system uses the annualization factor of the standard work period, in combination with the standard hours, to calculate FTE (full-time equivalency). |
Employee Type |
The default value and valid options are defined by the pay group. If an employee type doesn't exist for this pay group, establish one on the Pay Group table. |
Holiday Schedule |
If you linked an established holiday schedule on the Pay Group table, it appears here. |
FLSA Status (Fair Labor Standards Act status) |
Set by default from the position data on the job code. |
Employee Classification |
Identify another method of grouping employees. |
Regular/Temporary |
Indicate whether the employee is a regular or temporary employee. The Manage Base Benefits business process of PeopleSoft Human Resources uses this value when determining eligibility requirements. |
Supervisor Level |
If the employee is in a supervisory position, this value is set by default from the Position Data page. |
Work Schedule |
Set by default from the position. |
Standard Hours |
The field is populated by default with the standard hours for the agency as specified in the Installation tables. You can change this information manually. |
FTE (full-time equivalency) |
Identifies the percentage of full-time the employee should normally work in this job. The system calculates this value based on the standard hours entry for this job and the standard work period. However, you can override the system-calculated FTE and enter a new value less than or equal to 1.0. |
Adds to FTE Actual Count (adds to the full-time equivalency actual count) |
Switch to Yes to include this employee's job when processing FTE edits for budgeting purposes. |
SF-113G Ceiling |
Switch to Yes if this position is reportable for the SF-113G ceiling. |
Regular Shift, and Rate/Factor |
If the employee is working shifts, select the appropriate shift, and specify the rate or factor for that shift type. |
Cyber Security Code |
Select the cyber security code for the position. You can also set priority if you are adding multiple cyber security codes. Note: You can associate up to 3 cyber security code with a position, if rows are added for effective date higher than December 1st, 2016. |
Note: Cyber Security Codes for an employee is stored in a new child record GVT_EE_CYB_CD. Data in GVT_JOB.GVT_CYBER_SEC_CD is marked obsolete and should not be used. Add button and Priority fields are visible only for row with Effective Date on or after December 1st, 2016.
Compensation Data
Note: Multiple components of pay, derivation of rates, and related features are not currently supported by PeopleSoft Human Resources USF functionality.
Many values on this page are set by default from values you entered in the Department and Job Code fields on the Job Data page. Override these values if necessary.
Field or Control |
Description |
|---|---|
Pay Rate Determinant |
Select a pay rate determinant. |
Pay Plan, Pay Table, and Grade |
Select the pay plan, table, and grade. |
Step |
Assign the correct step for the employee. Note: For certain Pay Rate Determinants this is not an option and the field does not accept data. |
Retained Pay Plan, Retained Pay Table, Retained Pay Grade, and Retained Step |
There are several instances where retained grade or pay is authorized based on prior federal experience within the employing agency or at another federal agency. After selecting the appropriate pay rate determinant (for example, Retained Grade-Diff Posn), you can enter information in this field. |
Step Entry Date and Grade Entry Date |
Enter the date the employee was first assigned to the grade and step. If the Multi-Step/Grade check box is selected on the Installation table and you select a step on this page, the system automatically enters the base pay for that step. |
Base Pay, Locality/LEO Adjustment, and Total Pay |
If you are using partial or full position management, a value is set by default here based on your prior assignment in the Step field. A GM pay plan position is the exception to this rule. Because the GM pay plan has no steps, you must enter the base pay amount. If you selected Yes for the Position Override option within the Job Data section of this page, you may also enter a base pay amount for a position with steps. This is appropriate in cases where the base pay amount is beyond the step 10 level. Enter the base pay amount based on the compensation frequency period indicated. For example, if the frequency period is one month, the base pay entered would be the pay earned for one month. The system calculates and displays the value in the Loc/LEO Adjustment (if appropriate) and Total Pay fields after you have provided the compensation data. |
Compensation Frequency |
Set by default from the job code; override if necessary. |
Annuity Offset Amount |
This field is available only after the annuitant job record has been saved with one of the following values in the Annuitant Indicator field: 1, 4, 5, A, C, or E. If the employee is an annuitant, enter a CSRS, FERS, or FERS RAE annuity offset amount. Note: The Annuity Offset Amount that you enter cannot be greater than the Base Pay amount. |
Adjusted Base Pay |
The system calculates and displays the adjusted base pay by applying the Loc/LEO adjustments to the employee's base pay. This field is used for pay limits computation of the locality pay. |
Benefit Base Override and FEGLI Base |
The system calculates the FEGLI base rate. Select the Benefit Base Override check box to override this default and then enter a new amount. |
Other Pay Information |
Click to access the Other Pay Information Page and enter compensation that employees receive that's in addition to base pay. |
Expected Pay |
Click to access the Expected Pay Page and view the various pay rate and compensation calculations the system calculates and displays based on the base pay and compensation frequency that you enter on this page. |
Accounting Information |
Click to access the Accounting Information Page and view a summary of the employee's job earnings distribution. |
If you selected the Multi-currency check box on the Installation table and entered the base pay in a different currency from your base currency, the system converts the rates to the base currency and compares them with the ranges specified for this salary grade in the Salary Grade table. If the rates exceed the salary range, a warning message appears.
Understanding Default Values for Compensation Data
After you enter job and position data, pay information is populated by default within the Compensation Data section. If you associated pay plans with job codes, the Pay Plan field is populated by default from the data in the Job Code table. The Grade field is populated by default from the job code. After the values in the Pay Plan and Grade fields appear, the system also displays the Grade Entry Date field, which is the date the employee first joined the grade. When a value is entered in the Step field, the value in the Step Entry Date field populates by default. You can override these values if you choose.
The system verifies any combinations of pay plans and grades that you select. If the combination doesn't exist, a warning message appears.
Use the FEGLI/Retirement/FICA (Federal Employees Group Life Insurance / Retirement / Federal Insurance Contributions Act) page (GVT_BENDATA1_SCF) to enter life insurance and retirement data.
Navigation:
Click the FEGLI/Retirement/FICA link on the Request Data - Job Related Data Page, Job Data section.
This example illustrates the fields and controls on the FEGLI/Retirement/FICA page (1 of 2).
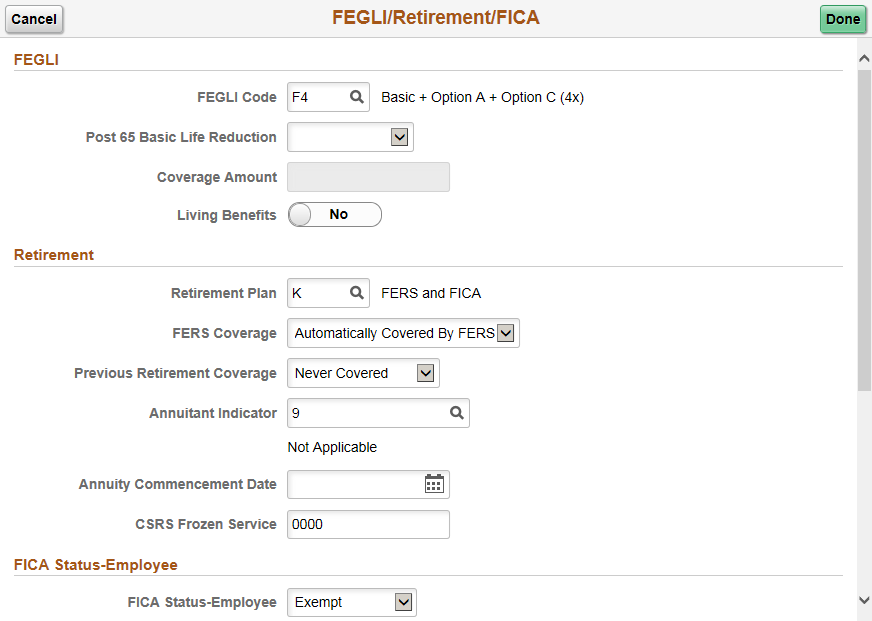
This example illustrates the fields and controls on the FEGLI/Retirement/FICA page (2 of 2).
FEGLI
Field or Control |
Description |
|---|---|
FEGLI Code (federal employees group life insurance code) |
Enter the FEGLI code. |
Post 65 Basic Life Reduction |
Select the employee's post-65 basic life reduction coverage. |
Coverage Amount and Living Benefits |
Use these fields only when selecting living benefits (not during the hiring process). |
Retirement
Field or Control |
Description |
|---|---|
Retirement Plan |
Select the employee's retirement plan. |
In addition to the retirement plans used for submission to Central Personnel Data File (CPDF), the PeopleSoft application supplies the following codes that you may use for documentation purposes only:
|
Retirement Plan Code |
Explanation |
|---|---|
|
7 |
For foreign national employees exempt from retirement and from social security and Medicare tax deductions. |
|
8 |
U.S. Court of Veterans Appeals without election of survivor annuity benefits. Code is for use by the judges of the U.S. Court of Veterans Appeals only. |
|
9 |
U.S. Court of Veterans Appeals with election of survivor annuity benefits. Code is for use by the judges of the U.S. Court of Veterans Appeals only. |
|
A |
Article III judges and justices. |
|
B |
Bankruptcy judges and justices under the Judicial Retirement System. |
|
S |
U.S. Claims Court Judges Retirement System. |
|
V |
Clerks/magistrates (CSRS). |
|
U |
Bankruptcy judges (full FICA/partial CSRS). |
|
Y |
Bankruptcy judges (full FICA/full CSRS). |
Field or Control |
Description |
|---|---|
FERS Coverage (Federal Employees Retirement System coverage) |
Select the employee's FERS coverage. |
Previous Retirement Coverage |
Select the employee's previous retirement coverage. |
Annuitant Indicator |
Select the employee's annuitant indicator. |
Annuity Commencement Date |
If a new employee is a reemployed annuitant, enter the annuity commencement date. |
CSRS Frozen Service (Civil Service Retirement System frozen service) |
Enter the total years and months of civilian and military service that is creditable in a CSRS component of a FERS employee. In the case of a CSRS offset employee, the service that would be included in a CSRS component if the employee ever becomes covered by FERS. You need to enter the time span as a four-number code. The first and second positions indicate the number of years, while the third and fourth positions indicate the number of months. For example, a time span of 5 years and 3 months would be entered in CSRS Frozen Service as 0503 |
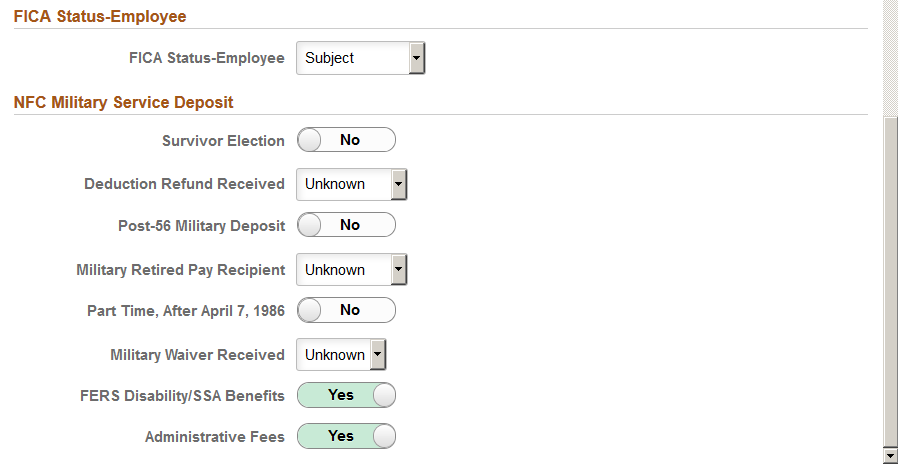
FICA Status-Employee
Field or Control |
Description |
|---|---|
FICA Status-Employee |
Indicate whether the employee is employer FICA exempt, exempt, subject, or subject to Medicare only. |
NFC Military Service Deposit
Field or Control |
Description |
|---|---|
Survivor Election |
Switch to Yes if this person has elected a survivor option. |
Deduction Refund Received |
Indicate if the employee is receiving retirement payments based on military service. Select from Unknown, No or Repaid, or Yes. |
Post-56 Military Deposit |
Switch to Yes to indicate the employee paid the post-1956 military deposit. |
Military Retired Pay Recipient |
Indicate if the employee previously received a retirement refund. Options include Unknown, No or Repaid, or Yes. |
Part Time, After April 7, 1986 |
Switch to Yes to indicate if the employee has any part-time service after April 7, 1986. |
Military Waiver Received |
Indicate whether a military waiver was received declining military pay. Options include Unknown, No, or Yes. |
FERS Disability/SSA Benefits |
Switch to Yes if this is a Federal Employees Retirement System employee applying for disability retirement and social security benefits. |
Administrative Fees |
Switch to Yes to indicate if the agency has to pay OPM an administrative fee. |
Use the Benefits/FEHB Data (Benefits / Federal Employees Health Benefits Data) page (GVT_BENDATA_SCF) to specify benefit programs in which the employee is enrolled in PeopleSoft Human Resources or in PeopleSoft Benefits Administration
Navigation:
Click the Benefits/FEHB Data link on the Request Data - Job Related Data Page, Job Data section.
This example illustrates the fields and controls on the Benefits/FEHB Data page (1 of 2).
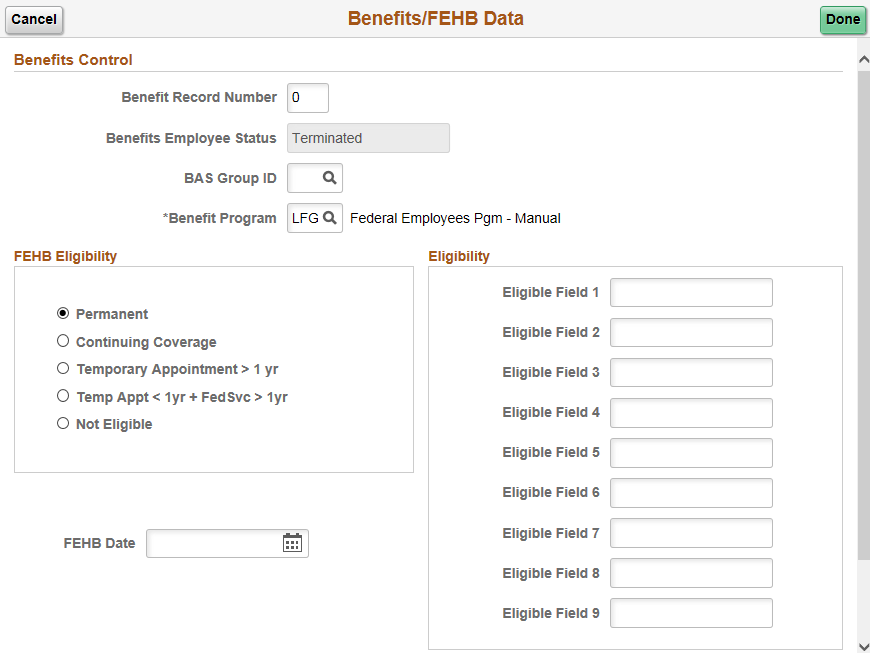
This example illustrates the fields and controls on the Benefits/FEHB Data page (2 of 2).

Benefits Control
Field or Control |
Description |
|---|---|
Benefit Record Number |
Enter a benefit record number that groups several jobs together for benefit purposes. A benefit record number can be assigned to multiple employee record numbers. If the new job entitles the employee to a new set of concurrent benefits, you should use a new benefit record number. If the job does not entitle the employee to new benefits, you should use an existing benefit record number. Each benefit record number must have a designated primary job. The primary job is used to process the benefit information. |
BAS Group ID (benefits administration system group ID) |
(Optional) Enter a BAS group ID. |
Benefit Program |
Enter a benefit program. This is a required field for all PAR transactions. |
FEHB Eligibility
Use the FEHB Eligibility (federal employees health benefits eligibility) group box to select the appropriate option to indicate the FEHB eligibility.
If you select Not Eligible, the FEHB Date field becomes available for entry. This typically applies to temporary employees.
FEHB Date
Field or Control |
Description |
|---|---|
FEBH Date |
Enter the date on which an employee will be eligible for FEHB coverage. Typically, the FEHB date is one year from the employee's hire date. |
Eligibility
Use this group box to enter values in the Elig Fld 1–9 (eligibility field 1–9) fields to further define an employee's benefits eligibility.
Each agency determines its own use of these fields. Contact the agency's Personnel Policy Officials for instruction using these fields.
NFC Benefit Coverage
Field or Control |
Description |
|---|---|
FEHB Coverage |
Identify the status of FEHB coverage. |
Project Sick Leave Usage Date |
Enter the date of the project sick leave. |
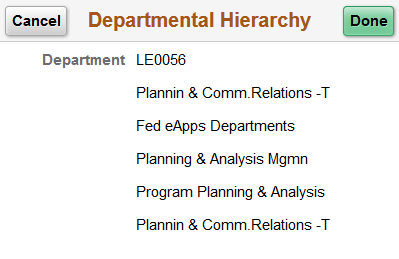
Use the Departmental Hierarchy page (GVT_DEPTINF_SCF) to view departmental hierarchy for the individual's position.
Navigation:
Click the Departmental Hierarchy link on the Request Data - Job Related Data Page, Job Data section.
This example illustrates the fields and controls on the Departmental Hierarchy page.
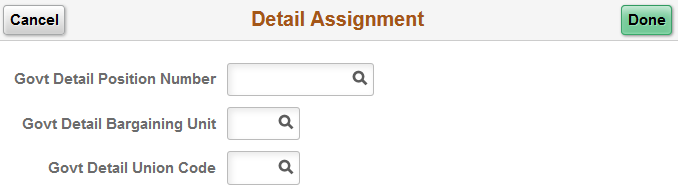
Use the Detail Assignment page (GVT_DETAIL_SCF) to track information for employees on a detail assignment.
You probably won't use this page when first hiring an employee.
Navigation:
Click the Detail Assignment link on the Request Data - Job Related Data Page, Job Data section.
This example illustrates the fields and controls on the Detail Assignment page.
Field or Control |
Description |
|---|---|
Govt Detail Position Number (government detail position number) |
Select the employee's detail position number. |
Govt Detail Bargaining Unit (government detail bargaining unit) |
Select the employee's detail bargaining unit. |
Govt Detail Union Code (government detail union code) |
Select the employee's detail union code. |
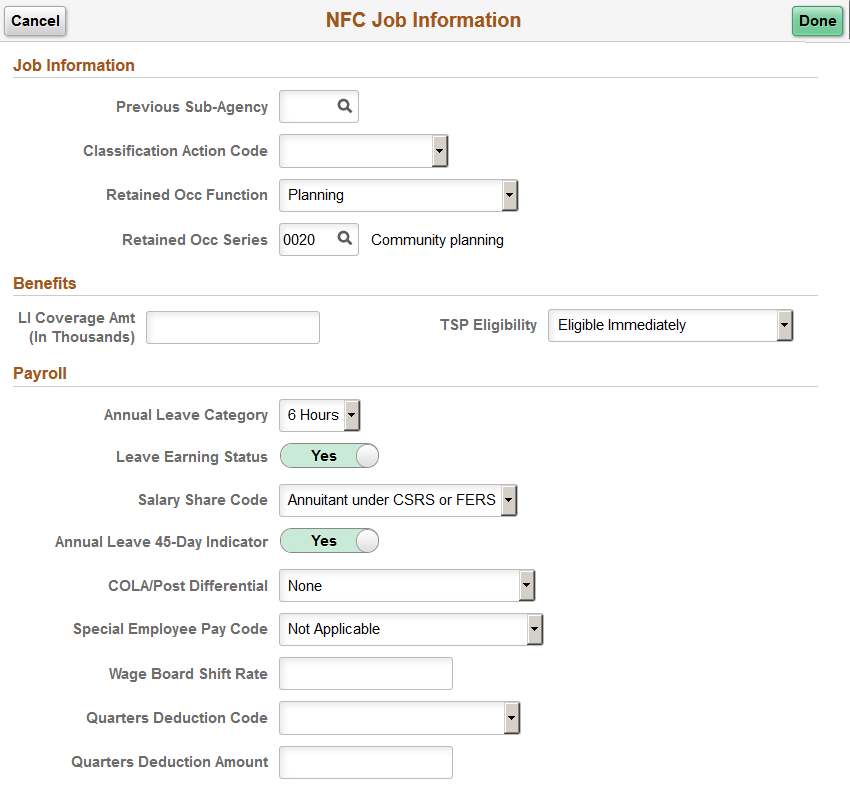
Use the NFC Job Information page (GVT_NFC_JOB_SCF) to track required National Finance Center (NFC) information for employees.
Enter Job, Benefits and Payroll values necessary for processing this employee at NFC.
Navigation:
Click the NFC Job Information link on the Request Data - Job Related Data Page, Job Data section.
Note: The NFC Job Information link appears on this page only if NFC (National Finance Center) product specific data is turned on at Installation table. The NFC Job Information link must appear on the page for you to access the NFC Job Information page described here.
This example illustrates the fields and controls on the NFC Job Information page.
Job Information
Field or Control |
Description |
|---|---|
Previous Sub-Agency |
Enter the previous sub-agency when the employee moves to another sub-agency within the same department. |
Classification Action Code |
Identify the method for processing a classification and personnel action at the same time. Used for reassignments, promotions or change to a lower grade. |
Retained Occ Function (retained occupational functional classification) |
Record the occupational functional classification corresponding to an employee's retained occupational series. This field is required only if the series specified as the retained occupational series is one for which OPM requires an occupational functional classification. |
Retained Occ Series (retained occupational series) |
Enter the occupational series on which an employee's salary is to be based when that series is not the series of the position the employee held immediately before being placed on grade retention. This would occur, for example, when an employee was returned to an unexpired period of grade retention at the end of a temporary promotion. |
Benefits
Field or Control |
Description |
|---|---|
LI Coverage Amt (In Thousands) [life insurance coverage amount (in thousands)] |
Enter the amount of basic life insurance coverage for an employee who is covered under the Federal Employees Group Life Insurance (FEGLI) plan. Complete this field only if one or more of the following conditions are met:
|
TSP Eligibility |
Specify the type of eligibility for the employee to participate in the Federal Thrift Savings Plan (TSP) for FERS, CSRS, or Offset employees. |
Payroll
Field or Control |
Description |
|---|---|
Annual Leave Category |
Select the code that identifies the annual leave earning status in the NFC payroll system. If the employee is eligible to earn annual leave, the code represents the appropriate earning category. |
Leave Earning Status |
Switch to Yes to identify an employee who is entitled to leave accruals for the first and last pay period of employment in the NFC payroll system. |
Salary Share Code |
Identify the source, in addition to the agency, that contributes to paying the employee's salary. |
Annual Leave 45-Day Indicator |
Switch to Yes to identify that the employee is stationed at an overseas foreign post of duty and are entitled to carry forward from one leave year to another a maximum annual leave accumulation of 45 days. |
COLA/Post Differential |
Select the option that identifies the type of cost of living allowance (COLA) or post differential, in addition to the base salary, that the employee is entitled to receive. |
Special Employee Pay Code |
Identify the special category of pay processing not accommodated in any other part of the NFC payroll/personnel system. This code enables certain operations to be performed which would not otherwise be applicable to this type of employee. |
Wage Board Shift Rate |
Enter the rate that NFC uses to compute pay for the varied shift time reported on the T&A for wage system employees. |
Quarters Deduction Code |
Select the code that identifies the type of quarters deduction for the employee. |
Quarters Deduction Amount |
Enter the monetary amount that is to be deducted through NFC payroll, either per day or per pay period, from the salary of an employee who is being furnished quarters, utilities, or other in kind allowances. |
Note: The information entered on this page is for NFC reporting purposes only. Benefit or payroll information that is entered on this page is not integrated with PeopleSoft benefit or payroll applications.
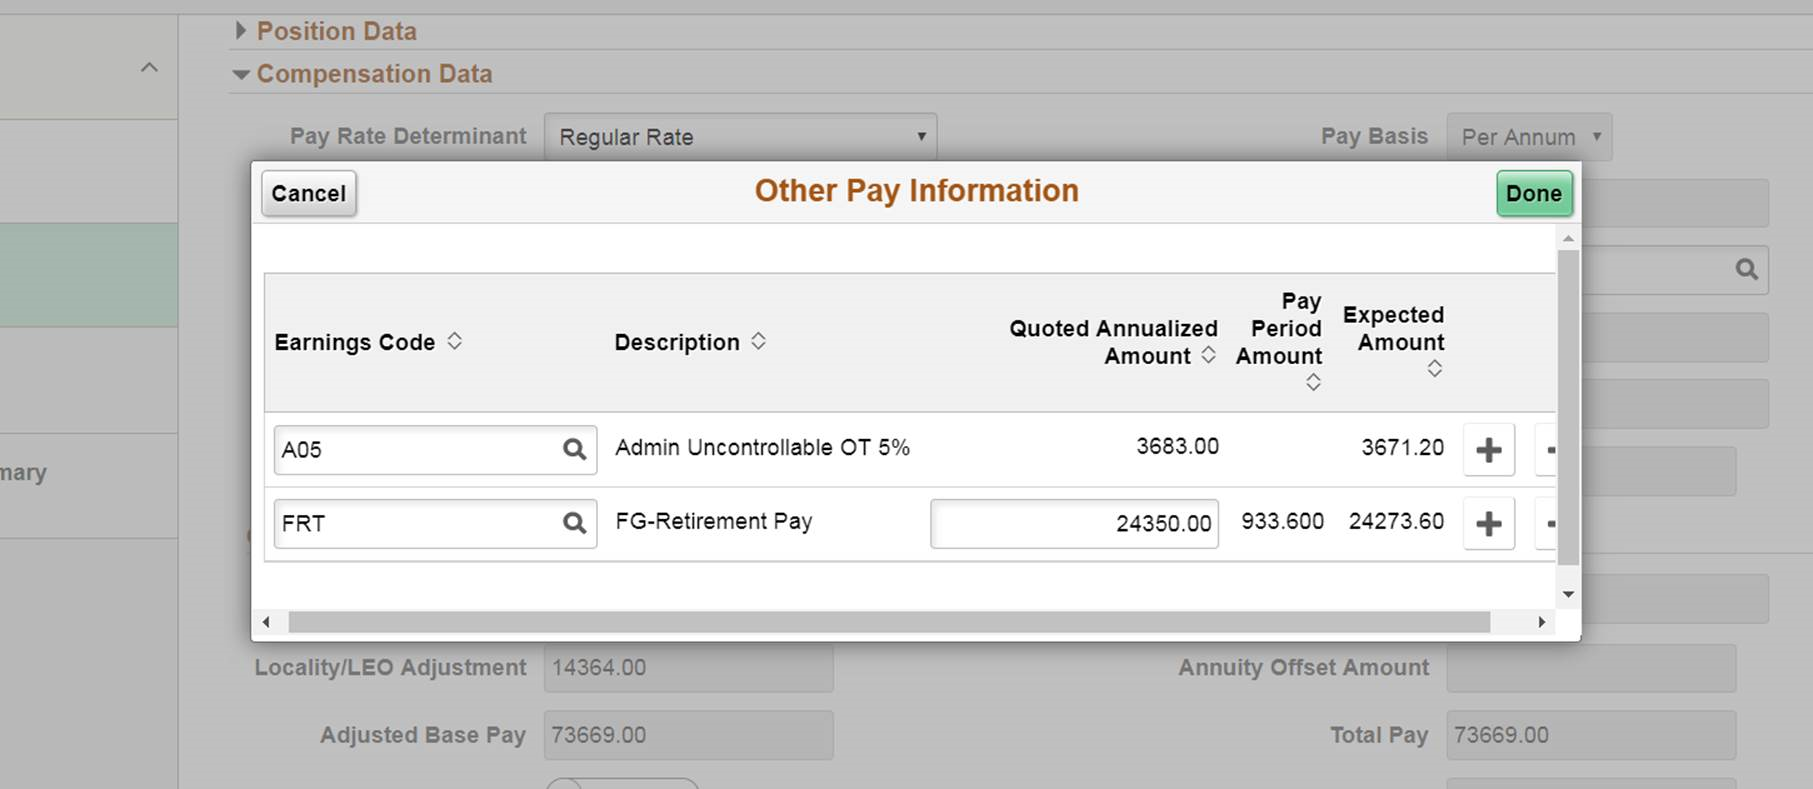
Use the Other Pay Information page (GVT_OTH_PAY_SCF) to enter compensation that employees receive that's in addition to base pay.
Navigation:
Click the Other Pay Information link on the Request Data - Job Related Data Page, Compensation Data section.
This example illustrates the fields and controls on the Other Pay Information page.
Field or Control |
Description |
|---|---|
Earnings Code |
Select the code for the additional pay type, such as automobile and beeper allowances. The system issues a warning indicating that the earnings code may be applicable to pay limits, at which time the employee's earnings calculation within payroll may be reduced. On selecting the Earnings Code, the other fields in the page gets enabled. |
Quoted Annualized Amount |
Enter the Quoted Annualized Amount. Note: This field will be read only for Earnings code, with multiplication factor or constant value defined. |
Pay Period Amount |
Pay Period amount is displayed. Note: If you had selected an Earnings Code with multiplication factor or constant value defined, Pay Period Amount field will not be displayed in the Other Pay Information page. For others, the value appears as read only. |
Expected Amount |
The system calculates and displays the expected amount. |
Note: A message appears when you enter premium pay that is subject to a pay limit. During payroll calculation, if the premium earnings plus adjusted base pay exceed the pay limit, the premium pay is reduced.
Use the Expected Pay page (GVT_LOC_PAY_SCF) to view the various pay rate and compensation calculations the system calculates and displays based on the base pay and compensation frequency you enter on the Compensation page.
Navigation:
Click the Expected Pay link on the Request Data - Job Related Data Page, Compensation Data section.
This example illustrates the fields and controls on the Expected Pay page.

Field or Control |
Description |
|---|---|
Locality Percentage or LEO Percentage (law enforcement officer percentage) |
Displays the locality or LEO percentage. This field shows the LEO Percentage label when the Primary FEPCA or Secondary FEPCA is selected in the LEO Position field. |
Change Percent |
Displays the information regarding a percent change when new rows are inserted that change the base salary amounts. |
Base Pay |
The system calculates and displays the hourly, daily, biweekly, monthly, and annual rates for this employee based on the base pay and compensation frequency you enter. |
With Locality |
The system calculates the same base pay figures using the locality adjustment listed at the top of the page. |
Total Other/Premium Pay |
Displays the total of annual expected pay for the items you entered on the Other Pay Information page. |
Total Pay |
The system calculates total pay by summing the annual pay with the locality adjustment and the total other/premium pay contributions. |
Note: The Rate Change Amount and Rate Change Percent fields are used when awarding increases (not for new hires).
If expected pay exceeds the pay cap, a message appears at the bottom of the page warning that the pay cap has been reached and pay was reduced.
Note: In the case of an employee that is subject to reaching a pay cap/limit, the compensation rate is displayed correctly, however, the change amount and change percent are displayed differently depending on whether you view this information on this page or on the commercial compensation pages.
Understanding Expected Pay and Quoted Pay Within PeopleSoft Human Resources Management for U.S. Federal Government
The difference between expected pay and quoted pay occurs as a result of the conversion factors used when comparing yearly and hourly pay rates on the Pay Plan page in the Pay Plan Table component and this page.
Rather than using the hourly conversion factor of 2080, as is often used as a business calculation factor, the U.S. federal government uses 2087.
This page calculates the daily, biweekly, monthly, and annual rates using the base pay amount from the Compensation Data section. These figures are based on the hourly conversion factor you set for the pay plan on the Pay Plan table, typically 2087.
It also breaks out into separate columns the pay into base pay (no locality, no adjustments), pay with locality, and LEO pay. Total other/premium pay is also calculated based on the amounts entered on the Other Pay Information Page. So, as a result of using 2087 in these calculations, the estimated quoted pay in the Compensation Data section is slightly higher than what the federal employee actually receives in a year.
These two fields for expected and quoted pay may not match. The procedures that the federal government has for deannualizing and reannualizing quoted compensation rates are the cause of the difference. To deannualize a quoted rate of pay (convert to hourly), you divide the quoted rate of pay by 2087. To reannualize a quoted rate of pay to determine the expected pay, you multiply the derived hourly rate by the employee's scheduled weekly tour of duty and then multiply that by 52 weeks.
Following are two examples:
Example 1
Full-time employee (40 hours per week) with quoted rate of 41,740 USD per year.
Quoted rate = 41,740 USD.
Hourly rate = quoted rate/2087 hours = 41,740 USD/2087 hours = 20 USD/hour.
Expected pay = hourly rate × standard weekly tour × 52 weeks = 20 USD/hour × 40 hours/week × 52 weeks = 41,600 USD.
Difference between quoted and expected pay on an annual basis = 140 USD.
Example 2
Part-time Employee (20 hours per week) with quoted rate of 41,740 USD per year
Quoted rate = 41,740 USD.
Hourly rate = quoted rate/2087 hours = 41,740 USD/2087 hours = 20 USD/hour.
Expected pay = hourly rate × standard weekly tour × 52 Weeks = 20 USD/hour × 20 hours/week × 52 weeks = 20,800 USD.
Difference between quoted and expected pay on an annual basis = 20,940 USD.
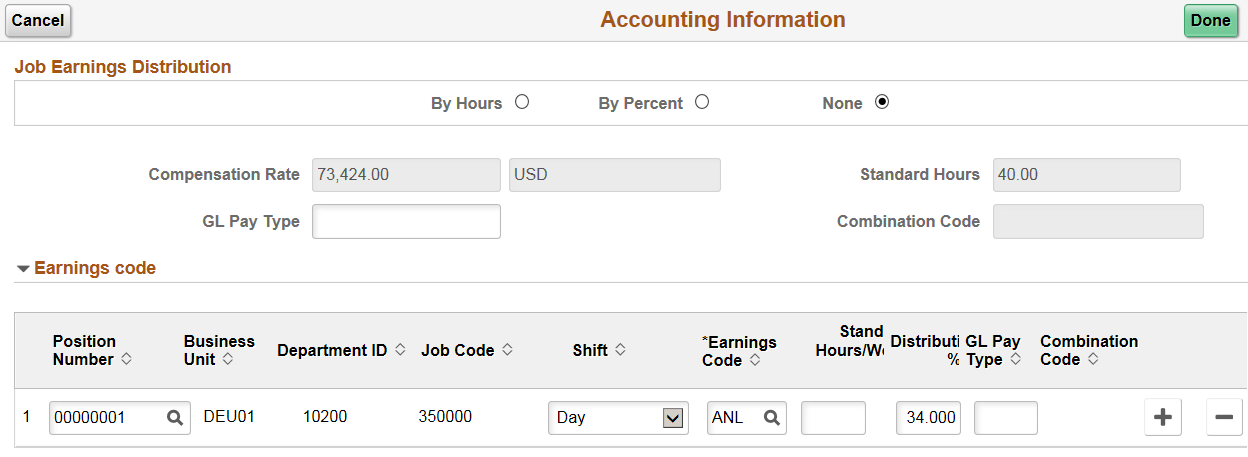
Use the Accounting Information page (GVT_JOBDIST_SCF) to view a summary of the employee's job earnings distribution.
Navigation:
Click the Accounting Information link on the Request Data - Job Related Data Page, Compensation Data section.
This example illustrates the fields and controls on the Accounting Information page.
Field or Control |
Description |
|---|---|
Job Earnings Distribution |
Select the appropriate option to indicate the job earnings distribution frequency: by hours, by percent, or not at all. When you select the By Hours or By Percent options, the GL Pay Type and Account Code fields are unavailable for entry. Use multiple rows to distribute earnings among departments. If you select the By Hours option, then enter the hours to be distributed to each department in the Standard Hours field corresponding to each department entered. If you select the By Percent option, enter a percentage corresponding to each department in the Percent of Distribution field. Percentages must total 100 percent and must equal the value in the Standard Hours field. |
Compensation Rate |
Displays the annual salary, including the locality and LEO adjustments. |
Standard Hours |
Display the default value from the job code. |
GL Pay Type (general ledger pay type) |
Enter the GL pay type that has been established by your agency. |
Position Number, Business Unit, Department ID, Job Code, and Shift |
Select the business unit, department, job code, position, and shift to which to charge the earnings. |
Earnings Code |
Specify the earnings code. This will default to the regular earnings code defined on the Paygroup Table. |
Standard Hours/Week (standard hours per week) |
If you select the By Hours option, then specify how many hours will be charged to the corresponding earnings code. |
Distribution % (percent of distribution) |
If you select the By Percent job earnings distribution option, enter the percent to be charged to the corresponding earnings code. |
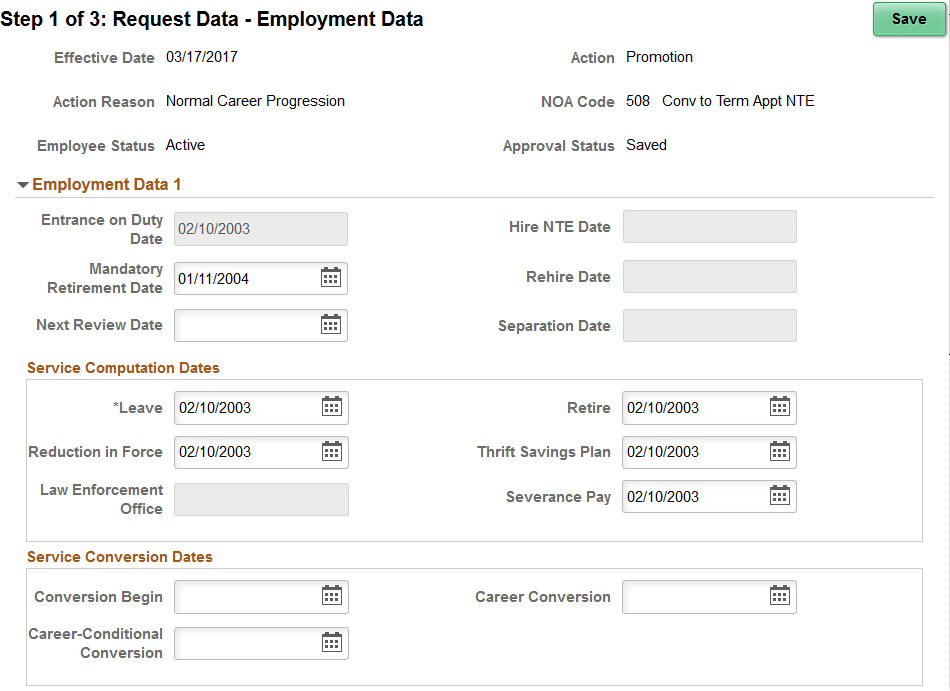
Use the Request Data - Employment Data page (GVT_EMPLOYMENT1_FL) to enter employment information, such as employee service computation and conversion dates, within-grade-increase data, union, probation, RIF, tenure, and security data. Also record the retained grade information.
Navigation:
Click the Employment Data page tab category from the left panel of the Create/View Personnel Actions - <Transaction Name> pages.
Click the Next button on the Request Data - Job Related Data Page.
Click the Previous button on the Validate Data Page.
This example illustrates the fields and controls on the Request Data - Employment Data page (1 of 2).
This example illustrates the fields and controls on the Request Data - Employment Data page (2 of 2).
Many values on this page are set by default from values entered in the Department and Job Code fields on the Request Data - Job Related Data Page. When adding an employment instance, the system populates most of the dates on this page with the effective date of the action. These dates are used later in various ways to calculate the employee's service time. Override these values as necessary.
If at a later date you change the status of an employee's employment, depending on the administrative action you select in the Job Related Data pages, the system will display the rehire date.
Employment Data 1
The field is
Field or Control |
Description |
|---|---|
Entrance on Duty Date |
Reflects the effective date of the hire request after you save the request. This date is distinct from the SCD dates in that it describes when the employee started federal employment with the employing agency; it does not reflect total federal service involving the employee's total career. |
Hire NTE Date (hire not to exceed date) |
Set by default from the Not to Exceed Date field on the Request Data - Data Control Page. In the case of a temporary hire, it designates the length of time the temporary employment can last. |
Mandatory Retirement Date |
If applicable, enter the employee's mandatory retirement date. |
Next Review Date |
Enter the next review date. This date, while informational only, can serve as a tickler date for employee performance review. |
Separation Date |
Shows the date that the employee left employment. This field is display-only. |
Service Computation Dates
Field or Control |
Description |
|---|---|
Leave |
Enter the service computation date for beginning the employee's leave computation. |
Retire |
Enter the service computation date for beginning the employee's retirement computation. |
Reduction In Force |
Enter the computation date for establishing the employee's RIF position. |
Thrift Savings Plan |
Enter the computation date for beginning the employee's thrift savings plan eligibility computation. |
Law Enforcement Office |
Enter the computation date for beginning the employee's law enforcement office retirement computation. |
Severance Pay |
Enter the service computation date for establishing the employee's severance pay computation. |
Service Conversion Dates
Field or Control |
Description |
|---|---|
Conversion Begin, Career Conversion, and Career-Conditional Conversion |
Enter the conversion begin date, the career conversion date, and the career-conditional conversion date. If the employee is hired using a career-conditional appointment, the conversion begin date is the effective date of the hire. Upon completion of the three-year period, the personnel office processes a PAR converting the employee to a career appointment and enters that effective date in the Career Conversion date field. If the employee was hired under a temporary appointment, the conversion begin date is the effective date of the hire. When the personnel office processes a PAR to convert the temporary employee to a permanent employee with a conversion to career conditional competitive appointment, the Career-Conditional Conversion date field is the effective date for that transaction. |
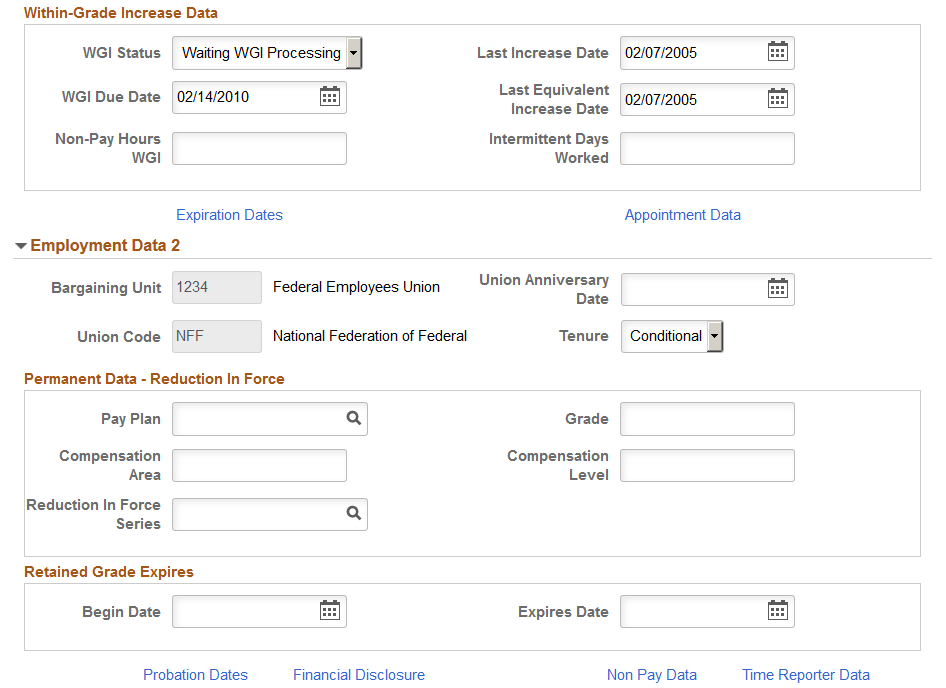
Within-Grade Increase Data
Field or Control |
Description |
|---|---|
WGI Status (within-grade increase status) |
Enter the WGI status, such as (none), Approved, Waiting, Denied, N/A, or Postponed. For a new employee, the default value is Waiting. Created is an option for WGI status, which is reserved for the automatic WGI process. Do not change this online, as the WGI process won't select it unless the status is Waiting or Approved. |
Non Pay Hours WGI and Intermittent Days Worked |
Leave these informational fields blank at hire. After running the WGI/Tenure Update process for leave without pay and processing a PAR, update the Non Pay Hours WGI field with nonpay hours from the WGI/Tenure Update report. Note: The WGI/Tenure Update process is a North American Payroll process specific to U.S. Federal government customers. |
Last Increase Date, WGI Due Date, and Last Equivalent Increase Date |
The system automatically enters the last increase date, LEI date, and WGI due date. For certain actions, the WGI Due Date field is set by default to the pay period begin date based on the pay calendar tables that your organization has established. For WGI due date calculation, it is imperative that you set up your pay calendars for this year, plus three years in advance of the current year. For example, if the current year is 2017, then your pay calendars need to be set up for 2017, 2018, 2019, and 2020. If you enter a date that isn't the beginning of a pay calendar, the system displays a message suggesting valid pay calendar begin dates into which your date falls. If the system suggests a date of January 1, 1899, this indicates that your pay calendars do not exist. See your implementation project manager about creating additional pay calendars. After running the WGI/Tenure Update process for leave without pay and processing a PAR, update the WGI Due Date field with the extended due date from the WGI/Tenure Update report. |
Employment Data 1 Links
Field or Control |
Description |
|---|---|
Expiration Dates |
Click to access the Expiration Dates Page and enter expiration dates for temporary promotions, position changes, sabbaticals, or detail assignments. |
Appointment Data |
Click to access the Appointment Data Page and enter appointment limits. |
Employment Data 2
Field or Control |
Description |
|---|---|
Bargaining Unit |
Select a code representing the bargaining unit to which the employee belongs. |
Union Code |
If your new employee belongs to a union, select the appropriate union code. |
Union Anniversary Date |
If the bargaining unit covers the position and the employee has elected to join, enter the date on which the employee's seniority ranking within the union is based. |
Tenure |
Indicate the type of tenure. |
Permanent Data - Reduction In Force
These informational fields enable the agency to track the employee relative to RIF processing.
Field or Control |
Description |
|---|---|
Pay Plan and Grade |
Enter the employee's pay plan and pay grade. |
Compensation Area and Compensation Level |
Enter the employee's compensation area and level. |
Reduction In Force Series |
Select the employee's RIF series. |
Retained Grade Expires
Field or Control |
Description |
|---|---|
Begin Date and Expires Date |
Where appropriate, enter the employee's retained grade begin date and expires date. These are informational fields provided for the agency to track the employee's eligibility to maintain retained grade. |
Employment Data 2 Links
Field or Control |
Description |
|---|---|
Probation Dates |
Click to access the Probation Dates Page and enter information related to probation periods. |
Financial Disclosure |
Click to access the Financial Disclosure Page and enter information related to the employee's financial disclosure requirement. |
Non Pay Data |
Click to access the Non - Pay Data Page and enter information related to a status of non-pay. |
Time Reporter Data |
Click to access the Time and Labor Data Page and review PeopleSoft time and labor data for this employee. If you aren't using PeopleSoft Time and Labor, the link is unavailable. |
Use the Expiration Dates page (GVT_EXPIRDT_SCF) to enter expiration dates for temporary promotions, position changes, sabbaticals, or detail assignments.
Navigation:
Click the Expiration Dates link on the Request Data - Employment Data Page.
This example illustrates the fields and controls on the Expiration Dates page.
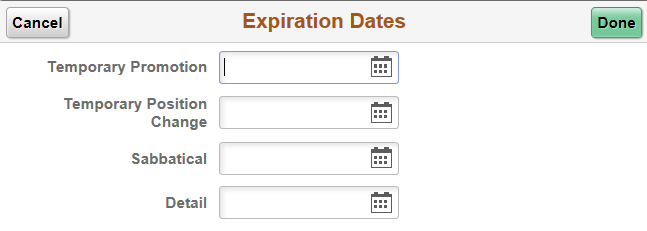
The following fields, which are updated by the user, are informational only.
Field or Control |
Description |
|---|---|
Temporary Promotion |
Enter the temporary promotion date. |
Temporary Position Change |
Enter the temporary position change expiration date. |
Sabbatical |
Enter the sabbatical expiration date. |
Detail |
Enter the detail assignment expiration date. |
Use the Appointment Data page (GVT_APPDATA_SCF) to enter appointment limits and indicate if this person is in a special employment program.
Navigation:
Click the Appointment Data link on the Request Data - Employment Data Page.
This example illustrates the fields and controls on the Appointment Data page.
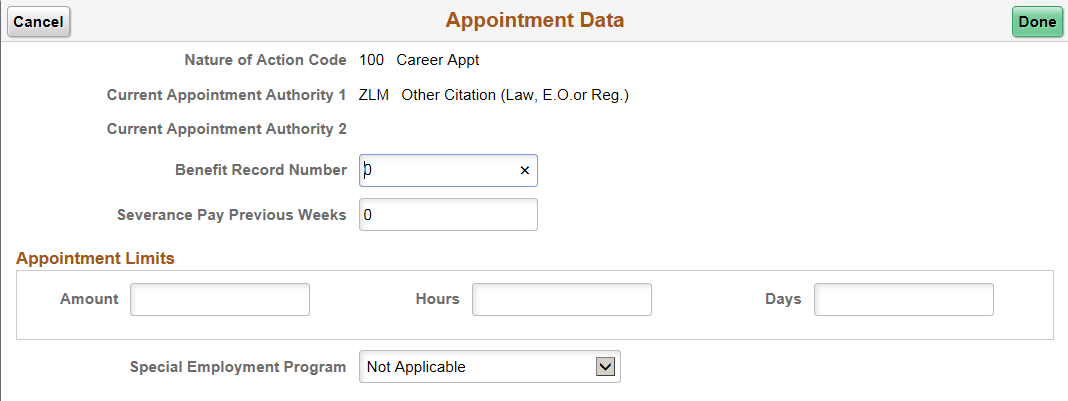
Field or Control |
Description |
|---|---|
Nature of Action Code, Current Appointment Auth Nbr 1 (current appointment authorize number 1) and Current Appointment Auth Nbr 2 (current appointment authorize number 2) |
Displays the fields maintained to reflect historic data on the employee's current appointment authority, that was used to authorize the employee's hire. |
Benefit Record Number and Severance Pay Previous Weeks |
For a new hire, you do not need to enter the benefit record number and the number of severance pay previous weeks. If changes occur to the employee's employment status, you must update these fields (for example, RIF). |
Amount, Hours, and Days |
Depending on the type of appointment used to hire the employee, enter the appointment limits amount, hours, or days. |
Special Employment Program |
Indicate the special employment program: Not Applicable, Other, Presidential Mgt Intern, SES Candidate Development, or Veteran's Readjustment Program. |
Use the Probation Dates page (GVT_EMPL_PROB_SF) to document any probation start and end dates that apply to this person.
Navigation:
Click the Probation Dates link on the Request Data - Employment Data Page.
This example illustrates the fields and controls on the Federal Probation Dates page.

Field or Control |
Description |
|---|---|
Supervisor/Mgr Prob Reqd Code (supervisor manager probation required code) |
Identify whether a supervisory/managerial probationary period is required, served, or waived. |
SES Probation End Date (Senior Executive Service probation end date) |
Enter the applicable probation end date. |
Supervisor/Mgr Probtn Start Dt (supervisor/manager probation start date) |
Enter the starting date for the supervisory/managerial probationary period, or for the SES probationary period. |
Supervisor/Mgr Probtn End Date (supervisor/manager probation end date) |
Enter the applicable probation end date. |
Probation Start Date |
Identify whether the employee's appointment is subject to completion of a one year probationary (or trial) period and to show the commencing date of the probationary period. |
Probation End Date |
Enter the applicable probation end date. |
Use the Financial Disclosure page (GVT_SECURTY_SCF) to indicate if financial disclosure is required and the due date.
Navigation:
Click the Financial Disclosure link on the Request Data - Employment Data Page.
This example illustrates the fields and controls on the Financial Disclosure page.
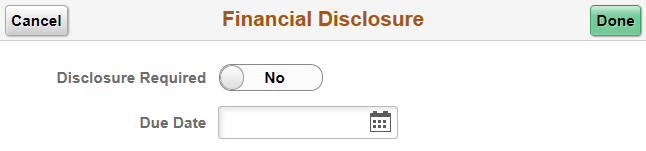
Field or Control |
Description |
|---|---|
Financial Disclosure Required and Due Date |
If a financial disclosure is required, switch to Yes and enter the due date for receipt. |
Use the Non - Pay Data page (GVT_NONPAY_SCF) to track information related to a status of nonpay.
Navigation:
Click the Non Pay Data link on the Request Data - Employment Data Page.
This example illustrates the fields and controls on the Non - Pay Data page.
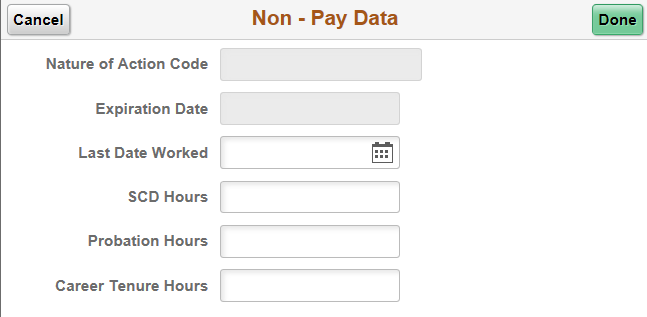
Information on this page affects FEHB eligibility and FEGLI.
Field or Control |
Description |
|---|---|
NOA Code |
Indicates the PAR processed to place the employee in a nonpay status. |
Expiration Date |
Displays the nonpay expiration effective date, which reflects the projected expiration of nonpay status and consequent processing of a PAR to return to pay status. |
Last Date Worked |
Enter the date last worked prior to being placed in a nonpay status. |
SCD Hours, Probation Hours, and Career Tenure Hours |
Enter and track SCD hours, probation hours, and career tenure hours in these informational fields. |
Use the Time and Labor Data page (TL_EMPL_DATAFG_SCF) to review or enter PeopleSoft time and labor data for this employee.
Navigation:
Click the Time Reporter Data link on the Request Data - Employment Data Page.
Note: If you aren't using PeopleSoft Time and Labor, the Time Reporter Data link is unavailable.
This example illustrates the fields and controls on the Time and Labor Data page (1 of 2).
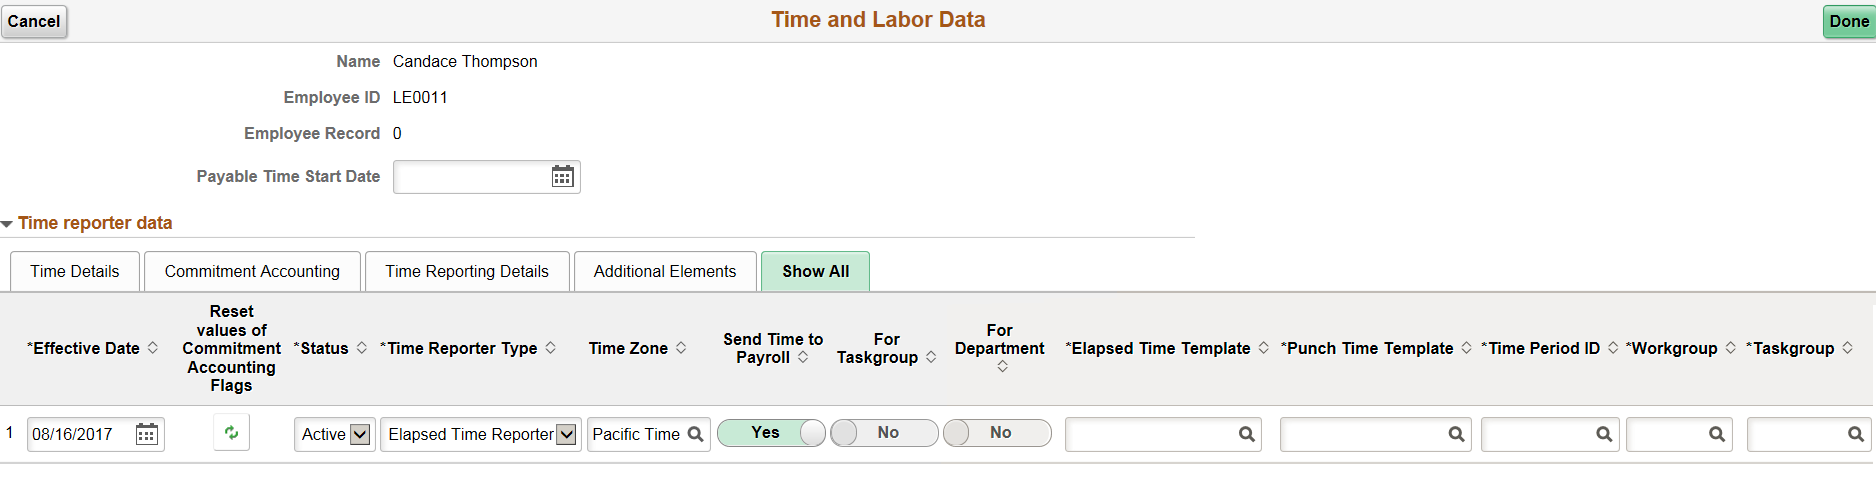
This example illustrates the fields and controls on the Time and Labor Data page (2 of 2).
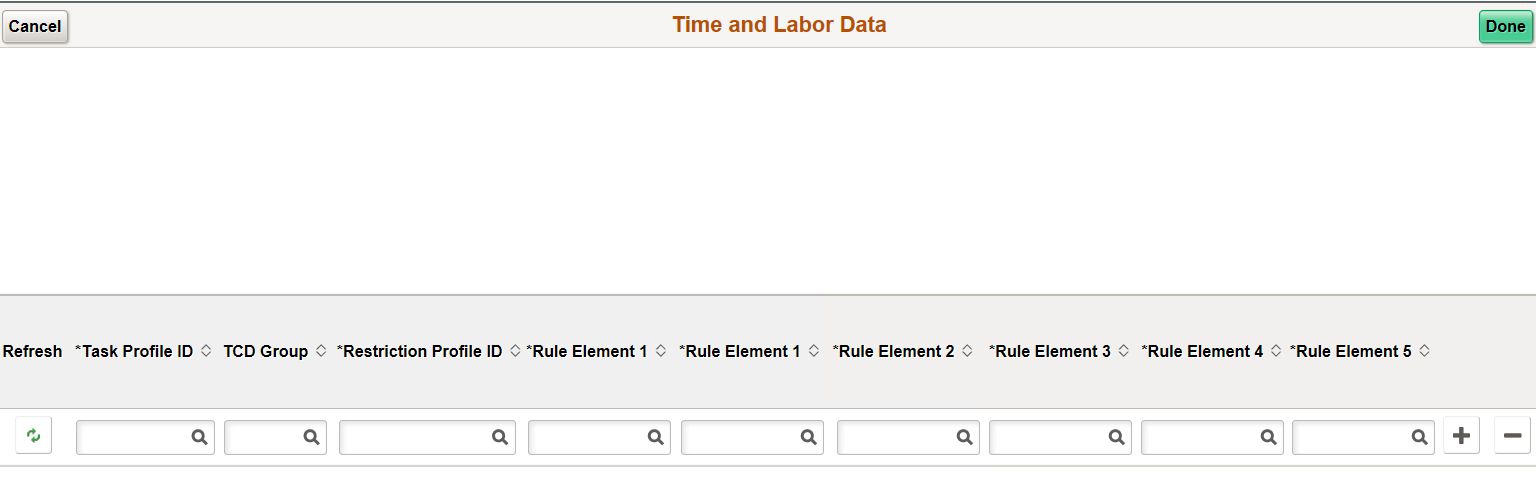
For more detailed information on the Time and Labor fields, see the documentation for the Create Time Reporter Data Page.
Field or Control |
Description |
|---|---|
Payable Time Start Date |
Enter the date for the system to start creating payable time for the time reporter. This date is important for time reporters in a workgroup defined for exception time reporting who will have payable time created from schedules. |
Workgroup |
Select a workgroup for the time reporter. It identifies the default TRC program, rule program, holiday schedule, time reporting period, and other information that the system uses when processing reported time for this person. |
Taskgroup |
Enter a taskgroup, which identifies the default task template, task profile, and time reporting templates that the system uses when collecting and processing reported time for this time reporter. If the time reporter's department is set up for commitment accounting (the For Department option is set to Yes in the Commitment Accounting section), you must assign a task group that's defined for commitment accounting. When you do so, the system enables in the For Taskgroup option to Yes. |
Task Profile ID |
Select a task profile ID for the system to use a different default task profile ID than that assigned to the time reporter's task group. Task profiles define the tasks to which a person's reported time is allocated automatically if task information is not reported. |
TCD Group (Time Collection Device Group) |
If the time reporter uses a TCD, such as a time clock or badge scanner to report time, select the appropriate TCD group. The TCD group identifies the TCDs that the time reporter is authorized to use. |
Restriction Profile ID |
Select a restriction profile ID in this field to apply a different restriction profile than that assigned to the time reporter's TCD group. This field applies only if the time reporter uses a time clock device to report time. |
Rule Elements 1-5 |
Assign up to five rule elements to a time reporter. When you run the Time Administration process, the system retrieves the values of the time reporter's rule elements and makes the values available for rules processing. This feature enables you to tailor rules to a specific population of time reporters. |
Reset values of Commitment Accounting Flags |
Click this button for the system to refresh the fields in the Commitment Accounting section. |
Time Reporter Type |
Identify how the time reporter will enter time: a Punch Time Reporter or an Elapsed Time Reporter. |
Payroll
Field or Control |
Description |
|---|---|
Send Time to Payroll |
Switch to Yes to integrate Time and Labor with, and send this time reporter's payable time to, a payroll system. |
Commitment Accounting
Field or Control |
Description |
|---|---|
For Taskgroup |
Displays as Yes automatically if the task group for the time reporter (in the Taskgroup field) is defined for commitment accounting. |
For Department |
Displays as Yes automatically if the time reporter's department is defined for commitment accounting in People Soft Human Resources. When the For Department check box is selected, assign the task reporter a task group that is also defined for commitment accounting. |
Time Zone |
Select the time zone in which the time reporter enters time. The system automatically populates the field with the base time zone defined with PeopleTools Utilities. |
Use the Attachments page (GVT_ATTACH_FL) to add, view or delete attachments associated with a Personal Action Request.
The attachments are routed for approval and available for review to the Personnel Action Request approvers.
Note: You can enable or disable the Attachments functionality in Guided PAR transactions using the Page and Field Configuration, based on requirements.
Navigation:
Click the Attachments page tab category from the left panel of the Create/View Personnel Actions - <Transaction Name> pages.
Click the Next button on the Request Data - Job Related Data page.
This example illustrates the fields and controls on the Request Data — Attachments page. You can find definitions for the fields and controls later on this page.
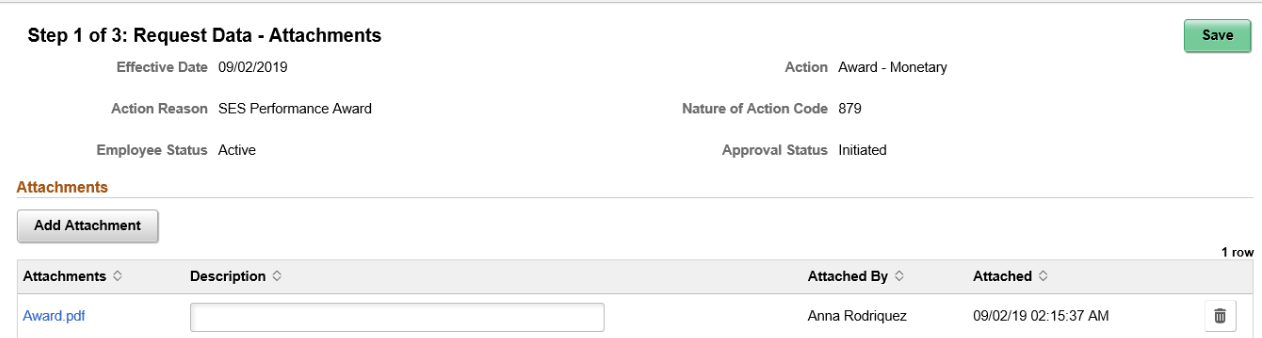
Click the Add Attachment button to open the File Attachment page and upload a file. After you have selected and uploaded the file, click Done to return to this page. The uploaded file will appear as an active link in the Attachments field. The page will display the date and time the file was uploaded.
Field or Control |
Description |
|---|---|
Attachments |
Click the Attachments link to open the attachment. |
Description |
Meaningful description for the attachment. |
Attached By |
Displays the name of the requester who uploaded the file. |
Attached |
Displays the date that the administrator uploaded the file to the request. |
Click the Delete button to remove the file from the page. The system will ask for confirmation that you want to delete this file. Click Yes to delete the file. This will automatically save the page with your deletion of the file.
Use the Validate Data page (GVT_CPDF_FL) to initiate online regulatory edits for this PAR transaction and review edits and errors.
Navigation:
Click the Validate Data page tab category from the left panel of the Create/View Personnel Actions - <Transaction Name> pages.
Note: This option is available after you have saved the information entered in the Request Data step.
Click the Next button on the Request Data — Attachments page or the Previous button from the Transaction Summary Page.
This example illustrates the fields and controls on the Validate Data page.
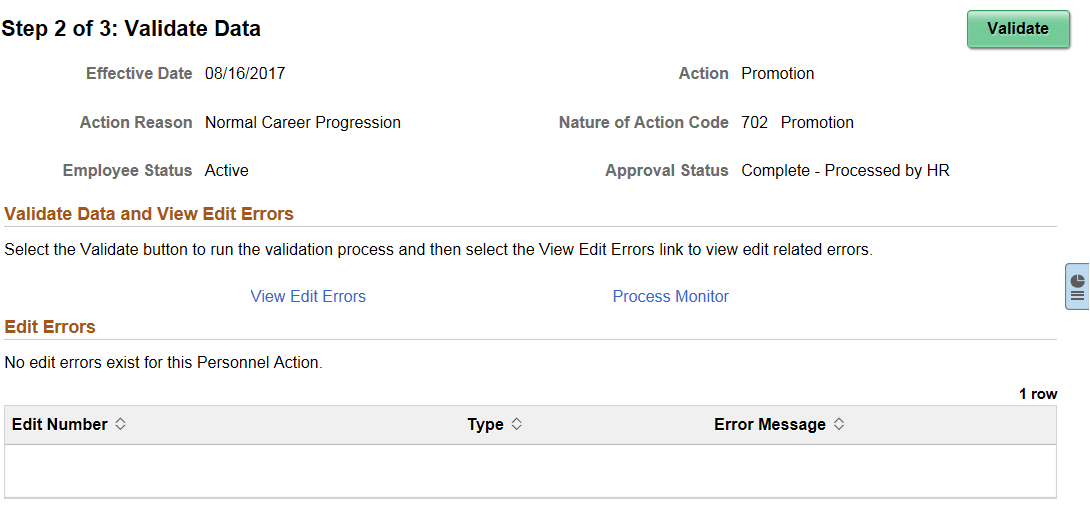
Field or Control |
Description |
|---|---|
Validate |
Click this button to run the CPDF edit validation process. Edits should be triggered after all information is entered. Note: Validation is an optional step. Depending on the state of the transaction, all edits may not run to completion because all data may not have been captured up to that point. Push Notification will appear on the banner once the validation process gets completed. |
View Edit Errors |
Click this link to view regulatory edit errors resulting from the validation process. The report lists the CPDF errors identified by the CPDF Validation process. If no errors were generated, when you click the link a message will display stating that currently, there are no edit validation errors to review. If there are errors, correct any errors, save, and validate the transaction again. |
Process Monitor |
Click this link to open the Process Monitor in another window and view the status of the process. |
Use the Transaction Summary page (GVT_SUMMARY_FL) to submit the PAR transaction request. This page will contain the summary of the changes you have made along with the existing data. The data that needs to be displayed in this page can be configured. For more information, see Defining Transaction Summary Configuration
Navigation:
Click the Transaction Summarystep from the left panel of the Create/View Personnel Actions.
Click the Next button from the Validate Data Page.
This example illustrates the fields and controls on the Transaction Summary page.
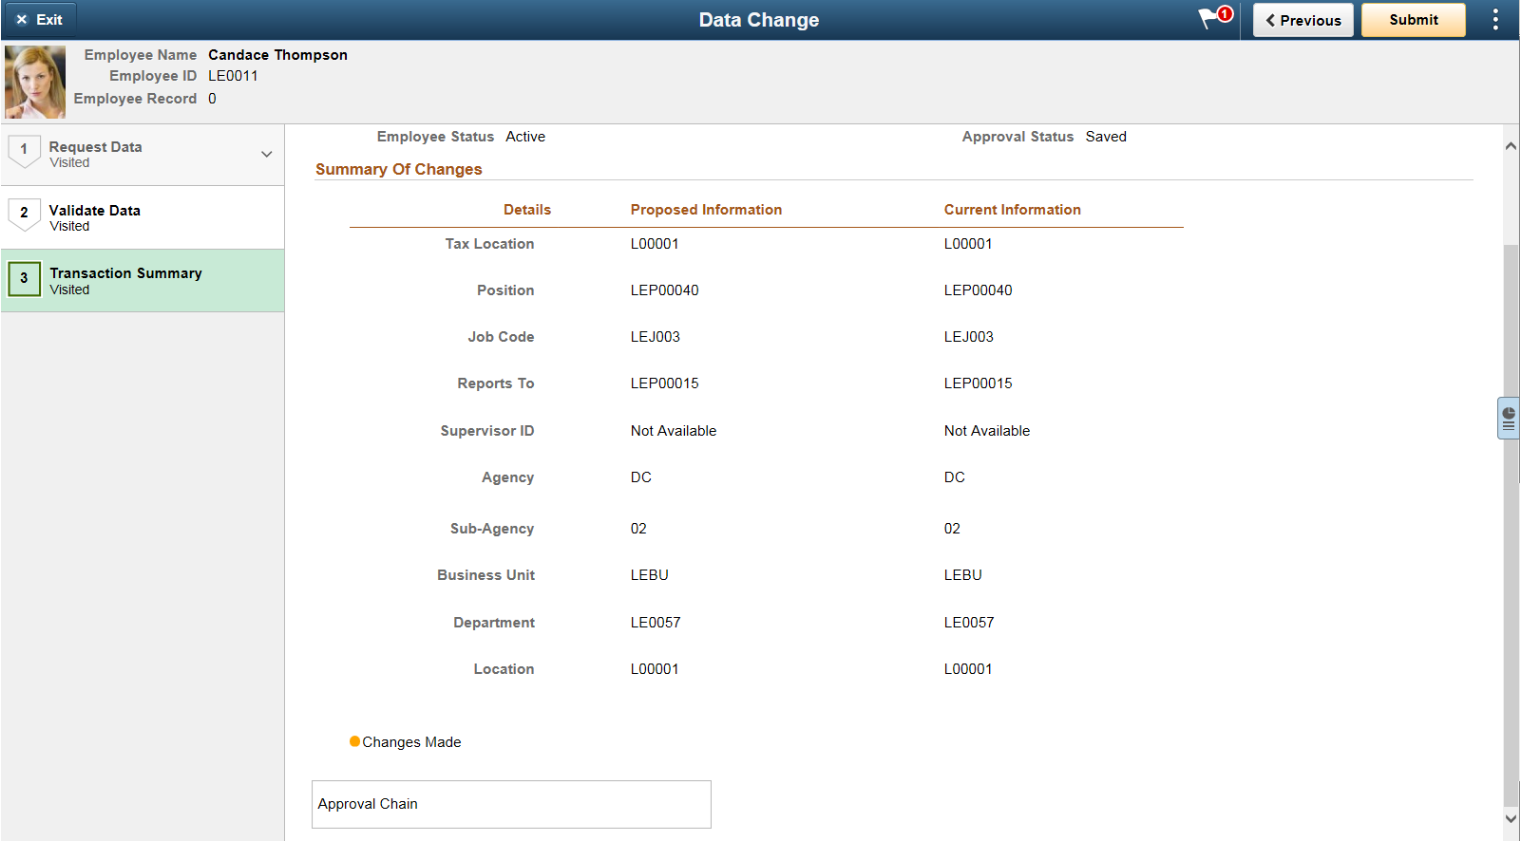
This page displays the Submit button in the banner of the page. See Create/View Personnel Actions Activity Guide Framework. After you have submitted this transaction, PAR Submit Confirmation page will be displayed. You can view the approval chain and the approval status on this page.
This example illustrates the PAR Submit Confirmation page.
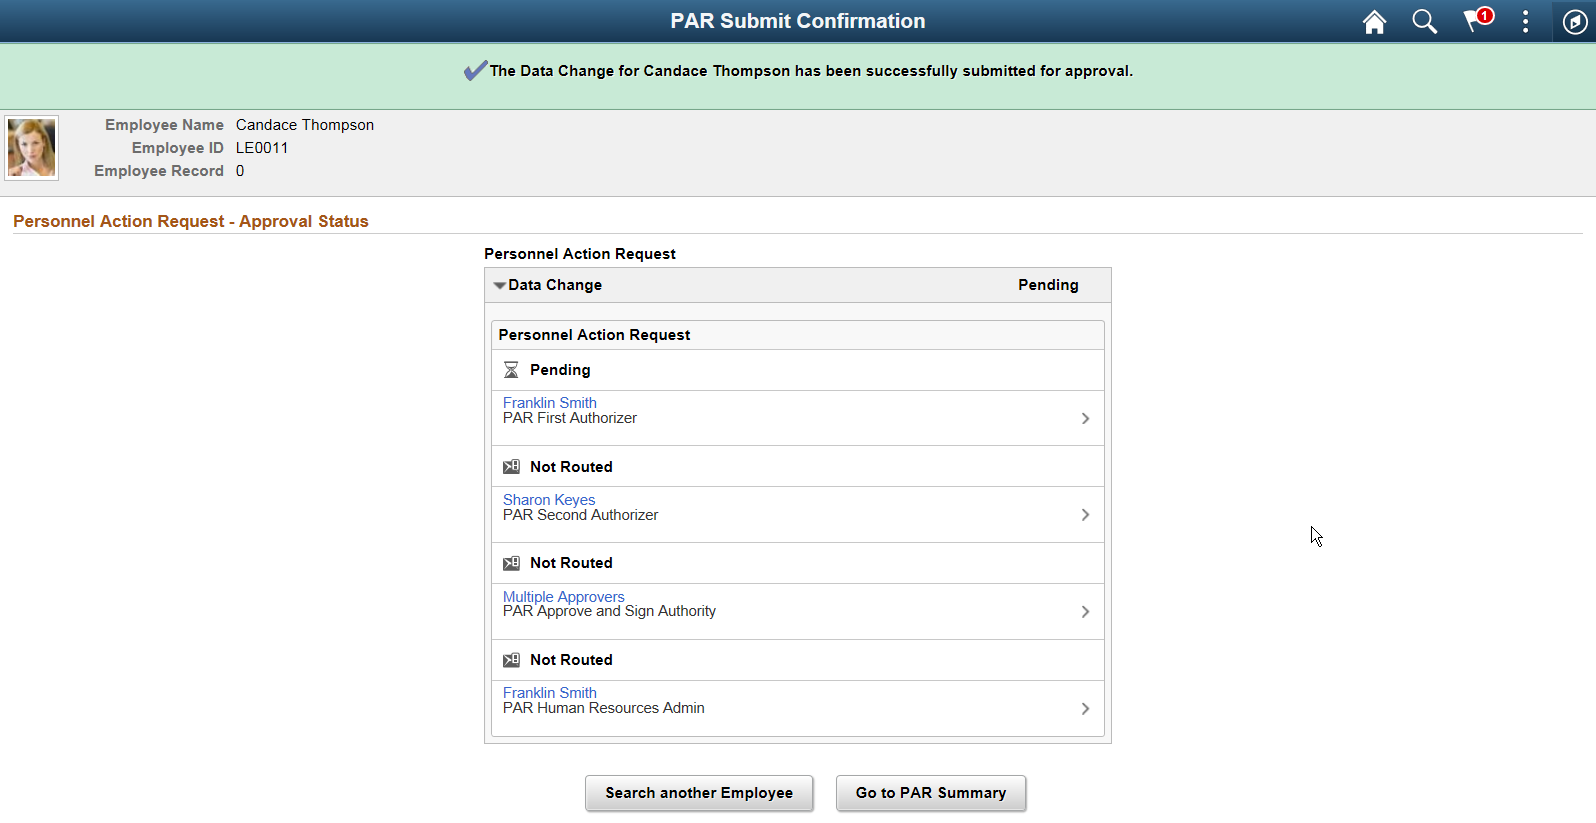
Field or Control |
Description |
|---|---|
Search another Employee |
Click the button to navigate to the Personnel Search page. |
Go to PAR Summary |
Click the button to navigate to the Create/View Personnel Actions Page of the employee for whom the request is submitted. |
An HR administrator may need to create a personnel action request for a past date prior to the latest PAR row. The process followed for creating a retroactive PAR is similar to the normal PAR process except for a few additional steps.
For creating a retroactive PAR:
Access the Create Personnel Action USF Tile from your homepage
Select the employee
Click the Create Personnel Action button
Enter the effective date. If you enter a past date prior to the latest PAR row as the effective date, system automatically identifies and process the request as retroactive personnel action request.
Note: You will receive an error message, if you try to add a personnel action request on top of a row (PAR) which is in Saved or In Progress status.
Once you select a past date prior to the latest PAR row as effective date, enter the details and click Continue, the following alert message will be displayed.
This example illustrates the Review Higher Dated Transactions Alert
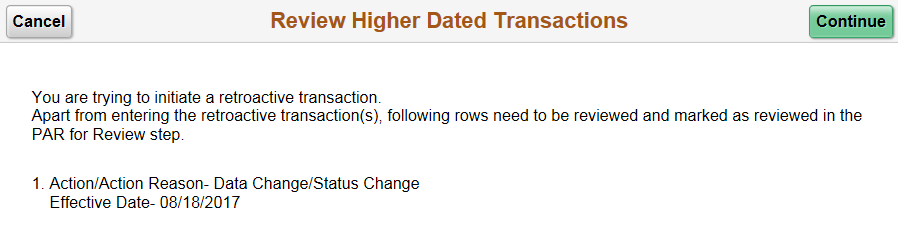
On clicking continue, Request Data — Data Control page is displayed with PAR for Review tab on the left panel.
This example illustrates the Activity Guide with PAR for Review step.
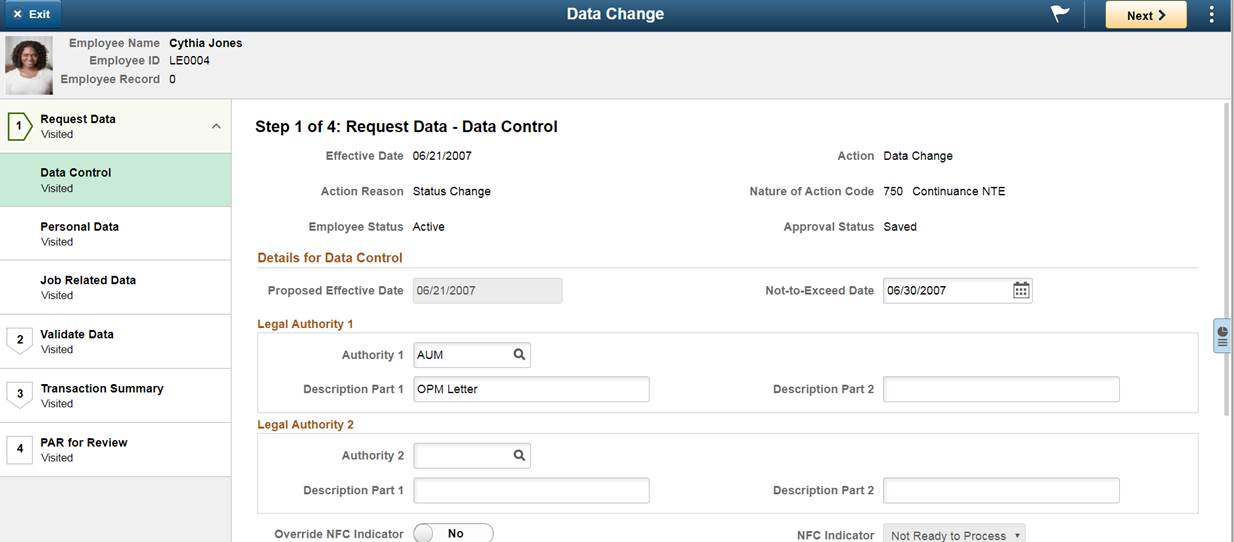
For more information on the fields and controls of the page, see Request Data - Data Control Page.
Use the PAR for Review page (GVT_PAR_RVW_FL) to view the higher dated action requests that are affected by the retroactive PAR.
You can view the list of PAR with succeeding dates (date later than the retroactive PAR) which needs to be reviewed before approving the retroactive PAR. This will ensure that the retroactive addition and the existing actions are synchronised.
Navigation:
Click the PAR for Review step from the left panel of the Activity Guide.
Click the Next button from the Transaction Summary Page.
This example illustrates the fields and controls on the PAR for Review page
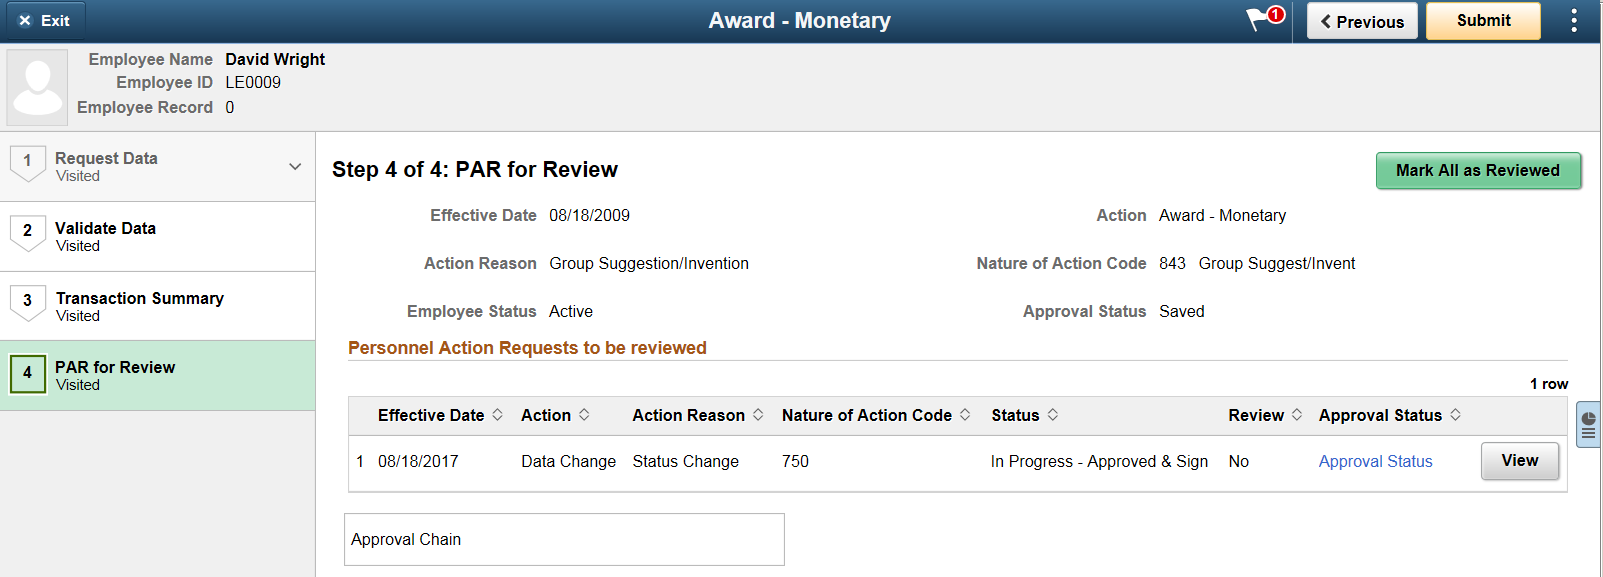
Field or Control |
Description |
|---|---|
Mark All as Reviewed |
Use Mark All as Reviewed button to mark all the listed actions as reviewed. Once you have marked the actions as reviewed:
Note: Oracle PeopleSoft delivers Notification Composer Framework to manage the setup and administration of all notifications in one central location. Once you have adopted the Notification Composer feature, you must use it to create new notifications and manage your existing notifications. Notifications delivered with HCM Image 48 or later must use Notification Composer. For more information about Notification Composer Framework, see Understanding Notification Composer. Note: System doesn't allow to submit a retroactive request until you have marked the actions as reviewed. If you exit the Activity Guide without submitting the request, you will have to again mark the actions as reviewed prior to submission. |
Approval Chain |
Use the Approval Status link to view the approval chain and status of each reviewer for the selected PAR. |
View |
Click the View button to view the PAR transaction details. |
This example illustrates View Job Information Page.
