(Fluid) Managing Employee Headers
PeopleSoft HCM provides you with the flexibility to configure employee header fields for fluid pages.
To manage the employee headers for fluid pages, use the Header Field Definition (HR_EH_FLDNM_TBL), Header Page Design (HR_EH_TBL), and Header Component Setup (HR_EH_COMPONENTS) components.
This topic provides and overview of employee headers in fluid, lists delivered fluid header field definitions, and discusses how to configure employee headers for fluid pages.
These videos demonstrates the configurable fluid header display feature:
Video: Image Highlights, PeopleSoft HCM Update Image 45: Configurable Fluid Header Display
Video: Image Highlights, PeopleSoft HCM Update Image 46: Configurable Header
|
Page Name |
Definition Name |
Usage |
|---|---|---|
|
HR_EH_FLDNM_TBL |
Maintain fields that will be available in the header design. |
|
|
HR_EH_TBL |
Create header designs by defining the fields that should show in the employee header of a page. |
|
|
HR_EH_PREVIEW_SEC |
View how the header will display the configured fields. |
|
|
HR_EH_COMP_SETUP |
Associate the configurable employee header with a component to override the default header. |
Many of the employee-related fluid pages display a header with the employee’s photo, name, job title, and an icon for accessing related actions.
Example of an employee header in fluid
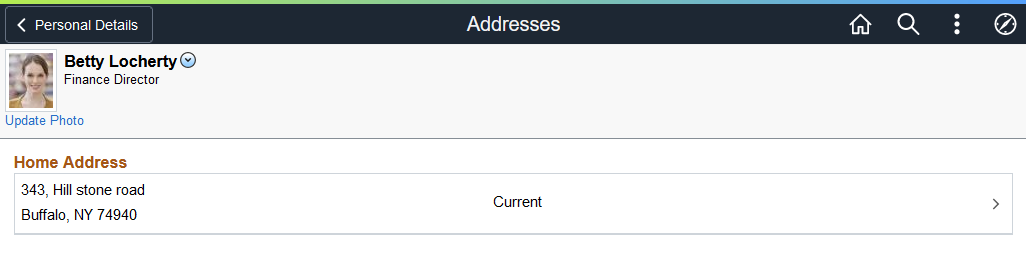
As delivered, the Employee Photo Header displays the employee's name and job title details in two rows. With the Employee Header Configuration feature, you can determine the field data that should appear in fluid headers, showing up to three rows.
Note: This feature is applicable only to the fluid pages that use the Employee Photo Header sub-page (HR_EMPL_HDR_SBF). HR_EMPL_HDR_SBF is delivered as part of Employee Photo feature in image 9.
To display additional employee information on the classic pages, see Setting Up Mouse Over Popups.
Note: The employee header configuration does not control the display of the employee photo. The photo in the common header is visible if the Display on Self Service option is enabled on the Installation Table - HCM Options Page, Employee Photo section.
Prior to creating your fluid header designs, you must identify the fields that can be included in the header of a component. The PeopleSoft application delivers these predefined fields:
|
Field Name |
Description |
|---|---|
|
BUSIENSS_TITLE |
Business Title |
|
BUSINESS_UNIT |
Business Unit |
|
COMPANY |
Company |
|
DEPTID |
Department |
|
|
|
|
EMPLID |
Person ID |
|
EMPL_RCD |
Employee Record |
|
EMPL_STATUS |
Payroll Status |
|
ESTABID |
Establishment ID |
|
FULL_PART_TIME |
Full/Part Time Status |
|
GRADE |
Grade |
|
HR_STATUS |
HR Status |
|
JOBTITLE |
Job Title |
|
LOCATION |
Location |
|
MANAGER_ID |
Manager |
|
NAME |
Employee Name |
|
PAYGROUP |
Pay Group |
|
PER_ORG |
Person Type |
|
PHONE |
Phone |
|
POSITION_NBR |
Position Number |
|
POSITION_TITLE |
Position Title |
|
REG_REGION |
Regulatory Region |
|
REMOTE_STATUS |
Remote Worker Status |
|
SAL_ADMIN_PLAN |
Salary Plan |
|
STD_HOURS |
Standard Hours |
|
STEP |
Salary Step |
|
TIMEZONE |
Time Zone Note: Employees can enter their time zone using the Add Contact or Edit Contact Page in the Company Directory. When the employee has not specified a time zone, the system determines the time using the base time zone from PeopleTools Options. |
Use the Header Field Definition page (HR_EH_FLDNM_TBL) to maintain fields that will be available in the header design.
Navigation:
This example illustrates the fields and controls on the Header Field Definition page.
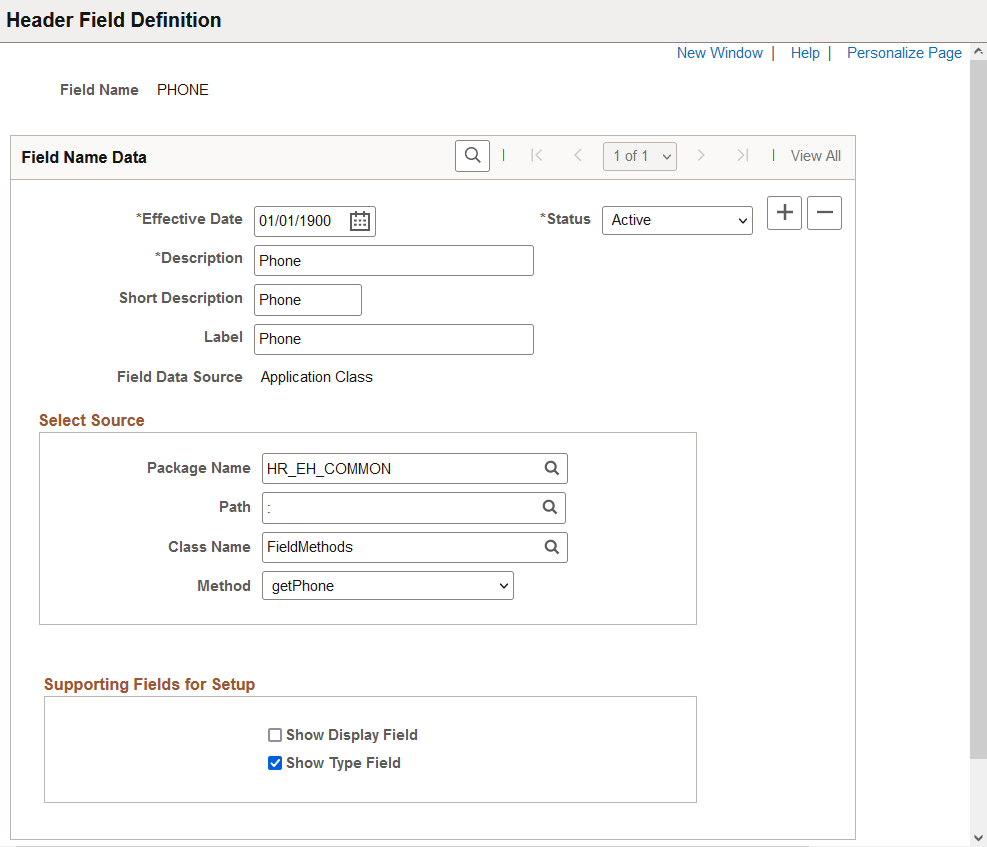
The PeopleSoft application delivers several predefined fields for the purpose of designing fluid employee headers. See the Understanding Delivered Header Field Definitions in this topic.
|
Field or Control |
Description |
|---|---|
|
Description |
Define a field name that should be available for entry on the Header Page Design Page when creating the header layout. |
|
Label |
Enter a label name that will appear in the Label field on the Header Page Design Page. |
Select Source
The source for the fields use an application package. Use this section to identify package details.
|
Field or Control |
Description |
|---|---|
|
Package Name |
Enter the ID of the application package that contains the action class to display the header. PeopleSoft HCM delivers the HR_EH_COMMON package for employee headers. |
|
Path |
Select the qualified package or path of the application package. |
|
Class Name |
Select the class name of the application package. |
|
Method |
Select the method within the application class that will be run to display the header. |
Supporting Fields for Setup
|
Field or Control |
Description |
|---|---|
|
Show Display Field |
Select to show the Display field on Header Page Design Page. This field enables the administrator to configure the field to show the code, description, or both. |
|
Show Type Field |
Select to show the Field Type field on Header Page Design Page. This enables the administrator to configure the field to display the field type, such as the business phone or mobile phone. |
Note: The Application Class should consider the Show Display Field and Show Type Field options when configured.
Use the Header Page Design page (HR_EH_TBL) to create header designs by defining the fields that should show in the employee header of a page.
Note: PeopleSoft HCM delivers the DEFAULT_HEADER value, which includes the employee name and job title.
Navigation:
This example illustrates the fields and controls on the Header Page Design page.
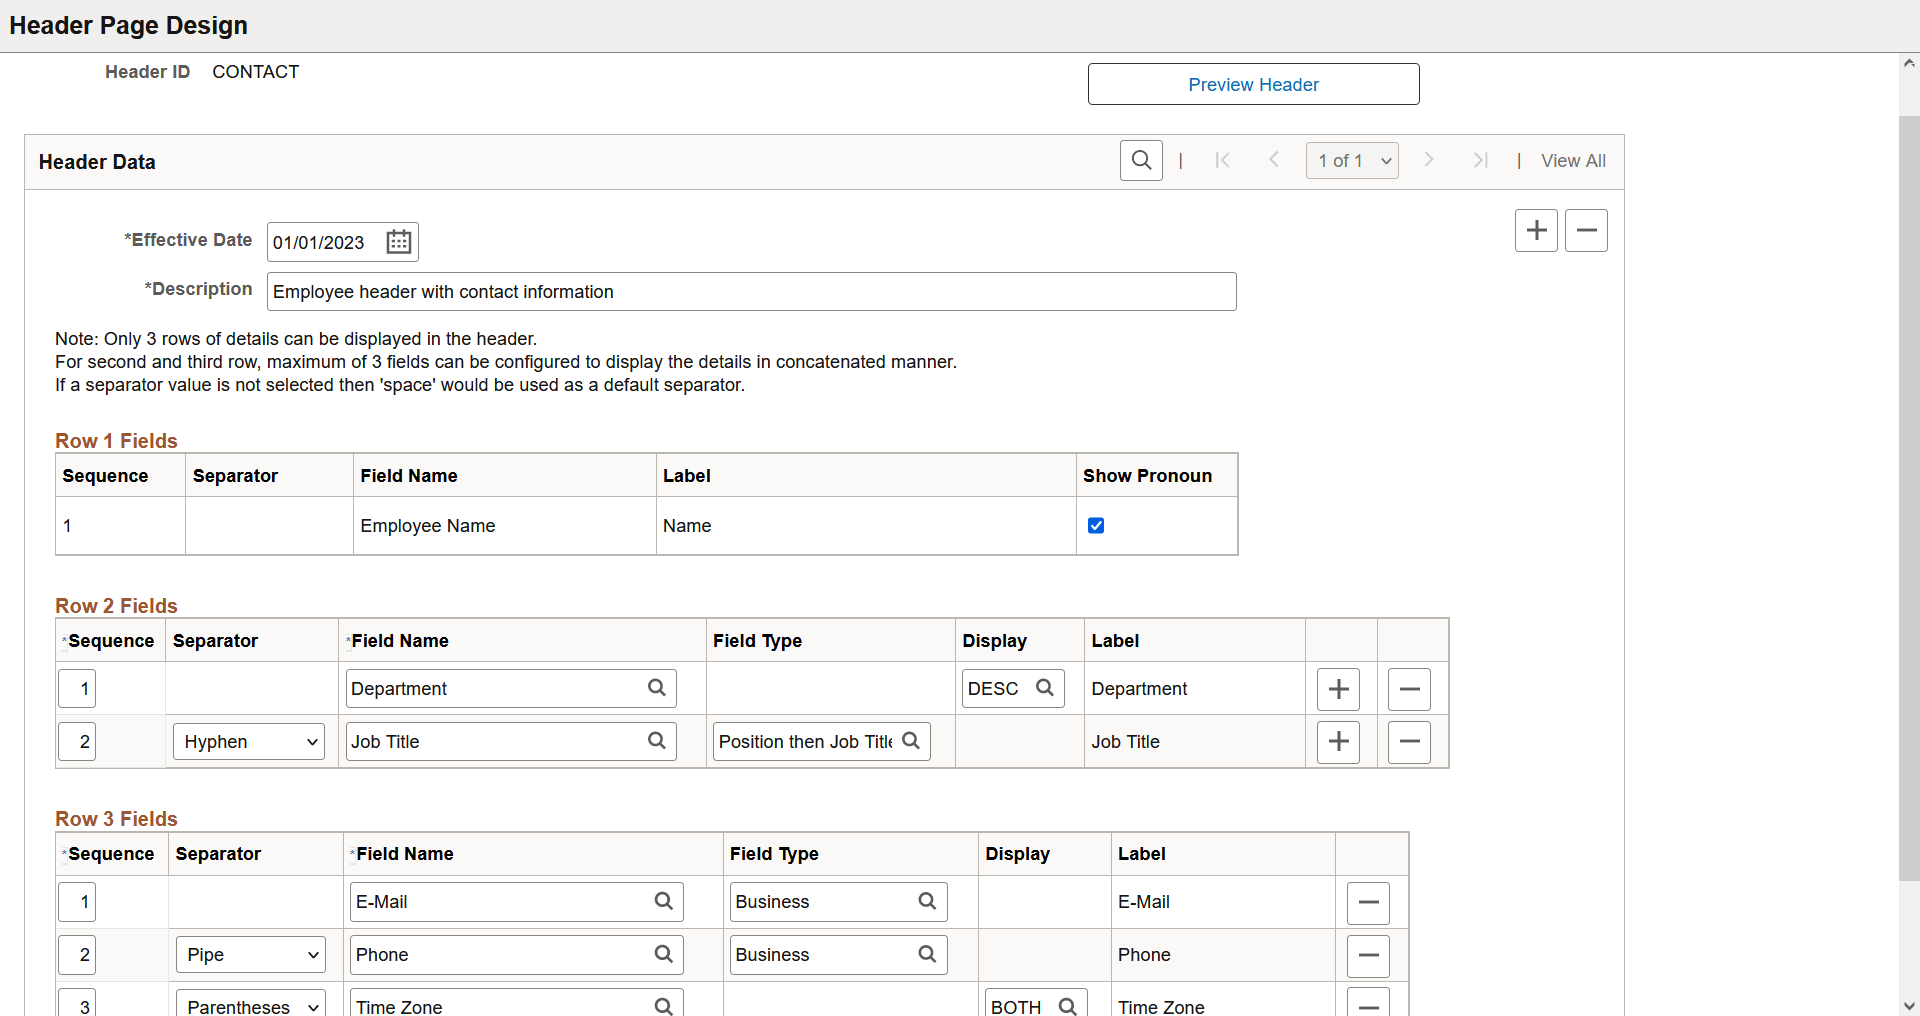
You can display up to three (3) rows of data on an employee header.
Row 1 will always display the employee's name. You can choose to include a person's pronouns.
Rows 2 and 3 can include up to three fields, but the information will appear in a concatenated manner, meaning they will appear in a linear fashion with the separator you define on this page.
|
Field or Control |
Description |
|---|---|
|
Show Pronoun |
Select to show a person's pronouns, if enabled and the person has specified them. If not configured, or an employee has not identified pronouns, the header will not display this field. To show a person's pronouns in the header, all of the following must be in place:
|
|
Sequence |
Indicate the order in which the fields should appear, lowest to highest. You can add up to three (3) concatenated fields for a row. |
|
Separator |
Identify how you want to separate the different fields on the row. Values include:
|
|
Field Name and Label |
Enter a field that should appear in the header for the employee. Valid fields and labels are defined on the Header Field Definition Page. |
|
Field Type |
This field is available when Show Type Field is selected on the Header Field Definition Page for this field. Select how you want the field value to appear in the employee header. Values include:
|
|
Display |
This field is available when Show Display Field is selected on the Header Field Definition Page for this field. Select the field type that should appear in the employee header. For example, identify whether you want to show the person's business phone number or mobile phone number. |
|
Preview Header button |
Select this button to open the Preview Header Page and view how the fields will appear in a header. |
Use the Preview Header page (HR_EH_TBL) to view how the header will display the configured fields.
Navigation:
Click the Preview Header button on the Header Page Design Page.
This example illustrates the fields and controls on the Preview Header page.
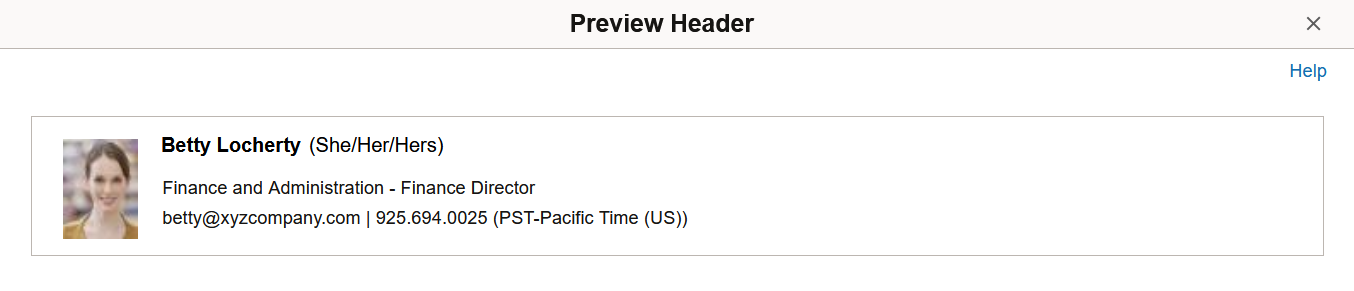
Note: The preview page allows you to see how data is getting displayed. However, the page look may be different on fluid transaction pages.
Use the Header Component Setup page (HR_EH_COMP_SETUP) to associate the configurable employee header with a component to override the default header.
Navigation:
This example illustrates the fields and controls on the Header Component Setup page.
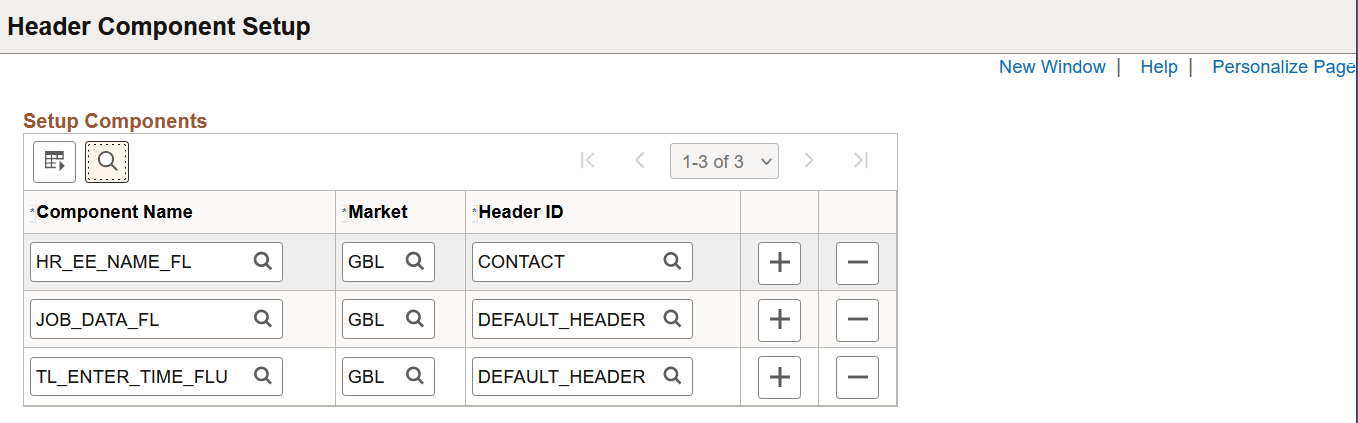
Use this page to associate components to header IDs when you want to display data differently from that provided with the DEFAULT_HEADER.
Important! If a product page uses a customized header instead of the delivered Employee Photo Header, you must remove the customization first in order for this header to render properly within the component.
If multiple components will use the same header, you will need to enter a row for each component with that the header ID.
|
Field or Control |
Description |
|---|---|
|
Component Name |
Enter the fluid component that will use this header. |
|
Market |
Indicate the market for the component. When different markets exist with the same component name you can differentiate them by market. |
|
Header ID |
Enter the header template ID you created using the Header Page Design Page. |