Configuring and Working with the HR Notepad
To configure the HR Notepad, use the HR Notepad Configuration (HR_NP_CONFIG) component.
These topics provide an overview of the HR Notepad and discuss how to configure and work with the HR Notepad.
|
Page Name |
Definition Name |
Usage |
|---|---|---|
|
HR_NP_CONFIG_HDR |
Configure the HR Notepad for use by an application. |
|
|
HR_NP_CONFIG2 |
Set up the keys for storing notes. |
|
|
HR_NP_CONFIG3 |
Configure the links that appear on application note pages. |
|
|
HR_NP_TEST_API |
Test the notepad configuration. |
|
|
HR_NP_NOTE_SRCH |
Access the notepad page to search for and enter notes. |
|
|
HR_NP_NOTE |
Enter or update a note. |
|
|
Confirm Delete Page |
HR_NP_MESSAGE |
Confirm the deletion of a note. |
|
HR_PSS_SEARCH |
Transfer ownership of the selected note to another person. |
A notepad is a logical grouping of text-based notes, or a collection of notes that a user has entered within the context of an application. For example, an employee might have a performance notepad within the context of ePerformance.
You can integrate the plug-in application that maintains the HR Notepad into any HCM application. This application enables the user to record logical notes that are relevant to a row of application data. A common data structure, partitioned by application, is used to store notes.
The notepad provides a consistent user interface (UI) that enables users to create, edit, view, and delete text-based notes. The Notepad UI is a single component that contains two pages for selecting and maintaining notes, a secondary page for displaying warnings and errors, and a tertiary page for viewing note history. In most cases, you can access the notepad pages when an application page displays the Maintain/View Notes icon.
Term |
Definition |
|---|---|
|
The Maintain/View Notes icon enables users to access the notepad pages to enter and view notes. |

Although the Notepad UI is consistent across all applications, detailed notepad presentation and behavior specific to a given application are defined in a configuration table entry for the application. This entry defines the behavior of the Notepad UI and the keys that are used for the particular application.
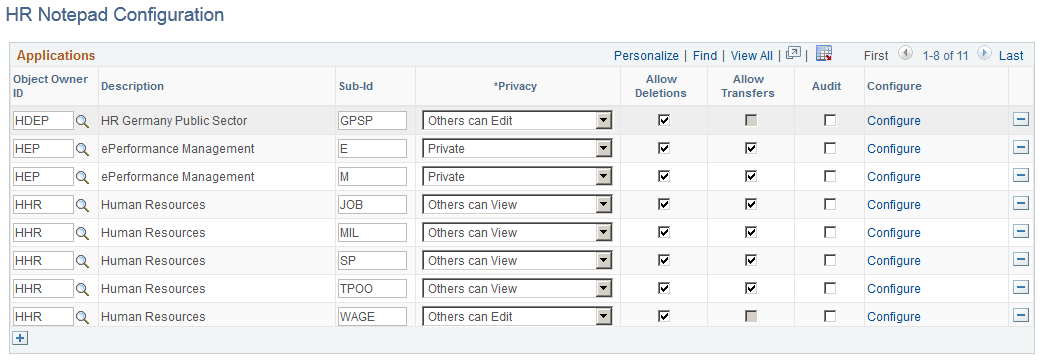
Use the HR Notepad Configuration - Application page (HR_NP_CONFIG_HDR) to configure the HR Notepad for use by an application.
Navigation:
This example illustrates the fields and controls on the HR Notepad Configuration - Applications page. You can find definitions for the fields and controls later on this page.
Field or Control |
Description |
|---|---|
Object Owner ID and Description |
Select an object owner. The system will display the description of the object owner. |
Privacy |
Select from these options:
|
Allow Deletions |
Select to permit users to delete notes. |
Allow Transfers |
Select to permit users who entered and therefore are the owner of a note to transfer ownership of a note to another individual. |
Audit |
When selected, this check box enables the Audit Changes feature for the partition. The system will automatically retain a history of all changes made to existing notes, including transfers and deletions. |
Configure |
Click to access to the Configure Keys page. |
Use the HR Notepad Configuration - Configure Keys page (HR_NP_CONFIG2) to set up the keys for storing notes.
Navigation:
Click the Configure link for an application on the HR Notepad Configuration - Select Application page.
This example illustrates the fields and controls on the HR Notepad Configuration - Configure Keys page. You can find definitions for the fields and controls later on this page.
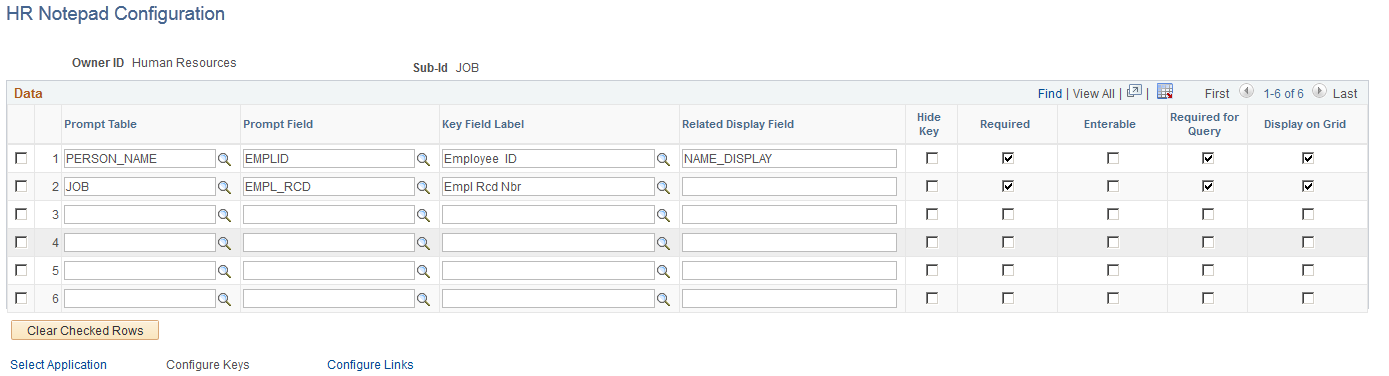
This page is for note pad key configuration and consists of six context key rows. Each row in the grid supports one key configuration requirement.
Field or Control |
Description |
|---|---|
Prompt Table |
Select the table that is used to provide a prompt list and validate the entry when a user enters a value into the key search field in the UI. |
Prompt Field |
Select the field within the prompt table that is used to provide the values in the prompt list. You must enter a value in this field if you enter a value in the Prompt Table field. |
Key Field Label |
Select the configurable label that will display on the page for this field. |
Related Display Field |
Enter the field name for the prompt table that appears in the UI as a related field for the value. This field is optional. If not specified, then there is no related-display field for the context key. For example, you do not usually specify a display field for a date or number context key. |
Hide Key |
Select to indicate whether this key field is exposed on the UI pages. This field is selected by default. |
Required |
Select to indicate that this key field is required when adding a note. This field is deselected by default. |
Enterable |
Select to indicate that the user is permitted to enter a value into this key field in the UI search criteria. This field is selected by default. You might deselect this field in cases which the key is automatically populated by the API and exposed on the UI, but you do not want the user to change it. |
Required for Query |
Select to indicate that the user must populate the key in the UI search criteria to see the list of notes that meet the search criteria, or to add a new note. This field is deselected by default. |
Display on Grid |
Select to display the context key value in the list of notes that meet the search criteria. You usually select this check box for any context key that has Required for Query deselected. |
Clear Checked Rows |
Click this button after you have selected any context key rows for which you want to clear from this configuration. The page will still display the row but the prompt table and field information will be cleared. |
Use the HR Notepad Configuration - Configure Links page (HR_NP_CONFIG3) to configure the links that appear on application note pages.
Navigation:
Click the Configure Links link on the bottom of the HR Notepad Configuration - Configure Keys page.
This example illustrates the fields and controls on the HR Notepad Configuration - Configure Links page: Menu/Bar tab. You can find definitions for the fields and controls later on this page.
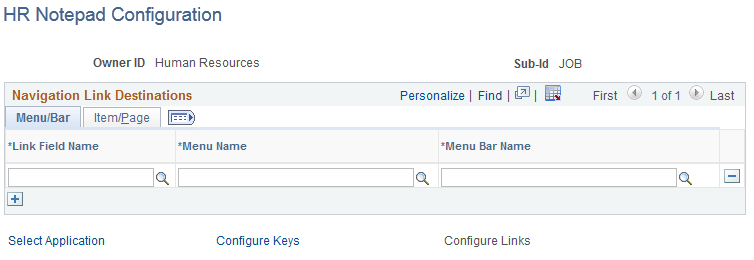
Use this page to define the navigation that takes place when the user clicks one of the navigation links at the bottom of the Notepad UI.
Field or Control |
Description |
|---|---|
Link Field Name |
Select the name of the navigational link. The prompt table for this field is a view of the four navigational fields that are provided on the Note Detail UI. If you do not add a row for a link in the prompt table, the link does not appear on the UI for the application. |
Menu Name |
Select the name of the menu to which the user is transferred when they click the link. The prompt table for this field is a view of all menus in the database. |
Menu Bar Name |
Select the name of the menu bar to which the user is transferred when they click the link. The prompt table for this field is a view of all menu bars for the menu specified in the Menu Name field. |
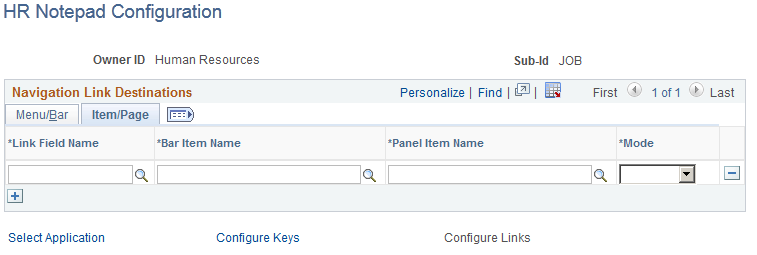
Access the Item/Page tab on the HR Notepad Configuration - Configure Links page.
This example illustrates the fields and controls on the HR Notepad Configuration - Configure Links: Item/Page tab. You can find definitions for the fields and controls later on this page.
Field or Control |
Description |
|---|---|
Link Field Name |
Select the name of the navigational link. The prompt table for this field is a view of the four navigational fields that are provided on the Note Detail UI. If you do not add a row for a link in the prompt table, the link does not appear on the UI for the application. |
Bar Item Name |
Select the name of the menu bar item to which the user is transferred when they click the link. The prompt table for this field is a view of all items for the menu bar specified in the Bar Name field. |
Panel Item Name |
Select the name of the page to which the user is transferred when they click the link. The prompt table for this field is a view of all pages for the bar item specified in the Bar Item Name field. |
Mode |
Select the operation mode for the page from the values Add, Update/Display, and Correction. |
Use the Note Pad Tester page (HR_NP_TEST_API) to test the notepad configuration.
Navigation:
This example illustrates the fields and controls on the Note Pad Tester page. You can find definitions for the fields and controls later on this page.
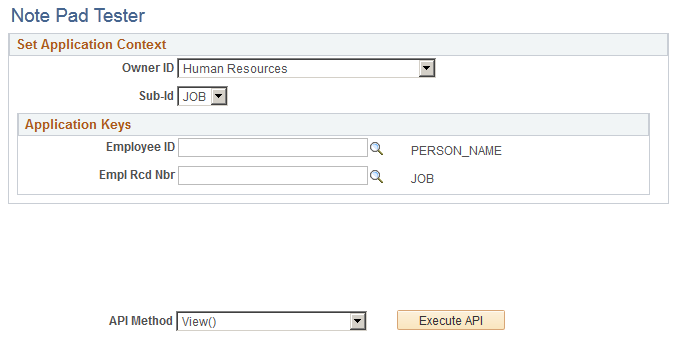
Use this page to test the Notepad configuration for an application and sub-ID, if applicable.
The application keys that appear on this page are the ones that are defined for the Object Owner ID and Sub-Id. When you first access this page, only the Object Owner ID field is enterable. After you enter the Object Owner ID, the Sub-Id field is populated with any valid sub ids for the application. The application keys that appear correspond to the application keys (up to six) that you configure on the HR Notepad Configuration - Configure Keys page.
Field or Control |
Description |
|---|---|
API Method |
Select the method to test.
|
Execute API |
Click to execute the API method with the keys you entered. |
Use the <application page> Notepad page (HR_NP_NOTE_SRCH ) to access the notepad page to search for and enter notes.
Navigation:
Click the Maintain/View Notes icon on an application page.
Click the Execute API button on the Note Pad Tester page.
This example illustrates the fields and controls on the Example of the Notepad page you access through the Job Data pages. You can find definitions for the fields and controls later on this page.
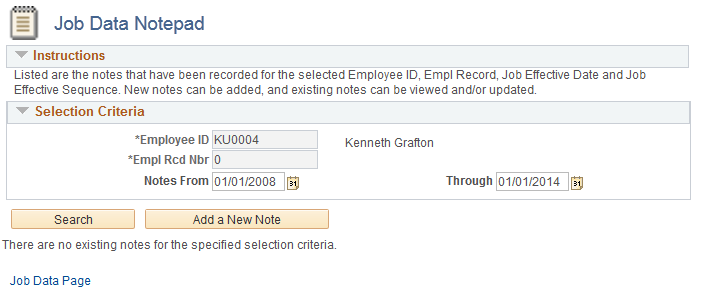
Note: The fields that appear on the notepad page are determined by the notepad configuration.
Selection Criteria
Depending upon the configuration of a page, you may need to select a person to add or view notes. Optionally, enter a Notes From and Through date.
Field or Control |
Description |
|---|---|
Search |
Click to view a list of notes that meet the search criteria. |
Field or Control |
Description |
|---|---|
Add New Note |
Click to access the Selected Note page, where you can create a new note. |
Existing Notes
This section displays if there are any notes that meet the search criteria. Click the link in the Subject column to open the Selected Note page and view or edit an existing note.
Field or Control |
Description |
|---|---|
Delete |
Select one or more listed notes and click this button to remove them from the system. |
Transfer |
Select one or more listed notes and click this button to access the Person Search - Simple page to transfer them to another person. |
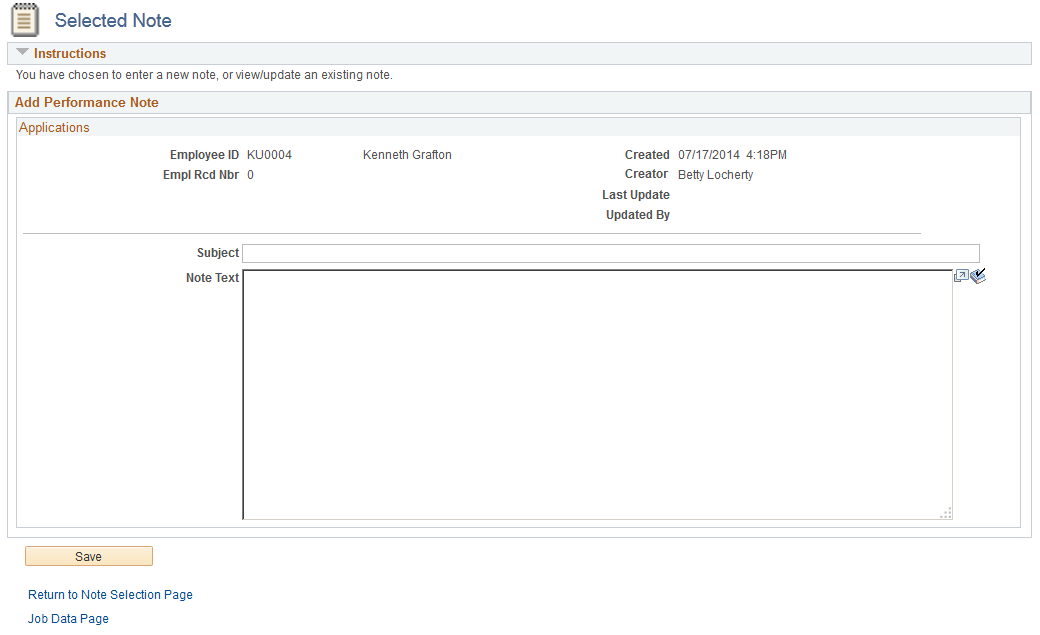
Use the Selected Note page (HR_NP_NOTE) to enter or update a note.
Navigation:
Click the Add a New Note button or select the View or Edit this Note link for an existing note on the <application page> Notepad page.
This example illustrates the fields and controls on the Selected Note page. You can find definitions for the fields and controls later on this page.
Field or Control |
Description |
|---|---|
Effective Date |
The note date for new notes is the effective date that appears on the page. You cannot change the date. Note: Changing the effective date of the record that is associated with the note does not change the note effective date. As a result, the note becomes inaccessible. For example, if you create a note for a job data row with a January 1, 2009 effective date, the note effective date is also January 1, 2009. If you use correction mode to change the effective date of the job data row to January 20, 2009, the note effective date remains unchanged. When you view the notes for the January 20 row of data, you will see only January 20 notes. Without a January 1 row of data, the original note is inaccessible, and users will not see any indication that the original note ever existed. |
Subject |
Enter the note subject. This entry appears as the link in the Subject column of the notepad page. |