Creating Garnishment Files
To set up garnishment files, use the Company USA (GPUS_COMPANY) and Create Garnishment File USA (GPUS_CTX_RC) components.
|
Page Name |
Definition Name |
Usage |
|---|---|---|
|
GPUS_COMPANY |
Indicate whether the company included in the pay run provides the Family Medical Plan. |
|
|
GPUS_CTX_RC |
Create the CTX file for garnishments. |
To create a garnishment file:
Set up company information for garnishments.
To set up company information for the United States, use the Company Table USA (GPUS_COMPANY) component.
Note: You use this component to indicate that the company included in the pay run provides family medical leave plan information.
Define parameters for the garnishment file.
Use the Create Garnishment File USA page to define the parameters for the garnishment file and to run the garnishment file process.
The garnishment file process is similar to the direct deposit file process, except that only information retrieved from the GP_PAYMENT table is needed to generate the garnishment file.
See Understanding the Direct Deposit File Process.
Note: The garnishment file is formatted according to the EFT format specified for the source bank of the pay entity, which is in the CTX format.
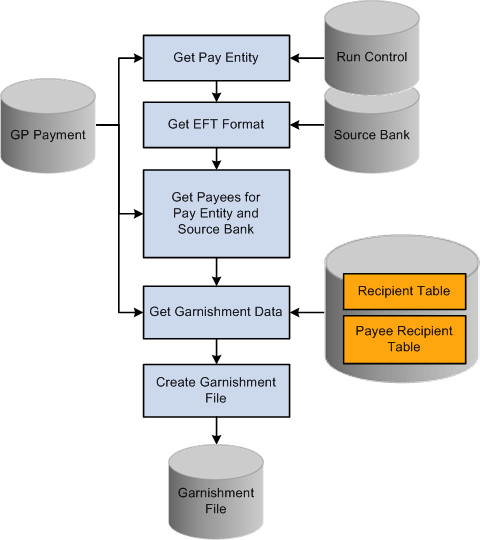
During the garnishment file process, the system performs these steps:
Gets data from the GP_PAYMENT table.
Runs the CTX EFT process.
Creates a CTX001.txt file.
Note: If you select data that includes multiple source banks, multiple CTX files are created, one CTX file for each source bank. The CTX files are named CTX001.TXT, CTX002.TXT, and so forth.
Note: A transmittal report for child support garnishment payments is automatically generated after the CTX file process. After the CTX file is successfully generated, the transmittal report is created based on the data selected from the Create Garnishment File USA page.
This diagram shows the garnishment file process:
This diagram shows the garnishment file process.
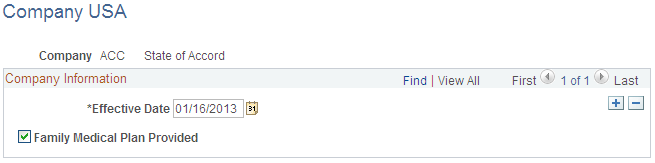
Use the Company USA page (GPUS_COMPANY) to indicate whether the company included in the pay run provides the Family Medical Plan.
Navigation:
This example illustrates the fields and controls on the Company USA page.
Field or Control |
Description |
|---|---|
Family Medical Plan Provided |
Select this check box for a company to be included in the pay run for garnishments. If you don't select this check box, you will get an empty CTX file. |
Use the Create Garnishment File USA page (GPUS_CTX_RC) to create the CTX file for garnishments.
Navigation:
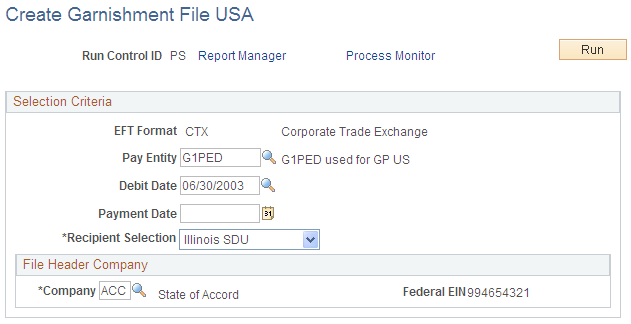
This example illustrates the fields and controls on the Create Garnishment File USA page.
Field or Control |
Description |
|---|---|
EFT Format (electronic funds transfer format) |
The EFT format always appears as CTX. |
Pay Entity |
Select the pay entity to be used with this garnishment file. Only those pay entities that are ready for banking and are in the selected calendar are available for selection. |
Debit Date |
Select the date that the payee's account will be debited. Only dates that are ready for banking are available for selection. If you enter information in this field, the Payment Date field is left blank. |
Payment Date |
Enter the date that the garnishment will be paid. If you enter information in this field, the Debit Date field is left blank. Note: You must enter information in either the Debit Date field or the Payment Date field, but not both. Note: The EFT process retrieves garnishment information for the value that you select for the specified debit date (or payment date) that is ready for banking. |
Recipient Selection |
Specify the type of recipient. Values are All, Illinois SDU, Indiana SDU, and Massachusetts SDU. |
Company |
Select the company for which this garnishment file is being created. Once this company is selected, the Federal EIN number for the company appears. This company is used in the File Header record when the payroll file is sent. |