Scheduling and Managing Interviews
This topic provides overviews of applicant interviews, calendar integration options, and interview letters and notifications. This topic then discusses how to schedule and manage interviews.
|
Page Name |
Definition Name |
Usage |
|---|---|---|
|
HRS_INT_SUMMARY |
Review summary data about existing interviews and evaluations, and enter a final recommendation for an interview. |
|
|
HRS_APP_ACTION |
Select the job opening for which you are scheduling an interview for an applicant. |
|
|
HRS_INT_SCHED |
Schedule applicant interviews. |
|
|
HRS_RCRTR_CMTS_SP HRS_REC_APP_CMT_SP |
Add a comment. Applicant comments are displayed on the interview detail page in Candidate Gateway. Interviewer comments are displayed to interviewers on the Interview Schedule page. |
|
|
HRS_APP_AVAIL_SP HRS_INT_AVAIL_SP |
View the current interview schedule for an applicant or interviewer. The system does not check external calendar systems for availability. Availability is based only on other interview schedules in the PeopleSoft system. |
|
|
HRS_INT_NOTE_PG |
Maintain interview-related notes. |
|
|
HRS_INT_MTG_REQ_PG |
Review and optionally modify notification text to be sent to interviewers and applicants. This page is relevant only under partial calendar integration. |
|
|
HRS_VW_ALL_INT_PG |
View a read-only summary of data from the Interview Schedule page. |
You can schedule applicant interviews at any time in the recruiting process, whether or not the applicant is associated with a job opening. To schedule and manage applicant interviews, use the Manage Interviews action.
The Manage Interviews Action
The Manage Interviews action provides access to two pages:
Use this page to enter and maintain detailed information about interviews, including the interview status, type, date, time, location, and a list of interviewers. The Interview Schedule page shows data for one or more applicants for a single job opening. You can also schedule interviews for applications without a job opening.
Recruiters use this page to view summary information about an applicant’s interviews and interview evaluations for a particular job opening (or application with no job opening) and to enter the final recommendation regarding the next step for the applicant.
This page is similar to the Manage Application Page: Interview Tab, except that the Manage Interviews page lets you enter a final recommendation directly on the page rather than in a modal dialog box.
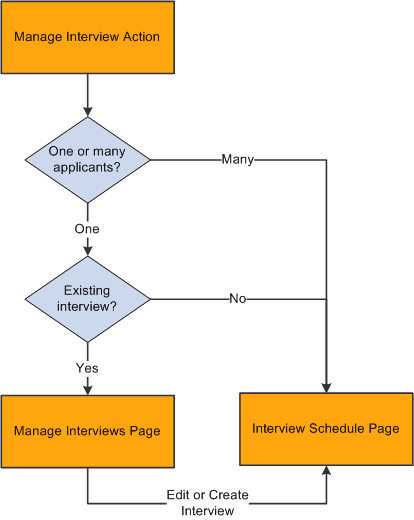
When you perform the Manage Interviews action, the Manage Interviews page appears if the action was initiated for a single applicant who already has an interview schedule. If the applicant does not yet have an interview schedule, or if you perform the action for multiple applicants, the context is not appropriate for the Manage Interviews page, and the Interview Schedule page appears instead.
This diagram illustrates which page appears when you perform the Manage Interviews action.
To initiate the Manage Interviews action, click the Manage Interviews icon (for a single application) or perform the Manage Interviews group action (for multiple applications) in these locations:
Manage Job Opening page
Manage Applicant page (no group action available)
Manage Application (no group action available)
Search Applications page
This page can list applications for more than one job opening, but the Manage Interviews action displays an error if the selected rows do not all have the same job opening ID.
Interview Summary Pages
The system provides additional options for viewing read-only summary information about interviews.
For an applicant-centered interview summary, use the Manage Applicant page: Applicant Activity Tab: Interview Schedule/Evaluation Section.
For a job-centered interview summary, access the Manage Job Opening page and click the Interviews toolbar button to access the Interview Summary Page.
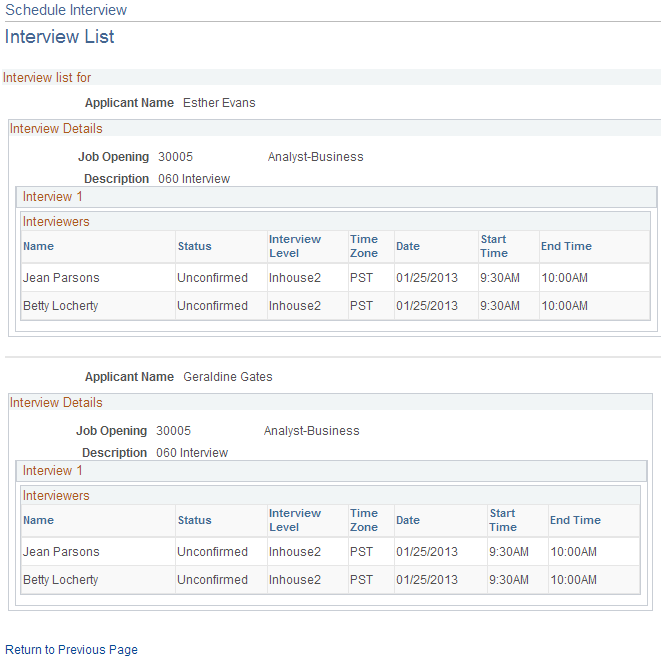
For a summary of the interviews that you are currently working with on the Interview Schedule page, click the View All Interviews button to access the Interview List Page.
The length of the Interview Schedule page can make it difficult to review data for more than one interview, so this summary provides a convenient way to double-check times and interviewers as you schedule multiple interviews.
To view your personal interview calendar (for interviews where you are a participant), use the self-serviceInterview Calendar Page.
To view a list of job openings or applicants where you are on the interview team, use the self-service Interview Team Schedule Page.
Flexible Recruiting Processes
If a job opening is governed by a flexible recruiting process, that process controls the availability of the Manage Interviews action. Availability can vary depending on the user’s role and the applicant’s current disposition.
The system hides the Manage Interviews icon for specific rows where the action is not available. The system does not remove the action from the Group Actions menu, but it prevents you from continuing with a group action if your selection includes rows where the action is not available.
The flexible recruiting process is a usability tool, not a security layer. Although it controls the availability of the Manage Interviews action, it does not prevent users from accessing the Interview Schedule page using links and buttons on the interview summary pages such as the interview calendar.
This overview describes calendar integration for interviews.
Integration Basics
To activate calendar integration for interviews in Talent Acquisition Manager, use the Recruiting Installation - General Page, where you select the level of calendar integration for your system:
Partial integration sends interview schedules to applicants and interviewers as iCalendar attachments.
An email with an iCalendar attachment is sent only when the user explicitly chooses to send a notification or when the interview status changes to Confirmed. The email with the attachment is sent in addition to a standard text-only PeopleSoft email notification.
The iCalendar file contains only the information that is required for creating a meeting request in an external calendar. Participant can imports the iCalendar meeting request into their own calendar system. This is a one-way integration, so Talent Acquisition Manager does not get any response back from the participant.
None indicates that you do not want to integrate with external calendaring systems.
Users can still choose to send notifications to applicants and interviewers, but the notifications are standard text-only PeopleSoft notifications.
-
The Full option is no longer supported.
Partial Calendar Integration
Under partial calendar integration, Notify check boxes for the applicant and the interviewers enable the user to send notifications to interview participants. If these check boxes are selected at the time an interview is submitted, confirmed, cancelled, the system sends each recipient an email with a formatted iCalendar attachment.
Recipients can open the iCalendar attachment in their calendaring software to add, modify, or remove the meeting request entry from their calendar.
Under partial calendar integration, the email with the iCalendar attachment is sent in addition to a standard text-only PeopleSoft email notification. When scheduling an interview on the Interview Schedule page, a user can preview and modify the text of this notification.
This overview describes interview letters and notifications
Interview Letters
When you enter interview information, you can optionally generate template-based interview letters to send to the applicant.
On an applicant’s overall interview schedule, the sections for individual interviews include a group box to use for producing an interview-specific letter or for marking the interview for inclusion in a consolidated interview letter. A separate Consolidated Interview Letter section appears after the last interview in the applicant's schedule, and you use this section to produce the consolidated letter.
The same letter templates are available for selection for individual interview letters and the consolidated interview letter. The delivered templates are valid for both scenarios because the letters list interviews in a table format even there is only one interview.
When the system generates interview letters, it also creates a contact note for the applicant.
Letter Generation
Talent Acquisition Manager uses Oracle Business Intelligence Publisher (BI Publisher) to generate recruitment letters, including interview letters.
You can generate interview letters manually on the Interview Schedule page. If you do not generate letters manually, then when you submit the interview schedule, individual interview letters that you defined but did not generate are added to the next run of the HRS Letter Generation (HRSLETTR) Application Engine process. This process generates all queued letters in batch.
Important! Only individual interview letters can be generated in batch. Consolidated interview letters must be generated manually on the Interview Schedule page. This behavior ensures that there are no changes to the list of interviews to be included between the time you mark interviews for inclusion and the time the letter is generated.
To generate a letter from the interview schedule, use these links, which appear both for individual interviews and for the consolidated interview letter:
Generate Letter
Click this link to generate an interview letter based on the selected template. The letter opens in a new browser window where you can review and optionally update it. If you make changes, save the modified letter to a local drive so that you can upload the revised version.
When you generate the letter, the system enters the current date in the Date Printed field and generates a contact note for the applicant.
Email Applicant
Click this link to access the Send Correspondence page. If you manually generated an interview letter using the Generate Letter link, then the Send Correspondence page includes the interview letter as a default attachment to the email. When you send the correspondence, the system generates a contact note for the applicant. The contact note includes any attachments that were in the email.
Upload Letter
Click this link to upload a letter file from a local drive. Typically, you are uploading a modified copy of the letter that you created by clicking the Generate Letter link.
When you upload a letter, the system creates a contact note for the applicant. The contact note includes the interview letter attachment.
These links become available for a new interview only after you save the interview. The links remain available even if you make changes to the interview, but the letter generation process uses the saved data, so remember to save changes to ensure that the letter includes the most current information.
Interview Notifications
Under partial calendar integration or no calendar integration, the Interview Schedule page includes Notify check boxes for the applicant and the interviewers. When a user submits, resubmits, confirms, or cancels an interview, the system sends notifications to participants whose Notify check box is selected. Any time the system sends a notification to an applicant, it also creates a contact note in the applicant's record.
Note: The system sends notifications only when the Notify check box is selected.
The following table summarizes the types of notifications that the selected interview participants receive under each integration option:
|
Notification Type |
Full |
Partial |
None |
|---|---|---|---|
|
Email with iCalendar Attachment (applicant and interviewers) |
Not applicable |
Yes |
No |
|
Text-only email notification (applicant and interviewers) |
Not applicable |
Yes |
Yes |
|
Candidate Gateway notification (applicant only) |
Not applicable |
Yes |
Yes |
In Candidate Gateway, notifications appear on the My Notifications page. The applicant can click the interview notification to access more complete interview details.
If an applicant already has a Candidate Gateway notification for the interview, and a recruiting user makes a change and sends a new notification, the system does not create an additional Candidate Gateway notification. Instead, the detail page that is accessed from the notification shows the updated interview data. If the applicant deleted the previous Candidate Gateway interview notification, then the notification process creates a new one.
When a participant's appointment status changes, the system sends a notification to the user who created the interview.
Notification Templates
To provide appropriate notification text for different scenarios, the system uses different notification templates depending on the action that triggered the notification and depending on whether the interview is for an application that is associated with a job opening or for an application with no job opening.
The following table lists the notification templates that the system uses to send notifications to interviewers:
|
Recipient |
User Action |
Job Opening or None |
Interviewer Notification |
|---|---|---|---|
|
Interviewer |
Submit or resubmit interview |
Job opening |
HRS_INTVW_SCHED_TEAM |
|
Interviewer |
Submit or resubmit interview |
No job opening |
HRS_INTVW_SCHED_TEAM_NOJO |
|
Interviewer |
Cancel interview |
Job opening |
HRS_INTVWSCHED_TEAM_CANCEL |
|
Interviewer |
Cancel interview |
No job opening |
HRS_INTVWSCHED_NOJO_CANCEL |
|
Applicant |
Submit or resubmit interview |
Job opening |
HRS_INTVWSCHED_APPL |
|
Applicant |
Submit or resubmit interview |
No job opening |
HRS_INTVWSCHED_APPL_NOJO |
|
Applicant |
Cancel interview |
Job opening |
HRS_INTVW_APP_CANCEL |
|
Applicant |
Cancel interview |
No job opening |
HRS_INTVW_CANCEL_APP_NOJO |
Use the Manage Interviews page (HRS_INT_SUMMARY) to review summary data about existing interviews and evaluations and to enter a final recommendation for an interview.
Navigation:
Initiate the Manage Interviews action for a single applicant who has at least one existing interview. This action is available on the following pages:
Manage Job Opening page: Applicant tab
Manage Applicant page: Applicant Activity page: Current Status section
Search Applications
Manage Application
This example illustrates the Manage Interviews page.

Toolbar
Field or Control |
Description |
|---|---|
Save |
Click to save changes to the Final Recommendation and Reason fields. |
Return |
Click to return to the page where you initiated the Manage Interviews action. |
Header
The header area of this page displays identifying information about the applicant and about the job opening for which the applicant has interviewed. This page requires the context of a single applicant and a single job opening (or an application without a job opening).
Interview Summary
This grid lists all of the applicant’s interviews for the specified job opening.
Field or Control |
Description |
|---|---|
Select |
Select the interview to be displayed in the Interview Details section of the page. |
Date |
Displays the interview date. |
Start Time, End Time, and Time Zone |
Displays the interview time in the time zone specified on the Interview Schedule page. |
Location |
Displays the interview location. |
Submitted |
Displays a check mark if the interview has been submitted. If the interview has not been saved as a draft but has not been submitted, this field is blank. |
Final Recommendation |
Displays the final recommendation as entered in the Interview Details section of this page. This field is initially blank for unsubmitted interviews. As delivered, the default value for newly submitted interviews is 005 Interview. This default is configured on the Recruiting Status Area Page. |
Interview Details
This section shows detailed information about the interview selected in the summary grid. The summary information from the grid is repeated in the details section.
Field or Control |
Description |
|---|---|
Edit Interview Details |
Click to access the Interview Schedule Page, where you can review and edit complete information about the applicant’s interviews for the specified job opening. |
Final Recommendation
Field or Control |
Description |
|---|---|
Final Recommendation |
The values in this drop-down list box are the statuses configured for the Interview status area on the Recruiting Status and Reason Page. This field is initially blank for unsubmitted interviews. When the interview is submitted, the default status is applied. As delivered, this default status is 005 Interview. If you use the delivered status change effects, and the applicant is currently in a pre-interview disposition, the creation of a new interview request with this status changes the applicant’s disposition to Interview. When entering a final recommendation for a completed interview, choose a status that indicates the recommended next step in the recruiting process. Delivered options include 020 Make Offer, 100 Hold, 110 Reject, 120 Withdrawn, and 130 Withdrawn Application. Saving changes to this field may trigger additional changes to the applicant's disposition, depending on status change effects configuration. |
Reason |
Optionally, select a reason for assigning the selected final recommendation. Values are available only if the status entered in the Final Recommendation field has associated reasons. |
Average Score |
Displays the average score from all submitted interview evaluations for this interview. Unsubmitted evaluations do not affect this calculation. |
Interview Evaluations
After an interview’s date and time have passed, the system automatically adds all scheduled interviewers to this grid.
Field or Control |
Description |
|---|---|
Name |
Displays the name of the evaluator. |
Interview Rating |
Displays the overall rating given by the evaluator. Values come from the rating scale associated with the interview evaluation template for the job opening. |
Interview Type |
Displays the interview type as entered on the Interview Evaluation page. This can differ from the interview type entered on the Interview Schedule page. |
Recommendation |
Displays the evaluator’s recommendation. The values are the same as those available for the Final Recommendation field. |
Score |
Displays the total score for the evaluation. This is the sum of the scores for each evaluation category. The evaluation categories and the points associated with each rating on the rating scale all come from the interview evaluation template for the job opening. |
Action |
Displays text that indicates the status of the evaluation. When appropriate, the Action column text is a link that the user clicks to access the Interview Evaluation page. Values in this column include:
|
Create New Evaluation |
Click this link to access the Interview Evaluation page to create a new evaluation. |
Create New Interview Schedule
Field or Control |
Description |
|---|---|
Create New Interview Schedule |
Click to access the Interview Schedule page. The system adds a new blank interview section to the schedule when it opens the page. |
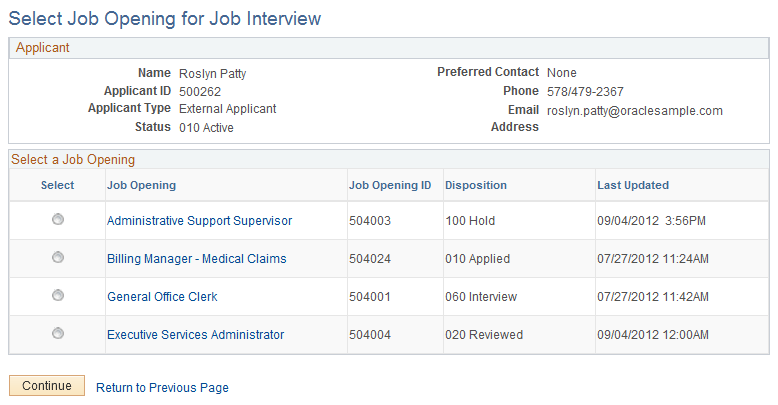
Use the Select Job Opening for Interview page (HRS_APP_ACTION) to select the job opening for which you are scheduling an interview for an applicant. This page appears when an applicant is associated with multiple job openings and you create a new interview from the Manage Applicant page, where the button for creating a new interview does not have the context of a job opening.
Navigation:
If an applicant has multiple recruiting records, this page appears when you click the Create Interview button on the Manage Applicant page: Applicant Activity tab: Interview Schedule/Evaluation section.
This example illustrates the Select Job Opening for Interview page.
Field or Control |
Description |
|---|---|
Select a Job Opening |
This grid lists all of the applicant’s job openings. Select the job opening for which you are creating an interview, then click the Continue button to continue to the Interview Schedule page. |
Use the Interview Schedule page (HRS_INT_SCHED) to schedule applicant interviews.
Navigation:
Initiate the Manage Interviews action for a group of applicants or for a single applicant with no existing interviews. This action is available on the following pages:
Manage Job Opening page: Applicant tab
Manage Applicant page: Applicant Activity page: Current Status section
Search Applications
Manage Application
You can also access this page using buttons and links on other pages throughout the system, including the following:
Manage Interviews page
Manage Applicant page: Applicant Activity tab: Interview Schedule/Evaluation section
Select Job Opening for Interview page
Interview Calendar page
Interview Team Schedule page
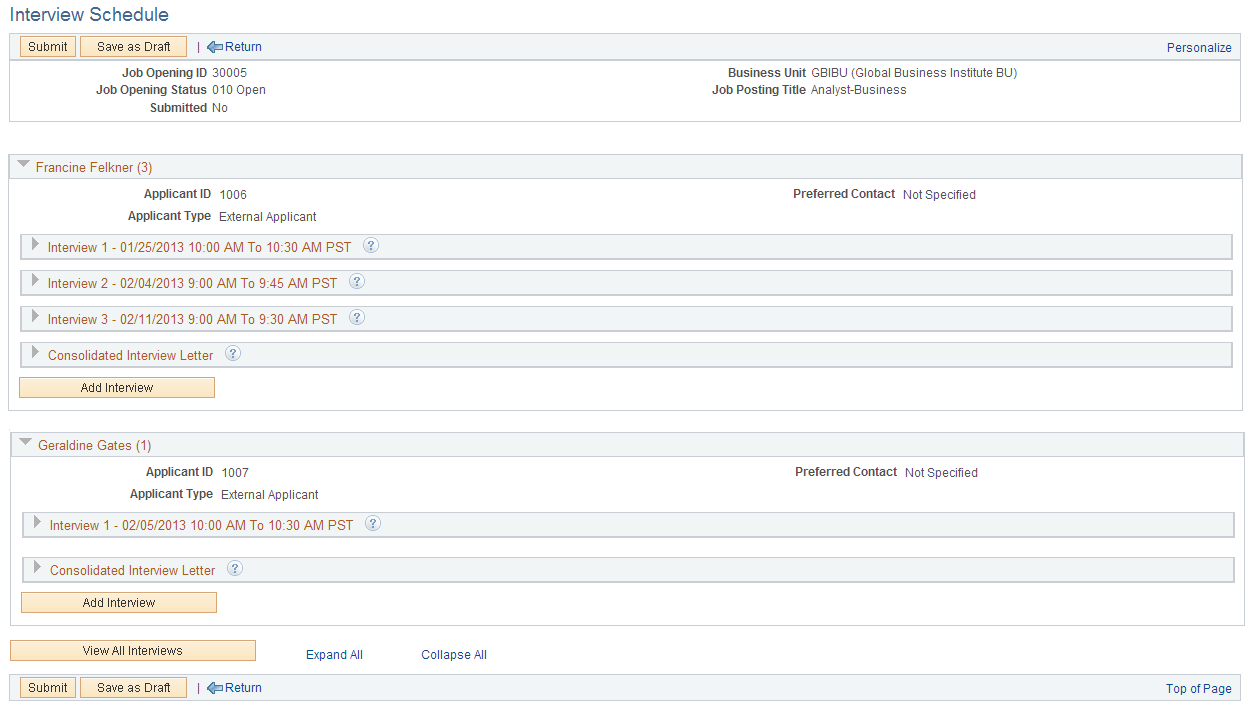
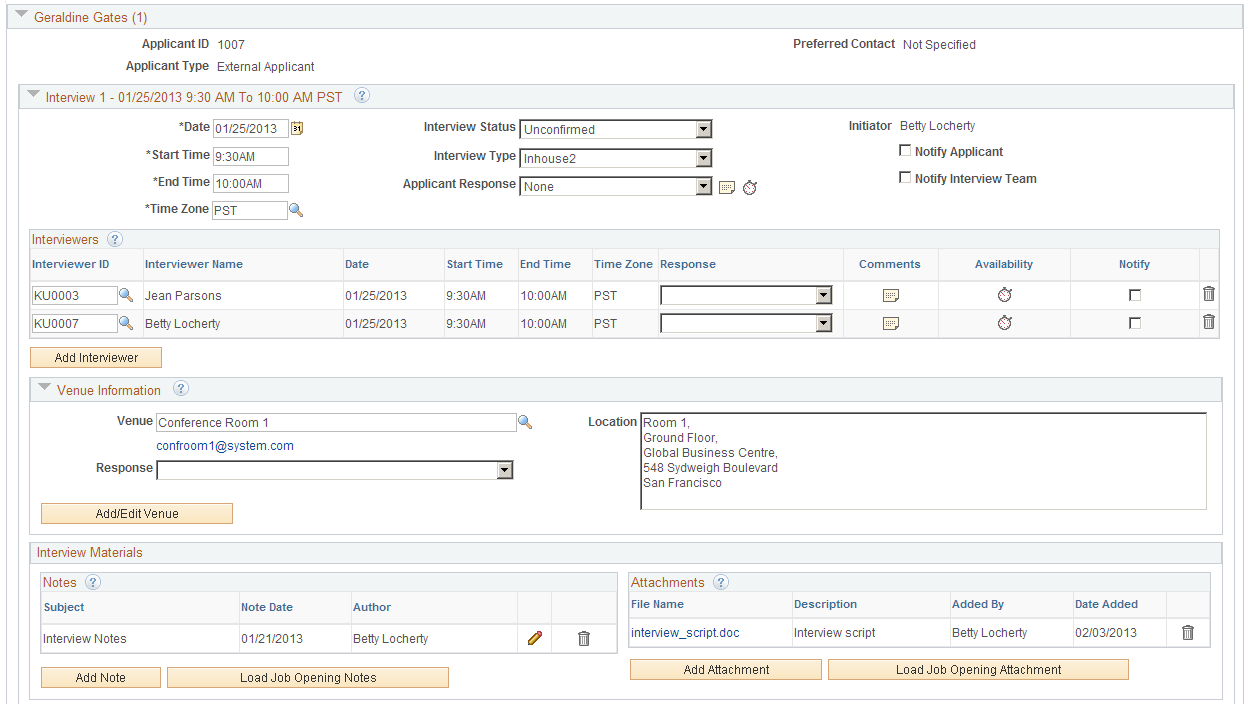
This is the first of three examples illustrating the Interview Schedule page. This example shows the general structure of the page. The page has collapsible sections for each applicant. Within the applicant sections, there are collapsible sections for each interview, followed by a section for setting up a consolidated interview letter.
This is the second of three examples illustrating the Interview Schedule page.
This is the third of three examples illustrating the Interview Schedule page.
Collapsible Sections on the Interview Schedule Page
Links at the bottom of the page enable you to expand or collapse all sections with a single click.
Field or Control |
Description |
|---|---|
Applicant |
The Interview Schedule page always shows interviews for a single job opening, but depending on how you access the Interview Schedule page, it can show schedules for one applicant or multiple applicants. The page includes a collapsible section for each included applicant, even if there is only one. |
Interview |
Within the section for a single applicant, there are collapsible sections for each scheduled interview. In this context, a single interview refers to a single block of time that is associated with one or more interviewers. To schedule separate time slots for different interviewers, recruiters need to set up multiple interviews. |
Consolidated Interview Letter |
For each applicant whose schedule appears on the page, the final collapsible section, after all of the interview sections, is for sending the applicant a consolidated interview letter. This is a letter that provides information about multiple interviews. The individual interview sections have separate page elements that you can use to mark them for inclusion in the consolidated letter. |
Page Elements That Vary According to the Integration Option
The following table lists the page elements that are hidden under each integration option:
|
Page Element |
No Calendar Integration |
Partial Calendar Integration |
|---|---|---|
|
Interview Status field (Interview section) |
Hidden |
Visible |
|
Scheduler Status field (Interview section) |
Hidden |
Hidden |
|
Notify check boxes for the applicant, for individual interviewers, and for the interview team (Interview section) |
Visible |
Visible |
|
Preview/Edit Meeting Request group box (Interview section) |
Hidden |
Visible |
|
Launch Scheduler button (Applicant section) |
Hidden |
Hidden |
Note: The preceding page illustrations show the Interview Schedule page as it appears under partial calendar integration, where everything is visible except for the Scheduler Status field and the Launch Scheduler link.
Toolbar
Field or Control |
Description |
|---|---|
Submit |
Click when you have finished entering the interview schedule. Submitting the interview generates notifications for the participants whose Notify check boxes are selected. If the interview was not previously submitted, submitting also sets the Final Recommendation field (which is not shown on the Interview Schedule page) to the default status for the Interview status area, Interview. If you use the system's delivered statuses and status change effects, and the applicant is currently in a pre-interview disposition, this status change in turn updates the applicant's disposition to 060 Interview. Note: The interview status that is set when you submit an interview does not appear on this page. On the pages where it is visible, it is labeled Final Recommendation. |
Save as Draft |
Click to save your changes without generating notifications, updating the applicant's disposition, or creating calendar meetings. |
Return |
Click to discard any unsaved changes and return to the previous page. |
Applicant Section
The system displays a collapsible section for each applicant for whom you are scheduling interviews. The section title shows the applicant's name followed by the number of interviews that exist for the applicant.
Field or Control |
Description |
|---|---|
Applicant ID |
Displays the applicant’s unique identifier. |
Applicant Type |
Displays the applicant type, either Employee, External Applicant, or Non-Employee. |
Preferred Contact |
Displays the applicant’s preferred contact method. Refer to this field when considering how to notify the applicant of the interview. |
Interview Section
For each applicant included on the page, the system displays one or more collapsible sections representing separate interview times. The section title uses the format Interview <#> – <date and time>.
Field or Control |
Description |
|---|---|
Date |
Enter the date on which the interview is to take place. |
Start Time, End Time, and Time Zone |
Enter the start and end times for the applicant's interview. The default time zone is the recruiter's own time zone. This time applies to all interviewers. To schedule different interviewers at different times, create multiple interviews for the applicant. |
Interview Status |
Note: This field appears only under partial calendar integration. Values in this status field represent the stages of the interview process. These are the possible statuses:
Note: This field is not associated with the Interview status area that is configured on the Statuses and Reasons page. |
Interview Type |
Select one of the interview types that your organization defined on the Interview Types Page. The specific values depend on how your organization chooses to classify interviews. |
Applicant Response |
Users can manually set the appointment status to Accepted, Declined, None (no response), or Tentative (tentatively accepted). |
|
Click to access the Interview Schedule Comments page where you can enter applicant-specific comments. These comments appear on the interview details page that the applicant sees in Candidate Gateway. |
|
Click to access the Interview Schedule page, which displays all interview dates and times for the applicant. This page displays only interview data from the PeopleSoft system. |
Initiator |
Displays the name of the user who originally created the interview. |
Notify Applicant |
Note: This check box appears only under partial or no calendar integration. By default, this check box is initially deselected. Select this check box to have an email notification sent to the applicant when the interview is submitted. Under partial calendar integration, the system sends both a standard notification email and a separate email with an iCalendar attachment. If the applicant is a registered user of Candidate Gateway, the system also sends a Candidate Gateway notification. |
Notify Interview Team |
Note: This check box appears only under partial or no calendar integration. Select this check box to make the system select all of the Notify check boxes for individual interviewers. This check box is simply a data entry shortcut: the system does not use this setting to determine who should receive a notification. If you select the Notify Interview Team check box and then deselect the Notify check box for an individual interviewer, the Notify Interview Team check box remains selected, but the system does not send a notification the deselected interviewer. |


Interviewers
Use the Interviewers grid to identify the interviewers who will participate in the interview. If the interview is for a job opening, this grid initially includes the interviewers from the job opening hiring team. Add or remove interviewers as needed.
Field or Control |
Description |
|---|---|
Interviewer ID and Interviewer Name |
Identify interviewers by entering their employee IDs; the system then displays the interviewers' name. |
Date, Start Time, End Time, and Time Zone |
These fields display the date and time for the interview in the interviewer's own time zone. Every interviewer is scheduled for the entire block of time. To schedule different times for different interviewers, create additional interviews. |
Response |
Set the appointment status to Accepted, Declined, None (no response), or Tentative (tentatively accepted) manually. |
|
Click to access the Interview Schedule Comments page and enter interviewer-specific comments. If interviewer-specific comments exist, the interviewer sees a comments icon alongside the interview on the Interview Calendar page. |
|
Click the icon to access the Interview Schedule page, where you can view the interviewer's current interview schedule. This page displays only interview data from the PeopleSoft system. |
Notify |
Note: This check box appears only under partial or no calendar integration. Select this check box to have an email notification sent to an individual interviewer when the interview is submitted, resubmitted, or cancelled. The system uses the email addresses from the interviewers' Personal Data records. |
Add Interviewer |
Click this link to add another row to the Interview Schedule grid. Click the Notify check box for the new row if you want the system to send notifications to the newly added interviewer when you submit the interview. |


Venue Information
Field or Control |
Description |
|---|---|
Venue |
In the Venue field, select a physical location for the interview. The available values are those that you set up in the Interview Facilities page. |
<Venue Email Address> |
When you select a venue, its email address appears. |
Response |
You can use this field to track venue availability by manually setting the value to Accepted, Declined, None (no response), and Tentative (tentatively accepted). |
Location |
If there is location information in the venue definition, the system enters that location information here, replacing any existing location text. You can modify the location text, and any changes that you make are saved to the venue definition. You can also enter location text without selecting a venue. |
Add/Edit Venue |
Click to access the Interview Facilities Page, where you can modify venue details for the currently selected venue, or add a new venue. |
Interview Materials
Field or Control |
Description |
|---|---|
Notes |
Use the Notes grid to add notes related to the interview. You can also add attachments to individual notes. These notes are specific to the interview; they are not associated directly to either the job opening or the applicant. |
Attachments |
Use the Attachments grid to attach external documents, such as interview scripts, to the interview schedule. Click the Add Attachment link to add file attachments to the grid; the system prompts you to identify the file to be uploaded. When a file is uploaded, the default description is the file name. You can modify this description until you save or submit the interview, at which point it becomes read-only. To view an existing attachment, click its file name. The attachment opens in a new window. |
Load Job Opening Attachment and Load Job Opening Notes |
Click these links to copy selected attachments and notes from the job opening to the interview. Job opening attachments and notes appear on the Manage Job Opening Page: Activity & Attachments Tab. Job opening attachments and notes are associated with specific audiences (Private, Public, or Interview), and when you load job opening attachments or notes into the interview, the system copies only the notes and attachments where the audience is Interview. |
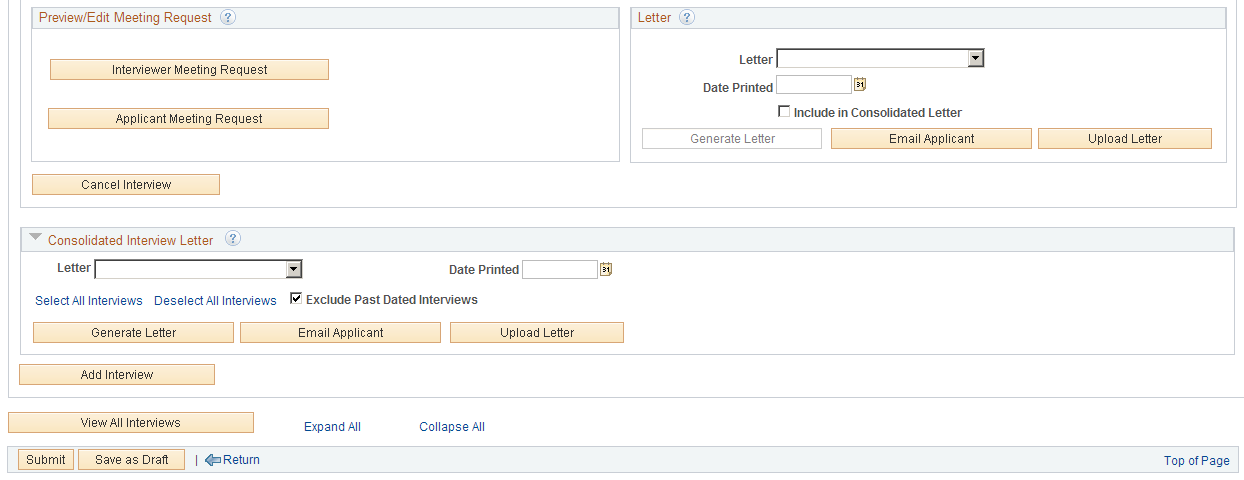
Preview/Edit Meeting Request
Use the links in this section to access the Interview Request page, where you can personalize the text of the meeting invitation for this interview.
Note: This section appears only under partial calendar integration.
Field or Control |
Description |
|---|---|
Interviewer Meeting Request and Applicant Meeting Request |
Click the appropriate link to review and optionally modify the text of notifications that the system sends to interviewers or applicants. You can also add attachments to the notification. As long as you do not make any changes to the default notification, changes that you make to the interview date, time and location are automatically reflected in the notification. However, after you save any changes to the default text, the system no longer makes any updates to the text. Note: If you change the interview date, time, or location after you modify the notification text, you must make any necessary changes to the notification text manually. |
Letter
Field or Control |
Description |
|---|---|
Letter |
Select a letter that you want to send to the applicant when an interview is scheduled. Talent Acquisition Manager uses Oracle Business Intelligence Publisher (BI Publisher) to generate recruitment letters. The templates that are available to use as interview letters are those from the HRS_INT_LET report definition |
Date Printed |
Displays the date that you printed the letter. The system populates the field when you click the Generate Letter link or when the letter is generated by the HRS Letter Generation batch process. |
Include in Consolidated Letter |
Select this check box to mark the interview for inclusion in a consolidated interview letter that lists all selected interviews. Selecting this check box makes the interview-specific fields and links inactive to suppress generation of a individual interview letter. If you select this check box for any interview, be sure to also generate the consolidated interview letter using the fields in the Consolidated Interview Letter section for the applicant. |
Generate Letter |
Click this link to generate the letter immediately. The system opens the generated letter in a new browser window, where you can print it or save it locally. Once the letter is generated, the Generate Letter link is no longer available and the letter is removed from the HRS Letter Generation batch process. When you generate a letter, the system creates a note on the Manage Applicant page: Notes tab. The letter is an attachment to the note. If you click the Email Applicant link after generating a letter, the system automatically attaches the generated letter to the email. |
Email Applicant |
Click this link to display the Send Correspondence page, where you can send the applicant email. If you have generated or uploaded a letter, the Attachments grid on the Send Correspondence page includes the letter (although you can remove or replace it if you wish). After accessing the Send Correspondence page, enter the email subject and message, then send it to the applicant. When you send the email, the system creates a contact on the Manage Applicant page: Notes tab. The email attachments are saved as note attachments. |
Upload Letter |
Click this link to upload a saved letter as an attachment. Most commonly, you use this link to upload a modified version of the original generated letter. However, it is not necessary to generate a letter before uploading one. When you upload a letter, the system creates a note entry on the Manage Applicant page: Notes tab. The letter is an attachment to the note. If you click the Email Applicant link after generating a letter, the system automatically attaches the modified letter (rather than the original) to the email. |
Buttons for Canceling and Reinstating Interviews
Field or Control |
Description |
|---|---|
Cancel Interview |
Click the Cancel Interview button, which appears only after an interview has been saved and submitted, to cancel the interview. When the interview is cancelled, the system changes the Interview Status to Cancelled, and all fields for the cancelled interview become read-only. Although these changes appear to occur immediately, you still need to submit or save the interview to complete the cancellation. Canceling an interview triggers notifications to participants whose Notify check boxes are selected. You cannot cancel interviews that have evaluations or where the applicant has proceeded past the Interview disposition. |
Reinstate Interview |
After an interview is cancelled, the Reinstate Interview button replaces the Cancel Interview button. Click the Reinstate Interview button to change the interview status to Unconfirmed and make the interview fields editable again. The system will not allow you to submit a reinstated interview without first changing the interview date or time or adding or deleting at least one interviewer. |
Consolidated Interview Letter
This group box appears after the last interview listed for the applicant. Use it to generate an interview letter that lists all of the interviews where the Include in Consolidated Letter check box is selected.
Field or Control |
Description |
|---|---|
Letter, Date Printed, Generate Letter, Email Letter, and Upload Letter |
Use these fields to select a template and generate a consolidated interview letter using that template. These page elements work similarly to the ones that appear for individual interviews, except that when you generate the letter, the system brings in data from multiple interviews. Note: Unlike individual interview letters, the consolidated interview letter cannot be generated by the HRS Letter Generation batch process. To produce a consolidated interview letter, you must use the Generate Letter link on this page. |
Select All Interviews and Deselect All Interviews |
Click these buttons to select or deselect the Include in Consolidated Letter check box for all of the applicant's interviews that appear on the page. These buttons are simply a data entry shortcut. You can still change the settings for individual interviews after clicking these buttons. |
Exclude Past Dated Interviews |
Select this check box before clicking the Select All Interviews button to prevent the button from selecting interviews on days before the current date. Interviews scheduled for the current date are not considered to be in the past. The Exclude Past Dated Interviews check box does not deselect past dated interviews, it just prevents them from being selected by the Select All Interviews button. For example, if you click the Select All Interviews button, then you subsequently select the Exclude Past Dated Interviews check box, any past dated interviews remain selected. To prevent those interviews from appearing in the consolidated interview letter, you need to deselect them either manually or by clicking the Deselect All Interviews button. |
Applicant-Level Actions
These page elements appear at the end of each applicant section.
Field or Control |
Description |
|---|---|
Add Interview |
Click this button, which appears once per applicant (at the bottom of the Interview Schedule page) to add an additional interview section for the applicant. |
View All Interviews
Field or Control |
Description |
|---|---|
View All Interviews |
Click to access the Interview List Page, which displays a read-only summary of the information on the Interview Schedule page. |
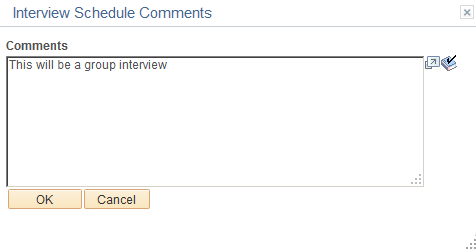
Use the Interview Schedule Comments pages for interviewers (HRS_RCRTR_CMTS_SP) and for applicants (HRS_REC_APP_CMT_SP) to add interview comments.
Navigation:
Click the Comments icon on the Interview Schedule page. There are separate Comments icons for applicant-specific comments and for interviewer-specific comments.
This example illustrates the Interview Schedule Comments page.
Field or Control |
Description |
|---|---|
Comments |
Enter comments for either the applicant or for a specific interviewer. Applicant comments are displayed on the interview detail page in Candidate Gateway. Interviewer comments are displayed to interviewers on the Interview Schedule page. |
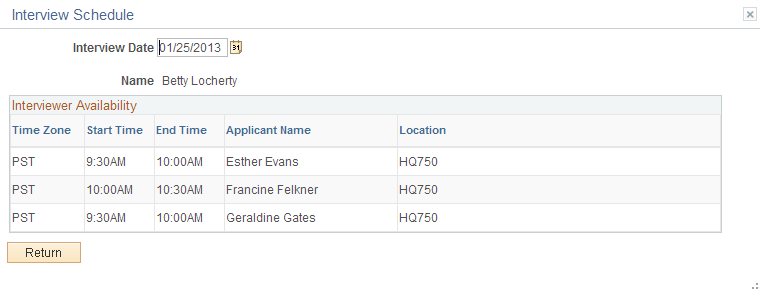
Use the Interview Schedule pages for applicants (HRS_APP_AVAIL_SP) and interviewers (HRS_INT_AVAIL_SP) to view the relevant interview schedules.
The system does not check external calendar systems for availability. Availability is based only on other interview schedules in the PeopleSoft system.
Navigation:
On the Interview Schedule page, click the Availability icon for the applicant or for a specific interviewer.
This example illustrates the Interview Schedule page that is used to view a participant’s availability.
Field or Control |
Description |
|---|---|
Interview Date |
Enter an interview date to see a list of interviews that the participant already has scheduled for that day. |
Use the Interview Note page (HRS_INT_NOTE_PG) to maintain interview-related notes.
Navigation:
Click the Add Note button on the Interview Schedule page.
Click the Edit icon for an existing note on the Interview Schedule page.
This example illustrates the Interview Notes page.
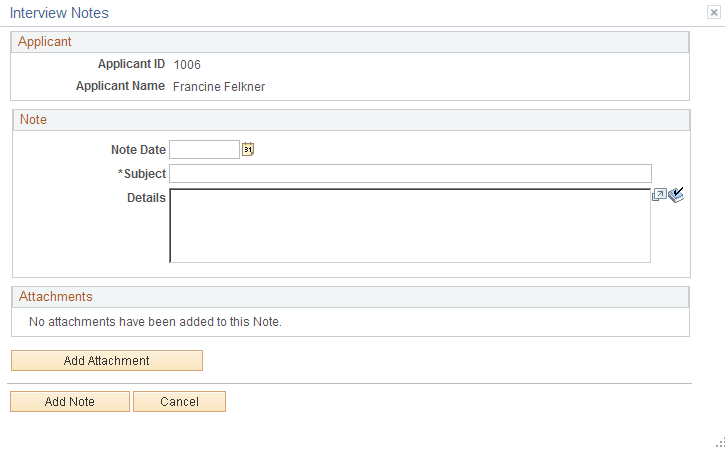
Interview notes include a date, a subject, option details, and optional attachments.
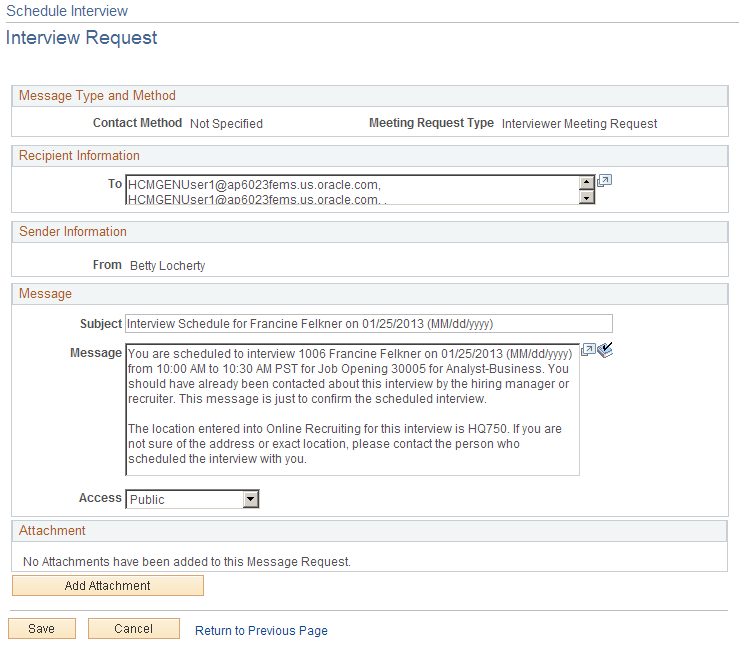
Use the Interview Request page (HRS_INT_MTG_REQ_PG) to review and optionally modify notification text to be sent to interviewers and applicants.
Navigation:
Click the Interviewer Meeting Request button or the Applicant Meeting Request button on the Interview Schedule page.
This example illustrates the Interview Request page.
Field or Control |
Description |
|---|---|
Subject and Message |
Review the default subject and text of the message and make any necessary modifications. |
Access |
Choose whether the contact note that is created for the notification is to be Public (the default) or Private. Anyone can view a public contact note; only the creator of the note can view a private note. |
Add Attachment |
You can optionally add attachments to the message. For example, you could attach a map to the interview venue. |
Note: After you modify the notification text, the system no longer keeps the date and time in the notification synchronized with the actual interview date and time. If you change the interview date or time after modifying the notification text, be sure to return to this page to make the necessary updates.
Use the Interview List page (HRS_VW_ALL_INT_PG) to view a compact summary of data from the Interview Schedule page
Navigation:
Click the View All Interviews link on the Interview Schedule page.
This example illustrates the Interview List page.