Understanding Employee Snapshot Dashboards and Tiles
The Employee Snapshot consists of sets of dashboards, tiles, and pages that enable managers to quickly and easily view human resource and talent related information about an employee. The dashboards aggregate and display tiles that share common or similar purposes and provide quick access to useful information by presenting concise but feature-rich tiles to the user. For information on what data is available on the Employee Snapshot, see Understanding the Employee Snapshot Content and Layout.
This topic provides an understanding of how to add, rename, or delete a dashboard within Employee Snapshot and how to display tiles on an Employee Snapshot dashboard.
Dashboards are created and maintained in the Portal Registry. For more information on Portal and Dashboard technology, see the PeopleTools: Portal Technology documentation.
The Employee Snapshot feature provides managers with a way to quickly review and analyze data about an individual employee without having to navigate to various locations throughout the system. Users can access the Employee Snapshot pages by selecting the View Employee Snapshot menu item from the Related Action icon after an employee’s name in fluid. Additionally, administrators have the ability to add the Employee Snapshot tile to a fluid homepage as well as modify dashboards and tiles within the fluid self service pages.
Adding a Dashboard to the Employee Snapshot Dashboard Action List
The left panel of the Employee Snapshot displays various dashboards, or business processes, that are available for Employee Snapshot. The PeopleSoft HCM application delivers the Summary and Promotion Readiness dashboards.
To add a new Employee Snapshot dashboard, perform these steps:
Navigate to .
Access the Fluid Dashboards page.
Click the Create new dashboard page link at the bottom of the page.
On the Dashboard Page Administration page, enter the dashboard name and label.
Enter CO_MANAGER_SELF_SERVICE in the Parent Folder field.
Select Public Access for the Security Type.
Save your data.
Important! Creating a new dashboard will create two (2) crefs: one in the folder you specified and a second one in Fluid Structure Content, Fluid Homepages. Do not use the Fluid Homepage version; only edit the one in the folder you specified during the dashboard creation.
Navigate to .
Click the label link for Manager Self Service.
Note: Do not use the link titled Fluid Homepage.
In the Content References group box, click the Edit link for the new dashboard you just created.
In the Content Reference Link Attributes group box, delete the NAVTOPWIN row by selecting the delete (-) button.
Copy the Attribute value text that ends in _LINK in the Attribute value field (for example, PROMOTION_READINESS_LINK).
Save the page.
Navigate to .
Enter Employee Snapshot in the Search By field and click Search.
Click the Edit link for Employee Snapshot.
Click Add Link button.
On the Add Link page, select Local Portal in the Source Portal field.
Paste the name that ends in _LINK you copied from the previous step into the Menu Item field.
Click OK, then Save.
Important! If you add a dashboard to Employee Snapshot, remember that other considerations need to be taken into account, such as adding the PeopleCode to select employees on the Person Selector. For more information on creating dashboard, see the PeopleTools: Portal Technology, “Administering Homepages and Dashboard Pages” documentation.
Renaming a Dashboard from the Employee Snapshot Dashboard Action List
To rename an Employee Snapshot dashboard, perform these steps:
Navigate to .
Access the Fluid Dashboards page.
Click on the Properties link for dashboard page you want to update.
Enter the new name in the Dashboard Label field.
Save.
Removing a Dashboard from the Employee Snapshot Dashboard Action List
To remove a dashboard from the left panel of the Employee Snapshot, perform these steps:
Navigate to .
Enter Employee Snapshot in the Search By field and click Search.
Click on the Edit link for Employee Snapshot.
Click the link for the dashboard (business task) that you want to remove.
Click on Delete Link button.
Save.
After you have created dashboards for the Employee Snapshot, the administrator can add tiles. To modify a dashboard by adding or removing tiles, follow these steps:
Navigate to .
Access the Fluid Dashboards page.
Click the Tiles button for the dashboard that you want to modify.
In the Employee Snapshot group box, select the tiles you want to display on the specified dashboard and select Required to ensure that the tile is always shown on that dashboard.
Save.
Note: Oracle recommends that you use only tiles delivered for Employee Snapshot. Also, tiles that are delivered for the Employee Snapshot may not work on other pages.
Determining the Sequence Order of Tiles on the Dashboard
When you have added tiles to a dashboard, you can select the order in which you want them to display.
Navigate to .
Click the Fluid Structure Content link.
Click the Fluid Pages link.
Click the Employee Snapshot link.
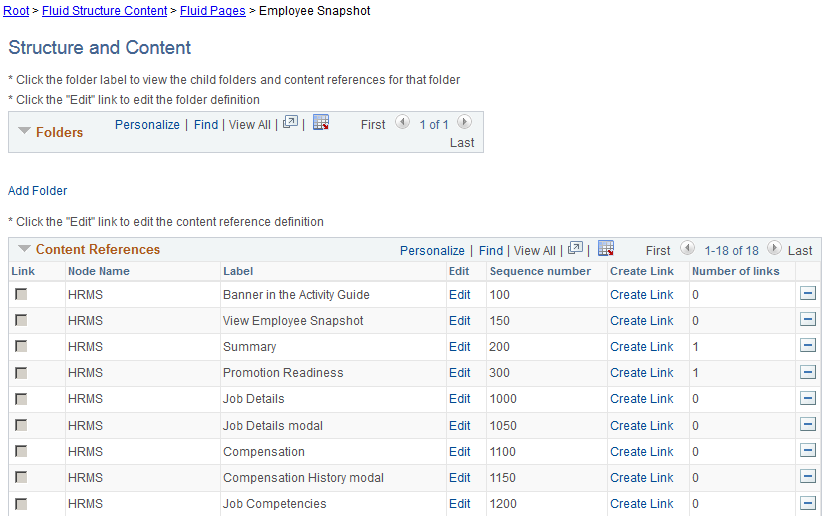
The Structure and Content page will display the content references associated with the Employee Dashboard. The Sequence number column displays the order in which the pages and tiles will appear in Employee Snapshot. Click the Edit link for the dashboard to update the Sequence number field and save your data.
This example illustrates the sequence numbering for the content references for the Employee Snapshot.
For more information on Content References, see the PeopleTools: Portal Technology, “Administering Portals” documentation.