Enrolling in Benefit Plans Using the PeopleSoft Fluid User Interface
This topic discusses the fluid Benefit plan pages to enroll in or review your benefit plans.
|
Page Name |
Definition Name |
Usage |
|---|---|---|
|
BNE_CARD_SUMM_FL |
View the enrollment summary and detailed information about various benefit plans which are open for enrollment or edits. |
|
|
1x Health Plans: Dental Page Medical/Dental Page Major Medical Page Vision Page Domestic Partner Medical Page Domestic Partner Dental Page Domestic Partner Vision Page |
BNE_PLAN_1X_FL |
Review or elect health (medical/dental/vision) plan-type benefits for employee and domestic partner. |
|
2x Life Plans: AD and D Page Life and AD and D Page Dependent AD and D Page Dependent Life Page Survivor Income Page Supplemental AD and D Page Spousal Life Page |
BNE_PLAN_2X_FL |
Review and elect life plan-type benefits for employee and dependents. |
|
3x Disability Plans: Long-Term Disability Page |
BNE_PLAN_3X_FL |
Enroll in short-term or long-term disability plans. |
|
4x Savings Plans: Profit Sharing Page Thrift Page IRA Page Capital Accumulation Page U.S. Savings Bonds Page 403(b) Page Nonelective Contributions Page Employer Only Page Section 456 Page Employee Stock Purchase Page |
BNE_PLAN_4X_FL |
Enroll in savings plan benefits. |
|
5x Leave Plans: Vacation Page Personal Page Family and Medical Act Page |
BNE_PLAN_5X_FL |
Enroll in a leave plan. |
|
6x FSA and HSA Plans: Flex Spending Health – U.S. Page Flex Spending Health – Canada Page Flex Spending Dependent Care Page Retirement Counselling Page |
BNE_PLAN_6X_FL |
Enroll in FSA and HSA plan benefits. |
|
7x Retirement Plan: |
BNE_PLAN_7X_FL |
Enroll in retirement plans. |
|
8x Pension Plans: Pension Plan 1 - U.S. Page Pension Plan 2 - U.S. Page Pension Plan 3 - U.S. Page Pension Plan 4 - U.S. Page Pension Plan 5 - U.S. Page Pension Plan 6 - U.S. Page |
BNE_PLAN_8X_FL |
Enroll in U.S. and Canada pension plan benefits. |
|
9x Vacation Plans: Vacation Sell Page |
BNE_PLAN_9X_FL |
Enroll in vacation plan benefits. |
|
Ax Simple Plans: Legal Services Page Wellness Credit Page |
BNE_PLAN_375AX_FL |
Enroll in simple plans. |
Note: To configure the display of the Contact and Resources panel in the Benefits Plan pages, see Enrollment Contact Assignment Page.
Dependents and Beneficiaries Enrollment Sections in Benefits Plan Pages
For 1x Health Plans, the Enroll Your Dependents section displays only when the Collect Dep/Ben check box in the Event Rules Table- Event Rules Page is selected. When the Collect Dep/Ben check box in the Event Rules table is not selected, then the plans will have all coverage levels listed separately under the Enroll in Your Plan section.
For 2x, 4x and 8x plans, the Designate Your Beneficiaries section displays only when the Collect Dep/Ben check box in the Event Rules table is selected.
Use the Medical page (BNE_PLAN_1X_FL) to review or elect health (medical) plan-type benefits for employee and domestic partner.
Navigation:
Click the Benefit Details tile on a PeopleSoft Fluid User Interface Employee Self Service homepage. Click the Benefits Enrollment tab on the left panel, and then under the Benefit Plans section, click the plan type, Medical.
You can also access the benefit enrollment plan pages using the Open Enrollment or OnBoarding tile on the Employee Self Service homepage. On the Open Enrollment or OnBoarding activity guide, click the Benefits Enrollment tab on the left panel and then under the Benefit Plans section, click the plan type, Medical.
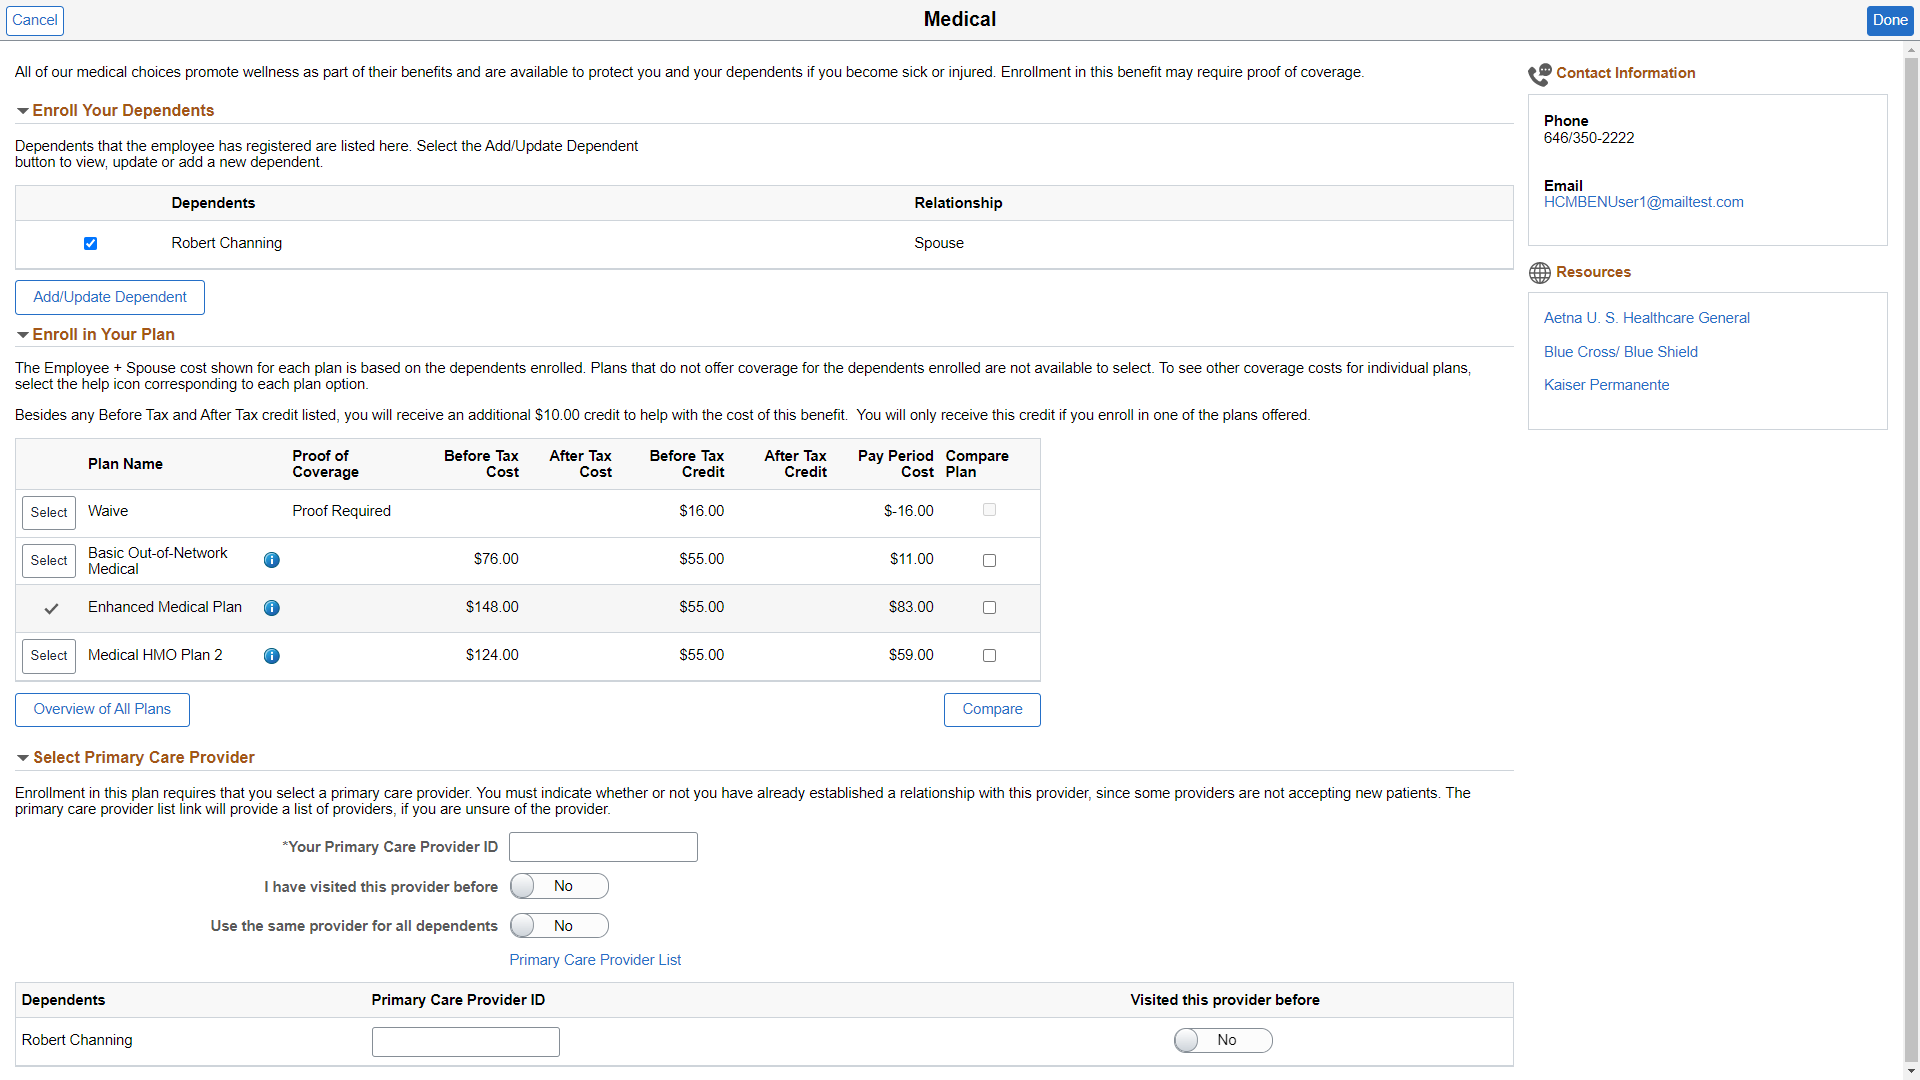
This example illustrates the fields and controls on the Medical Page. You can find definitions for the fields and controls later on this page.
Field or Control |
Description |
|---|---|
Enroll Your Dependents |
All dependents that the employee has registered are listed here. Select the check box next to the dependent you want to enroll in this plan. |
Add Dependent button |
Use the Add Dependent button, to add a new dependent. |
Enroll in Your Plan section |
This section displays the plan names and the cost based on the dependents you have enrolled. |
|
For more information about the plans, click the Information icon next to the Plan Name. |
|
Compare Plan check box |
Select the check box next to plan names to compare plans. For more information, see Using Plan Comparison In Benefits Enrollment. |
Overview of All Plans |
Click this to view a summary of all the benefit plans along with the cost for each coverage level. |
|
Compare |
Click to view the Benefits Plan Comparison page for the selected plan names. |

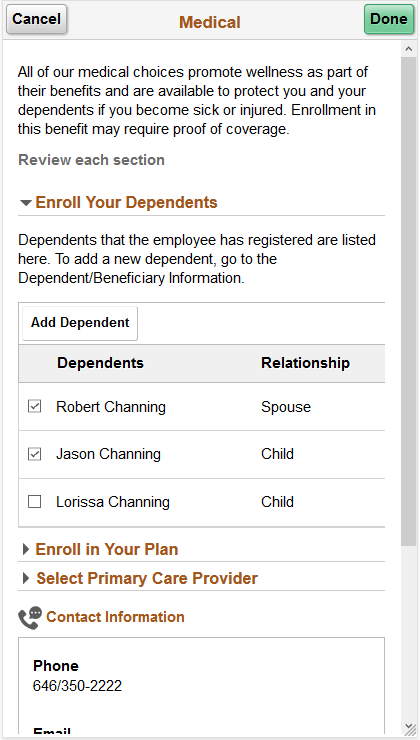
This example illustrates the fields and controls on the Medical page as seen on a smartphone.
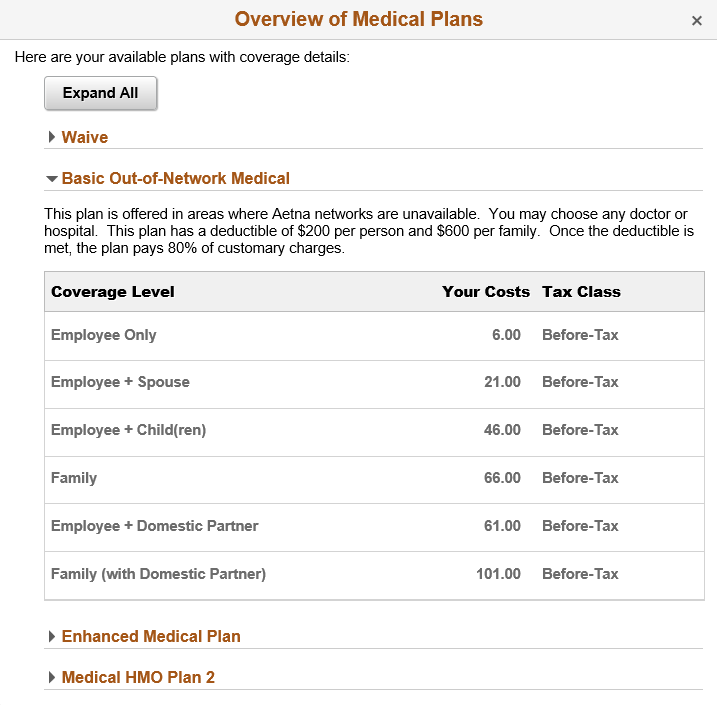
This example illustrates the fields and controls on the Overview of Medical Plans modal window.
Field or Control |
Description |
|---|---|
Select Primary Care Provider section |
Select Primary Care Provider section displays only when the Health Plan Table Page has the Health Provider set as required. The Primary Care Provider List link in this section displays if the enrolled benefit plan has an Authorized Provider URL ID associated in the Vendor Information table – Policy Information Page. |
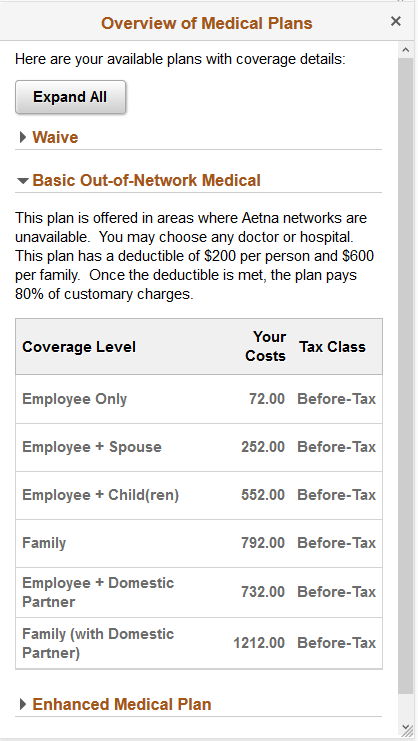
This example illustrates the fields and controls on the Overview of Medical Plans modal window as seen on a smartphone.
Use the Life page (BNE_PLAN_2X_FL) to review and elect life plan-type benefits for employee and dependents.
Navigation:
Click the Benefit Details tile on a PeopleSoft Fluid User Interface Employee Self Service homepage. Click the Benefits Enrollment tab on the left panel, and then under the Benefit Plans section, click the plan type, Life.
You can also access the benefit enrollment plan pages using the Open Enrollment or OnBoarding tile on the Employee Self Service homepage. On the Open Enrollment or OnBoarding activity guide, click the Benefits Enrollment tab on the left panel and then under the Benefit Plans section, click the plan type, Life.
Note: The 2x Life plans are configured based on the Coverage Type and Insured Person Type as set in the Life and AD/D Plan Table Page. And hence the 2x Life plans display different sections depending on the plan type you select.
The sections on the 2x Life plan pages are:
Enroll in Your Plan
Coverage Amount
Enroll Your Dependents
Designate Your Beneficiaries
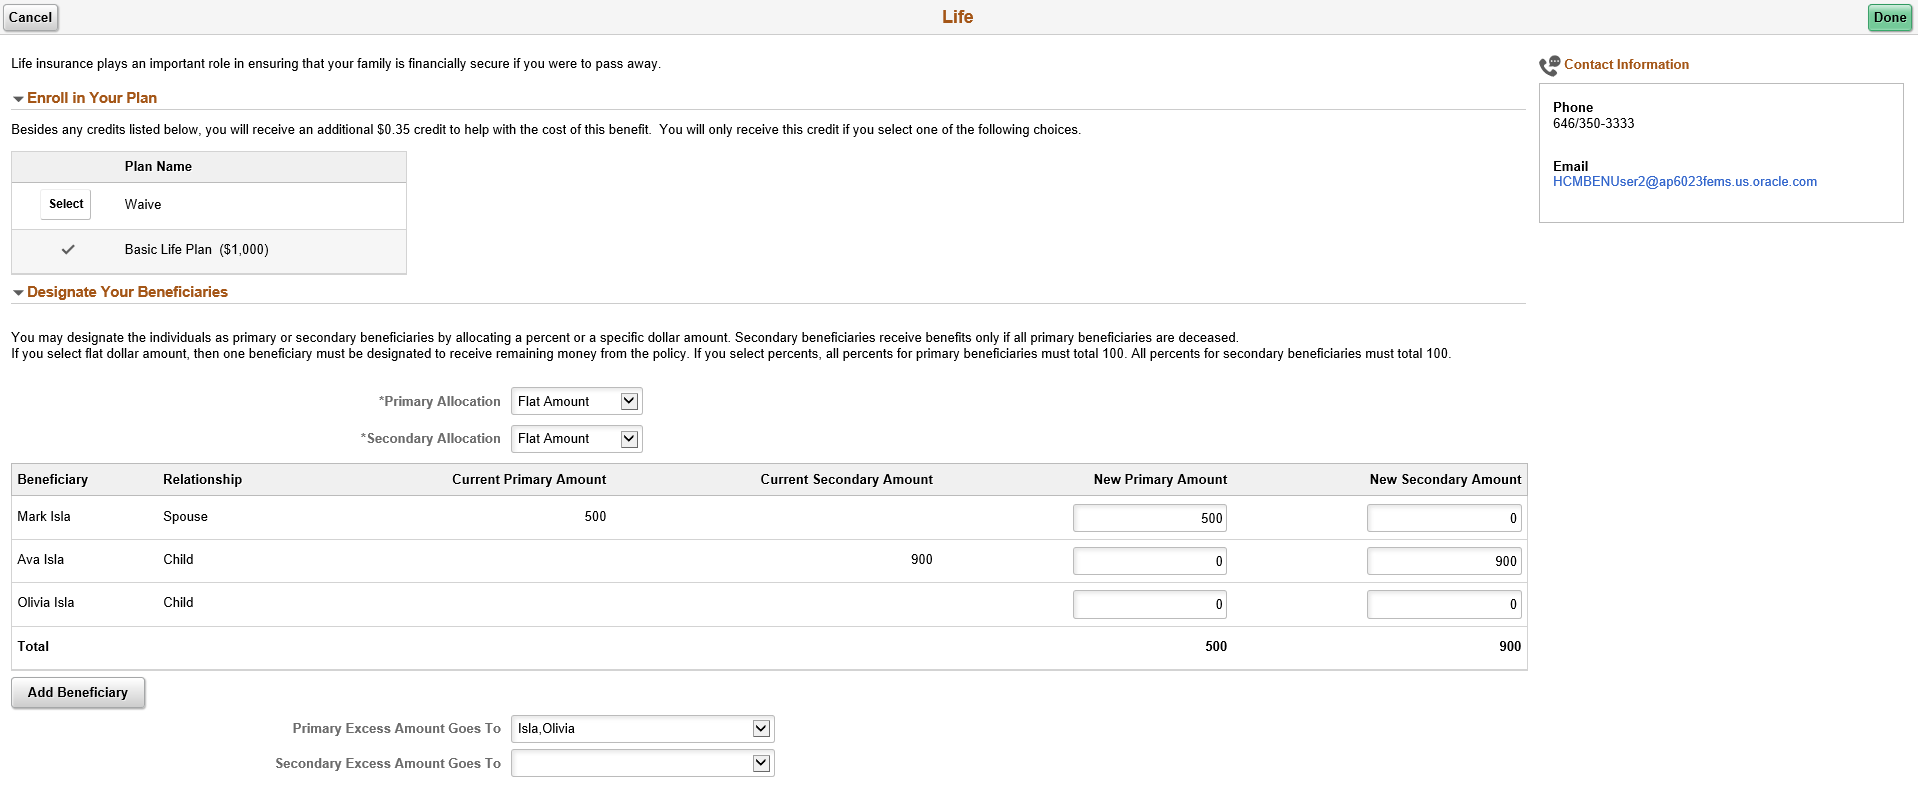
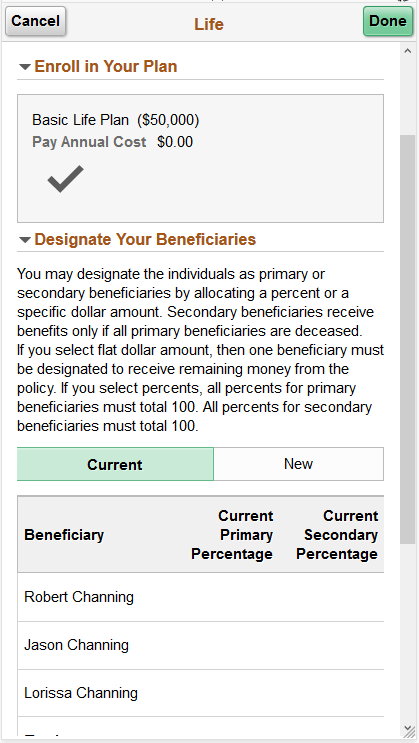
This example illustrates the fields and controls on the Life Page. You can find definitions for the fields and controls later on this page.
This example illustrates the fields and controls on the Life page as seen on a smartphone.
Field or Control |
Description |
|---|---|
Primary Allocation and Secondary Allocation drop-downs |
The allocation types available are Flat Amount or Percent. |
New Primary Amount orNew Primary Percentage, New Secondary Amount or New Secondary Percentage columns |
If percent is used in the allocation type, on the New Primary Allocation or New Secondary Allocation column enter values that add up to a 100 percent. If flat amount is used in the allocation type, on the New Primary Allocation or New Secondary Allocation column enter values that represents the dollar amount. |
Primary Excess Amount Goes To and Secondary Excess Amount Goes To |
If the primary and secondary allocation types are in percents, then these fields appear greyed out. If flat amount is used in the Primary or Secondary allocation type, in the corresponding drop-downs, select an eligible beneficiary. |
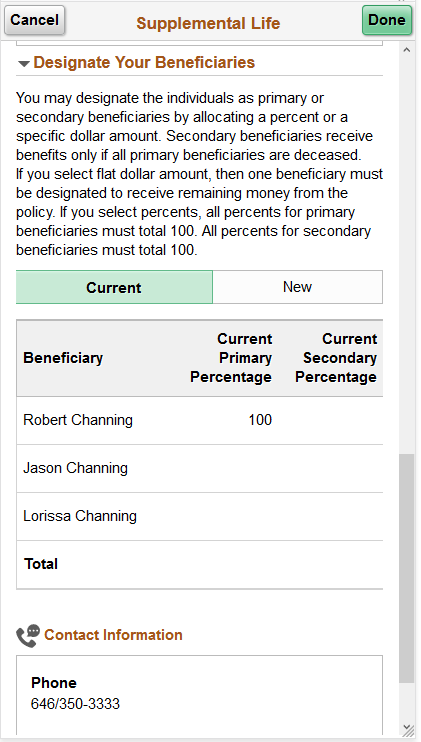
Use the Supplemental Life page (BNE_PLAN_2X_FL) to review and elect supplemental life plan-type benefits for employee and dependents.
Navigation:
Click the Benefit Details tile on a PeopleSoft Fluid User Interface Employee Self Service homepage. Click the Benefits Enrollment tab on the left panel, and then under the Benefit Plans section, click the plan type, Supplemental Life.
You can also access the benefit enrollment plan pages using the Open Enrollment or OnBoarding tile on the Employee Self Service homepage. On the Open Enrollment or OnBoarding activity guide, click the Benefits Enrollment tab on the left panel and then under the Benefit Plans section, click the plan type, Supplemental Life.
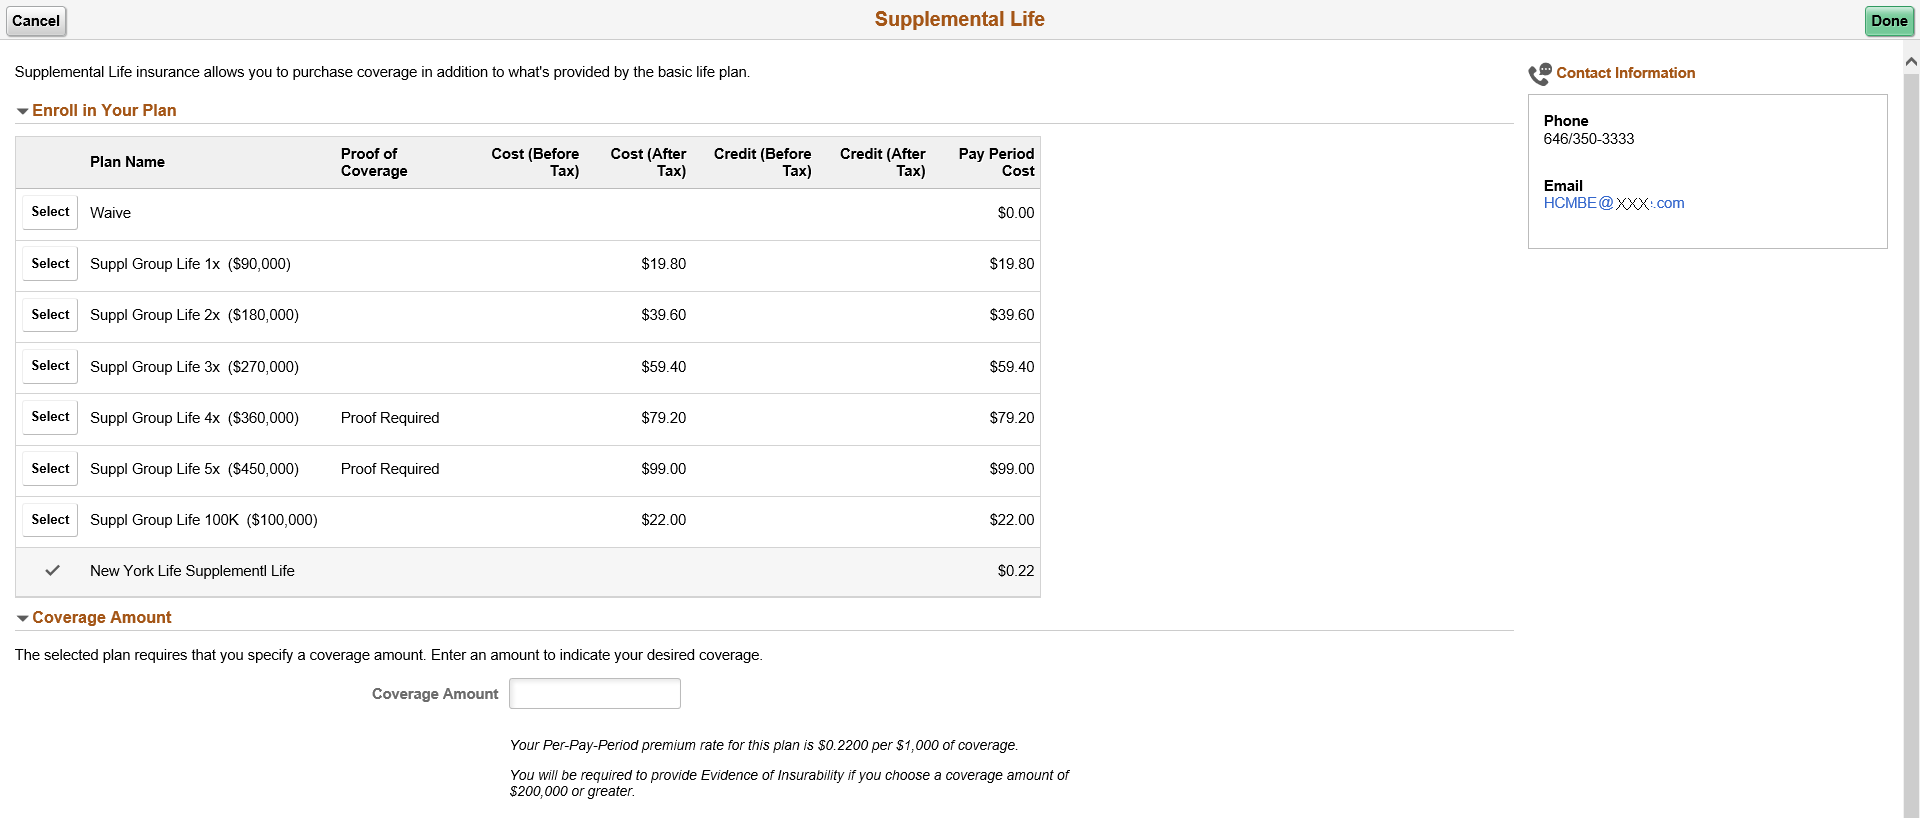
This example illustrates the fields and controls on the Supplemental Life Page. You can find definitions for the fields and controls later on this page.
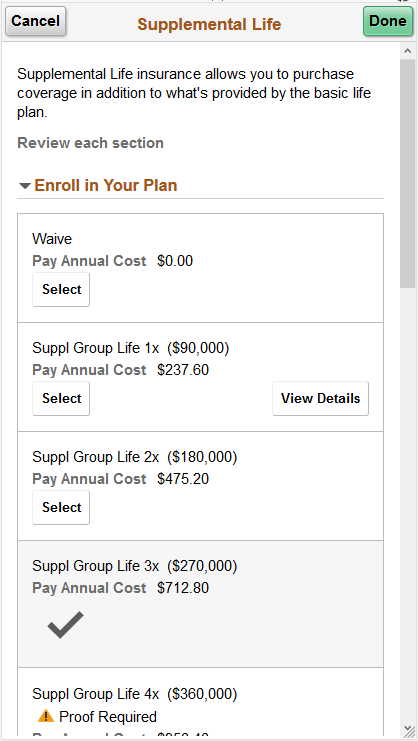
This example illustrates the fields and controls on the Supplemental page part1 as seen on a smartphone.
Field or Control |
Description |
|---|---|
Enroll in Your Plan section |
Click the Select button next to the plan you wish to enroll in. |
Coverage Amount |
Enter the amount, for the plans that allow you to specify a coverage amount. |
This example illustrates the fields and controls on the Supplemental Life Page - part2. You can find definitions for the fields and controls later on this page.

This example illustrates the fields and controls on the Supplemental page part2, as seen on a smartphone.
Field or Control |
Description |
|---|---|
Primary Allocation and Secondary Allocation drop-downs |
The allocation types available are Flat Amount or Percent. |
New Primary Amount orNew Primary Percentage, New Secondary Amount or New Secondary Percentage columns |
If percent is used in the allocation type, on the New Primary Allocation or New Secondary Allocation column enter values that add up to a 100 percent. If flat amount is used in the allocation type, on the New Primary Allocation or New Secondary Allocation column enter values that represents the dollar amount. |
Primary Excess Amount Goes To and Secondary Excess Amount Goes To |
If the primary and secondary allocation types are in percents, then these fields appear greyed out. If flat amount is used in the Primary or Secondary allocation type, in the corresponding drop-downs, select an eligible beneficiary. |
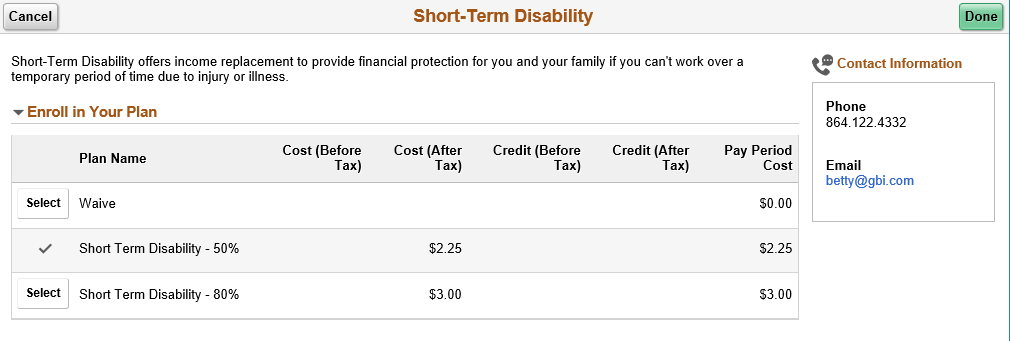
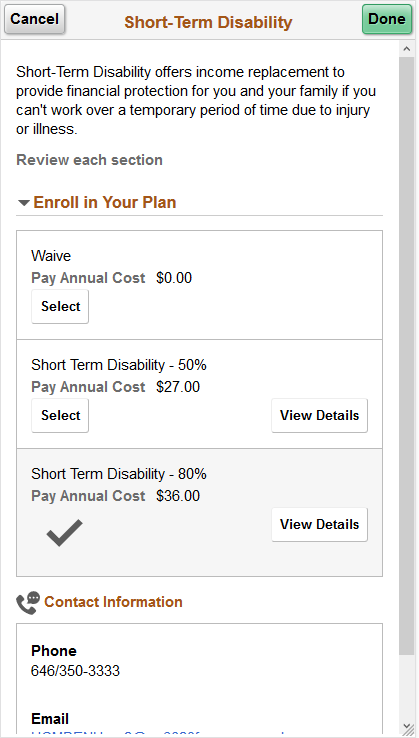
Use the Short-Term Disability page (BNE_PLAN_3X_FL) to enroll in short-term disability plans.
Navigation:
Click the Benefit Details tile on a PeopleSoft Fluid User Interface Employee Self Service homepage. Click the Benefits Enrollment tab on the left panel, and then under the Benefit Plans section, click the plan type, Short-Term Disability.
You can also access the benefit enrollment plan pages using the Open Enrollment or OnBoarding tile on the Employee Self Service homepage. On the Open Enrollment or OnBoarding activity guide, click the Benefits Enrollment tab on the left panel and then under the Benefit Plans section, click the plan type, Short-Term Disability.
This example illustrates the fields and controls on the Short-Term Disability Page.
This example illustrates the fields and controls on the Short-Term Disability Page as seen on a smartphone.
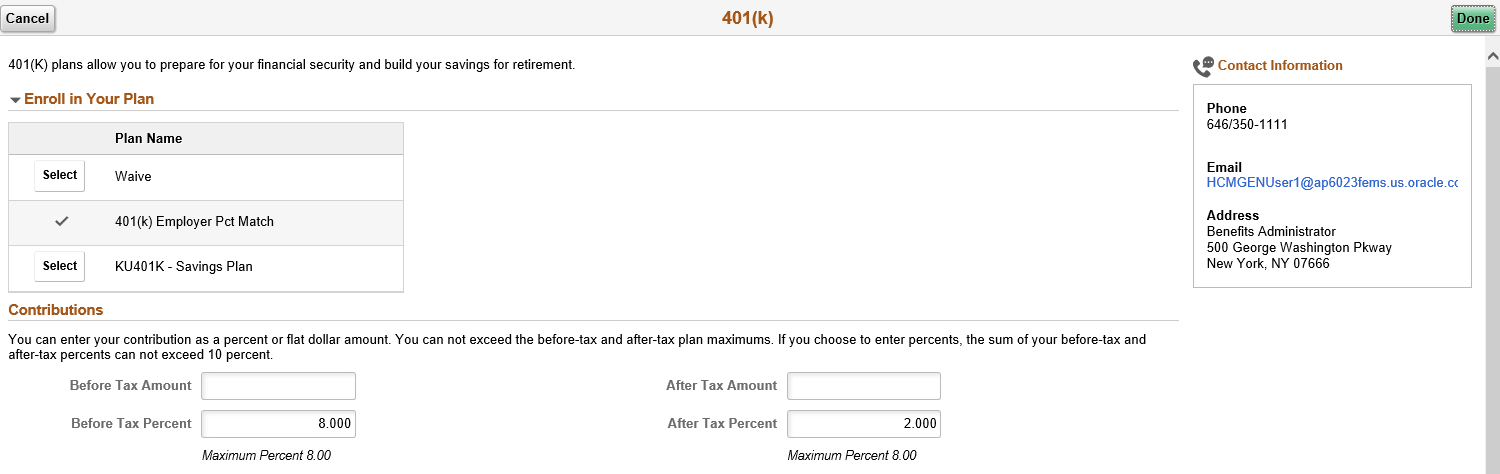
Use the 401(k) page (BNE_PLAN_4X_FL) to enroll in savings plan benefits.
Navigation:
Click the Benefit Details tile on a PeopleSoft Fluid User Interface Employee Self Service homepage. Click the Benefits Enrollment tab on the left panel, and then under the Benefit Plans section, click the plan type, 401(k).
You can also access the benefit enrollment plan pages using the Open Enrollment or OnBoarding tile on the Employee Self Service homepage. On the Open Enrollment or OnBoarding activity guide, click the Benefits Enrollment tab on the left panel and then under the Benefit Plans section, click the plan type, 401(k).
This example illustrates the fields and controls on the 401(k) Page – Part 1. You can find definitions for the fields and controls later on this page.
This example illustrates the fields and controls on the 401(k) Page – Part 1, as seen on a smartphone.
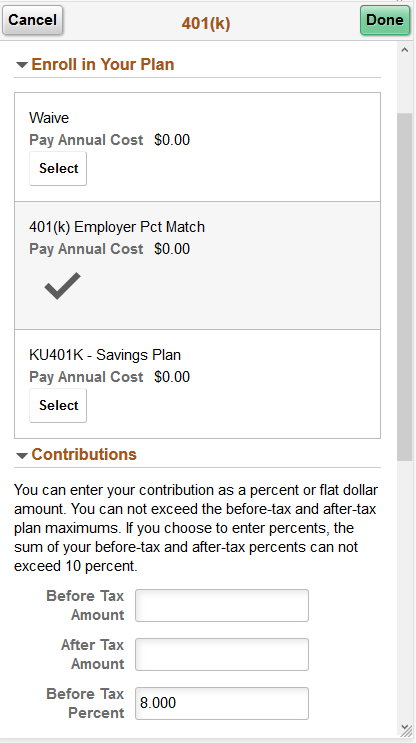
Field or Control |
Description |
|---|---|
Before Tax Amount and Before Tax Percent |
Enter either a flat amount or percent, but not both. |
After Tax Amount and After Tax Percent |
Enter either a flat amount or percent, but not both. |
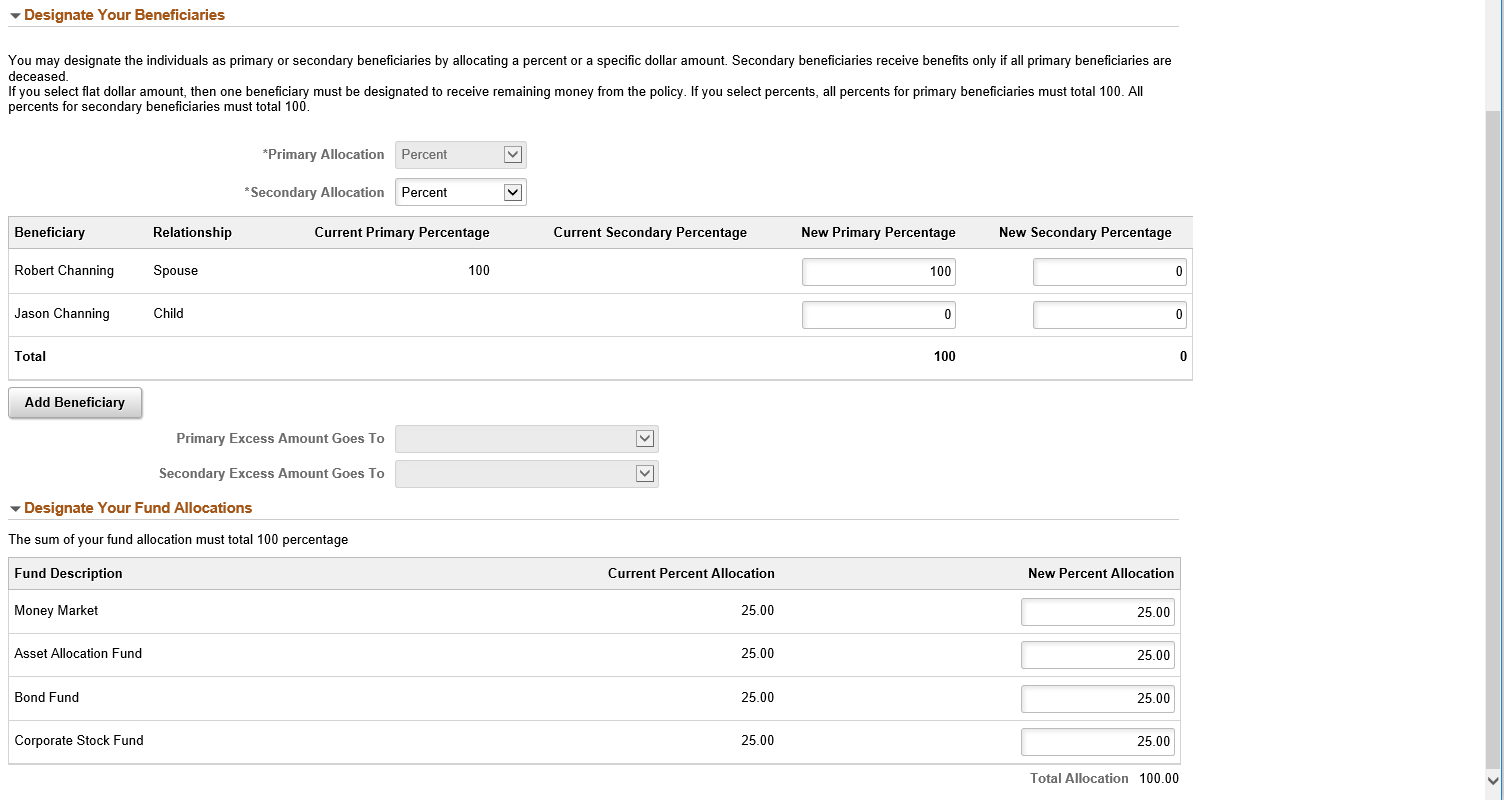
This example illustrates the fields and controls on the 401(k) Page – Part 2. You can find definitions for the fields and controls later on this page.
This example illustrates the fields and controls on the 401(k) Page – Part 2 as seen on a smartphone.
Field or Control |
Description |
|---|---|
Designate Your Beneficiaries: Primary Allocation and Secondary Allocation drop-downs |
The allocation types available are Flat Amount or Percent. |
New Primary Amount orNew Primary Percentage, New Secondary Amount or New Secondary Percentage columns |
If percent is used in the allocation type, on the New Primary Allocation or New Secondary Allocation column enter values that add up to a 100 percent. If flat amount is used in the allocation type, on the New Primary Allocation or New Secondary Allocation column enter values that represents the dollar amount. |
Primary Excess Amount Goes To and Secondary Excess Amount Goes To |
If the primary and secondary allocation types are in percents, then these fields appear greyed out. If flat amount is used in the primary or secondary allocation type, then in the corresponding drop-downs, select an eligible beneficiary. |
Designate Your Fund Allocations: New Percent Allocation |
Enter a new value in percent for each fund. |
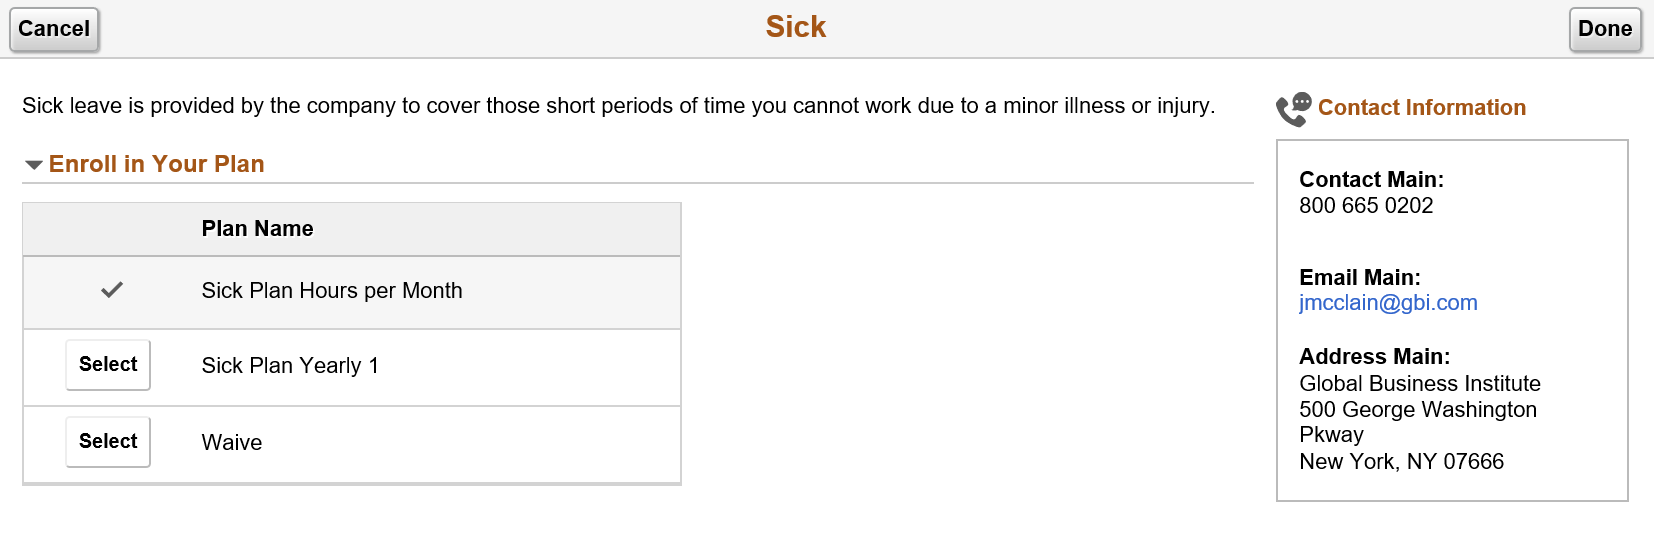
Use the Sick page (BNE_PLAN_5X_FL) to enroll in a sick leave plan.
Navigation:
Click the Benefit Details tile on a PeopleSoft Fluid User Interface Employee Self Service homepage. Click the Benefits Enrollment tab on the left panel, and then under the Benefit Plans section, click the plan type, Sick.
You can also access the benefit enrollment plan pages using the Open Enrollment or OnBoarding tile on the Employee Self Service homepage. On the Open Enrollment or OnBoarding activity guide, click the Benefits Enrollment tab on the left panel and then under the Benefit Plans section, click the plan type, Sick.
This example illustrates the fields and controls on the Sick page.
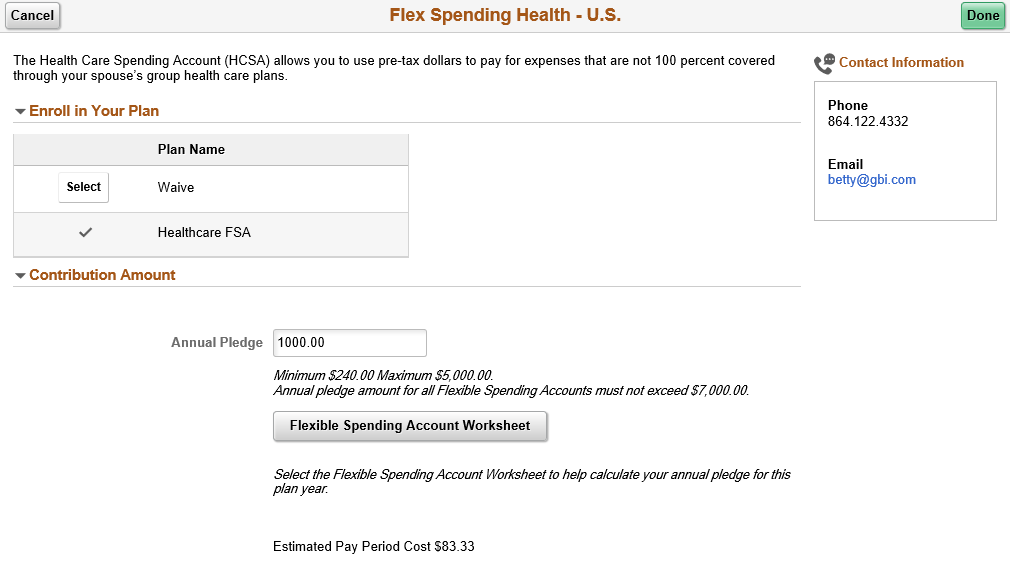
Use the Flex Spending Health – U.S. page (BNE_PLAN_6X_FL) to enroll in FSA plan benefits.
Navigation:
Click the Benefit Details tile on a PeopleSoft Fluid User Interface Employee Self Service homepage. Click the Benefits Enrollment tab on the left panel, and then under the Benefit Plans section, click the plan type, Flex Spending Health – U.S.
You can also access the benefit enrollment plan pages using the Open Enrollment or OnBoarding tile on the Employee Self Service homepage. On the Open Enrollment or OnBoarding activity guide, click the Benefits Enrollment tab on the left panel and then under the Benefit Plans section, click the plan type, Flex Spending Health – U.S.
This example illustrates the fields and controls on the Flex Spending Health – U.S. page.
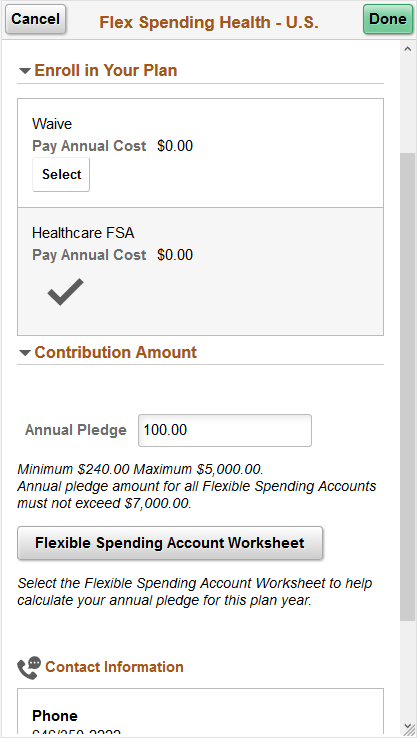
This example illustrates the fields and controls on the Flex Spending Health – U.S. Page as seen on a smartphone.
Field or Control |
Description |
|---|---|
Annual Pledge |
Enter your annual pledge amount. |
Flexible Spending Account Worksheet |
Click the button, to open a Flexible Spending Account Worksheet pop up window. |
This example illustrates the fields and controls on the Flexible Spending Account Worksheet. You can find definitions for the fields and controls later on this page.

This example illustrates the fields and controls on the Flexible Spending Account Worksheet as seen on a smartphone.

Field or Control |
Description |
|---|---|
Estimate Contribution from |
Select from the values in the drop-down: Annual Pledge or Per-Pay-Period. |
Your New Annual Pledge or Estimated Pay-Per-Period Contribution |
Enter the amount for either Annual Pledge or Per-Pay-Period contribution. |
Calculate button |
Click the button view the calculations. If you entered your annual pledge amount, then the calculation returns your Estimated Per-Pay-Period Contribution, and the values for Minus Your Year To Date Contributions, Divided by Pay Periods Remaining. If you entered your estimated per-pay-period contribution, the calculation returns your Your New Annual Pledge, and the values for Multiplied by Pay Periods Remaining and Plus Your Year To Date Contributions. |
Use the Health Savings Account page (BNE_PLAN_6X_FL) to enroll in Health Savings Account (HSA) plan benefits.
Navigation:
Click the Benefit Details tile on a PeopleSoft Fluid User Interface Employee Self Service homepage. Click the Benefits Enrollment tile in the Benefits Details dashboard. Select the event type to open the activity guide. Click the Benefits Enrollment tab on the left panel, and then under the Benefit Plans section, click the plan type, Health Savings Account.
You can also access the benefit enrollment plan pages using the Open Enrollment or OnBoarding tile on the Employee Self Service homepage. On the Open Enrollment or OnBoarding activity guide, click the Benefits Enrollment tab on the left panel and then under the Benefit Plans section, click the plan type, Health Savings Account.
This example illustrates the fields and controls on the Health Savings Account page.
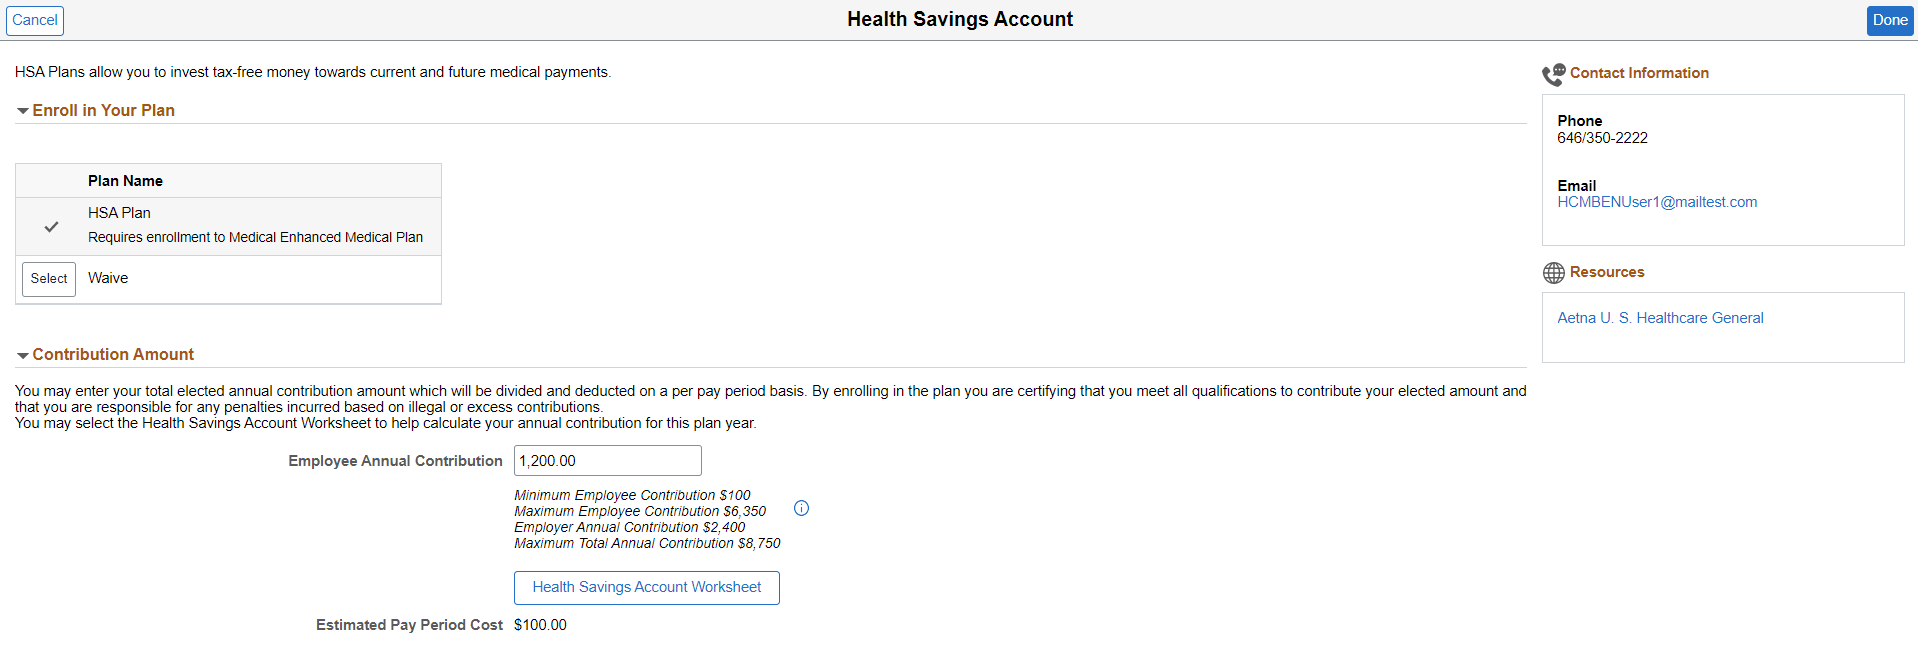
Note: The Contribution Amount section is hidden when the user selects Waive.
|
Field or Control |
Description |
|---|---|
|
Employee Annual Contribution |
Enter your annual contribution amount. The entered value is set as default for annual contribution in the Health Savings Account Worksheet window. Note: The system displays an error if the Employee Annual Contribution is not within the limits defined for the plan. The minimum and maximum values for the plan are indicated under the Employee Annual Contribution field. |
 |
Select to view the help text. The icon appears only for employees aged 55 Yrs and above. |
|
Health Savings Account Worksheet |
Select to open the Health Savings Account Worksheet modal window and estimate your per pay period contribution or annual contribution for the HSA plan. Note: Based on the payroll system (Payroll Interface or Payroll for North America) of the logged-in user, some fields are auto-populated in the Health Savings Account Worksheet window. These fields are also editable. |
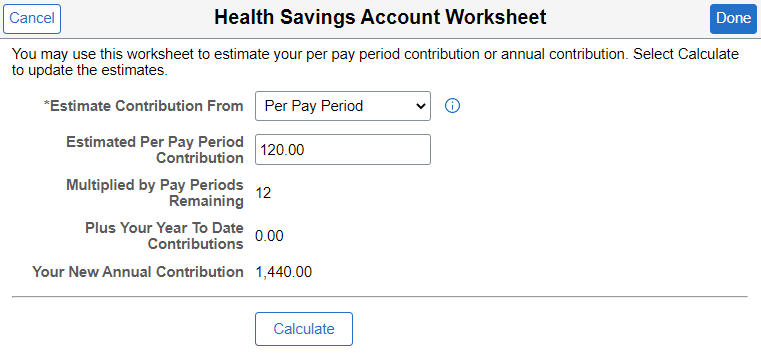
This example illustrates the fields and controls on the Health Savings Account Worksheet when user (Payroll for North America) selects Annual Contribution.
This example illustrates the fields and controls on the Health Savings Account Worksheet when user (Payroll for North America) selects Pay Per Period.
|
Field or Control |
Description |
|---|---|
|
Estimate Contribution From |
Select the option to determine how to estimate your contribution to the HSA plan. Values are: Annual Contribution and Per Pay Period. If you select Annual Contribution, then the worksheet estimates your amount per pay period. If you select Per Pay Period, then the worksheet estimates your annual contribution. |
|
Select to view the help text. |
|
Your New Annual Contribution or Estimated Pay Per Period Contribution |
Enter the amount for Your New Annual Contribution or Estimated Pay Per Period Contribution. The field appears based on the option selected for Estimate Contribution From. |
|
Minus Your Year To Date Contributions or Plus Your Year To Date Contributions |
Displays the year to date contribution for users with Payroll for North America as the payroll system. The value is auto populated based on their payroll data. For users with Payroll Interface as the payroll system, this field is editable and the data is not auto populated. |
|
Divided by Pay Periods Remaining or Multiplied by Pay Periods Remaining |
Displays the remaining pay periods for users with Payroll for North America as the payroll system. The value is auto populated based on their payroll data. For users with Payroll Interface as the payroll system, this field is editable. If the employer uses Payroll Interface deduction calculation, then this field is auto populated. |
|
Calculate button |
Select to calculate and view the estimates of your contribution for the HSA plan. If you entered your annual contribution amount, then the calculation returns your Estimated Per Pay Period Contribution, and the values for Minus Your Year To Date Contributions, andDivided by Pay Periods Remaining. If you entered your estimated per pay period contribution, the calculation returns your Your New Annual Contribution, and the values for Multiplied by Pay Periods Remaining and Plus Your Year To Date Contributions. Note: The system displays an error message if the Your New Annual Contribution or Estimated Pay Per Period Contribution value in the worksheet is not within the defined minimum and maximum limits for the plan. |
|
Cancel |
Select to cancel the worksheet calculations. |
|
Done |
Select to populate the Estimated Pay Period Cost and Employee Annual Contribution in the Health Savings Account page. |
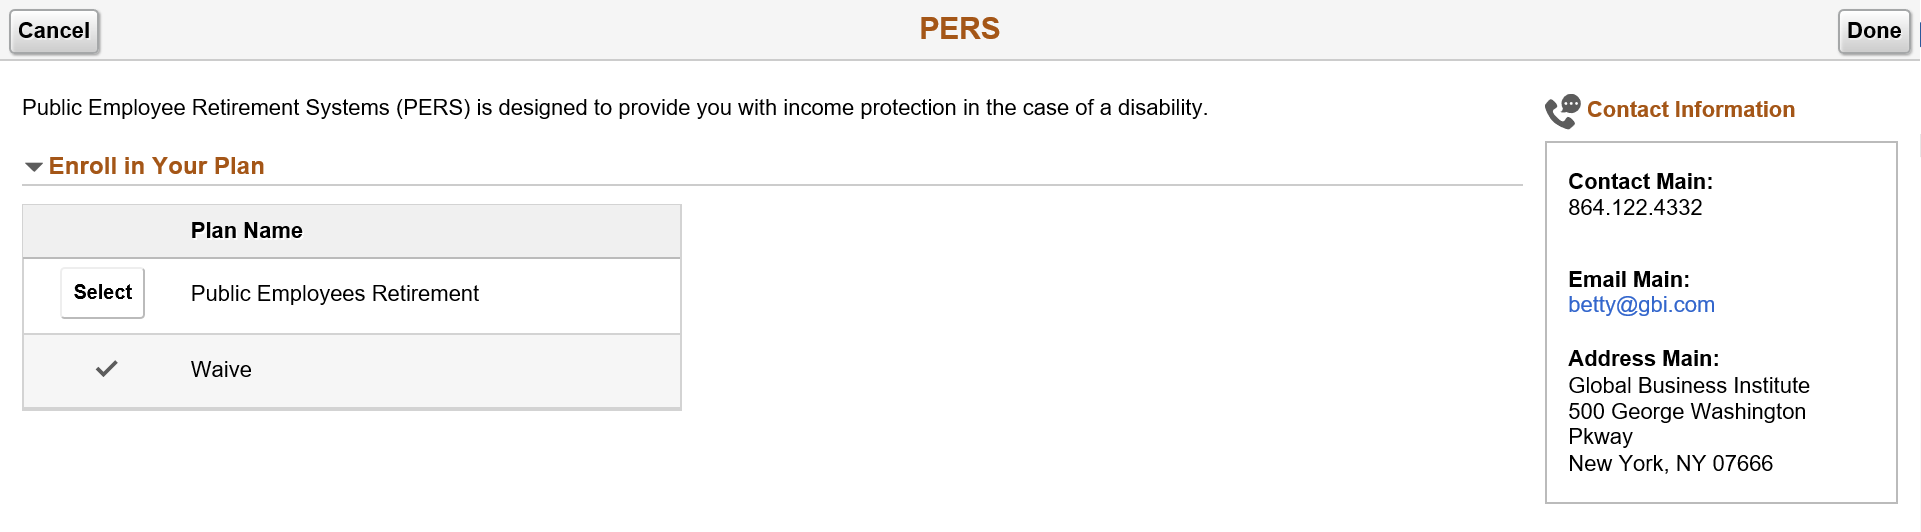
Use the PERS (Public Employee Retirement Systems) page (BNE_PLAN_8X_FL) to enroll in retirement plans.
Navigation:
Click the Benefit Details tile on a PeopleSoft Fluid User Interface Employee Self Service homepage. Click the Benefits Enrollment tab on the left panel, and then under the Benefit Plans section, click the plan type, PERS.
You can also access the benefit enrollment plan pages using the Open Enrollment or OnBoarding tile on the Employee Self Service homepage. On the Open Enrollment or OnBoarding activity guide, click the Benefits Enrollment tab on the left panel and then under the Benefit Plans section, click the plan type, PERS.
This example illustrates the fields and controls on the PERS page.
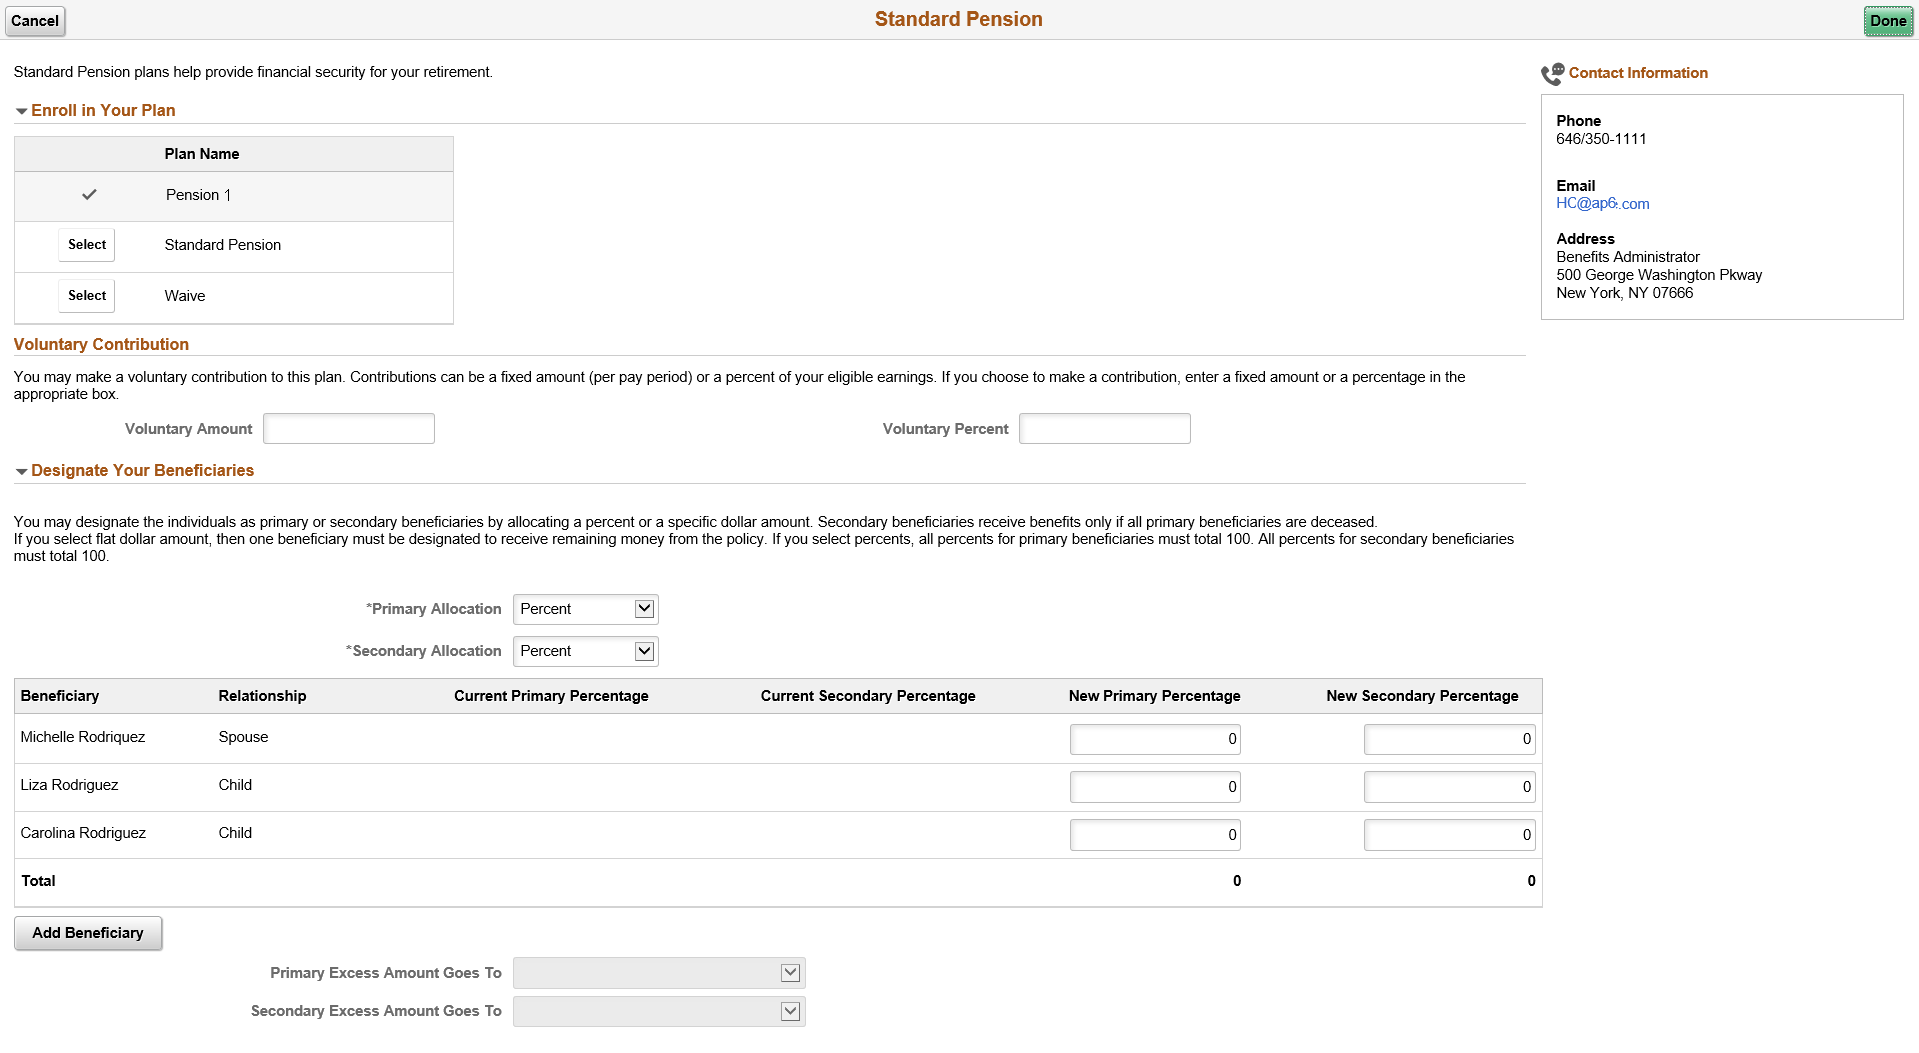
Use the Standard Pension page (BNE_PLAN_8X_FL) to enroll in pension plan benefits.
Navigation:
Click the Benefit Details tile on a PeopleSoft Fluid User Interface Employee Self Service homepage. Click the Benefits Enrollment tab on the left panel, and then under the Benefit Plans section, click the plan type, Standard Pension.
You can also access the benefit enrollment plan pages using the Open Enrollment or OnBoarding tile on the Employee Self Service homepage. On the Open Enrollment or OnBoarding activity guide, click the Benefits Enrollment tab on the left panel and then under the Benefit Plans section, click the plan type, Standard Pension.
This example illustrates the fields and controls on the Standard Pension page.
Field or Control |
Description |
|---|---|
Voluntary Contribution: Voluntary Amount or Voluntary Percent |
Enter the amount or percent for your voluntary contribution. |
Designate Your Beneficiaries: Primary Allocation and Secondary Allocation drop-downs |
The allocation types available are Flat Amount or Percent. |
New Primary Amount orNew Primary Percentage, New Secondary Amount or New Secondary Percentage columns |
If percent is used in the allocation type, on the New Primary Allocation or New Secondary Allocation column enter values that add up to a 100 percent. If flat amount is used in the allocation type, on the New Primary Allocation or New Secondary Allocation column enter values that represents the dollar amount. |
Primary Excess Amount Goes To and Secondary Excess Amount Goes To |
If the primary and secondary allocation types are in percents, then these fields appear greyed out. If flat amount is used in the primary or secondary allocation type, then in the corresponding drop-downs, select an eligible beneficiary. |
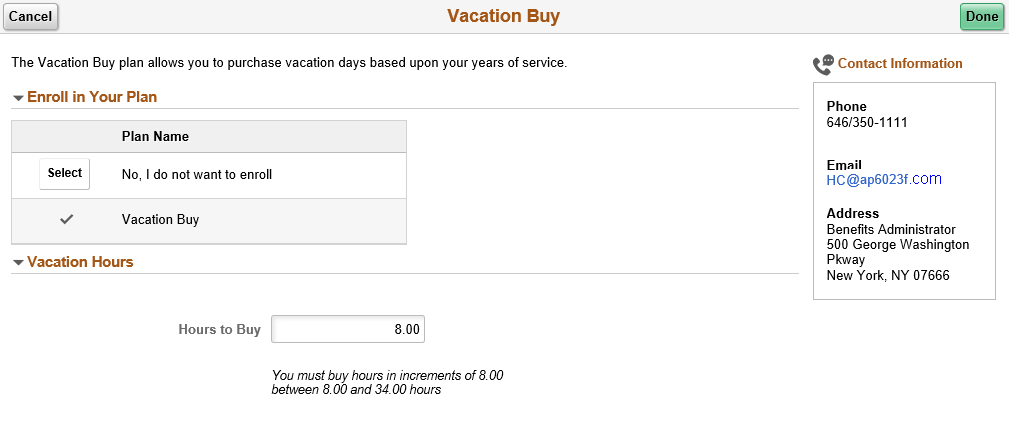
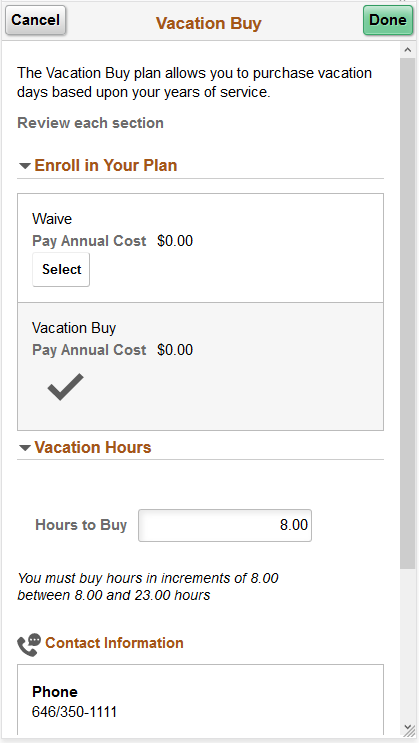
Use the Vacation Buy page (BNE_PLAN_9X_FL) to enroll in vacation plan benefits.
Navigation:
Click the Benefit Details tile on a PeopleSoft Fluid User Interface Employee Self Service homepage. Click the Benefits Enrollment tab on the left panel, and then under the Benefit Plans section, click the plan type, Vacation Buy.
You can also access the benefit enrollment plan pages using the Open Enrollment or OnBoarding tile on the Employee Self Service homepage. On the Open Enrollment or OnBoarding activity guide, click the Benefits Enrollment tab on the left panel and then under the Benefit Plans section, click the plan type, Vacation Buy.
This example illustrates the fields and controls on the Vacation Buy page.
This example illustrates the fields and controls on the Vacation Buy page as seen on a smartphone.
Field or Control |
Description |
|---|---|
Hours to Buy |
Enter the number of hours to buy based on your years of service. |
Use the Long-Term Care page (BNE_PLAN_375AX_FL) to enroll in simple plans.
Navigation:
Click the Benefit Details tile on a PeopleSoft Fluid User Interface Employee Self Service homepage. Click the Benefits Enrollment tab on the left panel, and then under the Benefit Plans section, click the plan type, Long-Term Care.
You can also access the benefit enrollment plan pages using the Open Enrollment or OnBoarding tile on the Employee Self Service homepage. On the Open Enrollment or OnBoarding activity guide, click the Benefits Enrollment tab on the left panel and then under the Benefit Plans section, click the plan type, Long-Term Care.
This example illustrates the fields and controls on the Long-Term Care page.
