Setting Up Notification Composer
This topic discusses the pages required to set up Notification Composer.
|
Page Name |
Definition Name |
Usage |
|---|---|---|
|
EONC_UL_SRCH_FL |
Maintain user lists and add new lists. User lists can be used to define notification recipients. |
|
|
EONC_UL_ADD_SCF |
Create user lists that can be used to define notification recipients. |
|
|
EONC_BUS_PROC_FL |
Maintain business process definitions and add new processes for Notification Composer. Business processes represent logical grouping of Notification Events. |
|
|
EONC_BP_ADD_SCF |
Add additional business processes for your Notification Composer configuration. Business processes represent logical grouping of Notification Events. |
|
|
EONC_BP_EDIT_SCF |
Edit an existing business process definition. |
|
|
EONC_XREF_DEFN_FL |
Manage notification events and create new events. |
|
|
EONC_XREF_ADD_SCF |
Create a new notification event. |
|
|
EONC_XREF_EDIT_SCF |
Modify an existing notification event. |
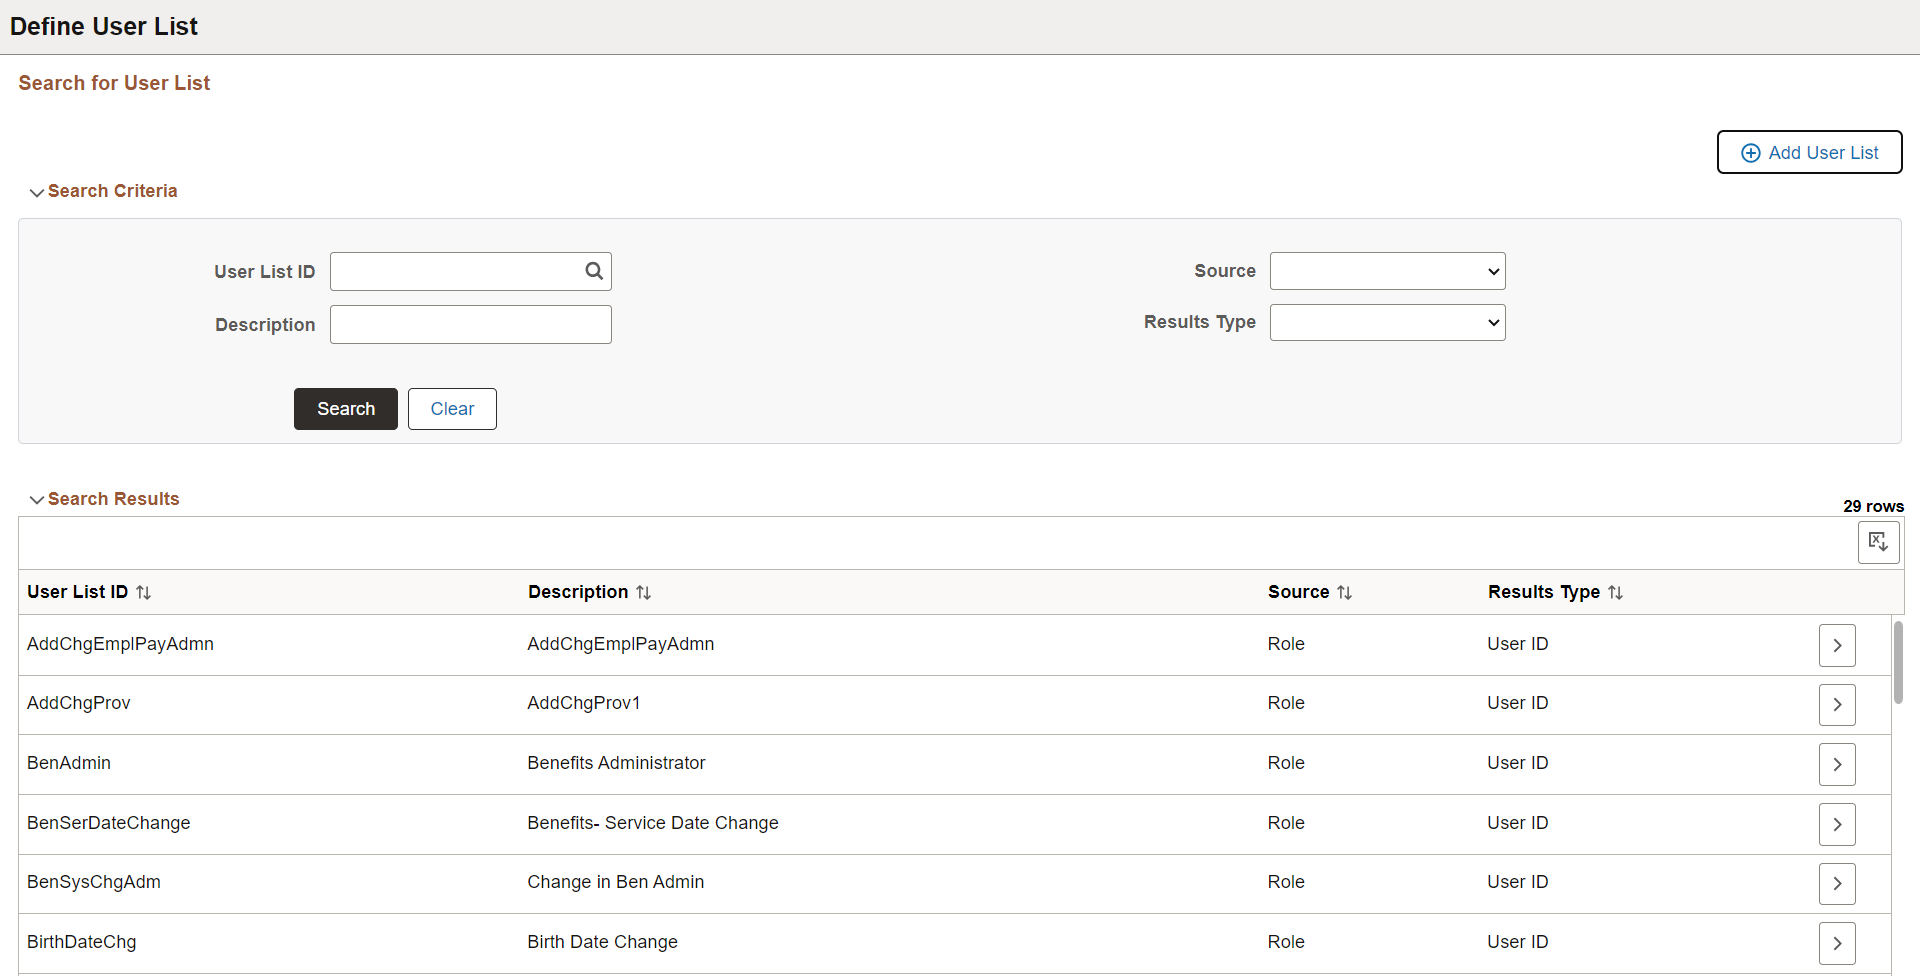
Use the Define User List page (EONC_UL_SRCH_FL) to maintain user lists and add new lists. User lists can be used to define notification recipients.
Navigation:
This example illustrates the fields and controls on the Define User List page.
|
Field or Control |
Description |
|---|---|
|
Add User List |
Select this button to access the Add New User List Page and create a new user list. |
Search Criteria
Enter search criteria to find existing user lists. You can search by User List ID, Source, Description, and Results Type.
Search Results
The Search Results displays existing user lists based on your search criteria. For an understanding of each column, see field definitions for the Add New User List Page.
Select a user list row to view user list details.
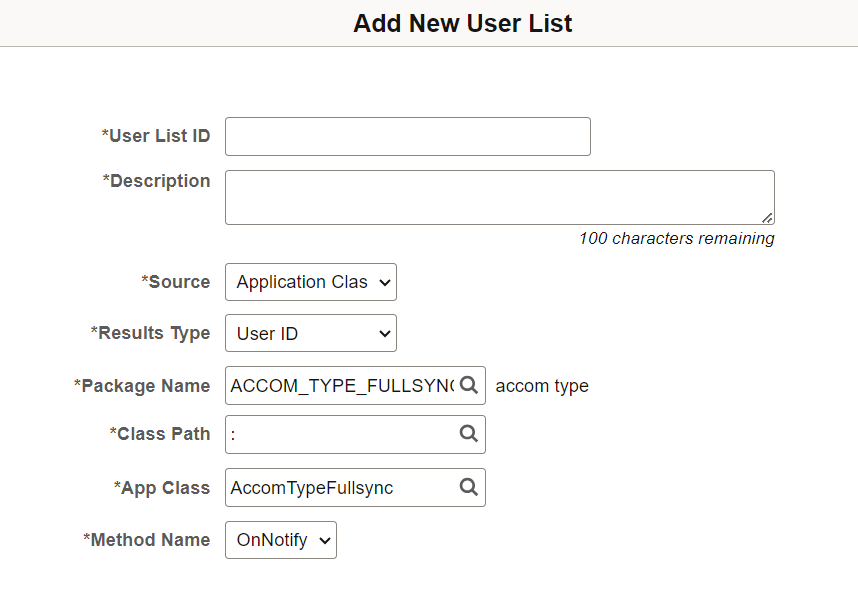
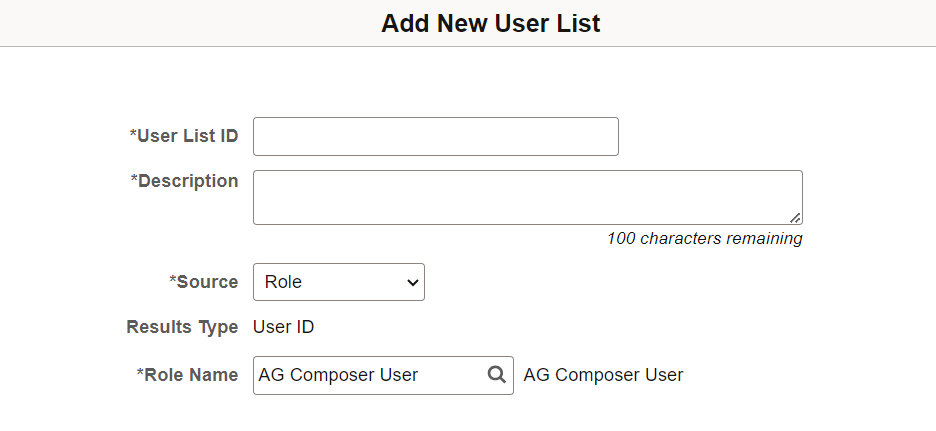
Use the Add New User List page (EONC_UL_ADD_SCF) to create user lists that can be used to define notification recipients. Some fields on the page are generated dynamically based on the Source field value.
Navigation:
This example illustrates the fields and controls on the Add New User List page- application class source.
This example illustrates the fields and controls on the Add New User List page- role source.
This example illustrates the fields and controls on the Add New User List page- role query source.

This example illustrates the fields and controls on the Add New User List page - SQL definition source.

|
Field or Control |
Description |
|---|---|
|
User List ID and Description |
Enter a short and long description for the user list. |
|
Source |
Select a source from which you will create the user list. Supported sources are:
When you select a source value, the fields on the page change dynamically. See the sections that follow to view the additional fields that appear with each Source option. |
|
Results Type |
Select a results type for the user list. The results type determines the type of contact information the source returns:
Note: If you select Role or Role Query from the Source field, only User ID result type can be used. |
Source: Application Class
The page displays these fields when you select Application Class for the Source value:
|
Field or Control |
Description |
|---|---|
|
Package Name |
Enter the package (container) associated with the PeopleTools Application Class that is the source for the user list. |
|
Class Path |
Enter the directory path that defines the location of the PeopleTools Application Class that is the source for the user list. |
|
App Class (Application Class) |
Enter the PeopleTools Application Class to be used as a source for the user list. |
|
Method Name |
Enter the method (function) associated with the PeopleTools Application Class that has the logic to identify the recipients. |
Source: Role
The page displays these fields when you select Role for the Source value:
|
Field or Control |
Description |
|---|---|
|
Role Name |
Enter the security role. Recipients are determined based on user IDs matching this security role. |
Source: Role Query
The page displays these fields when you select Role Query for the Source value:
|
Field or Control |
Description |
|---|---|
|
Query Name |
Enter the query name that returns one or more User IDs as the recipients. |
Source: SQL Definition
The page displays these fields when you select SQL Definition for the Source value:
|
Field or Control |
Description |
|---|---|
|
SQL Object ID |
Enter the stand-alone SQL defined in Application Designer that is the source for the user list. |
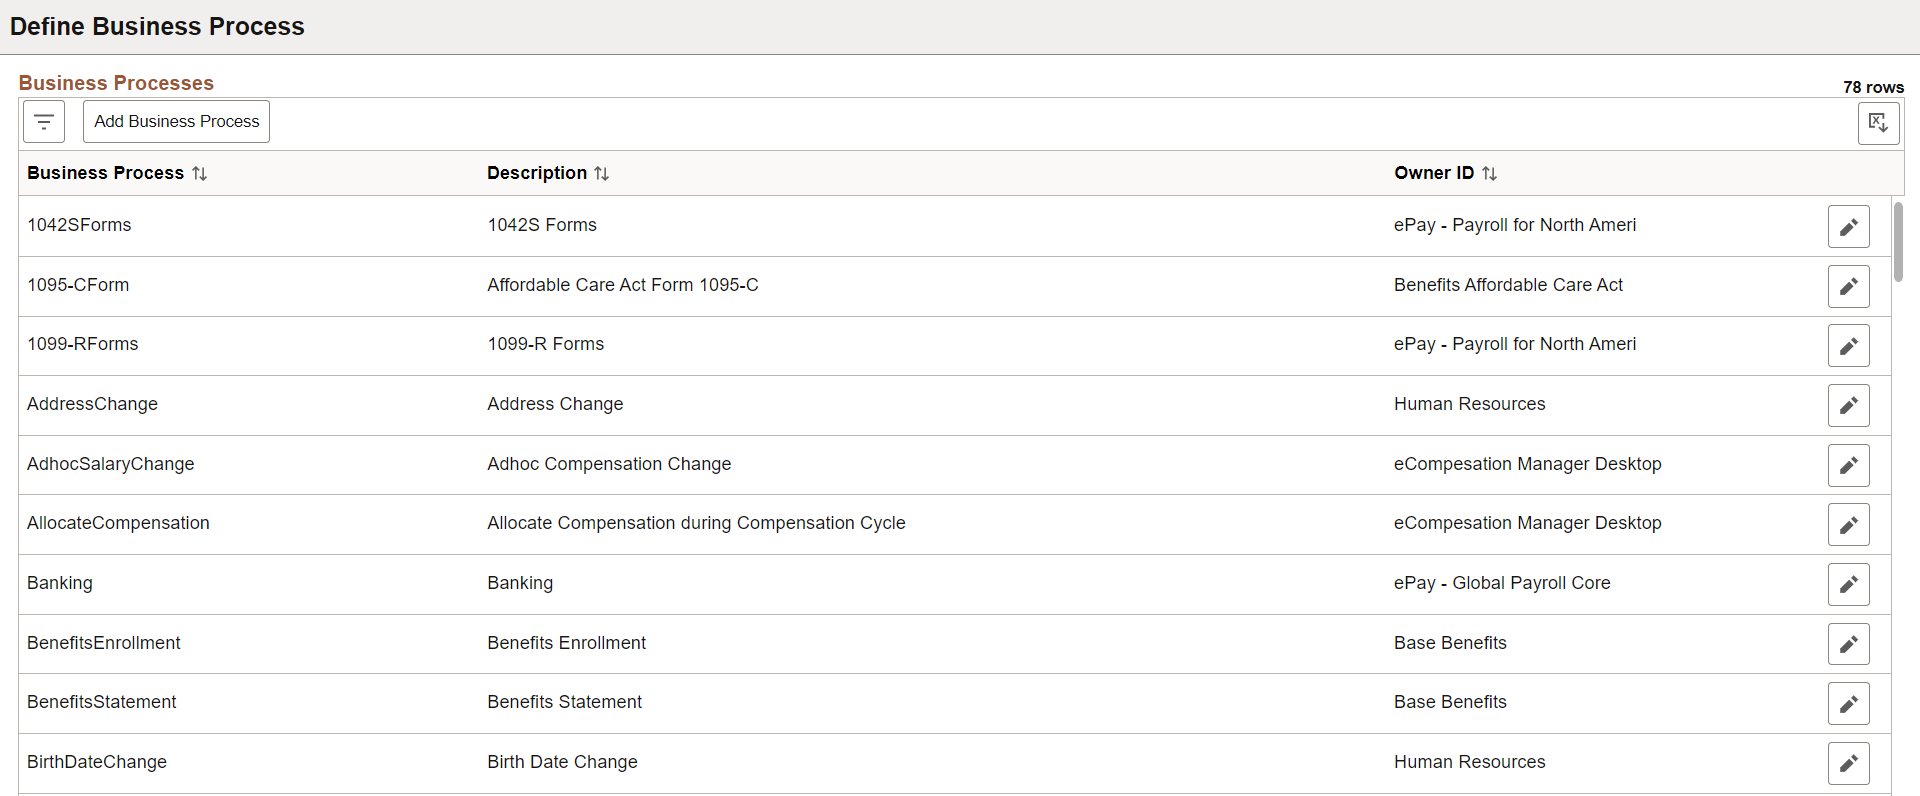
Use the Define Business Process page (EONC_BUS_PROC_FL) to maintain business process definitions and add new processes for Notification Composer. Business processes represent logical grouping of Notification Events.
Navigation:
This example illustrates the fields and controls on the Define Business Processes page.
|
Field or Control |
Description |
|---|---|
|
|
Select this button to access the Filters page and enter parameters used to filter the list by a given business process, description, or object owner ID. |
|
Add Business Process |
Select this button to access the Add Business Process Page and add additional business processes for your Notification Composer configuration. |
|
Edit
|
Select this button to access the Edit Business Process Page and edit an existing business process definition. |
|
Delete button |
Select this button to delete the business process. This button is available only for those business processes you created. You cannot delete a delivered system data event. |
 Filter
Use the Add Business Process page (EONC_BP_ADD_SCF) to add additional business processes for your Notification Composer configuration. Business processes represent logical grouping of Notification Events.
Navigation:
From the Define Business Processes Page, select the Add Business Process button.
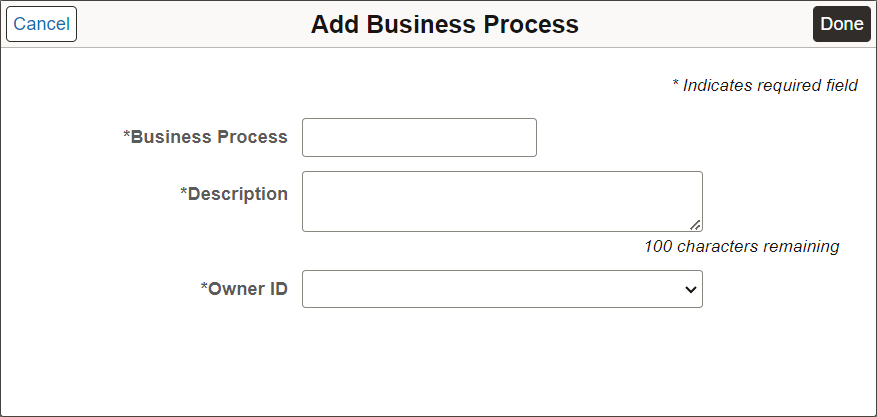
This example illustrates the fields and controls on the Add Business Process page.
|
Field or Control |
Description |
|---|---|
|
Business Process and Description |
Enter a short and long description for the business process. |
|
Object Owner ID |
Enter the application owner for the business process. |
|
Done button |
Select this button to add and save the business process. |
See the Define Notification Event Page.
Use the Edit Business Process page (EONC_BP_EDIT_SCF) to edit an existing business process.
Navigation:
From the Define Business Processes Page, select the  (Edit Business Process) button.
This example illustrates the fields and controls on the Edit Business Process page.
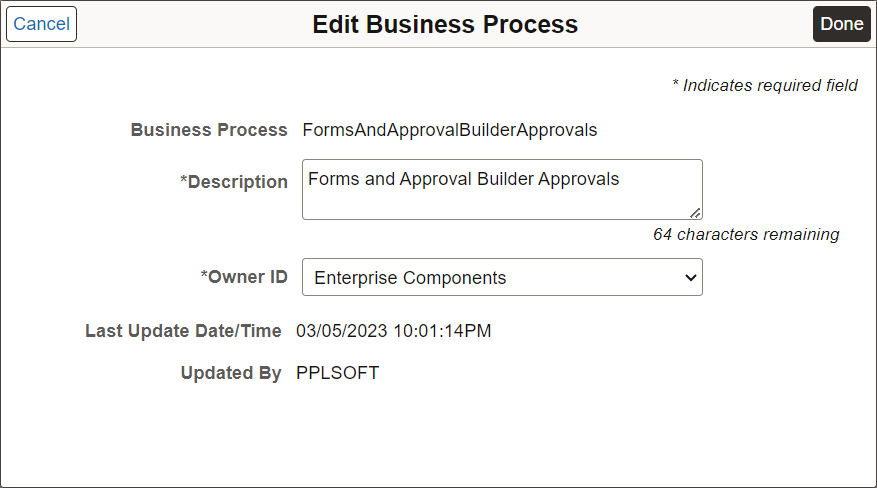
Use this page to modify the Description or Object Owner ID.
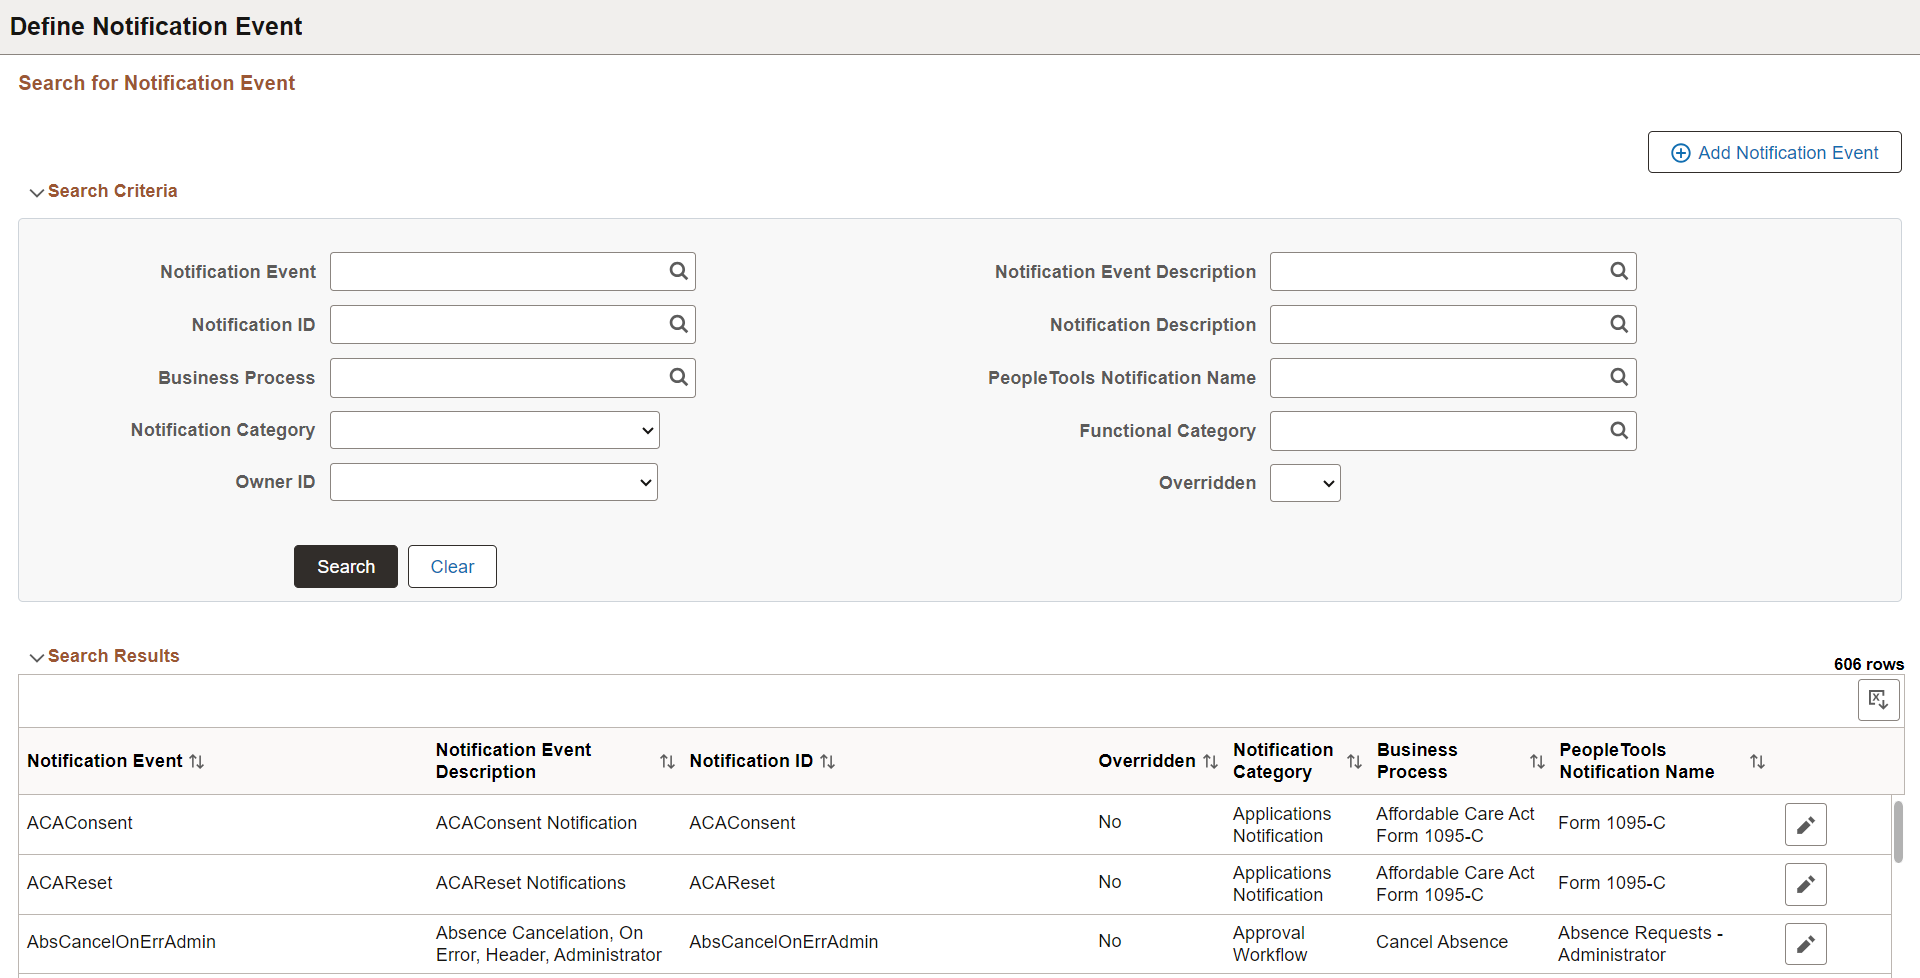
Use the Define Notification Event page (EONC_XREF_DEFN_FL) to manage existing notification events and create new events. Notification Events are events that occur within the context of a PeopleSoft application that trigger notifications, such as hiring an employee or adopting a baby. Notification Events map to theNotification ID, PeopleTools Notification Name, Functional Category, and Business Process.
Navigation:
.
This example illustrates the fields and controls on the Define Notification Event page.
|
Field or Control |
Description |
|---|---|
|
Add Notification Event |
Select this button to access the Add Notification Event Page and create a new notification event. |
Search Criteria
Enter search criteria to find existing Notification Events. You can search by Notification ID, Business Process, Owner ID, PeopleTools Notification Name, and so forth.
Search Results
The Search Results displays existing Notification Events based on your search criteria. For an understanding of each column, see field definitions for the Add Notification Event Page.
|
Field or Control |
Description |
|---|---|
|
Overridden |
Indicates whether the delivered Notification ID has been overridden with a new value. You can override the delivered Notification ID using the Edit Notification Event Page. |
|
Edit
|
Select this button to access the Edit Notification Event Page and edit an existing notification event. |
|
Delete |
Select this button to delete the Notification Event. This button is available only for those notification events you created. You cannot delete a delivered system data event. |
Use the Add Notification Event page (EONC_XREF_ADD_SCF) to create a notification event. Notification Events are events that occur within the context of a PeopleSoft application that trigger notifications, such as hiring an employee or adopting a baby. Notification Events map to the Notification ID.
Navigation:
From the Define Notification Event Page, select the Add Notification Event button.
This example illustrates the fields and controls on the Add Notification Event page.

|
Field or Control |
Description |
|---|---|
|
Notification Event |
Enter the notification event. This informaiton is used as the Notification Event ID. |
|
Notification Event Description |
Enter a description for the notification event. |
|
Notification ID |
Enter a Notification ID for the event. The Notification ID helps identify the corresponding PeopleTools Notification, Notification Category, Business Process, and Functional Category. After you enter the Notification ID, the corresponding PeopleTools Notification and Business Process fields display below. You can select the adjacent blue Information icon to access the Notification Details page and view notification details, such as in-app, email, and text. |
|
Notification Description |
Displays the description of the notification. |
|
PeopleTools Notification Name |
Displays the PeopleTools notification name associated with this event. PeopleTools notification name is defined within PeopleTools Push Notification Framework. You can select the adjacent blue Information icon to access the PeopleTools Notification Name Details page and view details specific to the PeopleTools notification name, such as delivery channel preferences and personalization authorization. |
|
Notification Category |
Displays the Notification Category associated with this event. |
|
Business Process |
Displays the Business Process associated with this event. Business process is a logical grouping of Notification Events. |
|
Functional Category |
Displays the Functional Category associated with the PeopleTools Notification. Functional category is defined within PeopleTools Push Notification Framework and represents a logical grouping of PeopleTools notification name. |
Use the Edit Notification Event page (EONC_XREF_EDIT_SCF) to modify an existing notification event.
Navigation:
From the Define Notification Event Page, select the (Edit Notification Event) button.
This example illustrates the fields and controls on the Edit Notification Event page.
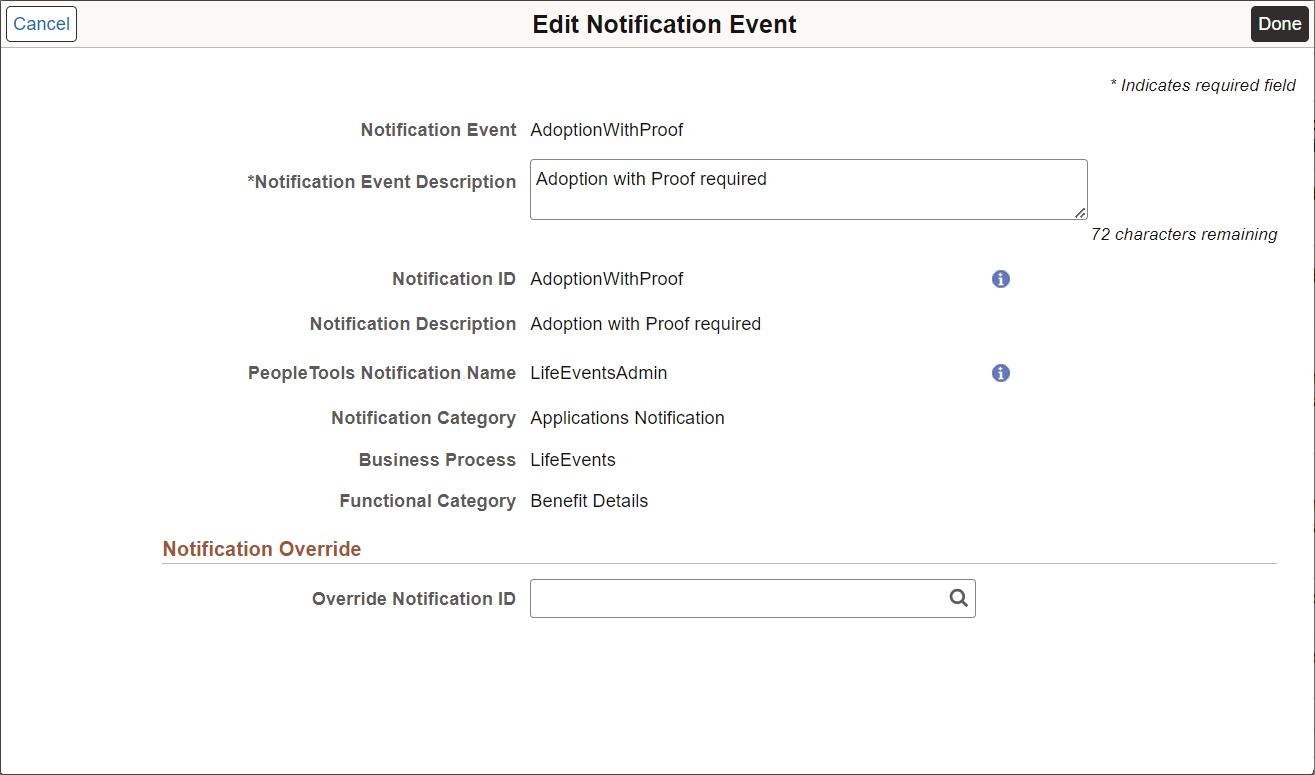
Use this page to modify the Notification Event Description or Override Notification ID values. For example, if you have cloned and modified a delivered Notification ID, use the Override Notification ID field to map to the cloned Notification ID.
Use the blue Information icons to access notification details.