Creating and Managing Notifications with Notification Composer
This topic discusses how to create and manage Notification Composer notifications.
|
Page Name |
Definition Name |
Usage |
|---|---|---|
|
EONC_REG_SRCH_FL |
Manage existing notifications and create new notifications. |
|
|
EONC_REG_SRCH_FL |
View your in-progress notifications. This page is available only when you have in-progress notifications that have been saved but not submitted. |
|
|
EONC_ADD_NOTIF_FL |
Create a notification. |
|
|
EONC_GEN_INFO_FL |
Define the general properties of a notification, such as owner, default message set, PeopleTools notification, and so forth. |
|
|
EONC_ASG_HNDLR_FL |
Define a custom handler for sending notifications. |
|
|
EONC_EVNT_MAP_FL |
Define a notification trigger using Event Mapping. |
|
|
EONC_EVNT_ADV_SCF |
Enter event map details, preprocessing and preprocessing parameters for a component. |
|
|
EONC_CFG_URL_FL |
Define the target page link that should be included in the notification |
|
|
EONC_MSG_SRC_FL |
Identify a message source (Message Catalog, custom text, or email template) for email, in-app, and text notifications. |
|
|
EONC_INAPP_CFG_FL |
Specify in-app notification parameters. |
|
|
EONC_EML_CFG_FL |
Specify email notification parameters. |
|
|
EONC_TXT_CFG_FL |
Specify text messaging notification parameters. |
|
|
EONC_REVIEW_FL |
View a summary of the notification setup before saving. |
|
|
EONC_CONF_FL |
Confirm the notification has been successfully configured and completed. |
|
|
EONC_COPY_NOTIF_FL |
Clone a notification. |
|
|
EONC_VIEW_SCF |
View the details of a notification. |
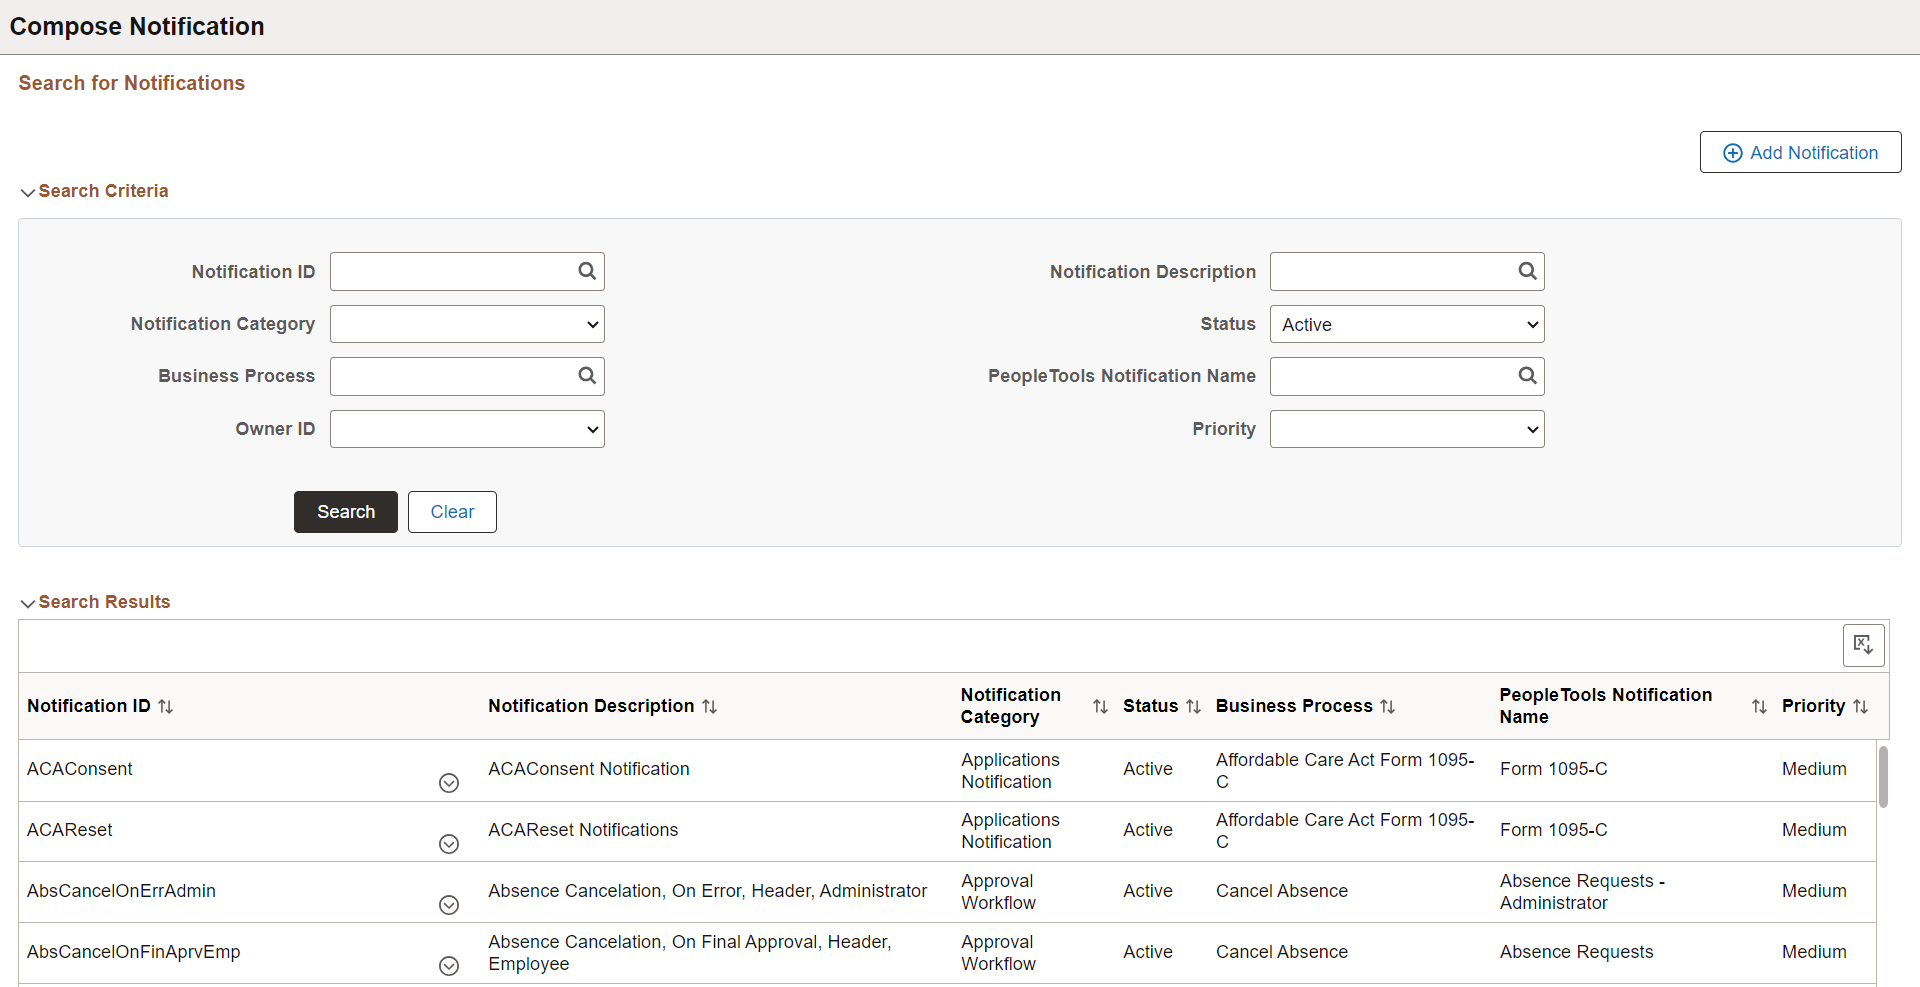
Use the Compose Notification page (EONC_REG_SRCH_FL) to manage existing notifications and create new notifications.
Navigation:
This example illustrates the fields and controls on the Compose Notification page.
This example illustrates the Actions options for the Composer Notification - Search for Notifications page.

|
Field or Control |
Description |
|---|---|
|
Add Notification |
Select this button to access the Add New Notification Page and create a new Notification Composer notification. If you have in-progress notifications that have been saved but not submitted, selecting this button accesses the Drafts page, where you can view your unfinished notifications. From there you can resume composing your notification or discard it. |
Search Criteria
Enter search criteria to find existing Notification Composer notifications. You can search by Notification ID, Business Process, Owner ID, PeopleTools Notification Name, and so forth.
Search Results
The Search Results displays existing notifications based on your search criteria. For an understanding of each column, see field definitions for the Add New Notification Page and General Notification Information Page.
|
Field or Control |
Description |
|---|---|
|
Actions |
Select the Actions icon to copy, edit, or view an existing Notification Composer configuration. Select Copy to access the Copy from Notification Page page and create a new notification by copying an existing one. Select Edit to access the General Notification Information Page page and modify an existing notification. Select View to access the Notification Details Page page and view the details of an existing notification. |

Use the Compose Notification - Drafts page (EONC_REG_SRCH_FL) to view your in-progress notifications. This page is available only when you have in-progress notifications that have been saved but not submitted.
Navigation:
From the Compose Notification Page, select the Add Notification button.
This example illustrates the fields and controls on the Composer Notification - Drafts page.
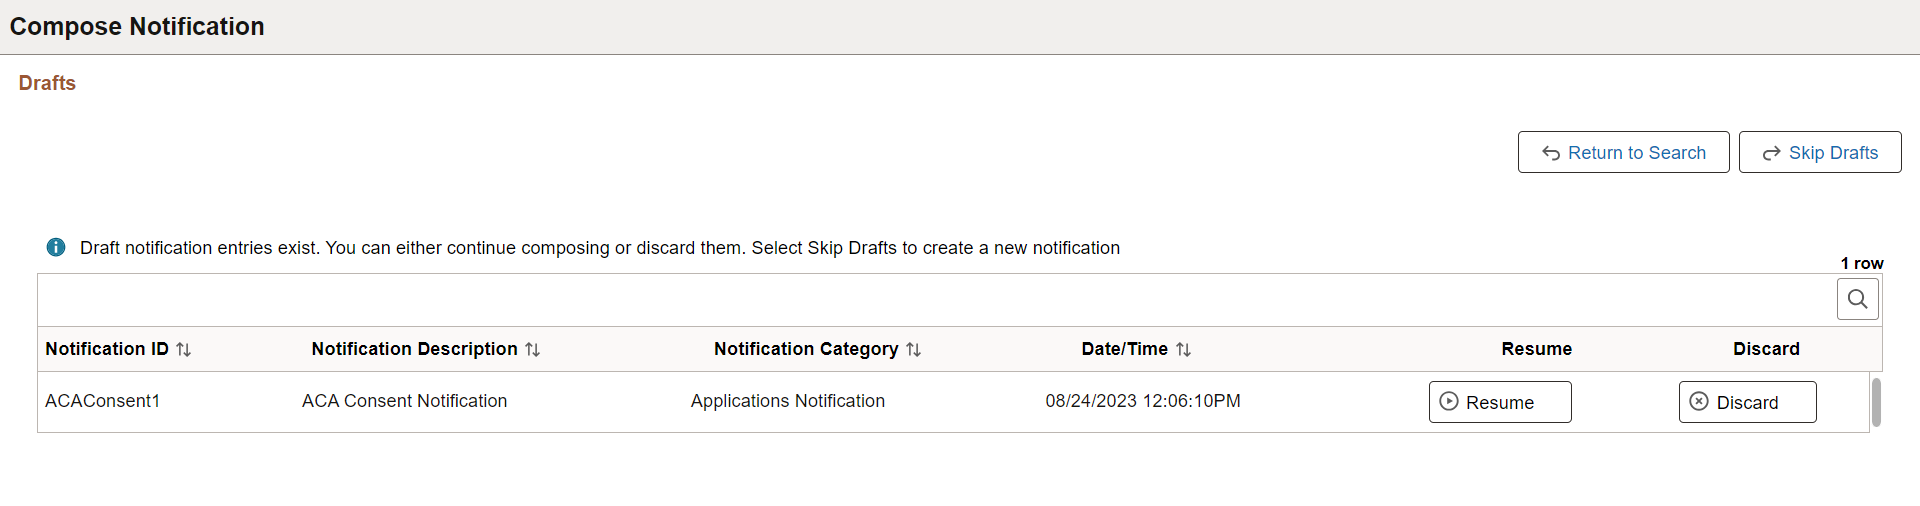
View unfinished notifications and either resume composing the notification or discard it. You can also choose to skip viewing the drafts altogether.
Use the Add New Notification page (EONC_ADD_NOTIF_FL) to create a notification.
Navigation:
From the Compose Notification Page, select the Add Notification button.
This example illustrates the fields and controls on the Add New Notification page.

|
Field or Control |
Description |
|---|---|
|
Compose button |
Select this button to access the Notification Composer activity guide and specify notification details. The activity guide begins with the General Notification Information Page. You must enter the Notification ID, Notification Description, and Notification Category before you can use this button. |
|
Notification ID and Notification Description |
Enter a unique ID and description for the notification. |
|
Notification Category |
Indicate a notification category (type) for which you are creating the notification. Available values are:
Your selection determines which composer preferences are available for configuration because the fields on the page change dynamically based on the selection. |
|
Activity Guide Category |
Enter an activity guide category associated with the notification. This field is available only for the Activity Guide Composer Notification Category. For more information on activity guide categories, see Setting Up Activity Guide Categories. |
Composer Preferences
|
Field or Control |
Description |
|---|---|
|
Configure Notification Link |
Select Yes to define a page link to include in the notification. When enabled, the Define Message Content - Notification Link Page is available within the Notification Composer activity guide. Using this page you can define a link to an application page that can be included in the notification. For example, if you send a notification to an administrator about an employee's change in marital status, you can include a link to the employee status application page. This field is available with the Applications and Approval Workflow Notification Category. |
|
Override Default Handler |
Select Yes to define a custom handler for sending notifications. When enabled, the Specify Notification Handler Page is available within the Notification Composer activity guide. This field is available with the Applications, Activity Guide Composer, and Questionnaire Framework Notification Category. Note: Oracle PeopleSoft recommends that you do not change the default handler. |
|
Event Mapping |
Select Yes to define a custom notification trigger using Event Mapping functionality. When enabled, the Define Event Mapping Page is available within the Notification Composer activity guide. Event mappings enable you to define your own business logic to be executed when specific events occur within the PeopleSoft application. This field is available with the Applications Notification Category. |
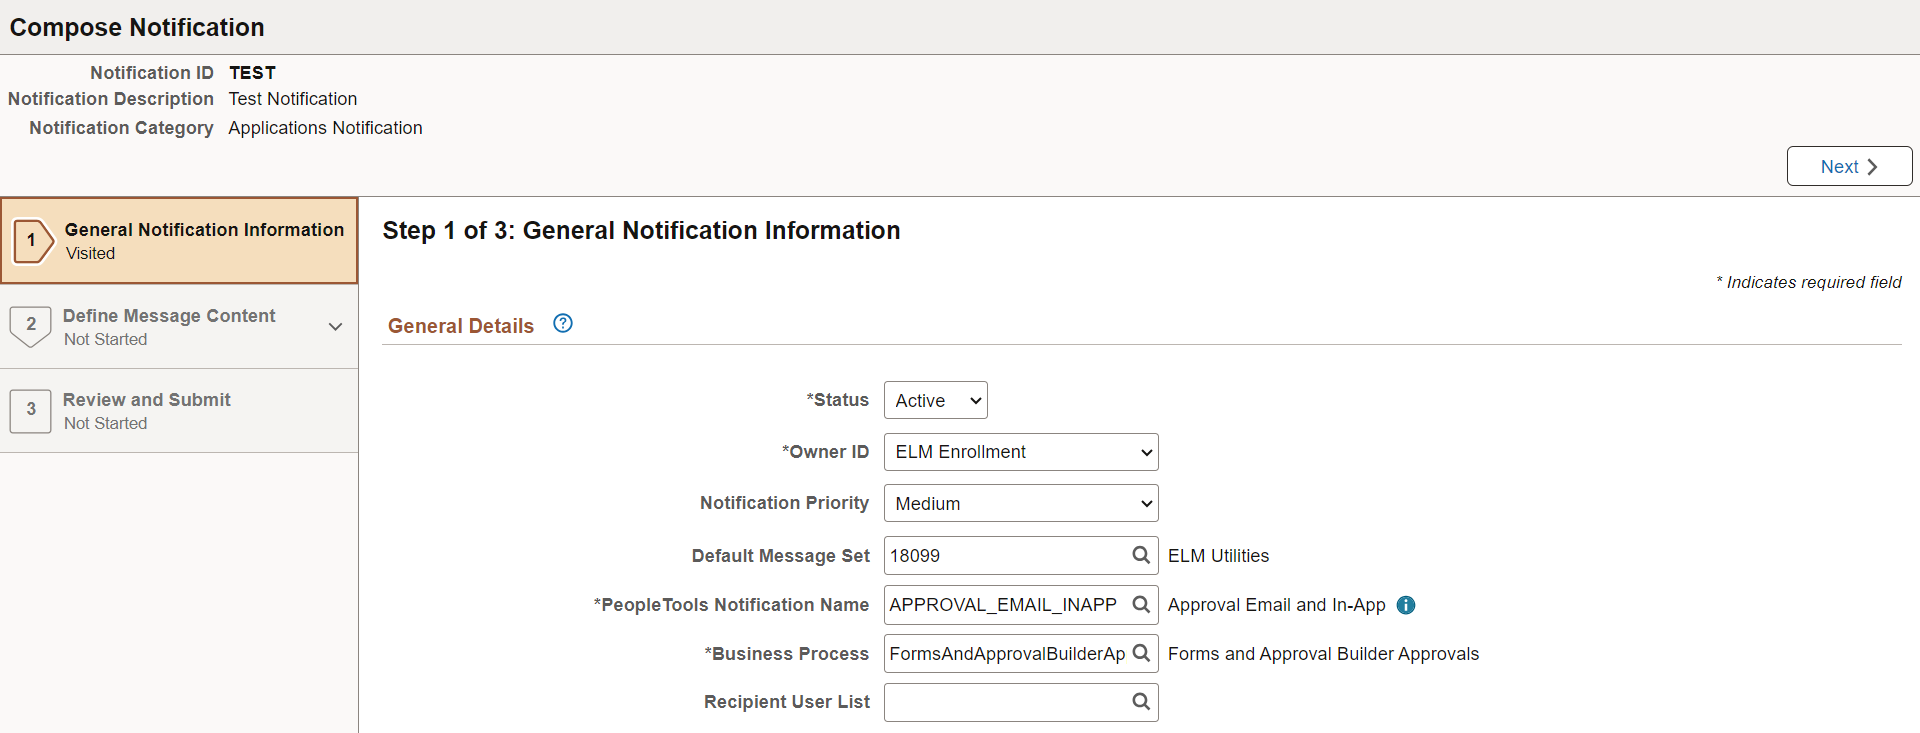
Use the General Notification Information page (EONC_GEN_INFO_FL) to define the general properties of a notification, such as owner, default message set, PeopleTools notification, and so forth.
Navigation:
From the Add New Notification Page, select the Compose button.
From the Compose Notification Page, select Edit from the Action icon for an individual notification.
From the Copy from Notification Page, select Continue button.
This example illustrates the fields and controls on the General Notification Information page.
|
Field or Control |
Description |
|---|---|
|
Save as Draft |
Select this button to save your progress within the Notification Composer Activity Guide. The next time you select the Add Notification button from the Compose Notification Page, you are taken to the Drafts page, where you can view your unfinished notifications. From there you can resume composing your notification or discard it. |
|
Status |
Indicate whether the notification is active or inactive.This can be changed later if necessary. |
|
Owner ID |
Select an owner for this notification. This provides another method for classifying your notification information and associate the notification to a specific area of application functionality. |
|
Notification Priority |
Select a priority for the notification. Values are:
For email and in-app notifications, this setting impacts how the message is displayed to the user. For example, high priority email notifications may display with an exclamation mark. |
|
Default Message Set |
Enter a default message set definition if you are using Message Catalog to define your notification content. A PeopleTools message set is a collection of related messages that are defined and organized together for use in PeopleSoft applications. The message set you specify here is used as the default when defining the notification content. |
|
PeopleTools Notification Name |
Enter a PeopleTools notification to associate with this notification. The PeopleTools notification controls the delivery channel preferences and user personalization access. You can select the adjacent blue Information icon to access the PeopleTools Notification Name Details page and view details specific to the PeopleTools Notification, such as delivery channel preferences and personalization authorization. For more information about PeopleTools notifications, see:
|
|
Business Process |
Enter the Business Process associated with this notification. Business process is a logical grouping of Notification Events. The business process must be defined using the Define Business Processes Page. |
|
Recipient User List |
Enter a recipient user list to use with this notification. User List determines the recipients of the notification. |
Use the Specify Notification Handler page (EONC_ASG_HNDLR_FL) to define a custom handler for sending notifications. A notification handler manages the generation and delivery of notifications within a PeopleSoft application. It provides a framework for managing and sending various types of notifications, such as email notifications, text notifications, and so forth.This page is available when you select Yes for the Override Default Handler option on the Add New Notification Page.
Navigation:
From the General Notification Information Page page, select the Next button.
This example illustrates the fields and controls on the Specify Notification Handler page.
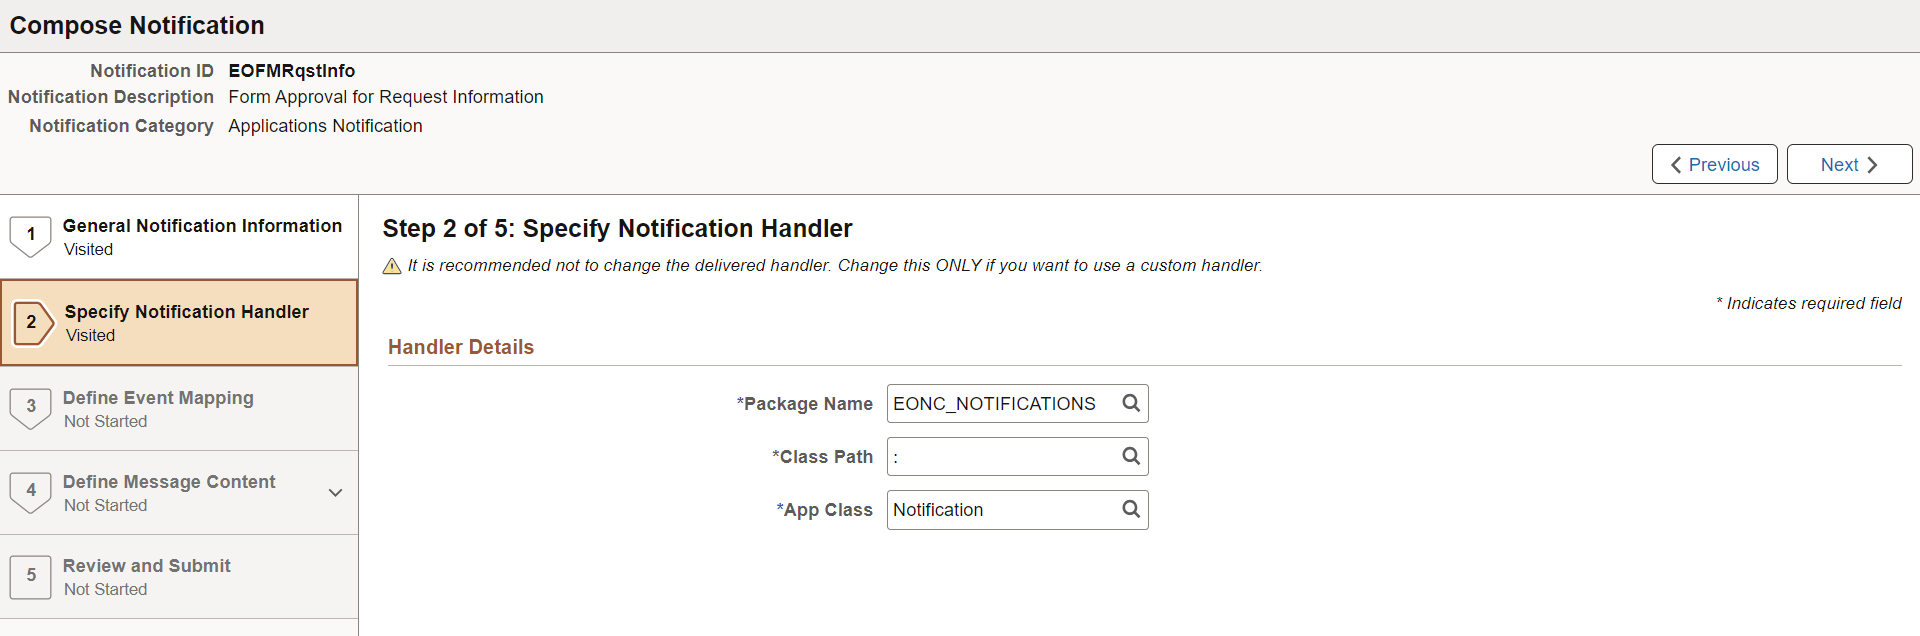
Important! PeopleSoft recommends that you do not modify the delivered handler.
|
Field or Control |
Description |
|---|---|
|
Package Name |
Enter the package (container) associated with the PeopleTools Application Class that should be invoked for the notification handler. |
|
Class Path |
Enter the directory path that defines the location of the PeopleTools Application Class associated with the notification handler. |
|
App Class |
Enter the name of the Application Class that contains the method to be invoked. This Application Class must extend the delivered class EONC_NOTIFICATIONS:Notifications. |
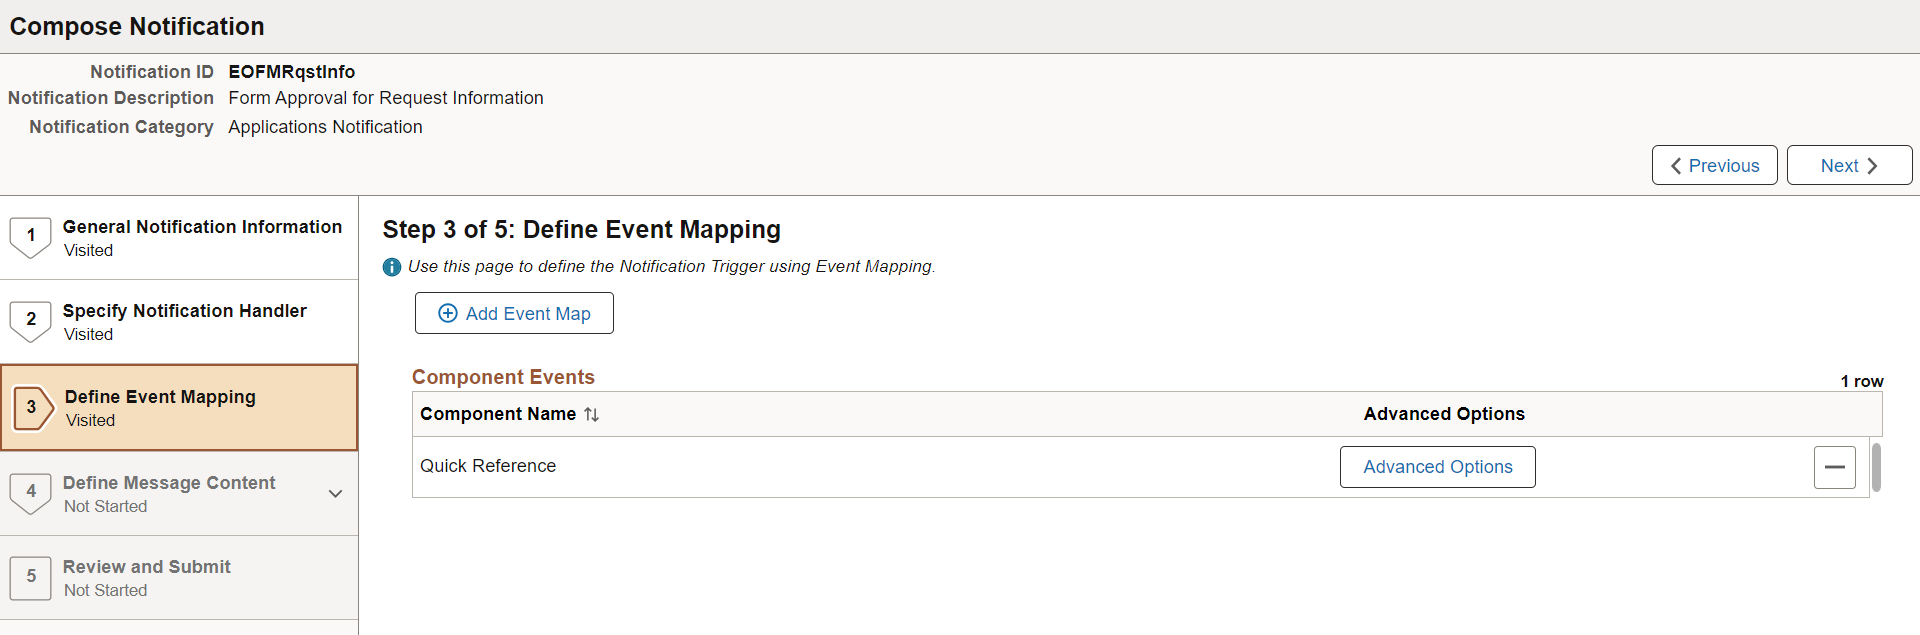
Use the Define Event Mapping page (EONC_EVNT_MAP_FL) to define a custom notification trigger using Event Mapping functionality. Event Mapping functionality allows you to define your own business logic to be executed when specific events occur within PeopleSoft applications. These events can be triggered by user actions or other predefined conditions.This page is available when you select Yes for the Notification Trigger option on the Add New Notification Page.
Navigation:
Select the Define Event Mapping step from the left navigation, or use the Next and Previous buttons to navigate to the page.
This example illustrates the fields and controls on the Define Event Mapping page.
|
Field or Control |
Description |
|---|---|
|
Add Event Map |
Select this button to search for and add an event mapping that executes the notification. The search bar opens in place of the button. When you select a component, the component Event defaults to SavePostChange and the Processing Sequence set to Post on the Define Event Mapping - Advanced Options Page. |
|
Component Name |
Displays the component used with the event mapping. |
|
Advanced Options button |
Select this button to access the Define Event Mapping - Advanced Options Page and enter event map details, preprocessing and preprocessing parameters for a component. |
See Configuring Event Mapping in the PeopleTools Portal Technology documentation.
Use the Define Event Mapping - Advanced Options page (EONC_EVNT_ADV_SCF) to enter event map details, preprocessing and preprocessing parameters for a component.
Navigation:
From the Define Event Mapping Page, select the Advanced Options button.
This example illustrates the fields and controls on the Define Event Mapping - Advanced Options page.
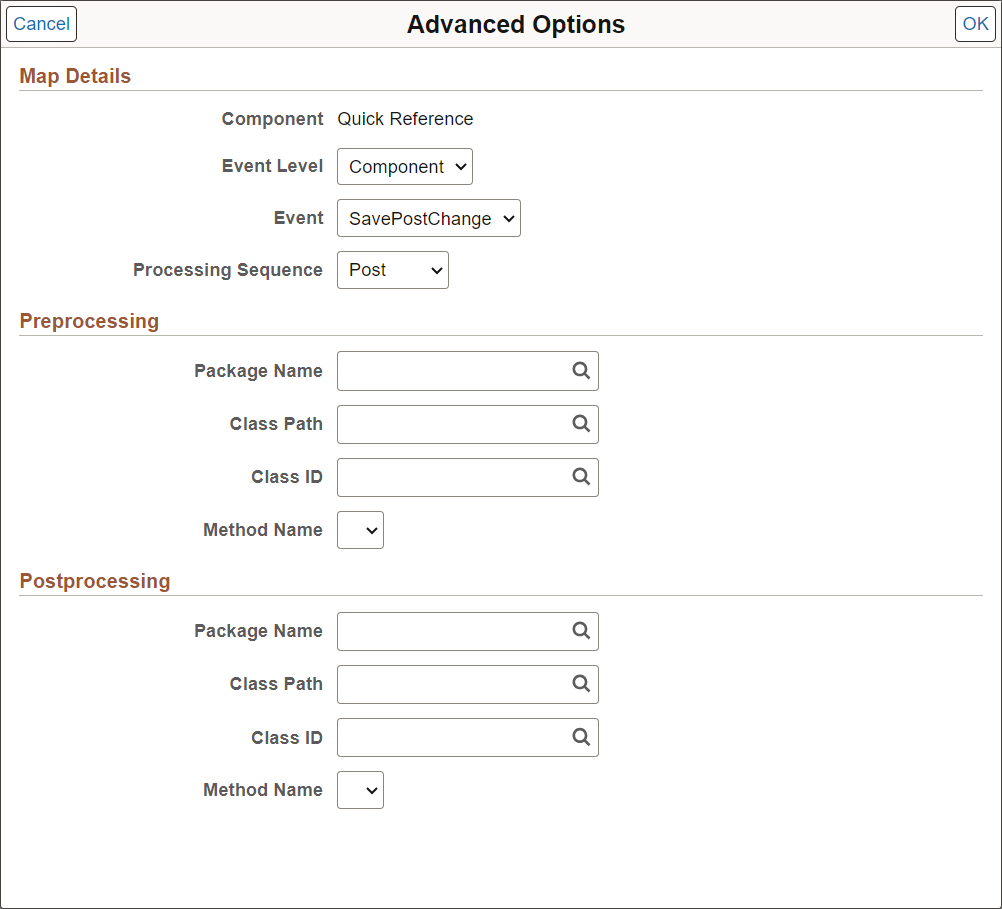
Map Details
|
Field or Control |
Description |
|---|---|
|
Component |
Displays the component associated with the event mapping. |
|
Event Level |
Select an option to specify the trigger event level:
|
|
Event |
Associate a class-based service for the component with a PeopleCode event. For Component event level, select one of the following values:
For Rec Field event level, select FieldChange. For Record event level, select one of the following values:
|
|
Processing Sequence |
Select the processing sequence with respect to any PeopleCode program defined for the same event on the component definition:
|
Preprocessing and Postprocessing
Use these sections to define pre-processing or post-processing logic.
|
Field or Control |
Description |
|---|---|
|
Package Name |
Enter the PeopleTools Application Package (container) associated with the PeopleTools Application Class that contains the pre-processing or post-processing logic. |
|
Class Path |
Enter the path that defines the location of the PeopleTools Application Class associated with the pre-processing or post-processing logic. |
|
Class ID |
Enter the PeopleTools Application Class ID that contains the pre-processing or post-processing logic. |
|
Method Name |
Select the method name in the PeopleTools Application Class that contains the pre-processing or post-processing logic. |
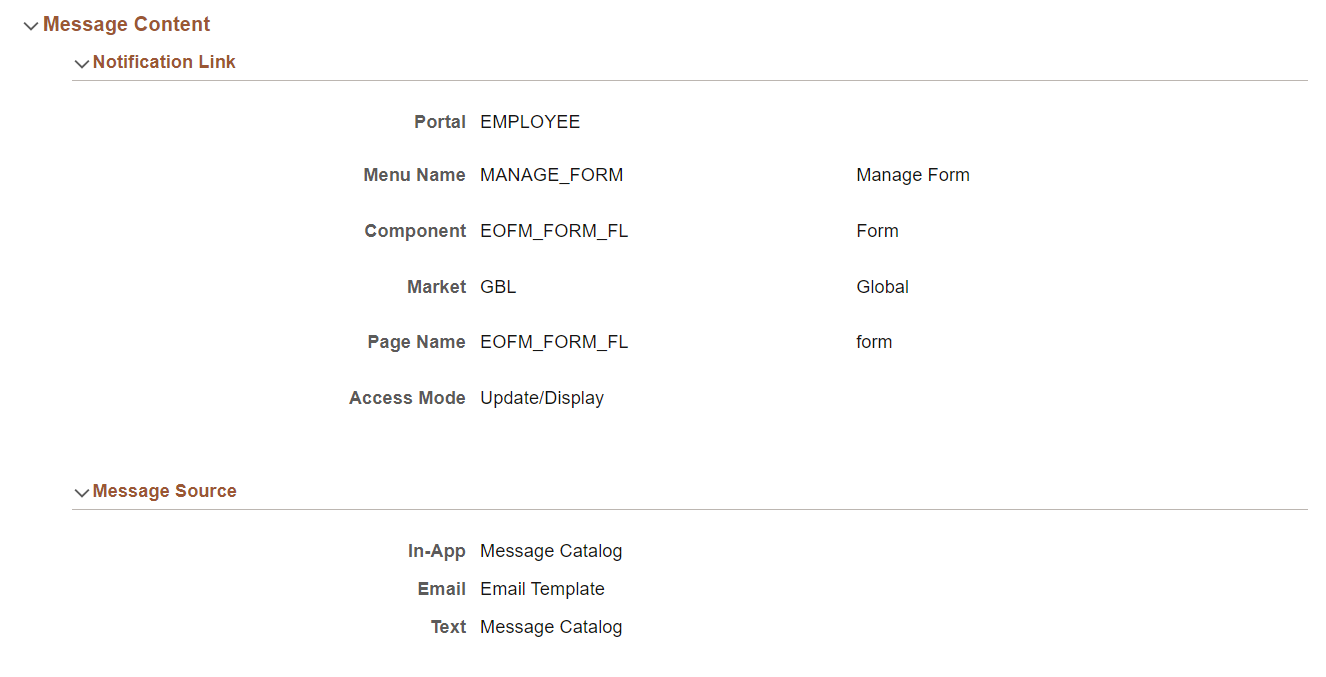
Use the Define Message Content - Notification Link page (EONC_CFG_URL_FL) to define a link to an application page that can be included in the notification.
This page is available when you select Yes for the Configure Notification Link option on the Add New Notification Page.
Navigation:
From the General Notification Information Page page, select the Next button.
This example illustrates the fields and controls on the Define Message Content - Notification Link page.
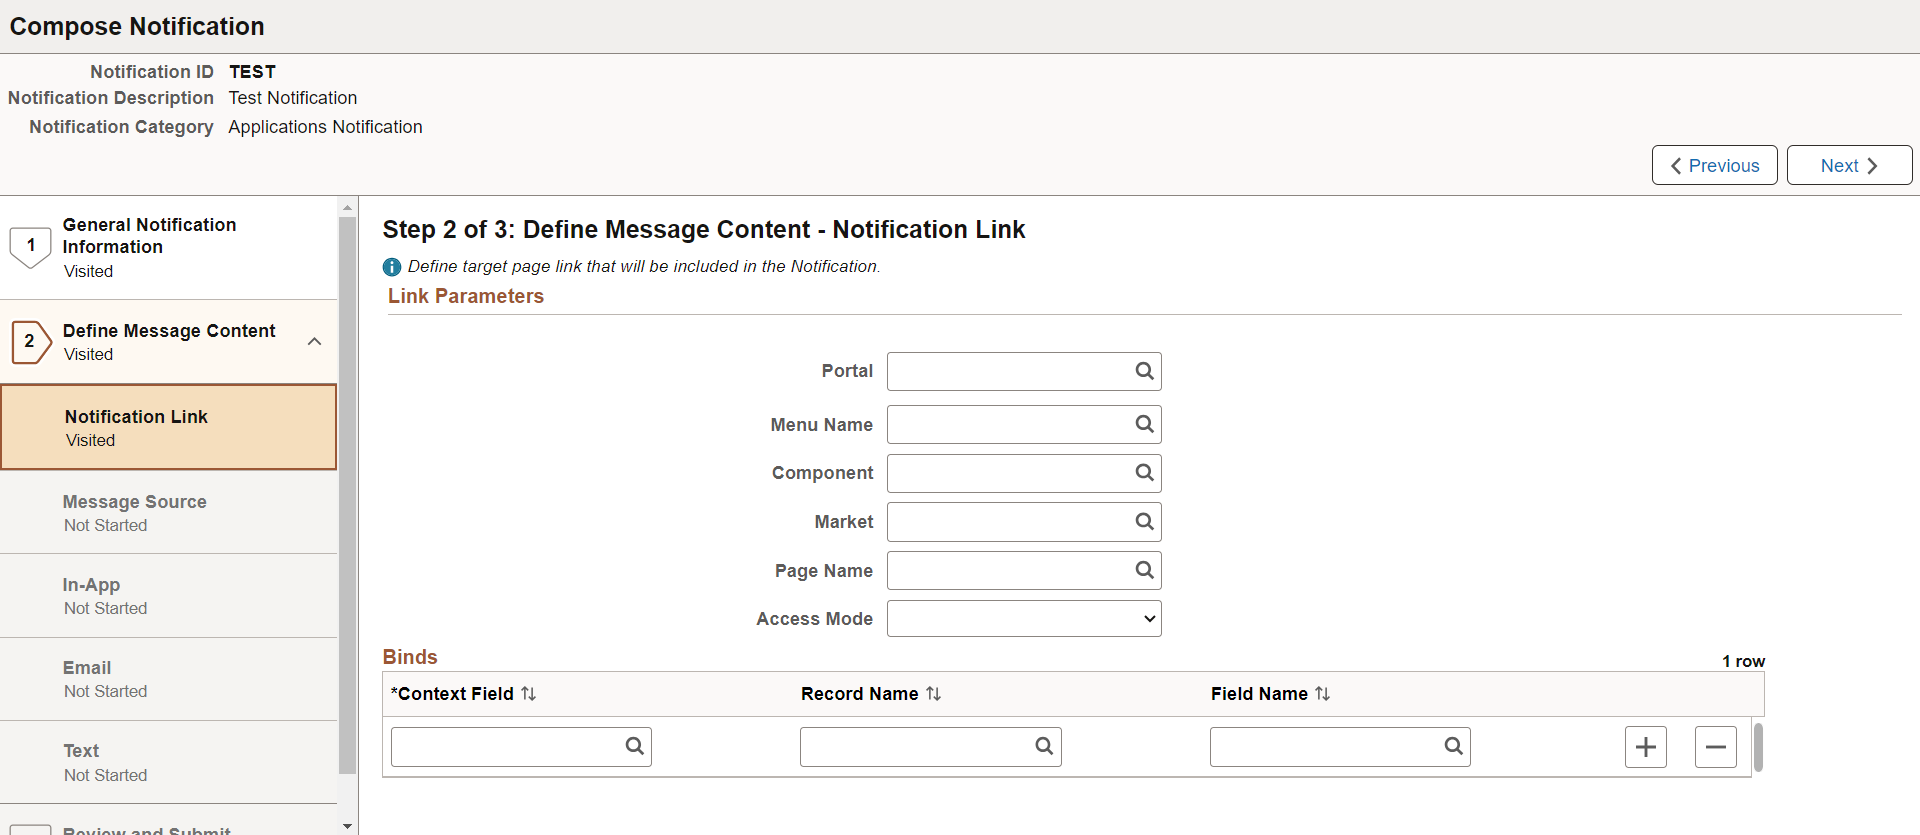
Link Parameters
|
Field or Control |
Description |
|---|---|
|
Portal |
Specify a portal—for example customer or employee. |
|
Menu Name |
Enter a menu name for the component. |
|
Component |
Enter the target component. |
|
Market |
Enter a market for the component. |
|
Page Name |
Enter the landing page in the component. |
|
Access Mode |
Specify the type of access allowed for the portal. Options are:
|
Binds
Use this section to specify the PeopleSoft component search key values
To create a link in the notification that directs the recipient to a PeopleSoft component, the URL must have the parameters and specific bind values that satisfy the required component search fields so that the URL can direct the recipient directly into a component. For example, you need to include the Employee ID and Employee Record Number field and value in the URL to directly access job data for a specific employee.
|
Field or Control |
Description |
|---|---|
|
Context Field |
Enter the name of the key field in the target component. |
|
Record Name |
Enter the name of the calling component record that contains the field and key value required by the target component. You can leave this field unpopulated if it is set by the calling program and passed to the handler. |
|
Field Name |
Enter the name of the field that contains the key value required by the target component. You can leave this field unpopulated if it is set by the calling program and passed to the handler. |
Use the Define Message Content - Message Source page (EONC_MSG_SRC_FL) to identify a message source (Message Catalog, custom text, or email template) for email, in-app, and text notifications.
Navigation:
(When Configure Notification Link option is not enabled) From the General Notification Information Page, select the Next button.
(When Configure Notification Link option is enabled) From the Define Message Content - Notification Link Page, select the Next button.
This example illustrates the fields and controls on the Define Message Content - Message Source page.
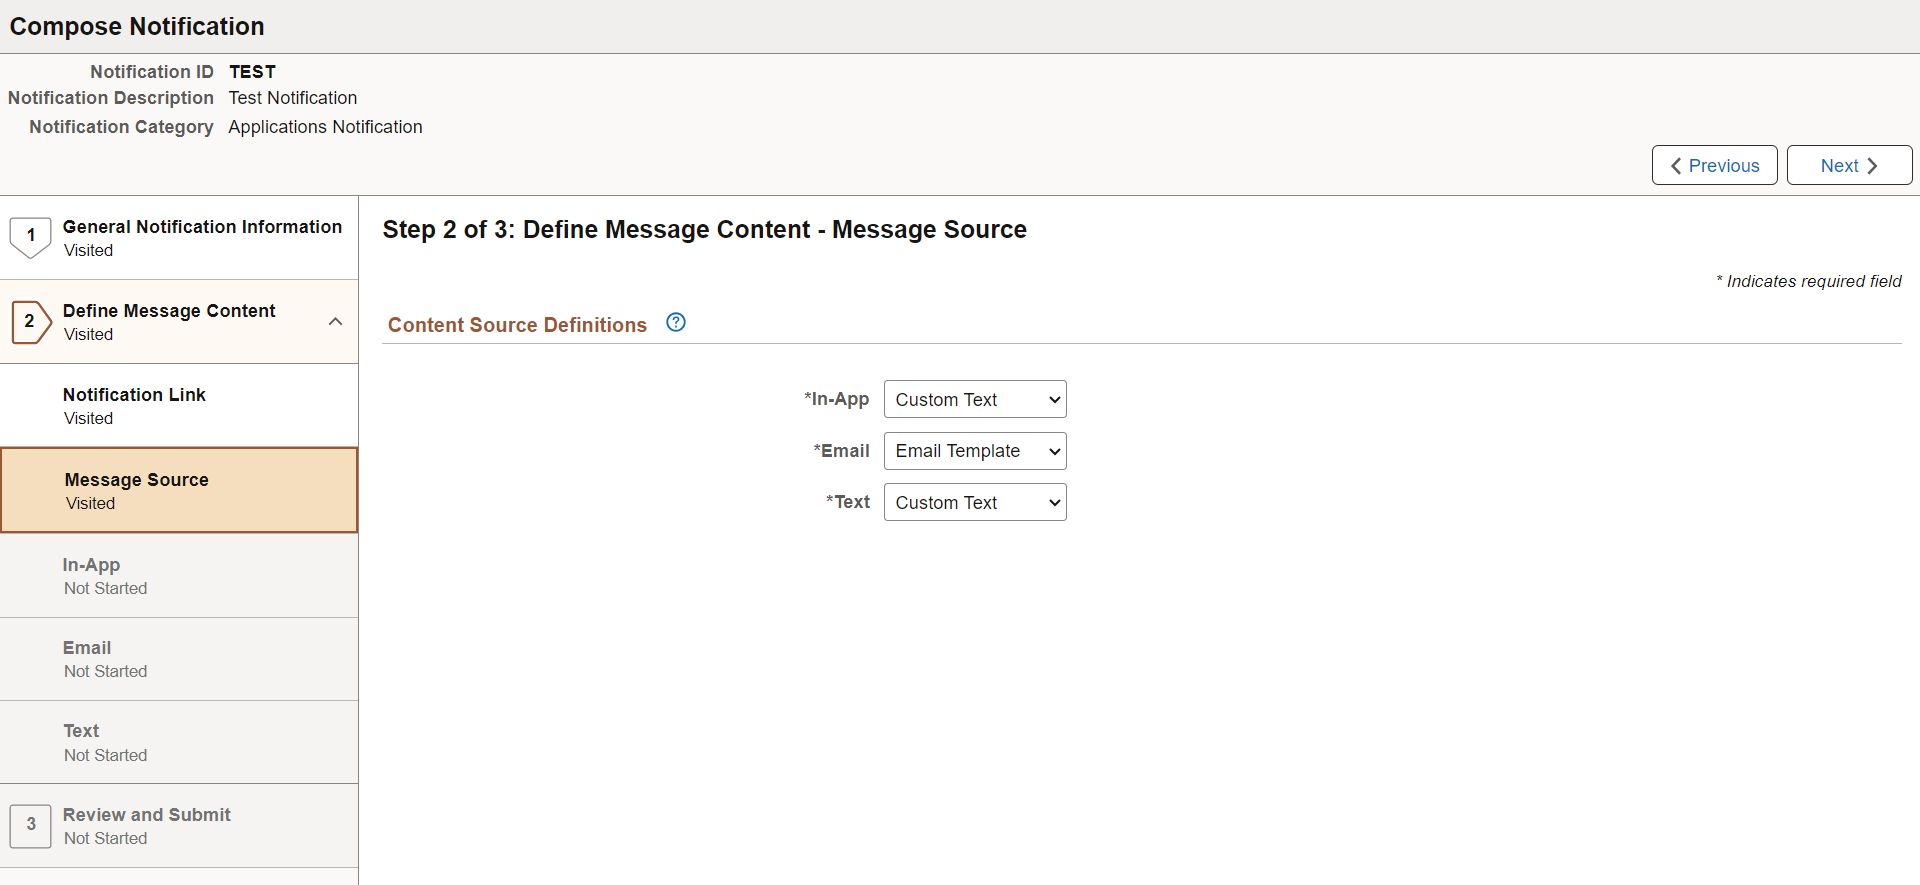
Message Catalogs entries are defined in PeopleTools and represent a collection of messages within a given message set. Email Templates are defined in PeopleTools and represent predefined email message formats that can be used to generate and send email communications from within PeopleSoft applications.
|
Field or Control |
Description |
|---|---|
|
In-App |
Define the message source for in-app notifications. Values are:
The value you select here determines the configuration fields that display on the Define Message Content - In-App Page. |
|
|
Define the message source for email notifications. Values are:
The value you select here determines the configuration fields that display on the Define Message Content - Email Page. |
|
Text |
Define the message source for text notifications. Values are:
The value you select here determines the configuration fields that display on the Define Message Content - Text Page. |
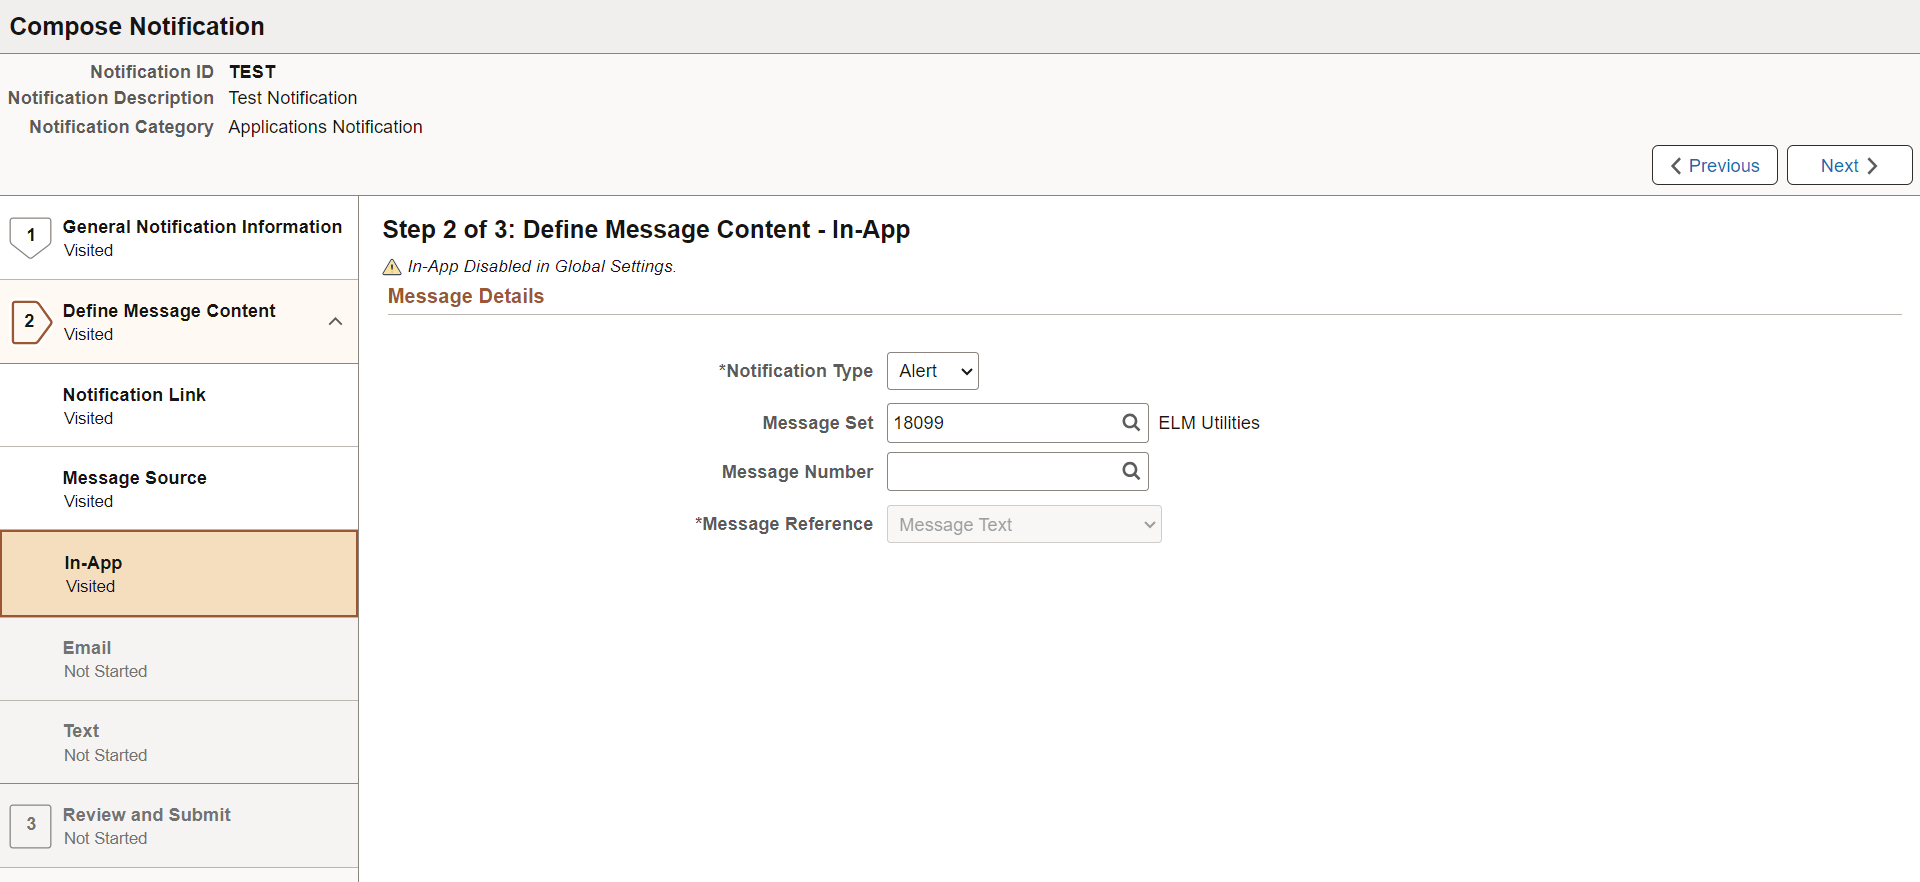
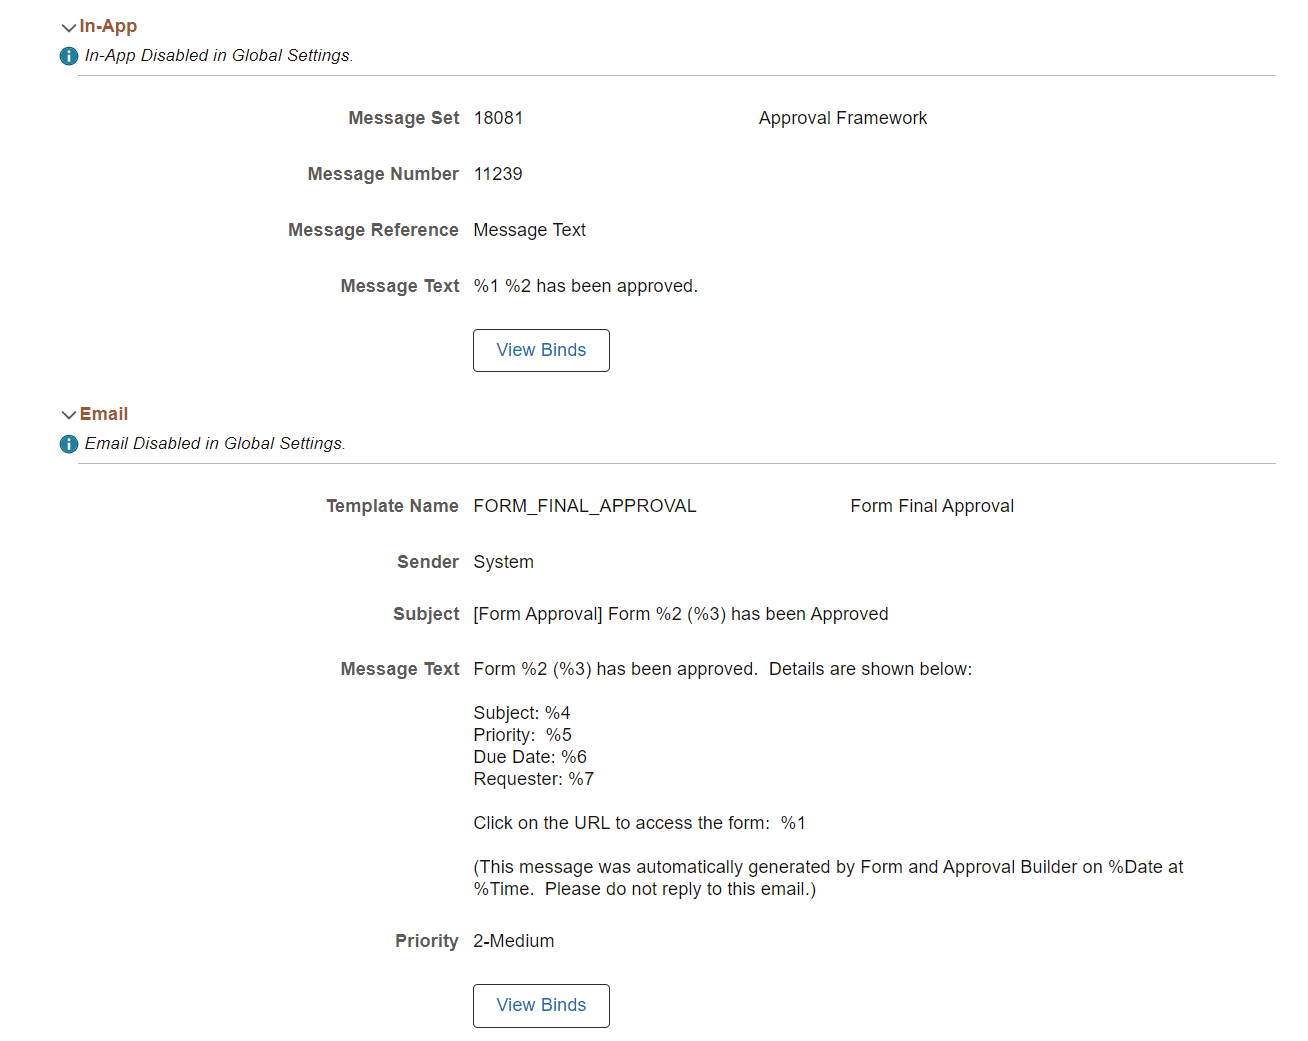
Use the Define Message Content - In-App page (EONC_INAPP_CFG_FL) to specify in-app notification parameters.
Navigation:
From the Define Message Content - Message Source Page, select the Next button.
This example illustrates the fields and controls on the Define Message Content - In-App page (when the source is set to Message Catalog).
This example illustrates the fields and controls on the Define Message Content - In-App page (when the source is set to Custom Text).
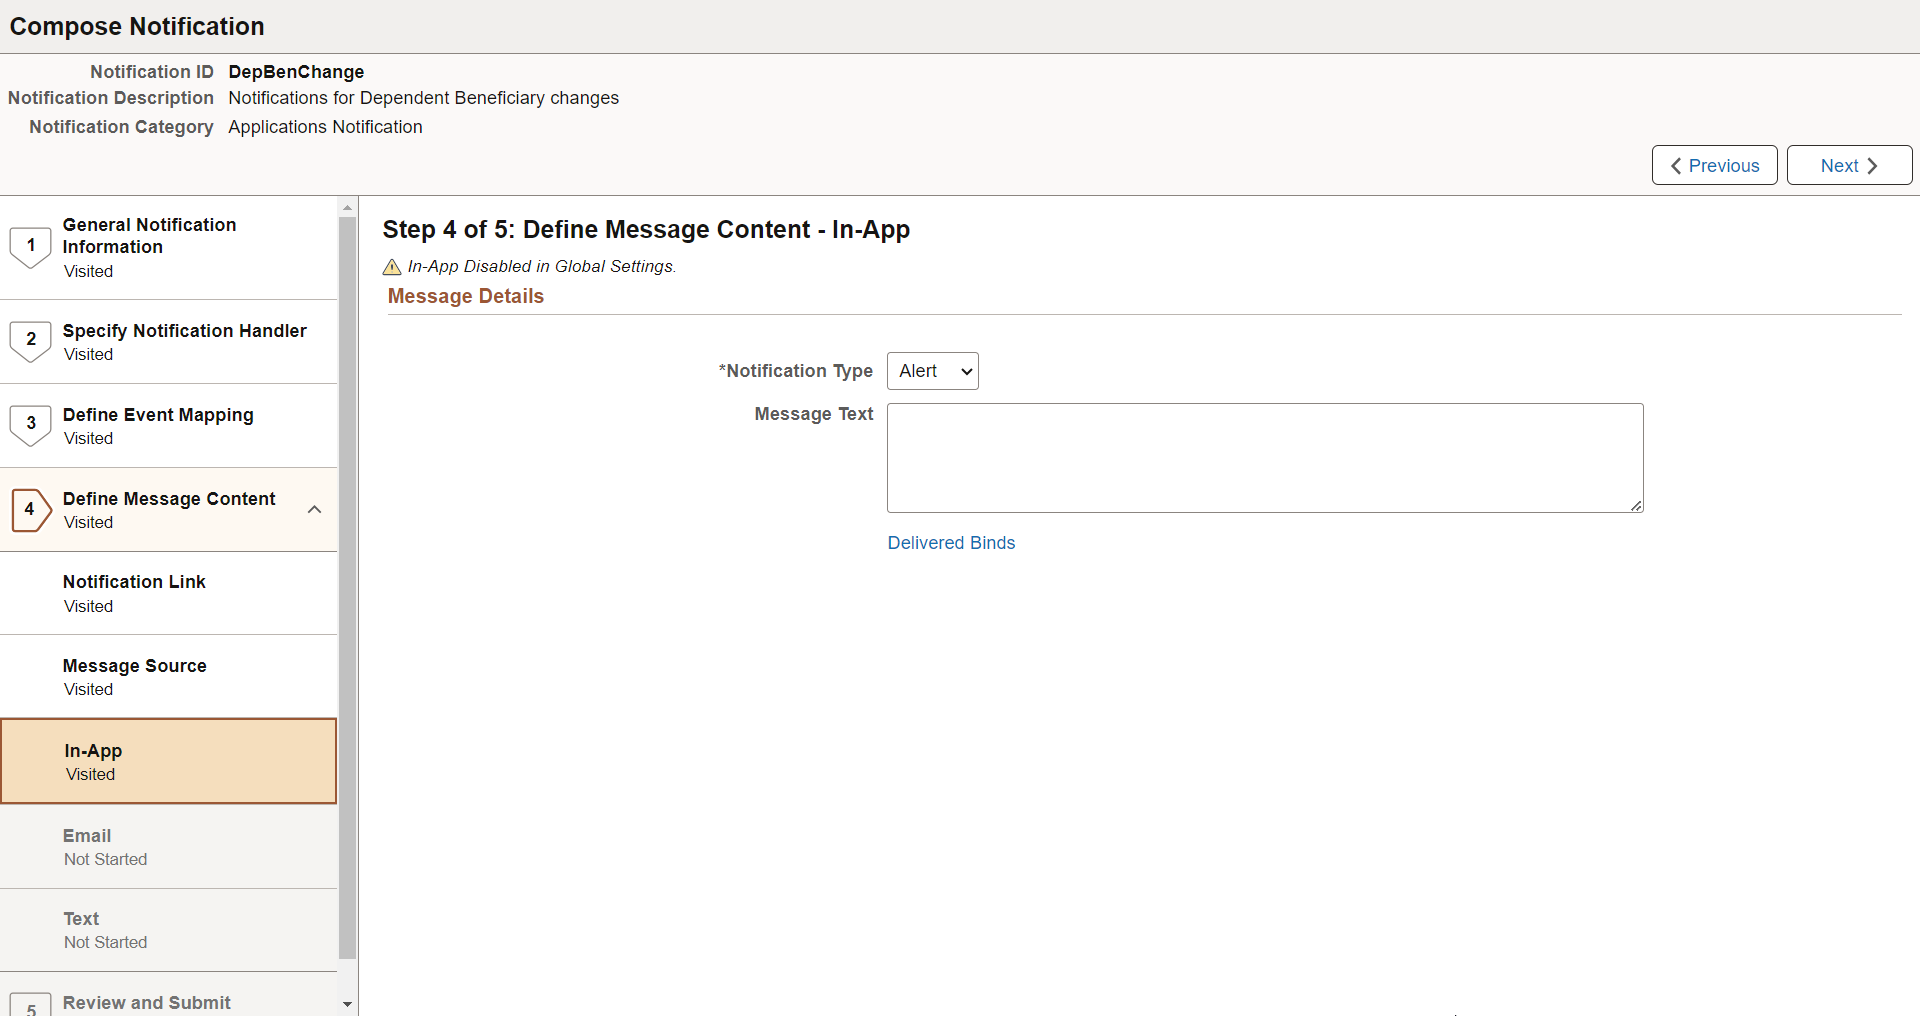
Message Details
This section displays differently based on the setting you select for the In-App field on the Define Message Content - Message Source Page.
|
Field or Control |
Description |
|---|---|
|
Notification Type |
Select Action or Alert. |
|
Show Mark Complete |
This field appears when you select a Notification Type of Action. Select Yes to enable the Mark Complete button on the Actions tab in the In-App Notifications side panel. |
|
Message Text |
Enter the message text that should appear for the notification. |
|
Delivered Binds |
Select to view a list of special system bind variables that can be used in the content, which are automatically resolved by the handler (for example, %DATE). |
|
Field or Control |
Description |
|---|---|
|
Message Set |
Indicate the Message Catalog Set for the in-app notification. This value determines which message numbers you can select. |
|
Message Number |
Enter a message number for the body of the email message. |
|
Message Reference |
Select from the following options:
|
|
Message |
Displays the content of the message description or text. |
Message Binds
Bind variables enable you to insert variable text into the notification messages. For example, you can add a bind variable for employee name within the message text. When the notification is sent to a group of employees, each employee has their own name appear in the message text.
The following binds are available for Applications notification category:
%URL: Target Transaction Link
%DATE: Current Date
%DATETIME: Current Date/Time
%TIME: Current Time
%SERVERTIMEZONE: Time Zone
%USERID: User ID
%USERDESCRIPTION: User Description (Name)
%EMAILADDRESS: User Email Address
%EMPLOYEEID: User Employee ID
%NOTIFICATIONPRIORITY: Notification Priority
The following binds are available for Activity Guide Composer notification category:
%DATE: Current Date
%DATETIME: Current Date/Time
%TIME: Current Time
%SERVERTIMEZONE: Time Zone
%USERID: User ID
%USERDESCRIPTION: User Description (Name)
%EMAILADDRESS: User Email Address
%EMPLOYEEID: User Employee ID
%NOTIFICATIONPRIORITY: Notification Priority
%AG_DETAILS%: Activity Guide Step Details
%AG_URL%: Activity Guide URL
%AG_USER%: Activity Guide User Description
%HR_OFB_CTX_VW-LAST_DATE_WORKED%: Last Date Worked
The following binds are available for Questionnaire Framework notification category:
%DATE: Current Date
%DATETIME: Current Date/Time
%TIME: Current Time
%SERVERTIMEZONE: Time Zone
%USERID: User ID
%USERDESCRIPTION: User Description (Name)
%EMAILADDRESS: User Email Address
%EMPLOYEEID: User Employee ID
%NOTIFICATIONPRIORITY: Notification Priority
%END_DATE%: End Date
%EVENT_NAME%: Event Name
%OPR_DESCR%: Operator Description
%QE_URL%: Questionnaire URL
|
Field or Control |
Description |
|---|---|
|
Token Value |
Displays the token value, or bind variable, for the notification. |
|
Description |
Enter a description of the bind variable. |
|
Record Name |
Enter the name of the record that contains the field required for the bind variable. You can leave this field unpopulated if it is set by the calling program and passed to the handler. Note: This field does not display for AWE notifications. |
|
Field Name |
Enter the name of the field required for the bind variable. You can leave this field unpopulated if it is set by the calling program and passed to the handler. Note: This field does not display for AWE notifications. |
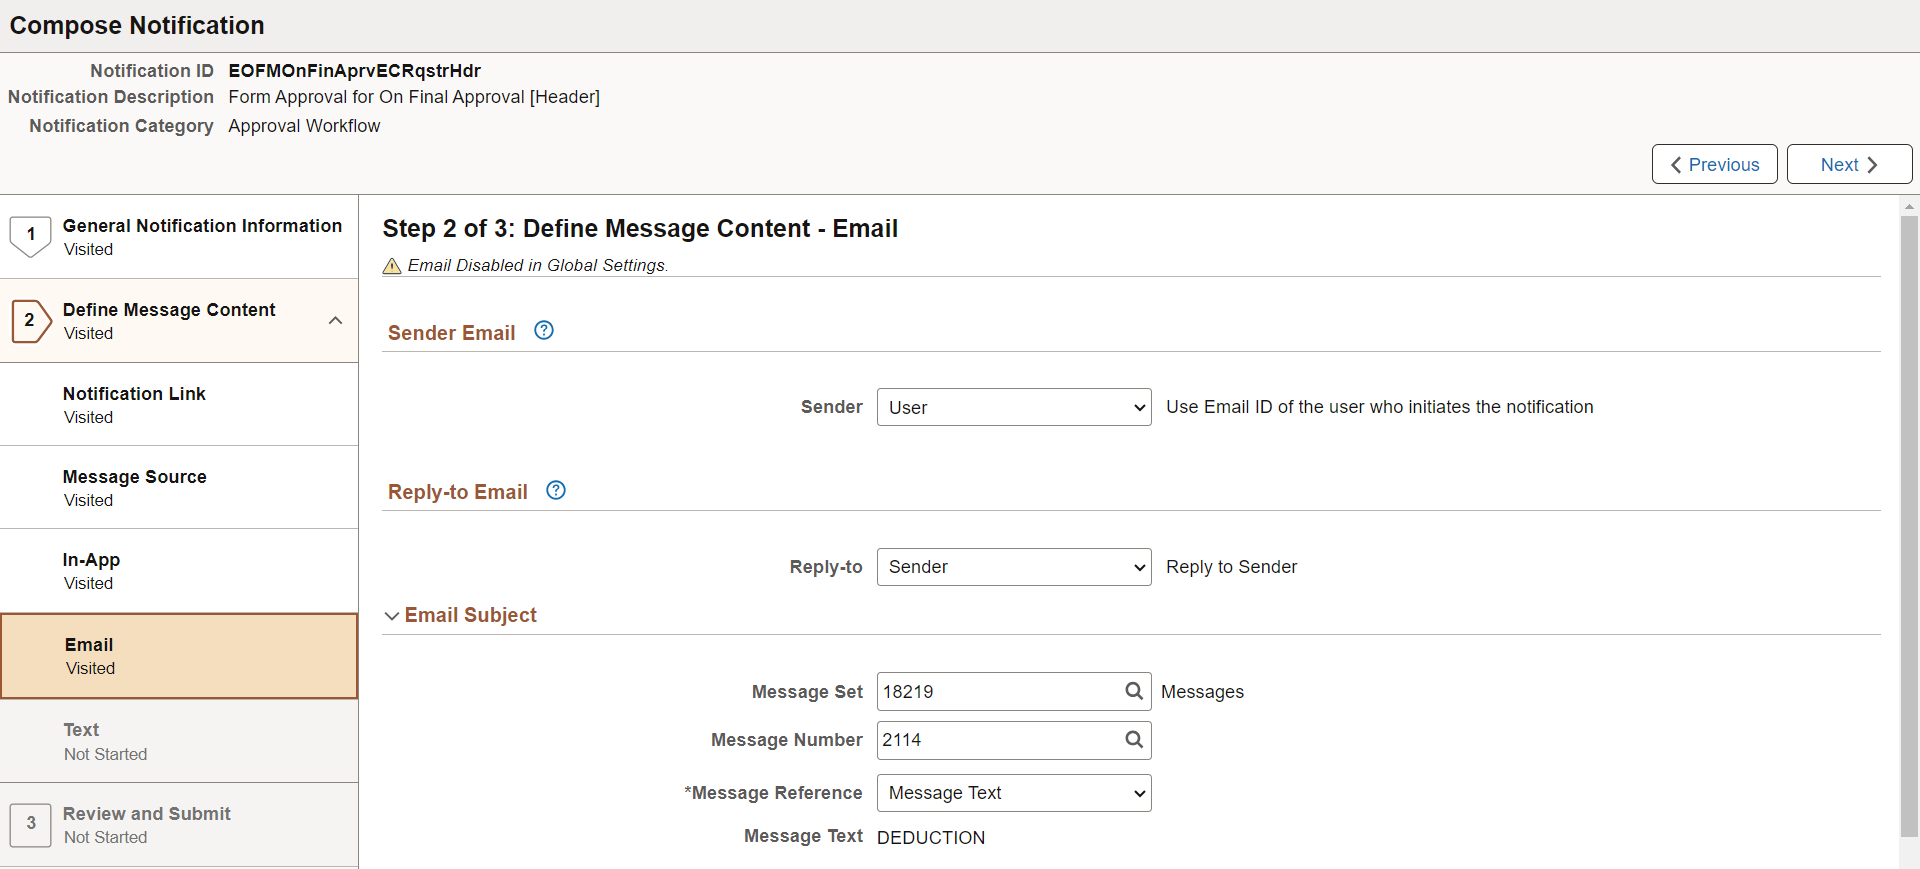
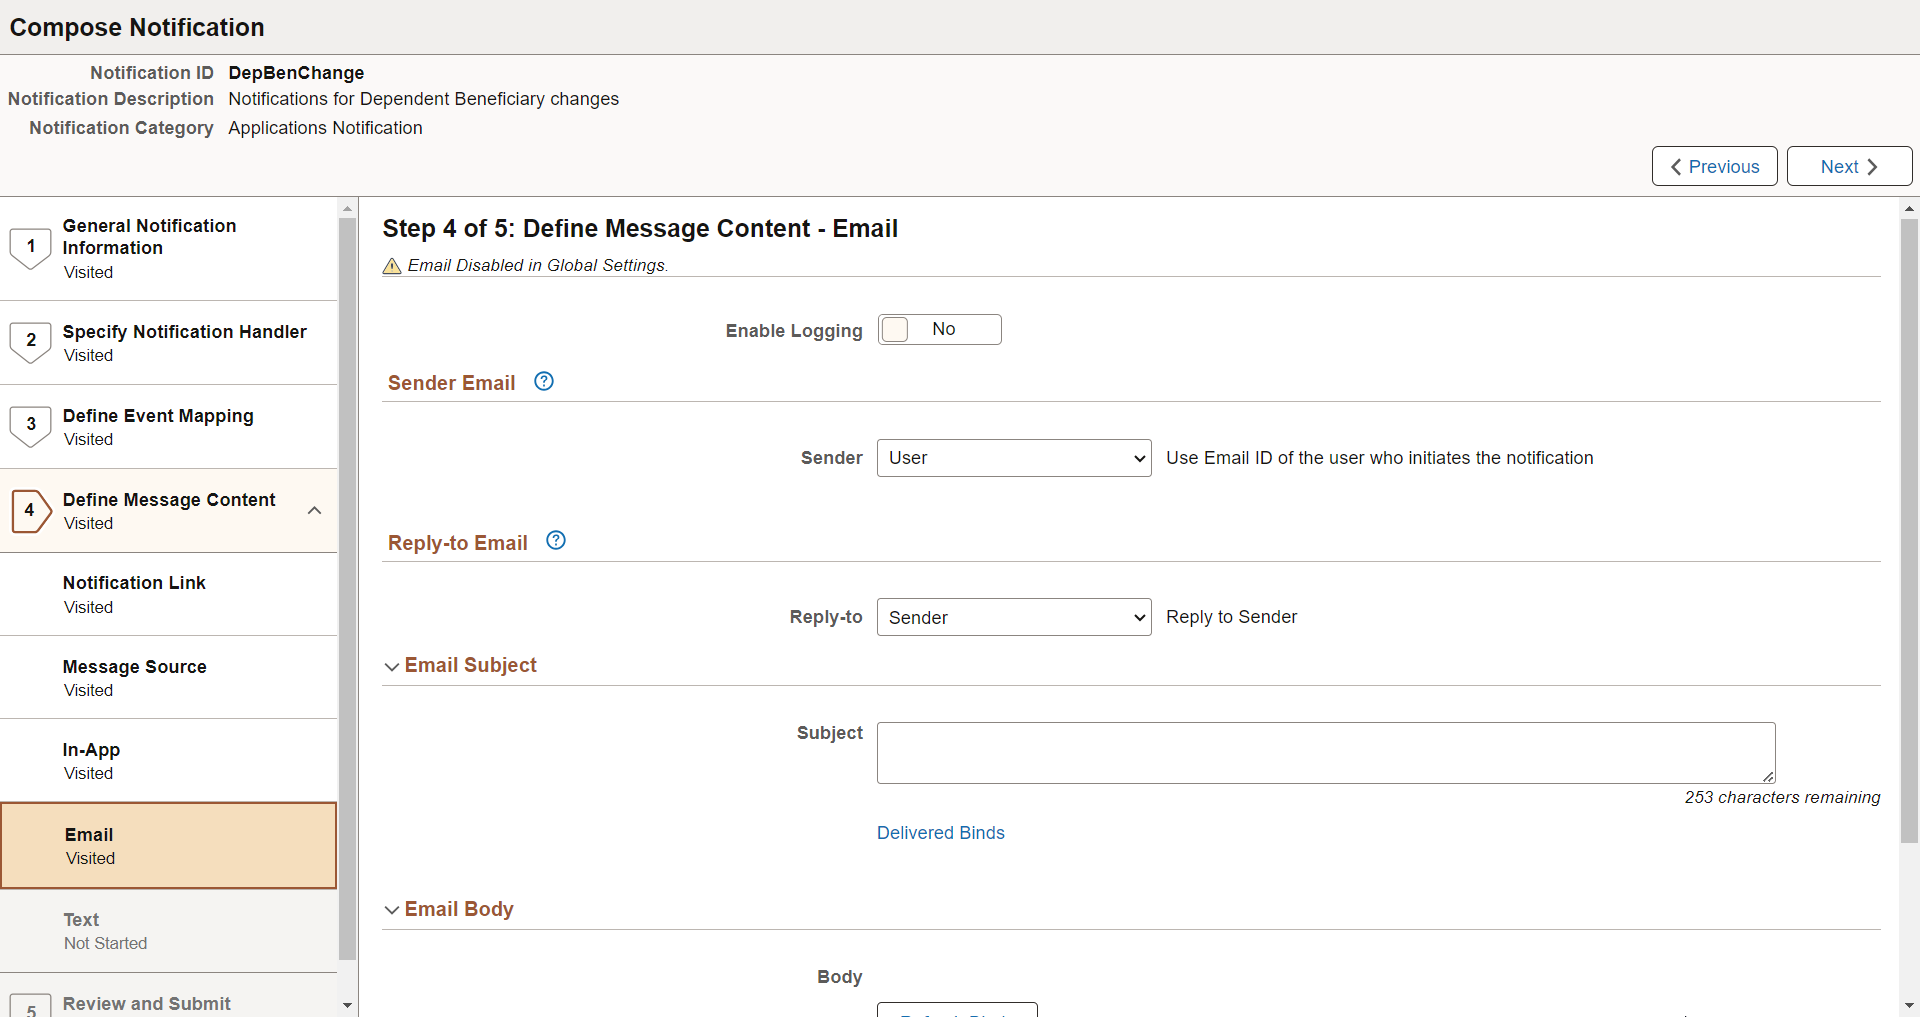
Use the Define Message Content - Email page (EONC_EML_CFG_FL) to specify email notification parameters. This page displays different fields based on the setting you select for the Email field on the Define Message Content - Message Source Page.
Navigation:
From the Define Message Content - In-App Page, select the Next button.
This example illustrates the fields and controls on the Define Message Content - Email page (when source is set to Message Catalog).
This example illustrates the fields and controls on the Define Message Content - Email page (when source is set to Custom Text).
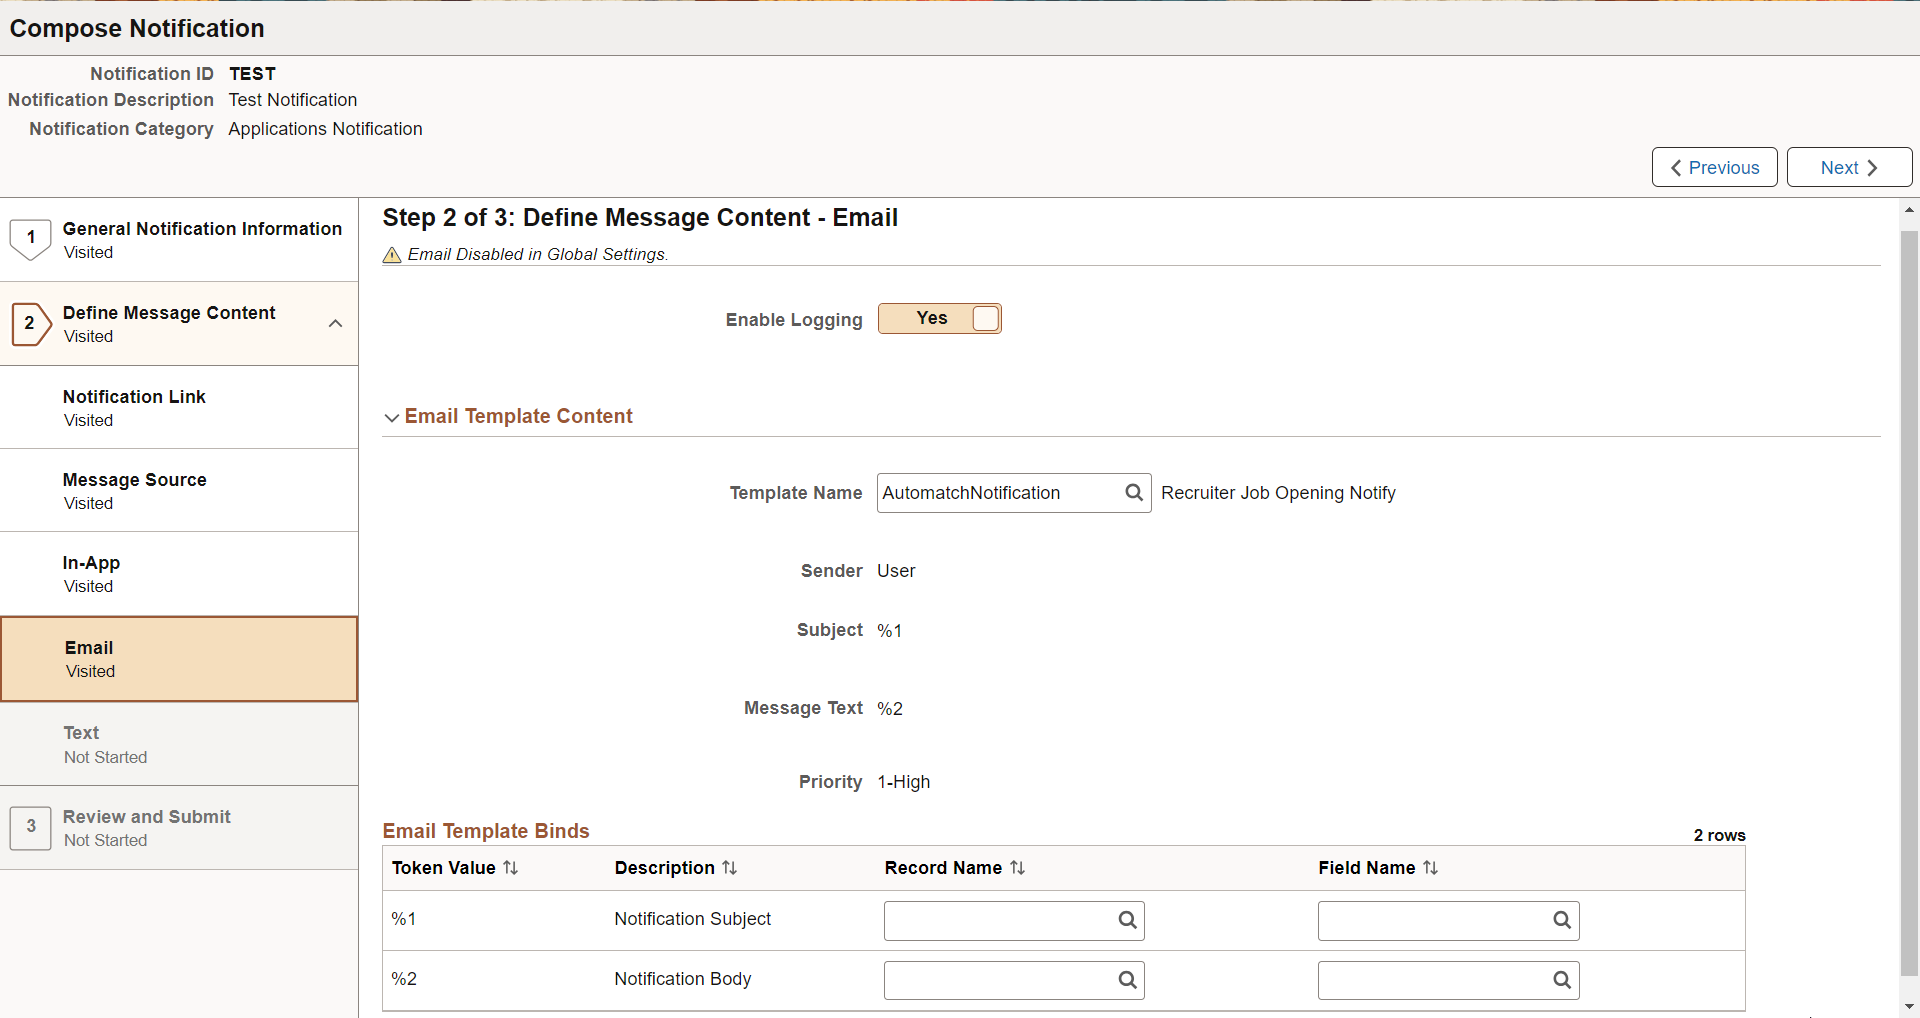
This example illustrates the fields and controls on the Define Message Content - Email page (when source is set to Email Template).
|
Field or Control |
Description |
|---|---|
|
Enable Logging |
Select Yes to enable notification logging. When enabled, a copy of the email is stored in the PT_WF_NOTFY_TBL table. You can view the log using the Workflow Notification component PT_WF_NOTIFY_RECV. |
Sender Email
This section appears when you select Custom Text or Message Catalog for the Email field on the Define Message Content - Message Source Page.
|
Field or Control |
Description |
|---|---|
|
Sender |
Choose from the following options:
|
|
Sender User List |
Specify a user list to receive the notification This field is available when you select Dynamic from the Sender field. |
|
Email ID |
This field is available when you select Specify from the Sender field. Enter the email ID of the person that should receive the notification. |
Reply-to Email
This section appears when you select Custom Text or Message Catalog for the Email field on the Define Message Content - Message Source Page.
|
Field or Control |
Description |
|---|---|
|
Reply-to |
Choose from the following options:
|
|
Reply to User List |
Enter a user list to which the notification will send a reply. This field is available when you select Dynamic from the Reply-to field. |
|
Email ID |
Enter the email ID of the person that should receive the notification reply. This field is available when you select Specify from the Reply-to field. |
Email Subject
This section appears when you select Custom Text or Message Catalog for the Email field on the Define Message Content - Message Source Page
The following fields appear for the Custom Text option.
|
Field or Control |
Description |
|---|---|
|
Subject |
Enter an email subject line. |
|
Delivered Binds link |
Select to view a list of special system bind variables that can be used in the content, which are automatically resolved by the handler (for example, %DATE). |
The following fields appear for the Message Catalog option.
|
Field or Control |
Description |
|---|---|
|
Message Set |
Indicate the Message Catalog set from which you will select a message number. |
|
Message Number |
Enter a message number from the catalog for the email subject. |
|
Message Reference |
Select from the following options:
|
Email Subject Binds
Bind variables enable you to insert variable text into the notification messages. For example, you can add a bind variable for employee name within the message subject line. When the notification is sent to a group of employees, each employee has their own name appear in the subject line.
The following binds are available for Applications notification category:
%URL: Target Transaction Link
%DATE: Current Date
%DATETIME: Current Date/Time
%TIME: Current Time
%SERVERTIMEZONE: Time Zone
%USERID: User ID
%USERDESCRIPTION: User Description (Name)
%EMAILADDRESS: User Email Address
%EMPLOYEEID: User Employee ID
%NOTIFICATIONPRIORITY: Notification Priority
Binds available for Activity Guide Composer notification category include contextual data fields defined in the activity guide category and the following values:
%DATE: Current Date
%DATETIME: Current Date/Time
%TIME: Current Time
%SERVERTIMEZONE: Time Zone
%USERID: User ID
%USERDESCRIPTION: User Description (Name)
%EMAILADDRESS: User Email Address
%EMPLOYEEID: User Employee ID
%NOTIFICATIONPRIORITY: Notification Priority
%AG_DETAILS%: Activity Guide Step Details
%AG_URL%: Activity Guide URL
%AG_USER%: Activity Guide User Description
%HR_OFB_CTX_VW-LAST_DATE_WORKED%: Last Date Worked
The following binds are available for Questionnaire Framework notification category:
%DATE: Current Date
%DATETIME: Current Date/Time
%TIME: Current Time
%SERVERTIMEZONE: Time Zone
%USERID: User ID
%USERDESCRIPTION: User Description (Name)
%EMAILADDRESS: User Email Address
%EMPLOYEEID: User Employee ID
%NOTIFICATIONPRIORITY: Notification Priority
%END_DATE%: End Date
%EVENT_NAME%: Event Name
%OPR_DESCR%: Operator Description
%QE_URL%: Questionnaire URL
|
Field or Control |
Description |
|---|---|
|
Token Value |
Displays the token value, or bind variable, for the notification. |
|
Description |
Enter a description of the bind variable. |
|
Record Name |
Enter the name of the record that contains the field required for the bind variable. You can leave this field unpopulated if it is set by the calling program and passed to the handler. Note: This field does not display for AWE notifications. |
|
Field Name |
Enter the name of the field required for the bind variable. You can leave this field unpopulated if it is set by the calling program and passed to the handler. Note: This field does not display for AWE notifications. |
Email Body
This section appears when you select Custom Text or Message Catalog for the Email field on the Define Message Content - Message Source Page
The following fields appear for the Custom Text option.
|
Field or Control |
Description |
|---|---|
|
Body |
Manually enter the email content. |
|
Refresh Binds button |
Select to update the binds within the text of the email. |
|
Delivered Binds |
Select to view a list of special system bind variables that can be used in the content, which are automatically resolved by the handler (for example, %DATE). |
The following fields appear for the Message Catalog option.
|
Field or Control |
Description |
|---|---|
|
Message Set |
Indicate the Message Catalog set from which you will select a message number. |
|
Message Number |
Enter a message number for the body of the email message. |
|
Message Reference |
Select from the following options:
|
|
Message Text |
Displays the content of the message description or text. |
Email Body Binds
Bind variables enable you to insert variable text into the notification messages. For example, you can add a bind variable for employee name within the message body. When the notification is sent to a group of employees, each employee has their own name appear in the message.
The following binds are available for Applications notification category:
%URL: Target Transaction Link
%DATE: Current Date
%DATETIME: Current Date/Time
%TIME: Current Time
%SERVERTIMEZONE: Time Zone
%USERID: User ID
%USERDESCRIPTION: User Description (Name)
%EMAILADDRESS: User Email Address
%EMPLOYEEID: User Employee ID
%NOTIFICATIONPRIORITY: Notification Priority
The following binds are available for Activity Guide Composer notification category:
%DATE: Current Date
%DATETIME: Current Date/Time
%TIME: Current Time
%SERVERTIMEZONE: Time Zone
%USERID: User ID
%USERDESCRIPTION: User Description (Name)
%EMAILADDRESS: User Email Address
%EMPLOYEEID: User Employee ID
%NOTIFICATIONPRIORITY: Notification Priority
%AG_DETAILS%: Activity Guide Step Details
%AG_URL%: Activity Guide URL
%AG_USER%: Activity Guide User Description
%HR_OFB_CTX_VW-LAST_DATE_WORKED%: Last Date Worked
The following binds are available for Questionnaire Framework notification category:
%DATE: Current Date
%DATETIME: Current Date/Time
%TIME: Current Time
%SERVERTIMEZONE: Time Zone
%USERID: User ID
%USERDESCRIPTION: User Description (Name)
%EMAILADDRESS: User Email Address
%EMPLOYEEID: User Employee ID
%NOTIFICATIONPRIORITY: Notification Priority
%END_DATE%: End Date
%EVENT_NAME%: Event Name
%OPR_DESCR%: Operator Description
%QE_URL%: Questionnaire URL
|
Field or Control |
Description |
|---|---|
|
Token Value |
Displays the token value, or bind variable, for the notification. |
|
Description |
Enter a description of the bind variable. |
|
Record Name |
Enter the name of the record that contains the field required for the bind variable. You can leave this field unpopulated if it is set by the calling program and passed to the handler. Note: This field does not display for AWE notifications. |
|
Field Name |
Enter the name of the field required for the bind variable. You can leave this field unpopulated if it is set by the calling program and passed to the handler. Note: This field does not display for AWE notifications. |
Email Template Content
This section appears when you select Email Template for the Email field on the Define Message Content - Message Source Page.
|
Field or Control |
Description |
|---|---|
|
Template Name |
Enter a template |
|
Message Text |
Displays the message text associated with the email template. |
Email Template Binds
Bind variables enable you to insert variable text into the notification messages. For example, you can add a bind variable for employee name within the message text. When the notification is sent to a group of employees, each employee has their own name appear in the message text.
The following binds are available for Applications notification category:
%URL: Target Transaction Link
%DATE: Current Date
%DATETIME: Current Date/Time
%TIME: Current Time
%SERVERTIMEZONE: Time Zone
%USERID: User ID
%USERDESCRIPTION: User Description (Name)
%EMAILADDRESS: User Email Address
%EMPLOYEEID: User Employee ID
%NOTIFICATIONPRIORITY: Notification Priority
The following binds are available for Activity Guide Composer notification category:
%DATE: Current Date
%DATETIME: Current Date/Time
%TIME: Current Time
%SERVERTIMEZONE: Time Zone
%USERID: User ID
%USERDESCRIPTION: User Description (Name)
%EMAILADDRESS: User Email Address
%EMPLOYEEID: User Employee ID
%NOTIFICATIONPRIORITY: Notification Priority
%AG_DETAILS%: Activity Guide Step Details
%AG_URL%: Activity Guide URL
%AG_USER%: Activity Guide User Description
%HR_OFB_CTX_VW-LAST_DATE_WORKED%: Last Date Worked
The following binds are available for Questionnaire Framework notification category:
%DATE: Current Date
%DATETIME: Current Date/Time
%TIME: Current Time
%SERVERTIMEZONE: Time Zone
%USERID: User ID
%USERDESCRIPTION: User Description (Name)
%EMAILADDRESS: User Email Address
%EMPLOYEEID: User Employee ID
%NOTIFICATIONPRIORITY: Notification Priority
%END_DATE%: End Date
%EVENT_NAME%: Event Name
%OPR_DESCR%: Operator Description
%QE_URL%: Questionnaire URL
|
Field or Control |
Description |
|---|---|
|
Token Value |
Displays the token value, or bind variable, for the notification. |
|
Description |
Displays a description of the bind variable. |
|
Record Name |
Enter the name of the record that contains the field required for the bind variable. You can leave this field unpopulated if it is set by the calling program and passed to the handler. Note: This field does not display for AWE notifications. |
|
Field Name |
Enter the name of the field required for the bind variable. You can leave this field unpopulated if it is set by the calling program and passed to the handler. Note: This field does not display for AWE notifications. |
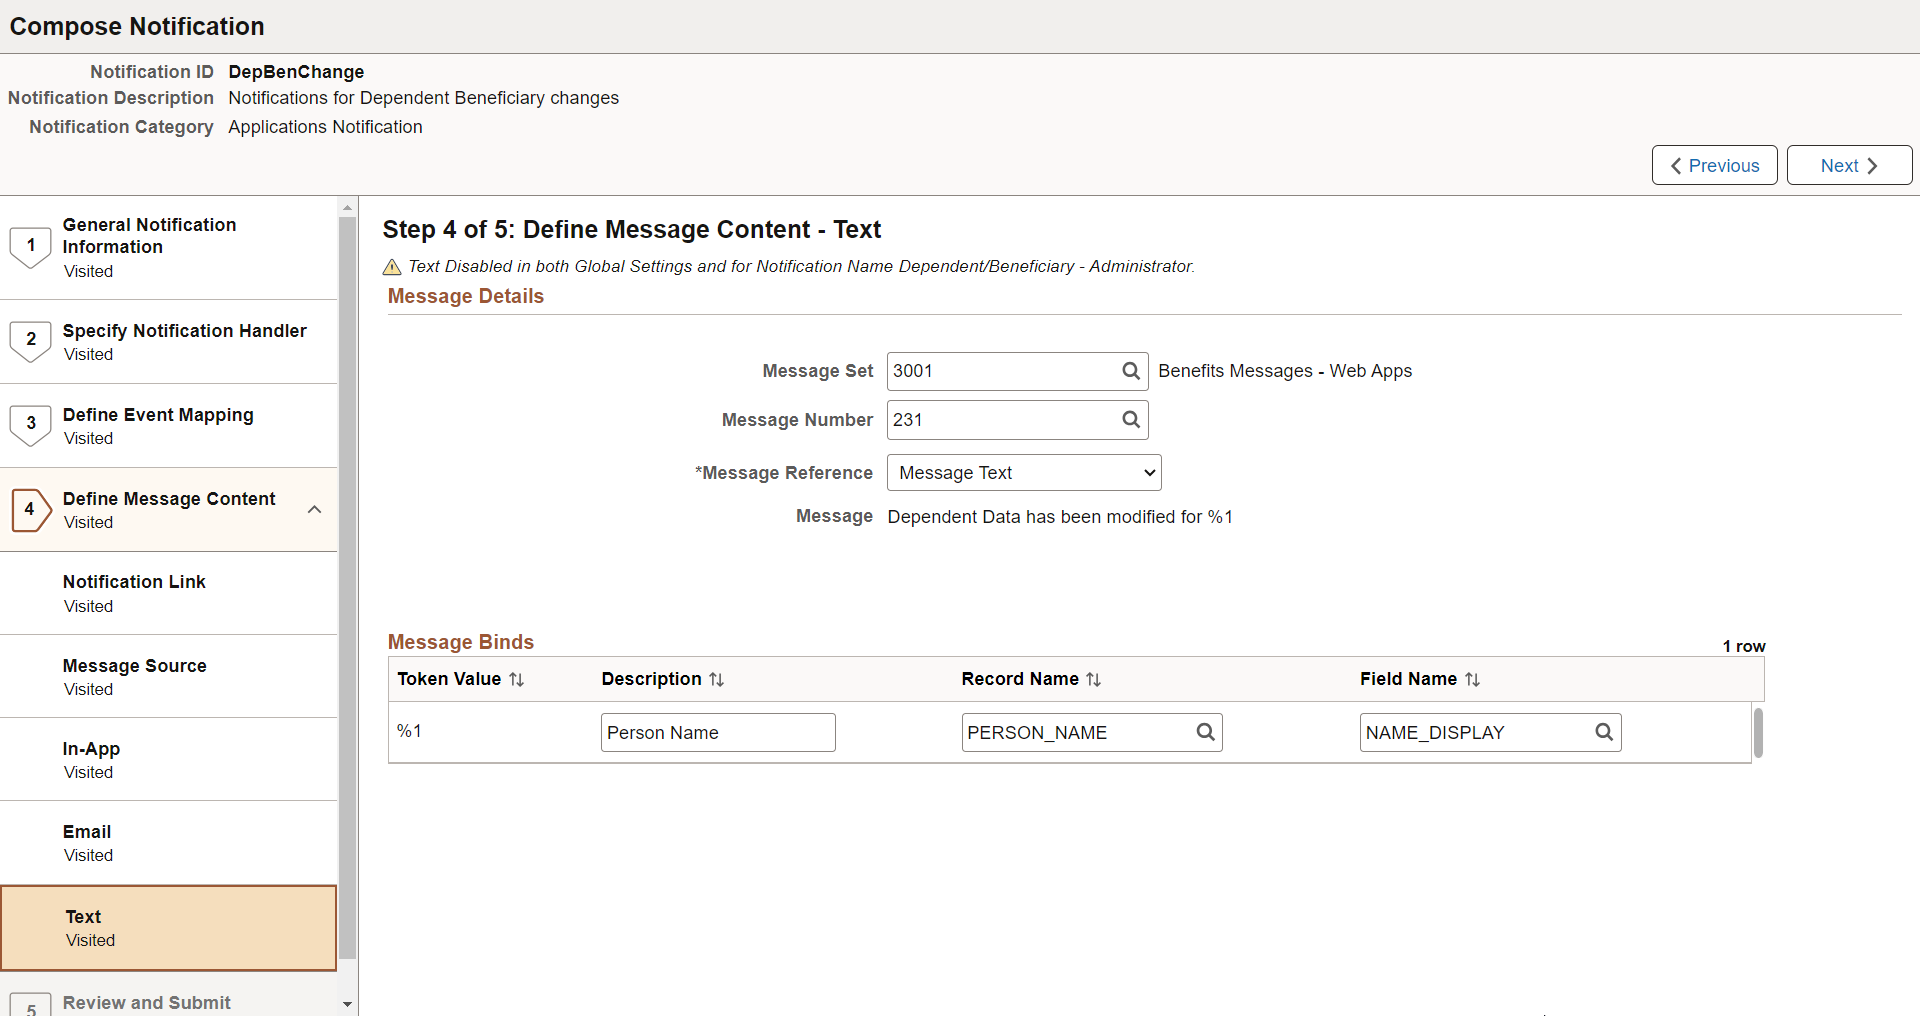
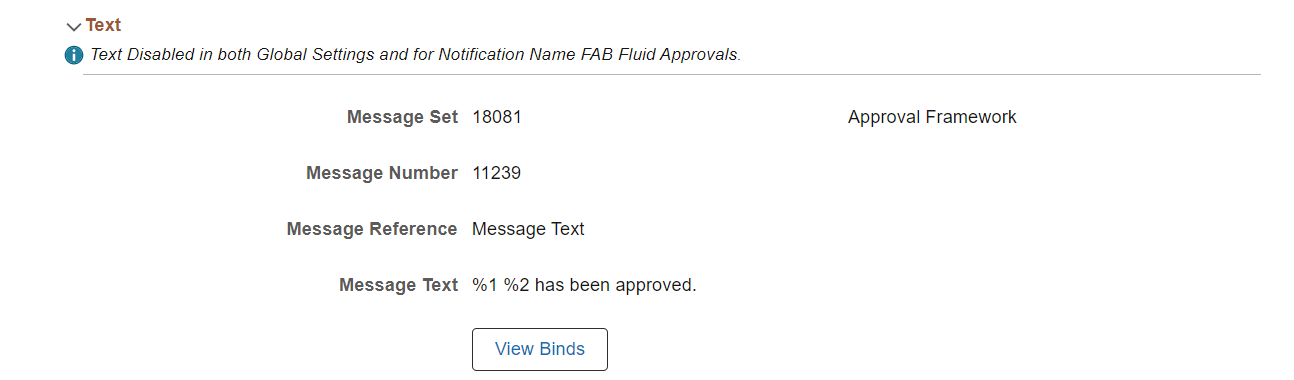
Use the Define Message Content - Text page (EONC_TXT_CFG_FL) to specify text messaging notification parameters. This page displays different fields based on the setting you select for the Text field on the Define Message Content - Message Source Page.
Navigation:
From the Define Message Content - Email Page, select the Next button.
This example illustrates the fields and controls on the Define Message Content - Text page (when source is set to Message Catalog).
This example illustrates the fields and controls on the Define Message Content - Text page (when source is set to Custom Text).
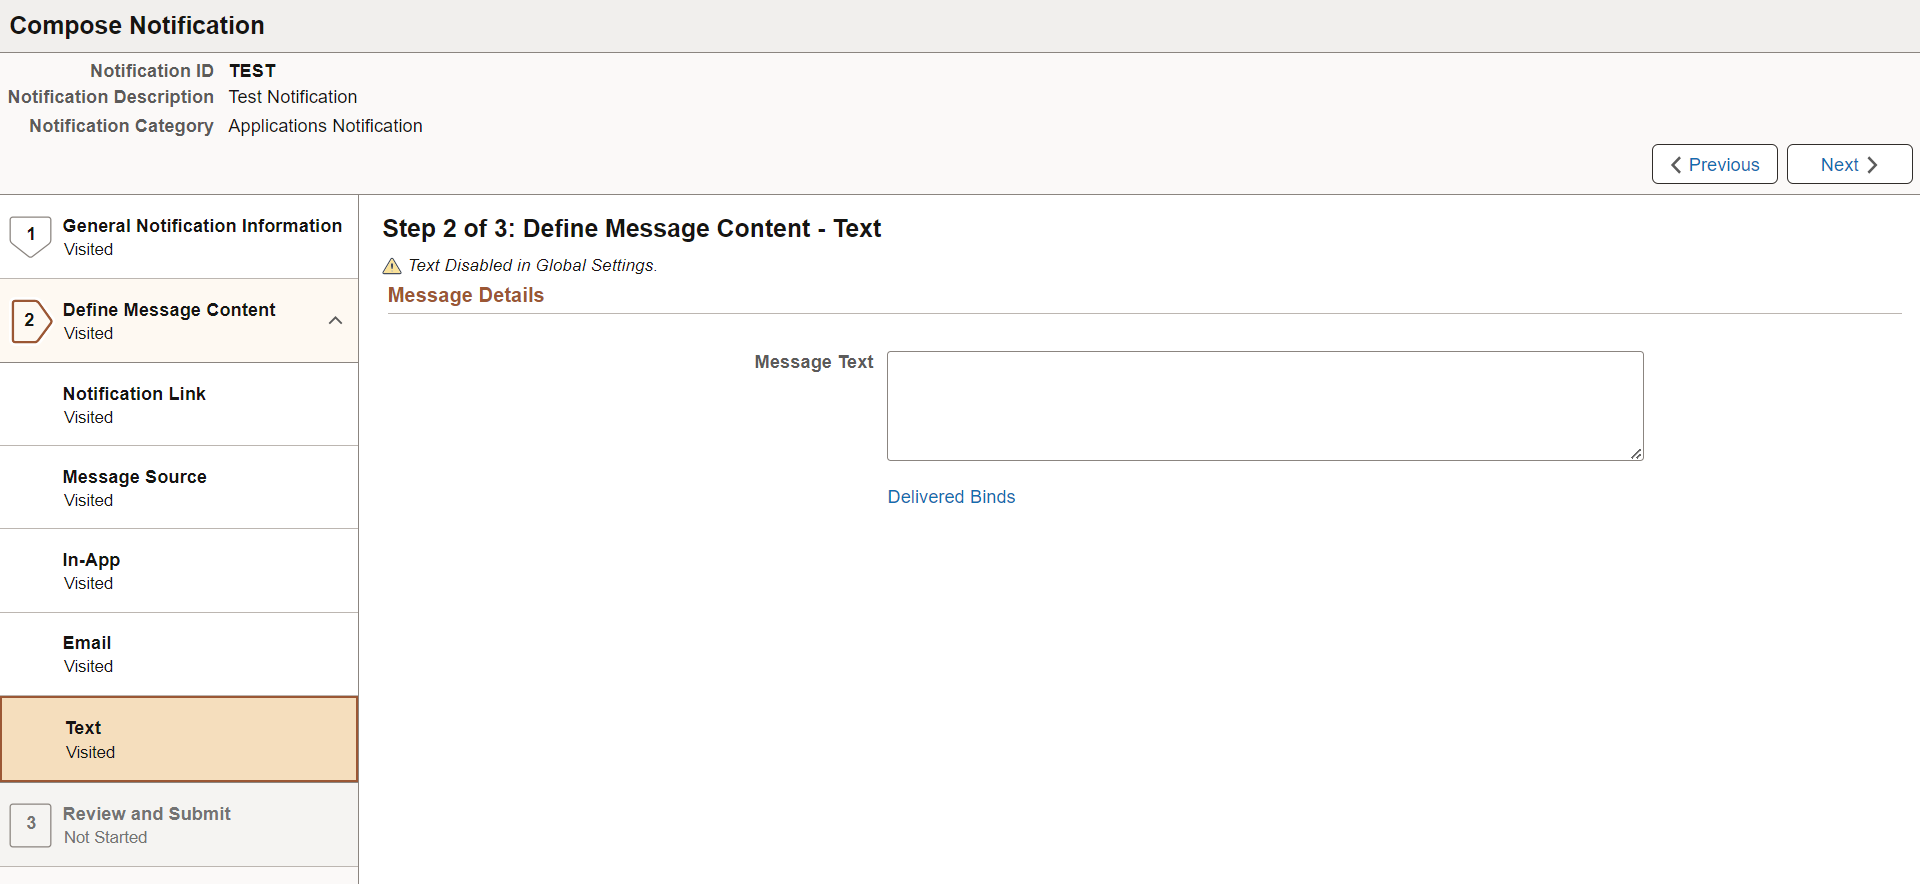
Message Details
These fields appear when you select the Custom Text value for the Text field on the Define Message Content - Message Source Page:
|
Field or Control |
Description |
|---|---|
|
Message Text |
Manually enter the text message notification. |
|
Delivered Binds |
Select to view a list of special system bind variables that can be used in the content, which are automatically resolved by the handler (for example, %DATE). |
|
Record Name |
Enter the name of the record that contains the field required for the bind variable. You can leave this field unpopulated if it is set by the calling program and passed to the handler. Note: This field does not display for AWE notifications. |
|
Field Name |
Enter the name of the field required for the bind variable. You can leave this field unpopulated if it is set by the calling program and passed to the handler. Note: This field does not display for AWE notifications. |
These fields appear when you select the Message Catalog value for the Text field on the Define Message Content - Message Source Page:
|
Field or Control |
Description |
|---|---|
|
Message Set |
Indicate the Message Catalog set from which you will select a message number. |
|
Message Number |
Enter a message number for the body of the email message. |
|
Message Reference |
Select from the following options:
|
Message Binds
Bind variables enable you to insert variable text into the notification messages. For example, you can add a bind variable for employee name within the message text. When the notification is sent to a group of employees, each employee has their own name appear in the message text.
The following binds are available for Applications notification category:
%URL: Target Transaction Link
%DATE: Current Date
%DATETIME: Current Date/Time
%TIME: Current Time
%SERVERTIMEZONE: Time Zone
%USERID: User ID
%USERDESCRIPTION: User Description (Name)
%EMAILADDRESS: User Email Address
%EMPLOYEEID: User Employee ID
%NOTIFICATIONPRIORITY: Notification Priority
The following binds are available for Activity Guide Composer notification category:
%DATE: Current Date
%DATETIME: Current Date/Time
%TIME: Current Time
%SERVERTIMEZONE: Time Zone
%USERID: User ID
%USERDESCRIPTION: User Description (Name)
%EMAILADDRESS: User Email Address
%EMPLOYEEID: User Employee ID
%NOTIFICATIONPRIORITY: Notification Priority
%AG_DETAILS%: Activity Guide Step Details
%AG_URL%: Activity Guide URL
%AG_USER%: Activity Guide User Description
%HR_OFB_CTX_VW-LAST_DATE_WORKED%: Last Date Worked
The following binds are available for Questionnaire Framework notification category:
%DATE: Current Date
%DATETIME: Current Date/Time
%TIME: Current Time
%SERVERTIMEZONE: Time Zone
%USERID: User ID
%USERDESCRIPTION: User Description (Name)
%EMAILADDRESS: User Email Address
%EMPLOYEEID: User Employee ID
%NOTIFICATIONPRIORITY: Notification Priority
%END_DATE%: End Date
%EVENT_NAME%: Event Name
%OPR_DESCR%: Operator Description
%QE_URL%: Questionnaire URL
|
Field or Control |
Description |
|---|---|
|
Token Value |
Displays the token value, or bind variable, for the notification. |
|
Description |
Displays a description of the bind variable. |
|
Record Name |
Enter the name of the record that contains the field required for the bind variable. You can leave this field unpopulated if it is set by the calling program and passed to the handler. Note: This field does not display for AWE notifications. |
|
Field Name |
Enter the name of the field required for the bind variable. You can leave this field unpopulated if it is set by the calling program and passed to the handler. Note: This field does not display for AWE notifications. |
Use the Review and Submit page (EONC_REVIEW_FL) to view a summary of the notification configuration before saving.
Navigation:
From the Define Message Content - Text Page, select the Next button.
This example illustrates the fields and controls on the Compose Notification - Review and Submit page.
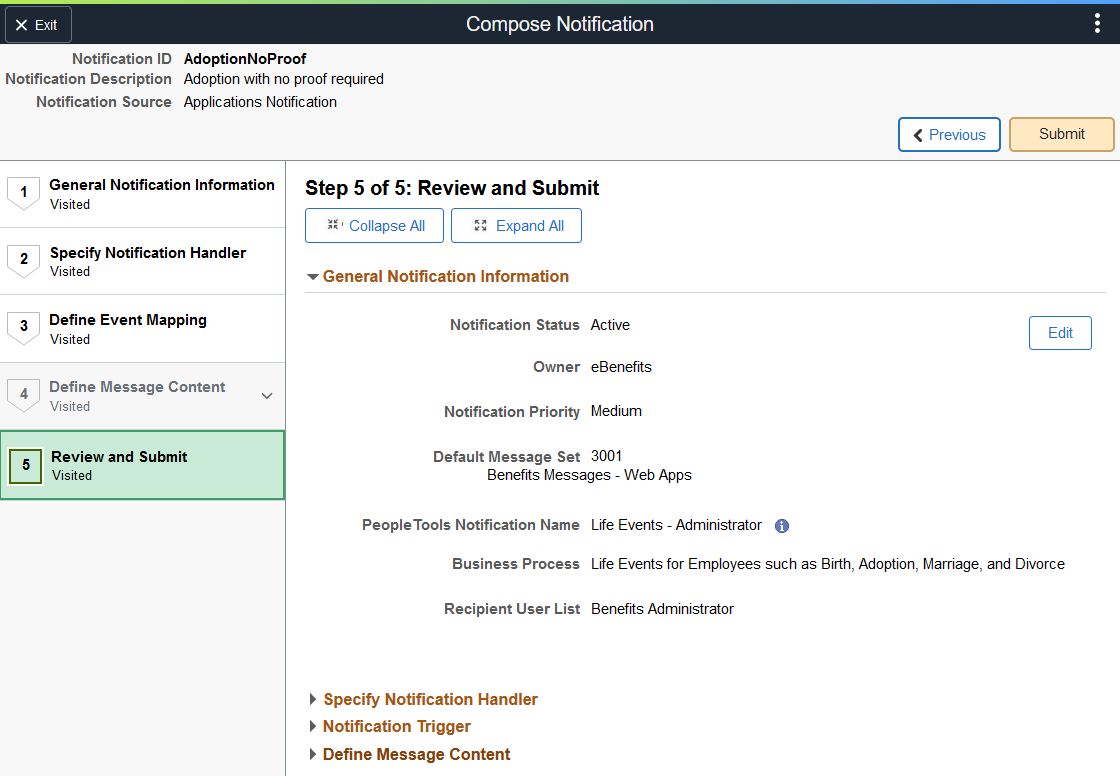
This page displays the configuration content of each page within collapsible sections. Expand or collapse sections individually or use the Collapse All and Expand All buttons to collapse or expands all sections simultaneously.
Select the Edit button within a section to return to the corresponding page and make updates.
Select the Submit button to validate and save the notification.
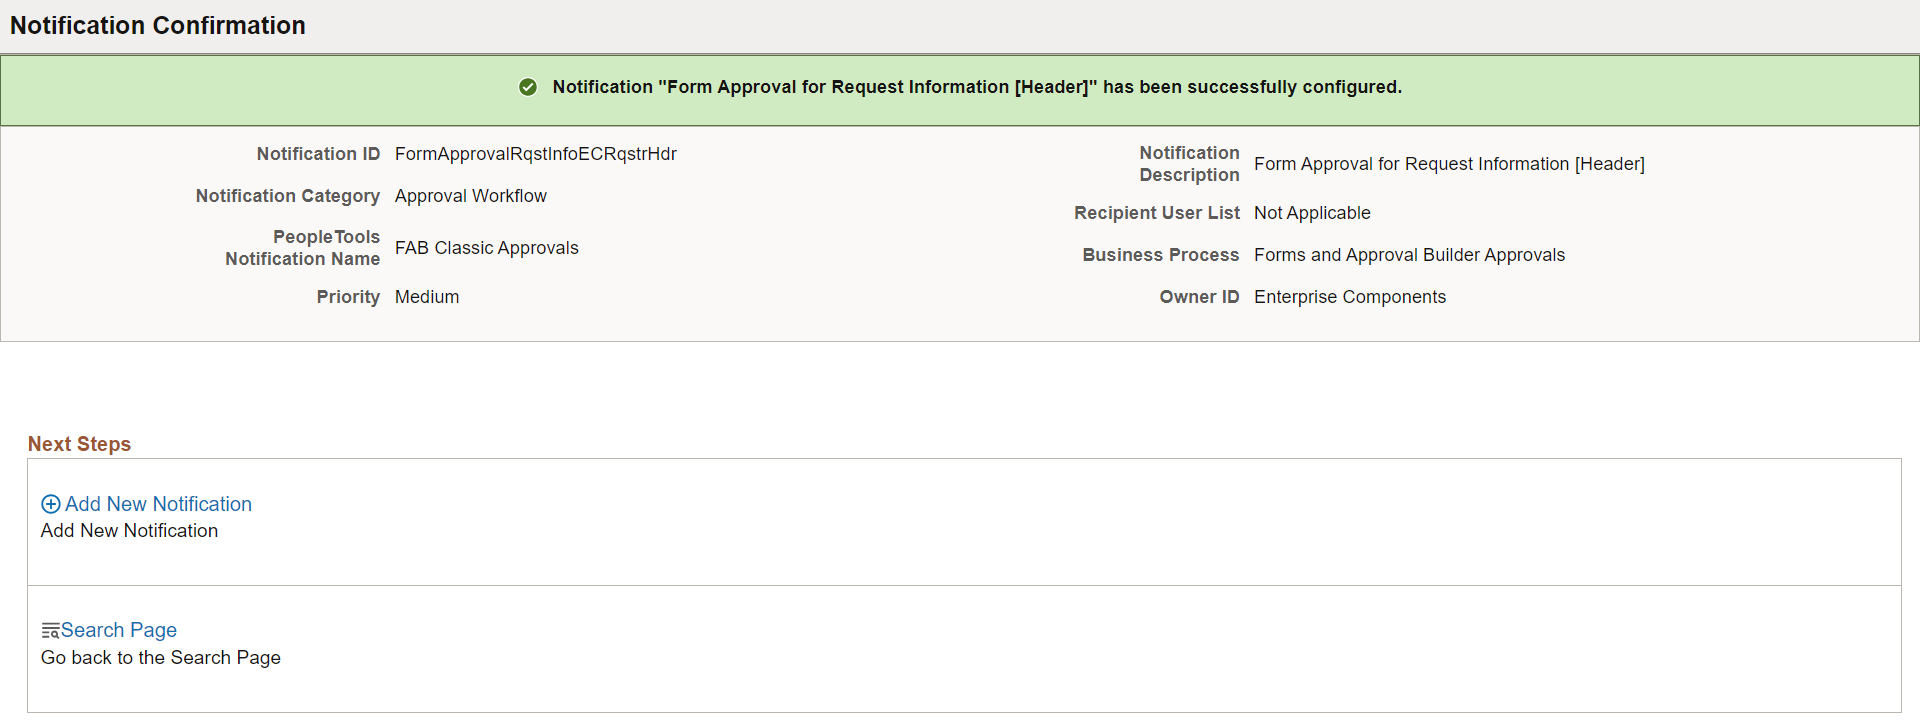
Use the Notification Confirmation page (EONC_CONF_FL) to confirm the notification has been successfully configured and completed.
Navigation:
From the Review and Submit Page, select the Submit button.
This example illustrates the fields and controls on the Notification Confirmation page.
Use the Notification Details page (EONC_VIEW_SCF) to view the details of a Notification Composer notification.
Navigation:
From the Compose Notification Page, select View from the Actions icon next to a notification.
From the Add Notification Event Page, select the Information icon.
From the Edit Notification Event Page, select the Information icon.
This example illustrates the fields and controls on the Notification Details page (1 of 4).

This example illustrates the fields and controls on the Notification Details page (2 of 4).
This example illustrates the fields and controls on the Notification Details page (3 of 4).
This example illustrates the fields and controls on the Notification Details page (4 of 4).
Use the Copy from Notification page (EONC_COPY_NOTIF_FL) to clone a notification.
Navigation:
From the Compose Notification Page, select Copy from the Actions icon next to a notification.
This example illustrates the fields and controls on the Copy from Notification page.
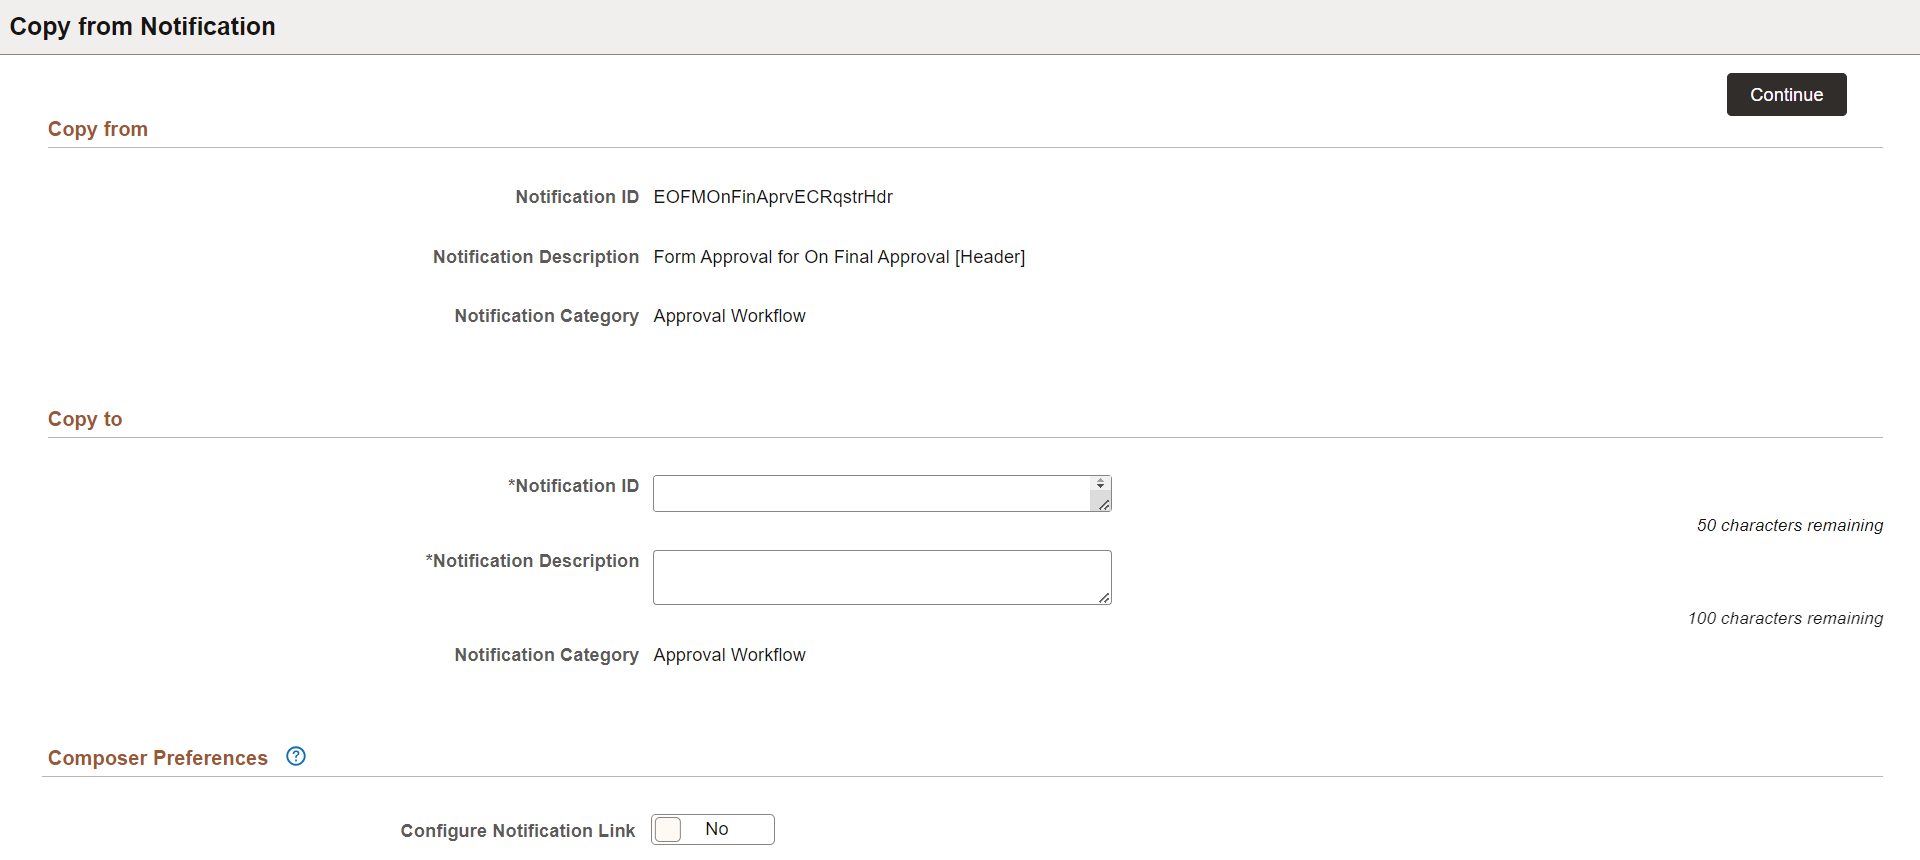
This page displays the notification information you are copying. You must enter details specific to this new notification event, such as Notification ID and description.
See the Add New Notification Page for field definitions.