
 Understanding GL Interface Processing
This chapter provides an overview of GL interface processing and discusses how to:
Load setup data using PeopleSoft Application Messaging.
Review setup table data.
Link Student Financials business units to PeopleSoft General Ledger units.
Set up the Ledger Fields Table
(Optional) Create ChartField speed type keys for department receipt processing.
(Optional) Activate ChartField combination editing.
Assign charts of accounts.
Validate ChartFields.
Set up integration with PeopleSoft Financials 8.4 and 8.8.
Copy ChartField information for item types from one term to another.
Understanding GL Interface ProcessingThis section provides overviews of:
GL interface processing using PeopleSoft General Ledger.
GL messaging.
GL interface processing using a third-party or legacy general ledger system.
Note. When customers license Campus Solutions, they receive a limited use license for Human Resources, Benefits Administration, and Payroll for North America.
GL Interface Processing Using PeopleSoft General LedgerMost of the setup needed to transfer information between the Student Financials application and the PeopleSoft General Ledger application is done within General Ledger and then transferred to Student Financials. Throughout the setup process, it is important for you to work closely with staff who coordinate your General Ledger application. They will assist you in defining your setup tables and tell you what information is necessary for the GL interface.
There are two different PeopleSoft Financials releases with which your system can interface for the purpose of GL processing. If you interface with PeopleSoft Financials 8.4 or 8.8, your system uses application messaging to share accounting line information with PeopleSoft General Ledger.
GL MessagingThe diagram below illustrates how GL messages travel between Student Financials and PeopleSoft Financials 8.4/8.8.
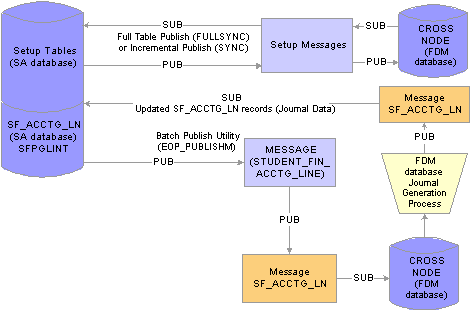
Student Financials to Financials 8.4/8.8 GL messaging process
During the GL messaging process, Student Financials delivers two message channels and three messages to the PeopleSoft Financials database:
|
Message Channel |
Message |
Description |
|
STUDENT_ADMIN_ACCOUNTING |
STUDENT_FIN_ACCTG_LINE |
Notifies the message broker that new SF_ACCTG_LN records are ready to be retrieved by PeopleSoft Financials and, after journal generation, retrieves the updated SF_ACCTG_LN records into Student Financials. |
|
HR_SETUP |
BUS_UNIT_SF_FULLSYNC |
Sends the BUS_UNIT, DESCR, and DESCRSHORT rows in the BUS_UNIT_TBL_SF to PeopleSoft Financials to seed its BUS_UNIT_TBL_SF. |
|
HR_SETUP |
BUS_UNIT_SF_SYNC |
Sends new Student Financials business units or updates when the DESCR or DESCRSHORT fields are changed. |
PeopleSoft delivers a default node of PSFT_LS. If you change this default, you must reconfigure the message channel. However, regardless of whether or not you change the message node, you must configure it by inserting the proper URL.
Note. An easy way to determine where messaging starts and ends is to name the publishing node with the name of the database to which
it publishes or from which it publishes.
In the PeopleSoft Financials database, message definition, message channel, and message node naming must match the naming
used in the Student Financials database.
PeopleSoft Financials subscribes to the published messages in the Student Financials database, takes the accounting lines
into their SF_ACCTG_LN table, and runs those lines through Journal Generator to create journal entries. PeopleSoft Financials
then publishes the updated accounting lines, Student Financials subscribes to these lines, and the data published by PeopleSoft
Financials updates the Student Financials SF_ACCTG_LN table.
GL Interface Processing Using a Third-Party or Legacy General Ledger SystemStudent Financials provides an extra field for you to use to enter chart of accounts data on your item types, course/class fees, and cashiering tenders/targets. You can use the existing PeopleSoft-delivered ChartFields (ACCOUNT, DEPTID, and so on) to enter your chart of accounts information.
Alternatively, Student Financials provides a 50-character field called External GL Chart Field (field name EXT_GL_CHARTFLD) that you can use to enter your chart of accounts data. To enable this field, you must signify to the system that you are not using PeopleSoft General Ledger. To indicate that you are not using PeopleSoft General Ledger, clear the General Ledger check box on the Installation Table page. Once you clear this check box, pages that normally display the PeopleSoft-delivered ChartFields for data entry instead (or, in some instances also) display the External GL ChartField field.
Using the External GL Chart Field does have some limitations. The system does not perform any editing against this field. In addition, the ChartField validation process does not check the contents of the External GL Chart Field to ensure that you have supplied valid chart of accounts information for each item type, course/class fee, and cashiering tender/target.
Even if you are not using PeopleSoft General Ledger, you still must populate the GL setup tables (except the ChartField definition tables) before you can use the GL Interface or Cashiering GL Interface processes.
See Also
Reviewing Installation Setup and System Defaults
Defining Number Sequence Start Points and Maximum Row Settings
Loading Setup Data Using PeopleSoft Application MessagingIf your system interfaces with PeopleSoft Financials 8.4 or 8.8, it shares accounting messaging directly through PeopleSoft Application Messaging . The following table lists all PeopleSoft Financials 8.4 or 8.8 published messages to which Student Financials subscribes in order to load ChartFields.
|
Message Name |
Channel |
Pub/Sub Node |
Records |
|
BUD_PERIOD_CALENDAR_FULLSYNC |
DETAIL_CALENDAR |
FDM \ SA |
CAL_DEFN_TBL |
|
BUD_PERIOD_CALENDAR_SYNC |
DETAIL_CALENDAR |
FDM \ SA |
CAL_DEFN_TBL |
|
DETAIL_CALENDAR_FULLSYNC |
DETAIL_CALENDAR |
FDM \ SA |
CAL_DEFN_TBL |
|
DETAIL_CALENDAR_SYNC |
DETAIL_CALENDAR |
FDM \ SA |
CAL_DEFN_TBL |
|
BUD_REF_CF_FULLSYNC |
ENTERPRISE_SETUP |
FDM/SA |
BUD_REF_TBL |
|
BUD_REF_CF_SYNC |
ENTERPRISE_SETUP |
FDM/SA |
BUD_REF_TBL |
|
CHARTFIELD1_FULLSYNC |
ENTERPRISE_SETUP |
FDM/SA |
CHARTFIELD1_TBL |
|
CHARTFIELD1_SYNC |
ENTERPRISE_SETUP |
FDM/SA |
CHARTFIELD1_TBL |
|
CHARTFIELD2_FULLSYNC |
ENTERPRISE_SETUP |
FDM/SA |
CHARTFIELD2_TBL |
|
CHARTFIELD2_SYNC |
ENTERPRISE_SETUP |
FDM/SA |
CHARTFIELD2_TBL |
|
CHARTFIELD3_SYNC |
ENTERPRISE_SETUP |
FDM/SA |
CHARTFIELD3_TBL |
|
CHARTFIELD3_SYNC |
ENTERPRISE_SETUP |
FDM/SA |
CHARTFIELD3_TBL |
|
CLASS_CF_SYNC |
ENTERPRISE_SETUP |
FDM \ SA |
CLASS_CF_TBL |
|
CLASS_CF_FULLSYNC |
ENTERPRISE_SETUP |
FDM \ SA |
CLASS_CF_TBL |
|
DEPT_FULLSYNC |
ENTERPRISE_SETUP |
FDM+SA \ FDM+SA |
DEPT_TBL |
|
DEPT_SYNC |
ENTERPRISE_SETUP |
FDM+SA \ FDM+SA |
DEPT_TBL |
|
FUND_LOAD |
ENTERPRISE_SETUP |
FDM \ SA |
FUND_TBL |
|
FUND_CF_SYNC |
ENTERPRISE_SETUP |
FDM \ SA |
FUND_TBL |
|
PROGRAM_CF_FULLSYNC |
ENTERPRISE_SETUP |
FDM \ SA |
PROGRAM_TBL |
|
PROGRAM_CF_SYNC |
ENTERPRISE_SETUP |
FDM \ SA |
PROGRAM_TBL |
|
HR_ACCT_CD_LOAD |
ENTERPRISE_SETUP |
FDM \ SA |
ACCT_CD_TBL |
|
BUS_UNIT_FS_FULLSYNC |
ENTERPRISE_SETUP |
FDM \ SA |
BUS_UNIT_TBL_FS |
|
BUS_UNIT_FS_SYNC |
ENTERPRISE_SETUP |
FDM \ SA |
BUS_UNIT_TBL_FS |
|
ACCOUNT_CHARTFIELD_FULLSYNC |
GL_SETUP |
FDM \ SA |
GL_ACCOUNT_TBL |
|
ACCOUNT_CHARTFIELD_SYNC |
GL_SETUP |
FDM \ SA |
GL_ACCOUNT_TBL |
|
LEDGER_DEFN_FULLSYNC |
GL_SETUP |
FDM \ SA |
LED_DEFN_TBL |
|
LEDGER_DEFN_SYNC |
GL_SETUP |
FDM \ SA |
LED_DEFN_TBL |
|
BUS_UNIT_GL_FULLSYNC |
GL_SETUP |
FDM \ SA |
BUS_UNIT_TBL_GL |
|
BUS_UNIT_GL_SYNC |
GL_SETUP |
FDM \ SA |
BUS_UNIT_TBL_GL |
|
BUS_UNIT_SF_FULLSYNC |
HR_SETUP |
SA \ FDM |
BUS_UNIT_TBL_SF |
|
BUS_UNIT_SF_SYNC |
HR_SETUP |
SA \ FDM |
BUS_UNIT_TBL_SF |
|
JOURNAL_GEN_APPL_ID_FULLSYNC |
JOURNAL_GENERATOR |
FDM \ SA |
JRNLGEN_APPL_ID |
|
JOURNAL_GENERATOR_APPL_ID_SYNC |
JOURNAL_GENERATOR |
FDM \ SA |
JRNLGEN_APPL_ID |
|
PROJECT_FULLSYNC |
PROJECTS_SETUP |
FDM \ SA |
PROJECT |
|
PROJECT_SYNC |
PROJECTS_SETUP |
FDM \ SA |
PROJECT |
See Also
PeopleSoft General Ledger 8.8 PeopleBook, “Integrating and Transferring Information Among Applications,” and “Integrating PeopleSoft General Ledger with PeopleSoft Applications”
Reviewing Setup Table DataAfter you have loaded all of the setup tables that support the GL Interface, you can use a variety of components to review the setup data for accuracy.
The Student Financials application recognizes three types of business units: the SF (student financials) business unit, the AP (accounts payable) business unit, and the GL (general ledger) business unit. You define GL business units in PeopleSoft General Ledger and load them through an integration point. The Business Unit GL component enables you to review the GL business unit definition.
You define the journal generator templates in PeopleSoft General Ledger and load them through an integration point. The Journal Generator templates define the valid template IDs that the GL Interface process assigns to each accounting entry it creates. Each accounting entry must have a valid journal generator template ID for it to be properly recorded in PeopleSoft General Ledger.
Note. Most of the fields on the Journal Generator Template - Defaults and Journal Generator Template - Summarization pages are used only by the PeopleSoft General Ledger system during journal generation processing.
Pages Used to Review Your PeopleSoft General Ledger Setup Data
|
Page Name |
Object Name |
Navigation |
Usage |
|
BUS_UNIT_TBL_GL1 |
Set Up HRMS, Product Related, Payroll for North America, GL Interface, Review GL Business Units, Definition |
View attributes assigned to your GL business unit. |
|
|
BUS_UNIT_TBL_GL2 |
Set Up HRMS, Product Related, Payroll for North America, GL Interface, Review GL Business Units, Currency Options |
View your currency option settings from your GL business unit. |
|
|
JRNL_GEN_DEFAULTS |
Set Up HRMS, Product Related, Payroll for North America, GL Interface, Review Journal Generator Tmpl, Defaults |
View the journal generator template ID used by the GL Interface process. Other fields on this page are used only in PeopleSoft General Ledger by the journal generator process. |
|
|
JRNL_GEN_SUM |
Set Up HRMS, Product Related, Payroll for North America, GL Interface, Review Journal Generator Tmpl, Defaults |
View summarization parameters that the PeopleSoft General Ledger Journal Generator Process uses. |
|
|
DETAIL_CALENDAR1 |
Set Up HRMS, Product Related, Payroll for North America, GL Interface, Review Detail Calendar |
View fiscal years and accounting periods from PeopleSoft General Ledger. |
Linking Student Financials Business Units to PeopleSoft General Ledger UnitsAfter reviewing your PeopleSoft general ledger setup data, you must tie together each Student Financials business unit to its associated PeopleSoft General Ledger unit using the General Ledger Unit field on the General 1 page.
See Also
Defining Basic Business Unit Parameters
Setting Up the Ledger Fields TableTo set up the ledger fields table, use the Ledger Fields Table component (SF_LED_FLDS_TBL).
When you define an item type GL interface you specify the ledger to which account information is transferred. The ledger field table defines what fields are available to you. Not all available ChartFields are necessarily needed to convey your accounting information. To prevent entering data into an incorrect ChartField, define only the values you need. The business unit, account and ledger fields are always required for the GL interface definition and do not need to be added to the ledger fields table.
Page Used to Set Up Your Ledger Fields Table
|
Page Name |
Object Name |
Navigation |
Usage |
|
SF_LED_FLDS_TBL |
Set Up SACR, Product Related, Student Financials, General Ledger Interface, Ledger Fields Table |
Define ledger fields. |
Defining Ledger FieldsAccess the Ledger Fields Table page.
|
ChartField |
Select the database field name representing a valid ChartField. |
|
Deferred ChartField |
Define the required ChartFields for the Deferred GL Interface page accessed from the GL Interface page in the Item Type component. |
Creating ChartField SpeedType Keys for Department Receipt ProcessingTo set up ChartField speed type keys, use the SpeedTypes component (SPEEDTYPE).
Often you will want to enter the same combination of ChartField values repeatedly for department receipts in the Cashiering feature. By creating shortcut keys called speed types for these frequently used combinations of ChartFields, you can reduce data entry time and increase data entry accuracy. Using a speed type key that you define, you can enter one alphanumeric code that automatically enters all of its defined ChartField values.
Pages Used to Create ChartField SpeedType Keys
|
Page Name |
Object Name |
Navigation |
Usage |
|
SPEEDTYPE |
Set Up SACR, Product Related, Student Financials, General Ledger Interface, SpeedTypes |
Define ChartField SpeedTypes for department receipt processing. |
Defining ChartField SpeedTypesAccess the SpeedTypes page.
|
Bypass Combo Edit (bypass combination edits) |
Select to bypass the combination edits when setting up SpeedTypes. This enables you to set up an incomplete SpeedType. For example, you could leave the Fund field blank. Then cashiers can enter the appropriate fund during department receipt creation. Note. The functionality of the Bypass Combo Edit check box is relevant only if you select the Edit Combinations check box on the SF Installation page. When you select the Edit Combinations check box, the system processes department receipts only if cashiers select the correct ChartFields. |
|
Type of SpeedType |
Select the type of speed type to restrict the key to a particular operator or class. One Operator: Only the operator specified in the dialog box can use this key combination. When you select this option, the User field becomes available and the Prim Perm List (primary permission list) field becomes unavailable. One Operator Class: Only the operator class specified in the dialog can use this key combination. When you select this option, the Prim Perm List field becomes available for use and the User field becomes unavailable. Universal (All Operators): All operators are authorized to use this combination. When this option is selected, both the User and Prim Perm List fields become unavailable. |
|
The system automatically populates this field with your institution’s base currency value. You can override this value to change the currency code. |
|
|
Statistics Code |
Optionally, enter a statistics code to record information used for statistical analysis. Your PeopleSoft General Ledger staff defines statistics codes. |
See Also
Activating ChartField Combination EditingIn addition to helping to ensure that ChartFields are valid, Student Financials also enables you to validate whether the combination of ChartFields that you have assigned to new item types, course and class fees, and cashiering tender keys and target keys is valid. There are multiple ways to use combination editing. You can directly load speed types from PeopleSoft General Ledger to be used as valid combinations. Alternatively, you can load combination data using a process delivered with PeopleSoft HRMS.
To activate ChartField combination editing in Student Financials:
Define speed types in PeopleSoft General Ledger that contain valid ChartField combinations. Use the delivered enterprise integration points to load the Speed Type tables with valid ChartField combinations from PeopleSoft General Ledger.
Alternatively, define valid combinations in PeopleSoft General Ledger using the Combination Build process. Execute the HR Account Load process to load combinations into the HR Account Code table. This process loads the result of the Combination Build process created in PeopleSoft General Ledger.
Select the Edit Combinations check box on the SF Installation page. Once you select the check box, save the page.
After completing these steps, when you define GL interface information for new item types, course or class fees, or cashiering tender keys and target keys, the Student Financials application ensures that the ChartField combination entered is valid. If the combination is not valid, the system does not permit the user to save the page until she enters a valid combination.
Note. When customers license Campus Solutions, they receive a limited use license for Human Resources, Benefits Administration, and Payroll for North America.
See Also
Creating ChartField SpeedType Keys for Department Receipt Processing
Setting Up Item Types and Item Type Groups
Assigning Charts of AccountsYou can assign a chart of accounts (ChartFields) to your item types, course and class fees (if you use course and class fees), and cashiering setup (if you use the Cashiering feature).
See Also
Setting Up Item Types and Item Type Groups
Establishing Criteria for Tuition Groups and Fee Triggers
Validating ChartFieldsStudent Financials provides several methods for ensuring that the ChartFields that you enter on item types, course and class fees, and Cashiering tender keys and target keys are valid. When you create these elements, PeopleCode programs on the GL Interface pages validate the ChartFields you enter against the setup data you loaded from PeopleSoft General Ledger.
Because your General Ledger staff can change ChartFields over time, inactivating them or even perhaps deleting them, Student Financials provides a process that validates ChartFields on item types, course/class fees, and cashiering tenders and targets. The ChartField Validation Process produces a report that identifies item types, course/class fees, and cashiering setup that contain invalid ChartFields.
Page Used to Validate ChartFields
|
Page Name |
Object Name |
Navigation |
Usage |
|
RUNCTL_SFGLVAL1 |
Set Up SACR, Product Related, Student Financials, General Ledger Interface, Chart Field Validation |
Identify invalid ChartFields in Student Financials. |
Identifying Invalid ChartFieldsAccess the Chartfield Validation page.
|
Business Unit |
Select the Student Financials business unit for which you want to validate ChartField information. |
|
As of Date |
Because your ChartField values can change as you synchronize with your PeopleSoft E&G Financials application, you must specify a date for which you want to run the verification. |
|
Effective Status Option |
Status options are: Active Status Only: Select this option to validate ChartField definitions for item types with a status of “Active.” Active and Inactive Status: Select this option to validate ChartField definitions on all item types regardless of status. |
|
Term |
Select the term you want to verify. |
Setting Up Integration with PeopleSoft Financials 8.4 and 8.8This section discusses how to:
Define batch publish rules for GL messaging.
Define batch programs for GL messaging.
Set up business unit synchronization.
Synchronize Student Financials business unit data with PeopleSoft Financials 8.4/8.8.
Pages Used to Set Up Integration with PeopleSoft
|
Page Name |
Object Name |
Navigation |
Usage |
|
EO_MSGPUBBATCH |
Enterprise Components, Integration Definitions, Batch Publish Rules |
Define batch publish rules for GL messaging. |
|
|
EO_MSGBATPGM |
Enterprise Components, Integration Definitions, Batch Publish Rules, Batch Programs |
Define batch programs for GL messaging. |
|
|
EO_MSGPUBFULL |
Enterprise Components, Integration Definitions, Full Data Publish Rules |
Set up business unit synchronization. |
|
|
EO_FULLDATAPUB |
Enterprise Components, Integration Definitions, Initiate Processes, Full Data Publish |
Synchronize Student Financials business unit data with PeopleSoft Financials 8.4/8.8. |
Defining Batch Publish Rules for GL MessagingAccess the Batch Publish Rules page.
To define batch publish rules:
Enter STUDENT_FIN_ACCTG_LINE in the Publish Rule ID field.
Select Active in the Status field.
For PeopleSoft Financials 8.4/8.8 integration, select the Create Message Header and Create Message Trailer check boxes. For PeopleSoft Financials 8.8 integration, clear these check boxes.
Defining Batch Programs for GL MessagingAccess the Batch Programs page and select STUDENT_FIN_ACCTG_LINE as the Message Name.
Enter the process names SFDPTREC (Cashiering GL Interface process) and SFPGLINT (GL Interface process), which EOP_PUBLISHM picks up when publishing accounting lines to PeopleSoft Financials. If you do not select this process, the messages will not be created when EOP_PUBLISHM runs.
Setting Up Business Unit SynchronizationAccess the Full Table Publish Rules page.
To set up business unit synchronization:
Enter BUS_UNIT_SF_FULLSYNC in the Publish Rule ID field. This rule publishes three fields (Business Unit, Description, Short Description) for all rows on the table to PeopleSoft Financials.
Select Active in the Status field.
Select the Create Message Header and Create Message Trailer check boxes.
Note. You must synchronize all Student Financials business units before you run any GL processes, by running BUS_UNIT_SF_FULLSYNC full table publish once. Thereafter, the system manages additions or changes through messaging in the SF Business Unit component.
Synchronizing Student Financials Business Unit Data with PeopleSoft Financials 8.4/8.8Access the Full Data Publish page.
To synchronize business units:
Enter a Request ID and Description.
Select the Once option in the Process Frequency group box.
Note. You can rerun this process without harming your system if the PeopleSoft Financials database becomes unsynchronized or corrupt.
Select BUS_UNIT_SF_FULLSYNC in the Message Name field.
Click Run.
Once the process runs, the system keeps business units synchronized by triggering a message to the PeopleSoft Financials database whenever you change information in the Description or Short Description fields on the General 1 page of the SF Business Unit component. In addition, the system triggers a message to PeopleSoft Financials whenever you add a new business unit.
Note. The message channel HR_SETUP enables one-way messaging and data publishing. To use this channel, you must configure the message node information by inserting the proper URL. PeopleSoft Financials must subscribe to these Student Financials published messages in order to keep its database up to date.
See Also
PeopleSoft Enterprise General Ledger 8.8 PeopleBook, “Integrating PeopleSoft General Ledger with PeopleSoft Applications”
Copying ChartField Information for Item Types from One Term to AnotherThis section discusses how to run the GL Term Copy process.
Page Used to Copy ChartField Information for Item Types from One Term to Another
|
Page Name |
Object Name |
Navigation |
Usage |
|
RUNCTL_SFGL_FEE |
Set Up SACR, Product Related, Student Financials, General Ledger Interface, Copy Term |
Run the GL Term Copy process. |
Running the GL Term Copy ProcessAccess the GL Term Copy page.
Parameters
|
From Term and To Term |
Select the term from which you are copying item type ChartField information and the term you are copying it to. |
|
From Session and To Session |
Select the session from which you are copying item type ChartField information and the session you are copying it to. |
Check one or more Item Types for Copy
In this group box, select the classification of item types for which you want to copy ChartField information.
When you run the GL Term Copy process, it copies all of the ChartField information for all item types within the classification you select. This process functions even if you previously copied ChartField information for an individual item type using the Copy GL Interface button on the GL Interface page of the Item Types component.