
 Understanding Payslip Layout
This chapter provides an overview of payslip layout and describes how to:
Set up payslips.
Add payslip comments.
View payslips.
Note. The PeopleSoft system delivers a query that you can run to view the names of all delivered elements designed for France. Instructions for running the query are provided in the PeopleSoft Enterprise Global Payroll 8.9 PeopleBook.
See Also
Viewing the Delivered Elements
Understanding Payslip LayoutPeopleSoft supplies a payslip model, which you may redesign to fit your needs.
The payslip has three different sections:
The payslip’s header usually contains payee personal information, employer name and address, and pay period dates.
The payslip’s body usually contains payee and employer earnings and deduction information.
The payslip’s footer usually contains accumulator information and payslip observations.
Note. Every payslip and pay annex sheet lists the current segment dates, day by day, with the hours scheduled for that day. If for
some reason the payee is absent for a day, an absence code is inserted, indicating the reason for the absence.
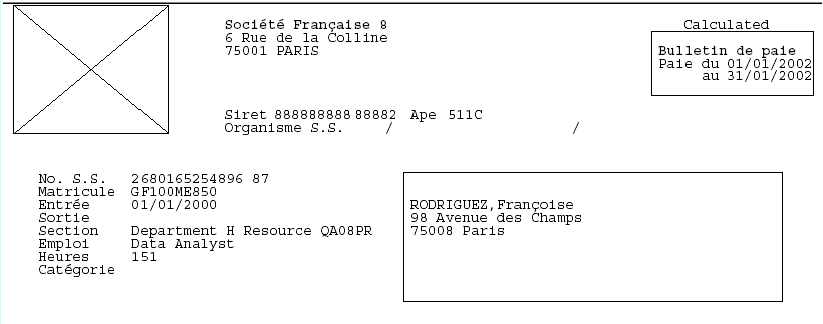
Sample header of a payslip
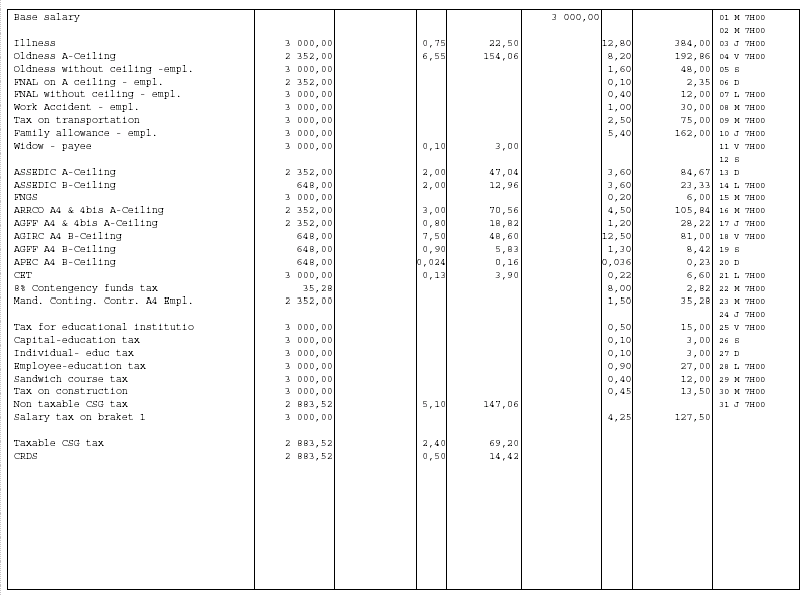
Sample body of a payslip
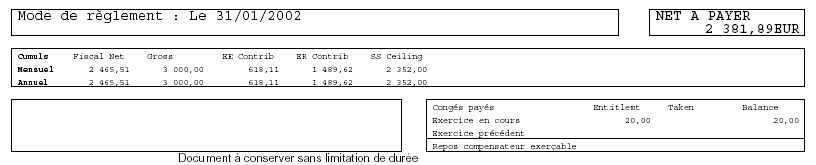
Sample footer of a payslip
See Also
Entering Absences and Generating Wage Certificates
Setting up PayslipsTo set up payslips, use the Templates FRA (GPFR_PAY_SLIP) component.
The payslip displays elements such as earnings, deductions, absence hours, current and year-to-date totals, as well as a daily record. When setting up the payslip, you must define which of these elements to print on the payslip and define the format of the payslip.
The payslip setup consists of:
Assigning at least one pay group to each payslip using the Payslip/Pay Group page.
Defining the sort-order keys that will be used to sort the payslip’s forms on the Payslip Sort Keys page.
Selecting and defining elements (earnings, deductions, and accumulators) to be printed on the payslip. You must also put the earning and deduction elements in the order in which they should appear in the body of the payslip or annex.
Do this on the Payslip Lines page.
Selecting the elements that must have totals printed on the payslip.
Do this on the Payslip Totals page.
When you install Global Payroll for France, the default installation refers to the delivered payroll elements.
Note. By law, some information is not allowed to appear on the payslip (bulletin de paie). If this information is relevant to a payee, it is printed on another form, called an annex (annexe). You are responsible for determining which information belongs on each form.
Pages Used to Set up Payslips
|
Page Name |
Object Name |
Navigation |
Usage |
|
GPFR_P_SLIP_GRP |
Set Up HRMS, Product Related, Global Payroll & Absence Mgmt, Payslips, Templates FRA, Payslip/PayGroup |
Associate pay groups with an individual payslip. Payslips must be associated with at least one pay group before they are included in a pay run. |
|
|
GPFR_P_SLIP_SK |
Set Up HRMS, Product Related, Global Payroll & Absence Mgmt, Payslips, Templates FRA, Payslip Sort Keys |
Set up the methods and order for sorting the different payslip forms. |
|
|
GPFR_PAY_SLIP_1 |
Set Up HRMS, Product Related, Global Payroll & Absence Mgmt, Payslips, Templates FRA, Payslip Lines |
Determine what is printed on each line of the body of the payslip. |
|
|
GPFR_PAY_SLIP_2 |
Set Up HRMS, Product Related, Global Payroll & Absence Mgmt, Payslips, Templates FRA, Payslip Totals |
Determine which accumulators to display in the footer of the payslip form. |
Associating Pay Groups With Payslips Access the Payslip/Pay Group page.
|
Payslip ID |
Displays the payslip ID that you selected. If you are using this page to create a new payslip ID, enter a description in the field next to the payslip ID. |
Payslip/Paygroups
|
Pay Group |
Select the pay group. Each payslip can have multiple pay groups. However, you can associate each pay group with only one payslip. If you want to reassign a pay group to a new payslip ID, first click the Delete button to delete the pay group from the payslip with which it is initially associated. Then add the pay group to a different payslip ID. |
Setting Up Sorting Methods and Order Access the Payslip Sort Keys page.
Each payee receives a payslip form per pay segment. The payee may also receive an annex, if necessary. The payslip and annex may be associated with up to five sort keys that are then used to sort the payslips.
|
Sort Key 1−5 |
Select the sort keys. You can select up to five sort keys, defined by variables. The information is sorted in the following order: Sort Key 1, Sort Key 2, Sort Key 3, Sort Key 4, and Sort Key 5. For example, if you select the variable REP VR PS COMPANY (company ID) for Sort Key 1 and REP VR PS ESTABID (establishment ID) for Sort Key 2, the payslips are sorted first by company and then by establishment. Note. Variables that you select must be defined as stored elements in the element definition. |
|
A/D (ascending/descending) |
Select the sort order: ASC to sort in ascending order, or DSC to sort in descending order. If you select ascending order, values appear in alphabetical order (A to Z) or numerical order (smallest to biggest). |
Determining Printed Information Access the Payslip Lines page.
Common Page Information
|
Payslip/Annex |
Select the document on which you want the elements to print: Pay-slip (Bulletin de paie) or Annex (Annexe). |
|
Print Order |
Enter the number that determines the order in which elements are printed on the payslip. All earnings and deduction elements delivered by PeopleSoft print in the following order:
You may reorder the elements. When reordering, use decimal points for the print order if there are no whole numbers available. For example, if Element A has print order 100.00 and Element B has print order 101.00, and you want element Element C to print between the other two elements, assign it print order 100.50. |
Use this tab to specify and order earnings and deductions that are printed on the payslip.
Note. The rows on each tab correspond directly to the rows on all other tabs. For example, the element referenced in row 1 of the Retro tab is the same as the element in row 1 of the Description tab.
|
EE Element Type (employee element type) |
Select the element type for the payee’s column in the payslip’s body: Earnings or Deductions. |
|
Element Name |
Select a payee’s earning or deduction element. If you specify Earnings in the EE Element Type field, you may select only earnings elements. If you specify Deductions, you may select only deduction elements. |
|
ER Element Type (employer element type) |
Select the element type for the employer’s column in the payslip’s body: Earnings or Deductions. The employer’s earning and deduction elements also appear on the payslip. The name of each element appears in the second Element Name field. |
|
Element Name |
Select an employer’s earning or deduction element. If you specify Earnings in the ER Element Type field, you may select only earnings elements. If you specify Deductions, you may select only deduction elements. |
Access the Description tab.
Use this page to view or change descriptions of earnings or deduction elements.
|
Take Description from |
Select one of these values: Employee Element to extract the payee element’s description from the GP_PIN table. Employer Element to extract the employer element’s description from the GP_PIN table. Description to enter your own description. |
|
Description |
If you select Description in the Take Description from field, enter the description for the element here. If you enter a new description here, it prints on the payslip. It does not, however, update the GP_PIN table. |
Access the Retro tab.
Use this page to select the method for printing retro earnings and deductions.
|
Retro Type |
Select a method for printing the retro earnings or deduction element: One Line, Current and Adjustment, or Current and Deltas. |
|
Detailed Instances |
If you select this check box each instance of the earning or deduction prints separately on the payslip. You cannot select the check box if you selected the retro type of One Line. If you select Current and Adjustment, only instances in the current period are printed separately. |
The following example illustrates the differences among the three Retro Type options. Suppose that last year a payee had a fixed monthly salary of 20000. However, in January of this year, the payee received a raise of 1000 per month. Despite the raise, payroll mistakenly paid the payee 20000 for the months of January and February. In March, the system must pay 1000 in retro pay for both January and February, as well as pay March’s salary of 21000.
If you select One Line, one line will include all current earnings and retro payments in a lump sum. Based on our example, 23000 appears on a single line.
If you select Current and Adjustment, the current salary appears on one line and the retro pay appears on the next line. Based on our example, the salary for March (21000) appears on one line and the retro adjustment and 2000 appears on the next line.
If you select Current and Deltas, the current salary appears on the first line, and each pay period’s retro pay appears on an individual line. Based on our example, the salary for March (21000) appears on one line, and the adjusted monthly amounts (1000 for January and 1000 for February) appear on the following two lines.
Note. This page does not process retro earnings and deductions. Do not use this page to define the retro rules for payroll. Use this page only to define a printing method.
Access the Spaces tab.
Use this page to insert blank lines to space the elements on the payslip.
|
No. of Space Lines Before (number of space lines before) |
Enter the number of empty lines you require before the element description. The default value is 0 lines. The maximum number of lines you can enter is 99. |
|
No. of Space Lines After (number of space lines after) |
Enter the number of empty lines you require after the element description. The default value is 0 lines. The maximum number of lines you can enter is 99. |
Determining Accumulators for Payslip Footer Access the Payslip Totals page.
|
Payslip/Annex |
Select whether the accumulator elements appears on the Pay-slip (bulletin de paie) or the Annex (annexe). |
|
Col. No. (column number) |
Select the column number to which you want to assign each accumulator. These columns appear in the footer section of the payslip. The payslip contains up to 14 different accumulators. The fourteen totals that appear on the payslip correspond to the 14 elements that appear on this page. The columns are separated into three sections: column numbers 1−10, 11−13, and 14. The first section contains ten columns in a row that are designed for accumulating earnings and deductions. Each of the ten accumulators has two values: the top row displays the current total and the bottom row displays the year-to-date total. PeopleSoft delivers the accumulators in the following order:
The second section contains three consecutive columns that display the holiday/vacation information. PeopleSoft delivers the accumulators in the following order:
Each of these three accumulators has two values: the top row displays the current year’s information and the bottom row displays the previous year’s information. The final section contains a single column, column 14: RC (Repos Compensateur), which displays the time-off in lieu of compensation earned (in days and half-days) during this month and that may be spent by the payee during the next two months. Note. If any amount resolves to zero, the header for that amount still prints on the payslip. |
|
Descr. 1 (description 1) |
Enter the description of the element. This description appears at the top of the column on the payslip form. |
|
Element Name |
Select the element name for the first amount (see above). The system uses this element to retrieve an amount from the Accumulator Results Table. |
|
Element Name |
Select the element name for the second amount (see above). The system uses this element to retrieve an amount from the Accumulator Results Table. |
Adding Payslip Comments To add payslip comments, use the Messages FRA (GPFR_PYSL_OBSRV) component.
You can print comments in the footer of the payslip. You can enter up to four different lines for comments. When requested, the four lines will print on the payslip.
Page Used to Enter Payslip Comments|
Page Name |
Object Name |
Navigation |
Usage |
|
Payslip Observation |
GPFR_PYSL_OBSRV |
|
View or edit the observations associated with the given observation ID. You can also use this page to create a new observation ID. Note. Use the Supporting Element Override page to give the observations an element name. |
Editing Payslip Observations Access the Payslip Observation page.
|
Observation 1 to Observation 4 |
Enter observations, also known as comments, associated with this Observation ID. Every payslip and pay Annex sheet has a space at the bottom for observations. These observations are associated with an Observation ID, which exists in the GP_PIN table. There are two observation elements on the GP_PIN table: REP VR PS OBS for the payslip observations and REP VR PS OBSA for the annex observations. These are assigned to a payee when the payslip is run. Observations created and edited here may be associated with either element. When the payroll is run, any observation element linked to the payee assigns the associated comments to the payslip or annex. |
Printing Payslips
This section explains how to create payslips using the report provided in Global Payroll for France.
Page Used to Print Payslips|
Page Name |
Object Name |
Navigation |
Usage |
|
Pay-slip Run Control |
GPFR_RUNCTL_PYSL |
Global Payroll & Absence Mgmt, Payslips, Create/Print Payslips FRA, Pay-slip Run Control |
Produce payslips for a group of employees. |
Generating PayslipsAccess the Pay-slip Run Control page
|
Calendar Group ID |
Select the calendar group for which you want to create payslips. |
|
Group List ID |
If you want to print payslips for some of the employees in the calendar group, select the Group List ID. |
|
Reprint |
Select this check box if you want to reprint payslips for a payroll that has been approved or finalized. Note. If the payroll is not approved or finalized, you can rerun the payslips without selecting this check box. The payslip has a draft status printed at the top of the payslip. |
Viewing Payslips To set up and view payslips, use the Admin Payslip/Results FRA (GPFR_ONPAY_SETUP) component.
You can view the payroll results during the payroll process, before you finalize the results. You can view the full payslip or specific elements. The payslip data that appears here is based on the payslip setup. To view specific data, create a list of viewable elements.
Pages Used to Set Up and View Payslips
|
Page Name |
Object Name |
Navigation |
Usage |
|
GPFR_ONPAY_SETUP |
Set Up HRMS, Product Related, Global Payroll & Absence Mgmt, Payslips, Admin Payslip/Results FRA, Element List |
Create the list of elements available on the payslip view on the Payslip Results page. |
|
|
GPFR_ONPAY_SUM |
Global Payroll & Absence Mgmt, Payslips, Rvw Admin Payslip/Results FRA, Summary |
View payslip summary information. |
|
|
GPFR_ONPAY_BODY |
Global Payroll & Absence Mgmt, Payslips, Rvw Admin Payslip/Results FRA, Body |
View payslip body information. |
|
|
GPFR_ONPAY_CALPIN |
Global Payroll & Absence Mgmt, Payslips, Rvw Admin Payslip/Results FRA, Supporting Elements |
View supporting elements. |
|
|
GPFR_ONPAY_ERNDED |
Global Payroll & Absence Mgmt, Payslips, Rvw Admin Payslip/Results FRA, Earnings Deductions |
View earnings and deductions. |
|
|
GPFR_ONPAY_ACUM |
Global Payroll & Absence Mgmt, Payslips, Rvw Admin Payslip/Results FRA, Accumulators |
View accumulators. |
|
|
GPFR_ONPAY_ABS |
Global Payroll & Absence Mgmt, Payslips, Rvw Admin Payslip/Results FRA, Absences |
View absence data (daily data and generated positive inputs). |
|
|
GPFR_ONPAY_PI |
Global Payroll & Absence Mgmt, Payslips, Rvw Admin Payslip/Results FRA, Positive Inputs |
View positive input. |