Maintaining Settlement Setup
To define Services Procurement business unit options, use the Services Procurement Options (BUS_UNIT_SPRO) component.
To define shifts, use the Shifts (SPB_SHIFT) component. To define shift and service combinations, use the Shift by Service (SPB_SHFT_BY_SRV) component. To define assignments, use the Assignments (SPB_ASSIGNMENT) component. To define assignment and service combinations, use the Assignment by Service (SPB_ASGN_BY_SRV) component. To define time category overrides, use the Review/Override Time Categories (SPA_TM_EDIT_TRC) component.
To define rules for reporting time, use the Time Reporting Rule (SPA_TRULE_DEFN) component. To set up the AP interface, use the AP interface (SPA_AP_INTRFACE) component. To set up payment types, use the Payment Types (SPA_EXPEND_MTHD) component. To set up expense types, use the Expense Types (SPA_EXPENSE_TYPE) component. To define your service time/progress template, use the Service Time/Progress Template (SPA_TIME_TMPL) component. To set up time reporting codes, use the Time Reporting Code (SPA_TRC_CODE) component.
To define business purposes, use the Business Purpose (EX_PURPOSE) component.
To set up preferred merchants, use the Preferred Merchant (EX_MERCHANT) component. Use the EX_MERCHANT_SETUP component interface to load data into the tables for this component.
To define expense locations, use the Expense Location (EX_LOCATION) component. Use the EX_LOCATION_SETUP component interface to load data into the tables for this component. To define expense payment type, use the Expense Payment Type (SPA_EXPEND_MTHD) component. To define expense types, use the Expense Type (SPA_EXPENSE_TYPE) component.
To define expense distance rates, use the Distance Rates (EX_AUTO_RT_TBL) component. Use the EX_AUTO_RATE_SETUP component interface to load data into the tables for this component.
This topic discusses how to maintain settlement setup.
|
Page Name |
Definition Name |
Usage |
|---|---|---|
|
SPB_SHIFT |
Define shifts to be used on timesheets. This page appears only if the Enable Shifts check box is selected on the Services Procurement Business Unit Definition page. |
|
|
SPB_ASSIGNMENT |
Define assignments to be used on timesheets. This page appears only if the Enable Assignments check box is selected on the Services Procurement Business Unit Definition page. |
|
|
Services Procurement Bus Def (business unit definition) Page |
BUS_UNIT_TBL_SP |
Select the check boxes to enable the business units to use shifts, assignments, and time category overrides. |
|
SPB_SHFT_BY_SRV |
View and modify valid shifts that are associated with a specific service. |
|
|
SPB_ASGN_BY_SRV |
View or modify assignments that are associated with a specific service. |
|
|
Service by Shift Service by Assignment |
QRY_QUERY |
Use this page to select the query name for which you want to run these PSQUERY reports:
|
|
SPA_TIME_TMPL_PG |
Create services templates. Enter or modify options used in a timesheet to enter time and expense information and progress information. |
|
|
Select ChartFields Page |
SPA_TIME_TMPL_DIST |
Select the ChartFields to display on the Timesheet. The values from the selected ChartFields will be used to allocate time on Distribution lines. This option is only available when you select Actual Allocation as your time reporting option. |
|
SPA_TRC_CODE |
Define time reporting codes. |
|
|
Pay Types by Time Reporting Codes Page |
SPA_TRC_PAYTYPE |
Enter and view pay types that are associated with time reporting codes. Use this page to indicate the pay rate and mark up rates that are used on the work order. This option is only available when pay types are used. |
|
SPA_TIMERPT_RUL |
Define rules for reporting time. |
|
|
EX_PURPOSE |
Use business purposes to justify a business expense as a corporate tax deduction. |
|
|
EX_AUTO_RT_TBL |
Define expense distance rates. |
|
|
SPA_EXPENSE_TYPES1 |
Define expense types. |
|
|
SPA_EXPENSE_TYPES3 |
Define expense types. |
|
|
Expense Payment Type Page |
SPA_EXPEND_MTHD |
Create payment types that show (on an expense sheet) how an expense item was paid. |
|
EX_LOCATION |
Create an expense location that can be required on an expense sheet. When you define an expense type, you can require a service provider to enter the location for the transaction to ensure that the cost accurately reflects prevailing prices for that region. |
|
|
Preferred Merchant |
EX_MERCHANT |
Define a preferred merchant that you can include in an expense type. When you define an expense type, you can require a service provider to enter the preferred merchant for that transaction to ensure that the cost accurately reflects prevailing prices for that region. |
|
PYMT_TERMS_TIMING |
Define payment terms timing for each period that you reference in your payments. |
|
|
PYMT_TERMS_SINGLE |
Define valid payment terms for single payments. |
|
|
SNGL_TRMS_WHR_USED |
View where payment terms are used. |
|
|
SNG_TR_CLC_PAY_DTA |
Calculate example data for single payment terms. |
|
|
PYMT_TERMS_MULTI |
Define valid payment terms for multiple payments. |
|
|
Calculate Example Payment Data (multiple payment terms) Page |
MLT_TR_CLC_PAY_DTA |
Calculate example data for multiple payment terms. |
|
SPA_AP_INTRFACE |
Define accounts payable application interface information. |
Field or Control |
Description |
|---|---|
Return to Time and Expense Setup |
Click this link to return to the Time and Expense home page. |
Use the Services Time Reporting Codes page (SPA_TRC_CODE) to define time reporting codes.
Navigation:
Field or Control |
Description |
|---|---|
Multiplication Factor |
Define the multiplication factor for the TRC. The system uses the value that you enter when calculating time and expense amounts. Note: This factor is applied in addition to any applicable shift or assignment pay rate. In addition, for assignment pay, the assignment pay rate must be Based on Time. |
Pay Types |
Associate pay types with time reporting codes. Available only if pay types are enabled on the Services Procurement Installation Options page. |
Pay Types by TRC
To access the pay types by TRC, click the Pay Types link on the Services TRC component.
Use pay types by TRC to determine how you pay the supplier. For example, you can have an agreement that you pay all pay types (pay rate, fixed cost, third-party markup, supplier markup) for hours 0 - 8. After 8 hours you might only pay the pay rate and fixed cost but no markups. In this case, you would create two TRCs, one with all 4 pay types and one with only pay rate and fixed cost. You would then create a services time template with overtime enabled. On the overtime rules, you would use the two new TRCs that you created.
You can select up to 4 pay types on this page, but each pay type can only be defined once.
Field or Control |
Description |
|---|---|
Pay Type |
Select the pay type you are to pay to the supplier |
Field or Control |
Description |
|---|---|
Multiplication Factor |
Select the multiplication factor for the pay type. The value appears by default from the Services TRC multiplication factor, but you can override the value. |
Use the Time Reporting Rule page (SPA_TIMERPT_RUL) to define rules for reporting time.
Navigation:
This example illustrates the fields and controls on the Time Reporting Rule page.
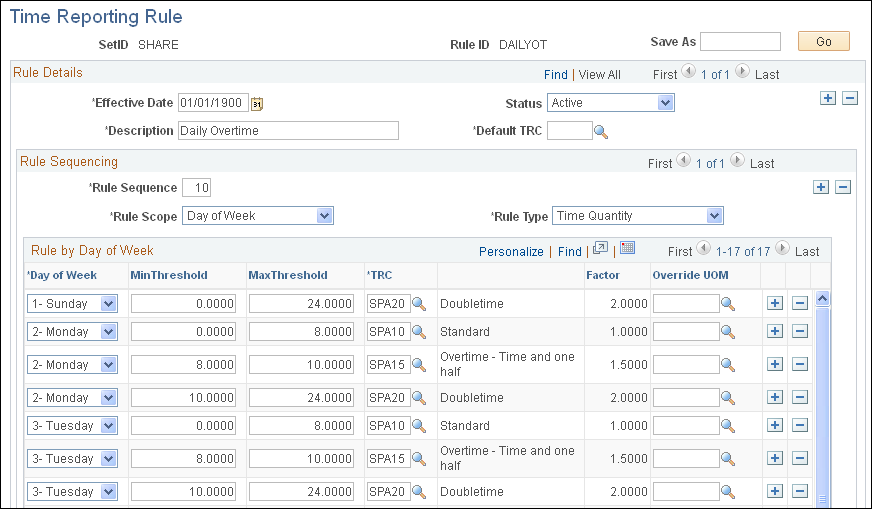
Rule Details
Field or Control |
Description |
|---|---|
Description |
Enter a long description to identify the time reporting rule. |
Default TRC (default time reporting code) |
Select a default TRC to use when the time reporting rule does not meet the rule criteria. |
Rule Sequence
Field or Control |
Description |
|---|---|
Rule Sequence |
Enter a rule sequence number. This value is used to determine the order the system validates and applies the rule criteria to a timesheet. Since the rule sequence numbers are incremental, be sure to prioritize the rule in the order in which you want the system to evaluate and validate the TRC codes to use for time reporting. Note: Always identify the most important rules at the lowest rule sequence to ensure that the system picks up those rules first. If you define a priority rule at higher sequence number and the system validates another rule that qualifies at a lower sequence number, the system uses the lowest rule sequence to populate the timesheet. For example, if you create a rule with specific capture dates (as in the case of holidays), always be sure to define those dates first. The system starts at the most current rule sequence and works its way down the list. Also, if you want to be sure that there is always a valid rule in place, identify the "catch-all" rule as the last rule in the sequence. That way, you are always sure that there is a valid rule in the sequence. |
Rule Scope |
Select the time scope that this rule sequence covers. Values include Date, Day of the Week, and Time Period. |
Rule Type |
Select the type for this rule sequence. Values include Time Quantity and TRC List. |
Rules by Date
Field or Control |
Description |
|---|---|
Date |
Enter the date for which this rule applies. |
Min Threshold (minimum threshold) |
Enter minimum quantity of hours for this rule. |
Max Threshold (maximum threshold) |
Enter the maximum quantity of hours fro this rule. |
TRC (time reporting code) |
Select a value to use with this time reporting rule. |
Override UOM (override unit of measure) |
Select an alternative UOM to use as an override on the work order. Use this UOM to calculate a different rate on the work order. |
Blackout |
Select to prevent time from being entered for the specified day. Note: This option is only available for the rule type of TRC List. |
Rules by Day of the Week
Field or Control |
Description |
|---|---|
Day of Week |
Enter a day of the week to create a time reporting rule. Values include:
|
Rules by Time Period
Field or Control |
Description |
|---|---|
Time Period |
Enter a time period to create a time reporting rule. Values include Bi-Monthly, Daily, Monthly, Semi-Monthly, and Weekly. |
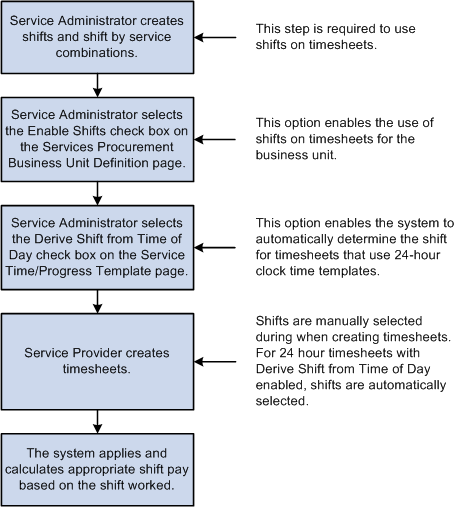
The following diagram illustrates the steps involved in defining shifts that can be used on timesheets:
Steps to define shifts that can be used on timesheets
Use the Shift page (SPB_SHIFT) to define shifts to be used on timesheets.
Navigation:
This example illustrates the fields and controls on the Shift page.
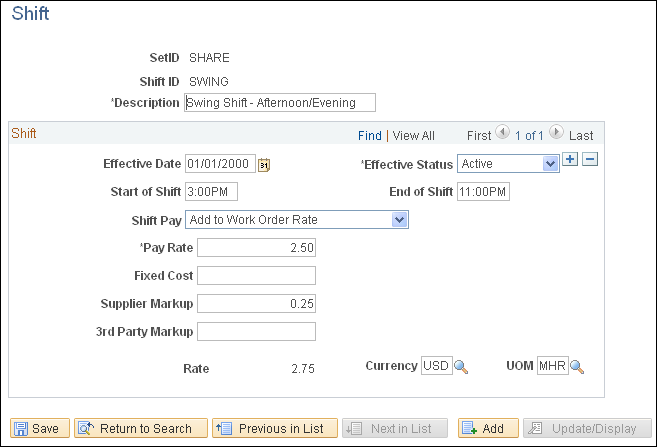
Note: These settings are defined at the SetID level.
Note: The fields that appear on this page depend upon the value selected for the Shift Pay field.
Note: The Document Service and Service Type labels will differ if Enterprise Human Capital Management is installed.
Field or Control |
Description |
|---|---|
SetID |
Select the SetID that will be able to use this shift. |
Shift ID |
Enter a name for the shift. |
Description |
Enter a description for the shift. This is a required field. |
Effective Date |
Enter the date that the shift will become effective. The current date is the default value. This is a required field. Add effective-dated rows for each Shift Pay type as required. |
Effective Status |
Select Active (default) or Inactive. This determines if this shift will be available for use on timesheets. Only shifts with a status of Active will be available for use. This is a required field. Note: If you change an Active shift to Inactive, the system will issue a warning message if there are any existing shift and service combinations for the effective-dated shift. |
Shift Start Time and Shift End Time |
(Optional) Enter the start and end times for the shift. Shift pay is paid for work performed during this time period. You can leave this blank and the system will automatically select the shift based on the start and end times entered on the timesheet. Note: Start and stop times are for informational purposes only. If the 24-hour clock time template is used and the Derive Shift Based From Time of Day option is selected, then the system automatically populates the default time values in this fields. However, these start and stop times can still be modified at the template definition level. |
Shift Pay |
Select a value to indicate the basis for the shift pay calculation:
This is a required field. |
Shift Pay Rate Percentage |
Enter a negative or positive percent value for the shift pay rate. This is a required field and is used with the Add % of Work Order Rate value. |
Shift Pay Rate Amount |
Enter a negative or positive amount. If pay types are not selected, then this is a single rate. If pay types are selected, this rate must be broken out into the Pay Rate, Fixed Cost, Supplier Markup, and Third-Party Markup fields that appear. This is a required field and is used with the Add to Work Order Rate or Substitute Work Order Rate values. |
Shift Pay Rate Currency |
Enter the currency code for this shift pay rate. This field works with the Add to Work Order Rate or Substitute Work Order Rate values. |
Shift Pay Rate UOM (unit of measure) |
Enter the unit of measure for this shift pay rate. This field works with the Add to Work Order Rate or Substitute Work Order Rate values. |
Use the Shifts by Service page (SPB_SHFT_BY_SRV) to view and modify valid shifts that are associated with a specific service.
Navigation:
This example illustrates the fields and controls on the Shifts for Service page.
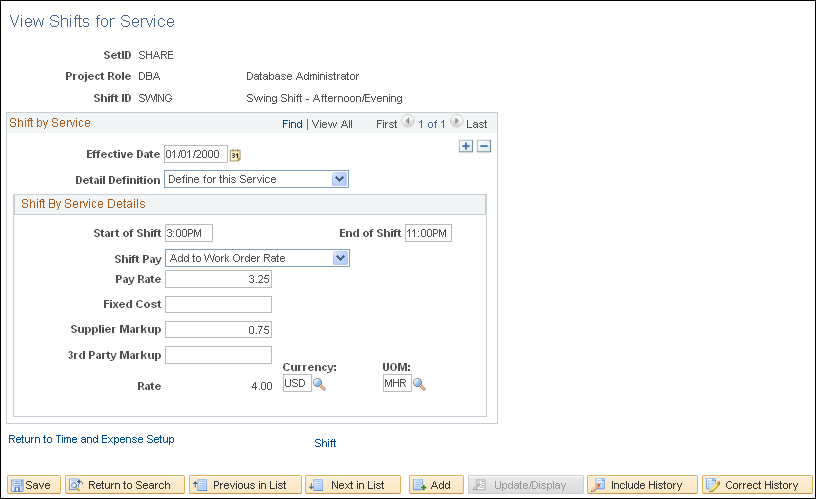
Note: These settings are defined at the SetID level.
This page identifies the shifts that are valid for a particular service. Only shifts associated to the service can be associated to time reported against a work order for that service. In addition, for 24-hour clock time entry, only shifts that are associated to the time template can be associated to the time reported.
Shift by Service Details
Field or Control |
Description |
|---|---|
Project Role |
Select a value for this service (job) code. |
Shift ID |
Select the shift to be associated with this service. |
Effective Date |
Enter the effective date for this service. This is a required field. |
Detail Definition |
Select a method to use for defining details of the shift. Values are:
|
Description
Field or Control |
Description |
|---|---|
Start of Shift and End of Shift |
(Optional) Enter the beginning and ending times for the shift. Note: Start and stop times are for informational purposes only. If the 24-hour clock time plate is used and the Derive Shift Based From Time of Day option is selected, then the system automatically places default time values on this fields. However, these start and stop times can still be modified at the template definition level. |
Shift Pay |
The default values come from the Shift definition page but you can modify it here. Values are:
|
Pay Rate |
This required field is available if you select Add to Work Order Rate or Substitute Work Order Rate.If you selected the Add to Work Order Rate, you must enter a positive or a negative amount in this field, If you selected the Substitute Work Order Rate value, you must enter a positive amount. If pay types are not selected, then this is a single rate. If pay types are selected, this rate must be broken out into the Pay Rate, Fixed Cost, Supplier Markup, and Third-Party Markup fields that appear. |
Shift Percent |
You must enter a positive or a negative percent in this field if you selected the Add % of Work Order Rate value. This is a required field. |
Currency |
You must enter a value in this field if you selected the Add to Work Order Rate or Substitute Work Order Rate option. |
UOM (unit of measure) |
This field is available if you select the Add to Work Order Rate or Substitute Work Order Rate value. This is a required field. |
Shift |
Click this link to access the Shift definition page for this specific shift. |
The following diagram illustrates the steps involved to define assignments that can be used on timesheets:
Define assignments that can be used on timesheets
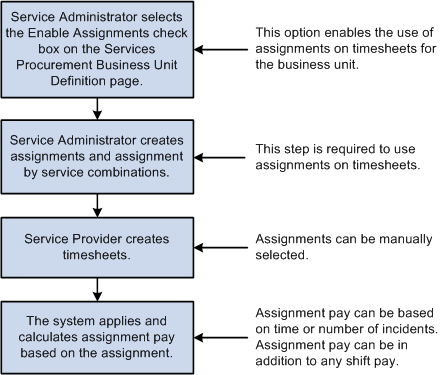
Use the Assignment page (SPB_ASSIGNMENT) to define assignments to be used on timesheets.
Navigation:
This example illustrates the fields and controls on the Assignment page.
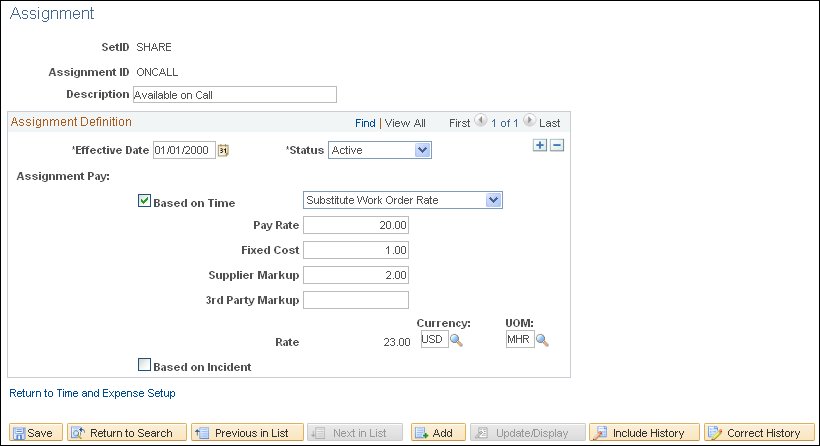
Note: These settings are defined at the SetID level.
Note: The fields that appear on this page depend upon the value selected for the Assignment Pay field.
Field or Control |
Description |
|---|---|
SetID |
Select the SetID that will be able to use this assignment. |
Assignment ID |
Enter a name for the assignment. |
Description |
Enter a description for the assignment. |
Assignment Definition
Field or Control |
Description |
|---|---|
Effective Date |
Enter the date that the assignment will become effective. The current date is the default value. This is a required field. Add effective-dated rows for each Assignment Pay type as required. |
Status |
Select Active (default) or Inactive. This determines if this assignment will be available for use on timesheets. Only assignments with a status of Active will be available to associate with services or on timesheets. This is a required field. Note: If you change an Active assignment to Inactive, the system will issue a warning message if there are any existing assignment and service combinations for the effective-dated assignment. |
Assignment Pay |
Select the value on which the assignment pay calculation should be based. Values are Based on Time or Based on Incident.
If you select Based on Time, select a value as the basis for time associated with the assignment:
|
Rate |
This display-only field shows the total of the Pay Rate, Fixed Cost, Supplier Markup, and 3rd Party Markup fields. |
Currency |
Enter the currency associated with the assignment pay rate. This field is available if you select the Add to Work Order Rate or Substitute Work Order Rate option. |
UOM (unit of measure) |
Enter the unit of measure associated with the assignment pay rate. This field is available if you select the Add to Work Order Rate or Substitute Work Order Rate option. |
If you select Based on Incident, you must break down the assignment pay amount into these fields.
Note: The total of these fields should add up to the total assignment pay amount.
Pay Rate
Fixed Cost
Supplier Markup
3rd Party Markup
Field or Control |
Description |
|---|---|
Rate |
This display-only field shows the total of the Pay Rate, Fixed Cost, Supplier Markup, and 3rd Party Markup fields. |
Currency |
The value in this display-only field comes from the assignment currency. |
Use the Assignments by Service page (SPB_ASGN_BY_SRV) to view or modify assignments that are associated with a specific service.
Navigation:
This example illustrates the fields and controls on the Assignments by Service page.
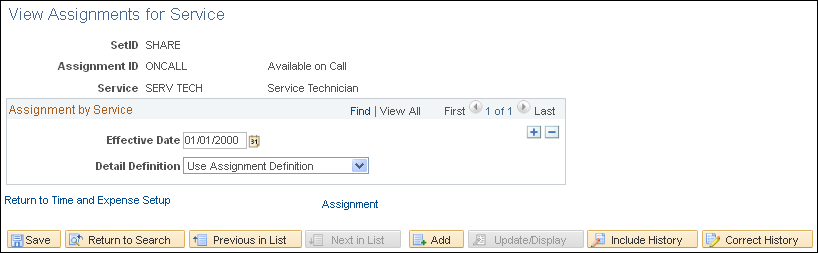
Note: These settings are defined at the SetID level.
Field or Control |
Description |
|---|---|
Assignment ID |
Enter a description for this assignment by service. |
Service |
Enter the service code. |
Assignment by Service
Field or Control |
Description |
|---|---|
Effective Date |
Enter the effective date for this service. This is a required field. |
Detail Definition |
Select a method to use for defining details of the assignment by service combination. Values are:
|
Description
Field or Control |
Description |
|---|---|
Assignment Pay |
Select the method on which to base the assignment pay. Values are:
|
Pay Rate |
This required field is available if you select Add to Work Order Rate or Substitute Work Order Rate. If you selected the Add to Work Order Rate, you must enter a positive or a negative amount in this field, If you selected Substitute Work Order Rate, you must enter a positive amount. If pay types are not selected, then this is a single rate. If pay types are selected, this rate must be broken out into the Pay Rate, Fixed Cost, Supplier Markup, and Third-Party Markup fields that appear. |
Percent |
You must enter a positive or a negative percent in this field if you selected the Add % of Work Order Rate value. This is a required field. |
Currency |
You must enter a value in this field if you selected the Add to Work Order Rate or Substitute Work Order Rate option. |
UOM (unit of measure) |
This field is available if you select the Add to Work Order Rate or Substitute Work Order Rate value. This is a required field. |
Assignment |
Click this link to access the Assignment definition page for this specific assignment. |
Use the Services Procurement Business Unit Definition page (BUS_UNIT_TBL_SP) to select the check boxes to enable the business units to use shifts, assignments, and time category overrides.
Navigation:
Time and Expense Settings
Field or Control |
Description |
|---|---|
Enable Shifts |
Select this check box if you want to use shifts on timesheets. |
Enable Assignments |
Select this check box if you want to use assignments on timesheets. |
Enable Time Category Override |
Select this check box if you want to enable time category overrides. |
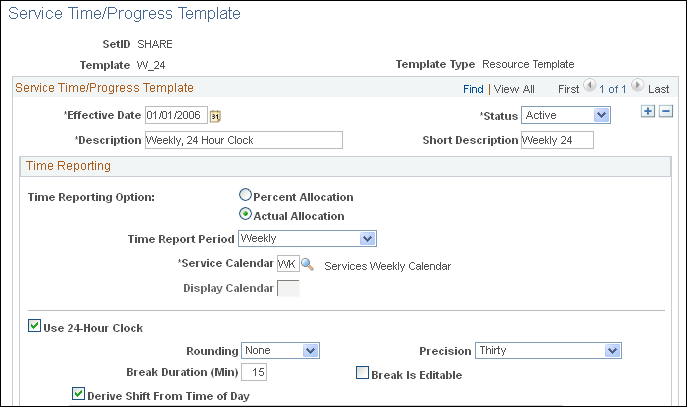
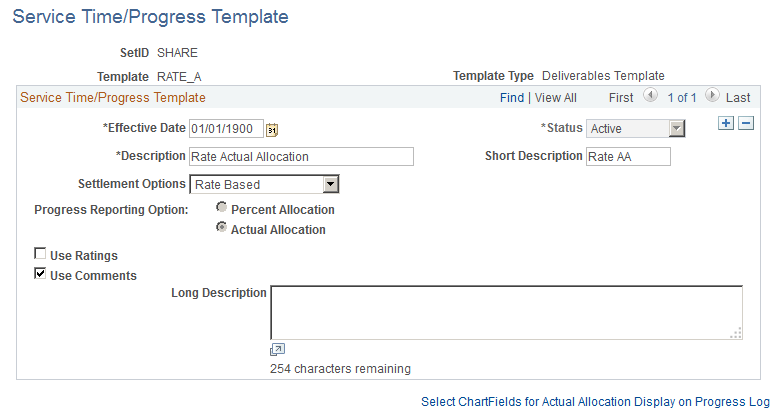
Use the Service Time/Progress Template page (SPA_TIME_TMPL_PG) to create services templates.
Enter or modify options used in a timesheet to enter time and expense information and progress information.
Navigation:
This example illustrates the fields and controls on the Service Time/Progress Template page.
This example illustrates the fields and controls on the Service Time/Progress Template page.

If a timesheet has been created using a service time/progress template, the system displays a message on the template page. The message indicates that the template has been used in the creation of a timesheet and that some fields for effective-dated rows have been disabled. The system also makes the Status and Time Reporting Option fields unavailable on the page when a work order has been created against the time template.
Time Reporting
Field or Control |
Description |
|---|---|
Time Reporting Option |
Use this option to determine whether a resource based work order requires the service provider to report time against specific ChartFields, or whether the total time is entered and distribution percentages automatically split time or progress according to the ChartField distribution defined for the work order. Values are:
|
Time Reporting Period |
Select a period that indicates how often service providers enter their work hours. The default value is Weekly. Other values are Daily, Bi-Weekly, Semi-Monthly, and Monthly. Note: When you select a the monthly time reporting option, the Display Calendar field is editable. You must select a display calendar to chunk monthly reporting properly. |
Service Calendar |
Select a service calendar for the time reporting period. Use this calendar as a detail for how the organization reports time during the calendar year. Values are:
|
Display Calendar |
Select an appropriate calendar display option. Use this option to determine how the calendar is displayed for the time reporting period. For example, if you select Monthly as the time reporting option, you may want to display the calendar on a weekly basis. |
Use 24-Hour Clock |
Select this option if you want time logged using the 24-hour clock. You select this check box if you want to pay providers shift differential using shifts. If you select to use a 24-hour clock, the system disables other entry fields. |
Rounding |
Select whether you want to round up or down to the hour. Select None if you do not want to round the minutes. |
Precision |
Select the number of precise minutes for rounding. Values are Six, Twelve, Fifteen, Twenty, and Thirty. |
Break Duration (Mins) (break duration - minutes) |
Enter the break duration in number of minutes. The break duration is subtracted from the total time difference between the start and end dates. For example, if you have a start time of 8:00 a.m. and end time of 5:00 p.m. with a 30-minute break duration, 8.5 hours are recorded for the day. |
Break is Editable |
Select to indicate that the break is not mandatory. |
Derive Shift From Time of Day |
Select this option if you want the system to automatically derive the shift depending upon the time of day. This option is used with 24-hour clocks only. You use the Derive Shift From Time of Day check box in conjunction with the shift and assignments functionality. |
Shifts |
This group box appears when you select Derive Shift From Time of Day. Use this group box to associate specific shifts with this time service template. Note: Start and stop times are for informational purposes only. If the 24-hour clock time plate is used and the Derive Shift Based From Time of Day option is selected, then the system automatically places default time values on this fields. However, these start and stop times can still be modified at the template definition level. |
Start of Shift and End of Shift |
These default values come from the Shift definition page, but you can override the values here. These are required fields. Note: Start and end times cannot fall within the ranges for another shift for the sample template. |
Allow for more than 24 hours |
Select if a service provider is enabled to enter more than 24 hours for a single project, work order, activity, and day. You can use this option for team reporting instead of individual reporting. Note: When you select this option, the Rounding, Default Start Time, Default Stop Time, Break Duration, Precision, and Break is Editable fields are available. |
Manually enter TimeSheet TRCs(manually enter timesheet time reporting codes) |
Select this check box to indicate that you want to manually enter TRCs for timesheets. The check box controls whether time reporting codes are assigned manually by the service provider during time entry or automatically assigned by the system based on predefined rules. You cannot assign a time-reporting rule to a template if this check box is selected. The Derive Shift From Time of Day check box is available if you do not select to manually enter timesheet TRCs. If you select to manually enter timesheet TRCs, the check box is not available. Note: When editing an existing time template, you cannot change the setting of the Manually enter Timesheet TRCs check box if there are already timesheets associated to the template. When a template is already in use, the system low-lights entry fields. |
Time Reporting Rule ID |
Select a time reporting rule to use for calculating different payouts. This field is not available if you select the Manually enter Timesheet TRCs check box. Note: To use this feature, you must first define the time reporting rules on the Time Reporting Rules page. |
View Time Reporting Rules |
Click to view the time reporting rule associated with this service template. |
Overtime Permitted |
Select to indicate if a requisition allows overtime. This is an informational field only. |
Use Ratings |
Select if the performance of a service provider during the time period is to be rated. Note: This check box is only accessible if the Use Ratings check box on the Services Procurement Business Unit Definition page is selected. |
Use Comments |
Select to enable service providers and provider contacts to enter comments or concerns on the timesheet and progress log. |
Select ChartFields for Actual Allocation Display on Timesheets |
Select the ChartFields to display on the timesheet. The values from the selected ChartFields will be used to allocate time on distribution lines. Note: This option is only available when you select Actual Allocation as the time reporting option. |
Service Time/Progress Template
This example illustrates the fields and controls on the Service Time/Progress Template page. You can find definitions for the fields and controls later on this page.
Field or Control |
Description |
|---|---|
Settlement Options |
View the settlement method for a work order, which is based on the service selected. Progress will be recorded based on the method defined. Values include:
|
Progress Reporting Option |
Use this option to associate the reporting options (Percentage/Actual) with Progress templates for each Settlement Option . This field is available only for Deliverable template type. The reporting options selected here controls the Template you select in a Work order. |
Use the Distance Rate page (EX_AUTO_RT_TBL) to define expense distance rates.
Navigation:
This example illustrates the fields and controls on the Distance Rate page.
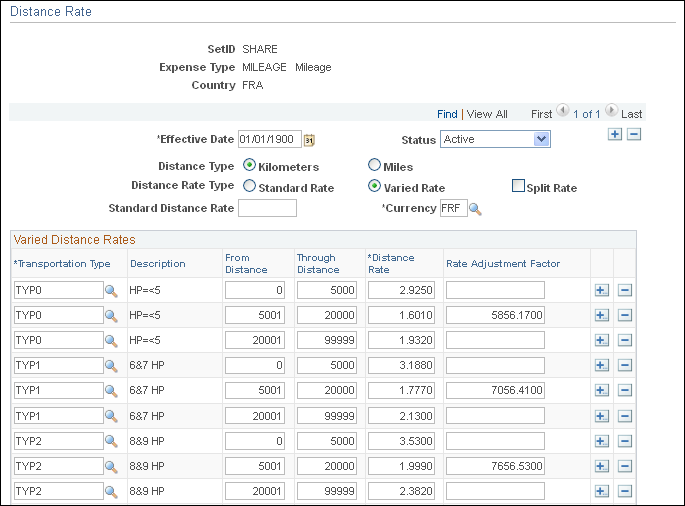
You can set up standard and varied distance rates in different base currencies with each combination tied to an expense type. When service providers use their automobiles for business purposes, you can reimburse them based on how far they must drive.
Field or Control |
Description |
|---|---|
Distance Rate Type |
Select Standard Rate to indicate a uniform reimbursement rate regardless of transportation type. Select Varied Rate to indicate reimbursement rates that depend on the transportation type. |
Standard Distance Rate |
Enter the monetary amount that is to be reimbursed per unit driven, if you selected Standard Rate. |
Varied Distance Rates
Field or Control |
Description |
|---|---|
Transportation Type and Distance Rate |
If you selected Varied Rate, enter a distance rate to define the monetary amount that is reimbursed for the transportation type per unit driven. |
Rate Adjustment Factor |
Enter an adjustment factor that the system applies for the transportation type. |
Use the Expense Types - Expense Types1 page (SPA_EXPENSE_TYPES1) to define expense types.
Navigation:
This example illustrates the fields and controls on the Expense Types1 page.

Required Fields
Field or Control |
Description |
|---|---|
Description, Merchant, Preferred Merchant, and Location |
Select each option to appear as a required field on the expense sheet that a service provider completes for the expense type. To define an expense location amount for this expense type, select the Location check box to make it a required field on the expense sheet. |
Use the Expense Types - Expense Types2 page (SPA_EXPENSE_TYPES3) to define expense types.
Navigation:
Click the Expense Types2 tab from the Expense Types1 page.
Field or Control |
Description |
|---|---|
Per Diem Amount |
Enter the amount that is authorized for this expense type. In the column that appears to the right of this field, select the per diem's currency. |
Deduct For Breakfast, Deduct For Lunch, and Deduct For Dinner |
Enter deduction amounts. The currencies for these amounts appear by default from the currency that you selected for the per diem. |
Preferred Merchant |
You can add more rows to create a list of merchants that service providers must use. If the expense type appears in an expense sheet and the service provider did not use a preferred merchant, the line item requires an explanation. |
Use the Payment Terms Timing Codes page (PYMT_TERMS_TIMING) to define payment terms timing for each period that you reference in your payments.
Navigation:
Payment terms are stored in separate tables and form the basis of net due date, discount due date, and discount amount calculations. You define the payment terms and timing methods that the system uses for supplier payments. The system supports percentage and fixed amount discount calculations. PeopleSoft Payables uses these payment terms and timing methods to schedule payments for invoices and to calculate amounts remitted to suppliers.
Use the Payment Terms - Single Payments page (PYMT_TERMS_SINGLE) to define valid payment terms for single payments.
Navigation:
Field or Control |
Description |
|---|---|
|
Click the Refresh Display button if you modified an existing term definition and want to display the original, saved terms definition. |
Search Where Used |
Click to access the Search Where Used page to view where this payment term ID is used. |
Calculate Example Payment Data |
Click to calculate example payment data for the payment terms ID, based on currency, gross amount, and basis date values provided as input variables. This enables you to perform a what if analysis regarding the effect of various parameter settings on the calculated result, before choosing to save a particular term's definition. |

Payment Terms Control
Field or Control |
Description |
|---|---|
Terms Applicability |
Displays Supplier-Only Terms. |
Split Net Terms |
Select to enable a definition of payment terms that contain multiple net terms and any associated discounts. For example, select this option to use one timing ID if the basis date is between the 1st and 15th, and another timing ID if the basis date is between the 16th and end of the month. Split terms definitions enable you to set up variable net due date terms. There are terms that, depending on the basis date, result in more than one possible set of net or discount due dates. |
Net Due Terms
Field or Control |
Description |
|---|---|
Basis From Day |
Enter the beginning day of the basis day range. The basis date's day value must be equal to or greater than this day or else the terms definition does not apply. This field is available for entry when the Split Net Terms check box is selected. |
Basis To Day |
Enter the ending day of the basis day range. The basis date's day value must be equal to or less than this day or else the terms definition does not apply. This field is available for entry when the Split Net Terms check box is selected. |
Timing ID |
Select to calculate the net payment due date for this day range within the single payment term. |
Discount Terms Available |
Select if the terms that you are defining include discount terms. |
Note: All available days, 1 to 31, must be accounted for in the basis from day and basis to day ranges.
Discount Terms
Field or Control |
Description |
|---|---|
Timing ID |
Select to specify the discount portion of this single payment term. |
Adjustment Days |
Enter the number of days used to adjust the discount due date for this single payment term. Define flexible discount terms by entering either basis date relative or due date relative discount due dates. This is useful if the discount terms are often calculated as, for example, 2 percent for the first 10 days following the start-of-terms (basis) date, or 2 percent up to 10 days before the payment due date. |
Discount Terms Percent |
Enter the discount percent that is applied to the invoice gross amount to calculate the discount amount. |
Discount Terms Amount |
Enter the flat amount discount that is applied to the invoice regardless of the invoice amount. Note: This value is applied using the transaction currency units defined for the voucher. The particular currency to use is not defined here but is determined by context. |
Use the Search Where Used page (SNGL_TRMS_WHR_USED) to view where payment terms are used.
Navigation:
Click the Search Where Used link on the Payment Terms - Single Payments page.
Field or Control |
Description |
|---|---|
Multi-Payment Terms ID |
Displays the multipayment terms ID that uses this single payment terms ID. |
Number of Terms |
Indicates the number of installments contained within the displayed multipayment terms ID that appears. |
Number of Occurrences |
Indicates the number of times that this payment terms ID is used within the multipayment terms. |
Use the Calculate Example Payment Data (single payment terms) page (SNG_TR_CLC_PAY_DTA) to calculate example data for single payment terms.
Navigation:
Click the Calculate Example Payment Data link on the Payment Terms - Single Payments page.
Field or Control |
Description |
|---|---|
Gross Invoice Amount, Terms Basis Amount, and Use Basis Amount |
Enter a value to use as the terms basis amount for the example discount calculation. To use a different amount, select the Use Basis Amount check box, which enables the Terms Basis Amount field, and enter a different value. Note: The terms basis amount value must be less than the gross invoice amount value. |
Basis Date |
The system populates this field with the current date by default. |
Calculate Example Payment Data |
Click the Calculate Example Payment Data button to calculate the payment data based on the values entered on the page. |
Use the Payment Terms - Multi Payment page (PYMT_TERMS_MULTI) to define valid payment terms for multiple payments.
Navigation:
Group single payment terms for payments split into multiple payments or installments.
Use the Calculate Example Payment Data (multiple payment terms) page (MLT_TR_CLC_PAY_DTA) to calculate example data for multiple payment terms.
Navigation:
Click the Calculate Example Payment Data link on the Payment Terms - Multi Payment page.
Use this page in the same way that you use the Calculate Example Payment Data (single payment terms) page.
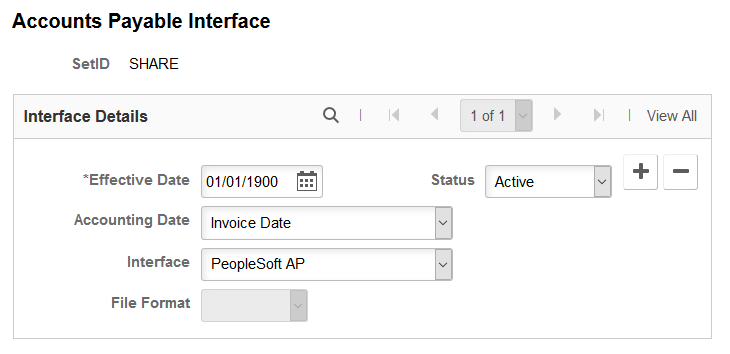
Use the Accounts Payables Interface page (SPA_AP_INTRFACE) to define accounts payable application interface information.
Navigation:
This example illustrates the fields and controls on the Accounts Payable Interface page. You can find definitions for the fields and controls later on this page.
Field or Control |
Description |
|---|---|
Accounting Date |
Select an Accounting Date.
|
Interface |
Select Other to indicate a third-party application. Select PeopleSoft AP to indicate that you use PeopleSoft Payables. |
File Format |
PeopleSoft Services Procurement uses comma-separated values as its only file format. If you select Other as the interface, the system exports invoice data to a flat file using this format, which you can use to export to your accounts payable system for invoice voucher generation. If you select PeopleSoft AP as the interface, this field is disabled, because it is not applicable. |