Importing Clauses and Sections
To import clause and section objects, use the Clause Import (CS_CLAUSE_IMPORT) component.
Note: If your organization uses Microsoft Word 2003, please reference previous versions of PeopleSoft Supplier Contract Management documentation for setup and usage steps.
|
Page Name |
Definition Name |
Usage |
|---|---|---|
|
CS_CLAUSE_IMP_SUMM |
Define default values for clause and section attributes, select and import object files, review object contents parsed from the uploaded file, and select to create objects in the contract library. See also Resolving Import Errors and Warning Messages and Creating and Reviewing a Document Configurator After Importing Objects. |
PeopleSoft Supplier Contract Management enables you to import legacy clauses, child clauses, and sections that are not currently in the Supplier Contract Management system. Legacy objects are preexisting objects, such as clauses, that were not created using the PeopleSoft system and that do not have content controls. To import clauses into the system, the clauses must exist or be saved in a Microsoft Word XML Document format.
You can import a single object or use the same object import session to import multiple objects. An import session is typically a one-time setup and compilation of Microsoft Word-based legacy objects that you want to create in the contract library. As part of the import process, you can also control the structure of content as it is imported. For example, you can load a series of clauses independently or select multiple clauses to be sections, child clauses within sections, or dependent clauses within clauses. After you create the clauses, sections, and child clauses and while you are still in the same session of the import component, you can create a new configurator from the content that you just imported. This can be useful if you have existing Microsoft Word templates that you want to break into clauses and create a configurator as part of the import process.
Note: You cannot create table clauses when you import clauses. A table of contents, headers and footers, section breaks, and attachments are not supported.
Note: The configurator creation feature is intended to be used only by clause librarians.
Object import sessions are made up of these stages:
Create an object XML file.
Each object (clause) within Microsoft Word must have specific content controls to meet the structural requirements for system objects. To create these XML files, in the Microsoft Word document you must use Content Controls and save the file as a Microsoft Word XML document. The content controls are used to identify the clauses or sections, as well as its attributes, when it is imported.
To complete this stage, edit legacy files on a local drive and prepare them to be imported to the Import Clauses/Sections Page.
Define object default attributes.
Before and during the process of importing legacy files, you define basic information that you can use as default values for one or multiple objects that are to be uploaded. Use the Defaults for Object Attributes section on the Import Clauses/Sections Page to complete this stage.
Select the object file.
Click the Select XML File button to browse for the file on a local system. Select the XML file that contains the legacy clauses, child clauses, or sections to be imported.
The file must be an XML file and created using Microsoft Word. If the file consists of multiple objects (each object can have a specific ID, title, full text, and by reference attributes), then content controls need to be added to each object and its attributes. To identify clauses and their attributes in a Microsoft Word document, you need to add content controls. To be imported into PeopleSoft, each clause, section, or child clause should have a content control, and then all its attributes (id, title, full text, and by reference) need content controls. Otherwise, all text within a content control that has new_clause in its tag property is imported as full text.
Upload the object file.
Click the Upload button. The system populates the Objects to be Created grid with objects contained in the selected file. The system assigns the same default value attributes to each object uploaded from the file. The title, full text, or by reference attributes are interpreted based on whether each is entered inside a content control in the file.
Note: The system automatically collapses the Defaults for Object Attributes section after uploading a file.
Edit individual object values.
Use the tabs within the Objects to be Create section to review and edit individual objects before you click the Create Selected Objects button.
Depending on whether you have already uploaded a file during this import session, the system appends new objects to Objects to be Created section or removes objects that were previously uploaded before uploading the new ones. When prompted, click Yes to append the new objects to the grid or click No to remove all uploaded objects from the grid.
Create the object in the contract library.
Click the Create Selected Objects button to add objects to the contract library. During this stage, you define object import types and you review and fix errors for each object that you select to create.
Create or append a configurator in the contract library.
After you create clauses and before exiting the component, you can create a new configurator ID or append the objects to an existing configurator:
To create a configurator, enter a new configurator ID and click the Create Configurator button.
This creates a new configurator and adds the content that is listed on the Import Object directly to the new configurator. For basic document configurators, this feature enables you to create a first draft of the equivalent configurator, which can later be modified. After you click the Create button, you can then click the configurator description to review and edit the Document Configurator Definition component for the new configurator that you just created.
To append objects to an existing configurator, select an existing configurator ID.
You receive a message asking if you want to append the objects to the configurator. Click the Yes button and the system changes the Create button to Append. Click the Append button.
See Understanding Document Clauses and the Import Clauses/Sections Page.
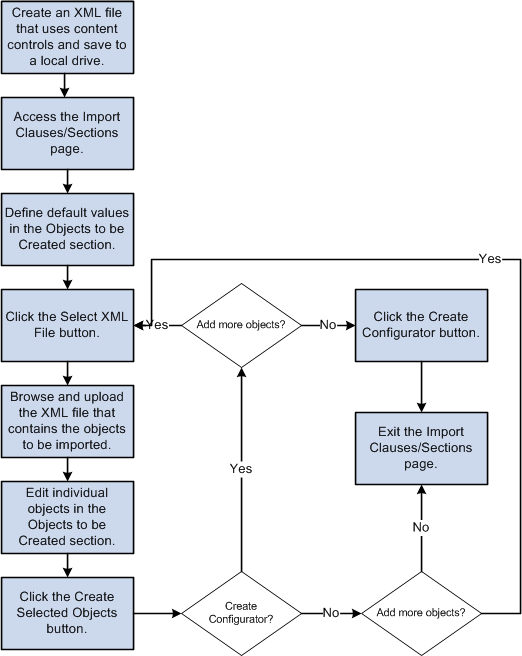
Object Import Process
This diagram illustrates the flow of the Object Import process.
This diagram illustrates the potential steps for importing objects. It includes creating a configurator during the process as well as adding more objects from additional files.
Import File
At a minimum, each clause, child clause, or section must be embedded in a content control and must specify a new_clause in the tag property. The Microsoft Word file must be saved as a Microsoft Word .XML Document format. The purpose of the new_clause content control is to identify the beginning and ending of each new object to be imported. If a file does not contain content controls, the system parses all the text as a single clause, child clause, or section, depending on the import type that you use to place the object in the contract library. If a file contains multiple objects and you add a content control to each new object but the text between objects does not have content controls, then the system ignores that text during the upload.
This example illustrates how a Microsoft Word file can be structured before importing it into Supplier Contract Management. This example includes the content controls that you add to clause and section objects.
This example illustrates the fields and controls on the Example of import file as they appear in a Microsoft Word document.
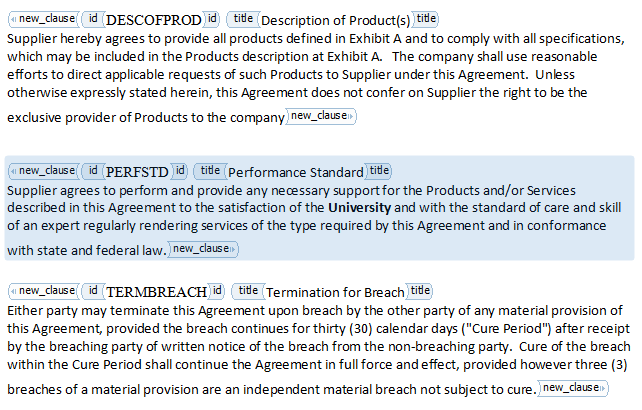
Using the XML file, you map data rows from the import source into the clause, child clause, or section definition structure of the application. A content control should be added to each clause, section, and child clause and each can have up to four embedded content controls, which are:
ID: You can enter an ID for the object that the system uses to name the object when it is created in the document authoring system.
Title: The system uses the value you define for this embedded content control as the object title. You can also use the first string of text in the title to create an ID for a clause or section object using the Import Clauses/Sections page.
Full Text: This embedded content control provides the Full Text field for the new object.
By Reference: All text within this embedded content control is parsed into the By Reference field of a new clause object.
After you add content controls to all objects within the document that you want to import, you must save the Microsoft Word document as a Word XML Document format. Then, you select the file on the Import Clauses/Sections page to upload it. You can complete the import process using this page by selecting the objects to create, defining the import type, and clicking the Create Selected Objects button. If you exit the page and objects from the same selected file remain before you click the Create Selected Objects button, then the system discards the objects and you must enter the default information and select the XML file again.
For more information about adding content controls, recording macros, and adding buttons to the quick access toolbar, seeEditing and Maintaining Documents Using Content Controls and Adding a Custom Button.
Formatting Imported Clauses
To reduce the amount of rework needed to achieve the desired format of clauses after they are in the library, consider these points. These points are not requirements but should be considered to help you during the object implementation process:
Titles
Use separate titles with each clause or section that you define, especially when using the system to automatically number the content. When using a separate title, each title is numbered, and the content below it is not numbered. This enables you to create a table of contents based on the paragraph style of the title in Microsoft Word.
Numbering
If an existing template and content contains basic numbering, such as when each outer clause is numbered, then remove the numbering in Microsoft Word prior to the import process. This is especially helpful when the template contains numbered text.
Paragraph Styles
If an existing template and document content contains clauses that do not have a lot of indented bullets and numbers, then you should remove all paragraph style formats and keep the style as normal. This enables you to maintain paragraph styles that you want using the system and have Microsoft Word paragraph styles applied to the document each time you generate it. See Setting Up Document Templates and Styles.
This approach may not be possible if you have clauses that are more complex. With complex clauses, it is possible to specify styles within each Microsoft Word clause. The system can incorporate these styles as it generates documents and ignores the paragraph style specified in the system's Microsoft Word templates.
When you are not sure about paragraph styles and number formats, use the Reveal Formatting feature in Microsoft Word and click on the content within an unprotected preview document in the document configurator to see which paragraph styles and number formats the system will apply when you create the document. When using information from the preview document, you can edit system templates or individual clauses and sections to achieve the format that you want.
Note: When using the object import process, you can only create general clauses. You cannot create table clauses, which are designed to be used with Microsoft Word tables and summarizations for transactional field values.
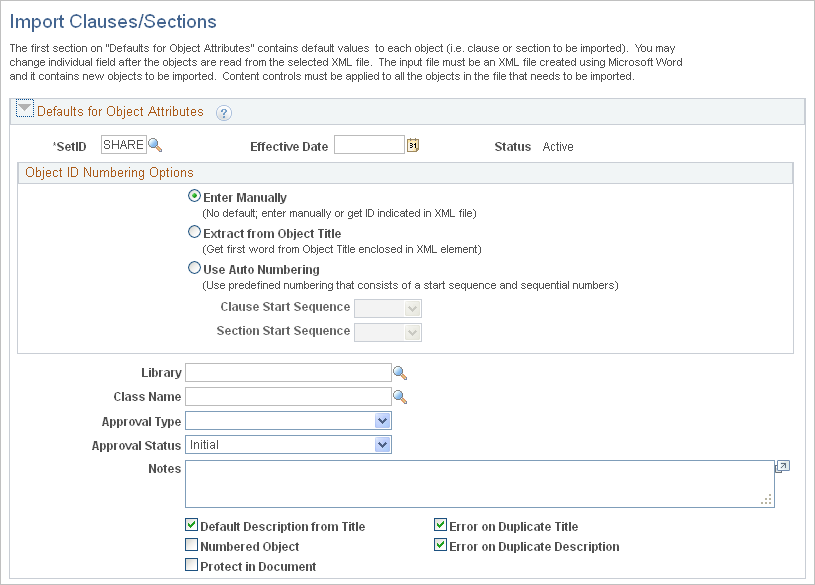
Use the Import Clauses/Sections page (CS_CLAUSE_IMP_SUMM) to define default values for clause and section attributes, select and import object files, review object contents parsed from the uploaded file, and select to create objects in the contract library.
Navigation:
This example illustrates the fields and controls on the Import Clauses/Sections page (1 of 2).
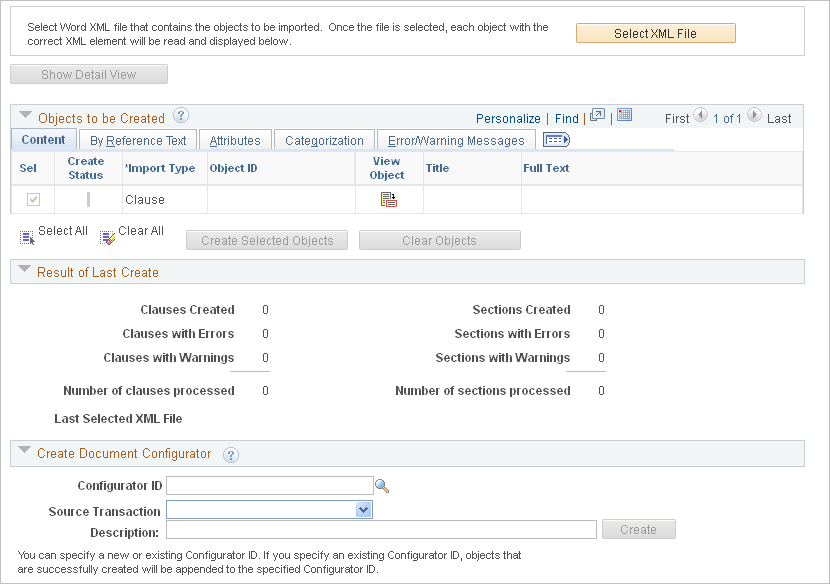
This example illustrates the fields and controls on the Import Clauses/Sections page (2 of 2).
After creating object–clauses and -sections, you can review and fix warnings and errors. The system creates error messages on the Error/Warning Message tab for each selected object that it fails to create. You can fix the objects that have errors and then attempt to create the objects again.
Note: The Show Detail View, Show Summary View, Create Selected Objects, and Clear Objects buttons are not available until after you have uploaded an object.
See Understanding the Object Import and Creation Process.
Note: When using this page, the term object refers to objects that are being imported from an XML file. Objects include clauses and sections.
Defaults for Object Attributes
Use this group box for objects uploaded from selected files that apply to all objects uploaded from the selected XML file. Selecting attributes saves time when importing multiple objects. While in the same session, you can change the default values by clearing all objects previously uploaded and clicking the Clear Objects button.
Field or Control |
Description |
|---|---|
SetID |
Select a SetID to apply to the objects that you will create. This field is required, and the system uses the same SetID for objects uploaded from the same file. |
Effective Date |
Select an effective date. The default value for the field is blank. You can also enter a date after you import the objects using the Show Detail View or Show Summary View buttons. Effective dates can be overridden for individual objects. Normally, when you initially import objects to create the contract library for existing approved objects, you want to enter an effective date in the past. This action makes the object active and available for any document that you need to generate based on the document start date. In addition, after you load an object with a specific effective date, you can reload the object to create a new instance of the object title and body text for the same object ID. This new instance enables you to update new versions of an existing object (clause or section). |
Status |
Displays the status of the object (clause or section). The default value for the field is Active. You cannot change the value because the system imports and creates clauses and sections with an Active status. |
Enter Manually |
Select to manually enter the ID for the object or use the value in the id content control from the Microsoft Word XML Document. You use the Object ID Numbering Options group box to select how you want to create names for the objects. |
Extract from Object Title |
Select to extract the object ID from the first string of text within the title content control. The system uses the first string of text in the file. For example, if a clause or section is preceded by a paragraph number with a space between the number and text, then the system uses the number as the ID for the object. If the first string is a word, then the system uses that word as the object ID. If the name contains spaces, then you can add a content control and enter id in the tag property. Otherwise, only the characters preceding the space are extracted as the object ID. |
Use Auto Numbering |
Select to use automatic numbering. The system displays the default starting sequence for clauses and sections, but you can select other values. When using automatic numbering, the system uses NEXT as the clause or section ID when each object is parsed from the uploaded file and added to the Objects to be Created section. When you create the object, the system assigns the next number in the specified starting sequence to the object–clause and -section.
For additional information, see Setting Up Automatic Numbering. |
Library |
Select the library to which you want to assign to the clauses or child clauses that you import and create. You can use the Categorization tab to override this value for individual clauses and child clauses. If the object is a section, the system ignores the value that you enter in this field because only clauses and child clauses are assigned to a library. See Library Definition Page. |
Class Name |
Select a class to assign to the clauses or child clauses that you import and create. If a default approval type exists for a specific class, the system displays it in the Approval Type field. You can use the Categorization tab to override this value for clauses and child clauses. This field only applies to clauses and child clauses, and is ignored for sections. |
Approval Type |
Select an approval type to assign to clauses and child clauses. If the class has a default approval type, you cannot change this field. This field only applies to clauses and child clauses, and is ignored for sections. See Setting Up Approval Types. |
Approval Status |
Select the status to apply to all objects when they are created.
|
Notes |
Enter additional information about the objects. You can override this value on the Attributes tab. |
Default Description to Title |
Select to indicate that you want the system to use the first 60 characters of the title element in the Microsoft Word XML Document as the Description. If a title does not exist for an object, the system leaves the Description field blank. You must enter a description before you create the object. |
Error on Duplicate Title |
Select to indicate that the system should check whether the title already exists for a object–clause or -section. If a duplicate title exists, the system does not add the object and creates an error message, which appears on the Error/Warning Messages tab. |
Numbered Object |
Select to indicate that all objects created during this import session should be numbered. After you import the objects, you can manually update the value for each object before creating them in the contract library. Numbered objects apply to all clauses and sections. |
Error on Duplicate Description |
Select to indicate that the system should check whether the description already exists for a object–clause or -section. If a duplicate description exists, the system does not add the object and creates an error message, which appears on the Error/Warning Messages tab. |
Protect in Document |
Select to indicate that the imported objects should be protected when they are included in an authored document. After you import the objects, you can manually update the value for each object before creating them in the contract library. |
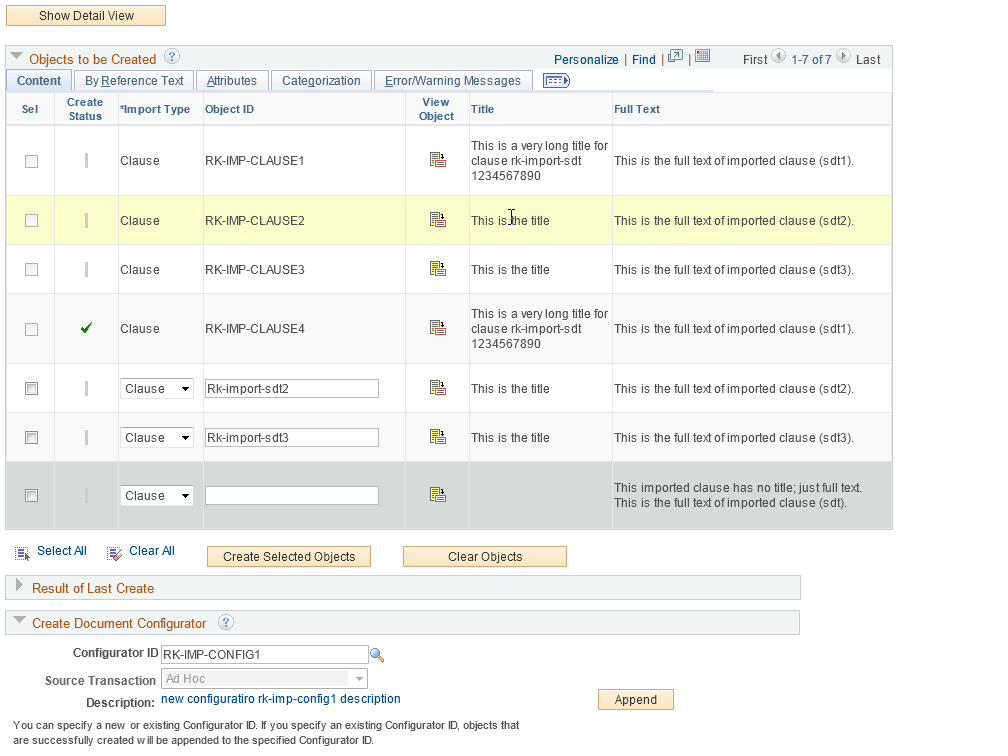
Objects to be Created - Content
Use this section to review and change information about objects before they are created. You can override most of the attributes for individual objects after you have uploaded them from the .xml file and before you create them in the contract library. For example, you can change the effective date for individual objects, whether an object is numbered, or the library to which a clause object is assigned before you create the object. This grid is not populated until you select to upload an XML file.
Field or Control |
Description |
|---|---|
Select XML File |
Click this button to access the Select XML File to Import Clauses page. Use this page to select a Microsoft Word XML file that contains the objects you want to import. Files that are eligible to be imported and created in your library must be an XML type file. If you are uploading objects from more than one file and you have previously uploaded objects that are shown in the Objects to be Created section, then the system prompts you to clear the existing objects or append the new objects. You can only select one .xml file at a time, but that file can contain multiple objects. The system segregates each object during the upload process and populates the Objects to be Created section. You can edit individual objects using the Objects to be Created section before they are created in the PeopleSoft Supplier Contract Management library. The system looks for content controls to identify what is being imported. A content control with a new_clause tag indicates a clause, child clause, or section. Then the system looks for embedded content controls tagged as id, title, full_text, and by_reference to import their attributes. Otherwise, all text inside a new_clause content control is imported as full text. |
Show Detail View and Show Summary View |
Click this button to access the Show Object Details (CS_CLAUSE_IMP_DTL) page. This button toggles between the detail view and the summary view, and the summary view is the default. The button is not available until you upload an XML file and the system parses the objects. The system adds each object extracted from the XML file to the grid. When importing objects, the summary and detail view pages are the same. However, the page layout is different:
|
Sel (select) |
Select this check box to include the corresponding object during the object creation process. The default value for the check box is selected. When you click the Create Selected Objects button, the system processes selected objects. |
|
This indicator appears in the Create Status column when the corresponding object is successfully created and added to the contract library. The Sel check box is not available after an object is created. |
|
This indicator appears in the Create Status column when the corresponding object has an error. An error means that a problem is associated with the object, such as missing information for required fields. These fields must have values:
When errors occur, the system does not create the object in the PeopleSoft system. Select the Error/Warning Message tab to view the errors. See Resolving Import Errors and Warning Messages. |
|
This indicator appears in the Create Status column when the corresponding object is created but has a warning message. The system creates the object in the contract library and provides warning information. For example, a warning message is generated when invalid bind variables exist in an object and the system has changed the approval status from Approved to Initial. In this example, you must to correct the binds in the object using the Clause Definition or Section Definition page before you can approve the clause or section. Other examples of warning messages are:
|
Import Type |
Select an option that identifies the type of object when the object is created in the contract library. When you select the XML file, the system identifies each object and populates the Objects to Be Created section. One row is created for each object. You need to assign an import type to each row in this section. Import types include:
Note: If you do not create new child content during the import process, you can use the Clause Definition page or the Section Definition page to create parent–child relationships after the objects are imported. |
Object ID |
Displays the ID for the object when it is created. Depending on your numbering scheme and whether the object has an id content control, the field may be blank or may contain a value. The field is required and, if it is blank, you must enter a value before creating the object. |
|
Click the View Object icon to view an object on the Clause Definition Page or the Section Definition Page after the object is added to the contract library. This button is not accessible until the object is successfully created, which occurs after you click the Create Selected Objects button. |
Title |
Displays the value within the title content control in the XML file. If the content control in the uploaded file has no value, then this field is blank. Using titles is recommended for sections and clauses because you can number them separately when documents are assembled. Titles are also useful when creating a table of contents in Microsoft Word. |
Full Text |
Displays the text within the Full Text content control in the uploaded XML file. If the object does not contain a full text content control, then all text within the new_clause block is imported as full text. |
Create Selected Objects |
Click this button to create objects that you have selected in the Objects to be Created grid box. See Understanding the Object Import and Creation Process. |
Clear Objects |
Click this button to remove all objects in the Objects to be Created grid. You can access the Defaults for Object Attributes section to make changes to the attributes before you select the next file from which to upload more objects. When you select an XML file and the system populates the Objects to be Created section, the values in the Defaults for Object Attributes section cannot be changed. This button enables you to clear all objects in the Objects to be Created section regardless of whether they have been created. It also opens the fields in the Defaults for Object Attributes section so you can change them. This action enables you to change default values and then select the XML file in which to upload objects. Note: When you click this button, the system also clear values in the Create Document Configurator section. |


Objects to be Created - By Reference Text
Use this tab to view by-reference text that is included with an object. This field is blank unless there is an explicit content control with by_reference indicated in the tag property with the new_clause content control. If the import type is Section, values do not appear in this field.
Objects to be Created - Attributes
Use this tab to view and update the Import Type, Object ID, and other fields. If you set up default attribute values in the Defaults for Object Attributes section, the fields on this tab display those values after you select the XML file.
Field or Control |
Description |
|---|---|
Effective Date |
Displays the default value that you entered in the Defaults for Object Attributes section. If you did not enter a value in the Defaults for Object Attributes section, the field is blank. You can enter a value or override the current value. The effective date determines when the object is available to be used, and is required. During the import process, effective dates can be overridden for individual objects. When importing objects to create the object library for existing approved objects, enter an effective date that is previous to the current date (in the past). This indicates that the object is active and available to be included during the document generation process based on the start date. |
Description |
Displays the object description, which is required. You can enter a description or override the default title. |
Notes |
Displays the default value you entered in the Notes field of the Defaults for Object Attributes section. If you did not enter a note , this field is blank. |
Objects to be Created - Categorization
Use this tab to update basic information about objects. Section import types do not have values for Class Name, Approval Type, and Library fields, and the Protect in Document check box.
Field or Control |
Description |
|---|---|
Numbered |
Select to indicate that all objects created during this import session should be numbered. The system uses the Number feature to determine the use of the paragraph style and number format as defined within the system's Microsoft Word template with this clause or section when creating a document. See Setting Up Document Templates and Styles. You can override the value you defined in the Defaults for Object Attributes section. After you import the objects, you can manually update the value for each object before creating it in the contract library. Numbered objects apply to all clauses and sections during the import process. |
Insert Page Break Prior |
Select to indicate that you want a page break prior to this object when an authored document is created prior to this object. |
Protect in Document |
Select to indicate that a clause should be protected when it is included in an authored document. You can override the value that you selected in the Defaults for Object Attributes section. After you import the objects, you can manually update the value for each object before you create it in the contract library. Section do not have values for this field. |
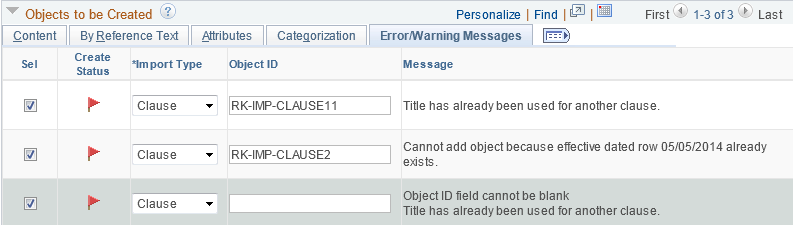
Objects to be Created - Error/Warning Messages
Use this tab to review warnings and error messages that result from the last object creation process. For additional information about errors and warnings, see Resolving Import Errors and Warning Messages
Result of Last Create
Use this section to review the results of the last object creation process. The section has no data until you create or attempt to create objects in the contract library.
This example illustrates the fields and controls on the Import Clauses/Sections page - Result of Last Create section.
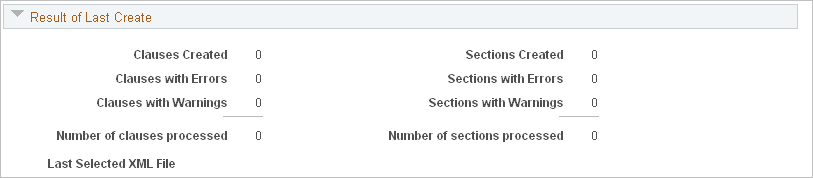
This section shows how many clauses and sections were processed and created. Child clauses are included in the clause count column. The results are refreshed when each file is loaded to the contract library and the process completes.
Field or Control |
Description |
|---|---|
Clauses Created and Sections Created |
Displays the number of clauses (including child clauses) and sections that were added to the contract library during the most recent object creation process. |
Clauses with Errors and Sections with Errors |
Displays the number of clauses (including child clauses) and sections that had errors during the last object creation process. Objects that have errors are not loaded to the contract library. |
Clauses with Warnings and Sections with Warnings |
Displays the number of clauses (including child clauses) and sections that had warnings during the last object creation process. Objects that have warnings are loaded into the contract library, but you should review the object using the Clause Definition Page or Section Definition Page before using it in a document. |
Number of clauses processed and Number of sections processed |
Displays the total number of clauses (including child clauses) and sections that the system evaluated and processed during the most recent object creation upload process. |
Last Selected XML File |
Displays the most recent XML file name that was uploaded to this page. If you have imported multiple files, only the last one appears in this field. |
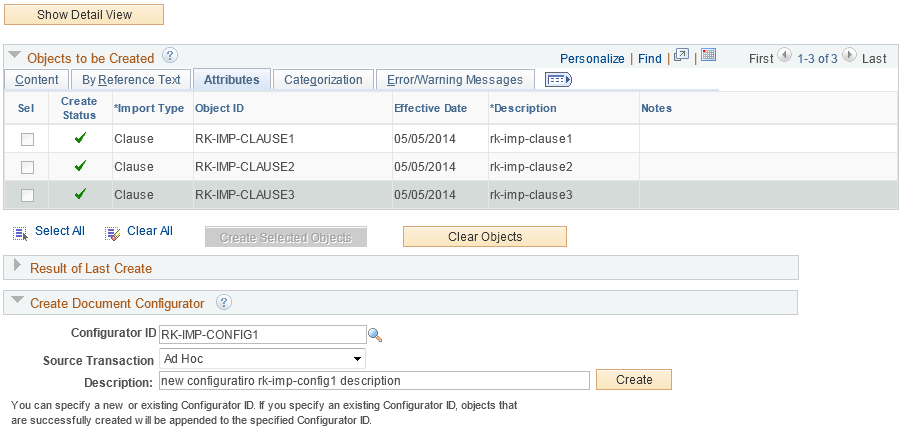
Create Document Configurator
Use this section to create a document configurator. This section is used after you import objects to the system, and before you navigate away from the page.
When you initially access this page, the Create button is not available. It becomes available after you have selected objects. You can continue to add objects that are to be part of a configurator using the Create Selected Objects button as long as you do not navigate away from this page. You can only create one configurator during your session. Therefore, include all the objects to be used with the configurator before you click the Create button.
After you create a document configurator, you can:
Maintain and add additional objects to the configurator using the Document Configurator Definition Page.
For an example of how this process works, see Creating and Reviewing a Document Configurator After Importing Objects.
Create more clauses and sections.
The Create button changes to an Append button if you remain on this page. You can select additional clauses and sections, and append them to the document configurator.
Field or Control |
Description |
|---|---|
Configurator ID |
Enter a unique ID for the configurator. You must define configurator details before you click the Create button. If you import additional objects after you create a document configurator, you cannot add them to the configurator. Instead, use the Document Configurator Definition Page to add new objects to the configurator. |
Source Transaction |
Select a source transaction to assign to the configurator. You can use a configurator for only one valid source transaction. Valid values include:
|
Description |
Enter a description for the configurator. After you create the configurator, the system uses the description as a link to the Document Configurator Definition Page, where you can update the configurator and preview the related Microsoft Word document. |
Create |
Click to add the document configurator to the database. After the system creates the configurator, the Create button is no longer available. Note: You must specify the details for the configurator before you click this button. After you create the configurator, this button and the configurator fields are no longer available. If you remain on this page, you can add more clauses an sections and this button changes to an Append button. |
Append |
Click to append additional clauses and sections to an existing document configurator. |
Use the Error/Warning Message tab to review errors and warnings for objects that cannot be created by the system. You can also use the Result of Last Create section to review how many objects were processed and created.
This example illustrates the fields and controls on the Import Clauses/Sections page: Error/Warning Messages tab.
During the creation process, the system makes three passes through values on the Import Clauses/Sections page to process the imported objects:
During the first pass, it processes all child clauses.
During the second pass, the system creates all clauses and clauses with dependents.
During the third pass, the system creates sections and sections with a clause structure.
If you select the Error on Duplicate Title or Error on Duplicate Description check box in the Defaults for Object Attributes section, the system generates an error if the title or description is a duplicate in the contract library for another clause or section. The errors that appear on the Error/Warning Messages tab are refreshed each time you click the Create Selected Objects button. If you deselect the check boxes, the system does not check for duplicate titles and descriptions and it does not generate duplication errors.
The Import Clauses/Sections page shows errors when similar objects that were uploaded to the contract library already existed in the library. You can load similar data into the library, but you must use different effective dates. If you use different effective dates, the system loads the data and provides a warning message that a new effective-dated row was added.
The system uses the Clause Definition and Section Definition component interfaces to create objects. During the import process, the system creates the error message in psmessages for the process session.
This table describes potential errors and how to fix the objects:
|
Error |
Resolution |
|---|---|
|
Cannot add clause because effective-dated row 01/01/xxxx already exists. |
If you are adding another effective-dated row, then you must use an effective date for the clause that is later than the current effective date. Otherwise, enter a different clause ID. |
|
Description for clause was already used for another clause. |
The system has found a duplicate clause or section description. Change the clause description or deselect the Error on Duplicate Description check box in the Defaults for Clause Attributes group box. |
|
Description cannot be blank. |
Enter a value in the Description field on the Attributes tab in the Clauses to be Created grid. |
|
Title was already used for another clause. |
The system has found a duplicate clause or section title. Change the clause title or deselect the Error on Duplicate Title check box in the Defaults for Clause Attributes group box. |
|
Clause ID field cannot be blank. |
The Clause ID is a required field. Enter a unique value in the field. |
|
Effective Date cannot be blank. |
Enter an effective date for the selected clause. It is recommended that you back date effective-dated clauses and sections in the library so that content can be referenced based on the begin date of contracts that you create. |
|
Effective date sequence must be greater than effective date sequence of current record. |
Use the Attributes tab to change the effective date to a date later than the effective date of the existing section or clause. |
This table describes potential warnings and how to fix the objects:
|
Warning |
Resolution |
|---|---|
|
Approval status is set to Approved, but clause contains invalid bind variables - clause is created but status is changed from Approved to Initial. |
Clauses cannot be approved until bind variables are valid. Use the Clause Definition Page to view the clause and determine how to fix the bind. |
|
Clause already exists; added a new effective-dated row 01/01/xxxx. |
No action is needed. This warning informs you that the system added a new effective date to the existing clause. |
|
Value for Clause ID is too long and is truncated to 20 characters: <Clause ID value from file> |
No action is needed. |
|
Value for Title is too long and is truncated to 254 characters: <Title value from file> |
No action is needed. |
|
Clause already exists; added a new effective-dated row effective date |
No action is needed. |
|
Dependents will not be updated for existing clause. |
The import process enables you to add child dependent clauses to newly created parent clauses or sections as part of a specific import session. These child clauses must be manually added as a dependent clause using the Clause Definition Page or Section Definition Page after you complete the import process. |
Use the Create Document Configurator section of the Import Clause/Section page to create a document configurator after you have uploaded all the objects into the contract library. The document configurator that is created includes the objects that were loaded to the contract library. This feature enables you to create a configurator using a legacy document.
The process of creating a document configurator from the Import Clauses/Sections page is considered to be the initial step to creating a document configurator. The document configurator and its content may require additional edits after it is created because the content and document format from the system depend on:
The content selected for the import.
The content format.
The Microsoft Word template that is use by system when it assembles the document for the newly created configurator.
When you click the Create button on the Import Clauses/Sections page, the system performs these tasks:
Checks that the configurator ID you specified does not already exist.
Ensures that the Configurator ID, Source Transaction, and Description fields were completed.
Ensures that all binds for clauses to be added to the document configurator have the same source transaction as the configurator.
Checks that the document format and options are set up for the SetID that you specify; otherwise, it displays an error.
Assigns the same SetID as specified on the Import Clauses/Sections page.
Sets the configurator availability status to In Progress.
Uses the Microsoft Word template that is specified on the Document Format and Options Page for the SetID.
Adds the date and time that the configurator was updated or created.
Provides user information for who updated or created the configurator.
Adds objects that were successfully created, even if they are unapproved.
You can perform multiple imports using the Import Clauses/Sections page and before creating a configurator, but you must remain on the Import Clauses/Sections Page. After you have uploaded the objects into the contract library and you exit the Import Clauses/Sections page, the objects are removed from the Import Clauses/Sections page and not eligible to be included in a new configurator using the Import Clauses/Sections page. You can only create the configurator once when using the Import Clauses/Sections page, so ensure that you have imported all the objects that you want to add to the new configurator. After you create the configurator, and you remain on the Import Clauses/Sections page, you can import additional objects from another .xml file. The system changes the Create button to an Append button and you can select it to append the objects to the newly created configurator. When you exit the Import Clauses/Sections page, this feature is no longer allowed, and you must use the Document Configurator page to add additional objects.
Example: Import Clauses/Sections Page Before Creating a New Document Configurator
This is an example of the Import Clauses/Sections page after clicking the Create Selected Objects button and before clicking the Create button.
This example illustrates the fields and controls on the Import Clauses/Sections page showing object attributes and document configurator information.
This example shows clause objects that have been created in the contract library. When these objects are included in a new document configurator, they will be sequential in the same order as shown. At this step of the process, you can:
Click the Select XML File button to append new objects to the new configurator.
Click the Clear Objects button to import additional files to add to the Objects to be Created section.
Click the Create button to create a new document configurator that includes all objects listed in the Objects to be Created section.
After creating the configurator, access the Document Configurator Definition Page and select the configurator that you created.
Example: Import Clauses/Sections Page After Creating a New Document Configurator
This example shows the Import Clauses/Sections page after clicking the Create button.
This example illustrates the fields and controls on the Import Clauses/Sections page after creating a new document configurator showing the Append button.
This example shows the Append button, which is only available after creating a new document configurator.
Example: Document Configurator Definition page After Importing Clauses
This example shows the objects in the Content Elements section on the Document Configurator Definition page.
This example illustrates the fields and controls on the Document Configurator Definition page after importing clauses.
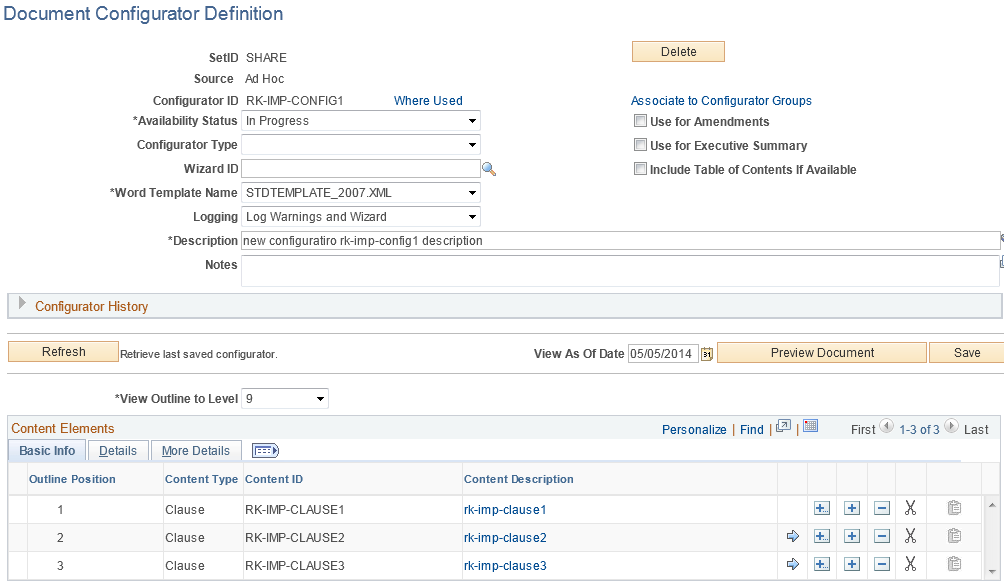
This example shows the new document configurator and the structure that was defined on the Import Clauses/Sections page. The system has applied the sequential order of the objects to the outline position in the configurator. You can click the Preview Document button to view the section and update the configurator using this page.