Packing Stock Into Shipping Containers
PeopleSoft Inventory's Packing Session component enables you to place material into new or existing shipping containers.
|
Page Name |
Definition Name |
Usage |
|---|---|---|
|
PACK_EST_SHIP |
Pack stock into a shipping container. |
|
|
SCNTR_SEL_INV_SP |
Specify search criteria for the demand lines that you want to load into the Packing Session page. Demand lines must be in the fulfillment state of Confirmed to be placed on the Packing Session page. |
|
|
OPEN_CONTAINER_SP |
Open an existing shipping container for packing. |
|
|
PACK_LINE_SEL_SEC |
Indicate which demand line to pack. |
|
|
PACK_CNTR_SP |
View the dimensions of the current shipping container, change freight amounts, add a tracking number, and override weight. |
|
|
Packing Session-Delivery Definition Page |
PACK_EST_DEFN_SEC |
View the grouping criteria for the delivery IDs used in this packing session by clicking the Delivery Definition link on the Packing Session page. |
|
PACK_INSTRUCTIONS |
View packing instructions for a demand line and an item. |
|
|
PACK_SERIAL_INV_SP |
Associate serial IDs with a shipping container. |
|
|
Lot and Serial Details (Lot ID) Page |
PACK_LOT_INV_SP |
Associate lot IDs with a shipping container. |
The Packing Session component is designed to easily pack shipping containers. You can create new shipping containers or pack an existing shipping container.
A packing session is the period of time during which you load the packing area, a logical holding place for the items you want to pack, and then pack material into one or more shipping containers. A given packing session lasts until you have packed all demand lines in the packing area, until you reload the packing area, or until you exit the Packing Session component.
You begin a packing session when you click the Search link to load the packing area (represented by the Deliveries - Available to be Packed scroll area on the Packing Session page) with the demand lines available to pack. You can load demand lines based on a wide variety of criteria, including ship to customer or location, demand source, source business unit, order number, pick batch ID, carrier ID, ship via, bill of lading, route code or group, shipping ID, or destination business unit.
The system applies an delivery management filter to all demand lines returned to the packing area. The filter divides the demand lines into delivery IDs, which are logical groupings indicating what can be packed into the same shipping container. These groupings are temporary, the delivery ID for a demand line can change at any time until freight has been calculated. If a demand line does not meet the criteria for an existing delivery ID, the system creates a new delivery ID for the line. Demand lines that have already been freighted (and therefore assigned to a delivery ID) are not available to be packed.
When demand lines have been returned to the packing area, you begin packing the shipping container. You can create a new container or open an already existing one. The two collapsible scroll areas on the Packing Session page provide continuous information as you pack demand lines into shipping containers: the Deliveries - Available to be Packed section displays delivery IDs and indicates which demand lines have been packed and which lines have not; the Current Shipping Container Contents section displays the contents of the container as you pack it.
Using the Packing Session component, you can:
Create a new shipping container.
Click the New Ship Container button or issue the corresponding wedge command code. The system saves and closes any already open container, and if automatic numbering is active for shipping containers, sets the current shipping container ID to NEXT. When you save the Packing Session page, PeopleSoft Inventory assigns the next sequential shipping container ID to this container.
Open an existing shipping container.
Click the Open Container link or issue the corresponding wedge command code. The system saves and closes any container that is already open and then prompts you to select another container to open.
Pack stock into a shipping container.
Enter or scan the item into the Item ID field in the Pack Items grid. If the item exists in more than one delivery ID, the system transfers you to a search page, where you indicate which demand line to pack. To pack a shipping container into another shipping container, enter or scan the container into the Shipping Container ID field in the Pack Containers grid.
The first item or container that you pack determines the delivery ID context: only material from the delivery ID associated with this item or container can be packed into the current shipping container. If you're opening a partially packed container, you can only add stock belonging to the delivery ID already assigned to the container.
If you attempt to add an item or shipping container that does not exist in the delivery ID for the current container (or, if this is the first item packed, in any delivery ID for the packing session), the system issues an error message.
When you have entered all the items and containers that you want to pack, save the page. The packed items or containers then appear in the Current Shipping Container Contents section. If any items do not have available quantity, the system issues an error message, and these items remain unpacked.
Note: Any items or containers with errors remain in the appropriate input grid; to complete packing these items or containers, correct the error or delete the line and then save the page again.
Unpack a shipping container.
Click the Unpack Ship Container button or issue the corresponding wedge command code. When the system issues the warning message Are you sure you want to unpack this container? click Yes. To unpack specific demand lines, click the Delete button next to a line in the Current Shipping Container Contents section. Unpacking an entire container clears the delivery ID context, enabling you to create a new delivery ID context.
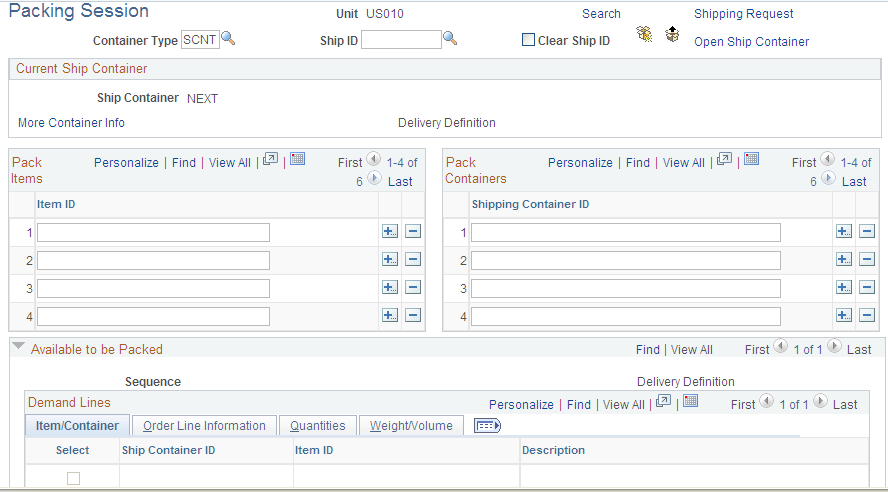
Use the Packing Session page (PACK_EST_SHIP) to pack stock into a shipping container.
Navigation:
This example illustrates the fields and controls on the Packing Session page (page 1 of 2). You can find definitions for the fields and controls later on this page.
This example illustrates the fields and controls on the Packing Session page (page 2 of 2). You can find definitions for the fields and controls later on this page.

Common Page Information
Field or Control |
Description |
|---|---|
Container Type |
Enter the container type. |
Ship ID |
Enter a Shipping ID to be applied to the container header, the demand lines within the container, and to any lower level containers and their demand lines. Your entry overrides any existing shipping IDs located on the selected demand lines and containers. |
Clear Ship ID |
Select this check box to remove the Shipping ID from the selected demand lines, the selected container, and any lower level containers and their demand lines. |
|
Click to create a new shipping container. This action saves and closes any open container and sets the current shipping container ID to NEXT. |
|
Click to remove all demand lines from the current shipping container. |
Shipping Request |
If packing is the last step in the shipment process, you can ship the container without using the Shipping/Issues component. After creating the shipping containers, click this button to assign a shipping ID and load the containers as a transaction request into the BCT_CTL and BCT_DTL staging tables using transaction code 0366 (Ship). The Fulfillment Requests process (IN_FUL_BCT) scans these tables and picks up the rows with the above transaction code. All of the shipping containers for the packing session are written under a single EIP control ID; therefore, you only need to click this button once, when the packing session is complete. |
Open Ship Container |
Click to access the Open Shipping Container page where you can select an existing shipping container to display on the Packing Session page. |
Ship Container |
Identifies the shipping container ID that you are currently packing. |
Delivery ID |
Displays the delivery that this shipping container is included in. |
More Container Info |
Click to access the Current Shipping Container page where you can view the dimensions of the current shipping container, change freight amounts, add a tracking number, and override weight. |
Pack Items |
Enter or scan the inventory item IDs that you want to pack. If the Pack Partial Quantity option on the Inventory Definition - Business Unit Options: Shipping Options page has been selected, you can enter the item quantity to be packed and indicate the unit of measure in which this quantity is expressed. If partial packing is not permitted, you must pack the entire quantity for the order line. |
Pack Containers |
To place any previously packed shipping containers into this container, enter or scan the desired shipping container IDs. |


Available to be Packed
This group box contains information about all demand lines and shipping containers that you have loaded into the packing area, grouped according to delivery ID. As you add stock to the shipping container, the system automatically selects the check box for the appropriate demand line, providing a continuous view of what has been packed and what still needs to be packed.
Field or Control |
Description |
|---|---|
Qty Ship Base |
Under the Quantities tab, this field displays the quantity shipped, expressed in the base unit of measure. If the demand line has already been shipped, this value is the quantity shipped. If the line has not been shipped, this value is the quantity picked. |
Qty Pack Base |
Under the Quantities tab, this field displays the quantity packed, expressed in the base unit of measure. This value equals the quantity ship base, unless the Pack Partial Quantity option on the Inventory Definition - Business Unit Options: Shipping Options page is selected and partial quantities of the item have already been packed into another shipping container. |
Current Shipping Container Contents
As you pack the shipping container, the quantities listed in this group box increase, providing you with a continuous view of the container's contents.
Field or Control |
Description |
|---|---|
Delete |
To unpack individual demand lines from the current container, click the button next to the line that you want to remove. |
Use the Load Packing Area Selection page (SCNTR_SEL_INV_SP) to specify search criteria for the demand lines that you want to load into the Packing Session page.
Demand lines must be in the fulfillment state of Confirmed to be placed on the Packing Session page.
Navigation:
Click the Search link on the Packing Session page.
This example illustrates the fields and controls on the Load Packing Area Selection page. You can find definitions for the fields and controls later on this page.
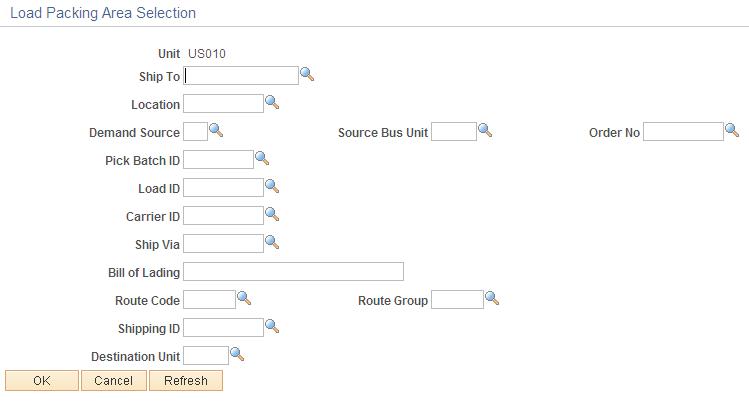
The fields on this page are optional; if you select nothing, the system returns all lines that are available for packing. Demand lines must be in the fulfillment state of Confirmed to be placed on the Packing Session page.
Use the Open Shipping Container page (OPEN_CONTAINER_SP) to open an existing shipping container for packing.
Navigation:
Click the Open Ship Container link on the Packing Session page.
This example illustrates the fields and controls on the Open Shipping Container page. You can find definitions for the fields and controls later on this page.
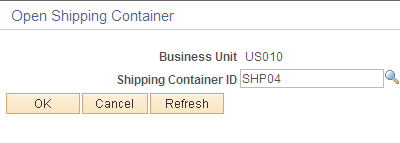
Select the shipping container ID for the container that you want to open.
Note: When using multilevel containers, only the highest-level shipping container ID is available for selection.
Use the Select Demand Line to Pack page (PACK_LINE_SEL_SEC) to indicate which demand line to pack.
Navigation:
Once you have selected an existing shipping container for packing, click the Open Ship Container link on the Packing Session page.
Field or Control |
Description |
|---|---|
Packing Delivery ID |
Identifies the delivery ID currently being packed. If the delivery ID context has not been set (that is, if no demand lines have been packed), this field is blank. |
Select the check box next to the demand line that you want to pack; the system automatically returns you to the Packing Session page.
Use the Current Shipping Container page (PACK_CNTR_SP) to view the dimensions of the current shipping container, change freight amounts, add a tracking number, and override weight.
Navigation:
Click the More Container Info link on the Packing Session page.
This example illustrates the fields and controls on the Current Shipping Container page. You can find definitions for the fields and controls later on this page.
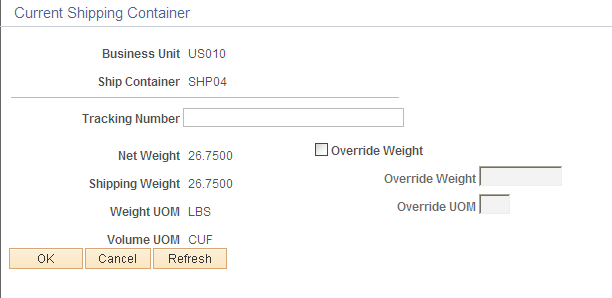
Use this page to view the dimensions of the current shipping container, change freight amounts, add a tracking number, and override weight.
Field or Control |
Description |
|---|---|
Freight Amount |
Enter an amount to be added to the existing freight charge or manually override the freight charge. The Freight Charge Override check box on this page determines how this value is applied. |
Use the Packing Instructions page (PACK_INSTRUCTIONS) to view packing instructions for a demand line and an item.
Navigation:
Click the Packing Instruction icon or the Container Packing Instructions icon on the Packing Session page.
This example illustrates the fields and controls on the Packing Instructions page. You can find definitions for the fields and controls later on this page.
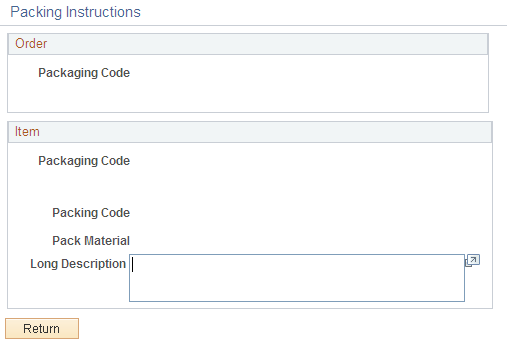
Order
Field or Control |
Description |
|---|---|
Packaging Code |
The packaging code assigned to the demand line during order entry, along with the descriptions defined for the code on the Item Packaging Codes page. |
Item
Field or Control |
Description |
|---|---|
Packaging Code and Packing Code |
The codes defined for the item in the Define Business Unit Item component or on the UOM Weight/Volume page. |
Pack Material |
Indicates the kind of material that should be used to pack the item. |
Long Description |
This field contains any packing instructions defined on the Packing Codes page. |
Use the Lot and Serial Details (Serial ID) page (PACK_SERIAL_INV_SP) to associate serial IDs with a shipping container.
Navigation:
Click the Lot/Serial link on the Packing Session page.
Note: Associating lot or serial IDs with a shipping container is optional. You will probably want to complete this step if you are packing partial quantities, and you need to see which lots or serial numbers are in each container.
Serial IDs
Field or Control |
Description |
|---|---|
Selected Flag |
Select to indicate that the shipping container holds this serial ID. |
Select All and Deselect All |
Click to include or remove all displayed serial IDs. |
Lot IDs
Field or Control |
Description |
|---|---|
Quantity |
Enter the quantity of the lot that you want to pack. |