Creating a Work Order Inspection Using the Work Order Component
To create a work order inspection, use the Work Order (WM_WO) component.
|
Page Name |
Definition Name |
Usage |
|---|---|---|
|
WM_WO_HDR |
Access the Job Templates or Task Templates to manually copy the template data that contain the associated work order inspection plan. |
|
|
WM_WO_TASK_RQMT |
Select or modify the work order inspection plan. |
|
|
WM_WO_TASK_SCHED |
Schedule the work Order inspection instance. |
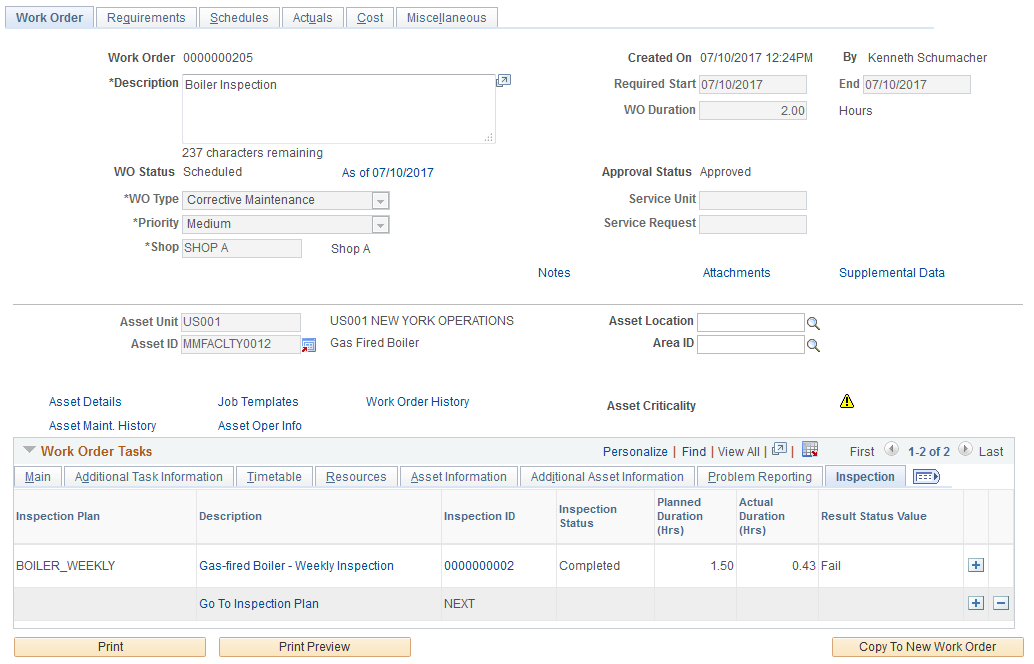
Use the Work Order page (WM_WO_HDR) to enable work order tasks to be associated with inspection plans. Work orders created through PM Batch processing can automatically generate work order inspections if the Generate PM Inspections option is selected on the Work Order-Definition page. You can associate only one asset inspection instance per task.
Note: Associating work order inspection to a task is optional.
Navigation:
Click the Inspection tab.
This example illustrates the fields and controls on the Work Order page-Inspection tab. You can find definitions for the fields and controls later on this page.
Field or Control |
Description |
|---|---|
Inspection Plan |
Displays the inspection plan associated to the task. |
Description |
Displays the inspection plan details. Click the Go To Inspection Plan link and select the required inspection plan for the task. |
Inspection ID |
Displays the sequential inspection ID automatically generated for the new inspection instance. Click the ID to view the details of the inspection. Note: The inspection plan details displays in a new window. You can either start working on the inspection in the new window or access the inspection instance using the Work Order Inspection component. See Completing Work Order Inspections. If an inspection plan is not associated to the task, the field displays the value as NEXT. |
Inspection Status |
Displays the status of the inspection. |
Planned Duration |
Displays the total time required to complete all the inspection activities. |
Actual Duration |
Displays the total time taken to complete all the inspection activities. |
Result Status Value |
Displays the inspection result value. |
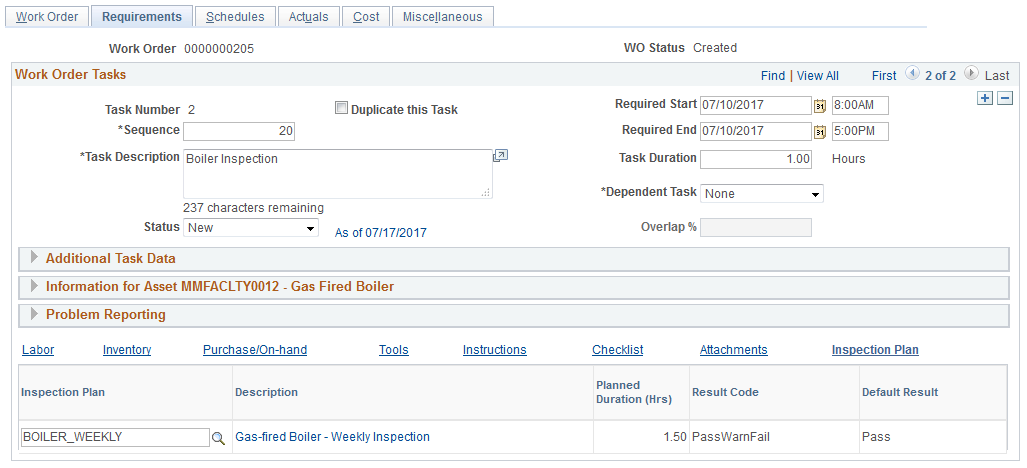
Use the Requirements page (WM_WO_TASK_RQMT) to select the inspection plan for the particular work order task.
Navigation:
Click the Inspection Plan tab.
This example illustrates the fields and controls on the Requirements page-Inspection Plan tab. You can find definitions for the fields and controls later on this page.
Field or Control |
Description |
|---|---|
Inspection Plan |
Click the Search icon to select the related inspection plan for the task. The selected inspection plan displays in the Work Order page and Schedules page. |
Description |
Click this link to view the current inspection plan details or to modify them. |
Result Code |
Displays the possible inspection result values as set in the inspection plan. |
Default Result |
Displays the expected inspection result as set in the inspection plan. |
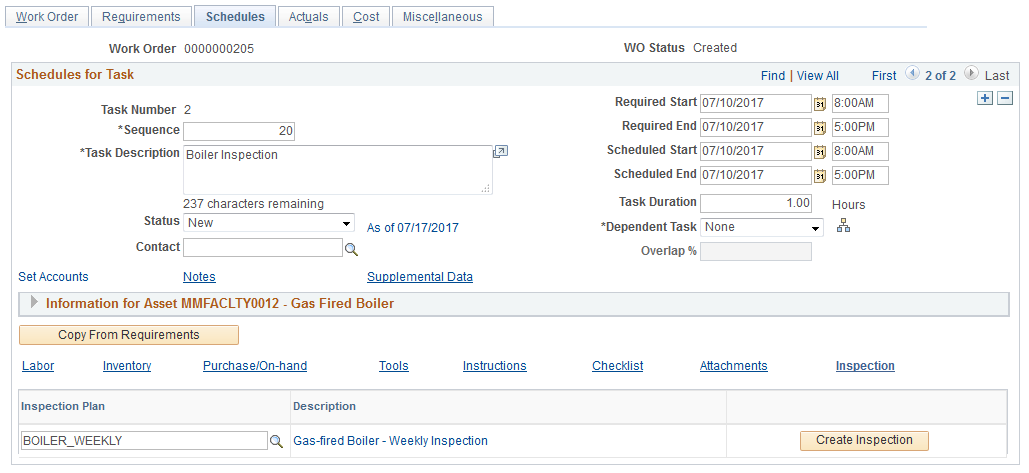
Use the Schedules page (WM_WO_TASK_SCHED) to create an actual inspection.
Navigation:
Click the Inspection tab.
This example illustrates the fields and controls on the Schedules page-Inspection Plan tab. You can find definitions for the fields and controls later on this page.
Field or Control |
Description |
|---|---|
Create Inspection |
Click this button to create the work order inspection instance. In the new window displayed, make the required changes to the work order inspection and save it. After saving the work order, both the Schedules and Inspection tabs display the automatically assigned next available sequential inspection ID as tracked on the associated WO Business Unit definition. Click the ID to initiate the inspection in the new window. Also, you can separately work on the inspection instance using the Work Order Inspection component. |