Setting Up Cash Forecasting
|
Page Name |
Definition Name |
Usage |
|---|---|---|
|
POS_TIME_SPAN_PNL |
Configure time segments with corresponding start and end cycles and store associated time periods |
|
|
POS_FIELD_TYPE_PNL |
Define user-friendly field names. |
|
|
CSH_FCST_GRP_BY |
Set up dimensions for reporting cash forecasting numbers. |
|
|
SOURCE_SET_DEFN |
Define position source sets, such as actuals, forecast, projected, or intraday. |
|
|
POS_SOURCE_TBL |
Define position records, drill back details, and selection criteria for position sources. |
|
|
POS_SOURCE_CNTC |
Associate source contacts with a Contact Type of Cash Forecast to a position source. |
|
|
POS_SOURCE_KEYS |
Define the method for drilling back to the source application, used to view details of a transaction from the Cash Forecasting Results page. |
|
|
POS_SOURCE_SQL |
Enter selection criteria for a source or regenerate SQL for several sources in batch. |
|
|
CSH_FCST_RULES |
Identify forecasting rules to shift or replace forecasting values. |
|
|
TR_TSPAN_REQ |
Run the Treasury Position Time Spans process (TR_POSN_TSPAN), which calculates time spans for a specified time set. |
|
|
TR_CREATE_SQL |
Enter the parameters and execute a process that creates the SQL defined for a position source. |
|
|
WORKSHEET_DEFN |
Define how your cash forecast worksheet will look and the calculations that will be made, including reporting currencies, forecast rules, source sets, and variance attributes. |
|
|
WORKSHEET_LINE_ITM |
Define line items, position sources, and position source processing attributes for the worksheet. |
To define PeopleSoft cash forecasting information, use the Define Cash Forecast menu, which includes components to set up worksheets, forecasting rules, time spans, and position source options.
Using pages in the setup menu, you define the following setup and source data:
Time sets.
Position field types.
Forecast mapping.
Position source sets.
Position sources.
Forecast rules.
Time span calculation.
Position source SQL.
Worksheet definitions.
As part of your installation of Cash Forecasting, you will need to evaluate the values needed for your business.
Configure time sets to create time intervals, or time buckets, that you want to leverage to display cash forecasting results.
You can define time sets with varying intervals, such as daily, weekly, monthly, quarterly, yearly, or rolling. Look up sample data for the intervals mentioned here to evaluate the associated time periods and make appropriate changes. You should create new intervals as needed.
Use the Define Time Sets page (POS_TIME_SPAN_PNL) to configure time segments with corresponding start and end cycles and store associated time periods.
Navigation:
This example illustrates the fields and controls on the Define Time Sets page.
Field or Control |
Description |
|---|---|
Number |
Indicates the sequential time segment that you are modifying. |
Start |
Select a start type to indicate how the system determines when a time segment starts. Values are:
|
Cycle |
Select a cycle type to indicate the repetition frequency of a time segment. Values are:
|
End |
Use to control when a time segment ends. After completing the appropriate number of cycles, the following values are available to control the end of the segment:
|
Calculate |
Click this button to generate the time span intervals. Your results appear in the Resulting Time Periods group box. |
Use the Position Field Types page (POS_FIELD_TYPE_PNL) to define user-friendly field names.
Position Field Types, also known as Alias Names, can be associated with prompt records and meta-SQL. They are used to map to source record fields, define position SQL criteria, and process cash forecast results.
Navigation:
This example illustrates the fields and controls on the Position Field Types page.

Review existing Position Field Types and define new ones if required to map position source record fields.
Select a Field Type in the system that you want this position field type Alias Name to represent.
Prompting Method
Select a Prompt option to indicate how to control prompting for values for the selected Field Type.
Field or Control |
Description |
|---|---|
Record |
Select to base the prompts on the actual database records. In the Record Prompt field, enter the field on which prompting is based. |
Translate |
Select to base prompting on translate values rather than the records themselves, and select the field name to use for translation. This value applies only to field records that use translate values. |
Define Meta Text
Field or Control |
Description |
|---|---|
Meta Field |
Select to incorporate a SQL statement with this alias. (Typically, you do not select this check box.) |
The following table lists examples of alias names that are delivered with the sample database:
|
Alias Name |
FieldType |
Description |
Prompt |
Record Prompt |
Field Name |
Meta Field |
Comments |
|---|---|---|---|---|---|---|---|
|
%THIS DEAL |
Other |
This Deal |
None |
|
|
Y |
Alias name with meta text ¹ |
|
ACCOUNT |
Bank Account |
Account |
Record |
BANK_ACCTNUM_VW |
|
|
Alias name with record prompt |
|
CANCEL_STATUS |
Other |
Cancel Status |
Translate |
POS_XLAT_PROMPT |
CANCEL_STATUS |
|
Alias name with record prompt and field |
|
AMOUNT |
Amount |
Amount |
None |
|
|
|
Alias name with only field type value |
1. Meta text for alias name %THIS DEAL is as follows:
(TREAS_HEADER_ID = %BIND(TREAS_HEADER_ID) and BUSINESS_UNIT = %BIND(BUSINESS_UNIT_DEAL))In addition to the system-defined groupings (Business Unit, Bank SetID, Bank, Bank Account, and Currency), you can map up to seven additional cash forecast dimensions for which you want to process cash forecast results and view them.
For each additional dimension mapped, you must update the Position Sources Mappings on the Position Source page and ensure that the source data have values for each mapped dimension.
As delivered in PeopleSoft Cash Management, the cash forecasting component stores results by bank, bank account, business unit, position currency, source set, value date, and transaction currency. No change to the forecast mapping is required if you view cash forecast results by delivered dimensions. Map a generic group-by field to an alias name if you want to summarize cash forecast numbers by another dimension.
Use the Forecast Mapping page (CSH_FCST_GRP_BY) to set up dimensions for reporting cash forecasting numbers.
Navigation:
This example illustrates the fields and controls on the Forecast Mapping page.
Field or Control |
Description |
|---|---|
Destination Field |
System-defined groupings include the following:
The system also provides seven generic Destination Field values:
You can map these fields to create groupings that represent a dimension to be displayed in your cash forecast results. For example, you might choose to map to a geographic region by country. Note: For each additional dimension mapped, you must update the Position Source Mappings and ensure that the source data have values for each mapped dimension on the Position Source page. |
Alias Name |
Select from user-defined Position Field Type values found on the Position Field Type page. Do not map to the alias names used by system-defined mappings. |
Default Value |
Enter a default value for each grouping field. If the source does not include a value for this field, the system uses the default value you define to group data. |
Use the Position Source Set page (SOURCE_SET_DEFN) to define position source sets, such as actuals, forecast, projected, or intraday.
Position Source Sets represent categories for grouping position source data, which you can view and/or compare data between two source sets on the cash forecasting results page.
Navigation:
This example illustrates the fields and controls on the Position Source Set page. .
Commonly used source sets are delivered as sample data with your system.
Field or Control |
Description |
|---|---|
SetID |
Enter a SetID. |
Description |
Enter a description. |
Source Set |
Enter a category for grouping position source data. |
Comments |
(Optional) Enter comments. |
A position source represents a source of data that is used to calculate cash forecast/position amount. It also holds details for drill back to source data and SQL criteria that can be applied when retrieving cash forecast/position amounts.
Note: At the time of installation, you should evaluate the appropriateness of the delivered data to your business context and assess whether to create your own position sources. In many cases, you must create your own.
To set up position sources for cash forecasting:
Define/identify the underlying position record.
(Optional) Define position source contacts.
(Optional) Configure drill back to source methodology.
(Optional) Define selection criteria for a source.
(Required if selection criteria are defined) Create position source SQL.
After mapping the required alias names—business unit, amount, value date, currency, and a reference—to fields in the record, you should map fields to use for additional forecast dimensions, such as bank, bank account, bank SetID, and any Group By fields that you defined on the Forecast Mapping page.
Use the Position Source page (POS_SOURCE_TBL) to define position records, drill back details, and selection criteria for position sources.
Navigation:
This example illustrates the fields and controls on the Position Source page.

Field or Control |
Description |
|---|---|
Record |
Select the database from which the position source derives data. |
Deal View |
Select to permit remapping of amount fields for different instruments. |
Display Only |
Select to Indicate that the source data is informational only and will not be included in worksheet calculations. Display-only position sources can be added to the worksheet definition, in the Non-Cash Flow Details grid on the Worksheet Line Items page. |
Reverse Amount Sign |
Select to reverse the sign on the amount from the source when the data are summarized. |
Note: In order to create a valid source, you must map corresponding fields in the record to the alias names for the business unit, amount, value date, currency, and a reference.
Field or Control |
Description |
|---|---|
Field Name |
Displays available field names of the selected record. |
|
Click the Position Field Types icon to define the sets of table fields that are available to the position management tool. |
|
Click the Long Description icon to enter a comprehensive description for the field. |
Default Value |
Choose default values for the bank account key, bank code, bank SetID, business unit, and currency, in case the fields in the source are empty. |


Use the Position Source Contacts page (POS_SOURCE_CNTC) to associate source contacts with a Contact Type of Cash Forecast to a position source.
Navigation:
Click the Contact Information link on the Position Source page.
This example illustrates the fields and controls on the Position Source Contacts page.
Field or Control |
Description |
|---|---|
Contact ID |
Enter the ID for a contact. |
Name, Phone, Ext, and Email ID |
Displays the contact’s name, phone, phone extension, and email ID, if available, from the contacts master table. |
Use the Drill Back Details page (POS_SOURCE_KEYS) to define the method to use to drill back to the source application, to view details of a transaction from the Cash Forecasting Results page.
Navigation:
This example illustrates the fields and controls on the Drill Back Details page. You can find definitions for the fields and controls later on this page.
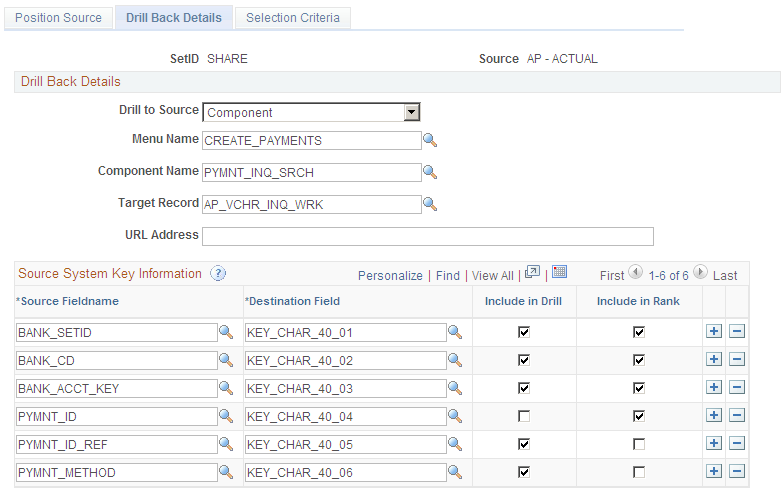
Specify the metadata to identify the drill detail information for the source. Enter the fieldnames from the record, and map them to the generic key fields in the Destination Field column. Select the mapped fields to be used for drilling back to the source and for ranking the rows.
A RANK() function is used to assign sequential numbers to the source detail result set. Provide sufficient Rank fields to identify a unique row in the group when entering source system key information.
Field or Control |
Description |
|---|---|
Drill to Source |
Select one of the following methods for drilling to source:
|
Menu Name, Component Name, and Target Record |
If you choose to drill to source by component, you must specify the menu and a component name. Specify a target record if the component points to a generic search page that doesn’t go through a search. You must specify the target record in order to populate the correct fields. |
URL Address |
Enter a URL if you select the URL method of drilling to the source. |
Specify the metadata to define the detail information from the source in the Source System Key information grid.
Field or Control |
Description |
|---|---|
Source Fieldname |
Enter the fieldnames from the record, and map them to the generic key fields in the Destination Field column. |
Destination Field |
Map delivered character, date/time, and number key fields to source fields, such as the amount, value date, and bank. You identify the destination key fields and the system extracts the information that will be stored on the detail table, which will be used when you drill down to the details. |
Include in Drill |
Select the mapped fields to be used for drilling back to the source. |
Include in Rank |
Select the mapped fields to be used for ranking the rows. A RANK() function is used to assign sequential numbers to the source detail result set. Provide sufficient Rank fields to identify a unique row in the group. |
Use the Selection Criteria page (POS_SOURCE_SQL) to enter selection criteria for a source or regenerate SQL for several sources in batch.
In cash forecasting, you define your selection criteria by source. You can create a Selection Definition here, which may include several criteria, then associate it at the worksheet level with the source using the appropriate Selection SQL ID. You can reuse the same selection criteria on any worksheets for the source.
Navigation:
This example illustrates the fields and controls on the Selection Criteria page.
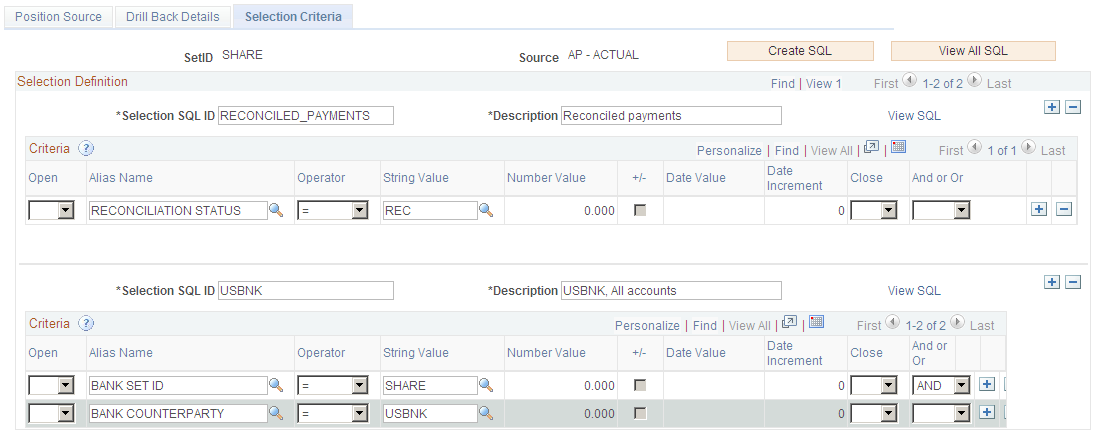
Field or Control |
Description |
|---|---|
Create SQL |
Click the Create SQL button to create the combined SQL statement from the various statements for different sets of criteria. |
View SQL |
Click the View All SQL to see the SQL that has been generated from the entered criteria. When the process finishes, a dialog box appears with the SQL statement. |
Use these fields to create a Selection Definition:
Field or Control |
Description |
|---|---|
Selection SQL ID |
Create an ID for the selection criteria for a source. |
Description |
Describe the SQL Criteria. |
Enter SQL criteria for each Selection SQL ID:
Field or Control |
Description |
|---|---|
Open |
Select from blank, (, ((, (((, or ((((, depending on your SQL statement and proper SQL syntax. |
Alias Name |
Select the appropriate alias name. |
Operator |
Select an operator for your SQL statement. |
String Value |
Enter any string value or choose one using the lookup prompt. |
Number Value |
Enter a numeric value. |
+/- |
Enter an addition/subtraction operator. |
Date Value |
Enter a calendar date or choose one using the calendar prompt. |
Date Increment |
Enter an incremental value of days. |
Close |
Select from blank, ), )), ))), )))), depending on your SQL statement and proper SQL syntax. |
And or Or |
Choose from blank, AND, or OR. |
Add row or Delete row |
Click to add or delete the current row. |
Forecast Rules are used to shift amount, shift value date based on business convention, shift value date by year, shift value date by month, shift value date by days, shift value date based on payment method, replace forecast data values.
The Forecast Rules page will render differently depending on the rule type you select. You can create the following types of rules or scenarios:
Amount
Date
Payment Method
Replacement
Worksheet Offset
The amount type rule is used to adjust the forecast amount, and you can add a weighting value. Or if you want to derive the amount from another field, enter the Alias Name for the field and choose either Per Unit in the Measurement field, along with Unit Price.
Use the Date type rule to adjust the forecast value date. You can specify a business day convention in the Convention field and enter the number of years, months, or days to adjust the source date.
Use the Payment Method rule type to shift value date by payment method.
Use the Replacement rule type to replace specific position source values.
Use the Worksheet Offset rule type when copying Cash Forecast Results to vary the date and amount.
Use the Forecast Rules page (CSH_FCST_RULES) to identify forecasting rules to shift or replace forecasting values.
Navigation:
This example illustrates the fields and controls on the Forecast Rules page. You can find definitions for the fields and controls later on this page.
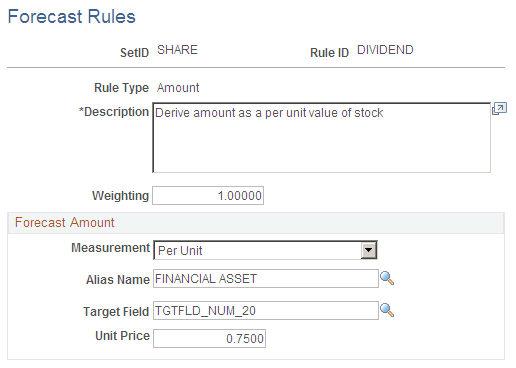
Field or Control |
Description |
|---|---|
Rule ID and Rule Type |
Define the rule by creating a rule ID, and specify a rule type for the rule. Options are:
|
Description |
Enter a description. |
Weighting |
Set the percentage that you want to apply to this cash forecast rule. You can also weight worksheet line items on the Worksheet Line Items page. For example, you use the weight of 1.1 to forecast a 10 percent increase or 110 percent of your current situation. Similarly, you use a weight of .9 for a 10 percent decrease or 90 percent of your current cash situation. |
In the Forecast Amount group box, enter values for these fields:
Field or Control |
Description |
|---|---|
Measurement |
Choose the Per Unit measurement option to enter a value in the Unit Price field. |
Alias Name |
Enter the alias name for another field from which you want to derive the amount. |
Target Field |
Select one of the available target record fields. |
Unit Price |
Enter a unit price value when you select the Per Unit measurement. |
Use the Calculate Time Spans page (TR_TSPAN_REQ) to run the Treasury Position Time Spans process (TR_POSN_TSPAN), which calculates time spans for a specified time set.
You can define time spans with varying intervals, such as daily for a week, weekly for a quarter, and then quarterly for a year. The time spans that you define can overlap, run consecutively, or both.
Navigation:
This example illustrates the fields and controls on the Calculate Time Spans page.
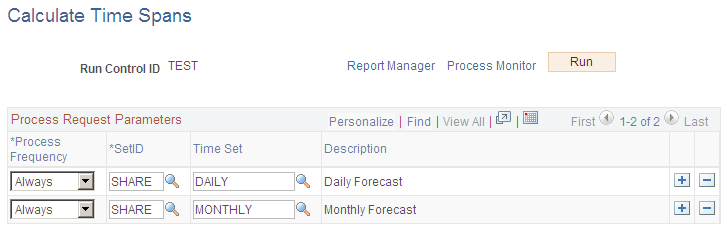
To define the Process Scheduler run, enter a request ID and description and indicate if you want the system to process using a single SetID or all SetIDs.
Field or Control |
Description |
|---|---|
Process Frequency |
Specify the frequency with which the process or job is to be run. Choose from Always, Once, or Never. |
SetID |
Enter a SetID. |
Time Set and Description |
Enter the time interval from sample data delivered with your system, or that you defined on the Define Time Sets page. |
Use the Create Position Source SQL page (TR_CREATE_SQL) to enter the parameters and execute a process that creates the SQL defined for a position source.
The position source SQL for cash forecasting is stored on the source. If you want to regenerate SQL for several sources in batch, you can do it through this component.
Navigation:
This example illustrates the fields and controls on the Create Position Source SQL page. You can find definitions for the fields and controls later on this page.
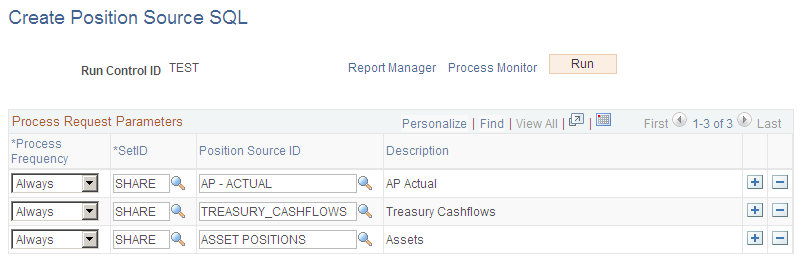
Field or Control |
Description |
|---|---|
Process Frequency |
Specify the frequency with which the process or job is to be run. Choose from Always, Once, or Never. |
SetID |
Enter a SetID. |
Position Source ID and Description |
Identify the record that will be used as the base when building the SQL to retrieve the impacted rows of data according to the search criteria. The SQL will retrieve distinct records for the main source record primary key. |
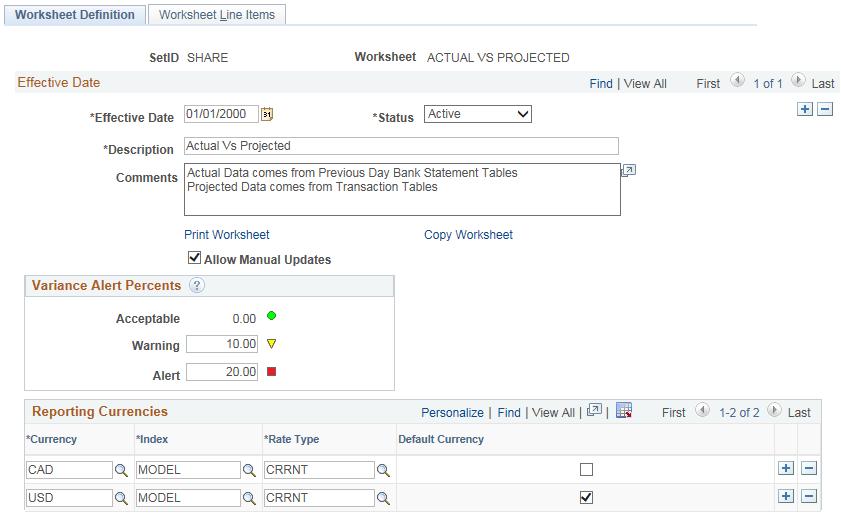
Use the Worksheet Definition page (WORKSHEET_DEFN) to set up a worksheet structure to define the overall processing options, reporting position currencies, forecast rules, source sets, and variance attributes.
The worksheet definition determines how your cash forecast results will be computed and displayed.
Navigation:
This example illustrates the fields and controls on the Worksheet Definition page (1 of 2).
This example illustrates the fields and controls on the Worksheet Definition page (2 of 2).

Field or Control |
Description |
|---|---|
Print Worksheet |
Click this link to preview the worksheet definition and print the worksheet. The process generates Worksheet Definition Report (TRX5100). |
Copy Worksheet |
Click this link to open the Copy Worksheet page, where you can specify a new worksheet ID and create a copy of the active worksheet definition. |
Allow Manual Updates |
To enable locking, select the Allow Manual Updates check box. If a worksheet is locked, the value does not change if the cash forecast is recalculated. It stays as it is until it is unlocked. |
Variance Alerts Percents |
Set up threshold levels of variance between two source sets. You can choose to show a variance that’s acceptable as well as levels for displaying a warning or an alert. There are three alert statuses you can use to indicate variance levels on the Cash Forecast Results page. Enter a numerical value to trigger an alert status as follows:
|
Reporting Currencies |
Define at least one and up to three different currencies for the cash worksheet. You must specify one currency as the default. This will be your position currency. Reporting currencies will be one of the parameters you can use to display your cash forecasting results on the Cash Forecasting Results page. |
Position Source Sets |
Enter one or more categories for grouping position source data that you defined on the Position Source Set page. You must specify one position source set as the default. |
Carry Total Forward |
Select the check box for an individual source set to populate the total carried forward row for line items, when viewing by Time Set on the Cash Forecasting Results page. |
Forecast Rules |
(Optional) Choose one Amount rule and/or one date type rule (Date or Payment Method). You can associate a maximum of one amount rule and one date type rule per worksheet definition. Note: You cannot associate the Replacement rule with a worksheet definition. The Replacement rule must be associated with the source on the Worksheet Line Items page. |
Variance Definitions |
In order to define variance for comparisons, you must have more than one source set associated with the worksheet. You define variance levels in the Variance Alert Percents group box. The variance percent is always calculated as follows: Variance percent = (Variance
Amount/Source_set2)*100
The Cash Position Variance Report shows the variance amount and variance percent between source sets that are defined on the Worksheet Definition page. You must provide variance definitions on the worksheet template to generate variance results. |
Source Set 1, Source Set 2, and Description |
Enter source sets against which to calculate a variance between the two. You must also enter a description for each pair of source sets. |
See also documentation for the Worksheet Definition (Report) Page.
Use the Worksheet Line Items page (WORKSHEET_LINE_ITM) to define line items, position sources, and position source processing attributes for the worksheet.
Each line item determines the different types of cash information that you are going to see on your worksheet, such as supplier payments, receipts, collections, and treasury inflows. You can enter cash flow as well as non-cash flow line items, which you can select to display in your cash forecasting results on the Cash Forecasting Results page.
Navigation:
This example illustrates the fields and controls on the Worksheet Line Items page.
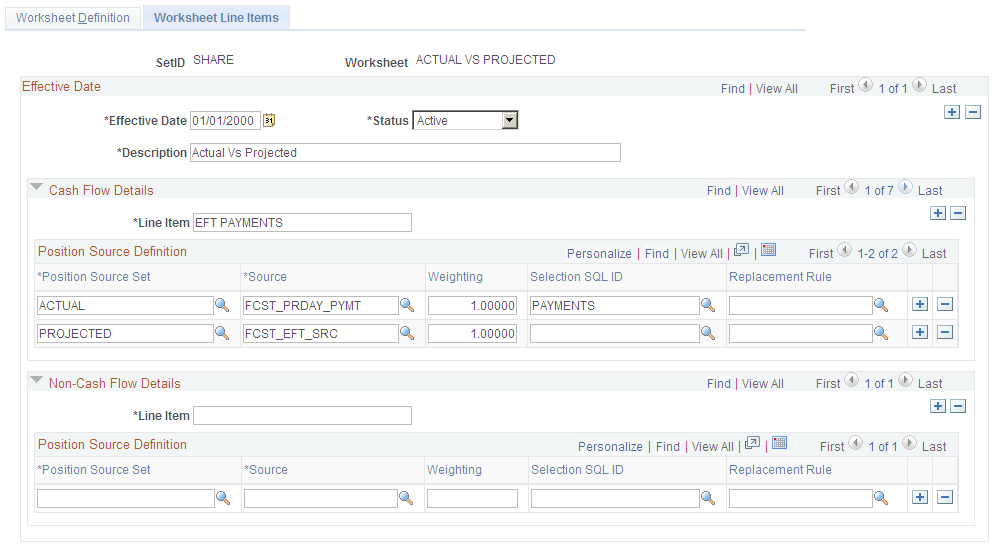
Note: You must set up at least one cash flow line item, with at least one source set and source, to create a valid worksheet. The non-cash flow line items are optional.
To display cash flow details, enter values In the Cash Flow Details section:
Field or Control |
Description |
|---|---|
Line Item |
Enter an item category that determines the characteristic of the line you want to show in your cash forecasting results. |
Position Source Set |
Enter a category for grouping position source data that you defined on the Position Source Set page. |
Source |
Identify a source record to be used in the search criteria. It will be part of the FROM statement of the SQL that will be generated to retrieve cash forecasting data. |
Weighting |
Enter a weighting value for the worksheet line items. You can add a weighting value to the cash forecast by defining a forecast rule weighting value on the Forecast Rules page and then applying the rule to the worksheet on the Worksheet Definition page. |
Selection SQL ID |
Enter an ID for the selection criteria for a source that you defined on the Selection Criteria page. |
Replacement Rule |
Enter a rule that you defined on the Forecast Rules page. |
To display non-cash flow details, enter values In the Non-Cash Flow Details section:
Field or Control |
Description |
|---|---|
Line Item |
Enter an item category that determines the characteristic of the line you want to show in your cash forecasting results. |
Position Source Set |
Enter a category for grouping position source data that you defined on the Position Source Set page. |
Source |
Identify a source record to be used in the search criteria. It will be part of the FROM statement of the SQL that will be generated to retrieve cash forecasting data. |
Weighting |
Enter a weighting value for the worksheet line items. You can add a weighting value to the cash forecast by defining a forecast rule weighting value on the Forecast Rules page and then applying the rule to the worksheet on the Worksheet Definition page. |
Selection SQL ID |
Enter an ID for the selection criteria for a source that you defined on the Selection Criteria page. |
Replacement Rule |
Enter a replacement rule that you defined on the Forecast Rules page. |