Importing Cash Forecast Data
This topic provides an overview of the cash forecast integration with external sources and discusses how to set up and import cash forecast data in the form of an XML message using Integration Broker, and import cash forecast data in the form of CSV or XML files.
|
Page Name |
Definition Name |
Usage |
|---|---|---|
|
FCST_IMPORT |
Configure the Cash Forecast Import Application Engine process (CSH_FCST_IMP) to manage various import methods for integrating external source data into the application tables. |
You can load third-party cash forecasting data into Cash Management by using the Cash Forecast Integration component functionality. The Cash Forecast Import Application Engine process (CSH_FCST_IMP) enables you to import source data in CSV or XML formats directly from a flat file in your system, or via a file transfer protocol (FTP) or HTTP. If you decide to import the cash forecasting source data by using FTP or HTTP, you must also set up the source data host with appropriate user and Integration Broker access settings.
This diagram shows the process of loading external source data into Cash Management:
Load data into the Cash Forecast Integration Staging table (CSH_FCST_INTG) using file-based import or message to Integration Broker
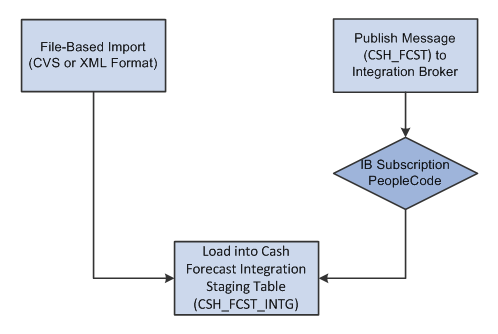
The system creates a new record (CSH_FCST_INTG) to store imported cash forecast data from external sources before loading into the application tables.
Prerequisites
If you decide to import the cash forecasting source data by using FTP or HTTP, you must also set up the source data node with appropriate user and Integration Broker access settings.
Note: For complete information on setting up Integration Broker and using service operations, see PeopleTools: Integration Broker and PeopleTools: Integration Broker Service Operations Monitor documentation for your PeopleTools release.
The cash forecast import service operation (CASH_FRCST) enables Cash Management to receive an incoming XML message with third-party cash forecast data, which is loaded into the cash forecast integration staging table (CSH_FCST_INTG).
PeopleSoft delivers service operations in PeopleSoft Integration Broker with a default status of Inactive. You must activate each service operation before attempting to send or receive data from a third-party source or another PeopleSoft system.
To set up this service operation, use the information in this table and refer to the integration scenarios in PeopleTools: Integration Broker.
|
Service Operation |
Description |
Direction and Type |
Handlers |
|---|---|---|---|
|
Cash Forecast Import (CASH_FRCST) |
Receives cash import data in the form of an XML message (CSH_FCST) from a third-party source. |
Inbound Asynchronous One-Way |
OnNotify |
To activate a service operation, complete the following steps in PeopleSoft Integration Broker:
Activate the service operation.
On the General tab of the Service Operations component, select the Active check box for the applicable service operation version. If the desired version is not the default version for the service operation, the default version must also be activated.
For asynchronous service operations only, verify the queue is running.
On the General tab of the Service Operations component, select the View Queue link at the bottom of the page. On the Queue Definitions page, verify the Queue Status field has a value of Run.
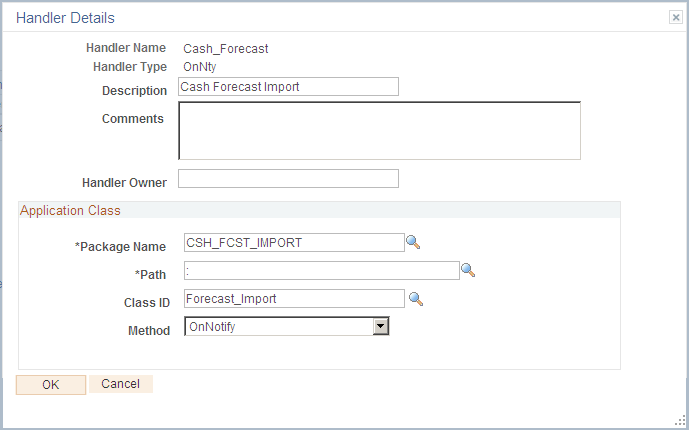
Activate the OnNotify service operation handler for Cash Forecast Import (CASH_FRCST).
Click the Detail link on the Handlers page (PeopleTools > Integration Broker > Integration Setup > Service Operations> Handlers) for the CASH_FRCST service operation to access the Handler Details page. Verify the following Application Class parameters:
Package Name = CSH_FCST_IMPORT
Path = :
Class ID = Forecast_Import
Method = OnNotify
This is an example of the Handler Details page (IB_SERVICEHDLR_SEC):
This example illustrates the fields and controls on the Handler Details page.
Activate an inbound routing to receive cash position import data into PeopleSoft Financial Gateway.
On the Routings tab of the Service Operations component, activate a routing definition for each node that will send or receive data. To activate a routing, select the check box next to the routing definition and click the Activate Selected Routings button.
Verify the node from the routing is active.
Go to the Node Definitions page and verify the Active Node check box has been selected for any sender or receiver nodes used in the routings that you activated on the Service Operations - Routings page.
Use the Import Cash Forecast Data page (FCST_IMPORT) to configure the Cash Forecast Import Application Engine process (CSH_FCST_IMP) to manage various import methods for integrating external source data into the application tables.
Navigation:
This example illustrates the fields and controls on the Import Cash Forecast Data page.
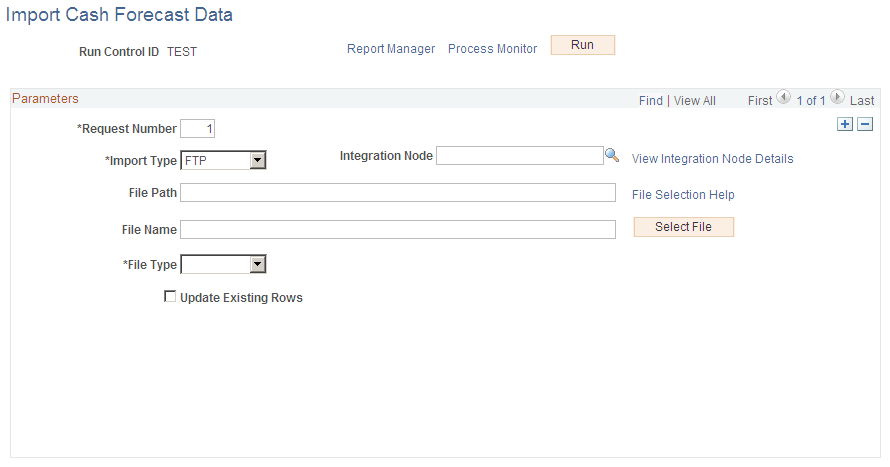
Before executing the Cash Forecast Import Application Engine process (CSH_FCST_IMP), check for data in CSH_FCST_INTG table. Navigate to Query Manager and search for the Query CSH_FCST_INTG. Click the Edit link to open the Query. Execute the Query in the Run tab.
On the run control page, click the Run button and select CSH_FCST_IMP process on the Process Scheduler Request page to load cash forecast data into the cash forecast integration (CSH_FCST_INTG) table.
Field or Control |
Description |
|---|---|
Request Number |
Enter a number or use the default autonumbering in the field. |
Import Type |
Choose from these options:
|
File Location |
Appears when using the File import type only. Displays the file location entered on the configuration page by a bank integration administrator. Users have access only to the folders below the base path displayed in the File Location field. For more information, see Managing Import File Locations. |
File Path |
Enter a file path according to the import type selected:
Note: Be sure that the application server and the Process Scheduler have access to the directory, FTP node, or HTTP node where the files are staged for import. |
File Selection Help |
Click to view help information (9450,1273) about specifying file paths and file names. |
File Name |
Enter a filename, including the file type extension. When you select a file using the Select File button, the filename appears in the File Name field. |
Select File |
Click this button to display all files and folders located in the specified file path when FTP or HTTP is selected as the import type. You must enter a file path to view the list of files. Click this button to open the File List dialog box, where you can select the file you want from the base path or child folders when File is selected as the import type. |
Integration Node |
Enter the bank node that was used to transfer the data. This field appears only if FTP or HTTP is selected as the import type. |
View Integration Node Details |
Click to access the Node Definitions page and review property details of the selected node. This link appears only if FTP or HTTP is selected as the import type. Note: Be sure that the application server and the Process Scheduler have access to the directory, FTP node, or HTTP node where the files are staged for import |
File Type |
Select CSV or XML. |
Update Existing Rows |
Select to override existing data while importing cash forecast data. If this check box is selected, the existing rows are updated or deleted. |