Setting Up Third-party Integrations
This topic discusses how to set up third-party integrations.
|
Page Name |
Definition Name |
Usage |
|---|---|---|
|
FO_VENDOR_SETUP |
Review the imported configuration. |
|
|
FO_MAP_SETUP |
Link an internal mapping element to a map name defined on the Application Integration Framework. This is used to define the specific map name that is being used by staffing for the integration. |
|
|
FO_MAP_VALUES |
Assign values for the selected map and domain name. |
|
|
FO_MAP_ERRORS |
Review mapping errors that occurred during resume load. |
Staffing Front Office enables you to set up integrations to third-party resume parsing and job board integration suppliers.
Resume parsing refers to stripping a resume of its formatting, resulting in basic and consistent data on an applicant's work history, skill sets, education, and so on. Once the data is parsed, it can be loaded into the database and into the appropriate fields for processing and searching.
There are two types of data mapping, dynamic and static. Dynamic data mapping is used when the XREF tables can change (add/update/delete) from time to time. Static data mapping is used when the codes used by the system are not changed a lot from time to time but still have different values used by candidates, such as gender. Static data mapping is covered in other documentation.
See Understanding Application Integration Framework Web Services
This topic breaks the steps to setting up resume parsing into these sections:
Configure Integration Broker.
Configure Enterprise Components.
Configure Supplier Integration Setup.
Configure Installation Options.
Configure Integration Broker
Set domain status to active using the Domain Status page (PeopleTools, Integration Broker, Service Operations Monitor, Administration, Domain Status).
Define the local gateway using the Gateways page (PeopleTools, Integration Broker, Configuration, Gateways).
Define gateway setup properties for advanced configuration using the PeopleSoft Node Configuration page (PeopleTools, Integration Broker, Configuration, Quick Configuration).
Add the proxy using the Gateway Properties page (PeopleTools, Integration Broker, Configuration, Quick Configuration). These settings depend on your environment.
Configure Enterprise Components
Define 11 maps using the Define Value Maps page (Enterprise Components, Integration Definitions, Transformation Framework, Define Value Maps).
See the product documentation for Understanding the Application Integration Framework
Configure Supplier Integration Setup
Assign the maps that are used by Staffing using the Mapping Setup Page (Set Up Financials/Supply Chain, Product Related, Staffing, Integration Suppliers, Mapping Setup ) and the Mapping Setup Values pages (Set Up Financials/Supply Chain, Product Related, Staffing, Integration Suppliers, Mapping Values).
Configure a Resume Parsing Supplier using the Supplier Setup Page (Setup Financials/Supply Chain, Product Related, Staffing, Integration Suppliers, Supplier Integration Setup).
Configure Installation Options
On the Installation Options - Staffing Installation Page (Set Up Financials/Supply Chain, Install, Installation Options) define the PeopleSoft Domain Name field, Candidate Registration field, After Update Status field, and Resume Parsing Provider section.
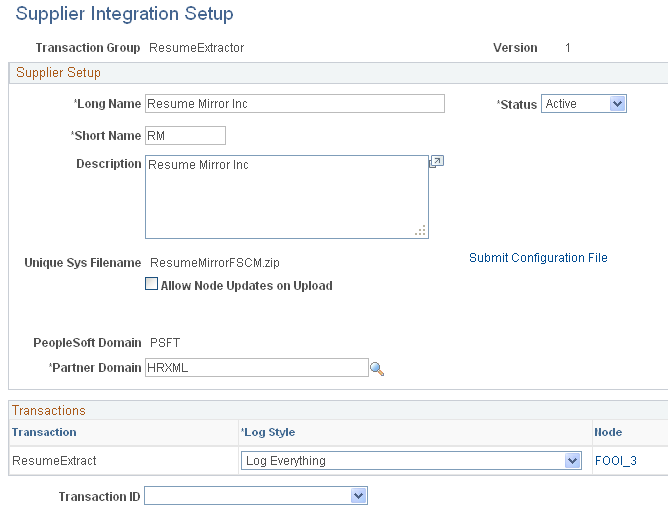
Use the Supplier Setup page (FO_VENDOR_SETUP) to review the imported configuration.
Navigation:
This example illustrates the fields and controls on the Supplier Integration Setup Page. You can find definitions for the fields and controls later on this page.
Field or Control |
Description |
|---|---|
Submit Configuration File |
This button appears when you add a new supplier. Every new supplier integration requires a zip file that includes these files:
|
Unique Sys Filename |
This is the name of the zip file that was submitted when the supplier was created. |
Submit File |
Allows the administrator to load a new supplier file. |
Allow Node Updates on Upload |
If there is a change on the supplier's configuration file, users can select this check box to allow node changes when reloading the config file. |
Partner Domain |
Defaulted from the map definitions created in the Application Integration Framework. |
Log Style |
Select to Log All transactions, Never Log the transactions, or log On Error only. |
Node |
Click to access the Node Definition page. |
Test |
This is a quick test interface to check if the integration is operational. The users can upload a resume document to execute a simple extraction test. |
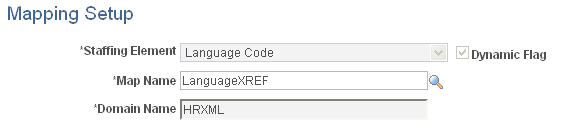
Use the Mapping Setup page (FO_MAP_SETUP) to link an internal mapping element to a map name defined on the Application Integration Framework.
This is used to define the specific map name that is being used by staffing for the integration.
Navigation:
This example illustrates the fields and controls on the Mapping Setup Values page. You can find definitions for the fields and controls later on this page.
Field or Control |
Description |
|---|---|
Staffing Element |
Select a staffing element. |
Dynamic Flag |
This check box is display only and is either selected or cleared depend upon the value selected in the system data. |
Map Name |
Select a map. The map definition must be must be previously defined on the Application Integration Framework using the same domain defined on the supplier Integration Configuration page. |
Domain Name |
Select the domain that was created in the Application Integration Framework. |
Use the Mapping Setup Values page (FO_MAP_VALUES) to assign values for the selected map and domain name.
Navigation:
This example illustrates the fields and controls on the Mapping Setup Values Page. You can find definitions for the fields and controls later on this page.
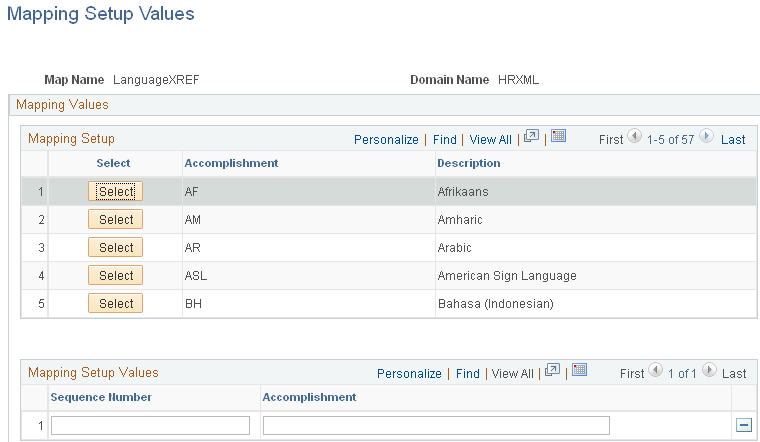
The field labels on this page vary depending upon the map name selected.
Field or Control |
Description |
|---|---|
Select |
Click this button to define the external value for the internal value. Then enter the external values in the Mapping Setup Values grid. If you have already defined the external values for the internal values, the Mapping Setup Values grid will populate with the external values when you click this button. |
Sequence Number |
Enter a unique number for each row. |