Maintaining Resource Profiles
The resource profile is a dynamic record designed for periodic review and update by the resource and resource manager to reflect changes in the resource's qualifications. You view or modify various parts of a resource's profile when you establish and maintain the resource.
This topic discusses how to maintain resource profiles.
|
Page Name |
Definition Name |
Usage |
|---|---|---|
|
RS_ERES_OVERVW |
View or modify a resource's objectives, areas of specialty, and additional resource information. |
|
|
RS_ERES_WORK_HIST |
View a resource's work experience information. |
|
|
Work Experience (edit) Page |
RS_WORK_HIST_EDIT |
Add or modify a resource's work experience entries. |
|
RS_ERES_COMP_ACOMP |
View or modify a resource's qualifications that are stored in the employee source database. |
|
|
RS_ERES_PREFS |
View or modify resource preference information. |
|
|
RS_ERES_GEN_INFO |
View or modify a resource's contact information, job, passports and visas, weekly work days, home airport, assignment restrictions, and flexible resource attribute values. |
|
|
Profiles - Secure Data 1 Page |
RS_SEC_DATA 1 |
Enables you to secure or unsecure data tabs based on the preference selected in the Installation options. |
|
Profiles - Secure Data 2 Page |
RS_SEC_DATA 2 |
Enables you to secure or unsecure data tabs based on the preference selected in the Installation options. |
|
RS_RES_PROF_RVW |
Review consolidated resource profile information in a resumé format. |
|
|
<Resource> Contact Information Page |
RS_RES_PROF_CONTCT |
Review a resource's address and telephone information. |
Use the Profiles – Secure Data 1 page (RS_SEC_DATA 1) to enable you to secure or unsecure data tabs based on the preference selected in the Installation options.
Navigation:
Click Secure Data 1 on any Resource Profile page.
Use the Profiles - Secure Data 2 page (RS_SEC_DATA 2) to enable you to secure or unsecure data tabs based on the preference selected in the Installation options.
Navigation:
Click Secure Data 2 on any Resource Profile page.
This example illustrates the fields and controls on the Profiles – Secure Data 1 and Secure Data 2 pages. You can find definitions for the fields and controls later on this page.
If a user has security access to a secure data tab, only that tab will be visible on the Maintain Resource Profile, Profile page. If they do not have access to any of the secure data tabs, then the tabs will not be visible on this page.
Note: If a field is placed on either secure data tab in the setup options, it is considered as a secure field. The position and headers/titles of these secure fields on their original tabs will remain the same. However, the actual data is replaced with the word SECURED. If a field is not placed on a secure data tab, then it will be visible throughout the tabs in their current place in the resource profile.
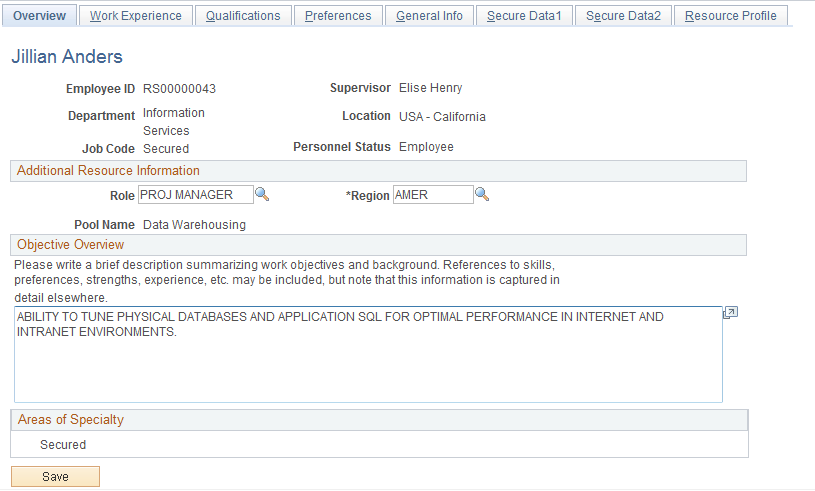
The information defined in the Resource Profile page is based on the secure profile data options set by the administrator. For example, if a particular field, such as job code, was selected as secured by the administrator, then you will not be able to view the job code. Instead, the text SECURED will appear for the particular field.
Use the Profiles - Overview page (RS_ERES_OVERVW) to view or modify a resource's objectives, areas of specialty, and additional resource information.
Navigation:
This example illustrates the fields and controls on the Profiles – Overview page. You can find definitions for the fields and controls later on this page.
Note: In the Overview tab, the Job code has been set to 'SECURED', as the job code field is placed on the secure data tab in the setup options. The position and headers/titles of the secure fields on their original tabs remain the same. If a field is not placed on a secure data tab, then it will be visible throughout the tabs in their current place on the resource profile. Similar functionality applies for all the other tabs in the Maintain Resource Profiles.
See Setting Up Cross-Application Installation Options.
Field or Control |
Description |
|---|---|
Additional Resource Information |
Enter the project role and region for the resource. This data is initially populated when the resource is established as a PeopleSoft Resource Management resource. You can update it on this page. The Pool Name field is not editable. To change the pool to which the resource belongs, the pool manager must transfer the resource from his or her current pool. |
Objective Overview |
Enter a summary of work objectives and background that a staffing coordinator can use when considering the resource for an assignment. |
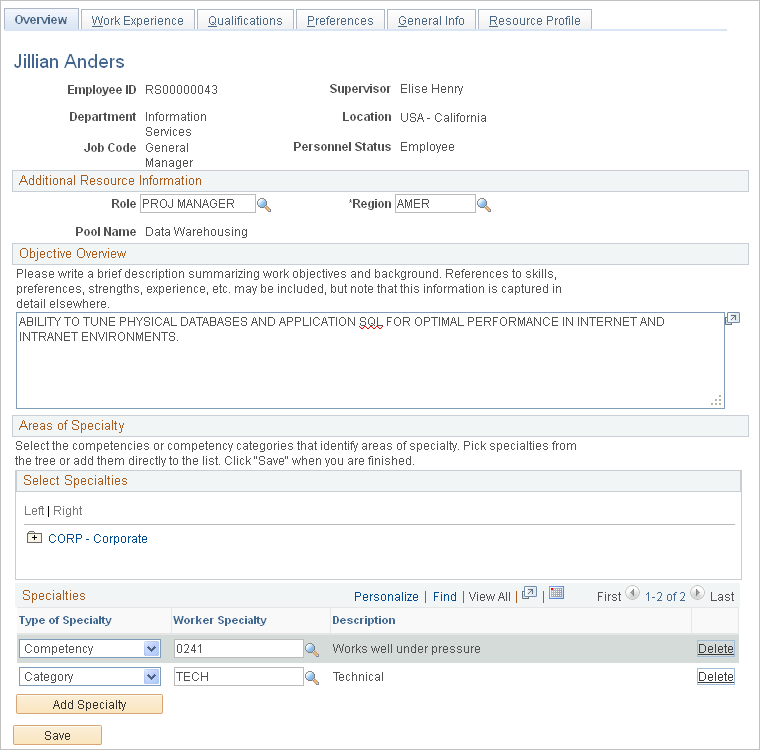
Select Specialties |
Enter specialties from the Competency tree that reflect relevant professional expertise. Specialties provide a means to highlight primary skills. Many resources have a long list of competencies ranging from technical to interpersonal skills; specialties; however, focus attention on core competencies. If you select a node from the tree, the specialty appears in the Specialties grid with the specialty type value Category. If you select a detail value, the specialty appears with the specialty type value Competency. Note: You can select specialties from the tree or click the Look up Worker Specialty icon. |
Type of Specialty |
Enter a type: Category: Select if the specialty represents a broad area of competency, such as managerial experience. Competency: Select if the specialty represents specific competencies that the resource possesses, such as strategic planning or project management experience. |
Worker Specialty |
Enter the individual competency or category of competency that the resource possesses. |
Delete |
Click to delete the competency or category from the resource profile. |
Add Specialty |
Click to add additional competencies or categories as specialties. |
Note: The Resource Matching process does not use the data that is captured for objective and areas of specialty. It is informational only.
Use the Profiles - Work Experience page (RS_ERES_WORK_HIST) to view a resource's work experience information.
Navigation:
Click Work Experience on any Resource Profile page.
This example illustrates the fields and controls on the Profiles - Work Experience page. You can find definitions for the fields and controls later on this page.
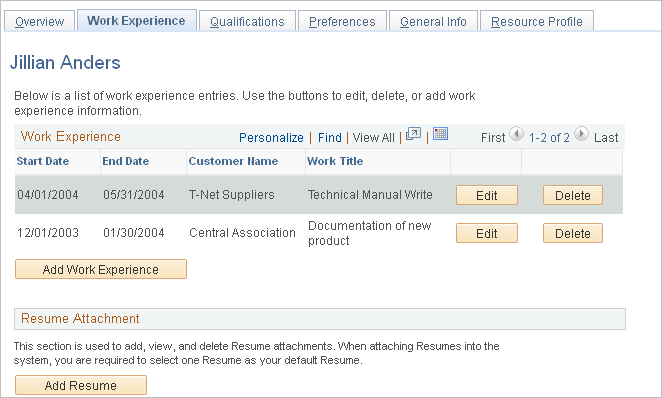
Note: Resource Matching uses the Work Description field on the Work Experience edit page to calculate Work Experience factor fit scores.
A resource's past, present, and future work assignments appear on the page. The system automatically adds a work experience entry to the page each time the resource placed on an assignment in the status Assigned or Pending Approval in PeopleSoft Resource Management. You can modify or enhance the entry for further clarity.
If a resource's assignment is canceled before the start date, the system automatically deletes the work experience entry from this page. If the assignment is canceled after the start date but before the assignment end date, the system automatically changes the work experience end date to the assignment cancellation date.
You can manually create work experience entries to record previous work experience that occurred at another company or before implementing PeopleSoft Resource Management.
Field or Control |
Description |
|---|---|
Start Date and End Date |
Displays past, current, or future assignment dates. |
Customer Name and Work Title |
Displays the customer and description for the assignment. |
Edit |
Click to access the Work Experience edit page to modify the work experience line. |
Add Work Experience |
Click to access the Work Experience edit page to enter new work experience information by adding any work information that is not initiated in PeopleSoft Resource Management. Work experience that you add here does not appear on the resource schedule; however, it is used by Resource Matching and can be reviewed by users who evaluate candidates. |
Resume Attachment
Click Add Resume to add a resumé attachment.
Field or Control |
Description |
|---|---|
File Name |
Click the link to open the resumé document attachment for the resource. |
Browse |
Click to browse through directories and locate the appropriate resumé document. Highlight the document and click Open to populate the attachment box with the document directory path. |
Upload |
Click to upload the selected document to the resource profile. |
Default |
Designates the default resumé document. If multiple resumé documents are available, specify the default for use by Resource Matching. |
Delete |
Click to remove the resumé document attachment from the resource profile. |
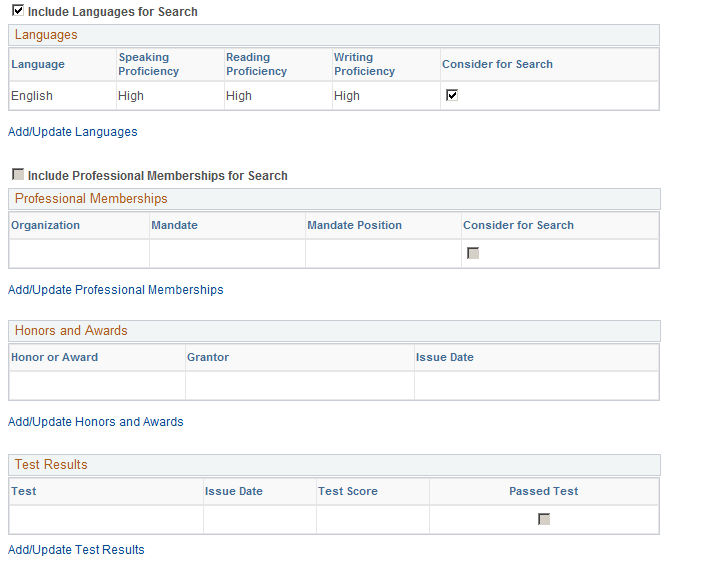
Use the Profiles - Qualifications page (RS_ERES_COMP_ACOMP) to view or modify a resource's qualifications that are stored in the employee source database. The check boxes at the top of each of the group boxes enable you to choose which of the resource’s competencies or accomplishments must be considered when a search is made for matching service orders in the Manage Utilization page. If you choose not to consider any competencies or accomplishments, clear the Include <Competencies or Accomplishments> for Search check box displayed at the top of each of the group boxes on the Profiles - Qualifications page.
Note: If you want to include specific competencies or accomplishments in the search, select the check boxes inside the group box and also the check box at the top of the group box. If the check box at the top of group box is not selected, the specific competencies and accomplishments that you selected will not be considered to be included in the search.
Navigation:
Click Qualifications on any Resource Profile page.
This example illustrates the fields and controls on the Profiles - Qualifications page (1 of 2).
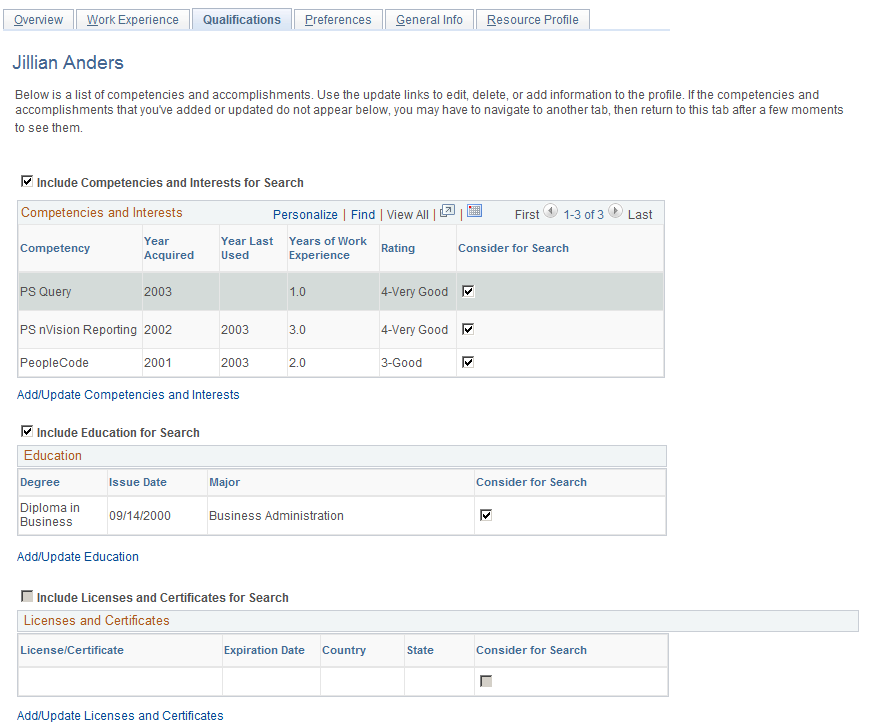
This example illustrates the fields and controls on the Profiles - Qualifications page (2 of 2).
Updating Qualification Information in PeopleSoft HCM
If PeopleSoft HCM is the employee source database, click the Add/Update link in a qualification region to access PeopleSoft HCM by using the Single Signon feature. There, you can make modifications, save your changes, and then return to the resource profile in PeopleSoft Resource Management.
Updating Qualification Information in PeopleSoft Resource Management
If the Financials database is the employee source database, click an Add/Update link to access the PeopleSoft Resource Management pages that you use to modify resource qualifications. This topic is discussed in more detail elsewhere in this topic.
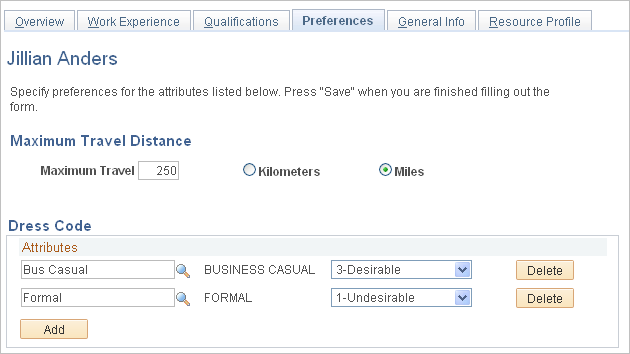
Use the Profiles - Preferences page (RS_ERES_PREFS) to view or modify resource preference information.
Navigation:
Click Preferences on any Resource Profile page.
This example illustrates the fields and controls on the Profiles - Preferences page. You can find definitions for the fields and controls later on this page.
Field or Control |
Description |
|---|---|
Maximum Travel, Kilometers, and Miles |
Enter the distance that the resource prefers not to exceed when traveling to an assignment, and select the unit of measure. Maximum travel distance is for information only. It is not used by Resource Matching or any other PeopleSoft Resource Management processes. |
If the organization establishes a flexible preference attribute, it appears on this page for the resource to specify values and preference levels. For example, if there is a flexible preference attribute called Work Region, the resource can specify a level of desire to work in each of the various regions.
Field or Control |
Description |
|---|---|
<Flexible Preference Attribute> |
Enter values that represent preferences for each attribute and enter the preference levels. Note: The preference level values are defined on the interest rating model (INT) during implementation. The Resource Matching process uses the INT values to calculate the Flexible Preference factor. An administrator can modify the INT values as required. If you integrate with PeopleSoft HCM, rating models are maintained in the HCM database. If you use the Financials database as the employee source database, rating models are maintained in PeopleSoft Resource Management. |
Add |
Click this button to add flexible preference attribute values. |
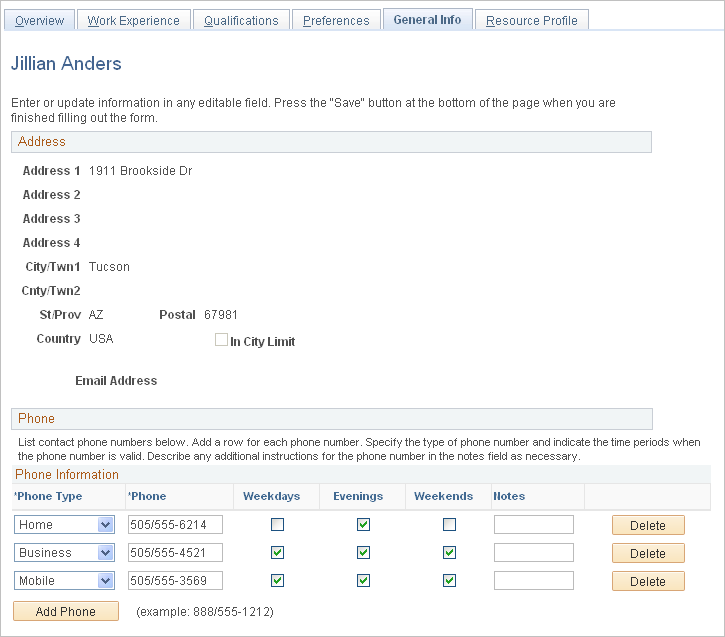
Use the Profiles - General Info page (RS_ERES_GEN_INFO) to view or modify a resource's contact information, job, passports and visas, weekly work days, home airport, assignment restrictions, and flexible resource attribute values.
Navigation:
Click General Info on any Resource Profile page.
This example illustrates the fields and controls on the Profiles - General Info page (1 of 2). You can find definitions for the fields and controls later on this page.
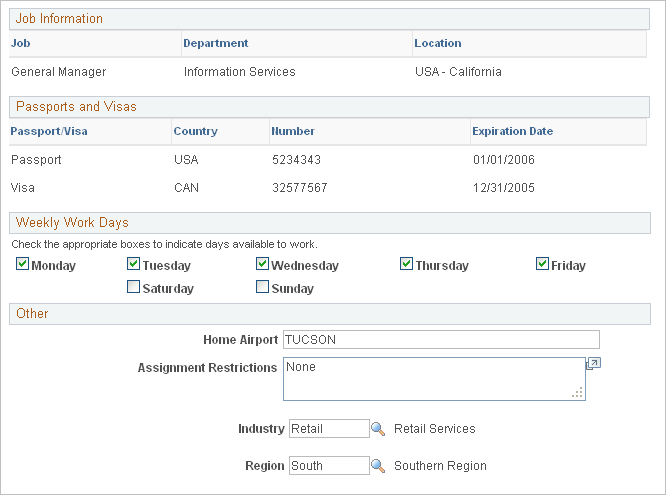
This example illustrates the fields and controls on the Profiles - General Info page (2 of 2). You can find definitions for the fields and controls later on this page.
You cannot modify address, job information, or passport and visa information on this page; you must update this information in the employee source database tables. For example, if the Financials database is the employee source database, you can update this information using the Personal Data component (RS_CM_PERSONAL).
Address
View the resource's street address, city, town, county, province, state, postal zip code, and country. Additionally, view the email address for the primary email account of the user ID that is associated with this resource. The email address is used when the system notifies the resource of date or status changes on assignments.
Phone
Enter a phone number, the type of phone number entered, and the days of the week that the resource can be reached at that number.
Job Information
Review the job title, department, and location with which the resource is affiliated, as defined in the employee's Job record. If the resource has multiple jobs, the job that is specified for use in PeopleSoft Resource Management appears.
Passports and Visas
Review passports or visas held by the resource as defined in the employee source database.
Weekly Work Days
Select the appropriate check boxes to indicate the days of the week that the resource is available to work.
Weekly work days are used to determine a resource's available work days for assignments and appointments. The resource schedule uses shading to indicate the work days that are not available.
Other
Field or Control |
Description |
|---|---|
Home Airport |
Enter the name of the preferred home airport (for information only). |
Assignment Restrictions |
Enter any special restrictions or requirements, such as wheel chair access (for information only). |
If the organization established a flexible resource attribute, either for use as a flexible qualification factor or for information only, it appears on this page. For example, if there is a flexible attribute called Industry, you can specify the industry expertise.
Field or Control |
Description |
|---|---|
<Flexible Resource Attribute> |
Enter or look up the appropriate value for each attribute. |
Add |
Click to add flexible attribute values, if the attribute allows multiple values. |
Use the Profiles - Resource Profile page (RS_RES_PROF_RVW) to review consolidated resource profile information in a resumé format.
Navigation:
Click Resource Profile on any Resource Profile page.
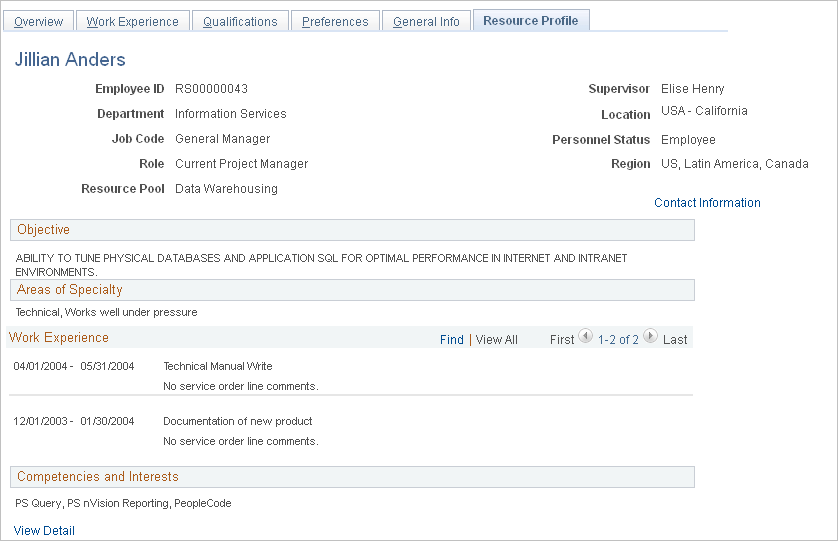
This example illustrates the fields and controls on the Profiles – Resource Profile Page (1 of 2). You can find definitions for the fields and controls later on this page.
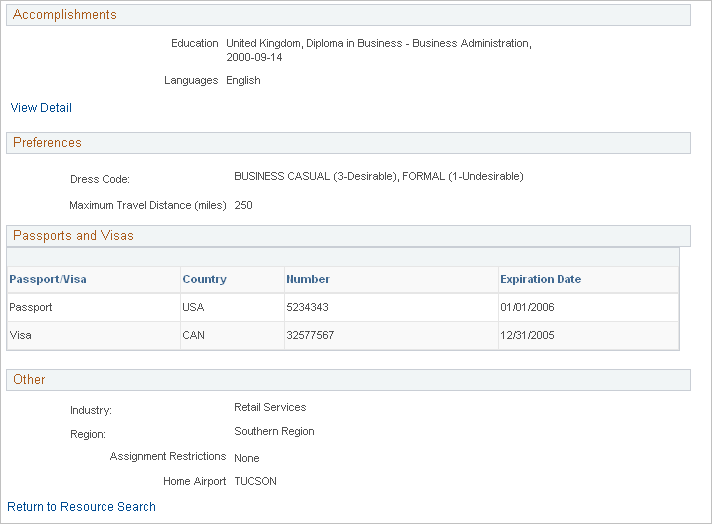
This example illustrates the fields and controls on the Profiles – Resource Profile Page (2 of 2). You can find definitions for the fields and controls later on this page.
This example illustrates the fields and controls on the Profiles – Resource Profiles Contact Information. You can find definitions for the fields and controls later on this page.

This page consolidates the resource profile sections into a single, display-only format. A group box appears on this page if the following two conditions are true:
It is selected during implementation to appear on the Resource Profile display-only summary page.
It contains data for the resource.
Field or Control |
Description |
|---|---|
Contact Information |
Click to access the <Resource> - Contact Information page to review the resource's city, state, country, and telephone information from the Profiles - General Info page. |
View Detail and View Summary |
Click View Detail in the Competencies and Interests or Accomplishments group boxes to view the qualification details. Click View Summary to return to the summary view. |
On installation, the administrator selects which items are to appear on the Resource Profile tab and also the resource-view only page in the Profile Display Options group box in the installation options. The six potentially secure fields on the Resource Profile tab are Job Code, Home Phone Number, Mobile Phone Number, City, Areas of Specialty, and Passport and Visa Numbers.
If one of the items chosen for the Resource Profile tab (and also the resource-view only page) is also a secure data field and if the user does not have access to this secure data field, then the header for this field will still be shown on the Resource Profile tab, but the actual data will be replaced with the word SECURED. If the user has security access to a secure data tab that has a data field enabled, then they will be able to see this field on the Resource Profile tab and also on the Resource-view only page.
If the field has not been assigned to either Secure Data 1 tab or Secure Data 2 tab, it is not considered a secure field and, therefore, would be visible on this tab and on the resource-view only page.
If they are viewing their own profile, then they should be able to see all fields on the Resource Profile tab and on the Resource-view only page.
When updating their own data at Resource Management, Maintain Resource Profiles, My Profile, the system disregards all secure data rules. There are no secure data tabs. The user can update and view their information exactly as they currently can with the fields in their current positions on the tabs.