Managing Pool Resources
This topic discusses how to manage pool resources.
|
Page Name |
Definition Name |
Usage |
|---|---|---|
|
RS_POOL_MEMBER |
View the resource information for the selected pool. |
|
|
RS_MBR_DETAILS |
View pool resource details and modify membership dates. |
|
|
RS_ADD_NAMED |
Add named resources to the pool. |
|
|
RS_ADD_GENERIC |
Add generic resources to the pool. |
|
|
RS_TRANSF_MBR |
Transfer named resources from one resource pool to another. |
|
|
RS_MODIFY_TRANSF |
Modify a pending resource transfer. |
|
|
Manage Pool Resources - Delete Confirmation Page |
EO_DEL_CONFIRM |
Remove a resource from the pool and confirm the deletion. |
|
Resource Pool History Page |
RS_POOL_HISTORY |
View the pool history for a particular pool. |
|
Supply Category Analytics Page |
RS_OCP_POOL_SELECT |
View the Supply Category Analytics for a particular pool. |
|
Transfer Assignments Page |
RS_TRNSFR_ASSGNMNT |
Transfer assignments from one resource to another in a particular pool. |
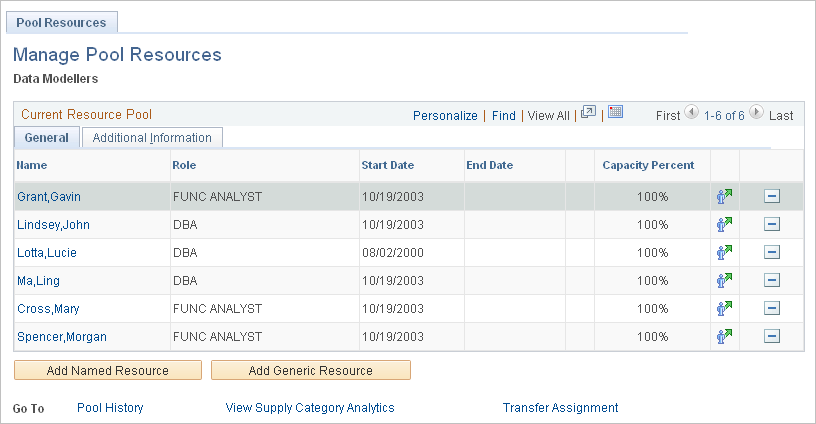
Use the Pool Resources - Manage Pool Resources page (RS_POOL_MEMBER) to view the resource information for the selected pool.
Navigation:
This example illustrates the fields and controls on the Pool Resources - Manage Pool Resources page. You can find definitions for the fields and controls later on this page.
Field or Control |
Description |
|---|---|
Name |
Click a name link to access the Pool Resource Detail page and view the resource's role, region, and personnel status, add comments, and change pool membership dates and capacity percent. |
Start Date and End Date |
Displays the range of dates in which the resource belongs to the pool. If the resource belongs to the pool for multiple date ranges, the earliest start date and the latest end date appear. Date ranges that are in the past do not appear on this page. You can view historical information on the Resource Pool History page. |
|
The Multiple Membership Dates icon appears next to a date range if the resource has multiple future date rows for the resource pool. |
Capacity Percent |
Displays the resource's availability percentage from a capacity planning perspective. For example, if the resource is a full-time worker, the percentage is 100%. If the resource only works half of the standard work week, the capacity percentage is 50%. You can also use this field to represent a resource who works full-time but whose time is only half allocated to project work that is considered for capacity planning. In this case the capacity is 50%. The percentage that appears is based on the active capacity percent for the current day that is specified on the Pool Resource Detail page for the resource. |
|
Click the Transfer Resources icon to transfer the resource to another pool. |
|
Click the Delete icon to delete the resource and the resource's history from the pool. Examples of when you might want to delete a generic resource from a pool are if the resource was created in error, if the manager's headcount was removed, or if you found a named resource to replace the generic resource. Deleting a generic resource from a pool also deletes all of the resource's history. Delete named resource only if the resource was added in error; otherwise, transfer the resource. If the named resource has been in the pool multiple times, deleting the resource removes only the resource's most current assignment entry, not the entire history. When you delete named resources from a pool, the system automatically adds them to the Unassigned Pool because each resource must belong to a pool in the system. |
Add Named Resource |
Click to access the Add Named Resource page and add a named resource to the pool. |
Add Generic Resource |
Click to access the Add Generic Resource page and add a generic resource to the pool. |
Pool History |
Click to access the Resource Pool History page to view pool history details. Note: Current resource assignments do not appear on the Resource Pool History page. |
View Supply Category Analytics |
Click to access the Supply Category Analytic parameters page to select pools and specify search options for the system to use to calculate supply category analytics. |
Transfer Assignment |
Click to access the Transfer Assignments page to view and transfer, in bulk, future-dated project and activity assignments. This is useful when pool managers know that they are transferring a resource from their pool and need to reassign any future work that is assigned to the resource. |


Use the Pool Resource Detail page (RS_MBR_DETAILS) to view pool resource details and modify membership dates.
Navigation:
Click a link in the Name column on the Pool Resources - Manage Pool Resources page.
This example illustrates the fields and controls on the Pool Resource Detail page. You can find definitions for the fields and controls later on this page.
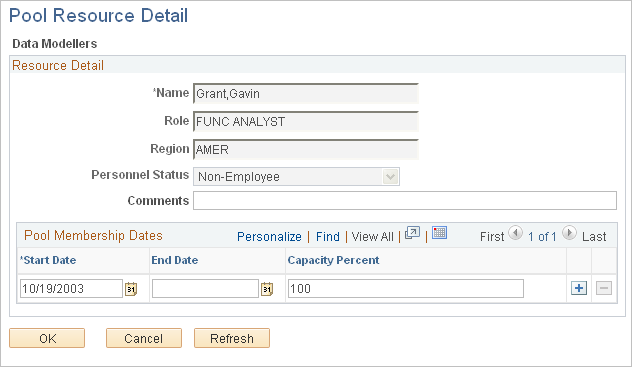
Pool Membership Dates
Any date periods with an end date that is greater than the current date appear in this grid. You can add different date ranges with different capacity percentages for the same resource.
Field or Control |
Description |
|---|---|
Start Date, End Date, and Capacity Percent |
Enter the specific additional start and end dates for a resource to have multiple date ranges in the same resource pool. Date ranges cannot overlap in the grid and must not overlap with dates for that resource in any other pool besides the Unassigned Pool. After you specify multiple date ranges for a resource, the earliest start date and latest end date appear on the Pool Resources - Manage Pool Resources page. The capacity percent that appears on the Pool Resources - Manage Pool Resources page is current for today's date. |
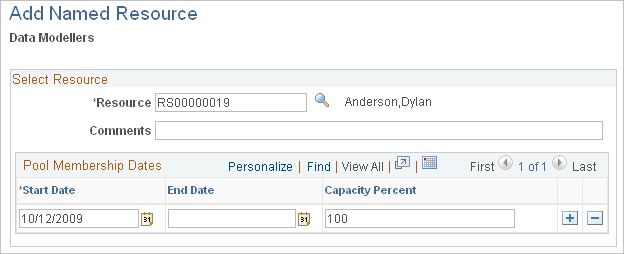
Use the Add Named Resource page (RS_ADD_NAMED) to add named resources to the pool.
Navigation:
Click the Add Named Resource button on the Pool Resources - Manage Pool Resources page.
This example illustrates the fields and controls on the Add Named Resource page. You can find definitions for the fields and controls later on this page.
Field or Control |
Description |
|---|---|
Resource |
Click the Lookup Employee icon to search for a resource from the Unassigned pool. When you add named resources to the pool with this method, you can only select resources that are currently belong to the Unassigned pool. |
Comments |
Enter additional comments to describe the resource. |
Start Date |
Enter the start date of the resource for this pool. This field is required. The start date must be greater than or equal to the start date of the resource in the Unassigned pool and less than or equal to the end date of the resource in the Unassigned pool. |
End Date |
Enter the end date of the resource for this pool. This field is optional because upon hiring the resource, you may not know when the resource is going to leave the pool. If the resource is part of another pool in the future, the end date on this pool cannot overlap the resource's pool assignment in another pool. |
Capacity Percent |
Enter a percentage for the resource. This value represents the availability of the resource from a capacity planning perspective. For example, if the resource is a full-time worker, enter 100 for 100 percent. If the resource works only half of the standard work week, enter 50 for 50 percent. This field is required. The value must be greater than or equal to 0 and less than or equal to 100. |
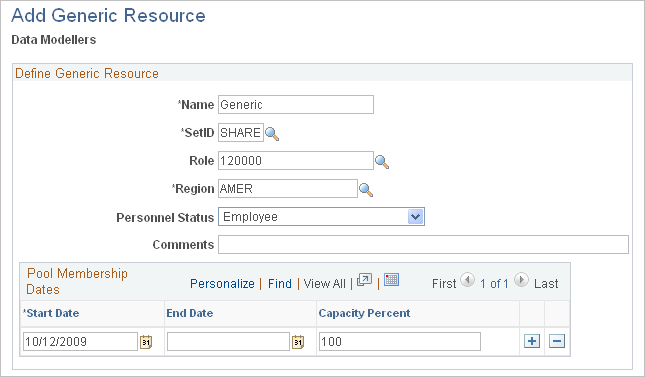
Use the Add Generic Resource page (RS_ADD_GENERIC) to add generic resources to the pool.
Navigation:
Click the Add Generic Resource button on the Pool Resources - Manage Pool Resources page.
This example illustrates the fields and controls on the Add Generic Resource page. You can find definitions for the fields and controls later on this page.
Field or Control |
Description |
|---|---|
Name |
Enter a descriptive name of the resource that you plan to hire, such as Generic Developer, that will help you distinguish this resource from others in the list. |
SetID and Role |
Enter the appropriate SetID and role from the Project Role table (PROJ_ROLE). This value is the resource's role for that particular pool, such as Staff Developer. Although resources can have multiple roles in an organization based on the project, the value in this Role field is the primary role and is used for capacity planning. |
Region |
Enter the region in which the resource is needed. Available values are from the Region Code table (REGION_CD) for the PeopleSoft Resource Management region category ID. |
Personnel Status |
Select Employee or Non-Empl (non-employee, such as a contractor) to designate the personnel type of the generic resource. |
Pool Membership Dates |
Enter the dates and capacity percent in this grid for the generic resource. |
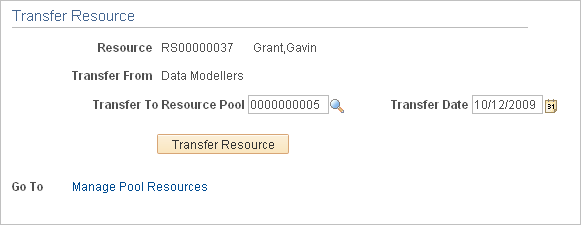
Use the Transfer Resource page (RS_TRANSF_MBR) to transfer named resources from one resource pool to another.
Navigation:
Click the Transfer Resources icon on the Pool Resources - Manage Pool Resources page.
This example illustrates the fields and controls on the Transfer Resource page. You can find definitions for the fields and controls later on this page.
Field or Control |
Description |
|---|---|
Resource |
Displays the resource ID and resource name from the row in which you clicked the Transfer Resource icon on the Pool Resources - Manage Pool Resources page. |
Transfer From |
Displays the pool from which you navigated on the Pool Resources - Manage Pool Resources page. |
Transfer To Resource Pool |
Enter the resource pool to which you want to transfer the corresponding resource. You can select any active pool, including the Unassigned Pool. You can only select one pool. If you select the pool to which the resource currently belongs, an error message appears when you confirm the transfer. |
Transfer Date |
Enter the effective date of this transfer. You can enter any calendar date that is on or after the current date. Note: The transfer date is the start date of the resource in the transfer-to pool. The transfer-from pool is populated with the end date, which is the first calendar day preceding the transfer date. Note: You cannot enter a past date as the transfer date. |
Transfer Resource |
Click to complete the transfer resource process. The system checks to see if any pending Assignment Approval or Assignment Date Change workflow exists. If pending workflows exist, a warning message appears asking if you want to cancel the resource's pending Assignment Approval or Assignment Date Change workflow. Click Yes for the transfer process to cancel the pending (incomplete) workflow. Click No to cancel the transfer process and return to the Transfer Resource page. Oracle recommends that users manually resolve all outstanding assignment workflow before transferring a resource so they will know the potential resource assignments and date changes for the resource. |
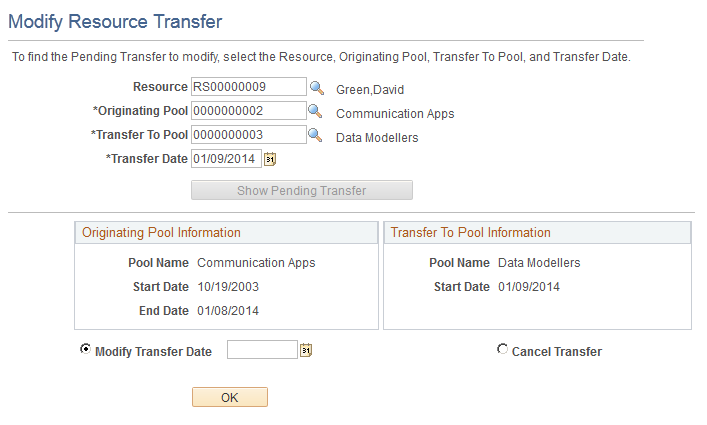
Use the Modify Resource Transfer page (RS_MODIFY_TRANSF) to modify a pending resource transfer.
Navigation:
This example illustrates the fields and controls on the Modify Resource Transfer page. You can find definitions for the fields and controls later on this page.
Field or Control |
Description |
|---|---|
Resource |
Enter the employee ID of the resource with the pending transfer. |
Originating Pool |
Enter the resource pool name from which this resource is scheduled for transfer. |
Transfer To Pool |
Enter the resource pool name to which this resource is scheduled for transfer. |
Transfer Date |
Enter the resource's original transfer date that you want to modify. |
Show Pending Transfer |
Click to view the Originating Pool Information, Transfer to Pool Information, and action buttons. |
Modify Transfer Date |
Select to modify the transfer date; enter the new transfer date. |
Cancel Transfer |
Select to cancel the transfer. |
OK |
Click to perform the action of modifying the transfer date or canceling the transfer. |