Entering and Managing Direct Debit Mandates
This topic discusses how to work with direct debit mandates, including entering, updating, approving, canceling, and printing direct debit mandates.
|
Page Name |
Definition Name |
Usage |
|---|---|---|
|
Maintain Mandate Sequence Number Page |
PMT_SEQ_NUM_SEC |
Identify the sequence type (mandate ID and reference number), beginning sequence number, maximum length and last auto-assigned number to apply to a mandate form. See the Maintain Mandate Sequence Number Page for more information. |
|
RUN_PRT_MANDATE |
Print the mandate paper form that must be completed by a debtor for a creditor. |
|
|
PMT_MANDATE_DTL |
Enter and update direct debit mandate information. |
|
|
PMT_MANDATE_DTL |
Enter and update direct debit mandate information for customers. |
|
|
Mandate Attachments Page |
PMT_MAN_ATTACH_SEC |
Add attachments to a direct debit mandate. See the Direct Debit Mandate for Counterparties Page for more information. |
|
PMT_APPR_MANDATE |
Approve direct debit mandates. |
|
|
PMT_CAN_MANDATE |
Cancel individual direct debit mandates. |
|
|
PMT_CANCEL_MANDATE |
Cancel unused mandates. |
Use the Print Direct Debit Mandate Form page (RUN_PRT_MANDATE) to print the mandate paper form that must be completed by a debtor for a creditor.
Navigation:
This example illustrates the fields and controls on the Print Direct Debit Mandate Form page. You can find definitions for the fields and controls later on this page.
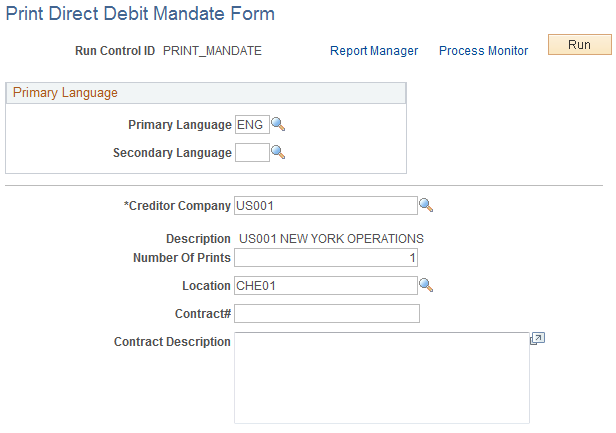
You can print a blank mandate form to send to the creditor to complete.
Field or Control |
Description |
|---|---|
Creditor Company |
Select the company that issues the mandate to the debtor to complete. The creditor must provide a pre-numbered SEPA direct debit mandate either in a paper form or the pre-numbered blank form can be sent electronically to the debtor to complete. The creditor prints the SEPA Direct Debit Mandates on a paper form with a pre-numbered mandate reference number. The system stores the last number used and automatically generates the next number. |
Note: Not all output types are supported for printing the form. Only the PDF output format is supported. On the Process Scheduler Request page, select PDF to print mandate forms.
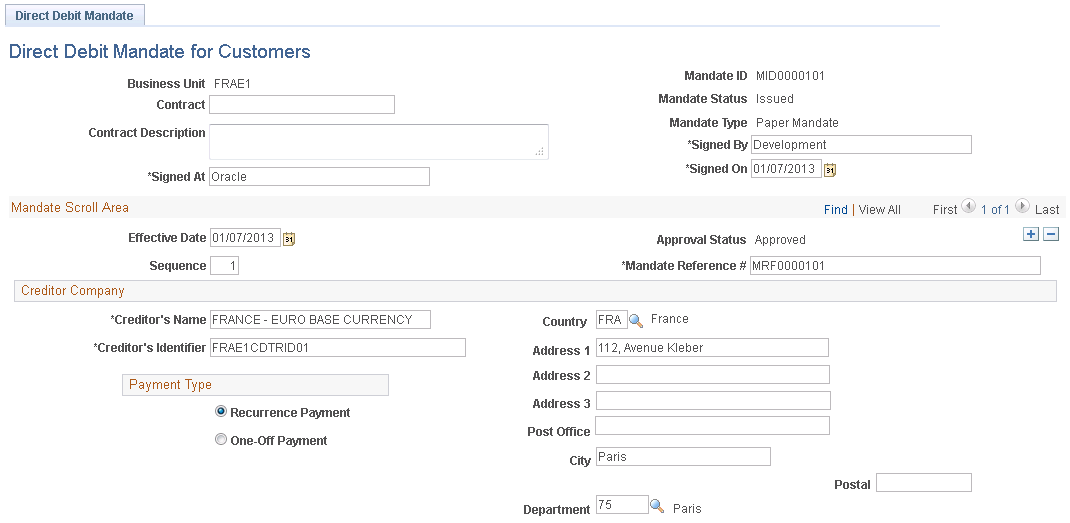
Use the Direct Debit Mandate for Counterparties page (PMT_MANDATE_DTL) to enter and update direct debit mandate information.
Navigation:
This example illustrates the fields and controls on the Direct Debit Mandate for Counterparties page (1 of 2).

This example illustrates the fields and controls on the Direct Debit Mandate for Counterparties page (2 of 2).
Field or Control |
Description |
|---|---|
Mandate ID |
When you add a mandate and select a business unit, the next mandate ID is automatically generated based on the General Ledger business unit applied to this mandate. The Mandate ID appears on the form when the form is created or printed. This ID is used to track the mandate in the system and is automatically sequenced each time the mandate is modified or changed. |
Contract and Contract Description |
Enter the contract number associated with this mandate. |
Mandate Status |
Default value when you add a new mandate to the system is Issued. This is a read-only field. If you cancel this mandate, this value changes to Cancelled. |
Mandate Type |
Default read-only value is Paper. |
Signed By |
Enter the name of the debtor who signed this direct debit mandate. This is a required field. |
Signed At |
Enter the city or town in which the creditor signed this direct debit mandate. This is a required field. |
Signed On |
Select the date on which this direct debit mandate form was signed. This is a required field. |
Mandate Scroll Area
Field or Control |
Description |
|---|---|
Effective Date |
Select the date from which the information entered on this mandate is effective. |
Approval Status |
The default value for a new mandate is Pending For Approval. This is a read-only field. Once the mandate is approved, this value changes to Approved. |
Sequence |
The default value of a new mandate is 1. Change this sequence number if you have added more than one mandate for a the same effective date. |
Mandate Reference # (mandate reference number) |
Enter the reference number provided on the mandate paper form signed by debtor. This is a required field. |
Creditor Company
This section identifies the name and location of the creditor involved in the SEPA direct debit transaction.
Field or Control |
Description |
|---|---|
Creditor's Name |
This name is derived from the business unit that you selected for this mandate. It is a read-only field. |
Creditor's Identifier |
The default value for this field is derived from the value that you entered on the GL Business Unit ID Numbers page. This value consists of :
This is a read-only field. Important! Make sure that the number that you enter for this field in the business unit is correct, because the system does not verify the accuracy of the number. |
Payment Type |
Select one of these payment types:
|
Country |
Select the country code that represents the country in which this creditor is located. |
Address 1, Address 2, Address 3, City, County, State, and Postal |
Enter the address information for this creditor. |
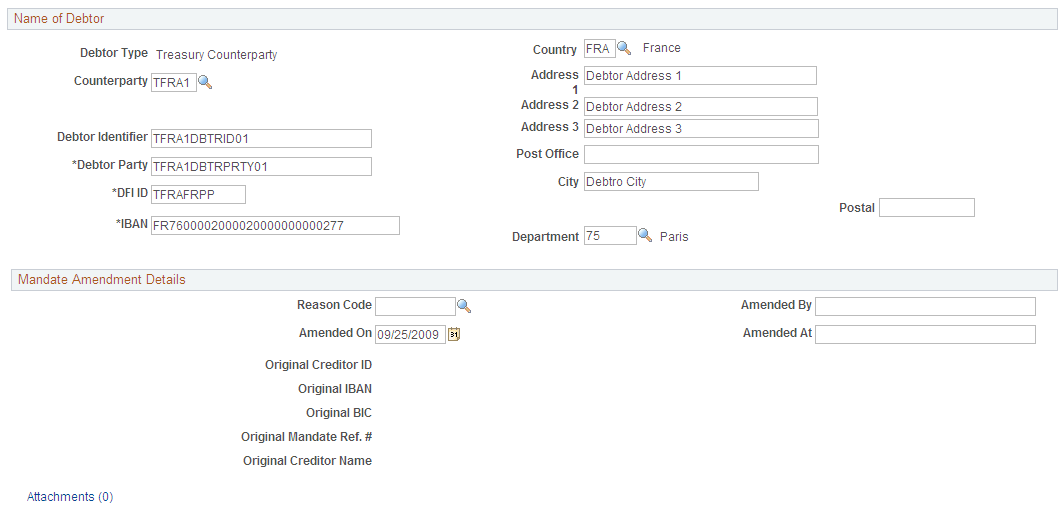
Name of Debtor
This section identifies the name and location of the debtor involved in the SEPA direct debt transaction. In this case the debtor is a Treasury counterparty.
Field or Control |
Description |
|---|---|
Debtor Type |
Default value is Treasury Counterparty, which is read-only. You must set up a counterparty before you can enter mandate information. |
Counterparty |
Select the associated counterparty. |
Debtor's Identifier |
Enter the identifier associated with this debtor. For business users, enter any code in this field that you want to have quoted by your bank. |
Debtor Party |
Enter the name of the party that owes an amount of money to the creditor. This can be the debtor or identify a party on whose behalf the debtor proposes to make the payment. This is a required field. |
DFI ID (depository financial institution identification) |
Enter the DFI ID (BIC) code for this debtor. All of the SWIFT validations for BIC are executed upon entering this code. This is a required field for SEPA direct debits. |
IBAN (International Bank Identifier Number) |
Enter the IBAN for this debtor in the IBAN field. This is a required field for SEPA direct debits. See SEPA Glossary. |
Attachments |
Click the attachment link to access the Mandate Attachments page where you can click the Add Attachments button to add documents to this form. This feature is primarily used to enable the creditor to attach a scanned image of the Direct Debit Mandate paper form to the online mandate. See Installation Options - Multiple Attachments Page to define the maximum attachment upload limit for various products. |
Save |
Click to save the page. |
Use the Direct Debit Mandate for Customers page (PMT_MANDATE_DTL) to enter and update direct debit mandate information for customers.
Navigation:
See Direct Debit Mandate for Counterparties Page.
This example illustrates the fields and controls on the Direct Debit Mandate for Customers page (1 of 2).
This example illustrates the fields and controls on the Direct Debit Mandate for Customers page (2 of 2). You can find definitions for the fields and controls later on this page.
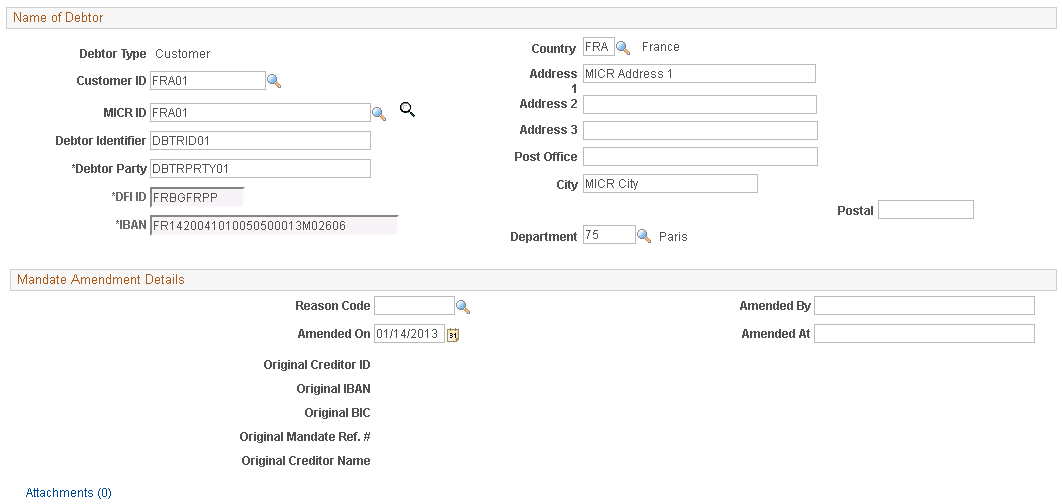
Most of the fields that appear on the Direct Debit Mandate for Customers page are identical to the fields on the Direct Debit for Mandate for Counterparties page with these exceptions:
Name of Debtor
Field or Control |
Description |
|---|---|
Debtor Type |
Displays Customer as the read-only default value. |
Customer ID |
Select the customer ID for this debtor. |
MICR ID (magnetic ink character recognition) |
Select the MICR ID for this debtor customer or search for and enter a new MICR ID for this customer. You must enter a MICR ID for this customer so that the DFI ID and IBAN values will display on the page. |
Debtor Party |
Enter the debtor party. This is a required field. This is the name of the party that owes an amount of money to the creditor. This can be the debtor or identify a party on whose behalf the debtor proposes to make the payment. |
DFI ID (depository financial institution identification) and IBAN (International Bank Identifier Number) |
Displays the DFI ID and IBAN values based on the values entered for the MICR ID associated with this customer (debtor). This fields are read-only and are not available for entry for a customer. |
Use the Mandate Amendment Details section of the Direct Debit Mandate for Customers (or Counterparties) page to amend an approved or pending approval mandate form.
This example illustrates the Mandate Amendment Details on the Direct Debit Mandate page.
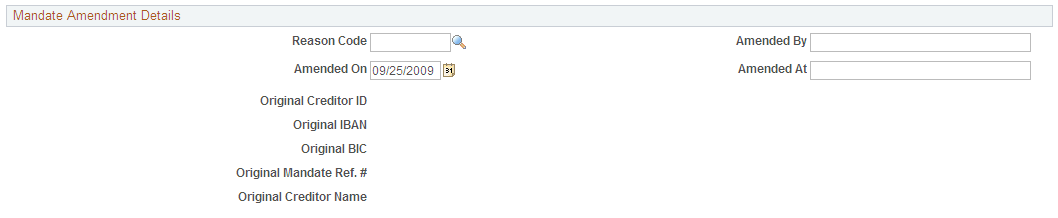
To amend a mandate form, you must add a new row when you click the Add icon in the Mandate Scroll area. You can change the effective date to a future date or change the sequence number if you have more than one amendment for the same date.
Field or Control |
Description |
|---|---|
Reason Code |
Enter a reason code that represents the reason for amending the mandate. Reason codes are set up in |
User ID |
The user id of the user who amends the mandate appears in this field. |
Signed On |
Select the date on which this mandate amendment was created. The default date is the system date. |
Signed At |
Enter the city (location) where the amendment was signed. |
Original Creditor ID (original creditor identifier) |
Displays the Creditor ID of the original creditor who issued the mandate and entered the mandate information. This value only appears if it was included in the amendment. |
Original IBAN |
Displays the creditor's original IBAN number. This value only appears if it was included in the amendment. |
Original BIC |
Displays the creditor's original BIC/SWIFT DFI ID code. This value only appears if it was included in the amendment. |
Original Mandate Ref # (original mandate reference number) |
Displays the original mandate reference number. Value only appears if mandate reference number is updated in the amendment. |
Use the Approve Direct Debit Mandates page (PMT_APPR_MANDATE) to approve direct debit mandates.
Navigation:
,
This example illustrates the fields and controls on the Approve Direct Debit Mandates page. You can find definitions for the fields and controls later on this page.

Field or Control |
Description |
|---|---|
Creditor's Company From and Creditor's Company To |
Select the creditor's company in the From field. The company you selected also appears in the To field. If the company has more than one or a series of offices or branches, select the last company that you want to include in the search. The system will search through all creditor companies that have mandates associated with them based on the selected search criteria, if you leave these fields blank. |
Date From and Date To |
Select a single date or a date range that includes the mandates that you want to have approved. The system will search through all mandate dates that fall within the selected search criteria if you leave these fields blank. |
Mandate ID From and Mandate ID To |
Enter a single mandate ID or a range of mandate ID values. If you leave these fields blank, the system will list all mandate ID values that fall within the selected search criteria. |
Mandate Reference Number From and Mandate Reference Number To |
Select a single mandate reference number for which to search or select a range of reference numbers. The system searches for and lists the mandates based on your selection. You can leave this field blank and the system will search for and list all mandate reference numbers based on any other selected search criteria. |
Search |
Click button to search for and display mandates that match the selected search criteria in the Approval Details group box. |
Approve |
Select the mandates in the Approve Mandate grid that you want to approve and click this button. The Approval Status values in for the mandates that were selected for approval changes to Approved after you click the Approve button. |
Use the Cancel Direct Debit Mandates page (PMT_CAN_MANDATE) to cancel individual direct debit mandates.
Navigation:
This example illustrates the fields and controls on the Cancel Individual Mandates page. You can find definitions for the fields and controls later on this page.

Field or Control |
Description |
|---|---|
Search |
Enter one or more values in the search criteria fields and click this button to search and list the mandates based on the selected criteria. |
Cancellation Remarks |
Enter the reason for the cancellation or any additional remarks. |
Cancel |
Click this button to cancel the selected mandates. Canceling a mandate updates the Mandate Status field to Cancelled for each mandate that was canceled. |
Use the Cancel Unused Mandates page (PMT_CANCEL_MANDATE) to cancel unused mandates.
Navigation:
This example illustrates the fields and controls on the Cancel Unused Mandates page. You can find definitions for the fields and controls later on this page.
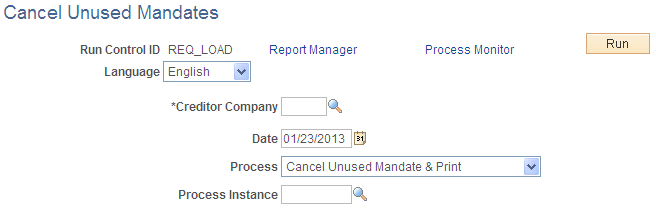
Based on SEPA usage rules, if the creditor does not present a collection under a given valid mandate for a period of 36 months, the creditor must cancel the mandate. The creditor is no longer allowed to initiate collections based on this canceled mandate. The PMT_CANCEL process is used to cancel all unused mandates associated with the selected creditor. You can print a list of mandates that need to be canceled. You can also undo the cancellation of mandates executed by this process.
Field or Control |
Description |
|---|---|
Language |
Select the language of the mandate that you want to cancel. English is the default language, which you can override. |
Creditor Company |
Select the creditor company associated with any unused mandates. |
Date |
Select the date on which you are canceling the mandates. This date is used as the basis for calculating the 36-month period, which is used to check for unused mandates eligible for cancellation. |
Process |
Select one of these processes:
|
Process Instance |
Select or enter the process instance number of an unused mandate that you have already canceled when you select Undo Cancel for the Process value. |