Creating Payment Requests Using PeopleSoft Fluid User Interface
For a detailed section on Configuration Options and Requirements for Payment Request, see Understanding Additional Payment Processing Options — Payment Request
|
Page Name |
Definition Name |
Usage |
|---|---|---|
|
PR_REQUEST_FL |
Click to access the Payment Request Center and view existing payment requests or create a new payment request. |
|
|
PR_CTR_FL |
View Payment Requests, filter Payment Requests by date and status or by alternative filters, create payment requests, and answer questions. |
|
|
NA |
Click to access the Payment Request Review Center and review existing payment requests. The tile is available only for Reviewer user roles. This is an expansion of the Fluid Payment Request Requestor page for Reviewer role by converting existing classic design of Payment Request Reviewer page. |
|
|
PR_CTR_FL |
Review Payment Requests, filter Payment Requests by date and status or by alternative filters, and answer questions. The page is available only for Reviewer user roles. |
|
|
PR_CTR_FILTER_SCF |
View the list of payment requests filtered either by a date range and status or by alternative filters. |
|
|
PR_CONVER_SUMM_SCF |
View a list of messages initiated by reviewers/approvers. |
|
|
PR_CTR_DETAIL_FL |
View the line details of a payment request. |
|
|
PR_APP_MONITOR_SCF |
View the details of the approval history. |
|
|
PR_SUMMARY_FL |
Create a payment request by entering the summary information about the new request. |
|
|
PR_ATT_SCF |
Include any attachments to the payment request. |
|
|
PR_MISC_AMT_SCF |
Enter miscellaneous costs to the payment request. |
|
|
PR_ VNDR_FL |
Enter supplier details for the payment request. |
|
|
PR_VNDR_ADD_SCF |
Enter a new supplier with details of address, contact Information, and new supplier questions. |
|
|
PR_LINE_FL |
Add invoice lines for the payment request. |
|
|
PR_LINE_FL |
Include a new invoice line for the payment request. |
|
|
PR_CF_SCF |
Enter accounting details to the accounting lines. |
|
|
PR_SUBMIT_FL |
Review and submit the Payment Request for approval. |
Use the Payment Request tile (PR_REQUEST_FL) to access the Payment Request Center and view existing payment requests or create a new payment request.
Navigation:
The Payment Request tile is delivered as part of the Employee Self Service home page, but the location can change if you change the delivered home pages or if administrators personalize their home pages.
This example illustrates the Payment Request tile.
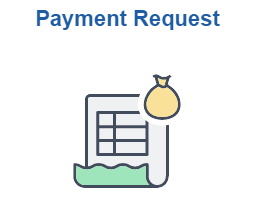
Click the Payment Request tile to access the Payment Request Center.
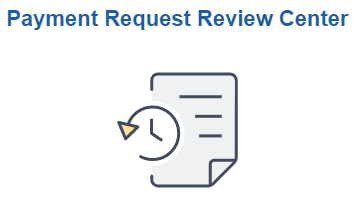
Use the Payment Request Review Center tile to access the Payment Request Review Center and review, edit and resubmit existing payment requests.
The Payment Request Review tile is delivered as part of the Employee Self Service home page, but the location can change if you change the delivered home pages or if administrators personalize their home pages.
This example illustrates the Payment Request Review Center tile
Use the Payment Request Center page (PR_CTR_FL) to view Payment Requests, filter Payment Requests by date and status or by alternative filters, to create payment requests, and to answer questions.
Navigation:
This example illustrates the fields and controls on the Payment Request Center page. You can find definitions for the fields and controls later on this page.
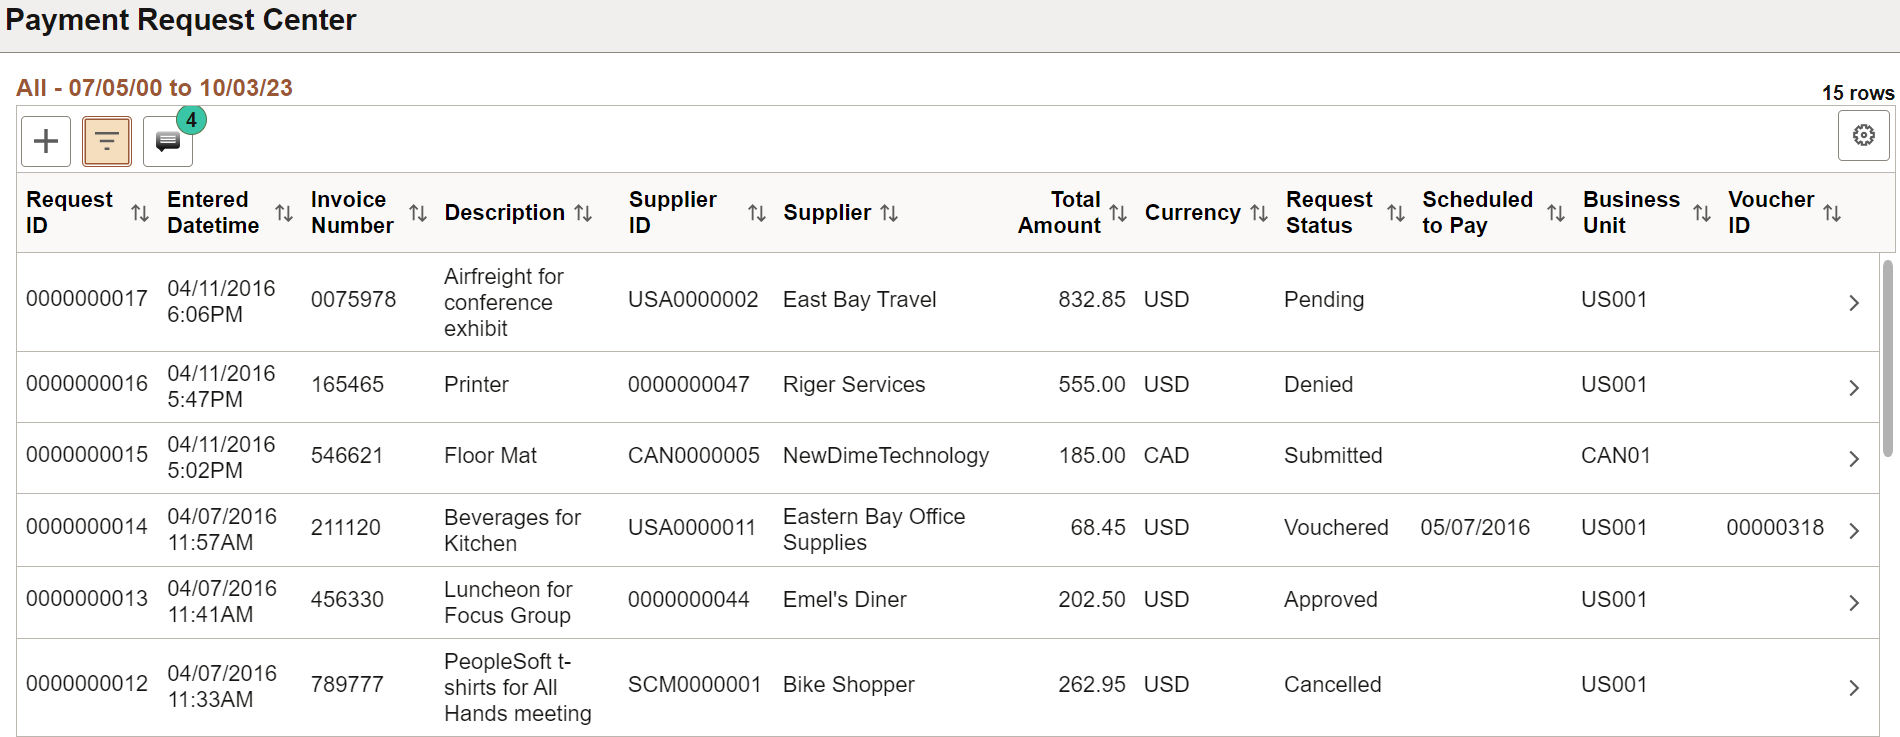
This example illustrates the fields and controls on the Payment Request Center page. You can find definitions for the fields and controls later on this page.

Field or Control |
Description |
|---|---|
|
Click to open the Summary page and enter summary information about the new payment request. Summary page is the first among the activity guide pages while creating a payment request. |
|
Click to open the Filters page and enter filter values to display the payment requests by date and by additional filters. |
|
Click to open the Review Messages page and view a list of messages initiated by reviewers/approvers. |
|
|
You can use the Personalize icon on each grid to reorder/ hide columns and sort columns by order. For more information, see PeopleTools Applications User’s Guide, “Working With the PeopleSoft Fluid User Interface", Working with Fluid Pages and Controls. |


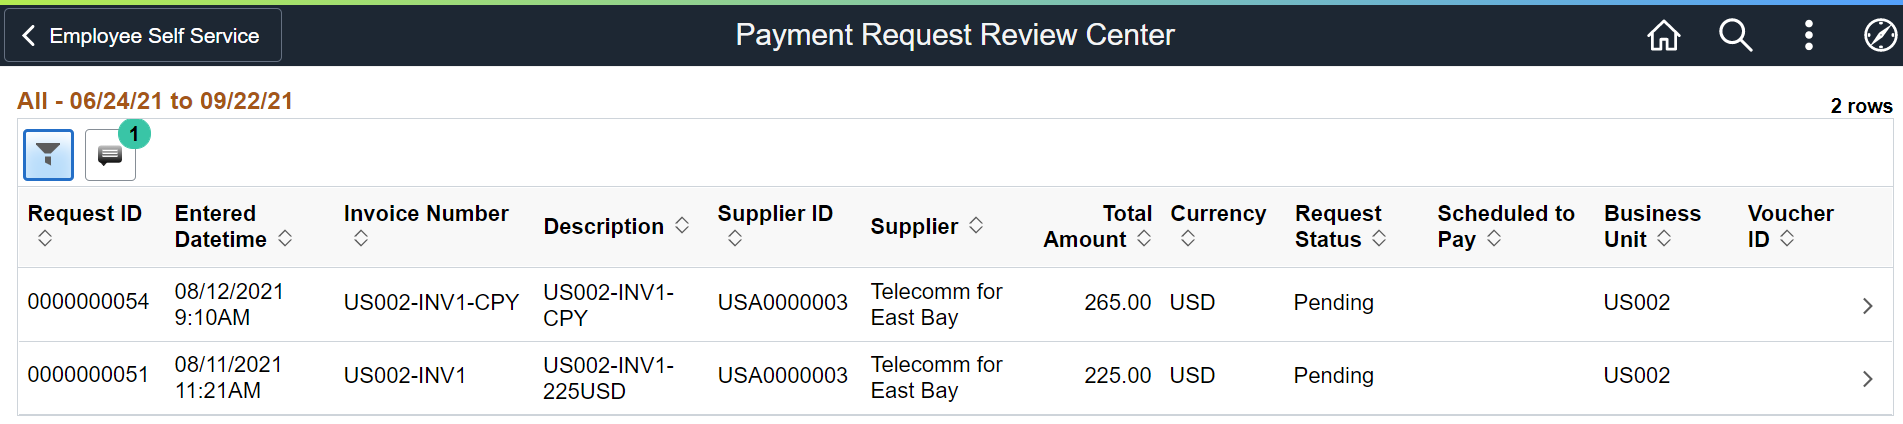
Use the Payment Request Review Center page (PR_CTR_FL) to review/ filter payment requests, and answer questions.
The Payment Request Review Center page is available only for Reviewer roles.
The reviewer role is configurable on Payment Request Template. Business unit level security is enforced for reviewers based on User ID or Permission List security. You cannot create or copy a payment request in the Payment Request Review Center page.
Navigation:
This example illustrates the fields and controls on the Payment Request Review Center page. You can find definitions for the fields and controls later
|
Field or Control |
Description |
|---|---|
|
|
Click to open the Filters page and enter filter values to display the payment requests by date and by additional filters. |
|
|
Click to open the Review Messages page and view unread messages posted by requesters. The count displayed on the Message icon indicates the number of messages yet to be responded. |
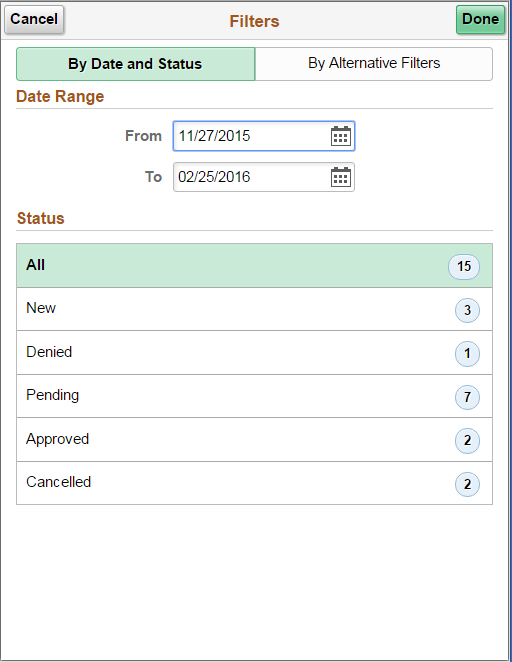
Use the Filters page (PR_CTR_FILTER_SCF) to list the payment requests filtered either by a date range and status or by alternative filters.
Navigation:
This example illustrates the fields and controls on the Filters page. You can find definitions for the fields and controls later on this page.
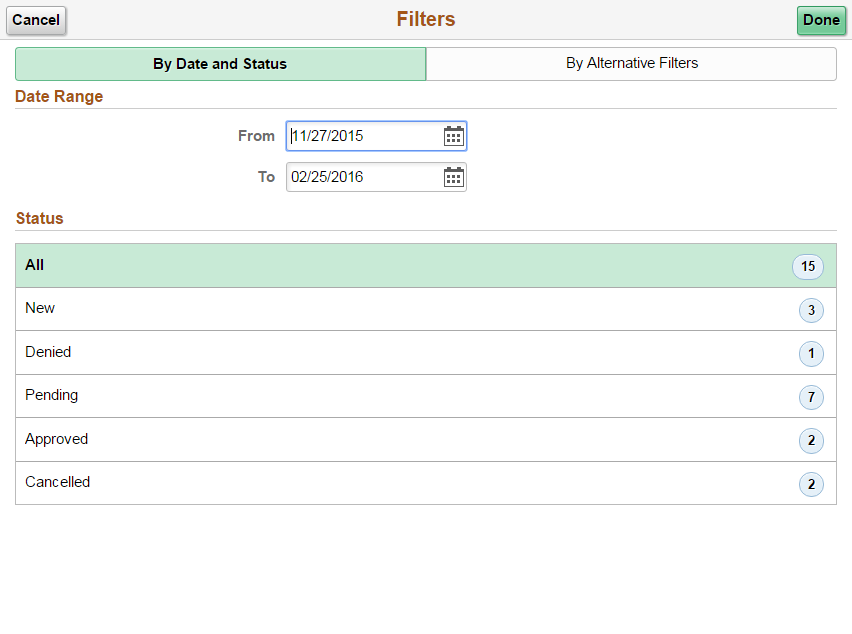
This example illustrates the fields and controls on the Filters page. You can find definitions for the fields and controls later on this page.
Field or Control |
Description |
|---|---|
Filters |
Click to open the Filters page and enter filter values to display the payment requests:
Note: The Filters page constitutes a mutually exclusive set of search criteria. In other words, the system allows search only based on the filter you select. |
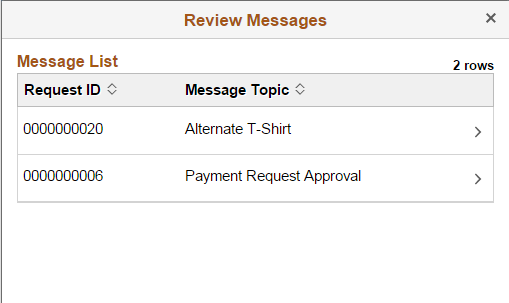
Use the Review Messages page (PR_CONVER_SUMM_SCF) to view a list of messages initiated by reviewers/approvers/requesters.
Navigation:
This example illustrates the fields and controls on the Review Messages page. You can find definitions for the fields and controls later on this page.
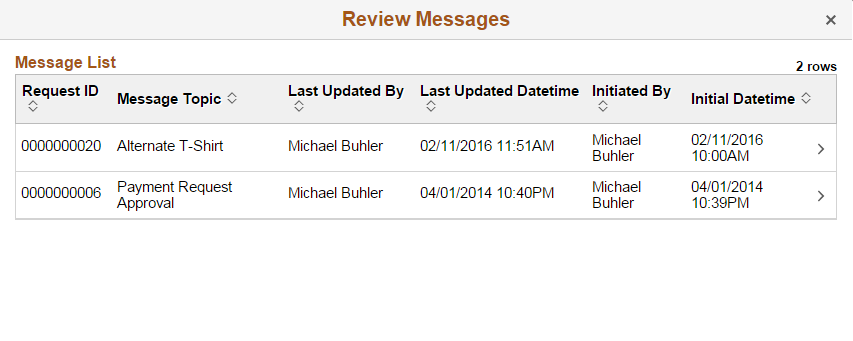
This example illustrates the fields and controls on the Review Messages page. You can find definitions for the fields and controls later on this page.
Field or Control |
Description |
|---|---|
Message List |
Click a message row to review the message. You can enter text in the Your Response field and click Post to post your response. |
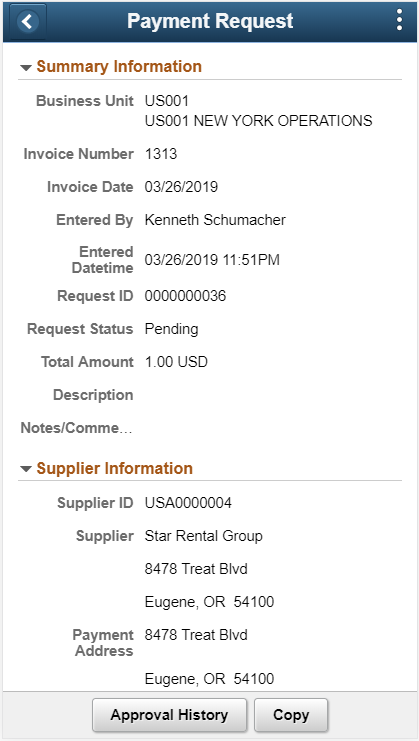
Use the Payment Request Details page (PR_CTR_DETAIL_FL) to view the line details of a particular payment request.
Note: You can customize this Payment Request Details Fluid page by using a Customization offered by PeopleSoft called Drop Zones. By using Drop Zones, you can add your own fields to Fluid pages to display or update your data. Drop Zones can be added on the top and bottom of this page. For more information on Drop Zones, See the product documentation for PeopleTools: Fluid User Interface Developer’s Guide Creating and Configuring Drop Zones.
Navigation:
Click a row on the Payment Request Center
This example illustrates the fields and controls on the Payment Request Details page. You can find definitions for the fields and controls later on this page.
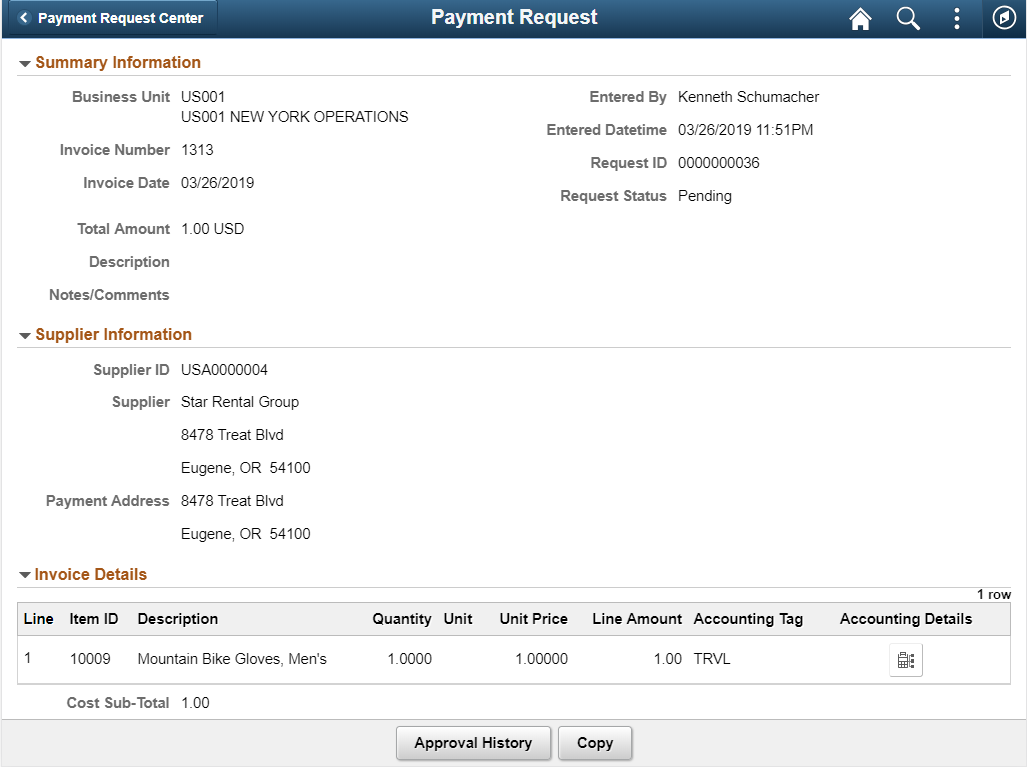
This example illustrates the fields and controls on the Payment Request Details page. You can find definitions for the fields and controls later on this page.
Copy Payment Request
The Copy functionality in an existing payment request allows Requesters to copy the payment request as a new request. The copied payment request is in New status and the date fields — Invoice Date and Entered Date and Time — are updated with current values. The requester’s name is updated in the Entered by field and all other details on the horizontal Activity Guide pages are automatically updated from the source payment request. Requesters can review and modify any option before submitting the new payment request for review and/or approval. The Save for Later button, which is available on each of the Activity Guide pages, is used to save the payment request at any time and the PR can be accessed later using the request ID that was generated upon save.
Based on user permissions the Copy button is available on all payment requests, irrespective of the status the payment request is in.
Note: Attachments are not copied when the Copy functionality is executed. You can include relevant attachments by clicking the Attachment(0) button on the Summary Page.
The options on the Payment Request Details page depend on the status of the payment request — New, Pending, Approved, Denied, and Cancelled.
Field or Control |
Description |
|---|---|
Update |
Click to open the Summary page of the payment request and update the values. The Summary page is the first page in the activity guide. This button appears if the status is New or Denied. |
Message |
Click to open the Review Messages page and view any messages from an approver. This button appears only if there is a message for this Payment Request. |
Approval History |
Click to open the Approval Flow Page and view the details of approval history. This button appears if the status is Pending, Approved, or Denied. |
Cancel |
Click to cancel the payment request. The payment request status changes to Cancelled. This button appears if the payment request status is New or Denied. |
Copy |
Click to copy the payment request into a new payment request. The system opens the Activity Guide pages of a new PR, with details copied into the respective pages. You can review all the Activity Guide pages, modify options, add an attachment, and finally submit the payment request for review and/or approval. See Summary Page . |
More |
Click to view the remaining option, Approval History and Cancel. |
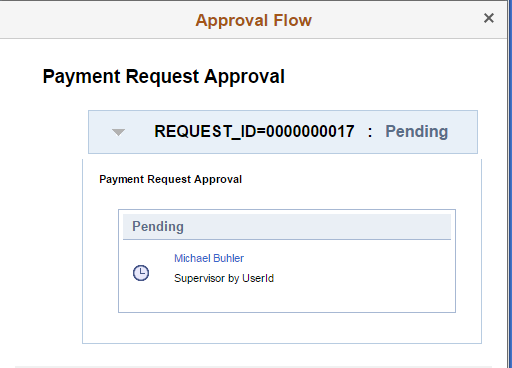
Use the Approval Flow page (PR_APP_MONITOR_SCF) to view the details of the approval history if the payment request status is Pending, Approved, or Denied.
Navigation:
Click the Approval History button on the Payment Request Details page
This example illustrates the fields and controls on the Approval Flow page.
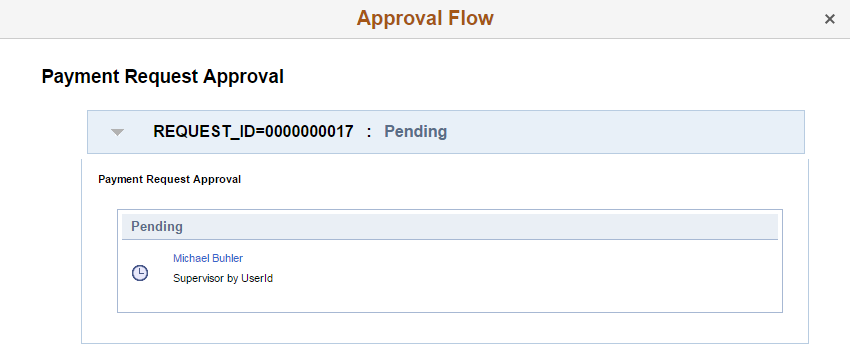
This example illustrates the fields and controls on the Approval Flow page.
Use the Summary page (PR_SUMMARY_FL) to enter the summary details and to include any attachments for the payment request you wish to create.
Note: You can customize this Summary Fluid page by using a Customization offered by PeopleSoft called Drop Zones. By using Drop Zones, you can add your own fields to Fluid pages to display or update your data. Drop Zones can be added on the top and bottom of this page. For more information on Drop Zones, See the product documentation for PeopleTools: Fluid User Interface Developer’s Guide Creating and Configuring Drop Zones.
Navigation:
This example illustrates the fields and controls on the Summary page. You can find definitions for the fields and controls later on this page.
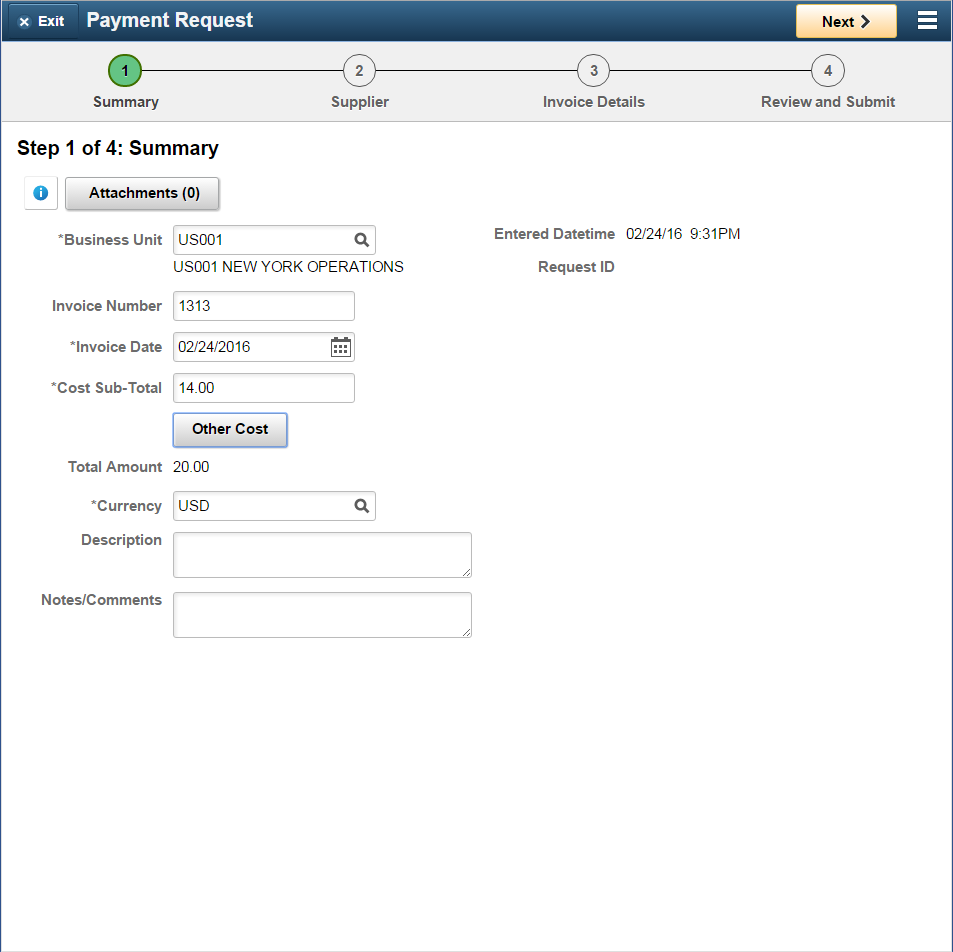
This example illustrates the fields and controls on the Summary page. You can find definitions for the fields and controls later on this page.
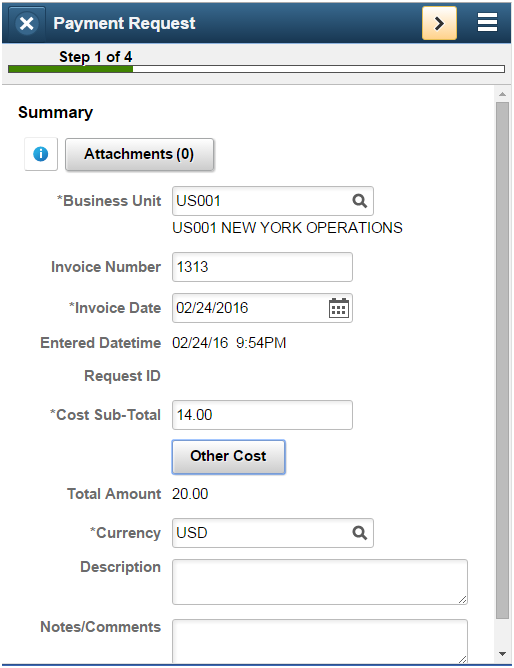
Field or Control |
Description |
|---|---|
|
Click to open the Instructions page and view any instructions about entering summary details, which were set up on the Payment Request Template page. This icon appears only if there are instructions entered in the Instructions section on the Payment Request Template page. |
|
Click the button to open the Attachments Page and include any attachments to the payment request. |

Use the Attachments page (PR_ATT_SCF) to include any attachments to the payment request.
Navigation:
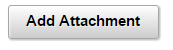
Click the Attachment(0) link on the Summary page. Click the Add Attachment button.
This example illustrates the fields and controls on the Attachments page. You can find definitions for the fields and controls later on this page.

This example illustrates the fields and controls on the Attachments page. You can find definitions for the fields and controls later on this page.
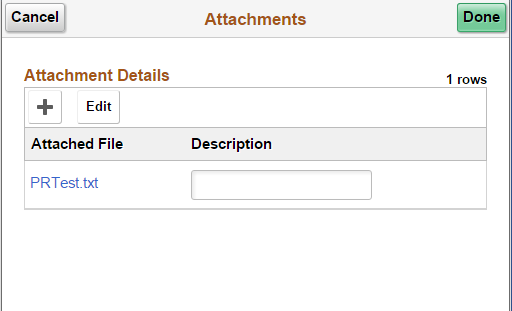
Field or Control |
Description |
|---|---|
|
Click to open the File Attachment page. Click the My Device button to choose a file source, select the file and click Upload. Click Done to return to the Attachments page. Note: This button appears only when there are no attachments (0) included earlier. |
|
Click to include additional an attachment. This button appears only if there are existing attachments included earlier in the payment request. |
Edit |
Click to open the Attachment Details page, select the attachment row and click Delete button to delete the attachment. |

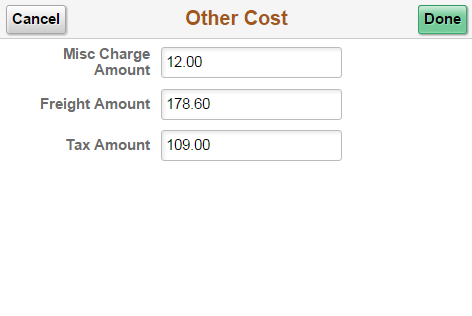
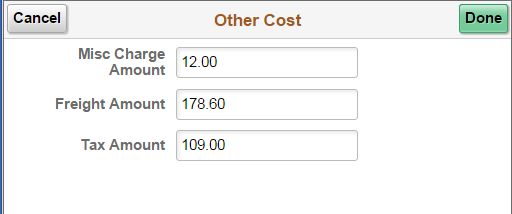
Use the Other Cost page (PR_MISC_AMT_SCF) to enter miscellaneous costs to the payment request. Miscellaneous costs include Miscellaneous Charge Amount, Freight Amount, and Tax amount.
Navigation:
Click the Other Cost button on the Summary page.
This example illustrates the fields and controls on the Other Cost page.
This example illustrates the fields and controls on the Other Cost page.
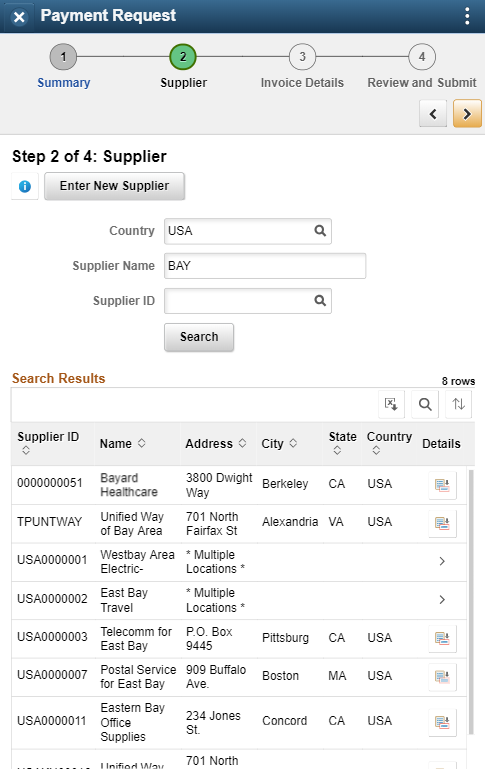
Use the Supplier page (PR_ VNDR_FL) to enter supplier details for the payment request.
Note: You can customize this Supplier Fluid page by using a Customization offered by PeopleSoft called Drop Zones. By using Drop Zones, you can add your own fields to Fluid pages to display or update your data. Drop Zones can be added on the top and bottom of this page. For more information on Drop Zones, See the product documentation for PeopleTools: Fluid User Interface Developer’s Guide Creating and Configuring Drop Zones.
Navigation:
Click the Next button on the Summary page.
This example illustrates the fields and controls on the Supplier page. You can find definitions for the fields and controls later on this page.
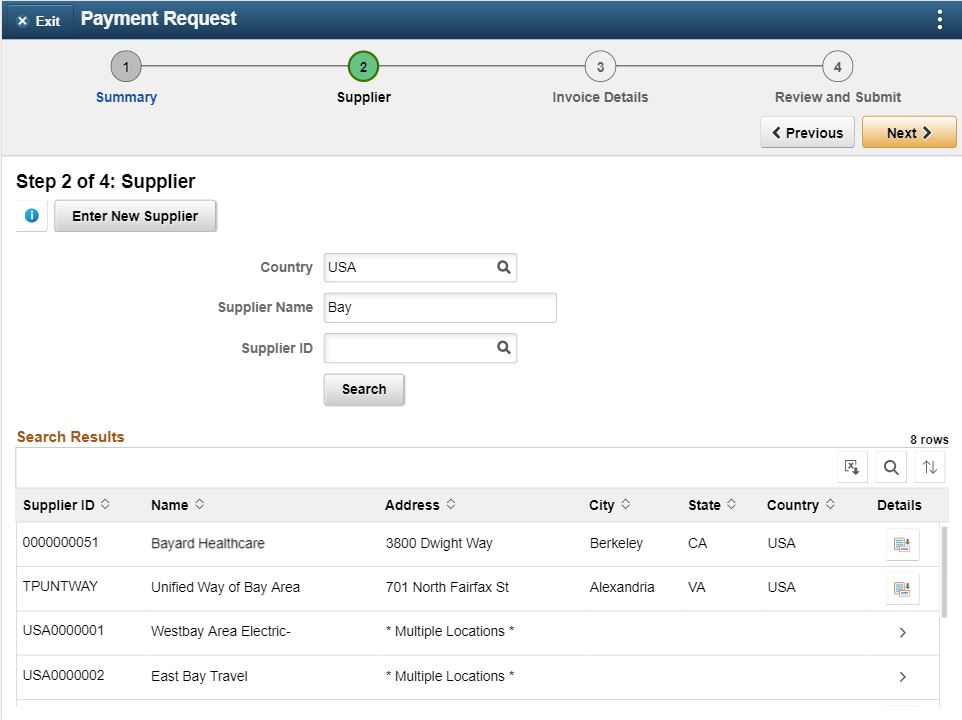
This example illustrates the fields and controls on the Supplier page. You can find definitions for the fields and controls later on this page.
Field or Control |
Description |
|---|---|
|
Click to open the Instructions page and view any instructions about entering supplier details, which were set up on the Payment Request Template page. This icon appears only if there are instructions entered in the Instructions section on the Payment Request Template Page. |
Address |
If a supplier is present in multiple locations, the Address field shows as “Multiple Locations”. Click the address link to open the Select Supplier Location page and select the desired location from the list. On a smartphone, you can click the ‘>’ button to open the Select Supplier Location page. |
Enter New Supplier |
Click to open the New Supplier Request page and enter the details of a new supplier. This button appears only after you select the Search button. |
|
Select to download the search results to Microsoft Excel spreadsheet. |
|
Select to find a string in the current page. |
|
Select to sort the data within the Search Results grid. |


After you select a Supplier, the supplier information and payment address displays.
This example illustrates the fields and controls on the Supplier Payment Request page as displayed on a tablet. You can find definitions for the fields and controls later on this page.
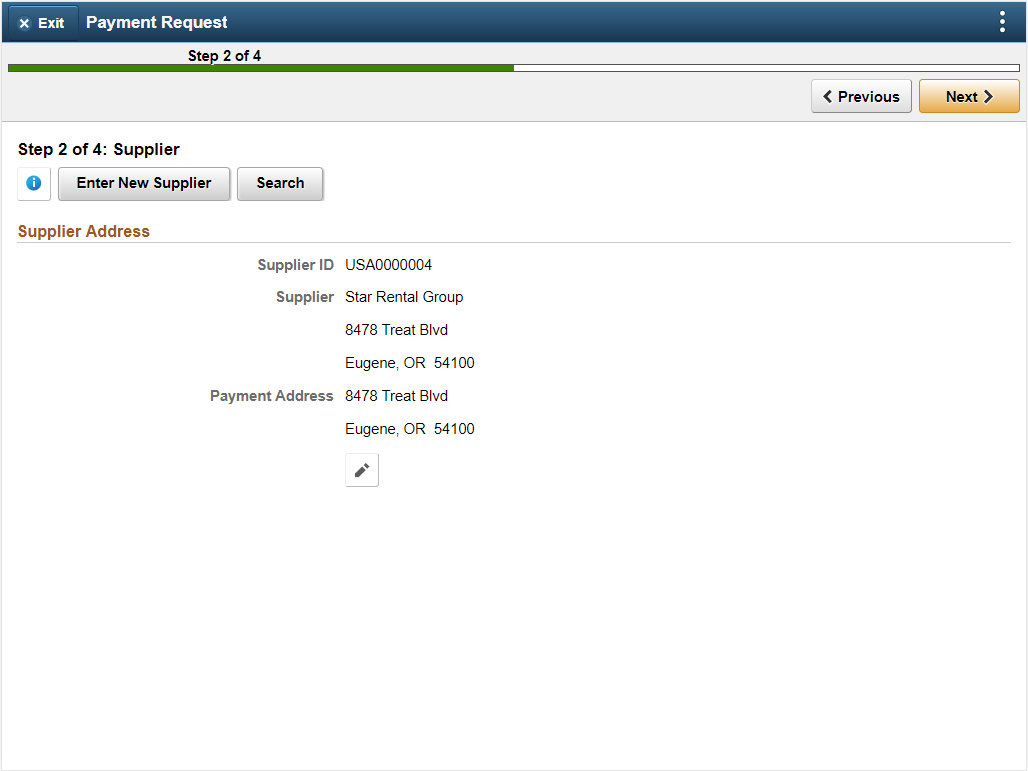
Field or Control |
Description |
|---|---|
|
Select to access the Select Payment Address page to choose a payment address. |

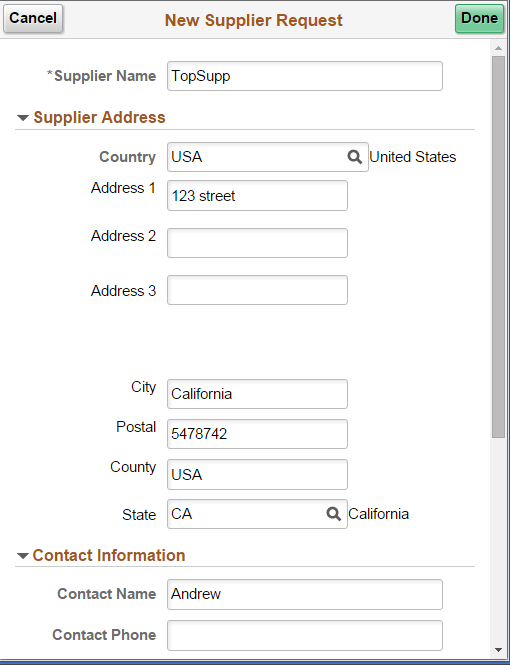
Use the New Supplier Request page (PR_VNDR_ADD_SCF) to enter a new supplier with details of address, contact Information, and new supplier questions. The Request New Supplier button appears only after you click the Search button. A new supplier can be requested only if existing suppliers are not preferred.
Navigation:
Click the Enter New Supplier button on the Supplier page.
This example illustrates the fields and controls on the New Supplier Request page.
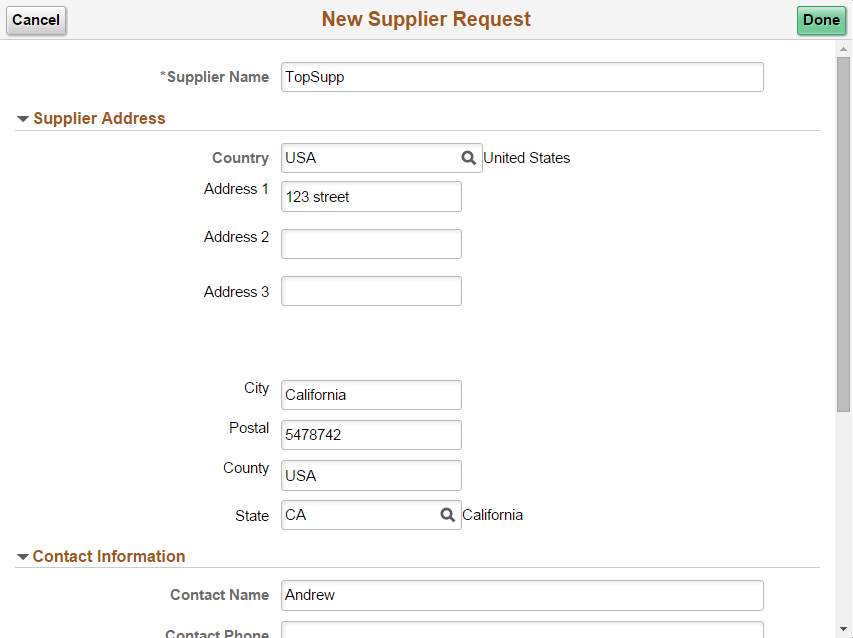
This example illustrates the fields and controls on the New Supplier Request page.
Use the Invoice Details page (PR_LINE_FL) to add invoice lines.
Note: You can customize this Invoice Details Fluid page by using a Customization offered by PeopleSoft called Drop Zones. By using Drop Zones, you can add your own fields to Fluid pages to display or update your data. Drop Zones can be added on the top and bottom of this page. For more information on Drop Zones, See the product documentation for PeopleTools: Fluid User Interface Developer’s Guide Creating and Configuring Drop Zones.
Navigation:
Click the Next button on the Supplier page. Click the Add Lines button to add an invoice line for the Payment Request.
In the desktop interface, clicking the Add Lines button allows you to enter the new line details on the Invoice Details page itself.
This example illustrates the fields and controls on the Invoice Details page. You can find definitions for the fields and controls later on this page.
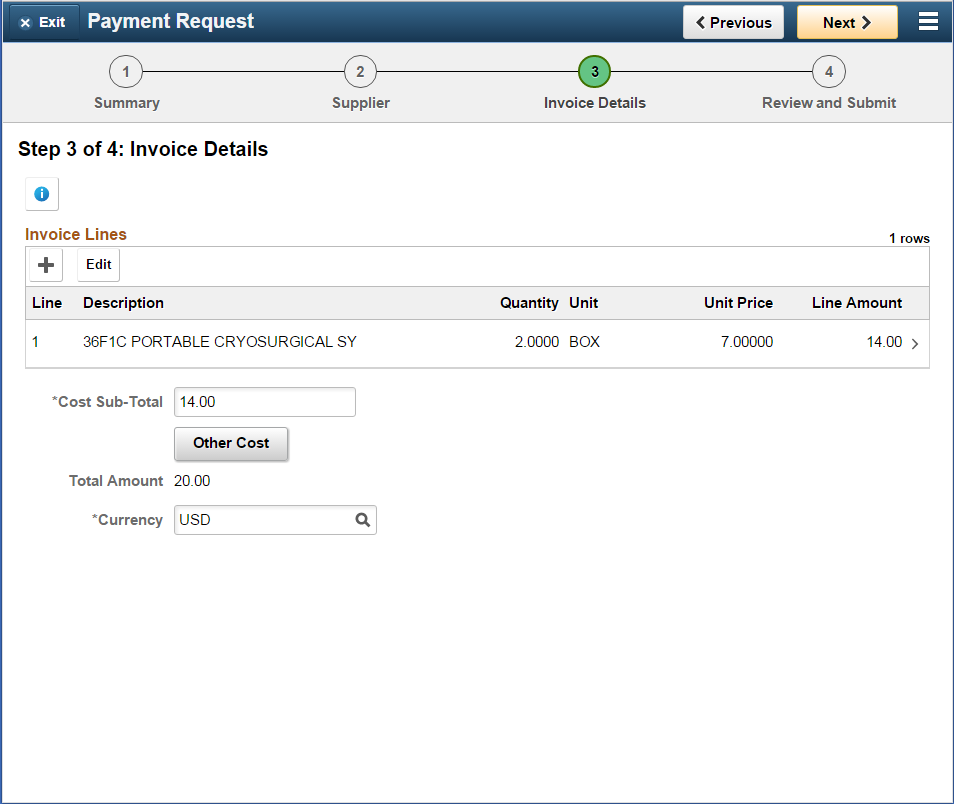
This example illustrates the fields and controls on the Invoice Details page. You can find definitions for the fields and controls later on this page.
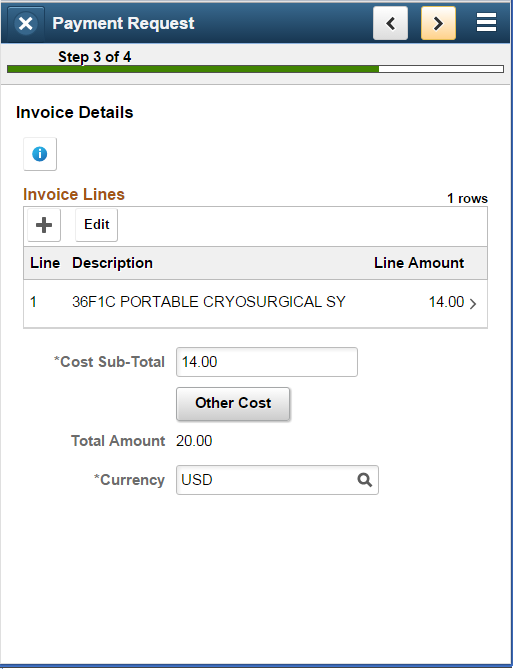
Field or Control |
Description |
|---|---|
|
Click to open the Add a New Line Pageand enter details of the invoice line. This button appears only for including the first invoice line. Use the Add Lines (+) button for including subsequent lines. |
|
Click to insert an additional line and enter the details. |
Edit |
Click the button and select invoice lines to delete. Click Delete. |
Accounting Tag |
Select the desired accounting tag from the Accounting Tag - Accounting Tag List Page. See Selecting Accounting Tags in PeopleSoft Fluid User Interface |
|
Click the button to open the Accounting Details Page and enter the desired accounting details to the accounting lines. |


Use the Add a New Line page (PR_LINE_FL) to include a new invoice line for the payment request.
Navigation:
Click the Add Lines button on the Invoice Details page.
This example illustrates the fields and controls on the Add a New Line page.
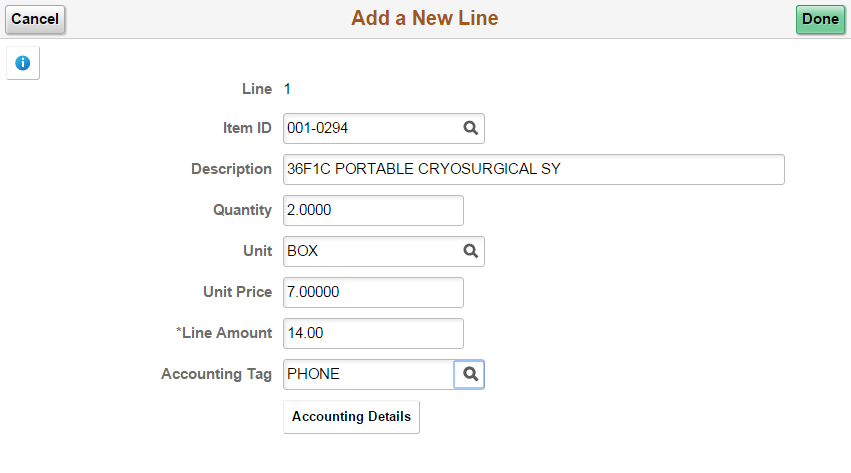
This example illustrates the fields and controls on the Add a New Line page.
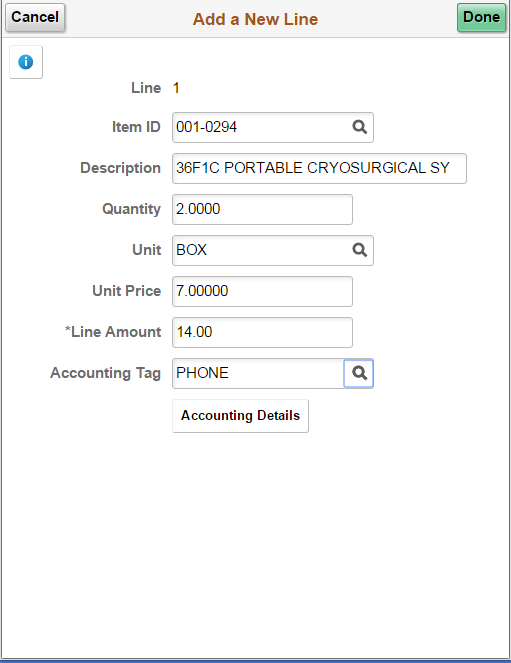
Note: The Add a New Line page is applicable for Fluid interface only.
Use the Accounting Details page (PR_CF_SCF) to enter accounting details to the accounting lines.
Navigation:
Click the Accounting Details button on the Invoice Details page.
This example illustrates the fields and controls on the Accounting Details page.
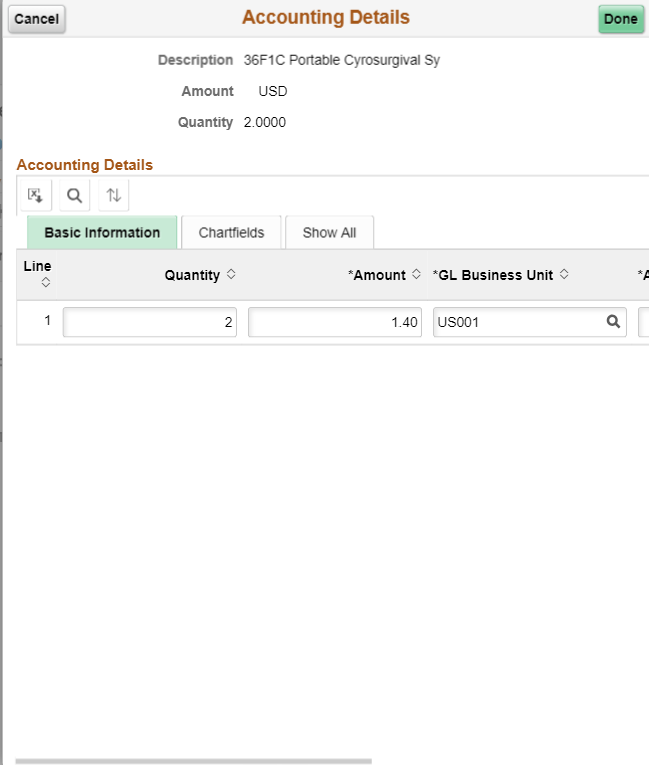
This example illustrates the fields and controls on the Accounting Details page.

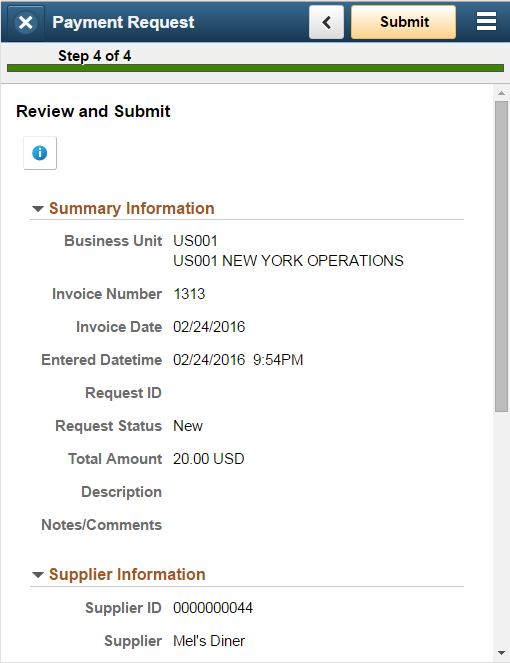
Use the Review and Submit page (PR_SUBMIT_FL) to review and submit the Payment Request for approval.
Note: You can customize this Review and Submit Fluid page by using a Customization offered by PeopleSoft called Drop Zones. By using Drop Zones, you can add your own fields to Fluid pages to display or update your data. Drop Zones can be added on the top and bottom of this page. For more information on Drop Zones, See the product documentation for PeopleTools: Fluid User Interface Developer’s Guide Creating and Configuring Drop Zones.
Navigation:
Click the Next button on the Invoice Details page.
This example illustrates the fields and controls on the Review and Submit page.
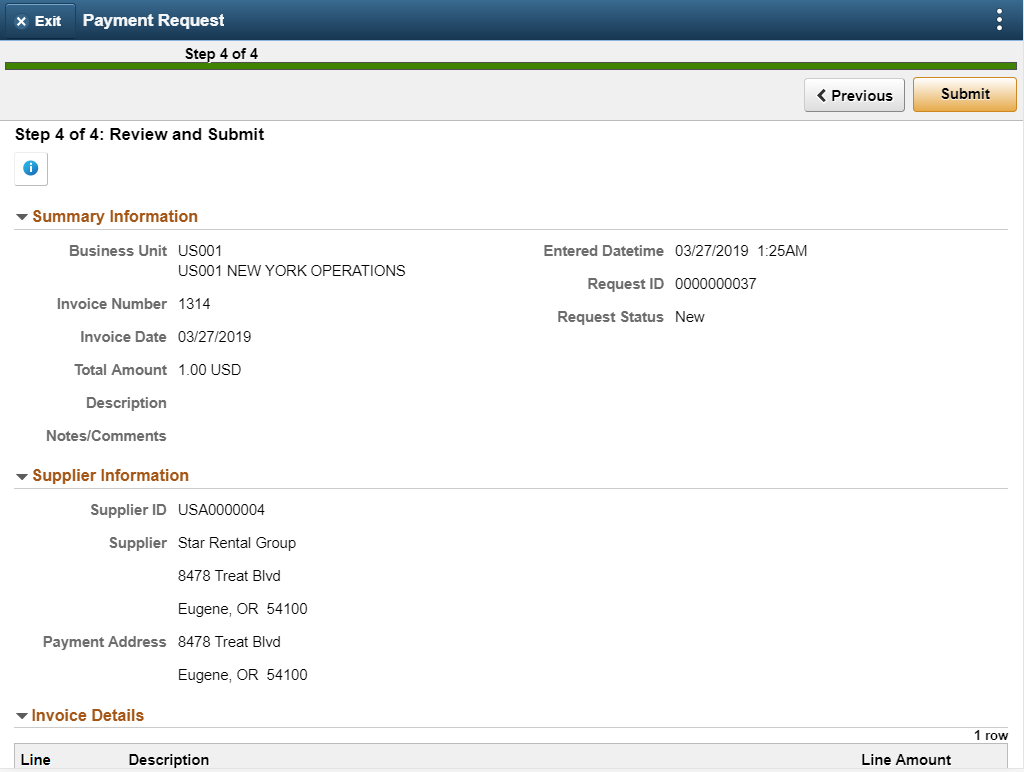
This example illustrates the fields and controls on the Review and Submit page.
Note: Duplicate invoice check is done for all payment requests before submission, review and approval. You can proceed with payment request creation or reject the request based on the setup done at the business unit level. For additional information, see Defining PeopleSoft Payables Business Unit Options by SetID
Email Notification
After a requester submits a payment request, if the workflow option is Review before Workflow Approval or AP Review - No Workflow Engine on the Payment Request Template, an email notification is sent to the reviewers with a link to the Fluid Payment Request page for reviewer. After the reviewer resubmits a payment request for workflow option Review before Workflow Approval, the Approval Workflow Engine sends an email notification to approvers with a link to the Fluid Payment Request Approval page.
When a requester submits a payment request, if the workflow option is Workflow Approval on the Payment Request Template, the Approval Workflow Engine sends an email notification to approvers with a link to the Fluid Payment Request Approval page.
If an approver denies the payment request or provides final approval of the payment request, the Approval Workflow Engine sends an email notification to requester with a link to the Fluid Payment Request Page for requester.
When a reviewer post a message to the requester, an email notification is send to the requester. The URL generated on email notification will point to the Fluid Payment Request page for requester. Similarly, when requester post a response to the reviewer, an email notification is send to the reviewer with a link to the Fluid Payment Request Page for reviewer.