 Common Elements Used in This Chapter
This chapter provides an overview of configuration model elements and discusses how to:
Set up configuration variables.
Use value lists and constraints.
Use matrices.
Create syntax expressions.
Maintain configuration messages.
Set up print codes.
Common Elements Used in This Chapter|
|
Click the Add/Update button to access the Search page associated with the adjacent field, where you can add or modify values using the field’s source component. If the field is blank, the source component is accessed in add mode. If the field is populated, the source component is displayed in update mode. |
Setting Up Configuration VariablesTo define internal variables, use the Internal component (INTRN_VAR_MAINT). To define option variables, use the Option component (CP_OPT_VAR_PNLG). To define global variables, use the Global component (CP_GBL_VAR_PNLG). To define secondary variables, use the Secondary component (CP_SEC_VAR_PNLG). To define multiple option variables use the Multiple Option component (MULTOP_MAINT). To define constant variables, use the Constant component (CP_CONSTANT). This section discusses how to:
Search for variable types.
View variable type search results.
Set up internal variables.
Maintain multiple option variables.
 Pages Used to Set Up Configuration Variables
|
Page Name |
Object Name |
Navigation |
Usage |
|
CP_VAR_INQ |
Configuration Modeler, Define Variables, Review Variables, Review Variables - Search |
Search for the variable types that exist in the configuration models. |
|
|
CP_VAR_IN2 |
Enter the search criteria on the Review Variables - Search page, and click the Search button. |
View the location of, and detailed information about, the selected variable type. |
|
|
CP_INTRN_VAR_PNL |
Configuration Modeler, Define Variables, Internal, Internal Variable |
Set up queries to retrieve existing data from PeopleSoft tables and views for use in an internal variable. |
|
|
CP_INTRN_QRY_WIZ |
|
Test the setup of internal variables within the product configuration. |
|
|
CP_OPT_VAR_PNL |
Configuration Modeler, Define Variables, Option, Option Variable |
View or create an option variable. |
|
|
CP_GBL_VAR_PNL |
Configuration Modeler, Define Variables, Global, Global Variable |
View or create a global variable. |
|
|
CP_SEC_VAR_PNL |
Configuration Modeler, Define Variables, Secondary, Secondary Variable |
View or create a secondary variable. |
|
|
CP_MULT_OP_PNL |
Configuration Modeler, Define Variables, Multiple Option |
View or create a multiple option variable. |
|
|
CP_CONSTANT |
Configuration Modeler, Define Variables, Constant |
View the name and description of a constant, a reserved system value within a configuration. For example, current date or order mode. |
Searching For Variable Types
Access the Review Variables - Search page.
The variable type search function searches for the specified variable type in the following areas: templates, internal variables, expressions, constraints, multiple option variables, messages, matrices, rules, and value lists.
Important! Due to database limitations, you cannot search for messages, expressions, custom internal variables, or custom value lists if you are using an Oracle or Informix database.
Viewing Variable Type Search Results
Access the Review Variables - Results page.
The system displays detailed information about the selected variable type. In particular:
|
Area |
Identifies where in the configuration model the variable value is located. |
|
Variable Value |
Click the value to navigate to the corresponding component, where you can access details about this variable. |
|
Detail |
Displays the detail or syntax expression that contains the search variable. |
Setting Up Internal VariablesInternal variables retrieve static or dynamically derived values from PeopleSoft application tables and views. This enables you to use existing business information, such as customer IDs, order numbers, business unit definitions, or pricing, without defining it within rules or in separate configurator tables.
Instead, there are two methods of performing Structured Query Language (SQL) queries in Product Configurator when defining internal variables and value lists:
Standard types (static meta-SQL equal-to values) enable you to enter the parameters of a simple AND statement/WHERE clause, and the system creates the query to retrieve the values from one table or view.
Custom types (dynamic) enable you to directly write SQL queries, as complex as necessary to retrieve the required information. You can also use configuration binds in the SQL.
To define or modify static internal variables:
Access the Internal Variable page.
Select Standard in the Type field.
Select a table or view to query.
Select a corresponding field.
Enter the parameters of the where clause.
The system initiates the query during configuration processing.
Click the Internal Variable Test link to view and test how the internal variable is retrieved during the configuration process.
Set up values for each field on the Internal Variable Tester page, and click the Execute Query button.
To define or modify dynamic internal variables:
Access the Internal Variable page.
Select Custom in the Type field.
The SQL field appears, where you can write custom SQL statements to dynamically generate values from existing database records. In addition, configuration binds can be used within the custom SQL statement.
For example, the configuration bind “O-COLOR” would resolve to the value of the option variable COLOR at run-time in the following SQL:
Select FIELD_1, FIELD_2, FIELD_3, FIELD_4
From PS_TABLE
Where FIELD_1 = %BIND(O-COLOR)
If COLOR = RED, then during rule processing the SQL changes to:
Select FIELD_1, FIELD_2, FIELD_3, FIELD_4
From PS_TABLE
Where FIELD_1 = ‘RED’
If the result is a number, the system replaces the bind variable with the actual variable. If it is a string, it places single quotes around the actual variable.
Note. Configuration binds are replaced differently for messages; they are simply replaced with the bind value (for example, %BIND(O-COLOR) = RED).
See Also
Maintaining Multiple Option VariablesAccess the Multiple Option page.
Enter an option name in the Option Variable field in order to associate option variables with a multiple option variable.
Multiple Option Variables check for a value within a set of option variables. Multiple Option Variables group option variables together to examine them as a group, and determine whether a particular value exists in that group.
For example, a model might use two option variables within it for the coloring of a configured bike:
Frame Color (FRAME_COLOR)
Seat Color (SEAT_COLOR)
For component purposes, you might not care what color any particular part of the bike is, but you do want to know whether you need red paint. By using the multiple option variable that contains these two option variables, you can create a single rule (leveraging the Exists on Multiple Option operator) that verifies whether either of the option variables has a value of RED.
Using Value Lists and ConstraintsTo create value lists, use the Value List component (USERCD_MAINT_GBL). To set up constraints, use the Constraint component (CP_CONSTRT_GBL). This section provides an overview of values lists, an overview of constraints, and discusses how to:
Create a value list.
Set up constraints.
See Also
Understanding Value ListsYou can define two kinds of value lists:
A standard (static) list of values that is based on existing values that are stored in a table or view within a given setID and that provide a prompt list of valid field values during configuration.
You can define as many value lists as you need and use them in any model within the setID. You can also set up constraints to validate complex interrelationships and compatibility between product options.
A custom (dynamically generated) list of values by writing a SQL query to access existing values anywhere in the database.
You can use binds in the expressions to avoid hardcoding the SQL values, but you cannot use constraints with dynamically generated value lists. To change a standard list to a custom list, you must first remove any existing constraint references.
Note. The long description field is language sensitive and can use related language tables to display in a nonbase language.
When you define or modify a custom value list value, you must include the following fields in the select statement. They do not all need to return data, blanks are allowed, but they should be in the following order:
Value list
Description
Image URL
Link URL
For example:
Select Value_List, Description, Image_URL, Link_URL
From PS_TABLE
Where FIELD = %BIND(O-COLOR)
Or:
Select Value_List, Description, Image_URL, ‘’
From PS_TABLE
Where FIELD = %BIND(O-COLOR)
Or:
Select Value_List, Description, ‘’, ‘’
From PS_TABLE
Where FIELD = %BIND(O-COLOR)
Note. Constraints, Matrix variables, and configuration templates can only use standard value list values.
See Also
Language Sensitivity in PeopleSoft Product Configurator
Understanding ConstraintsConstraints enable dynamic value list prompting by creating a new value list that is a subset of the original master value list. Constraints evaluate a series of syntax expressions or conditions in order to determine the correct set of values to apply.
For example, you might have a value list, COLORS, that contains a list of all of the colors for the bikes that you sell (red, blue, black, silver, gray, and white). However, you have two sequential constraint conditions:
You can paint titanium bikes using only silver, gray, and black paint.
You can paint aluminum bikes using only red, blue, gray, white, and black paint.
You could set up a single constraint with two conditions to handle this configuration modeling situation:
The first condition of the constraint checks to see if the bike is titanium. If yes, then the constraint would limit the values to only silver, gray, and white from the original COLORS master value list.
The second condition of the constraint checks to see if the bike is aluminum. If yes, then the constraint would limit the values to only red, blue, gray, white, and black.
If the bike is neither titanium nor aluminum, then the entire master value list of COLORS is available, because there is no constraint in effect.
You can create and apply a value list constraint at two different levels:
Option-level constraints apply to individual option variables. Option-level constraints create dynamic value list based on the master value list that is associated with the individual option variable.
Page-level constraints apply to all of the option variables that are associated with a particular Page Generation or Kit Generation rule and provide a way to validate an entire configuration page without creating multiple page validation rules. A page-level constraint will validate all of the condition within a constraint and return the validation messages associated with all of the true conditions to the corresponding configuration page.
Note. You can only apply constraints to standard (static) value list variables. Dynamic value lists cannot have constraints build on top of them.
See Defining Page Generation and Validation Rules.
See Defining Kit Generation Rules.
Constraint Types (Option-Level Constraints Only)
The system processes constraint conditions according to a constraint type:
The system returns a dynamic value list based on the first true condition statement that it encounters in the constraint sequence. If all of the conditions in the constraint resolve to false, then no constraints are placed on the value list, and the entire value list is used for validation.
The system processes through all constraint sequences and returns a dynamic value list based on the full list of all true conditions that are matched. If all of the conditions in the constraint resolve to false, then an empty value list is returned for validation.
The system processes through all constraint sequences and returns a dynamic value list based on the common list of values for all true conditions that are matched. If all of the conditions in the constraint resolve to false, then an empty value list is returned for validation.
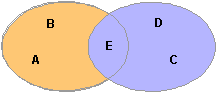
In this diagram, A, B, C, D, and E result from union constraints with true conditions, while E is also the result of an intersection constraint.
Pages Used to Set Up Value Lists and Constraints|
Page Name |
Object Name |
Navigation |
Usage |
|
CP_USERCD_PNL |
Configuration Modeler, Value Lists and Constraints, Value List |
View an existing value list or create a new one. |
|
|
CP_USERCD_IMG_SEC |
|
View the image that is associated with a value. |
|
|
CP_CONSTRT_PNL |
|
Validate option selections during option entry. |
|
|
CP_CONSTRT_SEL_VAL |
|
View or change the values that are associated with the constraint. |
Creating a Value ListAccess the Value List page.
To define or modify standard value lists:
Access the Value List page.
Select Standard in the Type field.
The Value List group box appears, where you can enter user-defined values and link to image files.
On the Description tab, enter the values.
The description of the value is generally informational, but you can use it instead of the actual value in configuration codes.
On the Links tab, associate image files and links with values.
The images and external links [uniform resource locators (URLs)] appear on configured pages for options with a Page Generation rule control type of radio button and the available options list boxes only. An image file can be any browser-supported image.
Enter the image URL to display an image that is associated with the value list value.
Note. You can set the image URL for images from the database with the following syntax: %IMAGE(<database image name>). See the sample data value list BCOLORS (setID SHARE) for an example.
Enter a link URL to display a URL to an external site that is associated with the value list value.
(Optional) Click the Preview Image/Link button to display the Value List - Preview Image/Link page.
To define or modify custom value lists:
Select Custom in the Type field.
The SQL field appears, where you can write custom SQL statements to dynamically generate values from existing database records.
Enter or modify the SQL statement.
Setting Up ConstraintsAccess the Constraint page.
Access the Constraint page.
To establish option-level constraints:
Select Option in the constraint Level field.
Select, modify, or add a value list with which to associate this constraint.
Select the constraint type
Select, modify, or add an expression ID in the Condition (Syntax) field to be evaluated to determine which value list subset to use.
The sequence determines the order in which the system evaluates the condition.
Select, modify, or add an error message that is to appear when page validation fails for this constraint.
Click the Select Value List Value(s) link to associate some or all of the values that are contained in the value list with the constraint.
To establish page-level constraints:
Select Page in the constraint Level field.
Follow steps four through six in the previous procedure.
Using MatricesTo create a matrix header, use the Matrix Header component (CP_MATRIX_MAINT_GBL). To create matrix details, use the Matrix Detail component (CP_MATRIX_DETL_GBL). This section provides an overview of matrices and discusses how to create a matrix.
Understanding Matrices
A Product Configurator matrix is a table that associates a combination of key fields with a unique result value. In effect, the matrix takes the place of a series of rules for different combinations of variable values. Matrix variables enable you to invoke result values from a predefined matrix of up to five variable values. You can, for example, define the value of combinations of prices, quantities, or options, and then call that value in syntax, without listing every possible combination in the configuration rules.
You can define an unlimited number of matrices to configure products in either the distribution or production processes. Within a matrix, you can define unlimited numbers of values for specific options, variations, or variables.
Matrix detail records are uniquely identified by an effective date, and you can access or test the matrix detail information based on this effective date. You can preset multiple detail sets that are activated automatically, based on an effective date.
In establishing the matrix variable details, you can specify wildcards (*) to aid in the maintenance when the system fails to find specific valid key field value combinations. The order of the key fields that are on the matrix controls the way that the system searches for a return value.
Note. You can use wildcards (*) anywhere in the matrix detail definition.
The system processes matrix details in the following order:
First, it looks for a matrix detail result that matches the values for all of the key fields.
If that fails, it tries again, but starts replacing values with a wildcard value (*) for the last key field on the matrix and moves forward.
This search is based on a boolean algorithm where 00000 represents all key fields matched and 11111 represents all wildcard values matched. The first search uses 00000 (no wildcards), then 00001 (1 wildcard in the last key), then 00010 (1 wildcard in the second to last key), then 00011 (2 wildcards—1 in the last key and in the second to last key), and so on.
If a result value is not defined for all wildcard key fields, and a result value is not found, the configuration engine generates a runtime error.
For example, for a matrix in which the key fields are Frame Color, Frame Material, and Frame Size, you might enter rows with the following values:
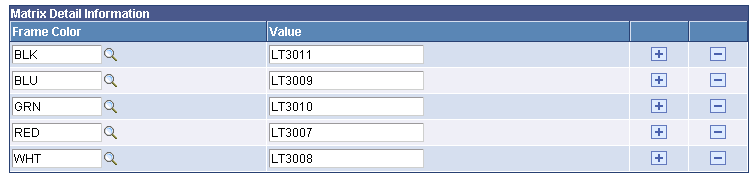
Example of Matrix Detail page
Here's how the return values appear for some key field values:
|
Frame Color |
Frame Material |
Frame Size |
Value |
|
BLK |
CFB |
30 |
200 |
|
BLK |
STL |
25 |
150 |
|
RED |
CFB |
40 |
300 |
|
WHT |
STL |
30 |
100 |
Common Elements Used in This Section|
Type |
Specifies whether the matrix result field type is Character or Numeric. |
|
Length |
Defines the number of characters that are allowed for each variable that is associated with the key field. The maximum length of a character type is 15 characters. |
|
Decimals |
Specifies the decimal precision for numeric types. The range of decimal precision values is 11,4 through 8,7. |
|
|
Key Detail button. |
|
|
Add/Update button. |
See Also
Common Elements Used in This Chapter
Pages Used to Set up Matrices|
Page Name |
Object Name |
Navigation |
Usage |
|
CP_MTX_HDR_PNL |
|
Create a matrix and control the way that the system applies it. |
|
|
CP_MTX_HDR_SEC |
|
View the details for the specific matrix key field. |
|
|
CP_MTX_DETL_PNL |
|
Identify valid key combinations and their associated result field values. |
|
|
CP_MTX_DETL_WIZ |
|
Test a matrix definition. |
|
|
Upload Download Matrix |
RUN_CPS4000 |
Configuration Modeler, Define Matrices, Upload/Download Matrix, Upload Download Matrix |
Use this page to initiate the Upload/Download Matrix SQR process (CPS4000.SQR). This process will import a matrix from a spreadsheet or flat file or export a matrix to a flat file using the information that you enter on this page. |
Creating a MatrixTo create a matrix:
Access the Matrix Header page and enter the information for identifying a matrix and controlling how the system applies it.
The header fields on this page determine the matrix result format.
Specify up to five matrix key fields and their characteristics, ordering the keys from the most important (in determining the result) to the least important to correctly prioritize the return values when the variable values do not match matrix combinations exactly.
Select a variable type: Global, Option, Internal, or Secondary.
Select, add, or modify a matrix key variable by using the Look up Variable or Add/Update buttons.
The Add/Update button is only present when no matrix detail exists for the matrix key field variable (for example, when you are creating a new header).
Enter a matrix key description.
This description is displayed as the column heading on the Matrix Detail page once you click the Go to Matrix Detail link.
Enter the operator: = (equal to), <= (less than or equal to), or >= (greater than or equal to).
The operator eliminates the need to enter every possible combination of values in the matrix detail. Instead, you can create levels of data within which the individual key field combinations might fall. The operator functions as follows:
[Matrix Detail Value] {Operator} [Key Variable Value]
Click the Add Key button to add another key to the matrix.
You cannot delete the first key information line; only those that are subsequent to the first (required) line.
After you create the key fields, click the Key Detail button to access the Matrix Header - Key Detail page to view or update the variable attributes for each key field.
Attributes appear by default based on the variable definition, but you may override them for increased or decreased decimal precision or accuracy.
When you are satisfied with the matrix key header definition, click the Go to Matrix Detail link to access the Matrix Detail page, where you define the matrix detail key values and result parameters.
Note. Once you click the Go to Matrix Detail link and save the matrix header information that you define, the resulting matrix details are tied to the matrix header key fields, which are then frozen; only the operator can be edited. To change a matrix header key at this point, you must create a new matrix variable.
The page is populated with editable variable fields for the matrix variable key fields.
Enter data in the key fields and define a matrix return value for each detail row.
To copy an entire matrix detail that is set to a new effective date, click the Add button.
The system copies the previous set of effective-dated data.
Note. You can use blank values within the matrix detail keys and return values.
Save the page and return to the Matrix Header page.
The Test Matrix link is now visible; click to access the Matrix Test page.
Enter test values for up to five matrix key fields, and click the Calculate Result button to get a return value or an error message.
Importing or Exporting a MatrixAccess the Upload Download Matrix page.
|
Action |
Select the type of action you want to perform. Values are:
|
|
Matrix |
Select the matrix. When uploading from a file, select the existing matrix that the data on the file to be uploaded applies to. When downloading to a file, select the matrix you want to download. |
|
Effective Date |
Select the effective date for the matrix. When uploading data from a file specify the effective date for the matrix detail that you desire. When downloading data to a file specify the effective date for the matrix detail you want to download from the existing set of matrix details. Note. When uploading data, if you select an effective date for a matrix detail that already exists the existing matrix detail data will be replaced if the upload is successful. |
|
Delimiter |
Select the delimiter that is associated with the import file or select the delimiter you want to use for the export file. Valid delimiters are: comma, slash, colon, semicolon, backslash, and bar. |
|
File Name |
Enter the file name in one of the formats shown on the page. File path standards are based on the Process Scheduler Server:
Note. It is recommended that you first perform a download of a matrix so that you can review the flat file format that is required. Then you can reference this downloaded flat file when creating a upload flat file because you will then know the correct data format that is required by the system. |
Creating Syntax ExpressionsTo create syntax expressions, use the Expression component (CP_EXPR_PNLG_GBL). This section describes how to create syntax expressions.
Pages Used to Create Syntax Expressions|
Page Name |
Object Name |
Navigation |
Usage |
|
CP_EXPR_PNL |
Configuration Modeler, Expressions and Messages, Expression |
Create and maintain the syntax expressions for use in Product Configurator rules. |
|
|
CP_SYNX_SEC_PNL |
|
Use the syntax builder feature to create simple or complex syntax expressions. |
Creating Syntax Expressions
Access the Expression page and enter a description for the expression ID.
If you know the entire expression that you want to create, enter it in the Syntax field.
(Optional) To select established variables and operators with which to build the statement, click the Syntax Builder link to access the Syntax Builder page.
(Optional) Build the syntax expression in the Syntax Builder group box on the Syntax Builder page.
To negate the operator, add not to the syntax statement by selecting the Not check box.
A simple expression contains a variable, Variable 1, an operand, and a second variable, Variable 2 and is entered in the form: (Variable 1, operand, Variable 2).
Click the Build Variable 1 or 2 button. When you click this button the Variable Builder group box in the lower portion of the page expands. Using the fields in the Variable Builder group box, select a variable type and an associated variable, and click the Add to Variable 1 or 2 button.
You can create nested expressions, as well.
A simple nested expression: [(Variable 1,operand,Variable 2),operand,(Variable 1,operand,Variable 2)]. To create a nested expression, add another operand after the second variable, and click the Add a New Row button to create a new row and continue the statement.
Note. The next time that you access the Syntax Builder page for this expression, the entire nested expression is contained in a single row.
Click the Build Syntax Expression button to assemble the variables and operands into an expression.
The system populates the Syntax Expression long character field on this page.
Click the OK button to return to the Expression page, which displays the syntax statement in the Syntax field.
Maintaining Configuration MessagesTo define messages, use the Message component (CP_MESSAGE_GBL). This section provides an overview of configuration messages and discusses how to maintain configuration messages.
Understanding Configuration MessagesTwo levels of messages are used in Product Configurator:
PeopleTools-generated messages.
These are used to display static text and field names and are defined on the Message Catalog page in PeopleTools Utilities. Product Configurator messages are stored in message set numbers in the following range: 15,600 to 15,699.
Configuration messages.
You can use Product Configurator’s Message component to create a custom configuration error message to use in Page Validation rules, value list constraints, and workflow rules.
Note. You can use PeopleSoft’s globalization features to display custom messages in nonbase languages.
See Also
Language Sensitivity in PeopleSoft Product Configurator
Enterprise PeopleTools 8.46 PeopleBook: PeopleSoft Application Designer
Page Used to Maintain Configuration Messages|
Page Name |
Object Name |
Navigation |
Usage |
|
CP_MESSAGE_PNL |
Configuration Modeler, Expressions and Messages, Message |
Create and maintain custom error messages. |
Maintaining Configuration MessagesAccess the Message page.
Enter the following:
|
Message ID |
Enter up to 18 characters. |
|
Description |
Enter up to 30 characters. |
|
Message |
Enter the message. This long character field uses database default length. Note. You can use configuration binds to avoid hardcoding values in configuration messages. Configuration binds are replaced differently for messages; they are simply replaced with the bind value (for example, %BIND(O-COLOR) = RED). See Configuration Binds. |
Setting Up Print CodesTo set up print codes, use the Print Code component (CP_PRINTCD_PNL_GBL). This section provides an overview of print codes.
Understanding Print Codes
This section provides an overview of print codes.
Print codes enable you to print user-defined configuration information on various PeopleSoft reports and view this information online.
When you add a new print code, associate it with the appropriate reports.
Then you can use it in the following configuration rules:
Page Generation, as an option attribute.
Configuration Detail, as a rule attribute.
(The option Variable rule is not provided with a print code; it acts like a Page Generation rule with a blank print code.)
The Configuration Detail table stores the output from Page Generation and Configuration Detail rules that are associated with a print code.
An option can be printed more than once on a report:
If you associate a print code with an option on a Page Generation rule.
If you associate the same option with a Configuration Detail rule.
The following reports use print codes:
|
Report |
Application |
|
Sales Order report |
Order Management |
|
Invoice report. |
Billing. |
|
Pick Plan report |
Inventory |
|
Packing Slip report |
Inventory |
|
Production Documents report |
Manufacturing |
|
Purchase Order report |
Purchasing |
See Also
Appendix A: PeopleSoft Order Management Reports
PeopleSoft Enterprise Inventory Reports
Pages Used to Maintain Print Codes|
Page Name |
Object Name |
Navigation |
Usage |
|
CP_PRINTCD_PNL |
|
Create and maintain print codes to control what configuration information is included on reports. |
|
|
CP_PRINTALL_PNL |
|
View all print codes for the setID, and the reports with which they are associated. |