 Understanding Capacity Planning
This chapter provides an overview of capacity planning, lists prerequisites, and discusses how to:
Set up capacity planning.
Create a supply forecast model.
Create a demand forecast model.
Conduct consolidated scenario analysis.
Understanding Capacity PlanningCapacity Planning is an integral piece of functionality for the Project Portfolio Management (PPM) and Information Technology (IT) governance markets. It is the merger and balance of human resources (supply) and work to be done (demand) to achieve and sustain peak operational efficiency.
Resource Management provides IT and development organizations with capacity planning functionality to empower managers who make important demand commitment decisions based upon limited resources or capacity information. Capacity Planning is primarily concerned with long-term projections and decisions about your organization's resource demand and supply.
Once IT and development organizations have made important demand commitment decisions based upon their strategic capacity planning, pool managers, resource managers, and program managers need to execute upon those commitments. At an operational or day-to-day level, difficult resource decisions need to be made over the course of a project to be successful. Some operational challenges—such as high resource turnover rates, extended vacations or illness on the part of key resources—cannot be forecast with Capacity Planning.
By logically grouping resources together, resource pools enable efficient resource management, while supply categories allow for classification of resources more interchangeably. Generic resource allocation enables managers to reserve pool capacity, and supply category analytics improve visibility of resource capacity.
Important Capacity Planning terms include:
|
Supply Forecast |
A supply forecast is an aggregated projection of all labor resource capacity based on resource pool headcount forecasts and capacity. |
|
Demand Forecast |
A demand forecast is an aggregated projection of all labor resource demand from projects and external data sources. |
|
Commitment Line |
A commitment line is the point at which a prioritized list of demand is separated into committed versus deferred. |
|
Capacity Planning Consolidated Scenario |
A complete capacity planning scenario consists of a version of the supply forecast, a version of the demand forecast, a commitment line and list of assumptions. |
|
Supply Categories |
A supply category is a specific resource attribute that is commonly used for capacity planning, availability and reporting purposes. The supply categories are project role, region, resource pool, and personnel status. |
|
Resource Pools |
A resource pool is a collection of resources distinctly different from a project team or HR department that is used for management and planning purposes. Resource pool setup is influenced by resource organization and can be based on such factors as location, job function, team, application, and so on. An administrator or pool manager defines the resource pools in the system, and pool managers manage the resources within the pools. |
|
Project Manager |
A project manager is responsible for the planning, estimating, resourcing, and execution of a project. |
|
HR Manager |
An HR manager is responsible for the budgeting, supervision, and performance review of a group of resources that is typically assigned to a department or cost center. |
|
Resource Pool Manager |
A resource pool manager is responsible for the management and capacity planning of a group of resources. |
This section discusses:
Resource pools.
Capacity planning.
 Resource Pools
Resource pool setup is an integral part of capacity planning, and is based on how your company wants to organize your resources based on such factors as location, job function, team, application, and so on. An administrator or pool manager defines the resource pools in the system, and assigns a manager for each pool. A pool manager can then add, update, or remove resources from pools.
Capacity PlanningCapacity Planning enables the chief-level and IT management to commit to the highest priority projects and other demands with confidence, knowing that sufficient resource capacity exists within the organization. Capacity planning provides management with:
The ability to create and join a supply and demand forecast that highlights future resource gaps and gluts.
The flexibility of performing what-if scenario analysis to find the optimal solution set.
The ability to create resource plans to resolve future resource imbalances.
The capacity planning process can be described in this way:
Executives organize resources into meaningful resource pools and set resource utilization percentages at the regional level.
Pool managers forecast capacity percentages for each resource role in their pool and account for future capacity.
The program manager creates the initial supply forecast model showing total capacity for each resource pool by using the capacity percentages combined with the preset region-based utilization percentages.
Once a supply forecast is created, executives can adjust capacity and regional utilization percentages to create different supply forecasts from the original model to analyze alternate scenarios.
The program manager creates the initial demand forecast, which is combined with supply forecasts to create consolidated scenarios for what-if analysis.
The flexibility of this conditional analysis helps management determine the optimal balance of available resources and pending work for the projected time period.
The project manager can add generic resources with supply categories to the project resource list and requests assignments. The project manager then creates a generic resource request, and has the option to automatically request generic and named resources during Microsoft Project (MSP) integration. The pool managers can view supply category capacity, allocation and availability by week at the pool and role level. The project manager can view individual resource availability based on project assignments and activity assignments. Once pool managers have viewed the supply category analytic information, they can transfer resources from one pool to another pool, or do a mass transfer of assignments from one resource to another resource. The pool managers can then update generic allocations to named resource assignments.
PrerequisitesThis section lists prerequisites to implementing capacity planning:
These applications must be installed: PeopleSoft Project Costing, PeopleSoft Program Management, and PeopleSoft Resource Management.
PeopleSoft Expenses must be installed for time reporting and policy time functionality so that historical policy time submitted for the preceding year can be accessed for the region utilization percentage.
Setting Up Capacity PlanningThis section provides an overview of resource utilization percentages and discusses how to:
Use the Strategic Capacity Planning Home page.
Associate business units with regions.
Set up resource utilization percentages by region.
Set up capacity planning options.
Understanding Resource Utilization PercentagesBefore you can create a supply forecast you must set up resource utilization percentages. The system enables you to view the historical utilization percentage of the resources and to set a new percentage to create a supply forecast model.
Utilization percentage consists of defining a region, associating time reporting business units and time reporting codes to a region, and setting a utilization percentage default per region.
Note. Region is a supply category.
The Link Regions to Business Units component (RS_REGION_BUEX)includes the mapping of PeopleSoft Expenses business units and setIDs to the region code. The Utilization Percentage Definition component (RS_REGION_UTIL) includes a breakdown of historical and default utilization percentages based on the setID’s time reporting codes (TRCs) for that region. The component searches the preceding year’s reported timesheets to gather the historical information for display on this page.
Note. The historical utilization percentage is an approximation and is mainly used for the creation of the supply forecast.
Pages Used to Set Up Capacity Planning
|
Page Name |
Object Name |
Navigation |
Usage |
|
RS_SCP_HOMEPAGE |
|
Provides a centralized location for strategic capacity planning activities, and lists the last five supply, demand, and consolidated scenario analysis forecasts accessed by the user. |
|
|
REGION_CD |
Set Up Financials/Supply Chain, Common Definitions, Location, Region Codes |
Set up region codes under the Region Category ID of Resource Management. Note. If you do not want to use regions, set up an Unassigned region for each setID and use that as the value when defining the Region supply category for a resource. See PeopleSoft Financials, Enterprise Service Automation, and Supply Chain Management Application Fundamentals 8.9 PeopleBook, Defining Financials and Supply Chain Management Common Definitions, Establishing Regions and Region Codes |
|
|
REGION_TYPE |
Set Up Financials/Supply Chain, Common Definitions, Location, Region Type Codes |
Set up region types. See PeopleSoft Financials, Enterprise Service Automation, and Supply Chain Management Application Fundamentals 8.9 PeopleBook, Defining Financials and Supply Chain Management Common Definitions, Establishing Regions and Region Codes |
|
|
RS_REGION_BUEX |
Set Up Financials/Supply Chain, Product Related, Resource Management, Utilization Percentage, Link Regions to Business Units |
Select the PeopleSoft Expenses business units to map to each region. The system calculates the historical utilization percentage of resources per region. An Expenses business unit can belong to only one region. All Expenses business units within a region must have the same SetID. |
|
|
RS_REGION_UTIL |
Set Up Financials/Supply Chain, Product Related, Resource Management, Utilization Percentage, Define Utilization Percentages |
Define utilization percentages for each region's policy time reporting codes. The system will initially calculate the utilization percentage based on the time logged by resources in that region to the policy time codes over the course of the previous year and display it on this page. You can use that calculated utilization percentage as a reference point in setting the actual region utilization percentage that will be used in capacity planning. |
|
|
INSTALLATION_RS |
Set Up Financials/Supply Chain, Install, Installation Options Click the Resource Management link. |
Select the default unit of measure display and conversion for resource work within the Capacity Planning Setup group box. In addition, verify that the scheduling options are set up appropriately for the default work days and standard hours per day. See PeopleSoft 8.9 Application Fundamentals for Financials, Enterprise Service Automation, and Supply Chain Management: Setting Installation Options for PeopleSoft Applications, Setting Up PeopleSoft Resource Management Installation Options Note. This page is also used for specifying the default capacity planning region. The system uses this region as the default when you add effort to a demand forecast or combined scenario analysis. |
Managing Strategic Capacity Planning
Access the Strategic Capacity Planning Home page.
Consolidated Scenario Analysis
Click a link in the Scenario column to view details of that scenario.
|
Create New Scenario |
Click this link to create a new consolidated scenario. |
|
Find Existing Scenario |
Click this link to view a particular consolidated scenario. |
Supply Forecast
Click a link in the Supply Name column to view details of that supply forecast.
|
Create New Forecast |
Click this link to create a new supply forecast. |
|
Find Existing Forecast |
Click this link to view a particular supply forecast. |
|
Copy Forecast |
Click this link to copy a particular supply forecast. |
Demand Forecast
Click a link in the Demand Name column to view details of that demand forecast.
|
Create New Forecast |
Click this link to create a new demand forecast. |
|
Find Existing Forecast |
Click this link to view a particular demand forecast. |
|
Copy Forecast |
Click this link to copy a particular demand forecast. |
Associating Business Units with Regions
Access the Link Regions to Business Units page.
|
Business Unit |
Select from a list of Expenses business units that are not yet associated with a region. Note. Business units that are already associated to a region do not appear in the list . |
Note. Region is a required supply category for all Resource Management resources.
See Also
Establishing and Maintaining Employees and Non-Employees as Resources
Setting Up Resource Utilization Percentages by Region
Access the Define Utilization Percentages page.
|
Time Reporting Code |
Displays the TRCs for each region. The system obtains the policy time codes using the business units that were linked to that region on the Region Codes page. |
|
Utilization % (utilization percentage) |
The utilization percentage that initially shows as the default value is the historical utilization percentage, but it can be overridden. Note. If you change the Utilization % after a forecast is saved, the forecast will not be affected. |
|
Historical Utilization %(historical utilization percentage) |
Displays the percentage of total time reported by the resources in the region for each TRC for the previous year in PeopleSoft Expenses. |
|
Total Utilization %(total utilization percentage) |
This value is calculated by subtracting all Utilization % rows from 100 percent and returns the final utilization to be used within strategic capacity planning (SCP) models. |
|
Total Historical Utilization %(total historical utilization percentage) |
This value is calculated by subtracting all Historical Utilization % rows from 100 percent and returns the final historical utilization. It assists management with determining the proper utilization value to set. |
Setting Up Capacity Planning Options
Access the Installation Options - Resource Management page.
Note. This information appears in the bottom section of the Installation Options - Resource Management page.
|
Default UOM Display |
Select the unit of measure that determines whether the effort is in Hours or Days. If you select to display the information by hours, all of the capacity planning data will be provided with the primary display and update fields in hours. |
|
Standard Hours per Work Day |
This value is obtained from the resources data setup accessed by selecting in Set Up Financials/Supply Chain, Common Definitions, Resources Data, Resource Setup. This indicates the standard number of hours in one work day. The value is not editable on the Installation Options - Resource Management page. |
|
Standard Work Days per Month |
Enter the number of work days in a month. Typically, 21 or 22 days equals one full month. |
|
Work Days to Full Time Resource |
Enter the number of days that could be translated into a single full-time resource. Typically this value is the same as the standard work days per month. |
|
Default Capacity Planning Region |
Specify the Region SetID and Region Code to use in combined scenario analysis. |
See Also
Setting Up Resource Management Installation Options
Creating a Supply Forecast ModelThis section provides an overview of the supply forecast model and discusses how to:
Create supply forecasts and select pools.
Add pools to forecasts.
Review supply forecasts.
View supply forecast details.
Modify supply forecasts.
Add new supply.
Modify region utilization.
Modify forecast history.
Analyze supply.
View supply forecast charts.
Copy supply forecasts.
Understanding the Supply Forecast ModelSupply is made up of human resources available to do work. A supply forecast is an aggregated projection of all labor resource capacity based on resource pool headcount forecasts and utilization. A supply forecast model provides an organization with a way to gain an accurate, concise picture of its forecasted resource capacity over a period of time.
Once resources are grouped in resource pools, pool managers can define a capacity percent for each resource (named or generic) in their pool and account for future capacity in those resource pools. This information combined with the preset, region-based utilization percentage to create a supply forecast that calculates the total capacity for each resource pool. Three other supply categories (role, region, and personnel status) further segregate the data.
The system also calculates the capacity of each resource (named and generic) within each of the selected pools for the selected date range. The data is presented in a summarized format and initially displayed by pool and role (within each pool). You have the option to view the data by other supply categories as well as in graphical format. In addition, you can view the resource information using PeopleSoft Analytic Calculation Engine interactive analysis.
The maximum range for supply forecasting is 24 months.
Note. All data in supply forecasts, demand forecasts, and consolidated scenarios is “point-in-time.” This means that if additional resource pools or demand data change or become available on the transactional side, it will not affect any existing forecasts or scenarios—unless you specifically choose to add them afterwards. In other words, forecasts are created based on the picture of the supply and demand as of the date the forecast was created. If pools and capacity are added a week later, for example, that information will not appear in the supply forecast. You can manually add the supply or new resource pools to the forecast or create a new forecast to capture the latest supply data.
This flowchart shows the supply forecast model process:
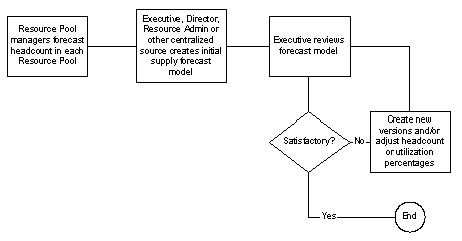
Supply Forecast Model process flow
You use the Supply Forecast component (RS_FR_SUPPLY) to create, view, and modify supply forecasts.
Resources and Capacity CalculationsThere are some important things to note about resources and creating supply forecasts.
Because role is not a required supply category for a resource, it is possible that the forecast will encounter resources that do not have a role specified. If the forecast encounters any resources with a blank Role field, the system displays the capacity for these resources with a label of Undefined Role. For example, this table lists the resources within Pool A:
|
Name |
Role |
Capacity |
|
Michael Fontes |
DBA |
100 days |
|
Serena Clemens |
DBA |
120 days |
|
Kelly Orihood |
QA |
100 days |
|
Justine Yee |
50 days |
|
|
Christopher Brown |
75 days |
The capacity is broken down as follows:
DBA - 220 days
QA - 100 days
Undefined Role - 125 days
Resource Capacity Calculations
The system calculates capacity in either hours or days. Organizations decide at the installation level if they will display and calculate capacity in hours or days. Capacity is calculated by selecting each resource that is part of the selected pools for the time period that the forecast is being created. Next, the system looks up the Capacity percentage that was set in that pool for each resource. The capacity is multiplied by the number of days or hours in the forecast period. Finally, a utilization percentage (based on the resource's region) is applied. Therefore:
capacity = (resource pool capacity percentage) × (number of days or hours in period) × (utilization percentage)
The following scenarios show how capacity is calculated. This table presents the information that is used in the subsequent scenarios:
|
Supply Forecast Period |
June, 2004 - May, 2005 (12 months) |
|
Display capacity in: |
Days (Installation setting) |
|
Number of hours in a day: |
8 (Installation setting) |
|
Number of days in a month: |
20 (Installation setting) |
|
One full-time resource: |
20 (Days per month = one full- time resource) |
|
Utilization percentage for USA: |
85 percent |
Scenario 1: Resource is in one pool with the same pool capacity percentage for the entire period.
|
Parameter |
Value |
|
Resource name |
Generic |
|
Role |
DBA |
|
Pool capacity percentage |
100 |
|
Region |
USA |
(pool capacity percentage) × (number of days or hours in period) × (utilization percentage)
1. 0 × (20 days × 12 months) × 0.85 = 204 days of capacity for the period
Scenario 2: Resource is in one pool with one pool capacity percentage for one full month and another pool capacity percentage for rest of the period.
|
Parameter |
Value |
|
Resource name |
Alysha Kibble |
|
Role |
QA Lead |
|
Pool capacity percentage |
50 (6/1/04 - 6/30/04) 100 (7/1/04 - no end date) |
|
Region |
USA |
(pool capacity percentage) × (number of days or hours in period) × (utilization percentage)
06/01/04 – 06/30/04: 0.5 × (20 days x 1 month) × 0.85 = 8.5 days of capacity
07/01/04 – 05/31/05: 1.0 × (20 days x 11 months) × 0.85 = 187 days of capacity
Total capacity for the forecast period is 195.5 days.
Scenario 3: Resource is in one pool with one pool capacity percentage for a partial month and another pool capacity percentage spanning multiple months.
|
Parameter |
Value |
|
Resource name |
Corinne Brown |
|
Role |
Project Manager |
|
Pool capacity percentage |
50 (6/1/04 - 7/21/04) 100 (7/22/04 - no end date) |
|
Region |
USA |
This scenario is one of the more complicated situations that may be present. The dates are broken down monthly (or by fractions of months when the capacity changes mid-month):
(pool capacity percentage) × (number of days or hours in period) × (utilization percentage)
06/01/04 – 06/30/04: 0.5 × (20 days x 1 month) × 0.85 = 8.5 days of capacity
07/01/04 – 07/21/04: 1.0 × (20 days x 0.68 month) × 0.85 = 5.8 days of capacity
07/22/04 – 07/31/04: 1.0 × (20 days x 0.32 month) × 0.85 = 5.4 days of capacity
08/01/04 – 05/31/05: 1.0 × (20 days x 10 months) × 0.85 = 170 days of capacity
Total capacity for the forecast period is 189.7 days.
Supply full-time resource takes into account all the regions found in the supply forecast. For example, if the number of days is 6000, the region utilization percent is 80 (since each region can have a different percent each one would have to be included in the calculations), the days per month for a full-time resource is 20, and the number of months in the scenario date range is 12, the calculation would be:
6000 days / 0.80 / 20 days / 12 = 31.25 full-time resources.
Note. Full-time resources are calculated differently between the Supply Summary page and the Supply Details page.
Pages Used to Create and Modify a Supply Forecast
|
Page Name |
Object Name |
Navigation |
Usage |
|
RS_FR_SUP_SEL_POOL |
Resource Management, Strategic Capacity Planning, Supply Forecast Click the Continue Selecting Pools link in an existing Supply Forecast. |
Add a new supply forecast and select the pools to add to the supply forecast. |
|
|
RS_FR_POOL_SRCH |
Resource Management, Strategic Capacity Planning, Supply Forecast Click the Continue Selecting Pools link in an existing supply forecast. Click the Search for Pools link on the Select Pools page. |
Search for pools by pool name, pool manager, or pool ID to be added to the supply forecast. |
|
|
RS_FR_SUP_SUMMARY |
Resource Management, Strategic Capacity Planning, Supply Forecast |
View the summarized information for a supply forecast. The page contains links to all the other supply forecast functions. When you have selected the pools that you want to include in the supply forecast, you can view the calculated capacity for all the resources (generic and named resources) that are in the selected resource pools. The data is summarized first by pool and then by role. |
|
|
RS_FR_SUP_DTL |
|
View the supply details for all of the pools or one particular pool in the supply forecast. |
|
|
RS_FR_SUP_MOD_SUP |
|
Add or subtract the actual supply in the forecast to, for example, model different scenarios for a given calculated resource pool role row. |
|
|
RS_FR_SUP_ADD_SUP |
Resource Management, Strategic Capacity Planning, Supply Forecast Click the Add New Supply button. |
Add additional supply to a forecast. Note. The system validates the dates you enter to ensure that the start date is not greater than the end date and that the date range does not exceed 24 months. When adding a new value, you can manually enter the supply forecast ID or the system can generate it. |
|
|
RS_FR_SUP_UTIL |
Resource Management, Strategic Capacity Planning, Supply Forecast Click the Modify Region Utilization button. |
Change the utilization percentage for a forecast. |
|
|
RS_FR_SUP_MOD |
Resource Management, Strategic Capacity Planning, Supply Forecast Click the Forecast Modification History link. |
View details of modifications made to supply forecasts. |
|
|
RS_SUP_ACE_PAGE |
Resource Management, Strategic Capacity Planning, Supply Forecast Click the Supply Analysis link. |
Dissect and scrutinize supply forecast data by supply categories by month and additional supply categories. |
|
|
RS_SUP_CHARTS |
Resource Management, Strategic Capacity Planning, Supply Forecast Click the Supply Summary Charts link. |
View graphical summarized capacity information by supply category. |
|
|
RS_FR_COPY |
Resource Management, Strategic Capacity Planning, Strategic Capacity Home Click a Copy Forecast link in either the Supply Forecast or Demand Forecast group box. |
Create copies of existing forecasts with same date range as the original forecast. Note. You can use this page to copy supply or demand. |
Creating Forecasts and Selecting Pools
Access the Supply Forecast - Select Pools page.
Adding Pools to Forecasts
Access the Search for Pools page.
|
Select |
Once you enter criteria and can view results from information you enter in the Search for Pools group box, select the check boxes for the pools you want to add to the forecast. |
|
Add To Supply Forecast |
Click this button to add the pools to the forecast. When you click this button, the Selected Pool icon appears next to the pool name. Click the Return to Select Pools link. |
Reviewing Supply ForecastsAccess the Supply Forecast Summary page.
|
Description |
Enter a description for this supply forecast. |
|
Pool/Role |
Displays the pool name and associated roles for the pool. Click a pool link in this column to view all the calculated capacity in detail for that role within the specific pool. You can remove an entire pool from the supply forecast by selecting the adjacent check box and clicking the Remove From Forecast button. |
|
Total Capacity(Hours) or Total Capacity(Days) |
Depending on your installation choice, this is the total calculated resource capacity in the pool for the date range specified for the supply forecast displays in hours or days. The data is summarized first by pool and then by role. |
|
Full Time Resource |
Displays the total number of full-time resources in the pool for the date range specified for the forecast. The common denominator for the calculation is the number of months included in the forecast. |
|
Total |
Displays the totals of the Total Capacity and Full Time Resource value. Click this link to view supply details for all the pools in the supply forecast. |
|
Add New Supply |
Click this button to select a date range within the forecast periods, pool, role, personnel status, and region, as well as an amount of capacity that you want to add to the supply forecast capacity. |
|
Modify Region Utilization |
Click this button to adjust the region utilization percentage for the current supply forecast. |
|
Remove From Forecast |
Click this button to remove selected Pool data from the forecast. |
|
Continue Selecting Pools |
Click this link to refine the pool selection for this forecast. |
|
Supply Analysis |
Click this link to view and analyze supply forecast data by the four supply categories with monthly views. |
|
Supply Summary Charts |
Click this link to view charts based on the supply categories. |
|
Forecast Modification History |
Click this link to view each modification to the actual supply in the forecast. |
Viewing Supply Forecast Details
Access the Supply Forecast Detail page.
|
Description |
Enter a description for this supply forecast. |
|
|
If this icon displays in a Supply Details row, it indicates that the row was added to the forecast by using the Add New Supply page. |
|
|
Click this icon to enter comments about the supply row. Two different icons can display: if the icon contains lines, there are comments entered for that row. |
Supply Details
|
Role, Pool,Region, and Personnel Status |
These are the supply categories of the displaying resource capacity. Click a link in the Role column to modify the actual supply shown in that row. |
|
Total Capacity (Hours) |
Displays the resource capacity for the row. The value is based on the unit of measure selected during installation. Note. Depending on your installation options selection, the capacity will display in either days or hours. |
|
Full Time Resource |
Displays the calculation of full-time resources for each row. The system calculates full-time resources based on the start and end dates on each row of the Supply Details group box. You can add a new row of supply that is within the forecast date range but that does not cover the entire range. It’s important to note that the calculation is based on the date range specified in that row. |
|
Start Date and End Date |
The system uses these dates to calculate capacity and full-time resources. All rows that are calculated from the resource pools must be the same date range as the forecast period. You can add new supply and specify date ranges within the forecast period. The capacity and full-time resources that the system calculates for the added rows are only based on the dates you entered on the Add New Supply page. |
|
|
Click the Comments button to add additional comments about the supply row. |
Modifying Supply Forecasts
Access the Modify Supply in Forecast page.
|
Supply Categories |
The supply categories for the selected row: Role, Region, Pool, and Personnel Status. Note. You cannot change the supply categories of an existing row that was calculated from a resource pool. |
|
Capacity |
Select capacity Days (or Hours; the field name depends on the unit of measure installation settings for capacity planning) or Resources. The values in the boxes prepopulate with what exists for that row. The values can be positive or negative numbers. Enter a value in one of the boxes. The system calculates the corresponding value (capacity in days or hours, or full-time resources) in the Supply Forecast Details group box after you click OK (it will not get calculated/displayed) in the Supply Modification page.) |
Note. Changes made to either the Days or Resources fields will not be saved unless the respective option is selected.
Adding New Supply
Access the Add New Supply To Forecast page.
Note. You can enter the same supply categories as an existing row (even with the same date ranges).
|
Role SetID |
Enter a setID. |
|
Role |
Enter any valid role. You can enter roles that are not yet in the forecast. |
|
Pool |
Enter a pool. If you later remove a pool from the forecast, any new supply rows that you added for that pool will be removed from the forecast as well. |
|
Region Code |
You can enter any valid region, not only what is in the forecast. |
|
Personnel Status |
Select Employee or Non-Employee. |
|
Capacity |
Select an option, and then enter the number of Hours (or days, depending on the installation settings) or the number of full-time Resources to add to the supply forecast. |
|
Start Date and End Date |
The date range over which you want to add this supply in the model. The forecast start and end date values will appear by default. The dates must be within or equal to the supply forecast date ranges. |
|
Comment |
Click this link to add comments about this new supply. |
Modifying Region Utilization
Access the Modify Region Utilization page.
Note. The utilization values only apply to the particular forecast and do not override the system region utilization percent.
|
Description |
Enter a description of your modifications. |
|
Region and Utilization % (utilization percent) |
This page displays all the regions that are set up in the system and the utilization percent. |
|
Utilization % for this forecast |
Enter a different utilization percent. The default value is equal to the Utilization % value. The system uses the value you enter to recalculate the supply in the current supply forecast. Note. The value you enter here will remain with this forecast whenever you access it; all supply will be based on the value specified in this field. |
Modifying Forecast History
Access the Supply Forecast Modification History page.
|
Action |
|
|
Capacity (Hours) and Full Time Resource |
These two columns display the difference between the original supply details value and what you changed in the Add New Supply To Forecast or Supply Forecast Modification pages. For example, let's say you update an existing row that was calculated based on the resource pools (and not by adding new supply row). You change the total capacity from 500 days to 250 days, and consequently the full-time resources change from 3 to 1.5. The Action becomes Update; the Capacity (Hours) value in the Supply Forecast Modification History is −250; the Full Time Resource value is −1.5. |
Analyzing Supply
Access the Supply Analysis page.
|
|
You can manipulate the data any way you like based on dimensions, including: Project Role, Pool, Region Code, and Personnel Status. For example, drag and drop the ALL_ROLES Project Role dimension to change the supply analysis view. You can also see all months, rolled up all together or individually, that are part of the forecast. You can apportion by supply categories to change the total Capacity and Full Time Resource dimension view. See Enterprise PeopleTools 8.46 PeopleBook: PeopleSoft Analytic Calculation Engine, Understanding PeopleSoft Analytic Calculation Engine |
Viewing Supply Forecast Charts
Access the View Supply Forecast Charts page.
|
Total CapacityFull Time Resources |
View the supply information by selecting Total Capacity (in whatever the capacity planning installation level unit of measure is: hours or days) or Full Time Resources. |
|
Chart Type |
Select to view a bar or pie chart. |
|
Refresh |
Click the refresh button after selecting different chart options to update the charts. |
Copying Supply Forecasts
Access the Copy Forecast page.
|
Forecast Type |
Displays the forecast type selection that you make from the home page. If you select Copy Supply Forecast from the home page, the value is Supply. If you select Copy Demand Forecast from the home page, the value is Demand. Note. You can create copies of existing supply forecasts. The newly created copy has the same date range as the original. The main purpose is to enable you to create multiple supply forecasts quickly for the same period to model multiple supply scenarios. For example, one forecast might be for increasing contractor supply, another for moving some supply offshore, and another for modeling zero supply change. |
|
New Forecast ID |
Enter the ID for the new supply or demand forecast. It can be autonumbered or set manually. If it is set manually, you can enter up to 15 characters. If it is autonumbered, the ID will be 10 characters. |
|
New Forecast Name |
Enter the name of the new forecast. |
|
Copy from Forecast |
Select the forecast that you want to copy. |
|
Copy |
Click this button to access the Supply Forecast page with the new Supply Forecast ID and Supply Forecast Name populated. The forecast will already be saved as a result of the Copy Forecast Application Engine process. (You do not have to click Save to save this new forecast; it will already be saved.) |
Creating a Demand Forecast ModelThis section provides an overview of the demand forecast model and discusses how to:
Import external demand data.
Note. Third-party data can be loaded into a staging table using the Excel-to-CI spreadsheet and viewed through this component (RS_EXT_DMD_SRCH) and validated so that it contains the proper information for enhanced analysis through the scenario component.
Create a demand forecast.
Search for demand data.
Review summary demand data.
Modify the demand forecast.
View demand forecast charts.
Analyze demand.
Add demand.
Add new roles.
Understanding the Demand Forecast ModelIn an IT organization, there is the need for frequent projections of upcoming work to be done in an effort to improve a company’s overall operational efficiency. IT executives need foreknowledge of the potential projects that are coming, and to compare the demand on their resources with projections of how much work they can manage given their existing resource constraints.
Whether the demand is as minor as a project to relocate a server (tactical project) or as significant as a system implementation spanning several years (strategic program), the supply of resources must remain adequate to meet the demand for work to be completed. Capacity planning enables management to build supply forecasts based on existing headcount, along with engaging in what-if scenarios so they can determine the effect of adding or cutting resources, obtaining contractor services, and so on. Similarly, the process of collating demand into a demand forecast is also needed.
IT organizations receive demand on their time through multiple methods, ranging from projects to external demand data sourced out of third-party systems. Before creating the demand forecast, the setup of import data and cleanup—or scrubbing—of that data must take place so that it can be used in the demand forecast.
The demand for resources is brought into the demand forecast from the following sources:
Pending and active projects (from PeopleSoft Project Costing).
External third-party systems using a generic Excel component interface upload process.
Once the preliminary demand forecast is populated with the raw data, you have the ability to add or delete demand from the list, categorize the entries in the list, and prioritize and rank the individual demand’s importance for the organization. When you have verified and cleaned up the demand forecast, you can combine it with a similarly verified and scrubbed supply forecast into a consolidated supply-demand scenario, where you can perform further what-if scenarios to determine the optimal balance of available resources and pending work for the upcoming projected time period.
Note. The maximum range for demand forecasting is 24 months. Although demand itself can span longer (for example, a five-year implementation project), the forecast only concerns itself with a maximum of two years, and will only pull effort data within that two-year span.
You can upload data with the Excel-to-CI utility. The component interface used in this process is RS_EXT_DMD_CI. This component interface contains all the fields that are required in order to load demand data into the system.
You first load demand-related data into the Excel spreadsheet. After you run the Excel-to-CI utility to load the data, you use the Load External Demand page to clean up the data and add any additional information that was not specified in the Excel-to-CI process.
Demands loaded using the utility display in the Load External Demand page. The interface staging table RS_INTFC_DMD contains all the rows that you entered in the spreadsheet. All rows are validated against the prompts in the RS_EXT_SRCH_DMD, which is driven by business unit. Relevant rows that pass all validation tests are moved to the RS_EXT_SRCH_DMD for more cleanup. You can add any demand, delete any demand, or update existing demands.
The Demand Forecast component (RS_FR_DEMAND) is used to create, view, and modify demand forecasts.
Note. All data in supply forecasts, demand forecasts, and consolidated scenarios is “point-in-time.” This means that if additional resource pools or demand data changes or becomes available on the transactional side, it will not affect any existing forecasts or scenarios—unless you specifically choose to add them afterwards. In other words, forecasts are created based on supply and demand as of the date the forecast was created. If pools and capacity are added a week later, for example, that information will not appear in the supply forecast. You can manually add the supply but it does not automatically appear in the forecast.
Pages Used to Create a Demand Forecast
|
Page Name |
Object Name |
Navigation |
Usage |
|
RS_EXT_DMD |
Resource Management, Strategic Capacity Planning, Maintain External Demand Data |
Import and clean up external demand data for use in demand forecasts. |
|
|
RS_ADD_DMD |
Resource Management, Strategic Capacity Planning, Demand Forecast Click the Continue Selecting Demand link. |
Browse for demand from a predefined, filtered list to include in the demand forecast. |
|
|
RS_SEARCH_DMD |
Click the Search for Demand link on the Demand Forecast - Browse for Demand page. |
Search for demand using a set of multiple search criteria to include in the demand forecast. |
|
|
RS_DMD_SUMMARY |
Resource Management, Strategic Capacity Planning, Demand Forecast |
View total time needed (in hours or days) and full-time resource count by application area. This page displays the total time required (in hours or days, with conversion to full-time resource count) by application area only for the selected forecast ID. |
|
|
RS_DMD_DETAIL |
Resource Management, Strategic Capacity Planning, Demand Forecast, Demand Forecast Details |
Build and modify demand forecasts. |
|
|
RS_DMD_ROLE |
Click a link in the Demand column on the Demand Forecast Details page. |
View details by role and other demand data. |
|
|
RS_DMD_CHARTS |
Click the Demand Summary Charts link on the Demand Forecast Summary page. |
View graphical summarized capacity information by demand category. |
|
|
RS_DMD_ACE_PAGE |
Click the Demand Analysis link on the Demand Forecast Summary page. |
Dissect demand forecast data by supply categories by month. |
|
|
RS_DMD_ROLE |
Click the Add New Demand button on the Demand Forecast Details page. |
Add new demand to the forecast. |
|
|
RS_ADD_NEWROLE_DMD |
Click the Add New Role button on the Demand Forecast - Demand Details page. |
For the demand, add, modify, or delete roles, and change the level of effort needed for each role. |
Importing External Demand Data
Access the Load External Demand page.
|
Sequence Number |
Enter a unique number in the Microsoft Excel spreadsheet. Each batch sequence number is uniquely identified by a load description for every upload process. |
|
Load Description |
Enter a unique batch load description. You can vary the name of each run to distinguish the data during the upload process. |
|
Business Unit |
Enter a business unit to map external data to either through manual entry in the spreadsheet or at a later point in the during data scrubbing to drive setID prompting. |
|
Demand ID |
Enter an ID, which the system stores in a staging table (RS_INTFC_DMD). The system assigns items demand IDs during the load process. |
|
Demand Description |
Enter any text to identify the demand data row. |
|
Role SetID |
Enter the setID for the resource role requested by the demand. |
|
Project Role |
Enter the role requested by the demand. |
|
Program |
Enter a higher level categorization of Projects (this is an existing PeopleSoft Program management field). This field is optional. |
|
Effort |
Enter the estimated length of time needed for this demand row for this role. |
|
UOM (unit of measure) |
Specify corresponding effort capacity in Days or Hours. |
|
Application Area |
Enter the group to which the demand belongs, such as IT, Marketing, and so on. We strongly recommend that you populate this field in order to view the data in summarized format in the demand forecast. |
|
Application |
Enter an application to describe the system or application to which the demand applies, such as Program Management, Project Costing, and so on. |
|
Release |
Assign a release to demand lines to account for periodic releases. |
|
Category |
Enter a category to categorize the demand, such as Operational or Strategic. |
|
Requester |
Enter the original requester of the project request. |
|
Request Date |
Enter the date the project request was first submitted. |
|
Status |
Indicates whether a project is already active and in operation, as opposed to being in the proposal state. This helps you to determine whether projects currently running need to be cancelled. Values are:
|
|
Message |
Displays a descriptive message about the data row's status after the load process. |
|
Add Demand |
Click this button to add a row in the Demand Data Cleanup group box. You can enter any demand of your choice. The Demand ID is generated when a new row is added in the grid. |
|
Validate Demand |
Click this button to validate the demand data for business unit, required key fields, and translate values. |
|
Load Demand |
Click this button to retrieve all the rows from the RS_INTFC_DMD table. The process populates the RS_DMD_CACH table with all the demand data in monthly buckets and deletes the loaded rows from the interface grid in the page. |
Note. When entering data in the RS_LOAD_EXT_DMD component interface, it is important to ensure that the LINE_NBR field is not selected for input because it is an autogenerated field; do not enter any value in it.
See Also
Enterprise PeopleTools 8.46 PeopleBook: PeopleSoft Component Interfaces, Using the Excel to Component Interface Utility
Creating a Demand Forecast
Access the Demand Forecast - Browse for Demand page.
Demand
|
View Demand By |
Filter your demand by selecting one of these options:
After you select a filter to view the demand, click the View button to display the demand. Then, once you are satisfied with the demand, click the Add to Demand Forecast button and the system will add the demand. You can click a link in this column to browse further down into the individual demand and select projects individually to add to the forecast. Select the check box for each row of demand that you want to add to the forecast. Note. The demand forecast categorizes demand by application area, application, release, and program, although none of those fields are required for projects. Therefore, if you do not specify values in these fields, you cannot comprehensively use the Demand Forecast - Browse for Demand page because projects without those fields specified will not be visible. The only way you would be able to select projects to add to a demand forecast is to access the Search page (RS_SRCH_DMD) where all projects within the demand forecast date range are accessible—whether or not application area, application, release, or program are specified. |
|
|
Click this icon to drill further down to the individual demand level and select projects individually to add to the forecast. For example, click it to drill down from Application Area to Application and then to individual demand. |
|
Add to Demand Forecast |
Click this button to add the selected demand to the demand forecast. |
|
View Demand Forecast |
Click to access the Demand Forecast Details page where you can change the demand details for the specified Demand Forecast ID. |
|
Search for Demand |
Click this link if the Demand group box does not provide the appropriate information and you need to perform a more detailed search. |
Demand Forecast
|
Forecast ID |
The demand forecast ID. |
|
Name |
The name of the demand forecast. |
|
Start Date and End Date |
The start and end date range of the forecast in MM/YYYY format. |
|
View Demand Forecast |
Click this link to view forecast details, and change demand details for this demand forecast ID. |
Searching for Specific Demand Data
This page contains the results of the initial basic search. You can further modify the search parameters, and can search as many times as necessary to find the appropriate demand data.
The fields on this page are the same as the fields on the Demand Forecast Details page, also discussed in this chapter.
Reviewing Summary Demand Data
Access the Demand Forecast Summary page.
|
Continue Selecting Demand |
Click this link to add additional demand data to the forecast. |
|
Demand Analysis |
Click this link to perform further analysis. Perform these actions for all months (month by month), and one month at a time for each month in the forecast. |
|
Demand Summary Charts |
Click to access the Demand Summary Charts page where you can view graphical representations of the selected demand data. |
Demand Summary
View the data sorted by Application Area: the Total Effort required (in hours or days), with conversion to Full Time Resource count.
Total effort is based on the project calendar set for the demand (or for the external demand, using the default project calendar for that business unit), and is calculated using the number of days specified for each role on the project in the Assignment Schedule group box on the Resource Details page in PeopleSoft Program Management, less weekends and holidays. Full-time resources are calculated by dividing the effort by the number of days per month for a full-time resource (as defined during the capacity planning setup in Resource Management).
Note. The demand forecast first categorizes demand by the Application Area field. On this page, all demand is summarized at the application area. Any demand that does not have application area specified,
will not be part of the demand summary; it will not display nor be part of the total full-time resource (FTR) and capacity.
Demand that does not have application area specified, however, will be accessible on the Demand Forecast Details page.
Click the Save Forecast button to save the forecast, and to populate the lower half of the page with values in these fields:
Created By
Updated By
Created On
Updated On
Modifying the Demand Forecast
Access the Demand Forecast Details page.
Note. Many of the fields on this page are the same as fields on the Load External Demand page.
|
Rank |
This is a sequencing field in which you can enter a number to rank demand in order of importance. Rank for each demand must be unique across the demand forecast. |
|
Priority |
Assign a value of Critical, High, Medium, or Low to demand rows for informational purposes only. No processing is done on these fields. |
|
Demand |
This is a combined ID field that displays values from Project ID or External Demand ID, along with the demand description. Click a link in the Demand column on the Demand Forecast Details page to view details of that particular demand row, and modify demand information for the forecast. Note. Changing the value of any of these demand details fields will not change the values set on the actual project in the system. The values will only be used in this forecast. |
|
Schedule |
This field is a concatenation of the start and end dates, release, and status. For example: 09/20/2005 - 11/01/2005 Release: 8.9 Pending |
|
Effort and Category |
The estimated length of time needed for this demand row for this role. This is a concatenation of effort, unit of measure, and category. Category is specified on the Project General Information page. |
|
Application Area, Application |
Displays the group, and system or application to which the demand applies, such as ESA, IT, Marketing, Program Management, and so on. Application and application area are specified on the Project General Information page. |
|
Demand |
This field is a concatenation of the demand ID and the demand description. For example: M000397 Bulk Mailer Upgrade |
|
Business Unit |
This is the Project Costing demand business unit. |
|
Program |
This is a Program Management field that reflects a higher-level categorization of projects and project requests. |
|
Project Type |
This field is specified on the Project General Information page. |
|
Demand Source |
Indicates from where the demand data came. |
|
Requested by |
If the project came from a project request, this field will be populated with the requestor of the project request and the date the request was originally created. If the project was not created from a project request, it will be populated with the user ID that created the project in the system. |
|
Continue Selecting Demand |
Click this link to add further demand data to the forecast. |
|
Demand Summary Charts |
Click this link to view graphical representations of the selected demand data. |
|
Add New Demand |
Click this button to add new demand. |
|
Remove From Forecast |
Click this button to delete selected demand from the forecast. This deletes the rows from the Demand Detail table and Demand Forecast Cache table for the Demand ID specified. |
Viewing Demand Forecast Charts
Access the Demand Summary Charts page.
This page and its fields are similar to the page for supply forecasts.
Pie charts will feature metrics for each pie section, including total effort (in hours or days), full-time resources conversion, and a percent of total field. For example, a potential pie section label would be
950/45 27%
This label indicates 950 days, 45 full-time resources, and 27 percent of the total pie. (This does not apply for a bar chart view.)
Four pie or bar charts display:
Demand by Application Area: This view lists the total demand for each application area (not application) and displays an associated legend with such labels as IT, Marketing, Facilities, Quality Assurance, and so on.
Demand by Role: This view lists the total demand for each role and displays an associated legend with such labels as DBA, Developer, FA, and so on.
Demand by Release: This view lists the total demand for each release and displays an associated legend with such labels as 5, 3.1, 1.0, and so on.
Demand by Priority: This view lists the total demand for each priority and displays an associated legend with such labels as Critical, High, Low, and so on.
See Also
Viewing Supply Forecast Charts
Analyzing Demand
Access the Demand Analysis page.
This page and its fields are similar to the page for supply forecasts, except that you can manipulate the data by different categories:
Total Effort
Full Time Resources
Application
Application Area
Release
Program
See Also
Enterprise PeopleTools 8.46 PeopleBook: PeopleSoft Analytic Calculation Engine, Creating Analytic Grids
Adding Demand
Access the Demand Forecast - Demand Details page.
Enter demand detail information in the Demand General Information group box, and then click the Add New Role button to choose setID and role information to add to the Demand By Role group box. Click the OK button for the system to add the information to the Demand group box on the Demand Forecast Details page.
This inserts a row into the Demand Detail table for the Demand ID specified. Any demand you enter here is automatically split evenly into the months within the Start Date and End Date range you specified in the demand details.
See Also
Importing External Demand Data
Adding New Roles
|
Role SetID, Project Role, and Effort (Hours) |
Enter the role information for the demand. Note. The unit of measure for Effort will be in days or hours depending on the installation options you selected. |
Conducting Consolidated Scenario AnalysisThis section provides an overview of consolidated scenario analysis and discusses how to:
Create and review consolidated scenarios.
Adjust consolidated scenarios.
Adjust forecasted or allocated demand.
Adjust forecasted supply.
Approve consolidated scenarios.
Analyze consolidated scenarios.
Understanding Consolidated Scenario AnalysisThe consolidated scenario analysis is the final of three primary components in the Capacity Planning process flow. When you begin the Capacity Planning process, you can choose to either build the supply or demand forecasts (either can be completed before the other). Supply and demand forecasts are typically built by different users, but both forecasts need to be completed and available prior to performing the consolidated scenario analysis.
The currency code you select drives how the consolidated scenario displays estimated cost information. For example, if you select USD and the role rates by region are in another currency, the system converts the currency to USD during its calculation of the blended rate so that estimated costs for supply and demand can be shown in USD.
Note. If the same forecast has been included in more than one scenario prior to either forecast being approved, as soon as one of the scenarios is approved, the other can no longer be approved and will have a status of 'obsolete', because the forecasts are also locked.
With consolidated scenario analysis, you can:
View graphs of the combined supply-demand forecasts.
Project the amount of demand to which your organization can realistically commit based on the supply constraints.
Perform further modification of supply and demand forecasts to model what-if scenarios.
Approve a consolidated scenario and track assumptions made that are integral to the scenario’s approval.
Use the Combined Scenario component (RS_SCENARIO) to conduct consolidated scenario analysis.
Pages Used to Conduct Consolidated Scenario Analysis
|
Page Name |
Object Name |
Navigation |
Usage |
|
RS_SCENARIO_SUMM |
Resource Management, Strategic Capacity Planning, Consolidated Scenario Analysis |
View supply summaries and supply and demand metrics with graphical comparison. Note. This page is for users that have permissions enabling them to create, save, and approve consolidated scenarios. |
|
|
RS_SNR_UNAPPROVE |
Resource Management, Strategic Capacity Planning, Consolidated Scenario Analysis, Scenario Summary |
Users that have appropriate permission lists can use this page to unapprove a scenario. Note. This page is for users that have permissions enabling them to create, save, and approve consolidated scenarios, and to unapprove them. Permission list EPRS9500 enables approvals and unapprovals; EPRS9400 enables approvals but does not enable unapprovals. |
|
|
RS_SCENARIO_DTL |
Resource Management, Strategic Capacity Planning, Consolidated Scenario Analysis, Commitment Line |
Commit to or defer on the demand for a particular scenario. |
|
|
RS_SNR_DEMAND_DTL |
Click the Demand Name description links from the Consolidated Scenario Analysis - Commitment Line page. |
Adjust forecasted and allocated demand as well as modify project header information. |
|
|
RS_SCENARIO_ASSUMP |
Click the Approve button on either the Consolidated Scenario Analysis - Commitment Line page or Consolidated Scenario Analysis - Scenario Summary page. |
Upon approval of the scenario, enter any assumptions that assisted in approving the scenario. Note. The scenario Status must be Pending in order for this button to be visible. |
|
|
RS_ADD_ROLE_DMD |
Click the Add New Role button on the Consolidated Scenario Analysis - Demand Details page. |
Enter the role setID, role, forecasted demand, and allocated demand information to create a new role for the demand. |
|
|
RS_SNR_SUPPLY |
Click the Modify Supply button on the Consolidated Scenario Analysis - Scenario Summary page. |
Change virtually all of the same data that can be changed in the supply forecast. This page also provides additional information about which roles may be overallocated. |
|
|
RS_SNR_EDIT_REGION |
Click a link in the Role column on the Consolidated Scenario Analysis - Supply Details page. |
Adjust forecasted supply by region. |
|
|
RS_CON_ACE_PAGE |
Click the Scenario Analysis link on the Consolidated Scenario Analysis - Scenario Summary page. |
Dissect and scrutinize consolidated scenario data by supply categories by month. |
Creating and Reviewing Consolidated Scenarios
Access the Consolidated Scenario Analysis - Scenario Summary page.
|
Scenario ID |
This number is either generated by the system or is the unique ID you provided. |
|
Scenario Name |
The name of the scenario. |
|
Scenario Status |
The possible values are Pending, Approved, or Obsolete. A scenario starts in a pending status until it is approved. It can become obsolete if another scenario using either the same supply or demand forecast has already been approved. |
|
Start Date and End Date |
The start and end dates as on the supply and demand forecasts you selected for this scenario. |
|
Supply Forecast and and Demand Forecast |
The supply forecast and demand forecast for the consolidated scenario analysis. The date ranges for the supply and demand forecasts must be an exact match to be eligible for analysis. The initial supply and demand forecast prompts only return supply or demand forecasts that have not yet been approved through another scenario, because approval will lock the scenario and the forecasts. |
Supply and Demand Comparison
The supply and demand metrics compare total forecasted supply against total forecasted demand for the selected forecasts. The comparison displays effort (in hours or days depending on installation options), along with FTR (full-time resources) conversion and estimated costs.
|
Estimated Cost |
|
|
Days or Hours |
The total number of days (or hours depending on setup) available in the selected supply and demand forecasts (includes all roles in the forecast). |
|
Full Time Resources |
Displays the number of full-time resources needed in this consolidated scenario, by category. Note. This value takes into account your setting for the number of days per month and the total number of days in one month required to convert to one full-time resource. The system calculates full-time resources for demand using the region utilization percentage that is based on the default capacity planning Region Code specified on the Installation Options - Resource Management page. Full-time resources for supply are based on the full-time resources calculated in the supply forecast. |
Supply Summary
|
Supply Status |
There are five possible statuses, indicated visually by the colored bar with the black triangular pointer:
|
|
Forecasted Supply (Hours) |
Displays the total capacity as created by the selected supply forecast for all roles. |
|
Allocated Demand (Hours) |
Displays the total effort committed to, summed from the Demand - Summary rows on the Commitment Line page. Note. Upon entry into a new scenario, the system sets all demand lines to Commit by default, essentially making it an initial demand total. You can change the Commit to Defer on each demand line as needed, thus reducing the total demand. |
|
Overallocated Roles |
Displays the number of roles that have dropped below available supply. This is not a count of individuals but a sum of individuals based on the available roles in the supply forecast. |
|
Modify Supply |
Rate Options
Expand this group box to view the Blended Rate as calculated for the Supply and Demand Comparison fields. You can use the fields or Override the values. Any changes you make are valid only for the particular scenario.
The system uses the blended rate to calculate the estimated cost for the forecasted supply and demand. The blended rate is initially calculated by taking the average rate of every role in the forecasted supply across regions.
Note. The blended rate used here is for all roles and all regions; there is no blended rate by role. Providing this capability at a high level allows for what-if scenario planning.
|
Recalculate |
Click this button to recalculate the totals. |
Demand for all Projects
The charting functionality displayed in the bar graph shows three dimensions displayed by month:
Forecasted Demand
Allocated Demand
Forecasted Supply
The information displayed here is an aggregate total for the entire supply and demand forecast, not down to the role or project level. The y-axis shows the effort level (in days or hours), and the x-axis shows the months.
Adjusting Consolidated Scenarios
Access the Consolidated Scenario Analysis - Commitment Line page.
Adjusting Forecasted or Allocated Demand
Access the Consolidated Scenario Analysis - Demand Details page.
Demand General Information
In this group box, you can view the additional information about the forecasted or allocated demand and modify much of the project header information to adjust forecasted or allocated demand.
Note. Modifying this information does not update the actual project.
Demand By Role
The columns that appear in this group box vary depending on the View By selection. You can select <Month/Year>, All Months, or Summarized Demand.
|
ALERT |
An icon appears in this column when the variance is negative. |
|
Forecasted Demand and Allocated Demand |
For each month in the scenario, the total effort forecasted and allocated for the current month by role appears. If you modify the values for forecasted demand, it changes the values initially forecasted in the associated demand forecast. Since these rows display the effort by role and month, any modification you make changes the demand forecast data at the lowest level of the forecast. If your View By selection is Summarized Demand, you can modify the values and the changes you make will be spread across all months of the demand. If you modify the numbers for allocated demand, it changes the values directly in the scenario on the Commitment Line page. The values for allocated demand are part of the scenario only and are not sourced from the initial demand forecast. Upon initial creation of the scenario, the allocated demand is matched to the forecasted demand when the system autocommits to all demand in the scenario. |
|
Variance |
Allocated demand minus forecasted demand. |
|
View project details |
Click this link to access the actual project setup pages (if this is a project). If it is an external demand, this link is not available. |
|
Add New Role |
Click this button to add a new role for situations where there is no resource for the role already listed. Any new roles added at the summarized level are split out evenly across the months in the scenario for that particular role and for the unassigned resource pool, and a blank personnel status. You can drill down, however, and specify the month to add this data more accurately. If you want to delete a role, enter 0.00 in the fields for the row. Note. Because region is setID specific, if you add a role in either demand or supply (in consolidated scenario), the system uses the default region you specified in the Capacity Planning Setup group box on the Installation Options - Resource Management page. In addition, when you create regions, it is recommended to set them up under one setID unless your resources are spread amongst multiple setIDs. |
Click the OK button to return to the Commitment Line page with the summary data in the grid recalculated with the new information.
Adjusting Forecasted Supply
Access the Consolidated Scenario Analysis - Supply Details page.
Note. You can modify the overall forecasted supply level for the role without having to go down to the region level to adjust supply. Any change to the supply is automatically allocated to the region defined in the Default Capacity Planning Region group box on the Installation Options - Resource Management page and to the Unassigned resource pool. You can also adjust supply for each role at the lower region level by clicking the link in the Role column.
|
Role |
Click a link in this column to adjust forecasted supply by region. |
|
View By |
When you first access this page, the Supply group box displays the summary of all months in the scenario date range. You can change the view by selecting one of the following values and clicking the Go button:
|
|
|
An icon appears in this column only when the Variance column value is negative. The icon will be visible regardless of the View By selection; however, if you select a specific individual month, the system verifies whether that particular month has a negative variance. If a role is overallocated overall but is not overallocated in the specific month being viewed, the ALERT icon will not appear. |
|
Forecasted Supply |
The total capacity forecasted for the current month by role (all regions are summed). You can change this value here. Because changing data on this page does not specify which region for which capacity is being changed, the system places any additional capacity into the default region specified on the Installation Options - Resource Management page. The system also places negative changes—changes in which you decrease capacity—into the default region with a negative number, such as −100 if you've changed a value from 500 to 400. Any Summarized Supply data changes at this level mean the system will split the data amongst all the months in the scenario date range in the default region (the region set up at installation). For All Months or for individual months (<Month/Year>) data changes, the system will change the data only in the specific month being modified in the default region. |
Approving Consolidated ScenariosAccess the Consolidated Scenario Analysis - Scenario Summary page, the Consolidated Scenario Analysis - Scenario Summary unapprove page, or the Consolidated Scenario Analysis - Commitment Line page.
Click the Approve button to approve the scenario.
The Consolidated Scenario Analysis - Assumptions page appears so that you can enter any assumptions that assisted in approving the scenario.
Users with security to unapprove scenarios will see the Unapprove button on the Consolidated Scenario Analysis - Scenario Summary unapprove page. Click this button to make the consolidated forecast, and the associated supply and demand forecasts editable again.
Note. Approving a consolidated scenario does not trigger any workflow, nor does it affect the projects or resources in the system. Approving a consolidated scenario simply “locks” the supply and demand forecasts tied to the consolidated scenario so that any decisions made can be shared among appropriate individuals who can then execute on the agreed-to supply and demand plans presented in the forecasts.
Analyzing Consolidated Scenarios
Access the Consolidated Scenario Analysis page.
This page and its fields are similar to the page for supply forecasts and the page for demand forecasts. Scenario analysis enables you to analyze the data by the following attributes: Alert, Allocated Demand, Commitment Line, Forecasted Demand, Priority, Rank, and Variance.
See Also
Enterprise PeopleTools 8.46 PeopleBook: PeopleSoft Analytic Calculation Engine, Creating Analytic Grids