 Establishing Proposals
This chapter discusses how to:
Establish proposals.
Establish non-competing continuations.
Establish proposal budgets.
Submit proposals.
Print proposals.
Freeze submitted proposals by using version IDs.
Unlock proposal information.
View proposal audit logs.
Copy proposal information.
Inquire about proposal budgets.
Establishing ProposalsThis section provides overviews of Grants proposal preparation and proposal budgets and discusses how to:
Establish proposal-specific details.
Enter a due date and time for a proposal.
Enter budget express information for a proposal.
Enter additional information for a proposal.
Add or update projects that are associated with a proposal.
View department administrator information.
Enter departmental credit percentages.
Enter budget header data.
Set up F&A and pricing.
Maintain information about each resource for a proposal project.
Enter agreement details for subrecipients.
Enter budget information for subrecipients.
Add proposal professional details.
Maintain proposal-specific certifications.
Set up Grants report types for a proposal project.
Link documents to a proposal project.
Maintain address information for each project within a research proposal.
Enter protocols.
Track the status of proposal components.
Enter component stakeholders.
Enter component approval hierarchy.
View approval status and history.
Identify setup levels.
Link key words to a proposal.
Approve a proposal.
 Understanding Grants Proposal Preparation
A proposal in Grants consists of a statement of work, research plans, technical reports, and a proposal budget, as well as administrative, personnel, and submission information that is required by external funding agencies.
Note. The creation of the research plan is outside the scope of Grants.
Each proposal requires at least one project. You can, however, have multiple projects, or sub-proposals, within a single proposal.
After establishing basic setup information in Grants, you can enter data concerning proposals and projects, structure proposal budgets, work with research plans of principle investigators (PIs), and submit proposals to sponsors.
The proposal pages help you:
Track the development, verification, and submission status of proposals to sponsors.
Gather and organize proposal data.
Generate hard- and soft-copy proposals.
Facilitate the administration of proposals, awards, forms, and reports.
Note. Grants delivers proposal security by PI and department. You can also control access to the proposal pages by configuring Grants security options.
See Also
Setting Up and Maintaining Grants Information
Preparing a Proposal and Award for Cost Sharing
Understanding Proposal BudgetsThe budget represents an integral part of a research proposal. It captures budget line details and provides access to data such as the names of participating personnel, annual salaries, fringe rates, and F&A (Facilities and Administration) rates. These data elements support both pre-award and post-award functions.
Here is some general information about establishing proposal budgets:
Proposal budget items (pre-award) — such as salaries, equipment, and travel—have corresponding general ledger account values that are used to establish the award budget (post-award).
The proposal budget includes direct costs (personnel, animals, equipment, supplies), cost sharing, justifications, and F&A costs.
Employee information in the proposal budget is supplied from the institution's existing human resources database through an interface that populates the Personal Data table (PERSONAL_DATA) and the Job table (JOB).
During implementation, you can modify the data that is passed to Grants by way of the interface, for instances in which you do not want information, such as salaries, to be available to the public.
You must establish a proposal ID and a corresponding proposal project ID prior to creating a new budget.
All budget records are below the proposal project level.
You can create multiple budgets for a single proposal project.
PeopleSoft incorporates Transaction Set 194 values into the proposal budget pages and records.
Note. Grants supports organization, project and grant, and revenue estimate ledger types. Grants does not support appropriation budgets.
Note. The following PeopleTool pages will be uneditable during the approval process: Maintain Proposal, Overall Budget, and Budget Detail pages.
Understanding Grants StatusesThis diagram illustrates the flow of the Grants status as the proposal moves through the complete cycle from draft to award.
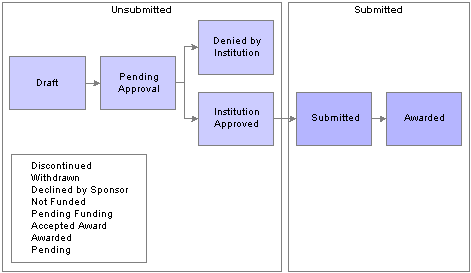
Grants Statuses process flow diagram
Understanding ComponentsAfter you enter all of the required information on the proposal pages, you can produce and submit a finished application for sponsored dollars to support institutionally approved projects. You can submit only institution approved proposals if Proposal Approval workflow is active.
This section provides an overview of the approval rules and processes and discusses how to:
Access the Component page.
Submit a proposal.
Designate an official for a proposal submission.
Approve a proposal.
The Proposal (Component) Approval process is triggered when the proposal’s status changes to a status that is listed in the Grant’s Award Setup Definition page. All people who are involved in the approval process receive workitem or email notification, or both, depending on the setup options.
The approval process is simultaneous or sequential, depending on your setup. If you set the approval process to sequential, the system generates the workitem for the next layer of approver after the workitem receives approval from all required approvers and reviewers at the current layer. Feedback from non-required approvers does not affect the approval process and status. For example, if all required approvers approve the component but not the non-required approver, the system still updates the component status to Approved or generates the workitem for the next layer of approver. All required approval roles must be defined in the Proposal, Project or Proposal/Project/Professional resource grid and set to workflow eligible.
The Approver/Reviewer receives a workitem or workitem and email notification during the approval process. The recipient can take the following actions depending on the workflow setup:
Approve
Send Back
Review
Reassign (the new approver or reviewer has the same authorities as the original approver or reviewer)
The component uses the following statuses:
Draft — when you are preparing the component.
In Progress — when the system sends the workitem to the approver and is waiting for approver action.
Approved — when all required approvers and reviewers approve or review the component.
Send Back — if any of the approvers return the component for modification.
When the component status changes to Send Back the approver initiator receives a workitem and can edit the project and budget. If you set the component Setup level at the all projects level, then the approver initiator can edit only the project that is associated with the Send back component. If you set the component approval at primary project level, then the approver initiator can edit all projects. During this time the approver initiator can add a new proposal component or delete one in the project under certain circumstances. Other users cannot edit the proposal during the approval cycle
The Grants Super User can cancel the proposal during the approval process and the system removes all workitems from the approver worklist. When all components are approved the proposal is considered institution approved. Approved or canceled proposals cannot be edited, as the proposal has reached the end of proposal process.
From draft status, you can manually change the status to Pending Approval, or click the Start Approval button which will then trigger the workflow process. When it is approved, you can start the submission process and proposal status is updated to Submitted. Only submitted proposals can be generated, at which time the system will change the Proposal status to Awarded. All other statuses can be selected prior to submission. If workflow is disabled, you can select any status at any time prior to submission. Those with authorization to the Submission component through the PeopleTools component security can change a submitted (but not generated) proposal back to Not Submitted. If workflow is enabled, the proposal status returns to Institution Approved. If workflow is disabled, the proposal status returns to Draft.
The following list describes proposal component approval activities:
A workitem/email is generated for the approver/reviewer when the proposal component is submitted for approval.
The workitem/email is generated for the approver initiator when the proposal component is sent back by the approver.
The workitem/email is generated for a new approver reviewer when the proposal component is reassigned by the approver reviewer
Email notification is sent to all people who are involved with the approval process when the proposal component status is changed.
This diagram shows the workflow process flow:
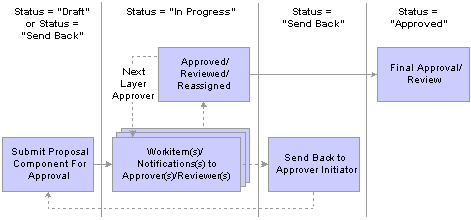
Workflow Process flow
Pages Used to Establish Proposals
|
Page Name |
Object Name |
Navigation |
Usage |
|
GM_PROPOSAL |
Grants, Proposals, Maintain Proposal, Proposal |
Establish proposal-specific details. |
|
|
GM_PROP_TITLE_LONG |
Click the Description link on the Proposal page. |
Enter a long description for the proposal. |
|
|
GM_PROP_DUE_BY |
Click the Due By link on the Proposal page. |
Enter the due date and time requirements for a proposal. |
|
|
GM_PROP_BUD_EXPRES |
Click the Budget Express link on the Proposal page. |
Enter data about the basic components of a proposal's total budget. Note. The data that you enter on this page is for informational purposes only. It has no downstream processing implications. |
|
|
GM_PROP_ADD_INFO |
Click the Additional Information link on the Proposal page. |
Enter additional information about the proposal. |
|
|
GM_PROP_CON_SUB |
Click the Additional Details link on the Additional Information page. |
Select the business unit, proposal, and version for each proposal that you are submitting concurrently. |
|
|
GM_PROP_COI |
Click the Additional Details link on the Additional Information page. |
Select check boxes to indicate if the conflict complies with the institution's policy and if you completed the review. |
|
|
GM_PROP_COST-SHARE |
Click the Additional Details link on the Additional Information page. |
Select to indicate if the sponsor requires cost sharing, who approved it, the date of approval, and the source |
|
|
GM_PROP_FLOWTHRU |
Click the Additional Details link on the Additional Information page. |
Select the primary sponsor that the proposal will flow through. |
|
|
GM_PROP_INTEL_PROP |
Click the Additional Details link on the Additional Information page. |
Enter information about the use of intellectual property. |
|
|
GM_PROP_PI_CHANGE |
Click the Additional Details link on the Additional Information page. |
Indicate the PI changed and select the ID of the previous PI. |
|
|
GM_PROP_PREAWD_SPD |
Click the Additional Details link on the Additional Information page. |
Indicate that pre-award spending is permitted and enter the guaranteed source of funding. |
|
|
GM_PROP_PREV_AW |
Click the Additional Details link on the Additional Information page. |
Enter information about the previous award and indicate that a renewal is in progress if it is based on an accomplishment. |
|
|
GM_PROP_REL_PROP |
Click the Additional Details link on the Additional Information page. |
Enter information about related proposals. |
|
|
GM_PROP_SOLICITATN |
Click the Additional Details link on the Additional Information page. |
Enter information about a solicitation. |
|
|
GM_PROPOSAL_PROJ |
Grants, Proposals, Maintain Proposal, Projects |
Add or update projects that are associated with a proposal. |
|
|
GM_PROP_DPT_ADM |
Click the Other Contacts link on the Projects page. |
View the names of the department administrator, department head and Institution Officer. Information on this page is display-only. All data comes from the Department Contact page and Institution Contact page. |
|
|
GM_PROJ_DEPT_PCT |
Click the Department Credit link on the Projects page. |
Enter the credit percentage for a department for a particular project. |
|
|
GM_PROP_J_DEPT_SP |
Click the Department Cost Share Comments button on the Projects page. |
Enter comments about the department cost share. |
|
|
GM_PROP_BUD |
Grants, Proposals, Maintain Proposal, Budgets |
Enter budget header information. |
|
|
GM_BUD_FA |
Click the F&A and Pricing Setup link on the Budgets page. |
Set up F&A rates for your institution, sponsor, and budget. |
|
|
GM_PROPOSAL_RES |
Grants, Proposals, Maintain Proposal, Resources |
Maintain information about each resource for a proposal project. These resources are used by Research or Workflow |
|
|
GM_PROP_VNDR_SP |
Click the Get Agreement Details button on the Resources page. |
Enter subrecipient details. |
|
|
GM_PROP_VND_LOC_SP |
Click the Get Location Details button on the Resources page. |
Enter subrecipient location and address information. |
|
|
GM_PROP_VND_CNT_SP |
Click the Get Contact Details button on the Resources page. |
Enter subrecipient contact information. |
|
|
GM_PROP_VND_BUD |
Click the Vendor Budget button on the Resources page. |
Enter subrecipient budget information. |
|
|
GM_PROP_PROF_DT_SP |
Click the Details button on the Resources page. |
Enter professional details about the resource. |
|
|
GM_ADDR_DTL_DSP_SP |
Click the Address link on the Professional Details page. |
View address information. |
|
|
GM_PROP_PROF_ED_SP |
Click the Education link on the Professional Details page. |
View educational information. |
|
|
GM_PROP_PROF_JB_SP |
Click the Job link on the Professional Details page. |
View job information. |
|
|
GM_PROP_PROF_WE_SP |
Click the Experience link on the Professional Details page. |
View work experience information. |
|
|
GM_PROP_PROF_AA_SP |
Click the Advisor/Advisee link on the Professional Details page. |
View advisor and advisee relationships. |
|
|
GM_PROP_PROF_MB_SP |
Click the Membership/Association link on the Professional Details page. |
View memberships and associations. |
|
|
GM_PROP_PROF_HA_SP |
Click the Honor/Award link on the Professional Details page. |
View honors and awards. |
|
|
GM_PROP_PROF_CB_SP |
Click the Collaboration link on the Professional Details page. |
view persons who have collaborated with the professional. |
|
|
GM_PROP_PROF_PB_SP |
Click the Publication link on the Professional Details page. |
View the professional's publications. |
|
|
GM_PROP_PROF_OP_SP |
Click the Pending Support link on the Professional Details page. |
View pending support. |
|
|
GM_PROP_PROF_OA_SP |
Click the Ongoing Support link on the Professional Details page. |
View ongoing support. |
|
|
GM_PROP_PROF_OC_SP |
Click the Completed Support link on the Professional Details page. |
View completed support. |
|
|
GM_PROP_CERT |
Grants, Proposals, Maintain Proposal, Certification |
Maintain all relevant proposal-specific certifications and enter multiple certifications for each proposal project. |
|
|
GM_PROP_CERT_SEC2 |
Click the Comments button on the Certification page. |
Enter comments about the certification. |
|
|
GM_PROP_J_REPT |
Grants, Proposals, Maintain Proposal, Reports |
Set up Grants report types for a proposal project. |
|
|
GM_PROP_DOC1 |
Grants, Proposals, Maintain Proposal, Attachments |
Create attachments for the proposal project. |
|
|
GM_PROP_J_LOCATION |
Grants, Proposals, Maintain Proposal, Location |
Select a location for a subrecipient. |
|
|
GM_PROP_PRJ_PCL |
Grants, Proposals, Maintain Proposal, Protocols |
Select a protocol to associate with the project. |
|
|
GM_PROP_COMPONENT |
Grants, Proposals, Maintain Proposal, Component |
Enter component information. |
|
|
GM_PROP_COMP_STK |
Click the Stakeholder link on the Component page. |
Enter the names and roles of stakeholders. |
|
|
GM_PROP_COMP_APP |
Click the Approval Hierarchy link on the Component page. |
This is a display only page. all informations display on the page come from the BU Workflow Approval/Notification Setup page. It shows the approval rules that were set up for the current component. |
|
|
GM_PROP_APP_HISTY |
Click the Approval Status/History link on the Component page. |
View the component approval history. |
|
|
GM_PROP_LVL_SETUP |
Grants, Proposals, Maintain Proposal, Setup Level |
Establish the setting levels asPrimary Project or All Projects for certifications, department credits, professional credits, resources, subrecipients, and components. All values default from Award setup and BU Definition pages. You can overwrite the value in Proposal level. |
|
|
GM_PROP_KEYWORD |
Grants, Proposals, Maintain Proposal, Key Words |
Link key words to a proposal and its projects. |
|
|
GM_COMP_APPROVAL |
Grants, Proposals, Proposal Component Approval |
Submit or approve a Proposal/workitem. Grants super user can use this page to monitor, approve, review, and/or submit all the workitems. |
Establishing Proposal-Specific DetailsAccess the Proposal page.
|
Version ID |
Displays the proposal version, which enables you to track changes to a proposal. All pages in this component display the proposal version. |
|
Add to My Proposals |
Click to add to your My Proposal list. |
|
Description |
Enter a brief version name. If you leave this field blank, the entry in the Title field appears by default. The system uses this title in the award generation process to name the award. The name of the generated post-award project comes from the proposal project short title. |
|
Start Approval Process |
Click to start the approval process. This option is available only if the proposal status is draft and workflow is active. |
|
Title |
Enter a short title for the proposal. The project title appears by default as the proposal title for all projects that are created with no short titles. When you navigate to the Project page, the short Title field is already populated with data. Also use the title as an alternate search option on the Search page to access the Proposal page. |
|
Description |
Click to access the Description page to enter a description of the proposal. |
|
PI ID (principal investigator ID) |
Select the principal investigator's ID. |
|
Sponsor ID |
Select the ID of the organization that is sponsoring the research. |
|
Purpose |
Select a proposal purpose from a list of entries that are defined by the institution. |
|
Proposal Type |
Select a proposal type from available options. |
|
CFDA (catalog of federal domestic assistance) |
Enter the CFDA number that is related to the proposal. There is a prompt table delivered which can be populated with the values to be used. (Optional) |
|
Confidence % |
Enter a number between 1 through 100 to reflect the level of confidence that the proposal will be approved. The system translates the number that you enter here to a color-coded icon that represents the confidence level as either high, medium, or low. These labels are predetermined on the Confidence Level Setup page. The colored icon next to this field indicates the confidence level of this proposal. |
|
Due By |
Click to access the Due By page. Enter due date and time information for the proposal. |
|
Budget Express |
Click to access the Budget Express page. Enter budget amounts for the proposal. |
|
Additional Information |
Click to access the Additional Information page. Enter additional information for the proposal. |
|
Facilities & Admin Requested (facilities and administration requested) |
Select to indicate that the institution is requesting indirect cost recovery. The system automatically selects the corresponding box on form PHS 398, page II, section 3. Note. If you leave this option cleared, the associated check box is cleared on form PHS 398. The system resets the F&A amounts in the budget to zero and deletes the F&A rates. F&A rates are set up within the Budget component; they are key to computing F&A amounts. |
|
Foreign Application/Component |
Select to choose the corresponding check box on form PHS 398, page II. |
|
NIH Modular Grant (National Institutes of Health modular grant) |
Select to designate that the proposal as an NIH modular grant. |
|
Template Proposal |
Select to create a template proposal. This option is available only when you first create the proposal. You can use the template to create new proposals based on information in the template which you can edit. |
|
Start Date and End Date |
Select the start and end dates for the proposal. The system automatically creates the overall budget with the same dates. Note. To change the dates on the Proposal page after you quit the date fields, update the overall budget date range first so that the dates remain synchronized. If you make a mistake, continue entering information, and then change the overall budget before returning to the Proposal page to make the correction. |
|
No. Periods (number of periods) |
Enter the number of periods for the budget. |
|
Build Periods |
Click to build the budget periods for the proposal. Note. After you click the Build Periods button, the following fields become unavailable: Proposal Start and End Date, Number of Periods, and the Build Periods button. These fields are available only if there are no rows in the Budget Period grid of a proposal. Also, the system computes the end date of the proposal when you enter a new row in the Budget Period grid. Proposal Start Date and End Date always equal to the Minimum Start Date and Maximum End Date of the Proposal Budget Period grid. |
Status
|
Proposal Status |
Select from these values:
|
|
Submit Status |
Select Submit or Unsubmit. If proposal approval workflow is active, you can only submit the proposal after the proposal status is institution approved. If not, then you can submit the proposal at any status. You cannot change or modify the proposal after it is submitted. If the proposal is submitted, you have the option to unsubmit it. |
|
Generate Status |
Displays the status of the proposal in the generate process. Values include Created, Pre-spending, and Not Creatd. |
|
In Approval Process |
Selected when the Proposal Status is Pending Approval and the proposal is in the approval process. It is deselected when the proposal completes the approval process. |
Budget Periods
When you first create a proposal as Draft, the Budget Period grid contains blank start and end dates. When you enter the proposal start and end dates, enter a value in No. Periods, and click the Build Periods button, the system automatically inserts a row is into the grid for each period. The first period start date and the last period end date are supplied by default from the proposal start and end dates. After you enter and save the budget details on the Budget Detail page the Target Sponsor Budget reflects the budget for each period. The Target Sponsor Budget amount displayed below the grid reflects the sum of all budget periods.
To re-initiate the build periods process, delete all rows in the grid to reactivate the Build Periods button.
Note. You can only re-initiate the process prior to saving the proposal. After you save the page, the numbers in the Period column of the grid become links to the Budgets page. If you copied a proposal, you can change the dates in this grid.
|
Target Sponsor Budget |
Each line of the grid represents the sum of all budgets of all the projects under this proposal for a particular period. |
Entering a Due Date and Time for a ProposalAccess the Due By page.
Budget Express
|
Due By |
Select whether the proposal due date criteria is set by the postmark or by the receipt of the proposal. |
|
Due Date |
Enter the date on which the proposal is due. |
|
Due Time |
Enter the time when the proposal is due. |
|
Due Time Zone |
Select the time zone in which the due date and time are set. |
Entering Budget Express Information for a ProposalAccess the Budget Express page.
Enter the budget numbers in the appropriate fields. The data that you enter on this page is for informational purposes only. It has no downstream processing implications.
Entering Additional Information for a ProposalAccess the Additional Information page.
|
Type and Comments |
Select the type of comment that you want to enter, and then enter a comment or click the Additional Details button to display an additional page specific to the type of comment that you selected. You can then enter the information in the fields on that page. Values are:
|
Adding or Updating Projects That Are Associated with a ProposalAccess the Projects page.
You can associate multiple projects with each proposal. Because the system uses a one-to-many relationship for proposals and projects, you can establish a separate project profile even in cases in which only one project is in a proposal.
Proposal Projects
|
Project ID |
Displays the Project ID which you can edit. When you first create a draft proposal the system automatically creates the first project and budget header with ID of Next_1. |
|
Primary |
Select to indicate that this is the primary project in the proposal. |
|
Title |
Displays the proposal title which you can change. |
|
Description |
Click to enter a long description for the project. |
|
Department |
Displays theDepartment value derived from the PI on the Proposal page. From the Department value, all other values on the Project page can be supplied by default. |
|
Dept. Contact(department contact) |
Select the name of the individual who is the department contact. Only the people who were added as department contacts in the Department Contact setup page will be listed on the prompt table. |
|
Subdivision |
Select the department subdivision. This is supplied from the department setup. The user should not change the value. |
|
Dept Rep (department representative) |
Select the name of the department representative. |
|
Institution |
Select the name of the institution that is associated with the project that is supplied from the department setup. The user should not change the value. |
|
Other Contacts |
Click to view he name of the department administrator, department head and Institution Officer who are associated with the project. |
|
Department Credit |
Click to enter the departmental credit percentages. The Total credit percentage should not exceed 100 percent. |
|
SPO (sponsored projects office) |
Displays the sponsored projects office associated with the department. This value comes from the Department-General Information (Grants, Departments, General Information) page. |
|
SPO Contact (sponsored projects office contact) |
Displays the name of the projects office contact of the sponsor. The SPO contact receives the Approval work item or email notification during the approval process. This value comes from the SPO General Information (Grants, Sponsored Projects Offices, General Information) page. |
F&A Distribution
|
Department |
Select the department collaborating on the project. If there is more than one department for the project, add a row for each department participating in cost sharing. |
|
Location |
Displays the location code that is associated with the department. |
|
Comment |
Click to add comments to explain departmental collaborations. |
|
Percent Shared |
Enter the respective percentage share for each department that is included in the project. The total percentage must equal 100 percent. |
|
Percent share total all projects |
Indicates the percentage of the total that is shared by all the projects. |
Viewing Department Administrator InformationAccess the Department Administrator page.
View the department administrator and head. The Department Contact page supplies this information. You can also view the Institution Contact. The Institution Page supplies this information
Entering Departmental Credit PercentagesAccess the Departmental Credit Percentage page.
Enter each department's percentage of credit for the project. If you want to capture departmental credit at the award level, you do not need to create another project to store the departmental credit. The system creates an identical table, entered by the project ID and department ID, on the Post Award side. Enter the departmental credit percentages on this page.
Note. If you select Primary Project at the setup level you can add, delete, and modify the Department Credit only at the Primary Project level.
Entering Budget Header DataAccess the Budgets page.
Budget Header
|
Budget ID |
Default Budget ID comes from Installation Page for Grants. This default is not at the Business Unit level. The budget ID is NEXT when you are adding a new value. |
|
Description |
Displays the proposal title description which you can change. |
|
Start Date and End Date |
Displays the start and end dates that you entered on the Projects page. |
|
Include in Proposal |
Select to include the budget header data in the proposal. |
|
F&A and Pricing Setup |
Click to access the F&A and Pricing Setup page. Enter F&A setup for the institution, sponsor, and budget. |
|
Total |
Displays the grand total for all budget periods within a project. |
Budget Period
|
Period |
Displays the budget periods. Click a period number to access the Budget Detail page and see budget detail for the period. The periods are the same as on the Proposal page. Budget Period, Start and End Date and Amounts on this grid are display only. |
|
Start Date and End Date |
Displays the start and end dates that you selected for the budget periods on the Proposal page. |
|
Amount |
Displays the total amount from the Budget Detail page. |
Setting Up F&A and PricingAccess the F&A and Pricing Setup page.
|
Institution Minus Funded |
Select to use the institution's F&A rate for calculating the cost-sharing F&A. |
|
Sponsor Minus Funded |
Select to use the sponsor's F&A rate for calculating the cost-sharing F&A. |
Contracts Related
|
Pricing Method |
Select either As Incur or Fixed to indicate the type of contract. Because fixed-fee and rate-based are by activity, rate-based activities can be on separate contract lines as the Product value that you select is from a prompt table. Different product IDs force different contract lines. |
|
Rate Set |
The system displays the rate set that is associated with the project . |
|
Product |
Select the product for the contract line. You can identify a distinct product within each activity. A product is a contractual obligation for products and services that you provide to your customers. In Contracts, you define a standard set of products; associate them with a set of attributes including pricing structure (as incurred or fixed fee), tax parameters, and accounting information; and then use the products in your contracts. |
F&A Set Up
Select the F&A rate type that you want and the F&A base to which the rate is applied for the institution, sponsor, and budget. The system applies rates to the sum of the budget categories that belong to the selected F&A bases. You can insert multiple rate types for one budget ID. If the F&A base types have overlapping budget categories, the system displays a warning message.
|
Rate Type |
Select a rate type. F&A rate types are associated with sponsors, institutions, proposals, or awards. Rate types include On Campus, Off Campus, or others as identified by the institution. |
|
FA Base (facilities and administration base) |
Select an FA base rate for the institution, the sponsor, and the funded amount. |
|
FA Rate % (facilities and administration rate percentage) |
Enter the F&A Rate percentages here that will be used to compute the sponsor F&A, institution F&A on the Budget Detail page (GM_BUD_LINE_SUM). |
Maintaining Information About Each Resource for a Proposal ProjectAccess the Resources page.
Note. This page uses NIH (National Institute of Health) resource types and draws from a control table in which you can add as many resource types as you need.
Note. If you select Primary Project at the setup level you can add, delete, and modify the Resource, Subrecipient, or Professional Credit only at the Primary Project level.
Resource
|
Type |
Select a resource type. The system-delivered resource types include Laboratory, Clinical, Animal, Computer, Office, Other, Major Equipment, Other Resources (NSF Specific), and Other Resources. Note. These resource types map directly to PHS 398, page HH. You cannot change the key values for these resource types without affecting the printing of the various proposal forms. |
The following is a list of resource type codes:
|
Resource Type Code |
Description |
Proposal Form |
Page |
Form |
Page |
|
LABOR |
Laboratory |
PHS 398 |
HH |
NIHMOD |
HH |
|
CLINI |
Clinical |
PHS 398 |
HH |
NIHMOD |
HH |
|
ANIMA |
Animal |
PHS 398 |
HH |
NIHMOD |
HH |
|
COMPU |
Computer |
PHS 398 |
HH |
NIHMOD |
HH |
|
OFFIC |
Office |
PHS 398 |
HH |
NIHMOD |
HH |
|
OTHER |
Other |
PHS 398 |
HH |
NIHMOD |
HH |
|
RESOU |
Other Resources (NSF Specific) |
|
|
|
|
|
Comments |
Describe the resource usage. |
|
Subrecipient |
Select the subrecipient whom you want to add to the proposal. |
|
Research |
Select to map the professional to the appropriate form. Selecting this option also distinguishes the research team administratively from individuals who related to the proposal creations. Select this field if listing a person whose name appears on the form and is part of the project team during the project generation process. Clear this field if listing a person only for workflow approval process. |
|
Employee ID |
Select the ID of the professional whom you want to add to the proposal. |
|
Name |
Displays the name of the professional who is associated with the ID that you selected in the ID field. If the professional is not entered into the system, enter the name in the field. Note. The name of the PI immediately appears by default in existing projects when you enter the name of the PI on the Proposal page. This occurs only in projects that have a blank grid for professionals. PI row-level security is used for professionals with a role type of PI in the proposal professional resources. |
|
Role |
Select the professional's role in the project. We deliver a list of Roles as system data. You can add new roles. Values include:
|
|
Credit % |
Enter the internal individual credit. The sum of the credit percent on all the rows cannot exceed 100 percent. |
|
Workflow Eligible |
Select to indicate whether the professional is eligible to receive workflow. The selection defaults from the professional's personal data. |
See Also
Entering Agreement Details for SubrecipientsAccess the Vendor Details page.
Enter details regarding the agreement with the subrecipient.
|
Agreement Category |
Select an agreement category. Values include:
|
|
Subrecipient Status |
Select a status. Values include:
|
|
Method Chosen |
Enter information into this open text field. You can enter the method used to select the subrecipient or spell out payment procedures for the subrecipient. You can define this field any way that you want. |
|
Type |
Select a type. Values include:
|
Entering Budget Information for SubrecipientsAccess the Subrecipient Budget page.
|
Third Party Amount |
Enter the amount of a third-party contribution, if any. |
|
Budget Item |
Select the each subrecipient budget item. |
|
Total Direct Budget |
Enter the total direct budget amount for each subrecipient budget item. |
Adding Proposal Professional DetailsAccess the Professional Details page.
This page contains links that provide access to the professional data maintenance pages. On most of these pages, you can click Load to insert all existing information for professionals from their profiles. You can then delete specific lines or reorder the list so that the most appropriate entries for this proposal or project are at the top. This enables you to tailor the professional's biosketch for a particular proposal.
|
Organization |
Displays the organization name for professionals with ID numbers and professional profiles in the system. The organization information for the individual maps to the Key Personnel section on PHS 398, page BB for individuals marked as key personnel types (PI, Co-PI, and Key Personnel). |
|
Project Role |
Enter the professional's position title for the project. |
|
Role Type |
Select the role that the professional plays in the project. Values are Co-PI, Key Pers (key personnel), Other, Authorized Person, and PI. Note. If you select Authorized Person, the employee can access the proposal, but the employee's name does not print on any proposal forms. |
|
Eligible PI, First Time PI, PI Eligibility Waiver, and New Personnel |
Select all check boxes that apply to the professional's role in the project. If the role is PI or CO-PI, and the professional is not listed as an eligible PI in the database, select PI Eligibility Waiver. |
|
Address |
Click to display the professional's address information from the professional profile. Only one address appears for each professional. |
|
Education |
Click to associate multiple degrees with the professional. Select Include in proposal for degrees or educational accomplishments that you want included in PHS 398, page AA, section 3b. Only three degrees can be printed in section 3b. |
|
Job |
Click to associate multiple jobs (appointments) with the professional. You can select the most relevant jobs to include in the proposal. |
|
Experience |
Click to associate multiple types of experience with the professional. |
|
Advisor/Advisee |
Click to associate multiple advisees and advisors with the professional. |
|
Membership/Association |
Click to associate multiple memberships and associations with the professional. |
|
Honor/Award |
Click to associate multiple honors and awards with the professional. |
|
Collaboration |
Click to associate multiple collaborators with the professional. |
|
Publication |
Click to associate multiple publications with the professional. |
|
Pending Support |
Click to link pending support information with the professional. The proposal status must be in one of the following statuses before you can load data onto the Pending Support page.
Note. The system loads only proposal information into the Professional Pending Support page from proposals that are in the Submitted status. |
|
Ongoing Support and Completed Support |
Click to link active and past support information for a professional. To add information regarding current support, the proposal status must be in the Awarded status. Note. Grants enables you to refer to other proposals that you have entered into the system that have a status of Pending. You cannot enter other support data if it is not already in the system. |
See Also
Setting Up and Maintaining Professional Data
Maintaining Proposal-Specific CertificationsAccess the Certification page.
This page provides a central data storage location for all relevant proposal-specific certifications. You can enter multiple certifications for each proposal project. Certification values that appear on this page are based on the PI and the institution associated with that PI that you select on the Proposal page.
Note. If you select Primary Project at the setup level you can add, delete, and modify the Certification only at the Primary Project level.
|
Certification Code |
Select the certification codes that are associated with the proposal. PeopleSoft delivers these codes as system data:
|
|
Certification Date |
Select the certification date for each code. |
|
Indicator |
Select the certification indicator. Values are N/A, No, Pending, and Yes. |
|
Certified By |
Select the name of the person who authorized the certification. |
|
Approval Date |
Select the date on which the certification was approved. |
|
Expiration Date |
Select the date on which the certification expires. The generate process brings this date forward to the award based. |
|
Assurance Number |
Enter the assurance number that is associated with the certification. |
|
Exemption Number |
Enter the exemption number that is associated with the certification. |
Review and Status
|
Full Review and Expedited Review |
Select one or both of these check boxes to indicate that the certification has been reviewed. These check boxes apply only to the values of Animal Care and Human Subjects. You can, however, select them for other types of certifications. |
|
Changed Since Prev Submission (changed since previous submission) |
Select to indicate whether any changes have been made since the previous submission. This field applies to inventions and patents (INVPT) only. |
|
Previously Reported |
Select to indicate that the certification has been previously reported. This field applies to INVPT (inventions and patents) certification code only. |
|
Add Comments |
Click this button to add comments. |
Setting Up Grants Report Types for a Proposal ProjectAccess the Reports page.
|
Type and Comments |
Select a report type, and then add any comments about the report. You can add rows to enter additional report types. Values include Abstract, Major Goals, and Progress Report Summary. Comments associated with the Abstract and Major Goals report types appear in the description box on the PHS 398 proposal form. |
Linking Documents to a Proposal ProjectAccess the Attachments page.
This page helps you keep track of documents the researchers prepare, such as statements of objectives and methods, budgets, and personnel information. You can attach multiple documents to the proposal.
|
|
Click the Add Attachment button to attach a document to the proposal. Note. The system does not track changes to external documents. Freezing a proposal does not freeze external documents associated with the proposal. |
|
Browse |
Click to search for the document that you want to attach to the proposal. This button appears after you click the Add Attachment button. |
|
Upload |
Click to attach the file to the proposal and return to the Documents page. This button appears after you click the Add Attachment button. |
|
|
Click the Delete Attachment button to delete a document. This button appears only after you attach a document to the page. |
|
|
Click the View Attachment button to view the attachment. This button appears only after you attach a document to the page. |
Maintaining Address Information for Each Project Within a Research ProposalAccess the Location page.
This page stores address information for each project within a research proposal as well as information concerning where the research for a project is conducted. This information maps to page BB on the PHS 398 form as performance sites.
|
Location |
Select a code to display the information from the location control table. When you select a site, the system populates the address information fields. You can also add new locations and enter information in the specific address and phone fields. |
|
Foreign |
Select to indicate that this location is outside the country of the institution. |
Entering ProtocolsAccess the Protocols page.
Select a protocol from the Protocol ID field to associate a protocol with a proposal. The protocol status must be Draft, Pending, Returned, or Approved for it to be selected.
Tracking the Status of Proposal ComponentsAccess the Component page
Each proposal can have multiple components. The Workflow component approval setup determines the Component Detail rows. You can program the Proposal Component to add to or delete from the proposal project automatically or manually, depending on the criteria that you set up in Proposal Component Approval rules. You establish these rules in the Common Workflow Approval/Notification Setup page. The component is added to the project if the criteria is entered or deleted; or if the proposal, project, or budget is updated, and criteria is no longer true. You cannot delete any Proposal component that was added programmatically. You can add or delete a Proposal component manually for an additional approval process.
Note. If you select Primary Project at the setup level you can add, delete, and modify the Component only at the Primary Project level.
|
Component |
Select the name of the component. This is a user-defined value. It defines those values that are in Set Up Financials/Supply Chain–> Product Related –> Grants –> Proposals Components navigation. |
|
|
Click the Add Component button to add new components. |
|
Status |
Select a status for each proposal component. If Proposal workflow is active this field is display only. The workflow process drives the component status. Values are Approved, Assigned, Draft, Finished, In Progress, Not Approved, and Send Back. |
|
Required Flag |
Select to indicate whether the component is required. All components that are added by program are set to Required. All required components must be approved before Proposal is approved. |
|
Click to select a stakeholder who is an employee of the institution. |
Approval Info
|
Component |
Select the name of the component. Values include and Research. |
|
Approval Hierarchy |
Click to view roles in the approval process. All information in this page is display-only. Values displayed on this page are from the Common Workflow Approval/Notification Setup page. |
|
Approval Status/History |
Click to view the current approval process and its history. |
|
Submit |
This button is active if the component status is Send back and the current user has the role of Approver Initiator or Grants Super User, or if the component is added after the approval workflow has started. You can click the Submit button to submit current component or click the Submit button on the project level which will submit all the components within the project for approval. |
See Also
Entering Component StakeholdersAccess the Component Stakeholder page.
Enter multiple stakeholders for each Proposal component. The stakeholder bears responsibility for reviewing each component.
Stakeholders
|
Stakeholder |
Select the name of the stakeholder. |
|
Workflow Eligible |
Select this option if the stakeholder is eligible to receive workflow items. |
|
Role |
Enter a role—such as PI, Co-PI, Department Chair, or Technician—for each stakeholder. |
|
Department and Description |
Information in these fields appears by default from the department contact table, which stores the relationship between professionals and their associated departments. |
Note. Components are user-defined, so you can track items that have not been delivered as part of system data. The data that PeopleSoft provides in this documentation represents examples only. You can also use components to implement configured workflow processes.
Reviewing Component Approval HierarchyAccess the Component Approval Hierarchy/Option page.
View the roles that are related to the approval process. Information on this page is display-only and cannot be modified. Information on this page is viewed from the common workflow Approval/Notification Setup page.
See Setting Up the Approval and Notification Process.
Viewing Approval Status and HistoryAccess the Component Approval Status/History page.
|
View By |
Select display options for the Component Approval History grid. Values include All, Notification Only, and Workitem only |
Component Approval History
|
Last Req ID(last requested identification) |
Displays a system generated value field. It shows the sequence in which the system generated the workitem or notification. |
|
Routing |
Displays the role of the approver/reviewer. Values may include Originator, Administrator, and Stakeholder. |
|
Name |
Displays the name of the person who performs the action appears in this field. |
|
Required |
Selected if the person is a required approver or reviewer. |
|
Pool List |
Selected if you require only one person from this role to perform an action. The system drops the workitem from other persons in the role when one person performs an action. |
|
Workitem |
Selected if the approver receives a worklist. |
|
Notification |
Selected if the approver receives an email notification. |
|
Status |
Displays the user's action status. Values include Submitted, Notified, Approve, Reassigned, and Send Back. The column is empty if the user has not taken action. |
|
Date/Time Stamp |
Displays the time and date of the action. |
|
Comment |
Displays comments entered by the approver. |
Identifying Setup LevelsAccess the Setup Level page.
Use this page to set up the certification, resource, department credit, subrecipient, professional credit, and component levels. The business unit setup value defaults. If you set the value at the all Projects level, then all components are submitted for approval. If you set the value at the Primary Project level, then only the components within the Primary project are submitted for the approval process.
Note. If you select Primary Project you can add, delete, and modify objects only at the Primary Project level. If you select All Projects you can add, delete, and modify objects to all the projects with the proposal.
Linking Key Words to a ProposalAccess the Keywords page.
You define key words in a control record that populates during implementation. You can use these entries to track proposals by subject category (such as cell biology, electrical engineering, and cancer) and to link multiple science codes to a project (as required by Transaction Set 194).
|
Key Word |
Click the Look up button to select a value from the list of available key words. The PI you select on the Proposal page determines the values included on this page. |
Approving a ProposalAccess the Proposal Component Approval/Submit page.
You can use the page to review, submit, and approve a proposal assigned to you. You access this page by clicking a worklist or by using the navigation. Grants super-users can use this page to review, submit, and approve all proposals.
The options available on this page are based on your authority or role. For example, if you are assigned to perform an approval action, you see the Approve and Send Back options as available. All other options are not available. You can also use this page to resubmit a component for approval. After you select an option, the system looks at the approval setup role and determines the next step. For example, if you are the last required approver within the current component, the component status is updated to Approve and if all components are approved the proposal is updated to Institution Approved.
Establishing Non-Competing ContinuationsThis section provides an overview of non-competing continuations and discusses how to:
Create a continuation.
Document a gender and minority study for a continuation project.
Summarize information about student trainees participating in a continuation project.
Understanding Non-Competing ContinuationsContinuations are mini-proposals you submit to a sponsor at the end of the first year of funding and are built the same way as proposals. They are based on awards rather than on previous proposals so they draw information from records that already exist in Grants. Continuations report information about the previous year's research, and, if you request changes from the original proposal, forecast expectations for the upcoming year of funding.
You use the Gender and Minority Study and Trainee pages in the Proposal component only in continuation proposals associated with Department of Health and Human Services (DHHS) grants.
Note. If the project is not a continuation, fields on the Gender and Minority Study and Trainee pages are display-only.
When you create a continuation, the system retrieves key information from the original award, such as PI, PI name, short title, sponsor, long description, certifications, and all project data.
The rest of the information remains in the award file to eliminate duplicate data in the award and proposal records. You must add continuation-specific information.
To create a continuation:
Access the Create Continuations page by choosing the Award ID you want to continue.
Enter a To Continuation Proposal ID field and a To Continuation Version ID field.
Click Create.
The system creates a new proposal ID with a proposal type of Non-Competing Continuation, and accesses the Proposal page.
Select Unobligated Balances as the comment type on the Additional Information page (GM_PROP_ADD_INFO) to describe unobligated balances for Continuation Form 2590.
Navigate through the proposal pages to complete any additional proposal requirements (professionals, budgets, and subrecipients).
Note. When you create a continuation, the system copies the HUMAN (human subjects), INVPT (inventions and patents), and ANIMA (vertebrate animals) continuation codes from the award to the continuation proposal.
Also, the system enables the following fields on the Certification page: Changed Since Prev Submission and Previously Reported.
If the certification code is HUMAN or ANIM, and the certification changed since the last submission, select the Changed Since Prev Submissioncheck box. If the certification code is INVPT and the certification was previously reported, select the Previously Reported check box.
Pages Used to Establish Non-Competing Continuations
|
Page Name |
Object Name |
Navigation |
Usage |
|
GM_CONT_ID_CREATE |
Grants, Awards, Create Continuation |
Create a continuation. |
|
|
GM_CONT_PRJ_ETHNIC |
Grants, Proposals, Maintain Proposal, Gender and Minority Study |
Document information regarding the gender and ethnic status of persons who are used in human research. |
|
|
GM_CONT_PRJ_TRAIN |
Grants, Proposals, Maintain Proposal, Trainee |
Summarize information about student trainees who are participating in a continuation project. |
Creating a ContinuationAccess the Create Continuation page.
|
Proposal ID: |
Displays the Proposal ID associated with the selected Award. |
|
To Continuation Proposal ID: |
Enter the continuation proposal ID. Enter NEXT to have the system increment the Proposal ID. |
|
To Continuation Version ID: |
Enter the continuation proposal ID. |
|
Budget Period |
Displays the budget period. |
|
Create |
Click Create. |
Documenting a Gender and Minority Study for a Continuation ProjectAccess the Proposal - Gender and Minority Study page.
|
Ethnic Type and Gender |
Select a value to represent the subject's ethnicity and gender. This data comes from a translate table and maps to continuation proposal forms. |
|
No. Of Subjects (number of subjects) |
Enter the number of people who are involved in the study who match the ethnic type and gender on the grid line. This information maps to continuation proposal forms. |
|
New Data |
Select if this is new data. All existing gender and minority information becomes old data when you create the Non-Competing Continuation proposal. If you modify this proposal and add a new gender, then that information becomes new data. The forms print process uses the presence of new data to determine whether to print this gender information on the Target/Planned Enrollment table or the Inclusion Enrollment report. |
|
Totals |
After you enter information regarding gender and ethnicity, the system enables this button. Click to display a page that lists totals by ethnic type, race, and gender. |
Summarizing Information About Student Trainees Participating in a Continuation ProjectAccess the Proposal - Trainee page.
Enter the student name, degree earned, and current position for each trainee participating in the project. You can enter multiple lines for multiple trainees.
|
Distribution of Trainees |
Click to access an inquiry page that lists totals by ethnic type, race, and gender. |
|
Ethnic Type and Gender |
Select a value to represent the student's ethnicity and gender. This data comes from a translate table and maps to the continuation proposal forms. |
Establishing Proposal BudgetsThis section provides an overview of proposal budgeting and discusses how to:
Enter detailed budget information.
View F&A cost calculations.
Distribute cost sharing commitments within the institution.
Distribute cost sharing commitments by budget line detail.
Enter budget details for personnel.
Enter budget details for animal care.
Enter budget details for other budget items.
Understanding Proposal Budgeting
This section discusses:
F&A Cost Calculations.
Overall cost sharing.
Summary cost sharing.
Budget line details.
Here is some general information about F&A cost calculations:
The system calculates the F&A costs for the current budget period.
To get F&A costs for each period in the entire budget, you must calculate them separately.
The rate type, waived calculation method, and base types for the institution and sponsor appearing on this page come from the F&A Set Up page.
If you define the sponsor F&A rate as Same as Institution in the sponsor F&A definition, the system makes the effective date and F&A rate percentage blank.
Also, the system clears the Same As Institution check box on the F&A Calculation page.
The system calculates the F&A costs for the institution and sponsor based on the effective dates of rates that are entered for each of their respective profiles.
If the proposal requires a specific F&A rate that differs from the sponsor and institution, you can enter rates and their effective dates in the fields that are provided.
The system sums all costs for budget items that belong to the base type that you select.
Here is some general information about overall cost sharing:
You can enter cost sharing data concerning individual lines on the lines that are on the Enter Budget Detail page.
You can enter cost sharing information for either the institution or a third-party by budget summary line, or for the overall budget for the entire period.
After you apply cost sharing to either the summary (overall budget) line or the detail (individual budget) line, you can apply it only at that level.
Here is some general information about summary cost sharing:
You can enter percentages or fixed dollar amounts to determine cost shares.
For cost sharing by the institution, you must enter a department for distribution purposes.
For cost sharing by third parties, enter the appropriate information in the lower portion of the Summary Cost Sharing page.
The system does not transfer third-party cost sharing amounts into the award setup budget.
If you do not cost share by summary line, you can enter cost share amounts for the sponsor, institution, and other applicable third parties on the Overall Cost Sharing page.
Here is some general information about entering budget line details:
You can enter multiple personnel budget lines for a single person or for multiple people.
You can calculate the compensation cost for individuals with multiple appointments.
When you select an employee who was previously entered as a professional on the Proposal Professional page, the Project Role and Role fields appear.
Other personnel information comes from multiple tables within the professional profile and includes name, job code, employee class, fringe rate type, annual salary, and fringe rate.
The system supplies annualized salary from the individual's job record.
The system calculates the budgeted salary based on the annualized salary and the number of months that the professional is involved with the research, along with the effort percentage for that time period and any merit increases.
A merit increase takes effect only if the merit increase date is between the start and end dates of the personnel detail line. To enter a fixed salary amount and bypass the salary calculation, use the Fixed Salary Amount field.
The system populates the Fringe Rate field only if you have entered a fringe rate type for the individual in his or her professional profile.
The system uses the current institution's fringe rate based on the employee's fringe rate type entered in his or her profile. The system calculates the budgeted salary and fringe benefits based on the parameters that you set.
You can enter an annual fringe amount, a fringe rate, or a fixed fringe amount.
If you enter an annual amount, the system calculates the budgeted amount based on the time period. If you enter a rate, the fringe amount is based on the calculated salary amount. If you enter a rate and an annual amount, the system calculates both and adds them together. You can also bypass all fringe calculations by entering a fixed fringe amount.
The system tracks total budgeted amounts for all salaries and fringe amounts that you enter.
Note. Fringe, C/S, and F&A round to whole dollars.
Pages Used to Establish Proposal Budgets
|
Page Name |
Object Name |
Navigation |
Usage |
|
GM_BUD_LINE_SUM |
Grants, Proposals, Enter Budget Detail, Enter Budget Detail |
Store detailed budget information by budget item. The page divides the total funding responsibilities of the sponsor and total cost sharing between the institution and any third parties. It also displays a breakdown of direct and F&A (indirect) budget amounts. |
|
|
GM_BUD_FA_PD |
Click the View FA Rate link on the Enter Budget Detail page. |
View the calculated budgeted and waived and cost shared amounts for the entire budget period. |
|
|
GM_BUD_CS_SUM |
Click the Cost Share link on the Line Data tab on the Enter Budget Detail page. |
Distribute cost sharing commitments by budget summary line. |
|
|
GM_BUD_PERS_DTL |
Click the Details button on the Line Data tab on the Enter Budget Detail page for the Personnel category. |
Enter additional budget information concerning personnel (salary and fringe calculations). |
|
|
GM_BUD_ANML_DTL |
Click the Details button on the Line Data tab on the Enter Budget Detail page for the Animal category. |
Enter additional budget information concerning animal care (cages and daily rates). |
|
|
GM_BUD_LINE_DTL |
Click the Details button on the Line Data tab on the Enter Budget Detail page for a category other than Personnel or Animal. |
Enter additional budget information concerning other information (equipment, travel, and so on). |
|
|
GM_BUD_JUSTIF |
Click the Budget Line Justification link on the Enter Budget Detail page. |
Enter justification details. |
Entering Detailed Budget InformationAccess the Enter Budget Detail page.
Note. If you create a proposal that lists specifically funded amounts for the overall budget and do not enter budget details for each period, the system sets the contract totals and award funding totals to zero when you run the award generation process. The system uses the budget detail amounts that you enter to create the resulting contract and funding amounts on the award pages. Therefore, if you do not enter budget details before you run the award generation process, you will have to enter the information manually in both Grants and Contracts.
To enter proposal budget line details:
Enter detail lines by budget period.
Multiple lines can exist for a single budget category. During line entry, the system displays totals, including the target budget amount and a breakdown of the current budget amount.
For each line, enter a description.
In the budget items for non-personnel budget lines, enter the amounts to calculate total direct costs and sponsor direct costs.
The system automatically calculates institution cost share and third-party cost share amounts.
Select the More Line Data tab.
Note. In PeopleSoft 8.9, if the amount entered in the Total Direct Amount field is a whole dollar amount, then the values in the Sponsor Direct and Cost Share (if applicable) fields will also be in whole dollar amounts. If, however, you enter a fraction in the Total Direct Amount field you will get a fraction also reflected under the Sponsor Direct field. If there is cost sharing on the line, then the fraction will be allocated to the Cost Sharing column and a whole dollar amount will appear in the Sponsor Direct field.
Select the Map Detail check box to pass the supporting detail lines to the award budget.
If you do not select the Map Detail check box, budget data is mapped directly from the summary line level, not the detail line level.
Creating an NIH Modular Grant Budget
If you selected the NIH Modular Grant check box on the Proposal - General Info page, you must create a budget that is specific to an NIH modular grant. This process is the same as the process for establishing a regular proposal budget, except for a few variations:
The system automatically selects the Modular check box to indicate that it is an NIH modular proposal.
The Category field shows how the various categories roll up on the form.
These categories serve as headings on the NIH Modular Budget Justification form.
The Map Detail check box appears by default based on the category, and indicates which lines should map to the form.
The system maps any text that you enter on the Justification page to the Budget Justification form under the corresponding category type heading.
When you save, the system issues a warning if the sponsor direct amount is not a multiple of 25,000 USD or if the amount exceeds 250,000 USD.
This is an informational warning. You can still save the data that you entered.
See Also
Establishing Institution Controls
Viewing F&A Cost CalculationsAccess the F&A Calculation page.
This page displays the calculated budget, as well as waived and cost shared amounts for the entire budget period.
Distributing Cost Sharing Commitments Within the InstitutionAccess the Overall Cost Sharing page.
Enter overall cost sharing information for the sponsor, as well as cost sharing information for departments and third parties.
Distributing Cost Sharing Commitments by Budget Line Detail
Enter overall cost sharing information for the sponsor, as well as cost sharing information for departments and third parties for the particular budget line that is associated with the overall budget.
Entering Budget Details for PersonnelAccess the Personnel Detail page.
To enter personnel budget details, enter or select information concerning appointment type, start and end dates, cost of living and merit increase percentages, salary, and fringe rates. Then click OK.
Entering Budget Details for Animal CareAccess the Animal Care page.
To enter budget details for animal care:
Enter a description, the number of animals, and number of animals per cage.
Enter the days elapsed, the amount charged for the first day of care or boarding, and the amount charged for subsequent days of care or boarding.
When you move the cursor to a new field, the system calculates total animal care costs based on the information that you entered.
Click OK.
Entering Budget Details for Other Budget ItemsAccess the Budget Detail page.
To enter details for budget items other than Animal or Personnel:
For each detail line, enter a total direct amount or a quantity and a unit cost.
If you enter a quantity and unit cost, the system multiplies the two amounts to determine the total direct amount.
You may also enter a start date and end date for each budgeted amount if the sponsor or the institution requires this information.
Click OK.
Submitting ProposalsThis section discusses how to submit a proposal and discusses how to:
Submit a proposal.
Designate an official for a proposal submission.
Pages Used to Submit Proposals
|
Page Name |
Object Name |
Navigation |
Usage |
|
GM_PROP_SUBMISN |
Grants, Proposals, Submit Proposal, Submission |
Set up the proper parameters for submitting a proposal. This is separate from the proposal pages to enable the institution to configure its security options for approving and submitting proposals. |
|
|
GM_PROP_SUBMIS_OFF |
Grants, Proposals, Submit Proposal, Official |
Store information regarding officials for a proposal submission. This is separate from the proposal pages to enable different security to operate for institution officials. |
Submitting a ProposalAccess the Proposal - Submission page.
Enter the dates for which a proposal version is valid. In the Transmission By field, select how the proposal will be submitted. Values are Mail, Electronically, Courier, and Fax. Enter the sponsor proposal ID. Select the submit status of the submission, the date on which the proposal was received, and the location of the sponsor. Enter any additional mailing instructions.
Note. You can submit an Institution Approved proposal only if the Proposal Component Approval workflow is active.
Note. After you mark a proposal version as Submitted, you can no longer modify any of the proposal information for that version. To make any modifications to a proposal after it has been submitted, you must create a new version of the proposal.
Designating an Official for a Proposal SubmissionAccess the Proposal - Official page.
|
Proposal Status |
Select the status of the proposal. |
|
Submit for Approval |
Select this check box to indicate you have submitted the proposal for external approval. Note. The system does not enforce this check. |
|
Admin Official, Financial Official, and Signing Official |
Select the officials who should approve the submission of the proposal. Officials are mapped to the proposal forms based on their official type. These officials come from the Institution Contacts page. Authorized officials can approve and sign the proposal. Their IDs are prompted from a control table that contains authorized officials within your institution. |
|
Approved |
Displays a check box for each official. For you to use this feature, the user IDs of the officials must be part of your PeopleSoft security system. |
Printing ProposalsThis section provides on overview of the forms printing process and discusses how to print a proposal.
Understanding the Forms Printing Process
Grants delivers standard forms that are used for proposals by the National Science Foundation and the National Institutes of Health along with electronic data interchange (EDI) files of the required data elements.
Here is some general information about printing proposals:
Grants provides application mapping onto proposal formats that are accepted by most funding agencies.
These forms simplify the production of multiple copies of proposals and facilitate their timely submission.
PeopleSoft delivers key values as system data for sponsor forms PHS 398, 2590 (for NIH continuations), and NIHMOD (for NIH modular proposals).
You cannot change this data, as any change would affect other system-delivered processes. These key values represent the form IDs that are supplied when you access the Create a Printed Proposal page. PeopleSoft uses these IDs to map the appropriate data values to the proposal form for printing.
See Also
Setting Up the Grants Forms Printing Solution
Page Used to Print Proposals
|
Page Name |
Object Name |
Navigation |
Usage |
|
GM_PROP_PRINT_REQ |
Grants, Proposals, Print Proposal, Create Printed Proposal |
Launches the print proposal process. |
Printing a ProposalAccess the Create Printed Proposal page.
To print a proposal:
Enter the business unit, proposal ID, version ID, and form ID for the proposal that you want to print.
Enter or select the as of date for the proposal.
Click Run to initiate the GMPROP process.
Select the server on which you want the job to run.
Click OK to start the job on the server.
Note. If the PeopleSoft Process Scheduler is not active on the server, and the appropriate software is installed on the client, then select the Client run location. In this case, you must run the GM_EDI Application Engine first, followed immediately by the ECOUT001 SQR report. In either case, the system generates the required data file, which the system converts into a PDF format that you can view or print using Adobe Acrobat Reader.
Freezing Submitted Proposals by Using Version IDsYou can use Grants to capture a snapshot of proposals as of their submission. This snapshot is important if a sponsor asks you to make changes and then resubmit the proposal, or if, for any other reason, you must make changes to a proposal after it has been submitted.
Grants uses version IDs to meet this need. Here is some general information about how version IDs are used for proposal submissions:
The version ID of a submitted proposal provides the system with a way to freeze the proposal at the time of submission.
The system does not permit you to make changes or updates to a proposal by using a version of the proposal that has already been submitted to a sponsor.
To make changes to a proposal after it has been submitted, create a new version, and then make the changes.
The version ID enables you to update information without deleting history.
Use the proposal pages to view a proposal or proposal project for any particular version that's been submitted.
You can submit the proposal multiple times by using different versions.
See Also
Unlocking Proposal InformationAfter you run the award generation process in Grants, the system locks the proposal so that users cannot make any further changes. This safeguard helps keep information on the pre-award side in sync with information on the post-award side.
To change information on a proposal that is in an Awarded status, users must copy the proposal to a new version. Creating a new proposal version and making changes to it, however, causes the new proposal to be out of sync with the information that was established during the award generation process. Also, for proposals with pre-award spending, users cannot change information prior to rerunning the award generation process.
PeopleSoft delivers a user option called Unlock Proposal (GM_PR_UNLOCK), which enables you to provide users with the capability to change proposal information after they run the award generation process.
Two methods are available by which you can unlock proposal information for users:
Use permission lists and the user personalization option to override the system setting and unlock proposal information for individual users or a group of users.
Reset the GM_PR_UNLOCK user option to Y to unlock proposal information at the system level for all users (not recommended).
Note. You do not need to make any changes to the system if you do not want to enable users to change proposal information after they run the award generation process. PeopleSoft is delivering this system update with the Unlock Proposal option set to N (no).
Unlocking Proposals by Using Permission Lists and the User Personalization OptionTo enable a group of users to unlock proposal information after they run the award generation process, use the Personalization page in the Permission List component. This page enables you to decide which personalizations the users are able to configure.
Select PeopleTools, Security, Permission & Roles, Permission Lists.
Select the permission list that is associated with the group of users whom you want to enable to unlock proposal information.
Select the Personalizations tab.
Click Edit Options.
The system displays the Personalization Permissions page.
Select the Allow User Option check box for the GM_PR_UNLOCK user option.
Click Save.
Selecting this option enables the users who are associated with the permission list to access their own Personalizations page and override the system setting that prevents them from changing proposal information after they run the award generation process. At this point, you can instruct the users who are associated with the permission list to change their Ability to Unlock Proposals personalization option to override the system setting. If you do not want to provide instructions to the users, you can sign in as the user and make the changes.
Changing a User's Personalization Setting to Unlock Proposals
To change the Personalization options for an individual user, you must sign in to the database as that user or provide instructions to the user on how to make the change.
After you sign in to the system:
Access the Personalizations page by clicking My Personalizations.
Click the Personalize Option button for the General Options category.
Enter Y in the Override Value field for the Ability to Unlock Proposals option.
Click OK.
Grants users who are signed in to the system can now modify proposal information after they run the award generation process.
Unlocking Proposals at the System Level for All UsersThe second method that you can use to unlock proposal information is done at the system level. This means that any user with access to Grants can change information on a proposal after the award generation process is run.
Warning! You should not unlock proposals at the system level unless you want to enable all users to change information after the proposal has been generated into an award.
To unlock proposals at the system level:
Select PeopleTools, Personalization, Personalization Options.
Select FIN (financials).
The system displays the Define Personalizations page.
Select the Format tab.
Click the Set Option Default Value link.
The system displays the Set Option Default Value page.
Enter Y in the Option Default Value field.
Click OK.
All Grants users can now change proposal information after they run the award generation process.
Viewing Proposal Audit LogsThis section provides an overview of audit logs and lists the pages that are used to view proposal audit logs.
Understanding Audit Logs
Proposal audit logs provide an audit trail of changes to important data elements in the proposal. Here is some general information about audit logs:
The audit trail accumulates automatically whenever you add, delete, or change one of the key data elements.
All audit pages identify the user, the type of change (add, change, or delete), and the date and time of change.
You can configure the set of data elements that are subject to auditing by changing the underlying audit records and making corresponding changes to the audit pages.
PeopleCode modifications are not required.
Pages Used to View Proposal Audit Logs|
Page Name |
Object Name |
Navigation |
Usage |
|
Proposal Audit Log - Header |
GM_AU_PROPOSAL |
Grants, Proposals, Review Proposal Audit Logs, Header |
View changes to proposal header information. |
|
Proposal Audit Log - Projects |
GM_AU_PROP_PROJ |
Grants, Proposals, Review Proposal Audit Logs, Projects |
View changes to proposal project information. |
|
Proposal Audit Log - Resources |
GM_AU_PROJ_RES |
Grants, Proposals, Review Proposal Audit Log, Resources |
View changes to proposal resource information. |
Copying Proposal InformationYou can copy a proposal ID, any number of its child projects, and selected proposal budgets and periods from one proposal to another without reentering data.
Note. Because you cannot add or update information in these pages, enter information in correction mode.
This section discusses how to:
Copy proposal information.
Copy budget period information.
Pages Used to Copy Proposal Information
|
Page Name |
Object Name |
Navigation |
Usage |
|
GM_BUD_PPSL_CPY |
Grants, Proposals, Copy Proposal |
Copy proposal information. |
|
|
GM_BUD_PD_CPY |
Grants, Proposals, Copy Budget Period |
Copy information concerning budget periods from existing proposal budgets. This is useful when you want to freeze a budget before making additional changes to it. |
Copying Proposal InformationAccess the Copy Proposal page.
To copy proposals:
In the search dialog box, select the business unit and the proposal ID from which you want to copy information. If you copy a Template Proposal the resulting proposal is not a template.
Enter NEXT in the To Proposal field to create a new proposal.
In the To Version field, enter or select the version ID to which you want to copy proposal data.
Use the From Project ID and From Budget fields to select the projects and budget IDs that you want to copy to the new proposal. Note that the default setting is for all the projects and activities to be copied.
You can have as many rows for projects and budget IDs as you require for the proposal.
Use the To Project ID and To Budget fields to select the projects and budget IDs that you want to copy to the new proposal, or accept the system defaults.
Select the Primary Project check box to indicate which project should be the primary project in the copied proposal.
Click Copy.
All fields in the Proposal - General Info page appear by default from the proposal that you are copying.
While by default the target proposal has the same dates as the source proposal from which it is copied you can change the start and end dates on the target proposal.
Note. If you don't change the dates, you will get a mirror copy of the source proposal. If you change the dates during the copy process all of the detail rows under each period will be assigned the dates entered for the period on the copy page.
Copying Budget Period InformationAccess the Copy Budget Period page.
To copy a proposal budget period:
In the search dialog box, enter the business unit, proposal ID, version ID, proposal project, and budget ID from which you want to copy proposal budget periods.
All target keys (or To fields) appear by default from the budget period that you are copying, including the To Budget ID field. The budget period should be one number greater than the number in the From Budget Period field (this restriction is due to the application of cost of living). However, you can change all the To fields except the To Budget Period field.
(Optional) Specify an escalation percentage.
The system inflates all budget amounts by the specified percent when they are copied to the new budget period.
Click Copy.
When you set up the budget period, the Copy Budget Period function copies all of the tables that are under the Budget Period key structure, such as budget summary, budget line detail, and cost sharing.
Note. The copy process automatically adjusts the start and end dates in the underlying budget detail in accordance with the from and to budget period dates. Make sure that no information is in the target budget period child records, or you will receive a data conflict error message.
See Also
Inquiring About Proposal BudgetsThis section provides an overview of budget inquiry and lists the pages used to inquire about proposal budgets.
Understanding Budget Inquiry
You can view information concerning pre-award proposal budgets by using the inquiry pages that PeopleSoft Grants delivers with the system. The pre-award budget inquiry pages store information about the pre-award proposal budget. The inquiry function within the proposal budget pages enables you to view budgets in three ways:
As a summary of all budgets that are marked as include in proposal within a proposal project.
As totals for each budget within a proposal project.
At a detailed level for each budget within a proposal project.
Inquiry pages are for viewing purposes only. You must make modifications to budgets from the Budget - General Info or Enter Budget Detail pages. The budget and cost calculations for sponsor, F&A, institution, and third-party appear at the bottom of each page.
Pages Used to Inquire About Proposal Budgets
|
Page Name |
Object Name |
Navigation |
Usage |
|
GM_BUD_INQ_PROP |
Grants, Proposals, Review Pre-Award Budget |
View comprehensive data about a pre-award budget based on the version ID. |
|
|
GM_BUD_INQ_PROJ |
Grants, Proposals, Review Pre-Award Budget, Projects |
View a breakdown of the overall proposal by project. |
|
|
GM_BUD_INQ_CS |
Grants, Proposals, Review Pre-Award Budget, Cost Sharing |
View sponsor direct costs. |