 Understanding Time Report Processing
This chapter provides an overview of time report processing and time report parameters and defaults, and discusses how to:
Create time reports.
Enter general information on a time report.
Enter project and personal hours on time reports.
Adjust time reports.
View or modify time reports.
Delete time reports.
Understanding Time Report Processing
Expenses provides a time reporting system to track project and personal time for employees. Time reports replace written time sheets, punch cards, and spreadsheets that require manual monitoring or organizational budgets.
From the Travel and Expense Center, you can select to create, modify, view, delete, and print time reports. As you go through the preparation process, you can change general information and charge hours to projects or activities. If you have installed Program Management and enabled the Estimated Time to Complete functionality, employees can view and modify their remaining work estimates. You can save time reports for further work or submit them for approval.
You can submit time reports weekly, biweekly, or semimonthly. You define the submission frequency at the general ledger business unit level and approvals at the setID level. If your organization requires monthly billing, employees can submit their time reports at the end of the month and submit a time report adjustment with their hours for the remainder of their workweek.
When project or activity status is set to Inactive, hours or adjustments may not be booked to them. Inactive projects or activities are not available for selection on a time report or for a time report adjustment. if a project or activity status is set to Closed, you may enter hours on a time report or a time report adjustment if the project control action is set to Warning in Project Costing. However, you may not enter hours on a time report or time report adjustment for a closed project when the project control action is set to Reject.
Expenses does not allow you to enter negative hours or more than 24 hours per day on a time report or time report adjustment. Also, you cannot enter hours on time reports or time report adjustments for days prior to the employee's hire date.
See Also
Copying or Adding Expense Lines
Controlling Incoming Transactions
Understanding Time Report Parameters and Defaults
You set up time reporting frequencies and thresholds on the Business Unit 2 page. The Time Report Period parameter determines the number of days to display for time entry. For example, if you select Weekly, Expenses displays a seven-day grid on the time report pages.
You can establish thresholds at the general ledger business unit level for Expenses to issue warnings or errors if employees submit time reports over or under the required number of hours for a time reporting period. For example, if you establish a maximum per period threshold of 50 hours per week and select an alert action to issue an error, Expenses prevents employees from submitting time reports that exceed 50 hours per week. If you select the Warning option, employees receive a warning message from the system, but they can still submit the report for approval. You can override these thresholds at the employee level on the Employee Profile - Organizational Data page by clearing the Use Business Unit Default check box and entering new minimum and maximum hours per period.
Also on the Business Unit 2 page, you can establish the window of time to submit transactions for inactivated employees. If you use the Inactive Employee Submissions option, Expenses checks the employee status and action date when a time report is submitted. If the employee is inactive, Expenses verifies if the grace period has been exceeded and, if so, issues an error to prevent further processing of the expense transaction.
The Time Grid Display group box on the Business Unit 1 page enables you to display project, policy, or both grids on time reports. If you select to display the project or policy grid, Expenses hides the other grid for employees in that general ledger business unit. You can also select on the Business Unit 2 page whether you want project codes or descriptions to prepopulate on time reports. Employees can override this setting by accessing the Employee Profile - User Defaults page where they can select their own defaults.
See Configuring Business Units for Expenses, Maintaining User Defaults.
Common Elements Used in This Chapter
|
Billing Action |
The system populates this field with information, if it exists, from the employee profile defaults. You may override or update this value. Select Billable, Nonbillable, or Internal. Billing action defaults to Billable if no user defaults are defined. If you use Project Costing, billing codes are required to identify project time that is both billable and charged to project costing ChartFields. |
|
Period End Date |
Displays the date that the time reporting period ends for the employee (based on the setID of the employee ID). If you create the time report without specifying a date, the system uses the current date to calculate the actual period end date:
|
|
Displays the time report status from POST_STATUS_EX. Statuses are:
|
|
|
Displays the time report status from TIME_SHEET_STATUS. Statuses are:
|
|
|
User Defaults |
Click to access the Employee Profile - User Defaults page to view or modify the defaults, which include creation method and project defaults. Expenses displays this link only in create or modify mode; approvers and project managers do not have access to this link. |
|
Version |
Displays the version type and version number of the time report. Values are:
|
Creating Time ReportsThis section provides an overview of time report creation options and discusses how to create time reports.
 Understanding Time Report Creation
When you create a time report, you have options on which to base the new document, and the selection that you make triggers other choices that prompt you for details about the time report. You can start with a blank time report that can be populated with defaults defined in the employee profile or populate it with data from another time report.
Pages Used to Create Time Reports
|
Page Name |
Object Name |
Navigation |
Usage |
|
TE_TIME_MAIN |
Employee Self-Service, Travel and Expense Center, Time Report, Create |
Create a new time report. |
|
|
TE_COPY_TIME_RPT |
|
Select a previous time report as a basis for a new report. |
Creating Time Reports
When you use the Employee Self-Service, Travel and Expense Center, Time Report, Create navigation, Expenses checks for a default creation method. Depending on what your default creation method is set to on the Employee Profile - User Defaults page, Expenses displays the next page based on the user defaults and prepopulates fields according to user defaults. If you do not have a default creation method, Expenses defaults to open a blank report.
The creation methods for time reports are:
Open a Blank Report: Expenses creates a new time report and displays the General Time Report Information page with the country, state, locality, and billing action fields populated with information from the user default table, if it exists. The system also populates project data from the defaults in the employee profile; however, only active and enabled projects populate the time report.
Copy an Existing Report or Copy from an Existing Time Report: Expenses displays the Copy from an Existing Time Report page.
To copy from a previous time report, enter a date range to display existing reports and click Search. Expenses displays all time reports whose period end dates fall in the range defined by the From and To dates. When you select a time report to copy, Expenses creates a new time report that is similar to the one that is chosen and displays the General Time Report Information page.
Entering General Information on a Time Report
This section discusses how to enter general information on a time report.
Page Used to Enter General Information on a Time Report
|
Page Name |
Object Name |
Navigation |
Usage |
|
TE_TIME_MAIN |
|
Enter descriptive information about a time report. |
Entering General Time Report InformationAccess the General Time Report Information page.
Note. Some fields on the General Time Report Information page do not appear in Create mode. Expenses displays these fields after you create the time report, save or submit the report, exit the component and return to the page.
Time Report Defaults
|
Country, State, and Locality |
The system populates these fields with information, if it exists, from the user default table. You may override or update these values. |
|
Continue |
Click to access the Time Report Summary page and enter project and personal hours. |
|
Copy from an Existing Time Report |
Click to access the Copy from an Existing Time Report page and select a time report to copy. This link appears only in create or modify modes. |
Entering Time and Details on Time Reports
This section discusses how to:
Enter project and personal hours.
Enter project time details.
Pages Used to Enter Time and Details on Time Reports
|
Page Name |
Object Name |
Navigation |
Usage |
|
TE_TIME_LINES |
Click the Continue button on the General Time Report Information page. |
Add, modify, or view project hours and personal hours for a time report. |
|
|
TE_TIME_DTL |
Click the Details link under the Project Time tab on the Time Report Summary page. |
Add, modify, or review project ChartField defaults for a time report. |
Entering Project and Personal HoursAccess the Time Report Summary page.
Note. For a weekly time reporting frequency, the system displays all days on a single page. For other frequencies, you must scroll through the pages by using the left or right arrows.
|
Time Report ID and Status |
The system automatically assigns these values when you save a time report for the first time. If you do not save the time report, the system does not display these fields. |
Project Time Tab
You define Project Costing business units, project IDs and activity IDs in PeopleSoft Project Costing. You also define whether entry of Project Costing business unit, Project ID, and Activity ID on time reports is required or optional.
Note. Before you close or inactivate a project ID or activity ID, PeopleSoft recommends that you verify that there are no pending transactions associated with those project IDs or activity IDs.
|
|
Click the Details button to access the Time Report - Project Time Details page to view or modify general ledger ChartFields, and location defaults for a time report. |
|
PC BU (project costing business unit) |
Select a business unit to report time for a project. |
|
Project |
Select a project for which you want to record time. You create projects in PeopleSoft Project Costing. |
|
Activity |
Select a project activity for which you want to record time. You create activities in PeopleSoft Project Costing. |
|
Project Related Hours |
Enter hours for each project on the applicable dates. |
|
Total |
Displays the total number of hours entered on the time report. |
|
Remaining Work |
Displays the calculated difference between the remaining work totals from Project Costing and the hours entered into the daily totals on the time report. Note. Expenses displays this field only you installed Program Management and selected the Allow Entry of Estimate to Complete check box on the Business Unit 2 page. |
|
New Estimate |
Enter a new estimated time to complete the project or activity. Note. Expenses displays this field only you installed Program Management and selected the Allow Entry of Estimate to Complete check box on the Business Unit 2 page. |
Status and Issues Tab
This tab is available if Program Management is installed. The status and issues links are available to transfer you into Program Management to report project status and manage project issues.
|
Status and Issues |
Click to access the Status Report Entry component (PC_SR_ENTRY) and Issue Management Issue Detail component (PC_IM_ISSUE) in Program Management where you can report project or activity status and manage project issues. |
|
Reset to User Defaults |
Click for the system to clear project hours and replace the PC BU, Project, and Activity ID fields with the information from the user default table. This button is not available to approvers or project managers. |
|
Update Totals |
Select to update and verify the totals for project and policy time. The system hides this button when the page is in a display-only mode. This button is available to project managers but not available to approvers. |
|
Description |
Enter hours to charge to nonproject time according to the mapped time report codes, such as floating holidays, contract holidays, illness, vacation, and so forth. |
|
Save for Later and Submit for Approval |
You can save the time report or submit it for approval based on the following rules:
|
|
Select to submit the time report for end of month processing, even if there are days remaining in the time reporting period. For non-semimonthly time reporting, the end of a month may not fall at the end of an employee's workweek. If your organization requires billing at the end of the month, employees can submit their time up to the end of the month and then submit another time report with the remaining hours for the time period. Note. Employees cannot submit another time report with the remaining hours for the time period until the partial time report is approved and posted. |
|
|
General Report Information |
Click to access the Time Report - General Time Report Information page to view the general information about the time report. |
Pending Actions
Expenses displays this section after you submit the time report.
|
Profile and Name |
Displays the names of the approvers and their roles. |
|
Action |
Displays the pending actions in the time report approval process. |
|
Date/Time |
Displays the date and time on which the approval status was assigned. |
Action History
Expenses displays this section after you submit the time report.
|
Profile and Name |
Displays the name of the originator, approver, and their role. |
|
Action |
Displays the completed steps in the time report approval process. |
|
Date/Time |
Displays the date and time on which the approval status was assigned. |
Entering Project Time DetailsAccess the Time Report - Project Time Details page.
If you install Project Costing, the system displays the PC Bus Unit (project costing business unit), Project, Activity, Source Type, Category, and SubCat (subcategory) fields where you can add or modify information.
Note. You define on the Projects Options page whether PC business unit, project, or activity are required or optional for PeopleSoft Project Costing.
If PeopleSoft Project Costing is not installed, the system displays the PC Bus Unit, Project, and Activity fields where you can add or modify information.
General Ledger ChartFields Tab
Add or modify general ledger ChartField information.
Location Tab
|
Locality |
This is a geographic area that your organization defines for reporting purposes. You can use this field to describe tax requirements that are local to the area. |
Adjusting Time ReportsThis section provides an overview of time report adjustments and discusses how to adjust time reports.
Understanding Time Report Adjustments
Employees can adjust time reports by creating a revision of the time report that they wish to adjust. Time reports become available for adjustments after they have been submitted, approved, and staged to Project Costing. You may not enter an adjustment for a time report if another adjustment is in progress for the same report.
For non-semimonthly time reports when the end of the month does not fall at the end of a workweek, employees can enter information up to the end of the month and submit a partial time report. After their partial time report has been approved and staged to Project Costing, they can add the remaining time as a new version of that report.
Use the Time Report, View navigation to create a revision of the time report that you want to adjust. If there is another adjustment pending for the time report, the time report ID link is not available for selection on the Time Report - Search Results page. The time report search page includes a Version column to indicate whether the time report is a Partial, the Original, or a Revision. Click the link in the Period End Date column on the Time Report - Search Results page to access any version of the time report. When Expenses displays the View Time Report - Time Report Summary page, you have the option to create a revision for the most current time report version. When you select Create Revision from the Version Action drop-down list box and click Go, Expenses creates a new time report with a new version identifier. If you navigate to an older version of the time report, either the original or a previous version, Expenses displays the report in view-only mode.
Internally, Expenses numbers an original time report as Version 1. When you adjust the time report, the system numbers it Version 2 but refers to it as Revision 1 in the search views. Expenses uses Version 0 for partial time reports. When you modify a partial time report to add remaining hours for the period, the system numbers it as Version 1. Subsequently, if you adjust that time report, Expenses numbers it Version 2 and refers to it as Revision 1 in the search views.
Note. If you use Mobile Time and Expense, Expenses downloads only the current version of the time report to the mobile device.
Note. You cannot perform a partial submit on a revision.
Pages Used to Adjust Time Reports
|
Page Name |
Object Name |
Navigation |
Usage |
|
Time Report - Search Results |
TE_TIME_ENTRY_INQ |
Employee Self-Service, Travel and Expense Center, Time Report, View |
Select a time report to view. |
|
View Time Report - Time Report Summary |
TE_TIME_LINES |
Employee Self-Service, Travel and Expense Center, Time Report, View |
View time reports that have been submitted, approved, and staged. In view mode, you can create a prior period adjustment. |
|
Time Report - Time Report Summary |
TE_TIME_LINES |
Select Create Revision in the Version Action drop-down list box on the View Time Report - Time Report Summary page. |
Create an adjustment for a time report. |
Adjusting Time Reports
Access the View Time Report - Time Report Summary page.
Note. Fields on the View Time Report - Time Report Summary page are the same as the files you see when you create a time report and are defined in that section of this chapter.
|
Version Action |
Select to create or view different versions of a time report. The Version Action page element appears only for time reports that have been submitted, approved, and staged to Project Costing. Options are:
|
|
View Other Version |
Select to view different versions of a time report. The View Other Version drop-down list box appears instead of the Version Action drop-down list box if time reports are not available for prior period adjustments. |
Viewing and Modifying Time Reports
This section discusses how to view or modify time reports.
Pages Used to View or Modify Time Reports
|
Page Name |
Object Name |
Navigation |
Usage |
|
Time Report - Search Results |
TE_TIME_ENTRY_INQ |
Employee Self-Service, Travel and Expense Center, Time Report, View |
Select a time report to view. |
|
View Time Report - Time Report Summary |
TE_TIME_LINES |
Employee Self-Service, Travel and Expense Center, Time Report, View |
View time reports that have been submitted, approved, and staged. In view mode, you can create a prior period adjustment. |
|
View Approver Comments |
EX_COMMENTS_RJCT |
|
When an approver sends back a time report, you can review their comments in full by clicking on the comment link at the top of the page. This takes you to the View Approver Comments page where you can see the full comment. |
Viewing or Modifying Time Reports
Access the Time Report - Time Report Summary page.
If you access the Time Report - Time Report Summary page using the View navigation, then Expenses displays the page in read-only mode. You can only view time reports that you submitted for approval.
If you access the Time Report - Time Report Summary page using the Modify navigation, then Expenses enables you to edit all of the fields. You can modify a time report if you have not submitted it for approval, or if an approver sent it back for revision or correction.
Note. Fields on the Time Report - Time Report Summary page are the same as the fields you see when you create a time report and are defined in that section of this chapter.
|
Sent Back for Revision and View Approver Comments |
Click the View Approver Comments link to access the View Approver Comments page and view the comments an approver made regarding the reason they sent the time report back for revisions. |
Deleting Time ReportsIf you create a time report and decide not to process it, you can delete the time report if it is in Pending status. You can also delete a time report if the status is Denied.
Page Used to Delete Time Reports
|
Page Name |
Object Name |
Navigation |
Usage |
|
TE_DEL_TIME |
Employee Self-Service, Travel and Expense Center, Time Reports, Delete Travel and Expenses, Time Reports, Delete |
Select and delete time reports from the expense system. |
Deleting a Time Report
Access the Travel and Expense - Delete Time Report page.
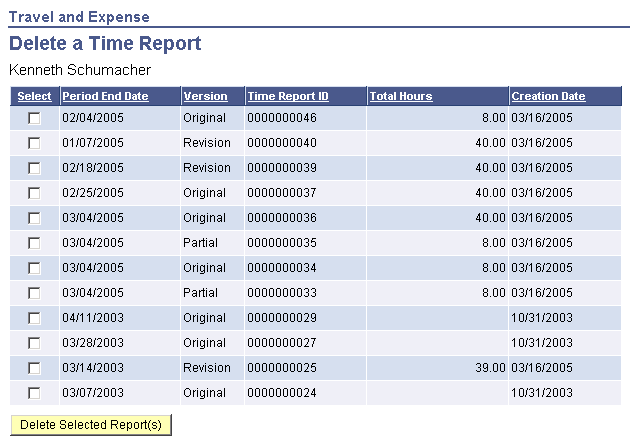
Travel and Expense - Delete Time Report page
Expenses displays a list of pending and denied time reports. Select those that you wish to delete and click the Delete Selected Report(s) button.