
 Understanding Data Enhancement Tools
This chapter provides an overview of the EPM Foundation data enhancement tools and discusses how to:
Set up value objects.
Define Data Manager rules.
Define Data Manager rule sets.
Rename Data Manager rules.
Associate Data Manger rules sets with a job.
Run the Data Manager engine.
Define Allocation Manager rules.
Define Allocation Manager rule sets.
Rename Allocation Manager rules.
Associate Allocation Manager rules sets with a job.
Process allocations.
Understanding Data Enhancement Tools
This section discusses:
Data Manager.
Allocation Manager.
Data Manager and Allocation Manager integration.
Mathematical model for Data Manager and Allocation Manager rules.
Data ManagerThe Data Manager is a flexible tool that enables you to:
Move data into the performance journal table (PF_JRNL_F00).
Organize the output from any PeopleSoft Enterprise Performance Management engine to create rows of data with multiple dimensions.
Create reporting categories (dimensions) that represent groups of information for reports, such as business units, customers, products, channels, accounts (revenue, expense, and so on), and departments.
Note these key features of Data Manager:
You can use Data Manager to consolidate or aggregate data and eliminate redundant rows.
You can run Data Manager using different rules to organize and create multiple dimensions for direct costs and revenue data.
Data Manager supports the following methods for moving data:
|
Method |
Description |
|
Copy |
Moves data from the source to the target. This method typically uses multiple-dimension data as the source. |
|
Arithmetic |
Applies an arithmetic operation using the amounts in both sources. |
|
GL Mapper |
Takes data from the general ledger tables and maps it to performance data. This method populates the temporary GLSTG table . From here, you can use the copy method to move data directly to the performance journal. |
|
Prorata |
Adds an additional dimension to your data and divides the amount across the dimension based on the percentage of the total amount. |
|
Spread Even |
Adds an additional dimension to your data and spreads the fact amount evenly across the dimension. |
|
Tree Aggregation |
Aggregates measures based on a tree hierarchy. The node names act as dimensions. |
Data Manager and the Profit Manager
Data Manager works with the Profit Manager tools by moving data to the performance journal table (PF_JRNL_F00). The Profit Manager tools verify this data (PF_EDIT engine) and post the data to the performance ledger (PF_POST engine). They also unpost data, if necessary (PF_UNPOST engine) and can clean up the performance journal table ( PF Journal Cleanup engine). The Profit Manager includes tools for balancing and reconciling your data.
The performance ledger, PF_LEDGER_F00, is a useful table for reporting because it contains all of the performance fact data. The facts have been allocated across several dimensions of your choice (typically channel, product, customer, and department). Having all of this information organized in a single table makes it easier for you to query and create reports.
The Profit Manager tools are described in later in this PeopleBook.
See Setting Up and Using Profit Manager.
To set up the Data Manager, you need to:
Define the necessary metadata (including tablemaps, datamaps, constraints, and filters).
The system uses datamaps and constraints to point to the appropriate tables.
Define Data Manager rules, including the method by which you want to move, aggregate, or create multidimensional data, as well as the sources and target of the process.
Create a Data Manager rule set that contains one or more rules.
Set up job metadata and jobstreams.
Associate the Data Manager rule set with a job.
Run the Data Manager engine.
Allocation ManagerAllocation Manager is a tool that enables you to distribute revenue, expense, and statistical amounts across business units, departments, and other dimensions. For example, you can allocate budget planning to detail levels to perform detailed budgeting. The type of allocation method that you select determines the output.
The following table lists the types of allocations that are supported by the Allocation Manager and describes each allocation type:
|
Allocation Type |
Description |
|
Arithmetic Operation |
Defines a mathematical calculation using the source and basis, such as source + basis. |
|
Prorata |
Divides the source amount proportionately among the targets based on basis measures. |
|
Spread Even |
Distributes the source amounts equally by the specified basis fields. For instance, if expenses were spread evenly across four business units, each would have 25 percent of the expense. |
|
Copy |
Copies the source amounts to the targets. |
Due to platform limitation issues on DB2 UDB for OS / 390 and z/OS (the index size is limited to 255 characters) and Oracle (which requires 30 columns in an index) the predelivered index is on the first 10 dimensions. However, based on your requirements and the database platform, you can increase the maximum number of dimensions in the Allocation Manager to 28. The records that need to be modified for index changes include PF_AL_CALC_T, PF_AL_DIFF_T, PF_AL_DIV_T, PF_AL_SRC01_T, PF_AL_BAS02_T, and PF_AL_TOTAL_T.
To increase the number of dimensions:
Open each of the above records in the Application Designer.
Open the relevant subrecord.
The delivered unique index is shown on the fields PF_AL_DIM1 to PF_AL_DIM10.
Depending on the number of dimensions you are adding, modify the index by adding the extra dimensions as keys.
For example, if you want to use 15 dimensions then modify the index to include PF_AL_DIM11 through PF_AL_DIM15 and build the record. Alternatively, you can add a custom index on the table, using the Add Index feature.
Note. You can also apply these steps to Data Manager.
Allocation Manager Setup Steps
To set up Allocation Manager, you need to:
Complete your metadata setup, including the datamaps setup for the source, basis, and target definitions.
Define Allocation Manager rules, including the method, source, basis, and target definitions.
Create an Allocation Manager rule set that contains one or more rules, and define post-processing routines for the rule set.
Set up job metadata and jobstreams.
Associate the Allocation Manager rule set with a job.
Run the Allocation Manager to process the allocations.
Mathematical Model for Data Manager and Allocation Manager RulesThe rules for Allocation Manager and Data Manager represent mathematical operations to be performed on the data you specify. Although Allocation Manger and Data Manager use different terminology, they perform similar calculations. For Allocation Manager, you must specify a source, basis, and target for the operation. For Data Manager you must specify two sources (source 1 and source 2) and the target.
The following table lists the Data Manager and Allocation Manager terms and how they relate.
|
Allocation Manager |
Data Manager |
|
Source |
Source 1 |
|
Basis |
Source 2 |
|
Target |
Target |
The sources of a rule use constraints to tell the Data Manager what is to be assigned and what basis to use. Use constraints to apply business rules to limit row selection. The target of a rule uses a datamap to tell the Data Manager where the rule should be located. The method that is applied to the rule determines the calculation that is performed.
Note. The explanation of the mathematical operations uses only Allocation Manger terms. Use the previous table to apply the Data Manager terms.
Understanding the Calculations Behind the Prorata and Spread Even Methods
The prorata and spread even methods perform the same calculation with the following exception: the prorata method uses measures from the basis table in the calculation, whereas the spread even method uses row counts from the basis to determine the ratio that is defined by basis measure ÷ basis total.
The prorata method performs the following calculation:
Source Measure * Basis Measure / Basis Total
Source Measure = Sum(Measures in source grouped by common dimensions and source mapped dimensions)
Basis Measure = Sum(Measures in basis grouped by common dimensions and basis mapped dimensions)
Basis Total = Sum(Measures in basis grouped by common dimensions only)
The spread even method performs the following calculation:
Source Measure * Basis Measure / Basis Total
Source Measure = Sum(Measures in source grouped by common dimensions and source mapped dimensions)
Basis Measure = Sum(Count of basis rows grouped by common dimensions and basis mapped dimensions)
Basis Total = Sum(Count of basis rows grouped by common dimensions only)
The following tables provide an example of the prorata method with one common dimension (unique dimension combinations).
Source:
|
Source Product |
Source Amount |
|
A |
10 |
|
B |
20 |
Basis:
|
Basis Product |
Basis Channel |
|
A |
X |
|
A |
Y |
|
B |
V |
|
B |
W |
Target:
|
Target Product |
Target Channel |
Target Amount |
|
A |
X |
3.33 (10 * 10/30) |
|
A |
Y |
6.66 (10 * 20/30) |
|
B |
V |
4 (10 * 10/50) |
|
B |
W |
16 (20 * 40/50) |
This table illustrates an example of the spread even method with one common dimension (unique dimension combinations).
Source
|
Source Product |
Source Amount |
|
A |
10 |
|
B |
20 |
Basis:
|
Basis Product |
Basis Channel |
|
A |
X |
|
A |
Y |
|
B |
V |
|
B |
W |
Target:
|
Target Product |
Target Channel |
Target Amount |
|
A |
X |
5 (10 * 1/2) |
|
A |
Y |
5 (10* 1/2) |
|
B |
V |
10 (20 * 1/2) |
|
B |
W |
10 (20 * 1/2) |
Understanding the Calculations Behind the Arithmetic Method
The arithmetic method performs the following calculation:
Source Measure [Operator] Basis Measure
Source Measure = Sum(Measures in source grouped by common dimensions and source mapped dimensions)
Basis Measure = Sum(Measures in basis grouped by common dimensions and basis mapped Dimensions)
Operator = [Addition (+), Subtraction (-), Multiplication (*), Division (/)]
Allocation Using Fixed Percentages
In Allocation Manager, you can divide a quantity by predetermined percentages and allocate those amounts by using the prorata method in combination with the fixed basis option.
In the calculation that is performed by the prorata method, the basis determines the ratio by which the source is divided. A ratio is another way to specify a percentage. By controlling the ratio, you can allocate the source amounts by specified percentages, or a fixed percentage.
Source Measure * (Basis Measure / Basis Total)
or
Source Measure * (%Percentage)
Warning! The prorata method always allocates 100 percent of the source. You must use the correct percentages when defining the fixed basis.
Setting Up Value ObjectsA value object provides descriptive information about fields and values. Value objects enhance the power of filters and can use constant strings to fill in target fields. Used in a filter, value objects play a role in the constraint's WHERE clause of a SQL command to enforce selection rules. There are two value object classes:
|
A PeopleSoft variable that returns a field that is maintained by the system, such as the current system date, current system time, user ID, and so on, or a value that was entered as a parameter on the Data Manager run control prior to execution of Data Manager. Parameters include business unit, scenario ID, fiscal year, period, and so on. |
|
|
A user-defined constant value. Examples of fixed values that are useful in the Data Manager include 0 (zero), and N (for yes/no fields). |
Note. PeopleSoft delivers predefined value objects with PeopleSoft Enterprise Performance Management. However, you might need to define your own using the Value Object page.
This section discusses how to define value objects.
Page Used to Set Up Value Objects
|
Page Name |
Object Name |
Navigation |
Usage |
|
Value Object |
MD_VALOBJ_TBL1 |
EPM Foundation, Foundation Metadata, Metadata Creation and Editing, Value Object |
Define or review value objects. |
Defining Value ObjectsAccess the Value Object page.
|
Value Object ID |
A unique identifier for the value object. All value objects are denoted in the system by a % at the beginning of the ID. |
|
Field Type |
Select the field type. Choices are: Amount, Basis Pts (basis points), Char (character), Date, Datetime, Number, and Rate. |
|
Value Class |
Select from the following: Meta Value: Meta values are meta SQLs that retrieve system dates, user IDs, and engine run control parameters. If you select this option, you must specify the state record and state record field. System Variables: System variables are values referencing system information (for example, the current date and time (%CurrentDateTime)). Fixed Value: Fixed values are user-defined strings of text or numeric values that might be useful in specifying the definition of an assignment object or rule. These are usually constants. If you select system variables or fixed values, the state record, state record field, quotes check box, and use tree check box are unavailable for entry. You must select the prompt table and enter a value. |
|
State Record and State Record Field |
For Meta Value, enter the state record and state record field. |
|
Quotes |
For Meta Value, select this check box for character strings. In most cases, you will not select this check box for numeric values. |
|
Use Tree |
For Meta Value, select this check box if you want to use trees. The Prompt Table field changes to a Tree ID field and you can select your tree ID. |
|
Prompt Table |
Use to select a prompt table as needed. |
|
Value |
For Meta Value, the value field is automatically populated based on the state record and state record field selections. For example, if you select EPM_CORE_AET as your state record and BUSINESS_UNIT as your state record field, the value field is populated with : %BIND(EPM_CORE_AET.BUSINESS_UNIT). For Fixed Value , enter a character constant in quotes or a numeric constant without quotes. For System Variables, enter the variable to use. |
|
Meta Value |
Displays the meta value for any meta value objects. |
Defining Data Manager RulesThis section provides an overview of Data Manager rule methods, lists prerequisites, and discusses how to:
Define a Data Manager rule.
Define sources.
Define the target.
Review and define the source 1 and source 2 columns.
Review the mapped common dimensions.
Review the generated SQL.
Understanding Data Manager Rules and MethodsData Manager rules use metadata to specify the source and the target tables for moving, aggregating, or creating multidimensional engine output.
Most rules have two sources: the measure to be assigned (for example Activity-Based Management indirect costs, revenue amounts, or inventory quantities) and the basis for the assignment (for example, per cent sales by region, product, or channel). Another datamap is selected as the target of the rule.
Data Manager rules define three things: source tables, targets, and the method that you want to apply to the data from the source tables as it moves to the target. These methods are:
Copy method.
Arithmetic method.
GL Mapper method.
Spread even method.
Prorata method.
Tree aggregation method.
The copy method moves data from the source to the target, but does nothing to the data. You would typically use multidimensional data as the source.
An example of this method would be the copy of REVENUE_F00, which is already attributed to the customer, product, and channel dimensions, to PF_JRNL_F00. In this move, no spreading of the revenue amount from the source to the target occurs.
In addition, this example shows that you can also use the copy method to generate aggregate amounts since more than one row of data might exist in source 1 for a customer/product/channel intersection. The copy method allows this type of aggregation by using the sum column on the Define Target page.
Source 1 datamap definition:
DIMs: CUST_ID, PRODUCT_ID, CHANNEL_ID
MSR: MONETARY_AMOUNT
Define Target page:
Target fields of CUST_ID, PRODUCT_ID, CHANNEL_ID mapped to corresponding source 1 fields
Sum check box selected for MONETARY_AMOUNT and mapped to source 1
Source 1 data:
|
Row |
CUST_ID |
PRODUCT_ID |
CHANNEL_ID |
MONETARY_AMOUNT |
|
1 |
CU1111 |
PR111 |
CH11 |
1000.00 |
|
2 |
CU1111 |
PR111 |
CH22 |
2000.00 |
|
3 |
CU1111 |
PR222 |
CH11 |
1000.00 |
|
4 |
CU1111 |
PR222 |
CH11 |
2000.00 |
|
5 |
CU1111 |
PR222 |
CH22 |
3000.00 |
|
6 |
CU2222 |
PR111 |
CH11 |
1000.00 |
|
7 |
CU2222 |
PR111 |
CH22 |
3000.00 |
|
8 |
CU2222 |
PR222 |
CH11 |
3000.00 |
|
9 |
CU2222 |
PR111 |
CH22 |
1000.00 |
Target results:
|
Row |
CUST_ID |
PRODUCT_ID |
CHANNEL_ID |
MONETARY_AMOUNT |
|
1 |
CU1111 |
PR111 |
CH11 |
1000.00 |
|
2 |
CU1111 |
PR111 |
CH22 |
2000.00 |
|
3 |
CU1111 |
PR222 |
CH11 |
3000.00 (Aggregated) |
|
4 |
CU1111 |
PR222 |
CH22 |
3000.00 |
|
5 |
CU2222 |
PR111 |
CH11 |
1000.00 |
|
6 |
CU2222 |
PR111 |
CH22 |
4000.00 (Aggregated) |
|
7 |
CU2222 |
PR222 |
CH11 |
3000.00 |
The arithmetic method applies an arithmetic operation (for example, add, subtract, multiply, or divide) to combine amounts in the sources that are grouped by common dimensions and source (or basis) mapped dimensions.
The GL Mapper takes data from the general ledger tables and maps it to performance data. It populates the temporary table GLSTG. From GLSTG, you can use the copy method to move data directly to the performance journal or apply other methods to enrich your data.
For example, let's say that source 1 looks like this:
|
warehouse business unit |
Account |
Customer |
Amount |
|
CORP1 |
110 |
C1 |
1500 USD |
|
CORP1 |
111 |
C1 |
1500 USD |
|
CORP1 |
110 |
C2 |
1000 USD |
|
CORP1 |
111 |
C2 |
1000 USD |
If you map 100 percent of the amounts from source accounts 110 and 111 to performance account 100000, the target would look like this:
|
warehouse business unit |
Account |
Customer |
Amount |
|
CORP1 |
100000 |
C1 |
3000 USD |
|
CORP1 |
100000 |
C2 |
2000 USD |
The spread even method adds a dimension to your data, and spreads the fact amount evenly across the dimension. For example, you have revenue for three products as follows:
Source 1:
|
Product |
Amount |
|
P1 |
3000 USD |
|
P2 |
2000 USD |
|
P3 |
1000 USD |
Source 2:
|
Customer |
|
C1 |
|
C2 |
The target looks like this:
|
Product |
Customer |
Amount |
|
P1 |
C1 |
1500 USD |
|
P1 |
C2 |
1500 USD |
|
P2 |
C1 |
1000 USD |
|
P2 |
C2 |
1000 USD |
|
P3 |
C1 |
500 USD |
|
P3 |
C2 |
500 USD |
The amounts for product are spread evenly across the customers.
The prorata method adds an additional dimension to your data and divides the amount across that dimension based on the percentage of the total amount. For example, you have revenue for three products as follows:
Source 1:
|
Product |
Amount |
|
P1 |
3000 USD |
|
P2 |
2000 USD |
|
P3 |
1000 USD |
You also want to attribute that revenue to customers. The revenue by customers is:
Source 2:
|
Customer |
Amount |
|
C1 |
4000 USD |
|
C2 |
2000 USD |
The target looks like this:
|
Product |
Customer |
Amount |
|
P1 |
C1 |
2000 USD |
|
P1 |
C2 |
1000 USD |
|
P2 |
C1 |
1333.33 USD |
|
P2 |
C2 |
666.67 USD |
|
P3 |
C1 |
666.67 USD |
|
P3 |
C2 |
333.33 USD |
The amounts for the products are prorated based on the percentage of total for each customer (C1 has two-thirds, or 66.67 percent, and C2 has one-third or 33.33 percent).
In the tree aggregation method, measures are aggregated based on a tree hierarchy. The node names act as the dimension. For example, assume you have the following data for individual customer IDs.
Source 1:
|
Customer |
Product |
Channel |
Amount |
|
C1 |
P1 |
CH1 |
1000 |
|
C1 |
P1 |
CH1 |
1000 |
|
C1 |
P2 |
CH2 |
2000 |
|
C2 |
P1 |
CH1 |
1000 |
|
C2 |
P2 |
CH2 |
2000 |
|
C3 |
P2 |
CH2 |
2000 |
|
C4 |
P1 |
CH1 |
1000 |
|
C4 |
P2 |
CH2 |
2000 |
|
C4 |
P2 |
CH2 |
2000 |
Assume you have the following customer location tree structure.
Source 2:
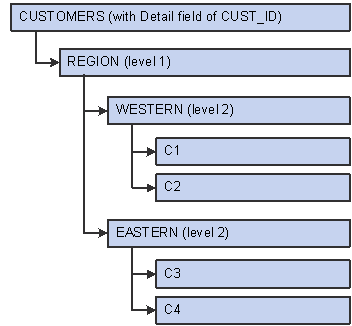
Sample customer tree
The system rolls up the source data (customer IDs) to the next level up (regions) summarizes it, and reduces the number of rows. In the target table, the customer ID is now the tree node at the desired roll-up level.
This is how the target looks:
|
Customer |
Product |
Channel |
Amount |
|
WESTERN |
P1 |
CH1 |
3000 |
|
WESTERN |
P2 |
CH2 |
4000 |
|
EASTERN |
P1 |
CH1 |
1000 |
|
EASTERN |
P2 |
CH2 |
6000 |
PrerequisitesBefore setting up your Data Manager rules, you must:
Complete set up of your metadata (tablemaps, datamaps, and constraints).
Define any value objects on the Value Object page.
See Also
Setting Up and Working with EPM Foundation Metadata
Pages Used to Set Up Data Manager Rules
|
Page Name |
Object Name |
Navigation |
Usage |
|
Data Manager Rules - Define Rule |
MD_RULE_TBL1 |
EPM Foundation, Data Enrichment Tools, Data Manager, Rules, Define Rule |
Define a data manager rule, including the method you intend to use. |
|
Data Manager Rules - Copy Rule |
MD_RULE_COPY |
Click on the Save As button on the Define Rule page. |
Copy a Data Manager rule and save it under a new rule name. |
|
Data Manager Rules - Define Source 1 |
MD_RULE_SCR1 |
EPM Foundation, Data Enrichment Tools, Data Manager, Rules, Define Source 1 |
Define source 1 information. |
|
Data Manager Rules - Define Source 2 |
MD_RULE_SCR2 |
EPM Foundation, Data Enrichment Tools, Data Manager, Rules, Define Source 2 |
Define source 2 information. |
|
Data Manager Rules - Define Target |
MD_RULE_TBL3 |
EPM Foundation, Data Enrichment Tools, Data Manager, Rules, Define Target |
Define the target for the rule and the target mapping. |
|
Data Manager Rules - DataSet for Source 1 |
MD_DATASET1_DEFN |
EPM Foundation, Data Enrichment Tools, Data Manager, Rules, DataSet for Source 1 |
Review and define the source 1 fields and measures that are mapped to target fields. |
|
Data Manager Rules - DataSet for Source 2 |
MD_DATASET2_DEFN |
EPM Foundation, Data Enrichment Tools, Data Manager, Rules, DataSet for Source 2 |
Review and define the source 2 fields and measures that are mapped to target fields. This page displays the prorata and spread even methods only. |
|
Data Manager Rules - DataSet for Common Dimensions |
MD_DATASET3_DEFN |
EPM Foundation, Data Enrichment Tools, Data Manager, Rules, DataSet for Common Dimensions |
Review the mapped common dimensions and prorata measure. |
|
Data Manager Rules - SQL |
MD_RULE_TBL4 |
EPM Foundation, Data Enrichment Tools, Data Manager, Rules, SQL |
Review the generated SQL for the Data Manager rule. |
Defining a Data Manager RuleAccess the Data Manager Rules - Define Rule page.
|
Method |
Select the method for the rule you are defining. Options are: Arithmetic, Copy, GL Mapper, Prorata, Spread Even, and Tree Aggregation. See Understanding Data Manager Rules and Methods. Note. If the method is changed after the target fields have been populated, some fields might be reset to blank. This occurs if the current method has a source 2 and the new method does not. All source 2 fields that were mapped in the Data Manager Rules component are reset. The system displays a warning message. For a method of Arithmetic, select the operation to use: Addition (+), Division (/), Multiplication (*), and Subtraction (–). For a method of Prorata, the system prorates measures in source 1 across all common dimensions based on source 2 numbers. For a method of Spread Even, the system spreads source 1 measures evenly across all common dimensions based on source 2 numbers. For a method of Tree Aggregation, the system copies data elements from the source to the target based on the source 2 tree structures. |
|
Save As |
In correction mode, click the Save As button to access the Copy Rule page on which you can enter a new rule ID to which you want to copy the rule information. Enter an effective date as today's date. Click OK to save the changes and return to the Define Rule page. |
|
|
Click the Compilebutton on this page or other pages in the component to build the Data Manager rule. Review the generated SQL on the Data Manager Rules - SQL page. |
Defining SourcesAccess the Data Manager Rules - Define Source 1 page and the Data Manager Rules - Define Source 2 page.
Note. If you change a source constraint after the populating the target fields, the target fields that were mapped to source fields will not be lost so long as the datamap is the same.
Defining the TargetAccess the Data Manager Rules - Define Target page.
|
Target |
Select the datamap to use as the target for the processed data. The system populates the Target Object Field Map grid with target fields based on the datamap you select. The system handles the mapping of all the fields except for the department and product fields, which you can only map to the source 1 department or product, a fixed value, or a meta value. For the GL Mapper method, the target is GLSTG. Warning! For the prorata and spread even methods, each target field must map to a source 1 field, source 2 field, or value object. The system issues a warning message if any dimensions exist on the datamap that are not mapped to a target field. |
|
Prorata Measure |
For a method of Prorata, select the measure to use for the prorata calculation. Only source 2 fields that are defined as measures on the datamap display in the prompt list. |
|
Measure |
For a method of Arithmetic, select the measure to use. The values in the list box are based on the selected source 2 constraint. |
|
Target Description and Metadata Type |
The system populates these fields based on the datamap you select as the target. The target description comes from the datamap definition. |
|
RvrsSign (reverse sign) |
Select to reverse the sign of the amount when the data is copied to the target table. Check boxes are available in this column only for target fields that are defined as a measure on the target datamap. |
|
Sum |
For a method of Copy, select this check box to total the amounts when the source 1 data is copied to the target table. Check boxes are available in this column only for target fields that are defined as a measure on the target datamap. |
|
From |
This field can be: Source 1: Data is copied from the source 1 table to the target field. Fixed Value: A constant value is inserted into the target field. Meta Value: A meta value is inserted into the target field. Sys Var: (system variable) A system variable is inserted into the target field. Note. For the GL Mapper method, you can only specify the From field for the department and product ID. |
|
Source Description |
If the value in the From field is Source 1 or if the value is mapped from source 1, a list box of the fields that were defined in source 1 is available. If the value in the From field is Source 2 or if the value is mapped from source 2, a list box of the fields that were defined in source 2 is available. If one of the value object types is specified for the value in the From field, the drop-down list box contains the objects that correspond to the specified value object class. |
|
Prorata |
For a method of Prorata, select this check box for any measures you want to use for the proration. You must select at least one measure field for prorata. |
|
Arithmetic |
For a method of Arithmetic, select this check box for a field in which you want to use in the arithmetic operation that is specified on the Data Manager Rules - Define Rule page. |
Target Definition for the Copy Method
When you are setting up the target field map for the copy method:
If you select a target measure field that is mapped to a source 1 field for a sum operation, all other measures that are mapped to source 1 fields must also be selected for a sum operation.
If you select the sum check box for any of the fields, you can map only key source 1 fields.
If you do not select the sum check box for any of the fields, you can map any source 1 fields to any target fields.
This might result in duplicate data when you run the Data Manager engine. This is because you are not grouping the data by the key values.
You can use expressions for your mappings.
Target Definition for the Prorata Method
When you are setting up the target field map for the prorata method:
Only three mapped measures are allowed.
The source 1 and source 2 datamaps must both have at least one key field that is marked as a dimension.
All non-measure target fields can be mapped only to source 1 or source 2 fields that are marked as dimensions (keys) on the datamap.
All measure target fields can only be mapped to source 1, fixed value, or meta value fields.
At least one measure target field must be marked for prorata.
If a target field is mapped to a source 1 field, it must be marked for prorata.
Target Definition for the Spread Even Method
When you are setting up the target field map for the spread even method:
Only three mapped measures are allowed.
The source 1 and source 2 datamaps must both have at least one key field that is marked as a dimension.
All non-measure target fields can only be mapped to source 1 or source 2 fields that are marked as dimensions (keys) on the datamap.
All measure target fields can only be mapped to source 1, fixed value, or meta value fields.
Data Manager uses all the source 1 mappings for the spread even calculation.
At least one measure target field must be mapped to a source 1 field.
Target Definition for Tree Aggregation Method
When you are setting up the target field map for the tree aggregation method:
Each target field must have a source 1 field, tree node, or value object to which it is mapped.
Only one target field can be mapped to the source 2 tree node.
This tree node field is used in conjunction with the source 1 mapping field for join criteria in the SQL.
You must have at least one non-measure target field mapped to source 1.
If the target field is mapped to source 2, you can select from all the fields for that source.
If a target field is mapped to source 2, the only selection available is Tree Node.
See Also
Reviewing and Defining the Source 1 and Source 2 ColumnsAccess the Data Manager Rules - DataSet for Source 1 page and Data Manager Rules - DataSet for Source 2 page.
|
Select |
Select this check box to include the dimension or measure. |
Note. The DataSet for Source 2 page does not display for the copy or GL Mapper method.
Reviewing the Mapped Common DimensionsAccess the Data Manager Rules - DataSet for Common DIMs page
This page shows the common dimensions that exist between source 1 and source 2. A dimension is common if it has a matching description in the source 1 and source 2 datamap fields.
For the prorata method, the page also shows the prorata measure marked as Sum.
Note. Common dimensions are very important. They determine the join criteria for the method. The criteria are based on the datamap, so always review this page to ensure the results are calculating as you expect.
Reviewing the Generated SQLAccess the Data Manager Rules - SQL page.
Once you have compiled a rule using the Compile button, review the generated SQL statement.
All %Bind and %SQL objects are resolved at run-time. There is only one SQL statement that is generated for each method.
A copy of this SQL is stored in the SQL repository with the SQL object ID prefix that is shown in this component. A sequential number for each SQL statement completes the SQL object name for the repository.
Defining Data Manager Rule SetsYou must define a Data Manager rule set for any Data Manager rules that you want to process. You can also use rule sets to combine multiple rules in one run of the Data Manager engine. Rules in a rule set are run in the order shown on the Data Manager Rule Sets page. The first rule must complete successfully before the second rule starts. The system places the data from the first rule in a temporary table (assigned by the engine) that will be the source of the second rule, and so on.
Note. A rule must be in a rule set, even if only one rule is processed.
This section discusses how to set up Data Manager rule sets.
Pages Used to Define Data Manager Rule Sets
|
Page Name |
Object Name |
Navigation |
Usage |
|
Assignment Rule Sets |
MD_RULESET_TBL1 |
EPM Foundation, Data Enhancement Tools, Data Manager, Rule Set, Assignment Rule Sets |
Set up Data Manager rule sets by defining the rules that are to be included in the rule set. |
|
Assignment Rule Sets - Notes |
MD_RULESET_TBL2 |
EPM Foundation, Data Enhancement Tools, Data Manager, Rule Set, Assignment Rule Sets |
Describe the purpose of this rule set. |
Setting Up Data Manager Rule SetsAccess the Assignment Rule Sets page.
|
RuleSet |
A unique identifier for this rule set definition. |
|
Sequence |
Enter a number, such as 100, for the first rule ID in the rule set. The next rule ID to run would have a sequence of 200. The actual sequence number is not important; it represents the order in which you want to process rules. The sequence must be unique. |
|
Rule ID |
Select the Data Manager rule to include in the rule set. You create the rules using the Data Manager Rules component. |
Click the Notes tab to enter a more detailed description of this rule set.
Renaming Data Manager RulesThis section discusses how to rename a Data Manager rule.
Page Used to Rename Data Manager Rules
|
Page Name |
Object Name |
Navigation |
Usage |
|
Rename Data Manager Rule |
PF_MD_RULE_RENAME |
EPM Foundation, Data Enhancement Tools, Data Manager, Rename Rules, Rename Data Manager Rule |
Rename existing rules for modification. |
Renaming a Data Manager RuleAccess the Rename Data Manager Rule page.
|
SetID and Rule ID |
Select the setID and rule ID for the rule you want to rename. |
|
Search |
Click the Search button. The search populates the grid with the names of the Data Manager rule sets that is affected by this rename. |
|
Rename |
To proceed with the renaming process, click the Rename button and enter a new name for the rule. Every instance in which the original rule name is used is changed to the new name. |
Associating Data Manager Rule Sets With a JobThe next step in the Data Manager process is associating the rule set with a Data Manager job. Each unique run of the Data Manager engine is given a job ID. You must establish an association to the rules and the actual job that will run them on the Job Association page. When the jobstream that contains the defined Data Manager job ID runs, it uses the setup on the Job Association page to find the Data Manager rule set to execute.
Note. Each time that you run a Enterprise Performance Management engine , it must have a unique job ID. These jobs must then be run in a jobstream.
This section discusses how to define rule sets to be run for a given job.
Prerequisites
Before you can associate rule sets with job, you must:
Set up the Data Manager job ID.
Set up a jobstream for the job ID.
See Also
Streamlining Processing with Jobstreams
Pages Used to Associate Data Manager Rule Sets With a Job
|
Page Name |
Object Name |
Navigation |
Usage |
|
Job Association |
MD_JOB_RULESET_TBL |
EPM Foundation, Data Enhancement Tools, Data Manager, Job Association, Job Association |
Define rule sets to be run for a given job ID. The order in which these rule sets are run is also defined. |
|
Job Association - Notes |
MD_JOB_RULESET_TB2 |
EPM Foundation, Data Enhancement Tools, Data Manager, Job Association, Notes |
Describe the job association. |
Define Rules Sets to be Run for a Given JobAccess the Job Association page.
|
Job ID |
Select the job ID. The job ID was created in the job metadata and represents a unique instance of a Data Manager engine in a jobstream. |
|
Ledger ID |
Select a ledger ID. This is required for the Profit Manager. |
|
Sequence |
Enter a number, such as 100, for the first rule set in the job association. The next rule set to run would have a sequence of 200. The actual sequence number is not important; it represents the order in which you want to process rule sets. The sequence must be unique. |
|
Rule Set |
Select the rule set or rule sets to include in the job. You create rule sets on the Data Manger Rule Set - Assignment Rule Sets page. |
Click the Notes tab to enter a more detailed description of this job association.
Running the Data Manager EngineAs a last step, you run the Data Manager engine in a jobstream. As you run the jobstream:
Use the Process Monitor to verify the status of your job.
Review the results by querying the target table for the Data Manager rules that you have run.
Review any error messages using the Error Messages component.
See Also
Defining Allocation Manager RulesThis section provides an overview of fixed source and fixed basis options in allocations, lists prerequisites, and discusses how to:
Determine the list of dimensions to use.
Create a list of sources.
Define an Allocation Manager rule.
Define the allocation rule source.
Define the allocation rule basis.
Review common dimensions.
Define the target.
Assign residual amounts.
Specify offset target information.
Understanding the Fixed Source and Fixed Basis OptionsYou use datamap metadata to define the tables that contain the source, basis, and target for you allocation in the Allocation Manager rule. However, in some cases you might not have source or basis data stored in tables in your database. To accommodate this situation, we deliver a set of metadata (the FIX_BASIS datamap, and PF_AL_FIX_SOURCE and PF_AL_FIX_BASIS constraints) that point to the fixed source and basis table (PS_FP_AL_FIX_BASIS). You can tailor this table by adding your organization's dimensions to it on the Fixed Dimensions page. Use the Fixed Dimension page to list the dimensions and assign prompt tables and trees and select values for each dimension.
Note. Fixed source and basis is used with the Allocation Manager only. It is available with all methods except period-based allocation.
Note. Before you create an Allocation Manager rule to associate with a setID, create a PF_AL_FIX_BASIS and PF_AL_FIX_SOURCE filter and constraint for that setID. You can model the setup for the PF_AL_FIX_BASIS and PF_AL_FIX_SOURCE filter and constraint using the sample data under the SHARE setID.
Warning! For period-based allocations, the Merge engine (PF_MERGE) moves data directly from the temporary table to the target table without using the edit process.
Prerequisites
Before setting up your Allocation Manager rules, you must:
Complete the setup of your metadata (tablemaps, datamaps, and constraints).
Define any value objects on the Value Object page.
See Also
Setting Up and Working with EPM Foundation Metadata
Pages Used to Define Allocation Manager Rules
|
Page Name |
Object Name |
Navigation |
Usage |
|
Fixed Dimension Setup |
PF_AL_DIM_TBL |
EPM Foundation, Data Enhancement Tools, Allocation Manager, Fixed Basis Dimensions, Fixed Dimension Setup |
Determine the list of dimensions that you can use with fixed source and basis. |
|
Allocation DataMap Setup |
PF_AL_DM_TBL |
EPM Foundation, Data Enhancement Tools, Allocation Manager, DataMap Setup, Allocation DataMap Setup |
Create a list of sources for the source, basis, or target and specify dimensions for your datamap. The purpose of this page is to reduce the of number datamaps from which to choose. In addition, you can give the datamaps more intuitive names. Add as many datamaps as necessary. |
|
Select Dimensions |
PF_AL_SELECT_DIM |
Click the |
Select the dimension metadata type. |
|
Rules - Method |
PF_AL_METHOD_DEFN |
EPM Foundation, Data Enhancement Tools, Allocation Manager, Rules, Method |
Define an Allocation Manager rule and select the method. |
|
Rules - Copy Rule |
PF_AL_RULE_COPY |
Click on the Save As button on the Allocation Manager Rules - Method page. |
Copy Allocation Manager rules. |
|
Rules - Source |
PF_AL_SOURCE_DEFN |
EPM Foundation, Data Enhancement Tools, Allocation Manager, Rules, Source |
Define the allocation rule sources. |
|
Fixed Source Dimension Setup |
PF_AL_USE_FSRC_DIM |
Click on the Choose Fixed Source Dimension link on the Allocation Manager Rules - Source page. |
Select which dimensions for a fixed source. |
|
Rules - Basis |
PF_AL_BASIS_DEFN |
EPM Foundation, Data Enhancement Tools, Allocation Manager, Rules, Basis |
Define the allocation rule basis. |
|
Fixed Basis Dimension Setup |
PF_AL_USE_FIX_DIM |
Click on the Choose Fixed Basis Dimension link on the Allocation Manager Rules - Basis page. |
Select which dimensions for a fixed basis. |
|
Rules - Source to Basis Relationship |
PF_AL_COM_DIM_DEFN |
EPM Foundation, Data Enhancement Tools, Allocation Manager, Rules, Source to Basis Relationship |
Review all common dimensions between the source and the basis. |
|
Rules - Target |
PF_AL_TGT_DEFN |
EPM Foundation, Data Enhancement Tools, Allocation Manager, Rules, Target |
Define the target, including the allocation mappings. The target is the destination to which the amounts that are defined by the source and basis are allocated. |
|
Allocation Manager Rules - Residual |
PF_AL_RESID_DEFN |
EPM Foundation, Data Enhancement Tools, Allocation Manager, Rules, Residual |
Assign residual amounts after the source amount has been allocated to dimensions in the target datamap. You can specify the residual account to use and other dimensions as applicable. |
|
Rules - Offset |
PF_AL_OFFSET_DEFN |
EPM Foundation, Data Enhancement Tools, Allocation Manager, Rules, Offset |
Specify offset target information based on dimensions in the target datamap. |
Determining the List of Dimensions to UseAccess the Fixed Dimension Setup page.
|
Dimension Name |
Each dimension on this page is based on the FIX_BASIS datamap. This datamap is delivered with your system and consists of a generic table into which you can enter your organization-specific information. You can define a maximum of 12 dimensions for this datamap. PeopleSoft delivers this datamap with several dimensions; however, you can create more, if necessary. |
|
Lookup Table and Lookup Tree |
For each dimension, assign either prompt tables, trees, or both to select values. |
|
Refresh |
Changes to the FIX_BASIS datamap do not automatically display on this page. Click the Refresh button to update the page with any additions or deletions to the datamap. |
Note. You can only change dimensions. Do not change attributes or the measure.
Creating a List of SourcesAccess the Allocation DataMap Setup page.
See Also
Defining an Allocation Manager RuleAccess the Rules - Method page.
Defining the Allocation Rule SourceAccess the Rules - Source page.
You can either use a fixed source by selecting it from the Fixed Source page or enter a source.
Specifying a Fixed Sourece
The dimensions that you select appear in the Fixed Sources grid.
Specifying a Source
If you are not using fixed source, you must specify the source to use.
|
Source |
Select a source from the available options. The options are based on the datamaps that are listed on the Allocation DataMap Setup page |
|
Source Adjustment |
Enter the source adjustment to use. |
|
Criteria |
Once you have selected a source, you can select a criteria or create a new one. If the criteria that you selected has meta value objects, you may assign values to them at this time. |
|
Create Criteria |
To create a criteria, click the Create Criteria link to transfer to the Filter setup page on which you can create a new filter and constraint. |
|
View Criteria |
If you select an existing criteria, the View Criteria link appears. Click this link to go directly to the Constraint Setup page where you can view or modify the constraint. |
|
Refresh |
In correction mode, click the Refresh button to update the page with any additions or deletions to the datamaps. |
Defining the Allocation Rule BasisAccess the Rules - Basis page.
You can either opt to use a fixed basis or enter a basis.
Specifying a Fixed Basis
|
Tree Level |
Select the tree level to which you want to resolve your allocation. Your options are: No Tree Allocation, Allocate to leaf level, or Allocate to next node. |
Select the values for each of the dimensions that you selected on the Fixed Basis Dimension Setup page.
|
|
Click the Use Tree Node next to any dimension field in which it displays to select the value using the Tree Viewer. |
|
Detail |
For tree node values, select this check box to sort your tree node information in ascending order. |
Specifying a Basis
|
Basis |
Select a basis from the available options. These options are based in selections that you made on the Allocation DataMap Setup page |
|
Criteria |
Once you have selected a basis, you can select criteria or create a new criteria. If the criteria that you selected has meta value objects, you may assign them values at this time. |
|
View Criteria |
If you select existing criteria, click this link to go directly to the Constraint setup page where you can view or modify the constraint. |
|
Create Criteria |
To create new criteria, click this link to transfer to the Filter setup page on which you can create a new filter and constraint. |
|
Base Scenario |
If you selected the Period Based Allocation check box on the Method page, select a basis scenario. Allocation Manager uses the calendar for the basis scenario that you selected to determine from which periods to use to prorate or spread the allocations. The target has the same fiscal year and accounting period as the basis. |
|
Arithmetic Measure |
For the Arithmetic method, select a measure. The available measures are based on the datamap that you selected as the basis. |
|
Prorata Measure |
For the Prorata method, select a prorata measure. The available measures are based on the datamap that you selected as the basis. |
|
Refresh |
In correction mode, click the Refresh button to update the page with any additions or deletions to the datamaps. |
Reviewing Common DimensionsAccess the Rules - Source to Basis Relationship page.
This page lists the common dimensions. Common dimensions are very important as they are used to determine the divisor, therefore the ratio, for the spread even and prorata methods. For all methods, they determine how the source and basis are to be grouped before applying any mathematical formulas. Select from which source to base dimensions by selecting the Use check box.
The system determines the common dimensions using the descriptions of the datamaps for the source and basis. It considers that any source and basis fields with the same description represent the same information and are therefore a common dimension if the fields are marked as dimensions on both the source and basis. When looking for common dimensions, the system ignores case and spaces at the beginning and end of the description.
Defining the TargetAccess the Rules - Target page.
|
Target |
Select the target datamap for the allocation. |
|
Target Field and Data Type |
The system populates these fields based on the target you select. |
|
Negate |
Select the Negate check box to reverse the sign of the amount when the data is copied to the target table. The Negate check box applies only to target fields with a data type of Measure. |
|
Source |
Select to use the field values from the source records. |
|
Basis |
Select to use the field values from the basis records. |
|
List |
Select to use predefined value objects. |
|
Map To |
Specify the mapping for your selection. |
Assigning Residual Amounts (Optional)Access the Rules - Residual page.
|
Allocate Residual |
Select this check box to allocate residual amounts. The page displays the target fields for the residual map. |
|
List |
Select the List check box to allocation residual amounts of a target field to a value object. The Map To field displays the value object. |
|
Map To |
If you select the List check box, the system displays the value object. Otherwise, you can enter the appropriate dimension value to use in this field. For example, to allocate residual amounts to a specific account, do not select the List check box. Simply select an account from the list of departments. You must select a value for at least one of the dimensions. |
The following table provides an example of an arithmetic allocation rule in which the residual source amount is set up with a target department value of RES (Residual). DIV1, 2, and 3 use a total of 400. The residual amount is 600, so that amount is placed in the RES account.
|
Source |
Basis |
Target |
|||
|
Source Department |
Amount |
Basis Department |
Unit |
Department |
Amount |
|
CORP |
1000 |
DIV1 |
0.1 |
DIV1 |
100 |
|
DIV2 |
0.1 |
DIV2 |
100 |
||
|
DIV3 |
0.2 |
DIV3 |
200 |
||
|
RES (Residual Account) |
600 |
Specifying Offset Target Information (Optional)Access the Rules - Offset page.
This page enables you to calculate offset for the target balance. Offset accounts aid in balancing source transaction and budget entries. You can use offsets to balance ledgers.
The following is an example of an arithmetic method offset allocation account:
|
Source |
|
Basis |
|
Target |
|
|
Department |
Amount |
Department |
Unit |
Department |
Amount |
|
CORP |
1000 |
DIV1 |
0.1 |
DIV1 |
100 |
|
|
|
DIV2 |
0.1 |
DIV2 |
100 |
|
|
|
DIV3 |
0.2 |
DIV3 |
200 |
|
|
|
|
|
OFST (Offset Account) |
=400 |
In this example, the offset account is equal to 400, which is the same total for Divisions (DIV) 1, 2, and 3.
|
Allocate Offset |
To allocated offset amounts, select the Allocate Offset check box. The system displays the target fields for the offset map. |
|
Allocate Offset for Residual |
To allocate offset amounts for a residual amount, select the Allocate Offset for Residual check box. The system displays the target fields for the offset for residual map. |
|
List |
Select the List check box to allocate the offset to a value object. The Map To field displays the value object. |
|
Map To |
If the List check box is selected, this field shows the value object. Otherwise, you can enter the appropriate dimension value to use in this field. For example, to allocate offset amounts to a specific account, do not select the List check box. Simply select an account from the list of accounts. You must select a value for at least one of the dimensions. |
Defining Allocation Manager Rule SetsThis section provides an overview of Allocation Manager rule sets and discusses how to
Set up Allocation Manager rule sets.
Define post-processing routines for an allocation rule set.
Understanding Allocation Manager Rule SetsYou must define an Allocation Manager rule set for any Allocation Manager rules that you want to process. You can also use rule sets to combine multiple rules in one run of the Allocation Manager engine. Rules in a rule set run in the order that is shown on the Allocation Manager Rule Sets page. The first rule must complete successfully before the second rule starts. The system places the data from the first rule in a temporary table (which is assigned by the engine) that will be the source of the second rule, and so on.
Note. A rule must be included in a rule set, even if only one rule is processed.
After you define a rule set, you can create post-processing routines that further process the results of the rule set. You can also tie the routines to a particular rule set so that they automatically run when the rule set completes. The following sections summarize specific features of the post-processing routines.
This feature provides visibility into the inputs and rules that calculate your allocations. Runtime information, source data transformations, and basis data transformations are some of the data that is captured by the audit feature. The data is captured in logs and is stored in the corresponding data warehouse tables. The following table contains a complete list of delivered audit logs and the data warehouse table in which the data reside:
|
Log Type |
Data Warehouse Table |
|
Runtime Log |
PF_AL_AUD_RUNLG |
|
Input Source Log |
PF_AL_AUD_SRC |
|
Input Basis Log |
PF_AL_AUD_BAS |
|
Target Log |
PF_AL_AUD_TGT |
You can view the audit logs using PeopleSoft Query.
Merging Allocation Results to Permanent Tables
After an allocation rule set completes processing, the results are stored in a temporary target data warehouse table. This feature automatically loads the results that are stored in the temporary target table to a permanent non-journal target table—for example, PS_PF_AL_TGT.
If you load your data to a journal target table, this feature ensures the journal dimensions have valid values. For example, you might create allocation rules at the beginning of the year. At the time of allocation rule creation, you specified account 100 as one of the target accounts for the allocation. Account 100 is a valid account. Suppose that during the year, account 100 is deactivated. If the allocation process is run and validate journal is checked, the process creates an error, as account 100 is no longer valid. Invalid journal dimensions are sent to the journal error table (PF_JRNL_E00).
If you load your data to a journal target table, this feature automatically reverses the journal entry. This process results in two journal entries: the original journal and another with all the amount signs reversed. In addition, you can specify whether you want to reverse a journal for the same or alternate accounting period.
Pages Used to Define Allocation Manager Rule Sets and Post-Processing Routines
|
Page Name |
Object Name |
Navigation |
Usage |
|
Allocation Manager Rule Set |
PF_AL_RULESET_DEFN |
EPM Foundation, Data Enhancement Tools, Allocation Manager, Rule Set, Allocation Manager Rule Set |
Set up an Allocation Manager rule set by defining the rules to include in the rule set. |
|
Result Processing |
PF_AL_PROC_OPTIONS |
EPM Foundation, Data Enhancement Tools, Allocation Manager, Rule Set, Result Processing |
Define post-processing routines that further process the results of the rule set. |
Setting Up Allocation Manager Rule SetsAccess the Allocation Manager Rule Set page.
|
Ruleset ID |
Displays the unique identifier for this rule set definition. |
Rules in Rule Set
|
Sequence Number |
Enter a number for the first rule ID in the rule set (for example 100). This number represents the sequencing order in which the rules run. The next rule ID to run might have a sequence number of 200. The actual sequence number is not important; it represents the order in which you want to process rules. The sequence must be unique. |
|
Allocation Rule ID |
Select the Allocation Manager rule to include in the rule set. You create the rules using the Allocation Manager Rules component. |
Defining Post-Processing Routines for an Allocation Rule SetAccess the Results Processing page.
|
Ruleset ID |
Displays the unique identifier for this rule set definition. |
|
Create Audit Trail |
Select this check box to generate audit logs of the inputs and rules that calculate your allocations. Runtime information, source data transformations, and basis data transformations are some of the data that is captured by the audit logs. You can view the audit logs using PeopleSoft Query. |
Options
|
Create Journal |
Select this option to automatically load the allocation output into a target Journal line table (for example, PS_PF_JRNL_F00). At runtime, the PF_EDIT process is called and a batch header (PF_BATCH_TBL) is created, which moves the journal lines from a temporary table to a permanent journal table. You can view results of this process using any SQL query tool such as Toad, Query Analyzer, and so on. When this option is selected, the Journal Options group box becomes available. |
|
Merge to Non Journal Target |
Select this option to automatically load the allocation output into a non-journal permanent target table. At runtime, the PF_MERGE process is called and loads the allocation output from the temporary table to a permanent table that you specify in the target setup page. You can view results of this process using any SQL query tool such as Toad, Query Analyzer, and so on. |
|
None |
Select this option if you do not want to load the allocation output into a permanent target table. When this option is selected, data from the allocation process remains in the temporary table. This option is the default for the upgrade process. |
Journal Options
|
Validate Journal |
Select this check box to have the PF_EDIT engine validate the journal dimensions that are specified during the rule setup. When this option is selected, the system validates all journal dimensions. The system also rejects any values that do not appear on the corresponding prompt table. Invalid values are sent to the journal error table (PF_JRNL_E00). If you do not select this option, the journal is created without validation and will be posted regardless of errors. It is recommended that you select this option. Note, however, that the validation process does increase processing time. |
|
Ledger ID |
Select the ledger ID to generate a corresponding batch ID, which is used to post the journal to the ledger. |
|
Post Journal |
Select this check box to store the data in a journal table and automatically post it to a permanent ledger table (for example, PF_LEDGER_F00). At runtime, the system calls PF_POST, which updates the ledger. |
|
Reverse Journal |
Select this check box to reverse a journal entry for the same or alternate accounting period. This process results in two journal entries: the original journal and another with all the amount signs reversed. When this option is selected, the Reverse Journal Options group box becomes available and enables you to further specify a particular accounting period for the reversed journal. |
|
Next Period |
Select this option to reverse a journal for the next accounting period. |
|
Specific Period |
Select this option to reverse a journal for a specific accounting period. |
|
Fiscal Year |
Enter the fiscal year for which you want to reverse the journal. |
|
Accounting Period |
Enter the accounting period for which you want to reverse the journal. |
The following table provides examples of the edit, validate, and post options used in combination with one another and the resulting output of the combination:
|
Options Selected |
Result |
|
Edit in Journal and Validate Journal |
Allocation output is automatically loaded into a target journal line table. A journal with dimensions is checked for balancing and batch header with a valid status. |
|
Edit in Journal and Post Journal |
The allocation output is automatically loaded into a target journal line table. The post process (PF_POST) is called to post data to a specified ledger. |
|
Edit in Journal, Validate Journal, and Post Journal |
The allocation output is automatically loaded into a target journal line table. A journal with dimensions is checked for balancing and batch header with a valid status. The post process (PF_POST) is called to post data to a specified ledger. |
Please note that these are merely examples of edit, validate, and post option-combinations; you can choose a number of different combinations.
Renaming Allocation Manager RulesThis section discusses how to rename an Allocation Manager rule.
Page Used to Rename Allocation Manager Rules
|
Page Name |
Object Name |
Navigation |
Usage |
|
Rename Allocation Rule |
PF_AL_RULE_RENAME |
EPM Foundation, Data Enrichment Tools, Allocation Manager, Rename Rules, Rename Allocation Rule |
Rename existing Allocation Manager rules. |
Renaming an Allocation Manager RuleAccess the Rename Allocation Rule page.
|
SetID and Rule ID |
Select the setID and rule to rename. |
|
Search |
Click the Search button. The system populates the Search Results grid with a list of the rule sets that affected by the renaming process. |
|
Rename |
To proceed with the renaming process, click the Rename button and enter a new name for the rule. Every instance of the original rule name is changed to the new name. |
Associating Allocation Manager Rules Sets With a JobThe next step in the Allocation Manager process is to associate the rule set with an Allocation Manager job. Each unique run of the Allocation Manager engine is assigned a job ID. You must associate the rules with the actual job that will run them on the Allocation Manager Rule Set Job Association page. When the jobstream that contains the defined Allocation Manager job ID runs, it uses the setup on the Allocation Manager Rule Set Job Association page to find the Allocation Manager rule set to execute.
Note. Each time that you run an Enterprise Performance Management engine, it must have a unique job ID. These jobs must then be run in a jobstream.
This section discusses how to define Allocation Manager rule sets to be run for a given job.
Prerequisites
Before you can associate rule sets with job, you must:
Set up the Allocation Manager job ID.
Set up a jobstream for the job ID.
See Also
Streamlining Processing with Jobstreams
Page Used to Associate Allocation Manager Rule Sets with a Job
|
Page Name |
Object Name |
Navigation |
Usage |
|
Allocation Manager Rule Set Job Association |
PF_AL_JOB_RSET_DEF |
EPM Foundation, Data Enrichment Tools, Allocation Manager, Job Association, Allocation Manager Rule Set Job Association |
Define rule sets to be run with a given job and the order in which these rule sets are run. |
Defining Allocation Manager Rule Sets to Run for a Given JobAccess the Allocation Manager Rule Set Job Association page.
|
Job ID |
Displays the unique instance of an Allocation Manager engine in a jobstream. |
|
Ledger ID |
Select a ledger ID. This is required for the Profit Manager. |
|
Sequence Number |
Enter a number, such as 100, for the first rule set in the job association. The next rule set to run would have a sequence of 200. The actual sequence number is not important; it represents the order in which you want to process rule sets. The sequence must be unique. |
|
Rule Set |
Select the rule set or rule sets to include in the job. You create rule sets on the Data Manger Rule Set - Assignment Rule Sets page. |
Processing AllocationsAs a last step, run the Allocation Manager engine in a jobstream. As you run the jobstream:
Use the Process Monitor to verify the status of your job.
Review the results by querying the target table for the Allocation Manager rules that you have run.
Review any error messages using the Error Messages component.
See Also