 Understanding Sessions, Webcasts, and Assignments
This chapter provides an overview of sessions, webcasts, and assignments and discusses how to:
Create session learning components.
Create webcast learning components.
Publish webcast enrollment and session information to vendors.
Create assignment learning components.
Understanding Sessions, Webcasts, and AssignmentsSessions, webcasts, and assignments are types of learning components. Sessions and webcasts are similar in that they are both scheduled. In other words, they provide a means to bring learners and instructors together on a specific date, at a specific time. A session learning component differs from a webcast learning component in that it also provides a physical place where the learners come together with the instructor, such as in a classroom, whereas a webcast meets over the Internet. So webcast learning components provide a virtual classroom environment, whereas session learning components provide a physical classroom environment.
Both session and webcast learning components contain sessions. A session, in this sense, is a single block of time designated for instruction. For example, a session or webcast learning component could consist of three days of instruction, Monday, Wednesday, and Friday, between 8:00 a.m. and 5:00 p.m. each day. Thus, in this example, three blocks of time are designated for instruction, so this learning component would consist of three sessions.
When you schedule session and webcast learning components, you can use session patterns. Session patterns facilitate the creation of session and webcast learning components that occur over multiple days.
Integration with PeopleSoft Enterprise Time and Labor
If you use PeopleSoft Enterprise Time and Labor, the calendar and schedule pages in that application can display the times that internal learners are scheduled for training in Enterprise Learning Management.
Two Enterprise Integration Points (EIPs) are delivered with Enterprise Learning Management to support this feature:
Scheduled Time FullSync
Use the Scheduled Time Export page (Set Up ELM, Export Scheduled Time) to run this EIP once during system implementation to publish information about the sessions and webcasts set up in Enterprise Learning Management.
Scheduled Time Sync
Activate this incremental EIP after you run the full sync EIP. Whenever sessions are added or changes are made to session dates or times, the incremental EIP will publish the information to Time and Labor. Enrolling or dropping a learner in an activity that includes a session or a webcast component causes the EIP to publish learner-specific data to Time and Labor.
See Also
PeopleSoft Enterprise Time and Labor 8.9 PeopleBook, "Using Manager Self-Service for Scheduling Components," Integrating with Enterprise Learning Management
Creating Session Learning Components To create session learning components, use the Maintain Activities (LM_ACT) and the Session Templates (LM_TMPL ) components.
This section provides an overview of session learning components and discusses how to:
Define session patterns.
Manage system-generated sessions.
View session conflicts.
View and modify session details.
Create session pattern templates.
 Understanding Session Learning Components
Session learning components are scheduled, instructor-led, classroom-based training. They are comprised of sessions. Sessions, in this sense, are blocks of time designated for instruction. When you create session learning components, you can define one or more sessions individually or you can define a session pattern. You also identify instructors, required equipment, and facilities.
To speed the creation of session patterns, you can define session templates that include commonly used scheduling patterns and resource assignments, including instructors, facilities, and materials. Templates decrease the amount of data entry required to create the same session definitions for multiple activities. You can apply a session template to an activity that you are scheduling, and then modify the session patterns at the activity level as necessary. Session patterns create actual sessions within the activity.
Pages Used to Create Session Learning Components
|
Page Name |
Object Name |
Navigation |
Usage |
|
LM_LC_SES |
Enterprise Learning, Catalog, Maintain Activities, Learning Components To create a session, click Add Component and then select Sessions. To edit a session, click Edit. |
Enter or modify name and description information for this learning component. |
|
|
LM_LC_PTRN |
From the Learning Component page, click the Session Patterns tab. |
Create session patterns. You can base session patterns on a previously defined session template. You use session patterns to generate actual sessions when the session has a repeating pattern. |
|
|
LM_LC_SES_LIST |
From the Learning Component page, click the Sessions tab. |
View and edit automatically generated sessions. You can also add and delete sessions. |
|
|
LM_SES |
Click the Session Date link (to view or edit an existing session) or the Add Session button (to create a new session) on the Sessions page. |
Modify automatically generated session details, or create new sessions. |
|
|
LM_ROOM_ADMIN_DTL |
Click the Details link on the Session Details page. |
View room detail. The detail is the same as you see on the Room Details page, which you access from the Rooms page in the Facilities component. See Defining Facilities. |
|
|
LM_ACT_CNFL |
Click the Warning - Scheduling Conflicts link on the Sessions page. (This link appears only when sessions are in conflict.) |
View sessions that are in conflict. Click the Session Date link or the Conflicting Activity link to access the Session Details page, where you can correct the conflict. |
|
|
LM_TMPL |
Enterprise Learning, Learning Resources, Session Templates |
Create session templates of common activity session characteristics. |
Defining Session Patterns Access the Session Patterns page.
|
Template ID |
Select a template if you want to use a template to create this session pattern. Create session templates on the Session Templates page. |
|
Apply Template |
Click to apply the template to your session pattern. The system creates the session based on the template that you apply. You can edit the session pattern after applying a template. |
Session Pattern
|
Enter the facility in which you want to hold this session. Define facilities on the Facility page. |
|
|
Enter the room in which you want to hold this session. Define rooms on the Rooms page. |
|
|
Start Date |
Enter the start date of this session. Note. This is not necessarily the start date of the activity. |
|
Create |
Enter the number of sessions you want to create. This tells the system when to stop repeating the pattern that you define. The pattern only tells the system on which days it can schedule sessions, such as Tuesdays and Wednesdays. So if you tell the system to create 10 sessions, then the class would repeat every Tuesday and Wednesday for five weeks. The system determines which days based on the session pattern, the start date, and the number of sessions you want it to create. For an example of how the number of sessions you create affects session creation, see Number of Sessions Created Example later in this chapter. Note. If you do not enter the number of sessions to create, the system does not create any sessions. |
Click the Add Instructor button to add session instructors. Select an instructor type for each instructor. Any costs for the instructor are added to the activity costs. Define instructor types on the Instructor Types page.
Click the Add Equipment button to select equipment for the session. To narrow your search, select the equipment type. Define equipment types on the Equipment Types page.
Additional Elements
|
Select this check box if you want to observe the holiday schedule that is linked to the facility that you selected for this session. If the system observes holidays and a holiday occurs on a day that would have otherwise become a session, the system finds the next available day and continues the pattern until it has created all the sessions that you specified. Holiday schedules are linked to facilities on the Facility page. For an example of how holidays affect session creation, see Number of Sessions Created Example later in this chapter.. |
|
|
Select to delete all existing sessions if you have made changes to an existing pattern. The system deletes any sessions previously built by the pattern and any sessions that were added manually. If you don't select this check box, the system adds any new sessions that you build to the existing sessions. |
|
|
Build Sessions |
Click to build sessions based on the pattern that you defined. The system does not allow you to build sessions that fall outside of the activity start and end dates. |
Simple Session Pattern Example
Suppose a session or webcast learning component runs from June 6 through June 9, Monday to Thursday, and the learning component involves two instructors, one primary and one secondary. This requires four sessions with each session having two instructors. You can have the system generate the four sessions by creating a session pattern, either directly or by using a session pattern template. This table shows how the session template or session would be set up:
|
Field |
Field Value |
|
Facility |
Building 1 |
|
Room |
Room 1 |
|
Start Date |
June 6 |
|
Start Time |
10:00 a.m. |
|
End Time |
5:00 p.m. |
|
Monday |
Y |
|
Tuesday |
Y |
|
Wednesday |
Y |
|
Thursday |
Y |
|
Friday |
N |
|
Saturday |
N |
|
Sunday |
N |
Complex Session Pattern Example
Although the preceding example is simple, session patterns can also handle a much more complicated session scenario. A session or webcast learning component can have multiple session patterns with multiple instructors for each. Using multiple session patterns for a session or webcast learning component is useful for those sessions that meet in several different facilities (for session learning components) or have different instructors or instructor combinations throughout the session. This table shows complicated examples and descriptions of how session patterns can be set up to automate the creation of sessions for session learning components:
|
Requirement |
Setup |
|
Learners meet for two weeks, Monday to Thursday in Room 1 and Friday in Room 2 with the same instructors for both weeks. This requires 10 sessions that the system can build from two session patterns. |
The first session pattern spans both weeks, with Monday to Thursday selected and facility set to Room 1. The second session pattern also spans both weeks but with only the Friday option selected and facility set to Room 2. |
|
Same scenario as above, but four different primary instructors are needed, one each for Monday to Thursday of each week and one each for Friday of each week. This still requires 10 sessions but needs four session patterns. |
The first session covers the first week with Monday to Thursday selected, facility set to Room 1, and instructor set to the first primary instructor. The second session covers only Friday of the first week, with Friday selected, facility set to Room 2, and instructor set to the second primary instructor. The third session covers the second week with Monday to Thursday selected, facility set to Room 1, and instructor set to the third primary instructor. The fourth pattern covers only Friday of the second week, with Friday selected, facility set to Room 2, and instructor set to the fourth primary instructor. |
Number of Sessions Created Example
The following three scenarios show how the system creates sessions based on the number of sessions that you specify in conjunction with the pattern that you establish. Scenario 3 includes a holiday.
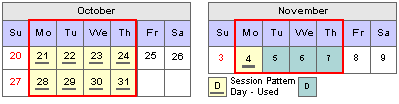
Scenario 1
This table presents requirements for scenario 1:
|
Parameter |
Value |
|
Start date |
October 21 |
|
Number of sessions to create |
2 |
|
Pattern days |
Monday through Thursday |
|
Holidays |
N/A |
This calendar shows the results:

Sessions Created: Scenario 1
Scenario 2
This table presents requirements for scenario 2:
|
Parameter |
Value |
|
Start date |
October 21 |
|
Number of sessions to create |
9 |
|
Pattern days |
Monday through Thursday |
|
Holidays |
N/A |
This calendar shows the results:
Sessions Created: Scenario 2
This table presents requirements for scenario 3. Note that there is a holiday in the session span and holidays must be observed.
|
Parameter |
Value |
|
Start date |
October 21 |
|
Number of sessions to create |
9 |
|
Pattern days |
Monday through Thursday |
|
Holidays |
Observe holidays selected. October 28 is a holiday. |
This calendar shows the results:
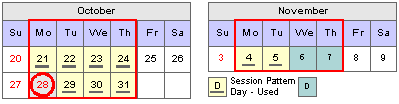
Sessions Created: Scenario 3
Managing System-Generated Sessions Access the Sessions page.
When you click the Build Sessions button on the Sessions Patterns page, you can view the sessions that the system built from the patterns. You can view session details by clicking the Session Date link to go to the Session Details page. You can also create new sessions in the Session Details page by clicking the Add Session button.
If any sessions are in conflict within this activity or with sessions in another activity, a Warning - Scheduling Conflicts link appears. Click the link to access the Session Conflicts page.
Viewing Session Conflicts Access the Session Conflicts page.
View session details by clicking the Session Date link or the Conflicting Activity link. Either link will take you to the Session Details page.
Use the Time tab to have the conflicting time detail displayed. The key fields displayed by the Conflict tab are retained for the Time tab.
Note. You will always see a link to the conflicting session, but you can only navigate to the conflicting session if you have a learning environment that allows such access. You can only edit other sessions for activities that are shared in your learning environment.
Viewing and Modifying Session Details Access the Session Details page.
|
Select to allow learners to view facility information from the self-service Activity Details page. If you select this check box, a location link appears in the Scheduled Sessions grid on the Activity Details page. Learners can follow this link to view the facilities location, attachment, and accommodations information. |
|
|
Details |
Click to view room details. The Room Detail page appears. |
Creating Session Pattern Templates Access the Session Templates page.
This list summarizes the relationship between a session template and a session pattern:
Whatever you can do on the Session Patterns page when scheduling an activity, you can also do in session templates, except specify a start date.
Start dates do not appear in templates.
When you apply a template on the Session Patterns page when scheduling an activity, the template becomes the session pattern just as if you had set the session pattern up directly at the activity level.
You can modify the session pattern as required after applying the template.
Creating Webcast Learning Components To create webcast learning components, use the Maintain Activities (LM_ACT) component.
This section provides an overview of webcast learning components and discusses how to:
Define webcast learning components.
Define webcast component defaults.
Understanding Webcast Learning ComponentsWebcast learning components provide a means to offer instructor-led, virtual-classroom instruction to learners through third-party webcast vendors. When you create a webcast learning component, you define the sessions or session pattern and assign an instructor just like you would in a session learning component.
See Defining Session Patterns.
Prerequisites
Before you create webcast learning components, you must set up webcast vendors.
See Setting Up Webcast Vendors.
Pages Used to Create Webcast Learning Components
|
Page Name |
Object Name |
Navigation |
Usage |
|
LM_LC_LWC |
Enterprise Learning, Catalog, Maintain Activities, Learning Components To create a webcast component, click Add Component, and then select Webcast. To edit a webcast component, click Edit. |
Create webcast learning components. |
|
|
LM_LC_LWC_DTL |
From the Webcast - Learning Component page, select the Webcast Defaults tab. |
Enter default information for webcast learning components. |
|
|
LM_LC_PTRN |
From the Webcast - Learning Component page, click the Session Patterns tab. |
Create session patterns. You can base session patterns on a previously defined session template. You use session patterns to generate actual sessions when the session has a repeating pattern. |
|
|
LM_LC_SES_LIST |
From the Webcast - Learning Component pagee, click the Sessions tab. |
View and edit automatically generated sessions. You can also add and delete sessions. |
Defining Webcast Learning ComponentsAccess the Webcast - Learning Component page.
|
Vendor |
Enter the name of the vendor supplying the webcast. Set up vendor information on the Live Web Cast Vendor Setup page. |
Defining Webcast Component DefaultsAccess the Webcast Defaults page.
|
Vendor |
The vendor appears by default from the Webcast - Learning Component page. |
|
Type |
Select the type of webcast the vendor offers. The vendor provides this information. |
Publishing Webcast Enrollment and Session Information to Vendors To publishing webcast enrollment and session information to vendors, use the Vendor Message Management (LM_LELW_MSG_LOG) and Test Webcast API (LM_LELW_TEST) components.
This section provides an overview of publishing webcast information to vendors and discusses how to:
Search for pending session and enrollment messages for webcast vendors.
Publish session information to webcast vendors.
Confirm publication of webcast vendor messages.
Understanding Publishing Webcast Information to VendorsWhen administrators schedule webcast learning components, or when learners enroll in a learning activity that includes a webcast learning component, the system adds the schedule information into a batch table for webcasts. You can view this information and publish it to webcast vendors by using the Maintain Vendor Messages component. Messages for new webcast sessions appear on the Webcast Messages (Session) page, and messages for enrollments into those sessions appear on the Webcast Messages (Enrollment) page. For example, when you schedule five sessions for a webcast learning component, five session messages appear on the Webcast Messages (Session) page. If you enroll three learners into the activity that contains this webcast learning component, 15 enrollment messages appear on the Webcast Messages (Enrollment) page. When you add sessions to a webcast learning component after learners have already enrolled in the activity that contains that learning component, the system adds the schedule information into the batch table for both sessions and enrollments and the messages appear on both the Webcast Messages (Session) and Webcast Messages (Enrollment) pages.
Depending on when you have scheduled the process to run, the Webcast Messages Application Engine (LM_LELW_AE) process batches webcast schedules and the learners' names and publishes them to the vendor's webcast system. Schedule the Webcast Messages process to run from PeopleTools, Process Scheduler, Processes.
If an error occurs while publishing information to your vendor, you can view the messages on the Maintain Vendor Messages page. From here, you can review the errors and again publish the individual messages after the errors are corrected. Your system sends these messages to the vendor in an XML file. If you need to edit the XML file to correct the errors, you can use the Test Webcast API page.
Learners must access the webcast through your system. They cannot go directly to the vendor site to launch the webcast. When a learner enrolls in an activity in Enterprise Learning Management that contains a webcast learning component, the system creates a randomly generated, internal password for the learner. The system uses this information to create the learner's profile on the vendor site. When the learner launches the webcast from Enterprise Learning Management, he or she accesses the vendor's site using the automatically generated password. This happens in the background; the learner does not need to enter the password to access the vendor's site.
Webcast learning component completion rules vary slightly depending on the vendor you choose.
See the vendor-specific companion documentation posted to Customer Connection.
Pages Used to Manage Webcast Enrollment
Searching for Pending Session and Enrollment Messages for Webcast Vendors Access the Vendor Message Management - Search page.
Enter search criteria to search for pending enrollment and session messages that are queued to be sent to the webcast vendor. Click Search to be taken to the Webcast Messages (Session) page.
Note. You must publish session information to vendors before you publish enrollment messages, so ensure that all session messages have been successfully published before publishing enrollment messages.
Publishing Session Information to Webcast VendorsAccess the Webcast Messages (Session) page.
Select the messages you want to publish and click the Publish button. If the message is published successfully to the vendor, the status changes from pending to success and the selected check box becomes unavailable. Also, the next time you enter the page, messages that were published successfully are no longer visible.
If a message is not published successfully, the status changes to error. The status then becomes a link that you can click to view the error message. In this case, you must correct the error and publish the message again.
Note. Enterprise Learning Management only performs its own logic checks when creating or deleting webcast sessions, or when enrolling learners in or dropping learners from webcast sessions. It does not perform logic checks based on rules established in the webcast vendor's system. The webcast vendor performs its own logic checks after session and employee messages have been published. Therefore, it is possible to successfully publish session and enrollment information that does not match the vendor's rules.
Confirming Publication of Webcast Vendor Messages Access the Test Webcast API page.
Select test values for the transaction you want to run for your vendor. You can then view the XML file of the transaction to correct errors.
Creating Assignment Learning Components To create assignment learning components, use the Messages (LM_LELW_MSG_LOG) component.
This section discusses how to define assignment learning components.
Assignment learning components can be anything from an on the job training task with a mentor to a meeting with a manager. Assignments enable you to include ad hoc tasks in a learning activity.
Page Used to Create Assignment Learning Components
|
Page Name |
Object Name |
Navigation |
Usage |
|
LM_LC_ASGN |
Enterprise Learning, Catalog, Maintain Activities, Learning Components To create an assignment component, click Add Component and then select Assignment. To edit an assignment, click Edit. |
Create or edit an assignment learning component. |
Defining Assignment Learning ComponentsAccess the Assignment Component page.
|
This field works in conjunction with the Mark Completion by Learner field. If you enable learners to update the completion status for this assignment, you can require that they enter their passwords when changing the status to complete. |
|
|
Mark Completion by Learner |
Select to enable learners to update the completion status for this assignment. If you also select the Mark Completion by Manager check box, both the learner and the manager can update the status. (Learners can use the self-service Activity Progress page to update the status.) |
|
Mark Completion by Manager |
Select to enable the learner's manager to update the completion status for this assignment. If you also select the Mark Completion by Learner check box, both the learner and the manager can update the status. (Managers can use the self-service Activity Progress page to update the status.) Instructors and administrators for the related activity always have the ability to update the completion status for an assignment through the activity's Component Roster page for that assignment. |
|
URL 1 and URL 2 and URL 3 |
Enter up to three URLs for this component. These links can point to regular web-based documents, such as HTML and PDF files. These links cannot point to SCORM or AICC compliant content. To create a learning component that is SCORM or AICC compliant, use the web-based learning component. |
|
URL Name |
Enter the name that you want to appear next to the URL on the page. For example, if you enter http://www.peoplesoft.com in the URL 1 field, you could enter PeopleSoft's Website in the corresponding URL Name field. The system displays both the URL and the URL name to learners. |