Finding and Attempting Solutions
This topic provides an overview of solutions and discusses how to:
Search for solutions.
Use FAQs to search for solutions.
Use frequently used solutions.
Enter new solutions.
Email solutions.
Review details of attempted solutions.
Add resolution notes and attachments.
|
Page Name |
Definition Name |
Navigation |
Usage |
|---|---|---|---|
|
Case - Solution |
RC_CASE_SOLN |
|
Find and attempt solutions to resolve cases. |
|
Service Order - Solutions |
RF_SO_SOLN |
|
Find and attempt solutions to resolve service orders. |
|
Quality Management - Solutions |
RQ_DEFECT_SOL_LNK2 |
|
Link attempted solutions to defects. |
|
Outbound Notification |
RB_EM_OB_NOTIFY |
Select a solution from the Attempted Solutions grid and then click the Email button. |
Email solution information to customers or contacts. |
|
Resolution Details |
RC_CASE_SOL_SUM |
Click a solution summary link on the Case - Solution page. |
Review details of attempted solutions. |
|
Resolution Details |
RF_SO_SOL_SUM |
Click a solution summary link on the Service Order - Solutions page. |
Review details of attempted solutions. |
|
Resolution Details |
RQ_DFCT_SOL_SUM |
Click a solution summary link on the Quality Management - Solutions page. |
Review details of attempted solutions. |
|
Case - Resolution Notes |
RC_CASE_RSLN_NOTE |
Click the Add Resolution Note button on the Resolution Details page of a case. |
Add notes and attachments that are associated with a resolution. |
|
Service Order - Resolution Notes |
RF_SO_RSLN_NOTE |
Click the Add Resolution Note button on the Resolution Details page of a service order. |
Add notes and attachments that are associated with a resolution. |
This topic discusses:
Solution library security.
Solution advisor searches.
FAQs.
Frequently used solutions.
New solution creation.
Adhoc solutions.
Customer notification.
How external content works.
Solution Library Security
When selecting solutions for a transaction, only solutions from authorized solution libraries (or solutions that are not associated with any library) will be available. Solution library security is defined on the Solution Library Security page.
The solution library security requirements vary by transaction, as shown in the following table.
|
Transaction |
Solution Library Security Factors Considered |
|---|---|
|
Support Case |
User Role, Agent Location, and Customer Region |
|
Self-Service Support Case |
User Role and Customer Region. |
|
HelpDesk and HR HelpDesk Case |
User Role, Agent Location, and Employee Location |
|
Self-Service HelpDesk and HR HelpDesk Case |
User Role and Employee Location. |
|
Service Order |
User Role and Customer Region |
|
Inbound Email |
User Role, Agent Location, and Customer Region |
|
Defect |
User Role |
|
Service Center for Higher Education Case |
User Role, Employee Location, Agent Location, and Customer Region |
|
Self-Service Case for Service Center for Higher Education |
User Role, Employee Location, and Customer Region |
Solution Searches
The Solution page has three search modes: basic, advanced, and more search options:
Basic Search
This is a PeopleSoft search that looks at all objects in the search index. The system ranks the search results by percentage according to how close the match is. It contains these characteristics:
Basic search is the default when the user selects the tab, unless the user has changed his preferences.
The problem summary text is populated in the Search Text field by default and can be updated. Click the Search button to launch a search against all search domains selected for the corresponding search page definition. Domains can include solutions, cases, fixes, defects, troubleshooting guides, and web contents.
Note: Click the Search button to launch a search against all the domains that are defined in the user's preferences. There is additional logic that the system uses to display the search text on the Case page. The system first tries to pull information from the quick code, then from the previous search (the saved search), and then the problem summary.
When the system performs a search, the text is stored as a keyword so that the next time the user opens the page, the previously used search text is automatically entered.
The system displays a message listing common or stop words that were not included in the search (examples are the, a, and, or and so on) above the search results, if they were set as a configuration option at the component level during implementation.
Advanced Search
Includes a series of text boxes used to perform a natural language internet-type search as configured in the search page definition. Advance search gives you the ability to perform these types of searches:
With all the Words: Works like a logical AND. All of the words must be in the text for which you are searching
With any of the Words: Works like a logical OR. If any of the words in the search text appear, the system returns results.
With the Exact Phrase: The exact phrase must appear in the text for which you are searching.
Restrict by Product: Enables you to restrict solutions by product. Although Restrict by Product appears in the list of solution fields in the advanced search, it is different from the other fields in the list because a solution can be related to many products, and therefore product is not a single searchable field in the Solution table.
Use Word Variations: Select one of the options to expand the search using different spellings of words or synonyms.
Rows to Display: Controls the number of rows in the search results grid.
FAQs
The FAQ tab displays a predefined list of solutions that the agent can choose from to resolve the case. If the FAQ check box is selected during implementation on the solution setup page, then the solution qualifies as an FAQ.
The Library field contains a list of libraries with associated solutions that have been identified as FAQ.
The results grid displays a list of the solutions that have been set up for the library selected. FAQs are sorted by the date and time that they were last modified on the solution so that the user sees the most up-to-date solutions first.
Note: FAQs can be searched from the Case component (agent-facing) as well as from the Customer or Employee Self-Service application (Customer Service Center, HR Service Center, Campus Service Center, and IT Service Center).
See Also
Understanding PeopleSoft Search Framework Implementation for CRM
Understanding PeopleSoft Search Framework Definitions for CRM
Frequently Used Solutions
The Frequently Used Solution tab lists frequently used solutions by type: either All, Category/Type/Detail, Error, or Product.
Solutions are sorted based on their solved counts. For example, the solution that solved the most cases for the product on the current case would be first, and so on. This tab must be turned on when you are configuring the system during implementation.
Prior to using Frequently Used Solutions, you must first run the Update Solution Usage Counts process (RC_SOLN_USAG) and then update the Solution search index by running the incremental index for the CR_CO_SOLUTION search definition. The relationships between solutions and products are not included in the Solution search index until the index is updated or rebuilt.
The Frequently Used Solution tab lists the solved count for each solution. Note that if solution counts have been updated for multiple types (such as Category/Type/Detail and Product.), the solved count displayed on this tab when viewing Type = All will be a summation of the solved counts for each of the other individual types.
Note: This feature is only used in PeopleSoft call center applications (PeopleSoft HelpDesk, Support and HelpDesk for Human Resources, and verticals).
See Also
New Solution Creation
If a user is unable to locate an existing solution, they can use the New Solution tab to enter a new solution (which will be created with a type of Adhoc). When the user enters a new solution and clicks the Attempt button, the system inserts the solution into the Attempted Solutions grid with the status of In Consideration. If they click the Solve button, the system inserts the solution in the grid with the status of Successful.
Note: The Attempt and Solve button are visible and applicable on all sections and tabs on the Solutions page, not just new solutions. This feature is not used in PeopleSoft Quality Management.
Adhoc Solutions
When a new Adhoc solution is first created, the solution status is set to Draft on the Solutions Details page.
Changing the solution status from Draft to Submitted for Review indicates that the Solution is ready for manager review. PeopleSoft, however, does not deliver an AAF policy to take action or send notification when the solution status changes. You must configure an AAF policy to send a notification or create a business project to start the solution approval process if this type of notification is desired.
See Understanding the Use of Active Analytics Framework in CRM.
Customer Notification
When a solution is in the status of Waiting on Customer you may want to send a notification to the customer. For example, an agent suggests two solutions on a an open case. One solution has the status of In Consideration and the other solution has the status of Waiting on Customer. When the agent saves the case, you could set up an AAF policy that sends a notification to the case contact with the solution details for the solution that is in the Waiting on Customer status.
To set up such a policy, use these parameters:
|
Parameter |
Value |
|---|---|
|
Term Name |
Case Resolution Status |
|
Trigger Point |
After a Support Case is Saved |
|
Condition |
Case Solution Status is equal to Waiting on Customer |
|
Actions |
Notify case contact via email |
Note: You can use AAF policies to send multiple notifications to the case contact when the case has more than one solution with the status of Waiting on Customer.
External Content Searching
PeopleSoft Search supports external content searching. You can build search definitions with the Web or File source type, and indicate the locations of the internet, intranet, or file system that you want to expose to the Search Framework crawling process to build the search index. At runtime, matching external links are displayed in the search results.
When external content solutions appear in the search results grid, the description includes a link that opens the external content in a new window. If the external content is a file, it opens in the appropriate application. The user can turn external search on or off by selecting or clearing the external content domain on the Advanced Search - More Search Options page.
When a user selects multiple items from the search grid, it transfers the user to the Solution Detail page. If external content is selected, it displays as a link with a description. Users can navigate into the solution to see the details or click Attempt or Solve to solve the case, service order, or defect.
Field or Control |
Description |
|---|---|
Select |
Select the check box next to the solution that you want to either attempt, use as a solution, or view and then click the appropriate button that corresponds to the action that you want to take. |
Attempt |
Click this button to attempt the solution that you selected. The system adds the solution to the Attempted Solutions grid for the service order, case, or defect with the status of In Consideration. |
Solve |
Click this button to use the solution that you selected to resolve the issue. The system adds the solution to the Attempted Solutions grid for the service order, case or defect with the status of Successful Resolution. |
View |
Click this button to view the solution that you selected. The system displays the Resolution Details page. |
Search |
Click to search for solutions that match the search criteria or text that you entered. |
Use the Case - Solution page (RC_CASE_SOLN), Service Order - Solutions page (RF_SO_SOLN), or Quality Management - Solutions page (RQ_DEFECT_SOL_LNK2) to find and attempt solutions to resolve cases and service orders, or link attempted solutions to defects.
Navigation:
The example in this topic shows the Case - Solution page in Advanced Search mode with More Search Options enabled. Click the Advanced Search link on the Search tab, and then click the More Search Options link.
Note: The Service Order - Solutions page (RF_SO_SOLN) and Quality Management - Solutions page (RQ_DEFECT_SOL_LNK2) look and functional the same as the page described in this topic.
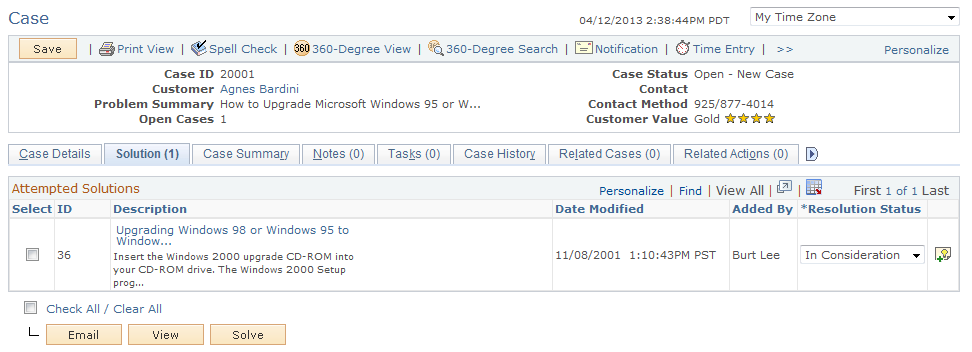
This example illustrates the fields and controls on the Case - Solution page (1 of 3).
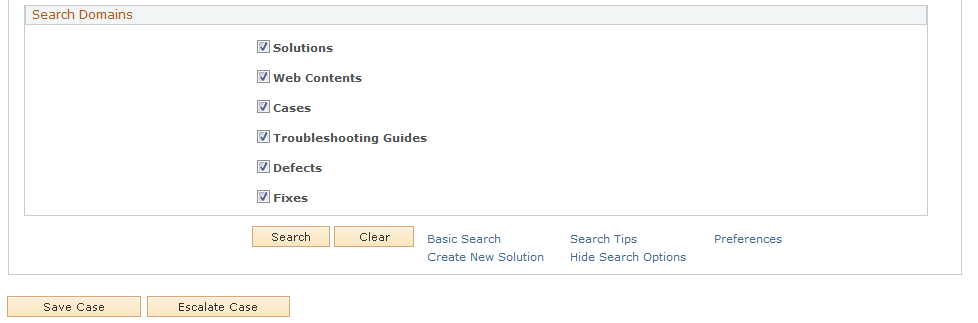
This example illustrates the fields and controls on the Case - Solution page (2 of 3).

This example illustrates the fields and controls on the Case - Solution page (3 of 3).
Attempted Solutions
This section displays the number of solutions that have been attempted.
Select the solution that you want to either attempt or that you have used to resolve the problem. To move the solution to the Attempted Solutions grid, either click the Attempt or Solve button. The system assigns it an appropriate status.
To email the solution to a customer, employee or agent, select the solution in the Attempted Solutions grid and click the Email button. The system displays the Outbound Notification page and the selected solution is prepopulated in the message area. Any attachments belonging to the solution's notes will be made available on the Outbound Notification page, where you may choose to add the attachment to the email by selecting the associated Include check box.
To view a solution, select it and then click the View button. The system displays the Resolution Details page. You can also click the solution description link to open the solution detail. From there you can attempt, solve, and add notes to the solution.
Field or Control |
Description |
|---|---|
|
Click the Add a New Note button to access the Resolution Notes page. The button changes slightly based on whether a note exists for the resolution or not. If there are no notes attached to the resolution, the system displays the Add a New Note button. If there are already notes attached to the resolution, the system displays the View Notes button. The Add a New Note button only shows up in the Attempted Solutions grid, not in the search results grid. |

Search Criteria
The Search Criteria section is shown in the advanced search mode with the More Search Options link selected. In addition to the Advanced Search mode, you can access the Basic Search by clicking the Basic Search link. Information on using these search options is detailed in the Understanding Solutions topic.
To narrow a search and improve performance, you can choose which of the available solution libraries to include in the search. Select the corresponding check box for each desired library to include it in the search. Conversely, deselect a library check box to exclude that library from the search. You can click the Preferences link to define and store which of your available libraries should be selected by default each time a case is opened.
Solution: Search Tab
Use the Search tab on the Solution page to search for different solutions and you can mark it as your personal favorite.
This example illustrates the fields and controls on the Case - Solution: Search page.

Click the My Favorite toggle button to mark the solution as favorite. You can view these favorite solutions in the Solutions: All My Favorite Solutions page.
Solution: FAQ Tab
Use the FAQs tab on the Solution page to view questions that are frequently asked about the issue.
This example illustrates the fields and controls on the Case - Solution: FAQ page.
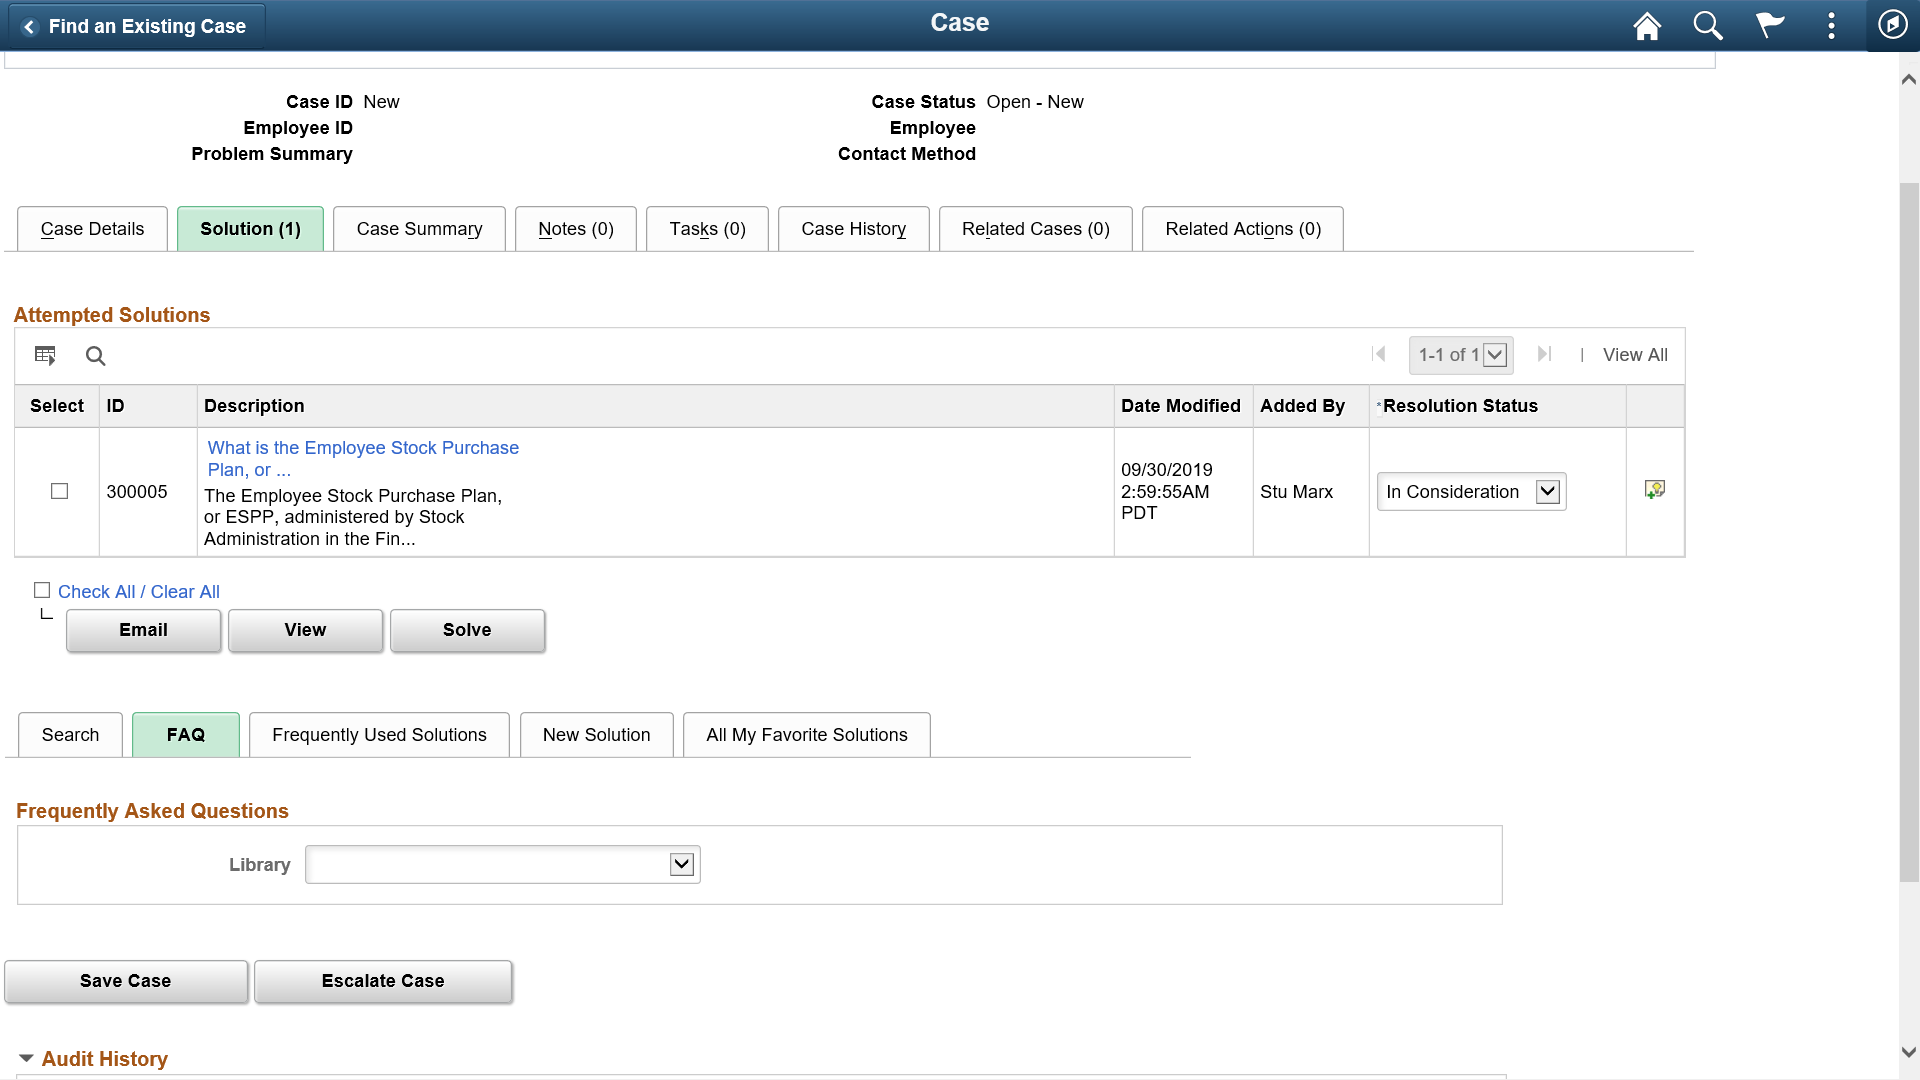
Field or Control |
Description |
|---|---|
Library |
Select the library that you want to use to search for solutions. Once you find a solution, select it and use the Attempt, Solve, or View buttons to indicate the action that you want to take. To open the Resolution Details page, click the Summary link |
Solution: Frequently Used Solutions Tab
Use the Frequently Used Solutions tab on the Solutions page to see solutions that have frequently resolved the issue.
This example illustrates the fields and controls on the Case - Solution: Frequently Used Solutions page.
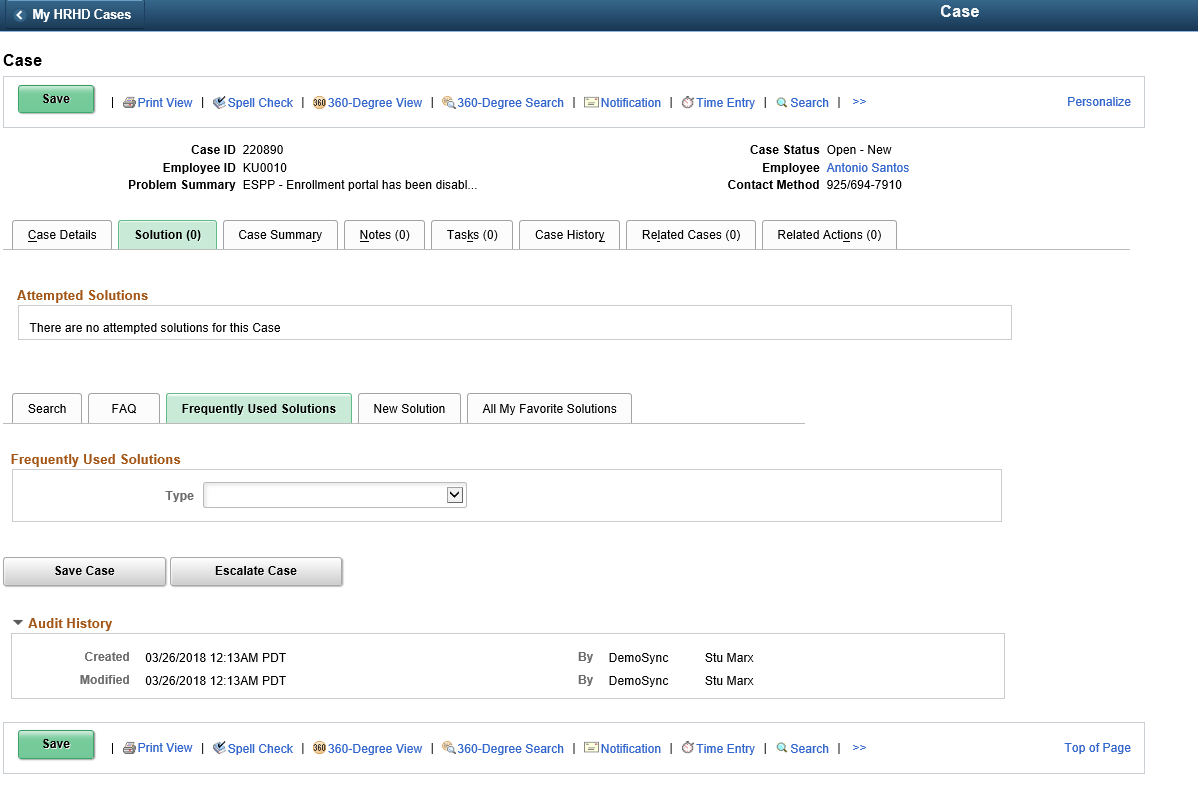
Field or Control |
Description |
|---|---|
Type |
Select the type of solution that you want the system to use for the search. Once you find a solution, select it and then click the Attempt, Solve, or View button to indicate the action that you want to take. To open the Resolution Details page, click the Summary link. |
Solution: New Solution Tab
Use the New Solution tab on the Solution page to add a solution for the issue.
This example illustrates the fields and controls on the Case - Solutions: New Solution page.
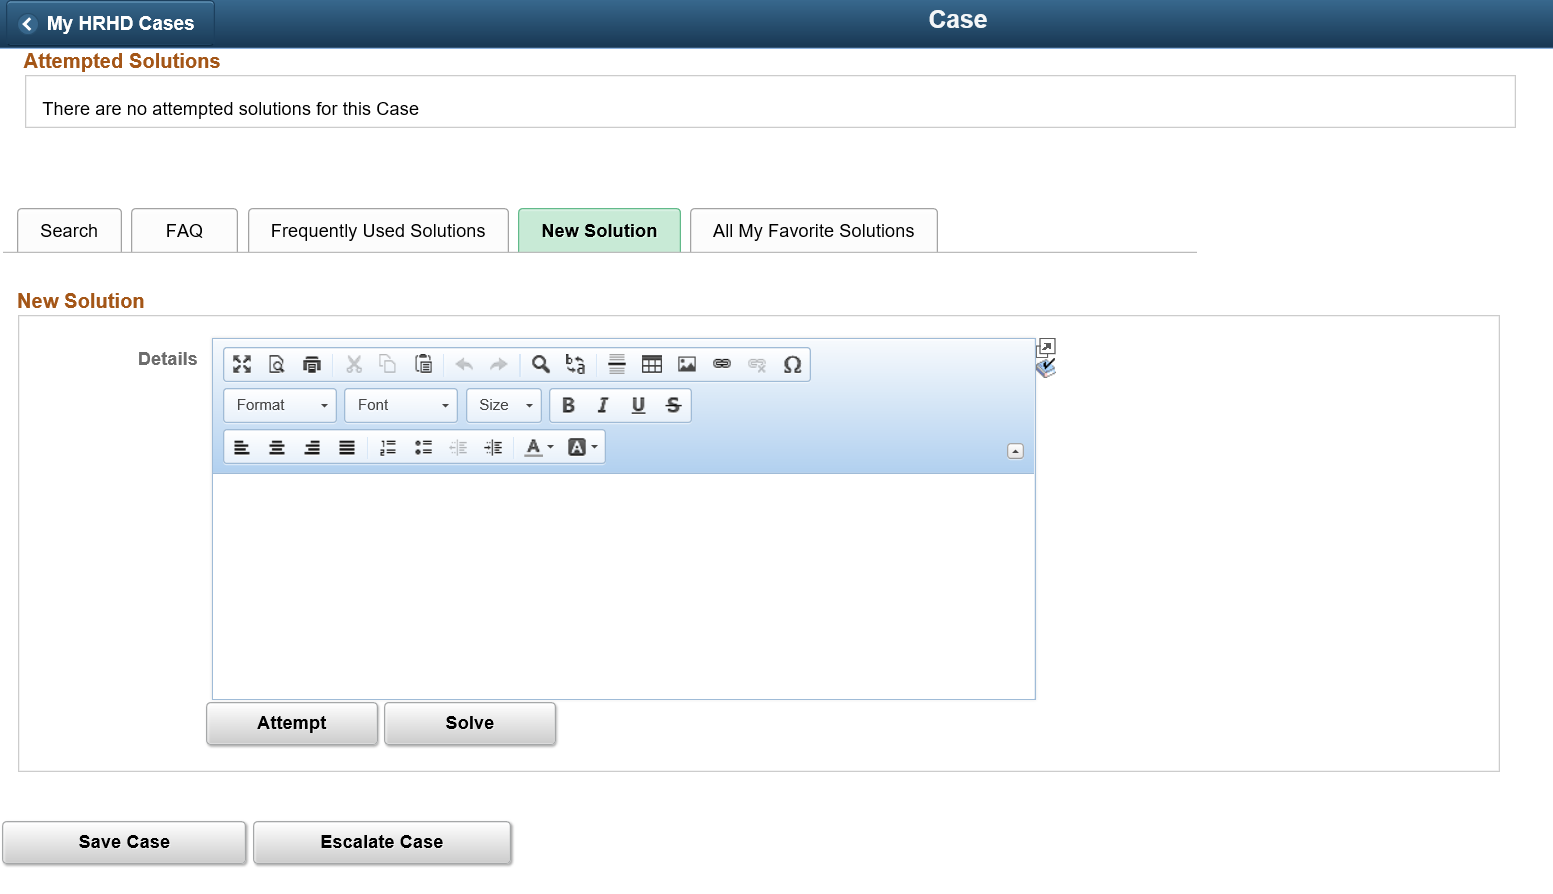
Note: Users can only search on active solutions. Solutions that are categorized as either canned or adhoc do not appear in searches on the Frequently Used Solutions page for both agents and self-service users.
Enter text describing the solution that you are either attempting or have used to resolve the problem. Click either the Attempt or the Solve button to send the solution to the Attempted Solutions grid, where it is assigned a status of either In Consideration or Successful Resolution.
Solution: All My Favorite Solutions Tab
Use the All My Favorite Solutions tab to view and manage all favorite solutions of agents, irrespective of a case relevance. You can attempt or solve these solutions to the case.
Note: This tab is displayed only when the ‘Favorite Solution for Agents’ checkbox is selected in the Call Center Definition page. For details, see Defining Call Center Business Units
This example illustrates the fields and controls on the Case - Solutions: All My Favorite Solution page.

All solutions marked as favorite by agents or employees are displayed under the Search Results block.
Use the Outbound Notification page (RB_EM_OB_NOTIFY) to email solution information to customers or contacts.
Navigation:
Select a solution from the Attempted Solutions grid of the Solution page, and then click the Email button.
This example illustrates the fields and controls on the Outbound Notification page (1 of 2).
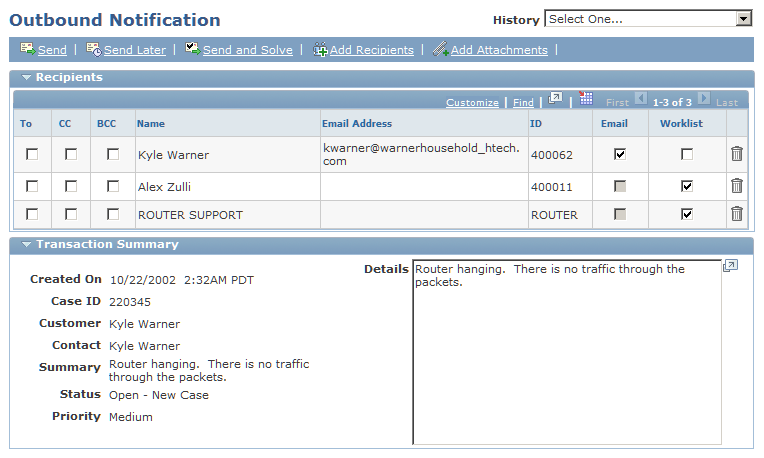
This example illustrates the fields and controls on the Outbound Notification page (2 of 2).
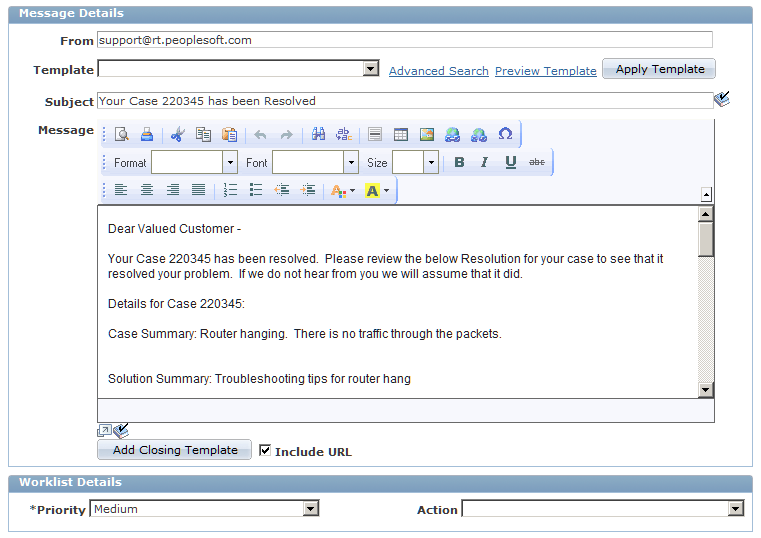
Any attachments from the solution's notes will be automatically added to the Solution Attachments grid on the Outbound Notification page. Select the Include check box for any such attachments that you want to be sent with the email.
Use the Resolution Details page (RC_CASE_SOL_SUM) to review details of attempted solutions.
Navigation:
Click a solution summary link on the Case - Solution page, Service Order - Solutions page, or Quality Management - Solutions page.
This example illustrates the fields and controls on the Resolutions Details page.
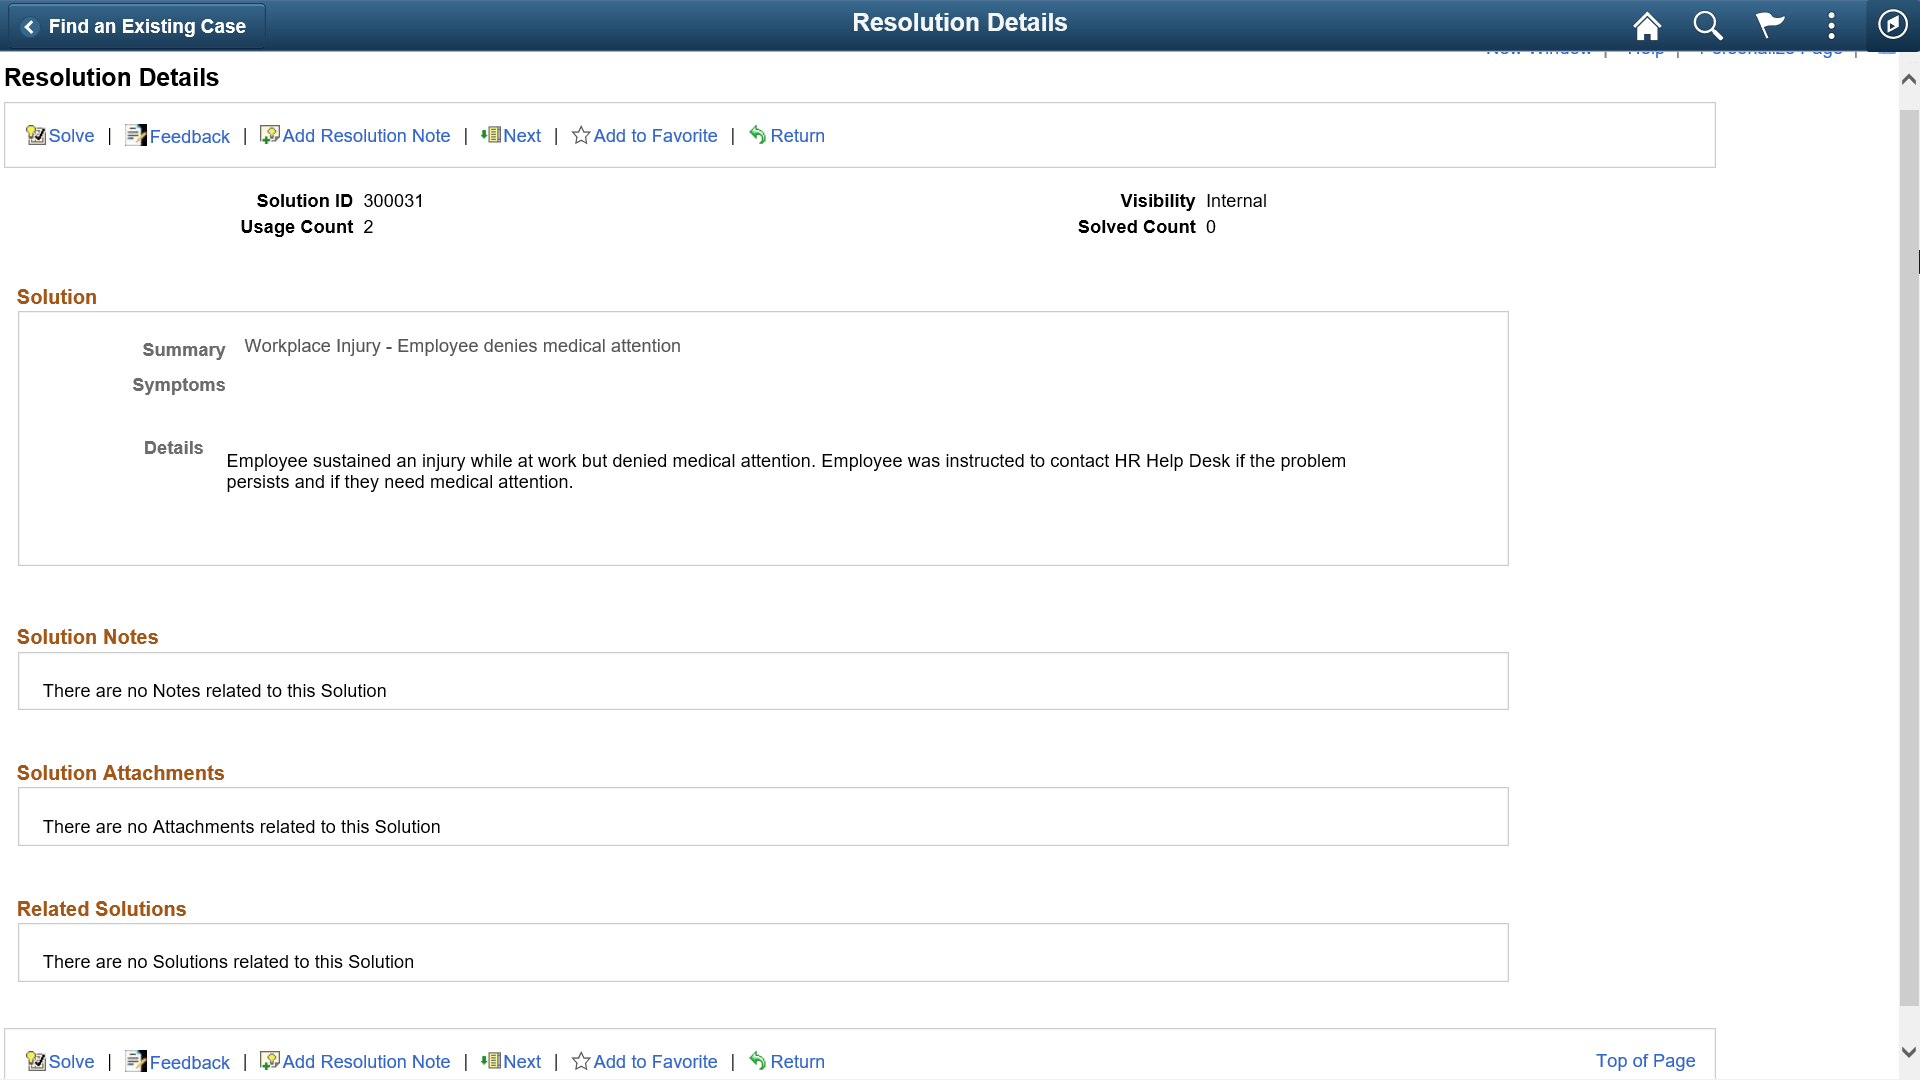
Use the Resolutions Details page to view the details of a solution, add solution notes and attachments, add resolution notes, and submit adhoc solutions for management approval.
Toolbar Area
Field or Control |
Description |
|---|---|
Attempt and Solve buttons |
If the solution has not been attempted, an Attempt button and a Solve button (Solve for Case only) appear. Choose the desired action to attempt or solve the transaction using this solution. (Once the solution has been attempted or solved, these buttons no longer appear.) |
Feedback |
Used to enter feedback while viewing a solution. |
Add Resolution Note |
Click to add a resolution note that is specific to this solution attempt. |
Add to Favorite/Remove from favorite |
Click the star icon to mark/unmark a solution as your personal favorite. |
Solve button |
If the solution is an Adhoc solution in Draft status, the Submit button appears. Once the Adhoc solution has been submitted, this button no longer displays on the toolbar. |
Usage Count |
Indicates the number of times the solution was used to help resolve cases. |
Solved Count |
Indicates the number of times the solution was used to successfully solve cases. |
Solution
Field or Control |
Description |
|---|---|
Summary |
The Solution summary is a link to the full solution definition. |
Symptoms |
Displays the symptoms as listed on the solution definition. |
Details |
Displays the details as listed on the solution definition. |
Solution Notes
To add a new solution note, click the Summary link in the Solution region of the page. The Solution page opens in a new window. Click the Notes tab to add a note to the solution.
Solution Attachments
To add a new solution note, click the Summarylink in the Solution region of the page. The Solution page opens in a new window. Click the Notes tab to add a note to the solution. Click the Add Note button. When you are finished adding your note, click the Add an Attachment link at the bottom of the Add a Note section.
Related Solutions
To add a new related solution , click the Summary link in the Solution region of the page. The Solution page opens in a new window. Click the Related Actions tab. Then click the Relate an Existing Solution button to relate a similar solution.
Note: You cannot relate an existing solution to an independent text or adhoc solution.
Resolution Notes
This group box appears with data only if the solution is associated with resolution notes.
Field or Control |
Description |
|---|---|
Summary |
Click the note's summary link to display note details on the Resolution Notes page. |
To add a new resolution note, click the Add Resolution Note button in the toolbar. The system displays the Resolution Notes page.
Use the Case - Resolution Notes page (RC_CASE_RSLN_NOTE) or Service Order - Resolution Notes page (RF_SO_RSLN_NOTE) to add notes and attachments that are associated with a resolution.
Navigation:
Click the Add Resolution Note button on the Solutions Detail page (in attempted solutions mode).
This example illustrates the fields and controls on the Service Order - Resolution Notes page.
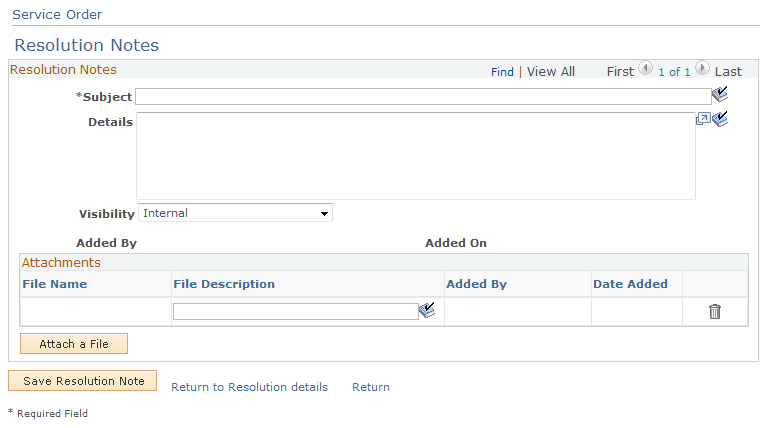
Resolution notes created on this page are intermingled with notes on the Notes pages in PeopleSoft Integrated FieldService, PeopleSoft Support, PeopleSoft HelpDesk, and PeopleSoft HelpDesk for Human Resources.
PeopleSoft CRM provides a similar interface for working with notes and attachments across all the components that use this functionality. You can access resolution notes from the Attempted Solutions grid and the Notes page.