Importing Sales Lead Data
This topic discusses how to:
Import lead data from an external file.
View a template definition.
View lead import results.
View lead import errors.
Search for imported data.
|
Page Name |
Definition Name |
Usage |
|---|---|---|
|
RB_IMP_RUN |
Select the template, map, and spreadsheet for importing lead data and run the import process. |
|
|
RB_IMP_TEMPL_DISPL |
View a display-only version of the specified template's definition. |
|
|
RSF_LE_IMP_RESULTS |
View results of the lead data import process. |
|
|
RSF_LE_VIV_ERR |
View results of the lead data import process. |
|
|
All Imported Leads |
RB_IMP_SEARCH |
Search for imported lead data. |
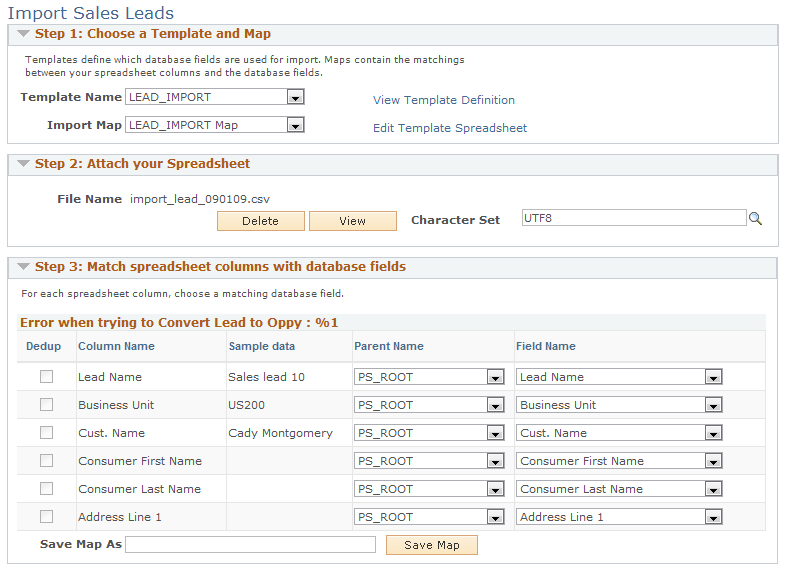
Use the Import Sales Leads page (RB_IMP_RUN) to select the template, map, and spreadsheet for importing lead data and run the import process.
Navigation:
This example illustrates the fields and controls on the Import Sales Leads page (1 of 2).
This example illustrates the fields and controls on the Import Sales Leads page (2 of 2).

Step 1: Choose a Template and Map
Field or Control |
Description |
|---|---|
Template Name |
Select the import template to use. Import templates identify the components that provide the database fields. |
View Template Definition |
Select to access a display-only version of the Import Template page for a specified template. |
Import Map |
Select the import map to use. The import map identifies which spreadsheet columns populate the various fields in your database, and it identifies which columns to import. |
Edit Template Spreadsheet |
Select to launch a new window with the Microsoft Excel spreadsheet template with column headings only. You can enter data (including placeholder data for required fields) or paste data from another spreadsheet. Note: If you make changes, be sure to save the spreadsheet before closing the window. |
Step 2: Attach the Spreadsheet
Field or Control |
Description |
|---|---|
Add |
Click to access the search page, where you can enter or browse for the path to the comma-delimited file of lead data to import. |
Upload |
Click to upload the file after identifying the path to the file. The system loads the spreadsheet and attempts to map the spreadsheet columns to the database fields identified on the selected template and map. The system accesses the Import Sales Leads page and displays the name of the uploaded file and mapping results. |
Delete |
Click to delete the uploaded file. The Add button appears. Click Add to browse for a different file to upload. |
View |
Click to open a new window where you can view the uploaded spreadsheet to confirm that it is the correct spreadsheet to use. |
Step 3: Match spreadsheet columns with database fields
If the columns and fields are acceptable as mapped, run the import process by selecting options in the Step 4: Run the Import group box.
If the automatic mapping is not acceptable, use the fields labeled Parent Name and Database field name to select the correct field for each column. Then enter a map name in the Save Map As field, and click Save Map. The map appears in the map drop-down list for that template.
Note: The Dedup check boxes indicate data that the system uses to check for duplicates. You specify the data for determining duplicates when you create the template definition. If you have the necessary permissions, you can edit the Dedup check boxes used for determining duplicates.
Step 4: Run the Import
Specify how the import runs—in real time or in a batch process at a later time.
Field or Control |
Description |
|---|---|
Run Import |
Click to submit the run request to the system. |
View Results |
Click to view import results after the process has run. |
Process Monitor |
Click to access the Process List page, where you can confirm that the request was received and determine its status. |
Execute AAF during Lead Import |
Select to launch the Active Analytics Framework policies when an imported lead contains the necessary conditions to trigger execution. |
Use the Lead Import Template page (RB_IMP_TEMPL_DISPL) to view a display-only version of the specified template's definition.
Navigation:
Click the View Template Definition link on the Import Sales Leads page.
This example illustrates the fields and controls on the Sales Lead Import Templates page.

This page is a display-only version of the Import Template page, so that you can view the template definition. To create or edit an import template, you must access the editable version of this page if your PeopleSoft Sales access profile permits.
Use the Sales Leads Import Results page (RSF_LE_IMP_RESULTS) to view results of the lead data import process.
Navigation:
Click the View Results button on the Import Sales Leads page.
This example illustrates the fields and controls on the Sales Leads Import Results page.
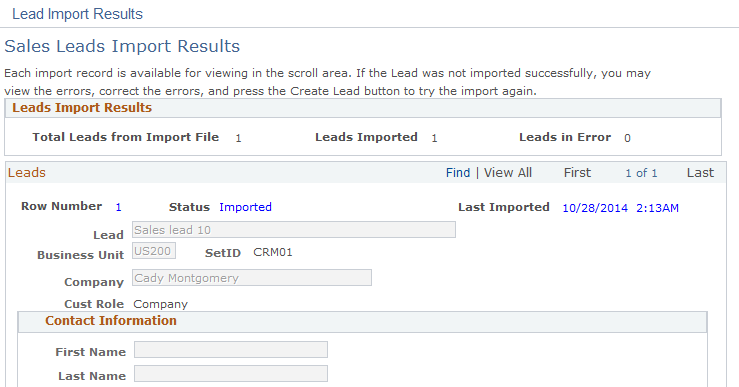
View the details of each lead that was imported. Edit imported data as necessary.
When the data is correct, click Submit All to submit all lead data without further adjustment.
If a lead is a prospect, you can leave it as a prospect or push it to the CDM.
Note: For customers, the Customer field is displayed as a link; for prospects, it is displayed as an editable field.
If an imported lead has a sales representative's person ID in an ID column, the system assigns the lead to that representative. If the imported lead has no person ID and the Auto Assign check box is selected, the system assigns a sales representative by using a territory tree. If the imported lead has no person ID and the Auto Assign check box is not selected, the lead is not assigned. You can search for unassigned leads on the Search Leads page.
If the imported lead does not have a rating, it is subject to auto rating.
See Setting Up Assignment Weights, Setting Up Lead Ratings.
Import Zone
If errors occurred during the import process, the Import Zone group box appears.
Field or Control |
Description |
|---|---|
View Errors |
Click to access the Import Errors page, where you can determine the errors that occurred. |
Create Lead |
Click to import leads one by one. Each time that you click this button, the system submits only the lead that appears in the Leads group box. |
Use the Import Error Information page (RSF_LE_VIV_ERR) to view results of the lead data import process.
Navigation:
Click the View Errors button on the Sales Lead Import Results page.
This example illustrates the fields and controls on the Import Error Information page.
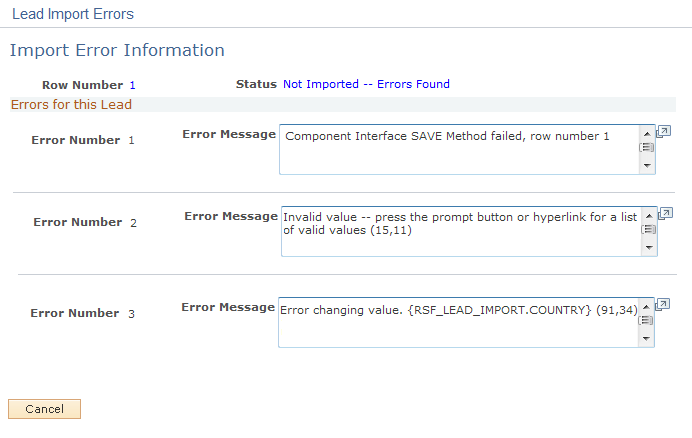
Determine the nature of each import error so that you can decide how to fix it.
Use the Batch Info (batch information), page (RB_IMP_SEARCH) to search for imported lead data.
Navigation:
This example illustrates the fields and controls on the Batch Info page.
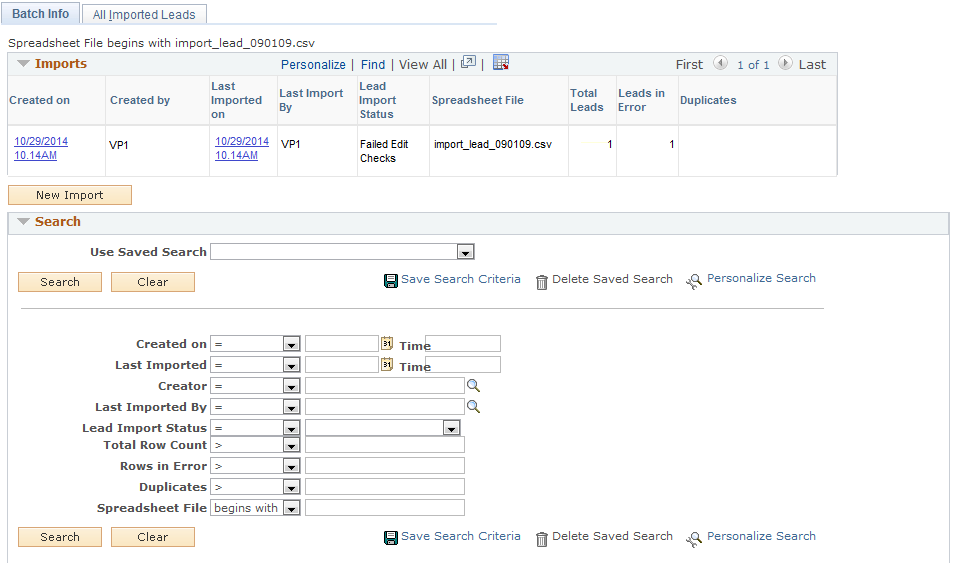
Use the Batch Info page to search for and view a list of imported lead data by run parameters.
Use the All Imported Leads page to search for and view a list of imported leads data by lead parameters.