Defining the Self-Service Home Page Content and Layout
This topic discusses how to define the self-service home page content and layout.
As an Administrator, you can perform the following for each pagelet:
Position of each pagelet
Whether the pagelet will be fixed or can be moved around by the end-user
Whether the end-user can remove the pagelet
Refresh and Page Setup icons
Pagelet title
|
Page Name |
Definition Name |
Usage |
|---|---|---|
|
RC_SS_GENERAL |
Enter an email address to which emails from the home page will be sent. |
|
|
RC_SS_SOLUTION |
Search for solutions using search criteria and select solutions to be displayed in the Top Solutions pagelet on the Support Self Service home page across different business units. |
|
|
RC_SS_TL_SETUP |
Set up the Browse By Topic tile and the order in which the links appear on the Browse By topic tile. Only the first 11 links are displayed on the tile. |
|
|
RC_SS_FACET |
Set up the Search Here for Answers pagelet on the home page by selecting the facets and values under each facet to be displayed. |
|
|
RC_SS_FAQ |
Select the top Frequently Asked Questions to be displayed in the FAQ pagelet on the home page across different Set Ids and Solution Libraries. |
|
|
RC_SS_ISSUES |
Select the Global Cases to be displayed to a self-service user. |
|
|
RC_SS_LINKS |
Set up HCM or Campus Solutions shortcut links to be displayed on the Home page. |
|
|
RC_SS_QUICK_LINKS |
Set up the quick links to be displayed in the Quick Links pagelet. |
|
|
RC_SS_AGT_SCHEDULE |
Set up Chat Schedule based on agent availability. |
|
|
PORTAL_HPCOMP |
Personalize the name of the home page, Welcome message, and select pagelets to be displayed. |
|
|
PORTAL_HPLAYOUT |
Personalize the appearance and layout of the home page and delete pagelets. |
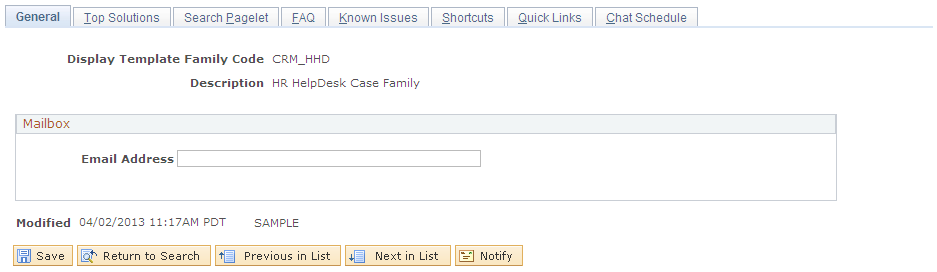
Use the Home Page - General page (RC_SS_GENERAL) to enter an email address to which emails from the home page will be sent.
Navigation:
This example illustrates the fields and controls on the Home Page - General page.
Field or Control |
Description |
|---|---|
Email Address |
Enter an email address in this field. The email address can be an ERMS mailbox or any other email address. |
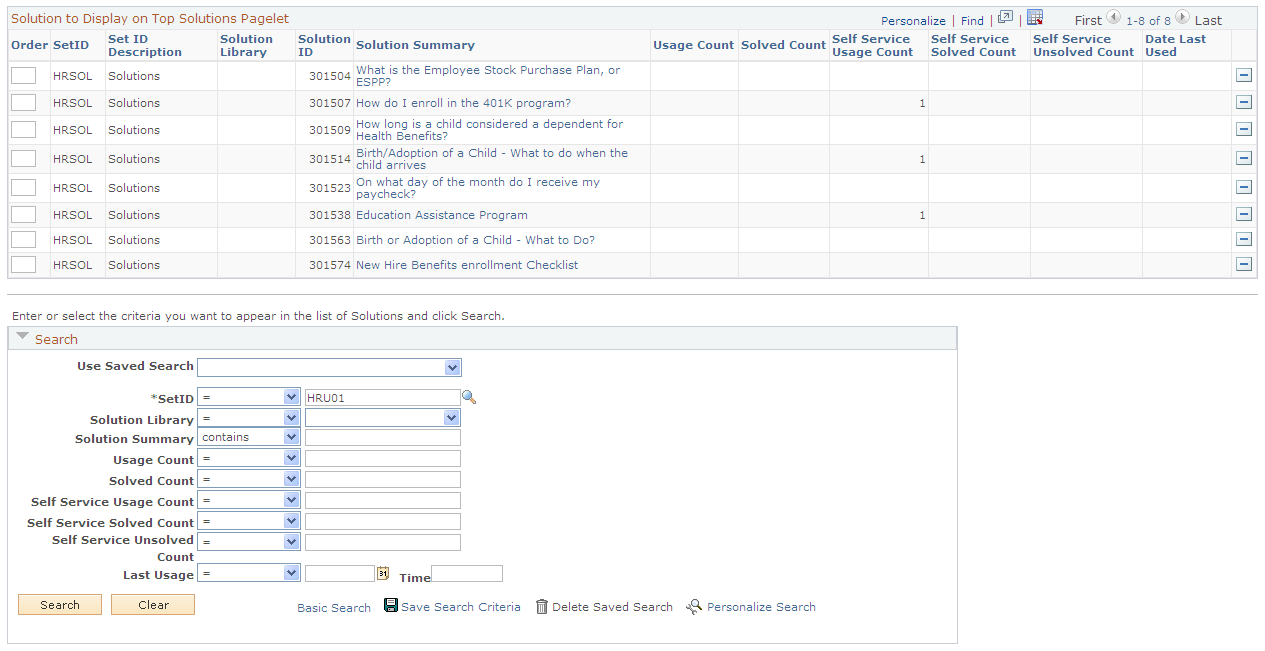
Use the Home Page - Top Solutions page (RC_SS_SOLUTION) to search for solutions using search criteria and select solutions to be displayed in the Top Solutions pagelet on the Support Self Service home page across different business units.
Navigation:
This example illustrates the fields and controls on the Home Page - Top Solutions page (1 of 2).
This example illustrates the fields and controls on the Home Page - Top Solutions page (2 of 2).
Solution to Display on Top Solutions Pagelet Section
Field or Control |
Description |
|---|---|
Solution Summary |
Click the Solution Summary link to drill into solution and open the solution details in a separate window. |
|
Click the Delete row icon to remove a solution so that it is not displayed on the Top Solutions pagelet on the home page. |
Order |
Specify the order in which the solutions will be displayed in the Top Solutions pagelet and click the Save button. |

Search Section
Search for solutions using one or more of the following search criteria:
Use Saved Search
SetID
Solution Library
Solution Summary
Usage Count
Solved Count
Self Service Usage Count
Self Service Solved Count
Self Service Unsolved Count
Last Usage
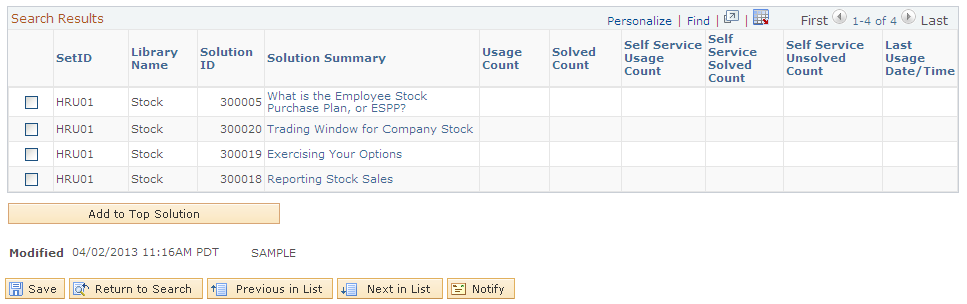
Search Results Section
This section displays solutions based on the search criteria and are filtered by solutions that are not marked as FAQ with Type = Standard, Status = Active, Visibility = All and solutions that are not expired. Only solutions that are not already added to the Top Solutions pagelet are displayed in the search results.
Field or Control |
Description |
|---|---|
Add to Top Solution |
Select one or multiple solutions in the Search results and click the Add to Top Solutions button. Note: It is recommended to keep this list to less than 15 solutions since these represent the top solutions and all top solutions will be displayed in this pagelet. |
Solution Summary |
Click a Solution Summary link to view the solution details in a separate window. |
Use the Home Page - Fluid Preferences page (RC_SS_TL_SETUP) to set up Browse By Topic tile and the order in which the links appear on the Browse By topic tile. Only the first 11 links are displayed on the tile.
Navigation:
This example illustrates the fields and controls on the Home Page - Fluid Preferences page. You can find definitions for the fields and controls later on this page.

Field or Control |
Description |
|---|---|
Topic check box |
Select the check box to enable the Topics grid below. |
Topics grid |
Select the Solution Libraries to be displayed on the Browse by Topic tile. Specify the order in which the solutions will be displayed on the Browse by Topic tile. The SetID drop-down list displays the set ids that correspond to the Business Unit for the display template family of the home page. The Topic lookup displays all Solution Libraries for the selected Set ID. |
Add Topic button |
Use this button to add a topic. |
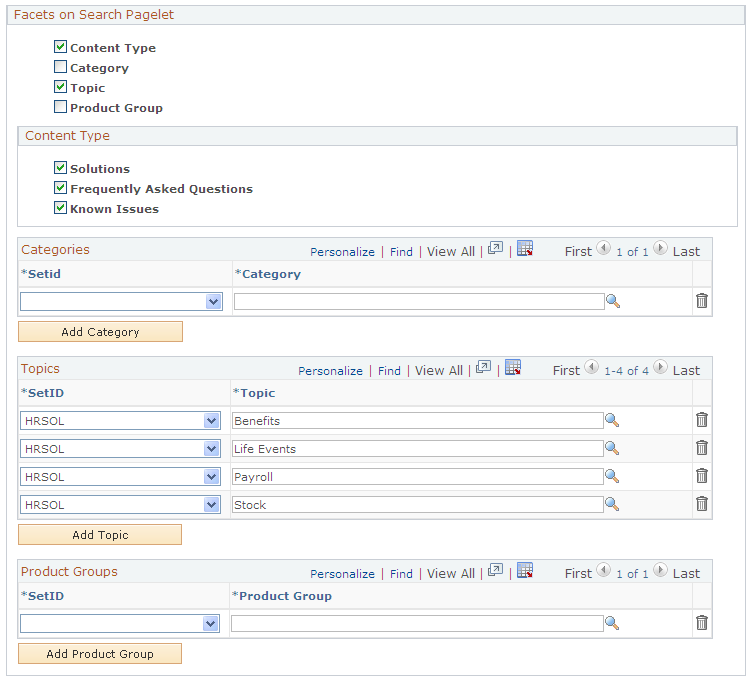
Use the Home Page - Search Pagelet page (RC_SS_FACET) to set up the Search Here for Answers pagelet on the home page by selecting the facets and values under each facet to be displayed.
Navigation:
This example illustrates the fields and controls on the Home Page - Search Pagelet page.
Field or Control |
Description |
|---|---|
Facets on Search Pagelet |
Select the facets to be displayed on the Search Here for Answers pagelet. |
Content Type |
Select the content types to be displayed on the Search Here for Answers pagelet. The different content types include Solutions, Frequently Asked Questions, and Known Issues. |
Categories |
Select the categories to be displayed under the Category facet on the Search Here for Answers pagelet. The SetID drop-down list displays the set ids that correspond to the Business Unit for the display template family of the home page. The Category lookup displays all categories that have an active combination under Combine Category Type Detail component for the selected Set Id. |
Topics |
Select the Solution Libraries to be displayed under the Topic facet on the Search Here for Answers pagelet. The SetID drop-down list displays the set ids that correspond to the Business Unit for the display template family of the home page. The topic lookup displays all Solution Libraries for the selected Set ID. |
Product Groups |
Select the Product Groups to be displayed on the Search Here for Answers pagelet. The SetID drop-down list displays the set ids that correspond to the Business Unit for the display template family of the home page. The Product Group lookup displays the product groups for the selected Set ID. |
Use the Home Page - FAQ page (RC_SS_FAQ) to select the Top Frequently Asked Questions to be displayed in the FAQ pagelet on the home page across different Set Ids and Solution Libraries.
Navigation:
This example illustrates the fields and controls on the Home Page - FAQ page (1 of 2).
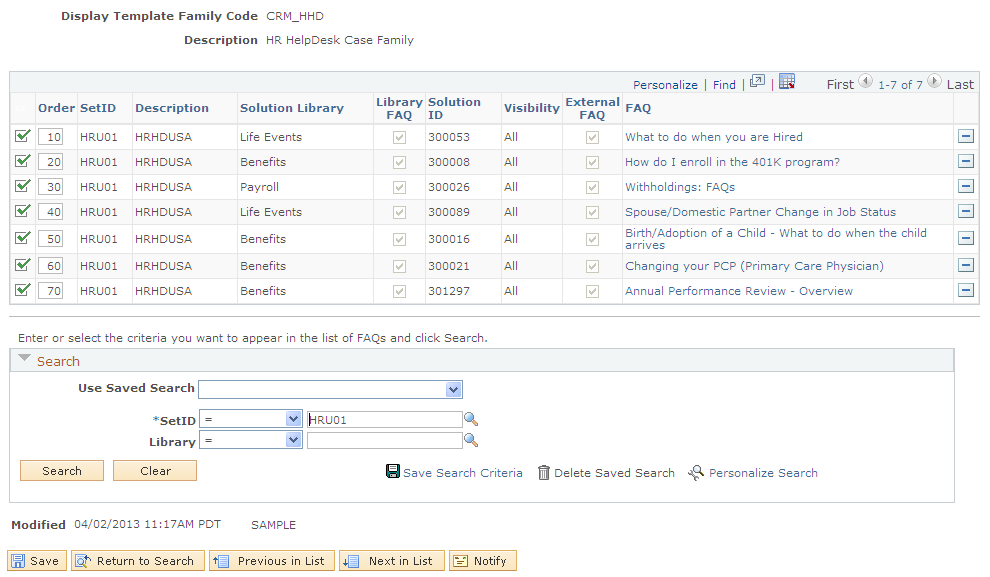
This example illustrates the fields and controls on the Home Page - FAQ page (2 of 2).
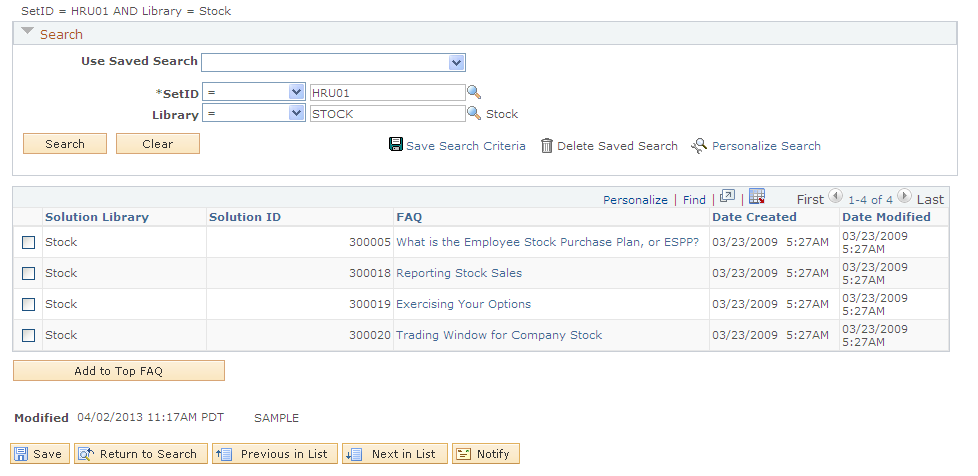
The page displays the list of FAQ that have been selected to display on the Top FAQ pagelet. The fields and controls in the Home Page - FAQ page are similar to the fields and controls in the Home Page - Top Solutions page. See the Home Page - Top Solutions Page topic for more information.
Use the Home Page - Known Issues page (RC_SS_ISSUES) to select the Global Cases to be displayed to a self-service user.
Navigation:
This example illustrates the fields and controls on the Home Page - Known Issues page.
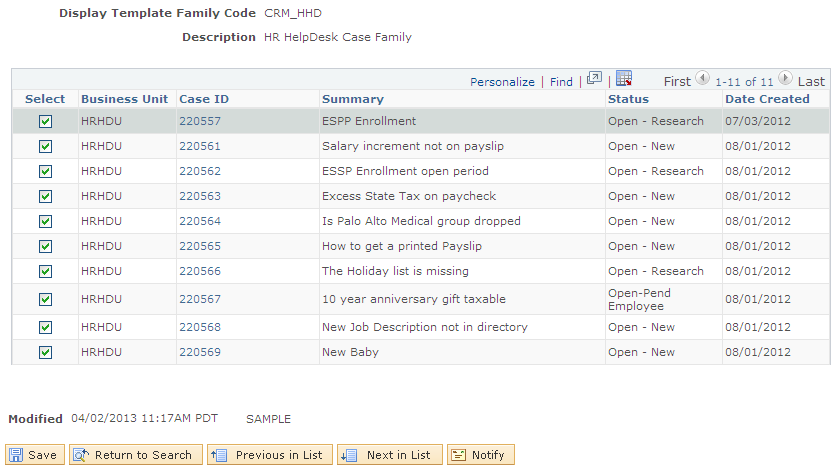
The Home Page - Known Issues page displays cases that are Global, Non-secured, with Visibility set to external and Open or On-Hold. It displays cases across all Business Units that are relevant to the Display Template Family. The cases are sorted by Date Created. You can click the Case ID link to view case details in a separate window. Select or deselect the global case to be displayed in the Known Issues pagelet.
Use the Home Page - Shortcuts page (RC_SS_LINKS) to set up HCM or Campus Solutions shortcut links to be displayed on the Home page.
Navigation:
This example illustrates the fields and controls on the Home Page - Shortcuts page.
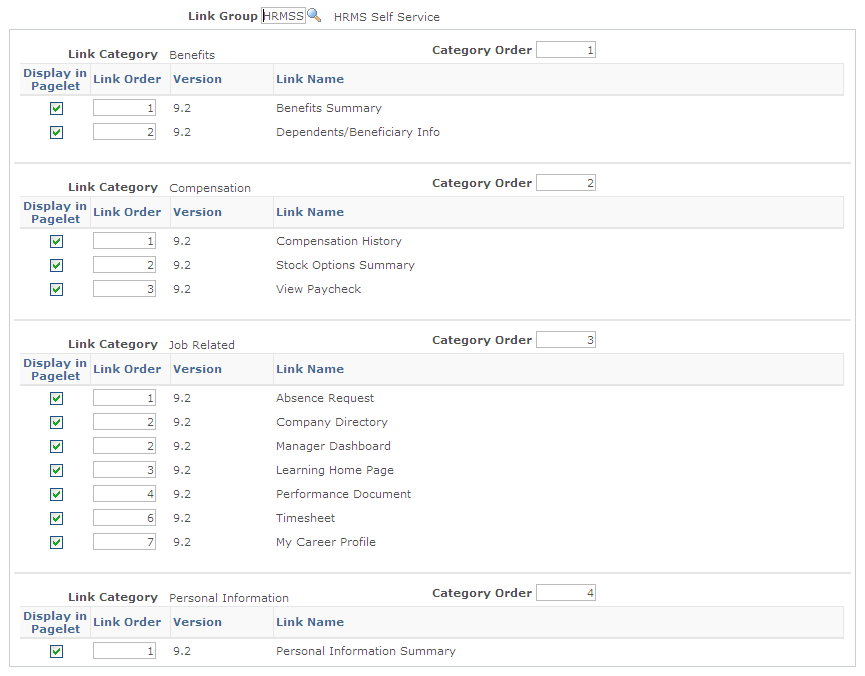
The Administrator can use the Home Page - Shortcuts page to set up the shortcut links to be displayed in the Shortcuts pagelet. These Shortcuts are integration points to HCM, EBS or Campus Solutions. The Administrator can set up any number of links to the commonly used components in HCM, EBS, or Campus Solutions.
The Shortcuts are defined using Link Groups, Link Categories and Link Definitions, which is existing functionality. The administrator can add the Link Definitions to the Shortcuts pagelet. Link Definitions that have been marked as Self Service will be available to be added to the Shortcuts pagelet.
Note: The Administrator can use the Link Group component (RC_LINK_GROUP) [] to set up a Link Group containing the required Link Categories and corresponding Links to be displayed on the Shortcuts pagelet.
The Administrator can select the Display in Pagelet check box to select the links to be displayed in the Home Page - Shortcuts page. The Administrator can also specify the Link Order and Category Order for the pagelet.
Use the Home Page - Quick Links page (RC_SS_QUICK_LINKS) to set up the quick links to be displayed in the Quick Links pagelet.
Navigation:
This example illustrates the fields and controls on the Home Page - Quick Links page.
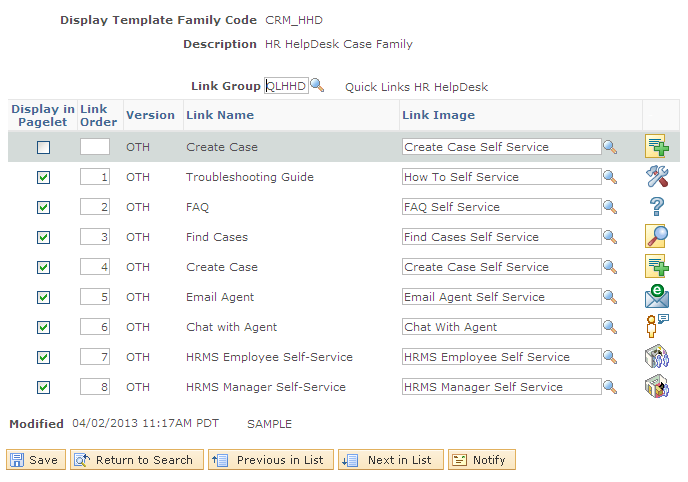
The Home Page - Quick Links page allows the Administrator to select Quick Links to be displayed to a self-service user and specify their order of appearance in the pagelet. Quick Links are provided to quickly navigate to some of the most used self-service pages in the application. The Administrator can add the Link Definitions to the Quick Links pagelet. Link Definitions that have been marked as Self Service will be available to be added to the Quick Links pagelet. Administrators can set up the quick links to be displayed in the Quick Links pagelet.
Note: The Quick Links are defined using Link Category Definition page, Link Definition page, and Link Group page.
There are two types of Create Case pages. The Administrators can enable one of the Create Case pages to appear in the home page as business requirements.
Use the Home Page - Chat Schedule page (RC_SS_AGT_SCHEDULE) to set up Chat Schedule.
Navigation:
This example illustrates the fields and controls on the Home Page - Chat Schedule page.

The Administrator defines the Hour of Operations for each day of the week during which the Chat agents will be available using the Home Page - Chat Schedule page. The Chat Schedule works based on the Display Template family defined. This helps to maintain different chat schedules for Support and Helpdesk call centers. The Time Zone and Hours of Operations are defaulted from the Calendar Options (). The Administrator can select a different Time Zone, if needed. The Chat with Agent link is displayed on the Quick Links pagelet when a self-service user logs in during these hours. The Holiday Schedule page (HOLIDAY_SCHED_TBL) [] specifies the days during which the Chat will not be available for the user.
An Administrator can configure a Live Chat with Agent section to appear on various pages using the Chat Enabled Page Setup page (RB_CHAT_ADMIN) []. The Chat Schedule set in the Home Page - Chat Schedule page affects this functionality as well. If the Chat with Agent functionality is enabled for a page (e.g. Contact Us page), then during runtime, the Live Chat with Agent section or Chat with Agent button is displayed only when a self-service user logs in during the Hour of Operations set through the Chat Schedule setup. Otherwise, Live Chat with Agent section or Chat with Agent button is not displayed.
When the chat functionality is configured, the following pages have the Chat with Agent button:
Troubleshooting Guide page
FAQ page
Create Case pages
Open/Display Case pages
Search page
Solution Details page
Known Issues page
Change Request page
Internal Contact page
Customer Selection page
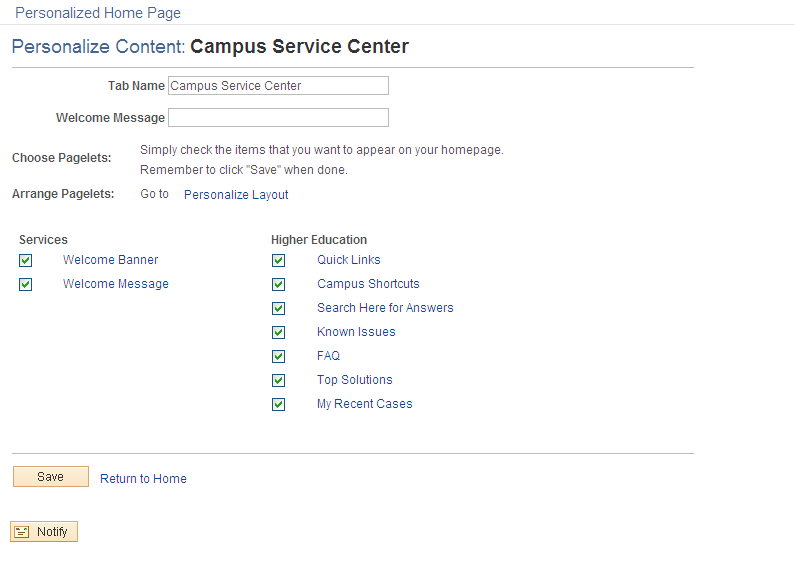
Use the Personalize Content: <Service Center Name> page (PORTAL_HPCOMP) to personalize the name of the home page, Welcome message, and select pagelets to be displayed.
Navigation:
Click the Personalize Content link on the top-right corner of the Self-Service Service Center Home page.
This example illustrates the fields and controls on the Personalize Content: <Service Center Name> page.
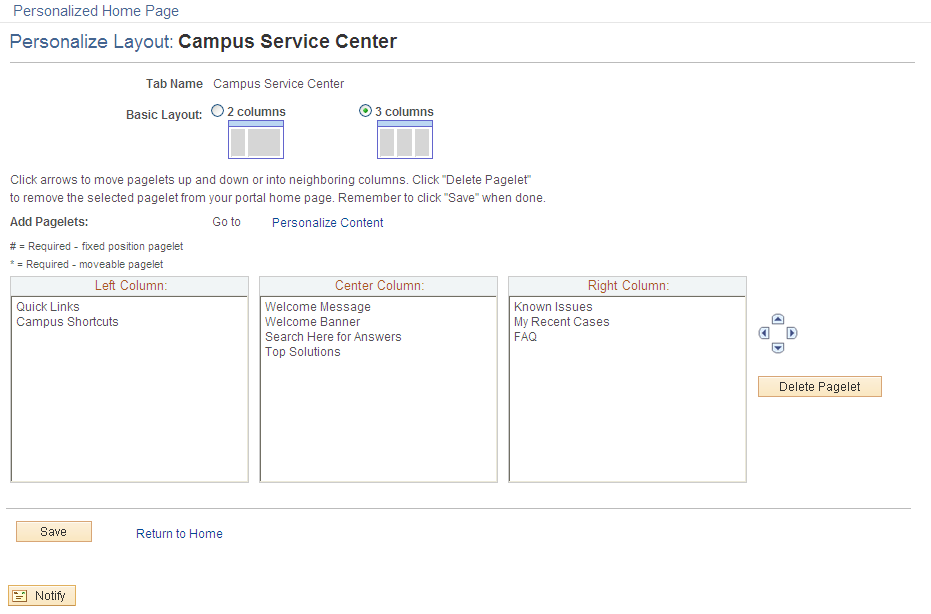
Use the Personalize Layout: <Service Center Name> page (PORTAL_HPLAYOUT) to personalize the name of the home page, Welcome message, and select pagelets to be displayed.
Navigation:
Click the Personalize Layout link on the top-right corner of the Self-Service Service Center Home page.
This example illustrates the fields and controls on the Personalize Layout: <Service Center Name> page.