Working with Detail Values
This topic discusses how to work with detail values.
A single detail value in PeopleSoft Tree Manager has three parts: the detail image, the detail name, and a detail description. Detail values can also appear as a range of values or as dynamic detail.
This is an example of a detail value with a description.

This is an example of a range of detail values.

This is an example of dynamic detail values or an empty detail.

The following is a complete list of detail value editing images. When you highlight a detail value, only the images that represent the available actions appear.
Field or Control |
Description |
|---|---|
|
Click the Insert Detail icon to insert a new detail value. This icon is available only if the detail value information has been entered on the Tree Structure Detail page. |
|
Click the Edit Data icon to display a page for maintaining or editing the application data for the detail value. The table that stores the data is defined on the Tree Structure Maintenance page. |
|
Click the Edit Properties to enable you to change the detail value itself. For example, you can change the range to and range from values. |
|
Click the Delete Detail icon to delete the selected detail. |
|
Click the Cut icon to cut one or multiple tree nodes or tree leaves, and then use the Paste as Sibling or Paste as Child icons to paste all cut tree nodes or tree leaves at once as children or siblings. When you perform cut and paste in Tree Manager, note that:
Note: This icon is not available for dynamic detail leaves. |
|
Click the Paste as Sibling icon to paste a cut detail value into the tree as a sibling. |


To add detail values:
Select
Search for an existing tree or create a new one.
On the Tree Manager page, highlight the node that you want the detail values to report to, or you can highlight one of the node’s other detail values.
To complete a detail value tree, you need to define detail values for each terminal node in the tree, which means each node that has no child nodes.
Click the Insert Detail icon.
If you are creating a dynamic detail tree, select the Dynamic Flag option.
The Detail Value Range page appears. It shows the tree node to which the new values report. If you select the Dynamic Flag option other fields on a page become locked. When you click the Add button, PeopleSoft Tree Manager displays brackets [ ] in place of the detail value for the selected node. When you use the tree, the system automatically selects the appropriate detail values for the node.
Note: Do not add dynamic details in a tree that already has details using ranges. Trees should be either all dynamic details or all ranges. Mixing detail types can cause unpredictable results in other applications, such as PeopleSoft Query and PeopleSoft nVision.
Use the search images to enter a range of detail values from the database field on which this tree is based.
To enter a single value, enter the same value in the From and To fields.
Note: When you specify a range of values, you cannot specify another detail value that appears within the range. For example, if you specify a range from 0271 to 0278, you cannot subsequently assign 0275 to another detail value – unless you selected the Allow Duplicate Detail Values option.
Click the Add button.
If you entered values that have already been defined in a database (User Detail Record), PeopleSoft Tree Manager adds the values to the tree when you click the Add button.
If you enter new values, PeopleSoft Tree Manager informs you that you have entered an undefined value. Depending on your security access, PeopleSoft Tree Manager may enable you to add the new value.
If you’re adding a new value to the database, click the Yes button.
PeopleSoft Tree Manager displays the page for adding new values for the field.
To change the description of a detail value:
Select
Search for an existing tree or create a new one.
On the Tree Manager page, highlight the detail value and click the Edit Data icon.
The original page with the detail value information appears.
Update the value in the Description field.
Click the OK button to apply changes to the appropriate database table.
Note: Detail value descriptions will not be visible if the effective date of the tree is earlier than the effective date of the node.
Use the Detail Value Range page (PSTREELEAF) modify the range of values in a detail.
Navigation:
Select
Search for an existing tree or create a new one.
Select a detail value on the Tree Manager page, and click the Edit Properties icon.
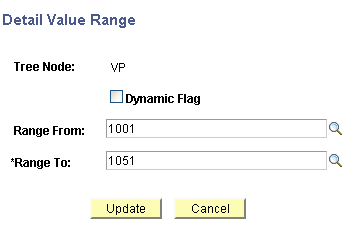
This example illustrates the fields and controls on the Detail Value Range page.
To modify a range of detail values:
Select
Search for an existing tree or create a new one.
Select a detail value on the Tree Manager page, and click the Edit Properties icon.
On the Detail Value Range page, modify the range values in the Range From and Range To fields.
Click the Update button to save your changes.
To delete detail values:
Select
Search for an existing tree or create a new one.
On the Tree Manage page, highlight the detail value and click the Delete icon.
A confirmation message appears.
Click the Yes button to delete or the No button to return to the tree without deleting.
Use the Detail Value List page to view the range of values in a detail or dynamic detail.
Navigation:
Select
Search for an existing tree or create a new one.
Select a detail value on the Tree Manager page and click the Edit Data icon.
Alternatively, select the bracket under a dynamic detail on the Tree Manager page, and click the Edit Data icon.
Note: The Detail Value List page is available only for detail ranges. This page is application defined.
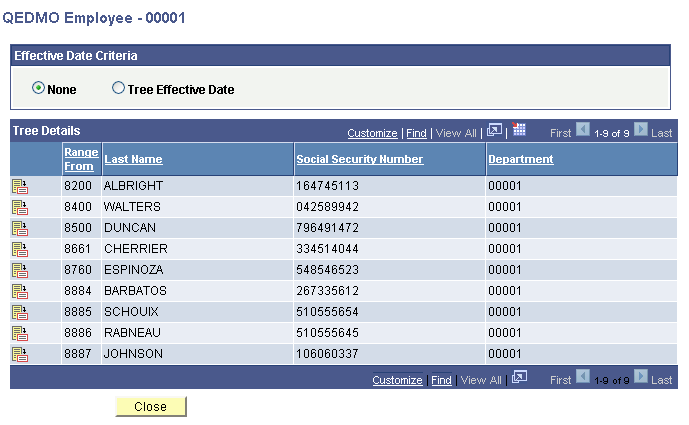
This example illustrates the fields and controls on the Detail Value List page – QEDMO Employee. Definitions for the fields and controls appear following the example.
Field or Control |
Description |
|---|---|
Effective Date Criteria |
Select the None option to display all EFFDT data rows for ranged or dynamic tree details, including future EFFDT data. Select the Tree Effective Date option to display EFFDT detail data with EFFDT less than or equal to a Tree EFFDT. Note: Future EFFDT detail date is not displayed if the Tree Effective Date option is selected. |
Customize |
Click to change the column or sort order. |
|
Click the Update icon to select the required detail value. |

This page lists the values in a range, or the values in a dynamic detail, depending on the node that you selected to access the page. In a normal detail tree, a specific value or range of values defines each node. A dynamic detail tree determines the value by matching the node name with a field on the value table.
Dynamic detail trees use the parent node name as a key to select the detail values.
Values are stored and compared as strings, not numbers. Therefore a range of values identified by numbers may include more values than anticipated. For example, a company contains the following departments: 0107, 1000, 1002, 1010, 1090, 1100, 1779, and 1869. If you specify a range of departments from 1000 to 1090, the values included would be 1000, 1002, 1010, and 1090 because the first three characters of these departments fall in the range between 100 and 109.
Although the number 10699999 is greater than 1090, when you use a string, the length of the value does not matter. For example, a range of words between CAP and CAT includes the word CARTWHEEL.